
Partitioning Your Application
The next issue that you should target is the size of your application. As soon as you start referencing various assemblies and adding assets to your application, it can rapidly increase in size. It will depend on the nature of your application as to whether this is an issue you should be concerned about. In an internal corporate environment where the application will be downloaded from a server located on the local network, this is generally not a particularly big issue. However, if your application is being deployed over the Internet, it becomes something that you should pay closer attention to. The larger the application, the longer it will take for the user to download it and get it up and running, and the more bandwidth it will require (for both you and the user). It provides more of a barrier for the user to use your application and gives them another reason to abandon the attempt. Let's take a look at some strategies you can implement to reduce the size of your application, or partition it into modules that can be downloaded on demand.
Initial Steps
The first step you should take is to look at the size of your .xap file and decide on how acceptable its size is. You might want to use the feature of Fiddler, discussed previously, to simulate modem speeds in order to determine how acceptable the time it takes to download might be to various users.
The next step is to ensure you aren't referencing any assemblies or assets not actually being used by your application. If your .xap file is still large, then it might be worth analyzing its contents, by changing its extension to .zip and unzipping it, as discussed in Chapter 1. Look for the largest files, and determine whether you can remove them or replace them with a suitable alternative.
Assembly Caching
One thing that you can do to partition you application into smaller pieces is to turn on assembly caching for your application. You will find a “Reduce XAP size by using application library caching” option that you can turn on in the project properties for your Silverlight project. Instead of creating a single large .xap file containing all the assemblies required by your application not part of the core Silverlight runtime, using this option will move all the assemblies with an accompanying extension mapping configuration file out of this file and into separate .zip files, as you can see in Figure 17-6.
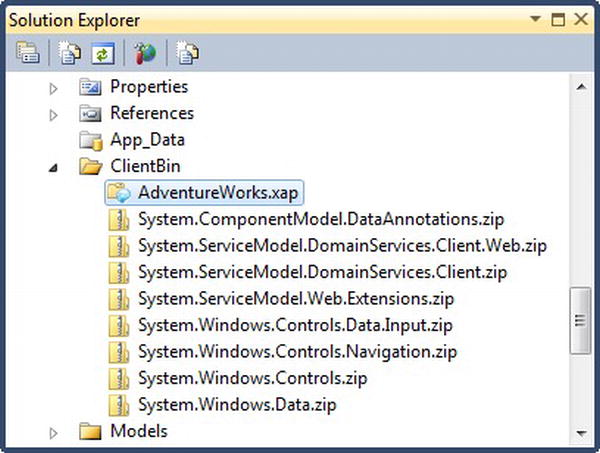
Figure 17-6. The ClientBin folder when using assembly caching
Why Use Assembly Caching
Assembly caching will result in the size of the .xap file shrinking. It won't actually reduce the total size of your application when it's initially downloaded, but it provides a big advantage when it comes to deploying updates to your application. Without assembly caching turned on, each time you deploy a new version of your application, the user needs to download the entire application from the server again—including the assemblies referenced by your application that haven't changed.
By turning assembly caching on, when you deploy an application update to the users, only the .xap file containing the application itself will need to be downloaded again. The assemblies referenced by your application that remained unchanged will not need to be downloaded again because they will remain cached in the user's browser cache.
Some of the assemblies, such as System.Windows.Controls.Data.dll, which contains the DataGrid control, are quite large, so requiring these assemblies to be downloaded only when the application is initially deployed will result in much smaller updates.
![]() Note One of the big downsides of turning this option on is that it can't be used with applications configured to be installable and run outside the browser. Out-of-browser applications require all of their assemblies to be located in the
Note One of the big downsides of turning this option on is that it can't be used with applications configured to be installable and run outside the browser. Out-of-browser applications require all of their assemblies to be located in the .xap file, excluding those assemblies downloaded on demand, as described in the next section. If your application is configured to run outside the browser, trying to turn this option on will result in a dialog appearing, requiring you to decide on one option or the other. However, if your application is designed to run solely within the browser, you should take advantage of this option.
How Assembly Caching Works
For an assembly to be able to be cached, it must be signed with a strong name and it must have a corresponding external part manifest file in the same path as it. External part files have the same name as the assembly but have an .extmap.xml extension instead of .dll. For example, you will find that the System.Windows.Data.dll assembly has a corresponding external part manifest file named System.Windows.Data.extmap.xml. If you open this file, you will find the following contents:
<?xml version="1.0"?>

<manifest xmlns:xsi="http://www.w3.org/2001/XMLSchema-instance"

          xmlns:xsd="http://www.w3.org/2001/XMLSchema">

  <assembly>

    <name>System.Windows.Data</name>

    <version>2.0.5.0</version>

    <publickeytoken>31bf3856ad364e35</publickeytoken>

    <relpath>System.Windows.Data.dll</relpath>

    <extension downloadUri="System.Windows.Data.zip" />

  </assembly>

</manifest>
This essentially defines the path where the assembly can be found, and where it can download the package containing it. When an external part manifest file is found for an assembly, and assembly caching is turned on, the assembly will be excluded from the .xap file, and packaged into its own .zip file, having the name as the download URI specified in the external part file.
![]() Note If the external part manifest file specifies an absolute URI, the assembly won't be packaged into a
Note If the external part manifest file specifies an absolute URI, the assembly won't be packaged into a .zip file. Instead, it will be downloaded from the specified URI rather than from the site from where the application is being downloaded. However, this is a cross-domain operation and, hence, requires a cross-domain policy file put in place in the root of the site from where the package is to be downloaded. See Chapter 5 for more information on implementing cross-domain policy files.
The assembly will then be referenced in the Deployment.ExternalParts section of the AppManifest.xaml file in the .xap file, enabling the Silverlight plug-in to know what additional packages it needs to download before it can run the application.
Enabling Your Own Assemblies to Be Cached
If you inspect your .xap file's contents, by changing its extension to .zip and unzipping it, as discussed in Chapter 1, you might find that not all the referenced assemblies have been packaged as external parts and are still packaged in your .xap file—particularly assemblies that you created yourself. For an assembly to be cached, it must be signed with a strong name and have an external part manifest file.
 Workshop: Signing an Assembly
In this workshop, you'll learn how to sign an assembly with a strong name.
- Open up the project properties for the project, and open the Signing tab.
- Select the “Sign the assembly” check box as shown in Figure 17-7.
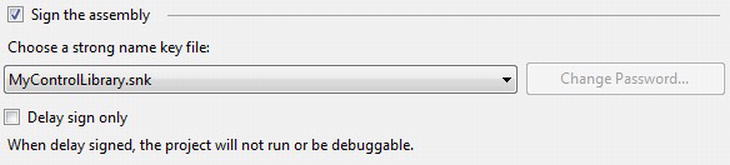
Figure 17-7. Configuring the strong name for the assembly
- Select
<New…>from the drop-down list, and enter a name and password for the strong name key file in the dialog that appears.The next time your application is compiled, it will then be signed.
Workshop: Creating an External Part Manifest File
The next step is to create the external part manifest file. The easiest way to create this is to use the DevCorner ExtMap Maker Utility tool created by Alex Golesh, which you can download from http://blogs.microsoft.co.il/blogs/alex_golesh/archive/2011/11/24/utility-extmap-maker-v1-1.aspx. This is a command-line utility, named Emm.exe, that you can point to your assembly, passing the path to the assembly as its command-line parameter, and it will create a corresponding external part manifest file for you in the same path as the assembly is located.
In this workshop, we'll demonstrate configuring a class library project to generate the .extmap.xml file each time you compile it. This assumes the class library project already exists, and is referenced by your main application.
- Add a folder named
Libsto your class library project. - Download the ExtMap Maker tool, and put the
Emm.exefile in theLibsfolder. - Open the class library's project properties window, and open the Build Events tab.
- Add the following line to the post-build command line:
"$(ProjectDir)LibsEmm" "$(TargetPath)" - Compile the project. You'll note that when you next compile the main application, a
.zipfile will be created for the assembly, and it will no longer be packaged into the.xapfile.
![]() Note You won't be able to perform the preceding procedure for third-party assemblies, but you can still run the ExtMap Maker tool to generate an
Note You won't be able to perform the preceding procedure for third-party assemblies, but you can still run the ExtMap Maker tool to generate an .extmap.xml file for the assembly using the command line and store that file in the same location from where the .dll file is being referenced.
Downloading Modules on Demand
Another way you can partition your application is by breaking it up into modules, each in their own assembly. These can be excluded from the main .xap package, minimizing the size of your main application, and downloaded only when they are required. For example, you might like to have separate modules for each functional area in your application. For users who use or have permission to access only one or two of those functional areas in the application, this will save them from having to download the entire application. For example, you might like to split the administrative functionality into another module, as only a subset of users will be permitted access to it.
There are a number of ways to modularize your application, and the method you decide to use will often depend on if you want to use a framework or not. Let's start by discussing some of the options available to you, and then look at implementing a simple means of modularizing your application.
One of the key decisions will be whether you are prepared to use an existing framework to modularize your application, or whether you'd rather create your own custom solution. Incorporating a framework can provide many benefits in addition to the modularization; however, it may also impose on the structure and design of your application—which, depending on the stage you are at in your development process, may or may not be an issue. Frameworks can also introduce additional complexity into your application and incur a significant learning curve. It will depend on the nature of both your application and your team as to whether you are prepared to undertake this process.
The most popular frameworks for implementing modularization in Silverlight applications include Prism and the Managed Extensibility Framework (MEF).
Downloading Modules on Demand Using the Navigation Framework
An option that doesn't rely on a framework such as Prism or MEF is to create a custom content loader for the Navigation Framework, which we briefly discussed in Chapter 3. This technique allows you to split your application's views up into separate assemblies. When the user navigates to a view in another assembly, the custom content loader needs to check whether that assembly is in the cache and, if not, download it. After it is downloaded, the requested view within that assembly can then be displayed within the frame.
David Poll has an excellent method for doing this that he has documented on his blog at www.davidpoll.com/2010/02/01/on-demand-loading-of-assemblies-with-silverlight-navigation-revisited-for-silverlight-4-beta/. He provides an easy way of implementing this behavior, which you can take advantage of in your Silverlight project by referencing some assemblies he's created, and following the instructions he has provided in his blog post.
Jeff Prosise also has an excellent article on implementing a content loader that dynamically downloads content, using a different method than David's, at www.wintellect.com/CS/blogs/jprosise/archive/2010/06/27/dynamic-page-loading-in-silverlight-navigation-apps.aspx.
Downloading Modules on Demand Using Prism
We discussed Prism in Chapter 14, and if you're using Prism within your Silverlight application, your best option is to use Prism's built-in on-demand module loading behavior. One of the key benefits of designing Silverlight applications according to the Prism guidance is how it encourages you to modularize your application's structure. Therefore, your application should already be in a state where you can identify modules than can be downloaded on demand. To make a module load on demand, you essentially need to set its InitializationMode to OnDemand. You can do so in code, in XAML, or in the application's configuration. More information on this topic can be found in Chapter 4 of the Prism guide at http://msdn.microsoft.com/en-us/library/gg405479.aspx. You might also find the Prism Navigation Framework project on CodePlex useful (http://prismnavigation.codeplex.com), created by Slobodan Pavkov.
Downloading Modules on Demand Using MEF
We discussed MEF in Chapter 14, but one of its features not mentioned there was its DeploymentCatalog feature. This feature allows you to break down your application into multiple XAP files, which can be downloaded on demand, and stitch the pieces back together.
![]() Note An in-depth discussion of MEF's
Note An in-depth discussion of MEF's DeploymentCatalog feature is beyond the scope of this book, but you can find out more information about it from http://mef.codeplex.com/wikipage?title=DeploymentCatalog.
Workshop: Modularizing Your Application
In this workshop, we're going to modularize a Silverlight application, breaking it up into multiple XAP files, and make use of a prebuilt assembly (MEFModuleLoader) to help us download and display the content from the modules on demand. The MEFModuleLoader assembly provides a custom content loader for the Navigation Framework, which will automatically download a module when the user navigates to a view in it. After the module has downloaded, the requested view will be displayed within the shell application's Frame control. By wrapping all this functionality, you just need to focus on modularizing your application, and the MEFModuleLoader assembly will take care of the rest.
![]() Note The
Note The MEFModuleLoader assembly is based upon a project on CodePlex named Silverlight MEF (http://silverlightmef.codeplex.com), by Michael Albaladejo, but with some slight modifications to make it easier for you to drop into a Silverlight project and start using it. You can find this assembly and its source code in the sample code for this chapter (downloadable from the Source Code/Download area of the Apress web site [www.apress.com]).
- Create a solution folder named
Modulesin your solution, and create a solution folder under it for each module. Create a corresponding folder structure on disk. - Add a new project to the solution folder for each module, using the Silverlight Application project template to create it. The code in this workshop will use a module named
AdventureWorks.ProductionModule. When the project wizard dialog appears, have the module hosted by the Web project, but deselect the “Add a test page that references the application” check box. Leave the “Enable WCF RIA Services” check box unchecked. - Turn on assembly caching for the shell project and each of the module projects, by selecting the “Reduce XAP size by using application library caching” option in its project properties.
 Note The “shell” project is the main Silverlight application that will host the modules. This workshop will assume that your shell project is named
 AdventureWorks. - Create a solution folder named
Libs. Get theMEFModuleLoaderassembly, which you can find in the sample code for this chapter (downloadable from the Apress web site [www.apress.com]), and put it in thisLibssolution folder. You're solution structure should now look something like that shown in Figure 17-8.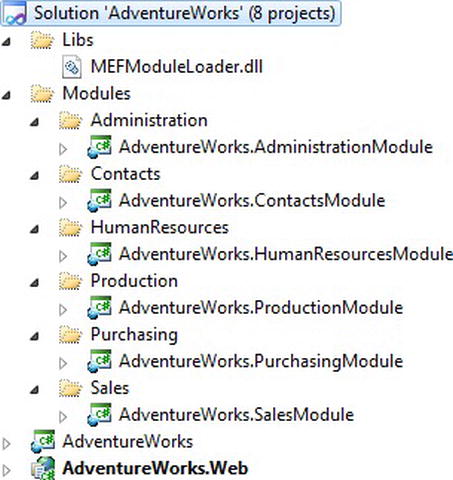
Figure 17-8. The modularlized solution structure
- Add a reference to the
MEFModuleLoaderassembly to the shell project and each of the module projects. - Each view in a module must have the
ExportModulePageattribute (found in theMEFModuleLoader.Attributesnamespace) from theMEFModuleLoaderassembly applied to its class in the code-behind.[ExportModulePage(NavigateUri="MainPage")]
public partial class MainPage : Page - Each module needs a reference to the following assemblies, as does the shell:
System.ComponentModel.Composition.dll

System.ComponentModel.Composition.Initialization.dll

System.Windows.Controls.Navigation.dll - Open the
MainPage.xamlfile in the shell project. Define thecontentLoadernamespace prefix in this file, like so:xmlns:contentLoader="clr-namespace:MEFModuleLoader.ContentLoader;assembly=MEFModuleLoader" - Set the
ContentLoaderproperty on theFramecontrol, as follows:<navigation:Frame.ContentLoader>
<contentLoader:MEFContentLoader />
</navigation:Frame.ContentLoader> - Define a resource at the view level, instantiating a ModulesLoadingStatusModel object provided by the
MEFModuleLoaderassembly. This has a property named IsBusy, which will be set to true when a module is downloading.<UserControl.Resources>
<contentLoader:ModulesLoadingStatusModel x:Key="loadingStatus" />
</UserControl.Resources> - We now want to show a message to the user when a module is downloading. Define the
controlsnamespace prefix as follows. (Note that this namespace will depend on your project's name and assumes that you've used the Silverlight Business Application project template when creating the shell project.)xmlns:controls="clr-namespace:AdventureWorks.Controls" - Then wrap the
MainPageuser control's existing content in aBusyIndicatorcontrol, like so:<controls:BusyIndicator IsBusy="{Binding IsBusy, Source={StaticResource loadingStatus}}"
BusyContent="Please wait - downloading module...">
<Grid x:Name="LayoutRoot" Style="{StaticResource LayoutRootGridStyle}">
<!--Remainder of content excluded for brevity-->
</Grid>
</controls:BusyIndicator> - You now need to provide a way for users to navigate to the content in the modules. Start by adding a URI mapping for each module, that you want the application to be able to download and use.
<uriMapper:UriMapping Uri="Production/{pageName}"

MappedUri="AdventureWorks.ProductionModule.xap;{pageName}"/> - You can then create links that navigate to pages in each module. For example:
<HyperlinkButton NavigateUri="/Production/ProductListView" Content="Products" /> - Now run your application. When you click on a link to a view in a module, you'll see the
BusyIndicatorcontrol briefly appear as the module is being downloaded, and after the download is complete, the view that you've requested will be displayed in theFramecontrol in the shell application. If you navigate away from this view and then back again, you'll find that the view immediately loads, as the module has been cached so that it does not need to be downloaded again during this session.
Workshop: Communication Between the Shell Application and the Modules
You will often find that your shell application and the modules need to communicate with each other. The shell project should have no direct reference to any of the module projects, and the module projects should have no direct reference to each other either. Instead, any communication should be via objects in a “Common” assembly that all these projects reference. In this workshop, we'll look at how you can create this assembly, and use it to enable the projects to communicate with each other.
- Create a class library project named
AdventureWorks.Common, using the Silverlight Class Library project template. - Configure it to permit it to participate in assembly caching, as detailed in the “Assembly Caching” section of this chapter. In summary, sign the assembly, and create an
.extmap.xmlfile for it. - The shell project and each of the module projects should each add a reference to this common assembly.
- There are a number of ways you can enable the shell and the modules to communicate with each other using this assembly. One way is to have commands in this file that a listener can define and that others can execute. Let's look at how you can enable the modules to request that the shell display the login window using this method. Start by creating a static class named
GlobalCommandsin the common assembly, containing a public field namedShowLoginWindowof typeICommand, like so:public static class GlobalCommands
{
public static ICommand ShowLoginWindow = null;
} - Define a
ShowLoginWindowcommand implementation in the shell project. For example:public class ShowLoginWindowCommand : ICommand
{
public bool CanExecute(object parameter)
{
return !WebContext.Current.User.IsAuthenticated;
}
public event EventHandler CanExecuteChanged;
public void Execute(object parameter)
{
if (CanExecute(parameter))
{
LoginRegistrationWindow loginWindow = new LoginRegistrationWindow();
loginWindow.Show();
}
}
} - Assign an instance of this command to the
ShowLoginWindowfield in theGlobalCommandsclass. This can be done at any time by the shell project, including just as the application starts up, in theApplicationobject'sStartupevent handler, as follows:GlobalCommands.ShowLoginWindow = new ShowLoginWindowCommand(); - Modules can now execute this command, and the shell project will display the login window:
GlobalCommands.ShowLoginWindow.Execute(null);
![]() Note You can also use this common assembly to share resources and data between the shell project and the modules. For example, you can extract the resource files defining the application's theme/styling into this assembly, from which both the shell project and the modules can then reference them.
Note You can also use this common assembly to share resources and data between the shell project and the modules. For example, you can extract the resource files defining the application's theme/styling into this assembly, from which both the shell project and the modules can then reference them.
Using RIA Services with Modular Applications
One of the issues you'll face with modularizing your application is how to work RIA Services into this structure. By default, RIA Services generates code directly into the shell project, which the modules will not be able to access. So how can you modularize your application but still take advantage of RIA Services? There are two solutions, and both require use of the RIA Services class library feature.
In Chapter 4, we looked at how you could extract your domain services and the code generated by the RIA Services code generator from your Web project and Silverlight project, respectively, into class libraries (see the section “Encapsulating Logic in a Separate WCF RIA Services Class Library”). If you follow the workshop that leads you through this process in that chapter, and configure the client class library project to support application caching, you will have an assembly that your shell project and all the modules can reference and share. The downside of this approach is that you will end up with one monolithic assembly, containing all the domain contexts, models, and shared code required by your application.
A better approach is to create a pair of RIA Services class library projects for each individual module in your application. The result of this structure is that each module can have its own dedicated set of domain services and corresponding domain contexts, and can include the client RIA Services class library in its XAP file, where the domain contexts, models, and shared code that it uses will only be downloaded to the client when the module is downloaded.
Creating RIA Services class library projects was also covered in Chapter 4, but you don't need to go through all the steps that the workshop walked you through for each module. To create these projects for a module, simply add a new project to the solution folder for the module, using the RIA Services Class Library project template. This will create pair of class library projects: one for the server and one for the client. Add a reference to the client class library project to the module project, and add a reference to the server class library project to the Web project. You can then start adding domain services to the server class library project for the module to consume. You can find an example of this structure in the sample code accompanying this chapter, downloadable from the Source Code/Download area of the Apress web site (www.apress.com).
![]() Note Domain services/contexts that are shared by multiple modules can be maintained in a common pair of RIA Services class library projects, which they all can share and reference in addition to their own dedicated pair of RIA Services class library projects.
Note Domain services/contexts that are shared by multiple modules can be maintained in a common pair of RIA Services class library projects, which they all can share and reference in addition to their own dedicated pair of RIA Services class library projects.