
P A R T 2
![]()
Getting Started
C H A P T E R 4
![]()
Installing Microsoft SQL Server 2008
The past two chapters discussed which edition of SQL Server 2008 to install, identifying and selecting the hardware requirements, and figuring out the high-availability solution to implement, if any. In an effort to help stimulate thought and effort into planning the installation of your system, there was an adequate amount of information presented. You have finally reached the point where you can validate your pre-installation considerations and install SQL Server 2008. There are three installation methods discussed throughout this chapter:
- Installing SQL Server using the GUI version of setup.exe
- Installing SQL Server from the command line
- Installing SQL Server using a configuration file
Installing SQL Server from the GUI version of setup.exe is the method that many of you use to complete your installations. Fortunately (or unfortunately, depending on your point of view), Microsoft has modified the setup installation process, forcing you to pay attention to the verbiage on each screen and be knowledgeable about the installation process. How many of you have previously installed SQL Server versions just by clicking on Next repeatedly until the install was complete? However, you no longer have that luxury. Beginning with SQL Server 2008, you need to know what options you want installed and where to find those options within the Installation Center.
Command-line installation allows you to pass parameters to the install executable in order to configure SQL Server 2008. Once you have determined the configuration options and the SQL Server features that you want, you can pass those as parameters to the command-line, and the installation process will proceed without any further user interaction.
You also have the option to install based upon a configuration that you record in a text file called a configuration file. This type of installation accepts a configuration file parameter at the command line, pointing to a file that specifies the tools and configuration options you want for that installation of SQL Server. Installing SQL Server using a configuration file also requires no user interaction. For those of you who want to deploy multiple instances of SQL Server 2008 throughout your organization with the same configuration, then pay close attention to the sections titled, “Command-Line Installation” and “Configuration File Installation.”
User Accounts
Before installing SQL Server 2008, we recommend spending some time identifying the type of login you want used for each one of the services. The selected components during install will create services to run them. You can set up all the services to run under one user account or have separate accounts for each one of the services. We prefer to set up restrictive accounts for each service, which only give rights to perform the tasks needed. This minimizes the chances of compromising all SQL Server components in the event that one of the user passwords is cracked. The user accounts can be one of three types: a domain user account, a built-in system account, or a local user account.
Use domain accounts if
- The service will be accessing files from another server (via sending or picking up).
- The service has to utilize network services.
Use local user accounts if
- The service will not access any of the servers.
- The server is not a member of the domain.
Use built-in system accounts if
- The service needs predefined rights on the local server or network.
Based on the needs of your service, choose the best type of account for your purposes. Remember, the security of your system depends on the decisions that you make. Don't rush this process; figure out what the best security policy is for you.
Preparation and Prerequisites
Before you start the install, there are a couple of terms used throughout SQL Server Books Online and the verbiage within setup that you should be familiar with:
- SQL Server Installation Center: The first screen that you will see after clicking on setup.exe.It contains the categories needed to navigate through the various installation methods.
- Database engine configuration: A screen you will come across when installing the database engine. It contains options for determining the security method for the SQL Server instance, the location of files, and the enabling of
FILESTREAM.
After you have inserted the SQL Server 2008 disk or navigated out to the network share where the SQL Server 2008 files are stored, you can double-click on setup.exe and start the installation process.
![]() Note We are walking through the installation of Enterprise Edition in this chapter.
Note We are walking through the installation of Enterprise Edition in this chapter.
When the installation process starts, SQL Server 2008 will check for some prerequisites for the application to install on the server/machine. The first prerequisite checks that you are likely to encounter are for the Microsoft .NET Framework and an update to the Windows Installer. (SQL Server 2008 requires you to have Microsoft .NET Framework 3.5 service pack 1 and Windows Installer 4.5 installed on your server/ machine.) Figure 4-1 shows you the prerequisite message.
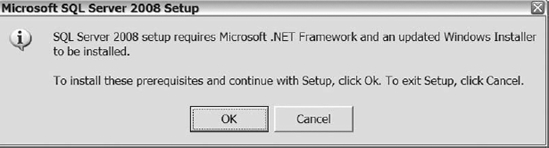
Figure 4-1. The SQL Server 2008 message that requires you to install Microsoft .NET Framework and an update to the Windows Installer
![]() Caution You need to ensure that any applications running on the sever or computer where SQL 2008 is being installed will continue to function properly with .NET Framework 3.5 service pack 1. You don't want to break other applications by blindly installing the new framework. If SQL Server is on a server/machine by itself, then upgrading the framework should result in minimal risk to your environment.
Caution You need to ensure that any applications running on the sever or computer where SQL 2008 is being installed will continue to function properly with .NET Framework 3.5 service pack 1. You don't want to break other applications by blindly installing the new framework. If SQL Server is on a server/machine by itself, then upgrading the framework should result in minimal risk to your environment.
After you have made the decision to install the prerequisites, follow the instructions on the screen to download and install the missing applications. Unfortunately, installing prerequisites, such as the .NET Framework, may require a reboot. Make sure you have scheduled downtime on the server prior to installing any prerequisite applications. Once you have installed the prerequisites, setup.exe will finish its initial validations and launch the SQL Server Installation Center.
SQL Server Installation Center
SQL Server Installation Center does not resemble any of the previous SQL Server versions. Keep in mind that SQL Server 2008 will not allow you to “Next” your way through the installation process. The initial screen of the SQL Server Installation Center requires you to read the options and select the category that best suits what you are looking for. Figure 4-2 shows you the default menu of SQL Server Installation Center.
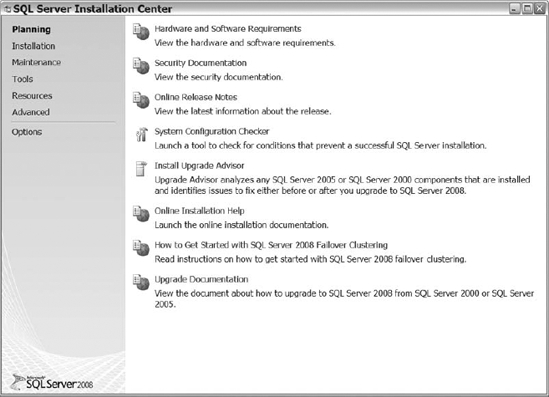
Figure 4-2. The various options available within the SQL Server Installation Center
As you can see from Figure 4-2, the SQL Server Installation Center has seven main categories to choose from: Planning, Installation, Maintenance, Tools, Resources, Advanced, and Options. Because each category has a series of different options, we want to review each of the categories with you to help you better understand how they work.
Planning
The Planning category within the SQL Server Installation Center incorporates links that take you to MSDN to review hardware and software requirements, security considerations, online release notes, online installation help, upgrade documentation, and information on how to get started with SQL Server 2008 failover clustering.
We've already covered hardware, software, and security requirements in the pre-installation process in Chapter 2. Hopefully, you followed our advice and started the planning process before beginning the actual installation. If you've arrived at the installation stage without any proper planning, then we encourage you to read or re-read Chapter 2 and plan your installation.
The Planning category also provides a System Configuration Checker and an installation Upgrade Advisor. The System Configuration Checker scans the machine where the installation of SQL Server 2008 exists and determines if there are stipulations that would cause SQL Server not to install properly. In order to continue on the installation path, the System Configuration Checker cannot fail on any of the items needed for the install. The System Configuration Checker will provide hints or suggestions for getting rid of any of the obstacles that are in your way.
The Upgrade Advisor identifies potential problems that may exist on your server/machine with components from SQL Server 2000 and SQL Server 2005. The feature determines if issues exist to address before or after an upgrade to SQL Server 2008. To run the Upgrade Adviser, first install it by clicking on the link, accepting the license agreement, and following the remaining instructions on the screen. Once the Upgrade Advisor install has completed, you are ready to utilize the Upgrade Advisor. (We cover the Upgrade Advisor in detail in Chapter 5.)
![]() Note This chapter focuses upon a fresh install of SQL Server 2008. Chapter 5 covers upgrading from a previous release.
Note This chapter focuses upon a fresh install of SQL Server 2008. Chapter 5 covers upgrading from a previous release.
Installation
The Installation category contains the wizards that will guide you through the various installation options available within SQL Server 2008. From this option, you can install SQL Server 2008 or add additional features to an existing installation. You can upgrade to SQL Server 2008 from SQL Server 2000 or SQL Server 2005, install SQL Server 2008 failover clustering, or add an additional node to an existing cluster. There is also an option to run Microsoft Update to check your machine for the latest and greatest patches. See Figure 4-3 for a glimpse of the installation options.
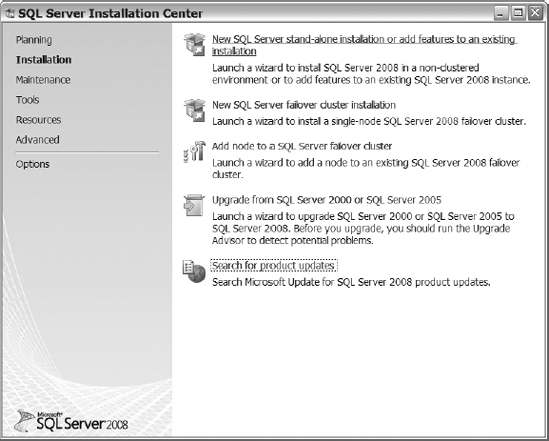
Figure 4-3. The options available under the Installation category
Maintenance
The Maintenance category provides options for modifying your SQL Server 2008 installation. (Figure 4-4 shows the Maintenance screen.) It provides selections for upgrading the edition of SQL Server 2008 that's currently installed (allowing you to move from, say, Standard Edition to Enterprise Edition), a choice to repair a corrupt SQL Server 2008 installation, and an option to remove a node from a SQL Server cluster.
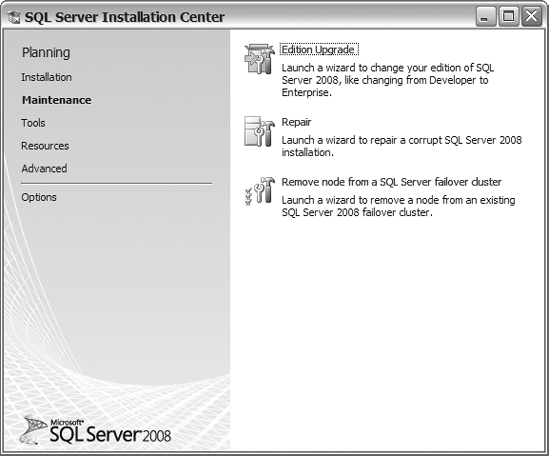
Figure 4-4. Options available for the Maintenance category
Remember that Chapter 2 covered the various editions of SQL Server 2008 that you can install. Some of you may have determined during your pre-installation planning that the SQL Server 2008 Workgroup Edition would fulfill your business requirements, and you may have installed that edition. If your requirements have changed, and you now need the Standard or Enterprise Edition, then you can use the Edition Upgrade option to modify your edition. You can do that without having to re-install SQL Server.
The Repair option resembles any other application repair processes. In the event of corruption within the core application files, you run the repair wizard and follow the instructions on the screen while it walks you through the repair process.
Earlier, in Figure 4-3, you saw the option to add additional nodes to a SQL Server cluster. It's here in the Maintenance category, though, where you remove unwanted nodes. (You can see that option in Figure 4-4.) Just as with earlier options, selecting the Remove Node from a SQL Server Failover Cluster option will launch a wizard that walks you through the process of removing the node.
Tools
The Tools category in the SQL Server Installation Center provides you with the means for ensuring no restrictions exist that would prevent you from installing SQL Server 2008. It allows you to identify all SQL Server 2000, 2005, and 2008 features and components. Finally, it provides a method for upgrading SQL Server 2005 SQL Server Integration Services (SSIS) packages to SQL Server 2008 SSIS packages. Figure 4-5 shows the screen and the options at your disposal.
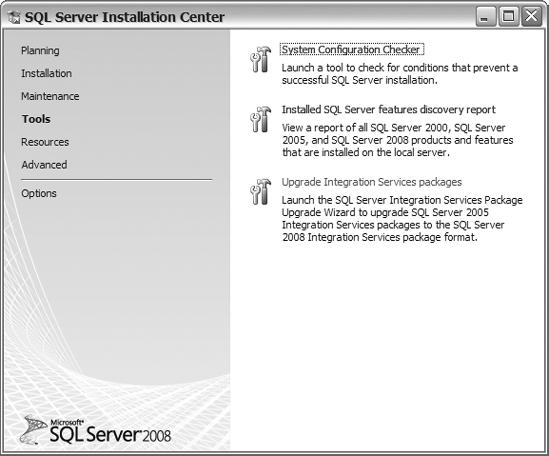
Figure 4-5. The Tools category of SQL Server Installation Center
The System Configuration Checker exists in the Tools category as well as in the Planning category. The designers of the Installation Center must have wanted to ensure that the System Configuration Checker wasn't overlooked or lost.
Selecting the Installed SQL Server Features Discovery Report option provides you with a detailed report of information about SQL Server products installed on the server. Reviewing that report is an excellent method for validating the features from SQL Server 2000, 2005, or 2008 that are currently installed. The report will display the product, instance, features, edition, version, and clustering, if it exists. (See Figure 4-6 for an example.)
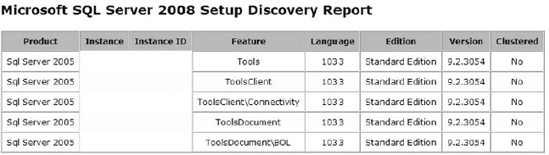
Figure 4-6. A sample Microsoft SQL Server 2008 Features Setup Discovery Report
The Upgrade Integration Services Packages option is a wizard that walks you through the process of upgrading your SQL Server 2005 SSIS packages to the SQL Server 2008 SSIS packages format. Upgrading SSIS packages will be covered in Chapter 5, so for now just be aware of the location of this option.
Resources
The Resources category contains links to various SQL Server 2008 informational web pages. From this category, you can quickly access SQL Server 2008 Books Online, SQL Server TechCenter, SQL Server Developer Center, and several other links. This category provides great links to increase your knowledge on SQL Server 2008 (see Figure 4-7).
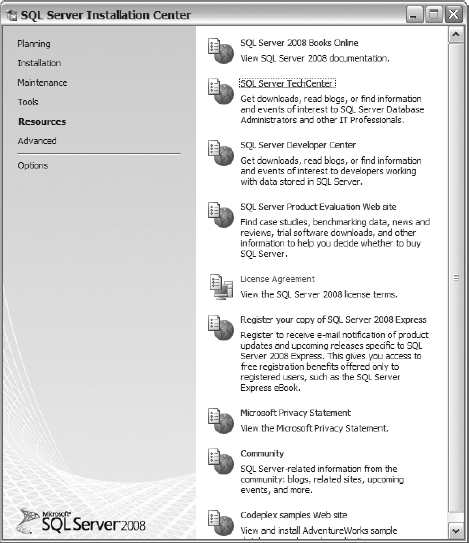
Figure 4-7. Links in the Resources category
Advanced
The Advanced category provides options for more complex installs, such as from a configuration file. The category also provides an Advanced Cluster Preparation wizard. Figure 4-8 shows the category screen.
The configuration file install selection allows you to install SQL Serve 2008 based on an existing configuration file. We will discuss configuration file installs later on in this chapter (see the “Configuration File Installation” section).
The other two options in this category pertain to wizards for preparing SQL Server 2008 for failover clustering installation, as well as for completing the setup of failover clustering. Detailed clustering installation information is not covered in this book, but please don't forget the location of these options, especially if you want to set up clustering in your environment.
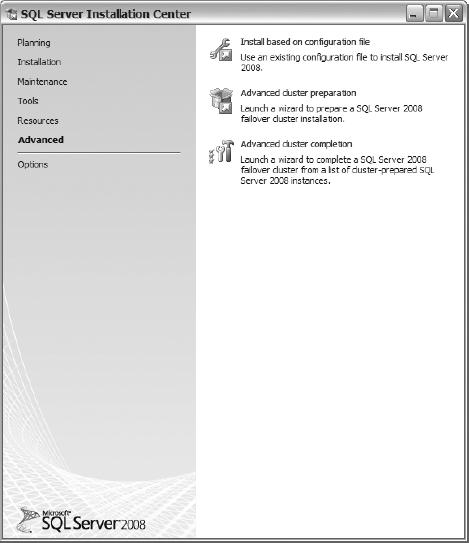
Figure 4-8. The Advanced category screen
Options
The Options category allows you to specify the architecture of SQL Server to install or to change the location of the installation files. The edition of SQL Server 2008 that you are installing, along with the hardware of the target PC or server, will determine the architecture options available (see Figure 4-9).
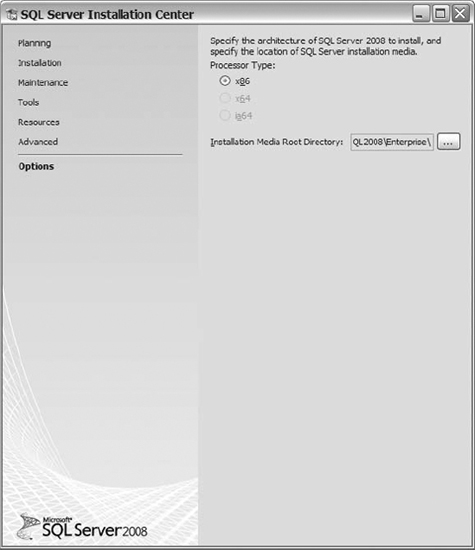
Figure 4-9. The Options category screen
The Processor Type options available for the Enterprise Edition are x86, x64, or IA64. Grayed out options are not supported by your server. The installation media will likely default to the location you clicked on in the setup file. If you would like to change the installation media location, then the options category is where you should make that change.
Installing Your First Instance
Now that you understand the layout of the SQL Server Installation Center and what is contained within each category, you can begin the installation process. In this section, we show how to install the SQL Server 2008 software and create your first database instance on a given server. The next major section, called “Installing More Than One Instance,” shows you how to install a second and subsequent instances on the same server.
Checking System Configuration
The first thing usually run is the System Configuration Checker. As stated earlier, this exists in both the Tools and Planning categories in the SQL Server Installation Center. After selecting the System Configuration Checker, a process will start scanning your server/computer to validate your configurations. See Figure 4-10 for an example of System Configuration Checker results.
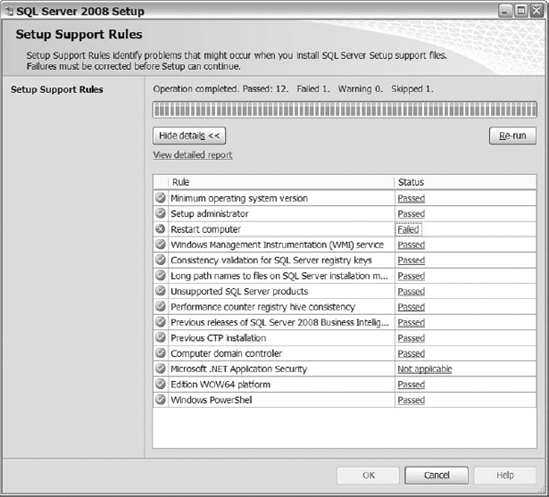
Figure 4-10. A sample of the results from the System Configuration Checker
Each rule may receive one of four statuses: Passed, Failed, Warning, or Not Applicable (option skipped because it does not apply). Passed means that the rule met the installation requirements. The Failed status, also symbolized by a red X icon, indicates problems that were identified during the scan. You must fix all failures before the setup process can continue. Click on the Failed link for information about each error and for help in resolving the issues. Figure 4-10 displayed a failure message on the Restart Computer rule because of a failure to restart the computer after an application install. The Failed link indicated the need to restart the computer in order to continue the installation process.
Review warnings even though they identify rules that did not fail. The Not applicable status indicates options that do not apply to your machine or server. After resolving any Failed statuses, or if nothing fails, you should receive a summary of the Setup Support Rules, as shown in Figure 4-11.

Figure 4-11. After the successful completion of the System Configuration Checker
After completing the System Configuration Checker, you can move on to perform a stand-alone installation. The option to do that is located in the Installation category. After you select the stand-alone installation option, the installer will run another check to validate specific rules. Since you have already executed the System Configuration Checker, and you know that your system is ready for the install, further delays will be minimal. This second check will run successfully, and you can proceed to the Product Key section. Enter your product key or select a free edition to install. Click Next after the selection and accept the license terms.
Once you've entered your product key and accepted the license terms, you move to the Setup Support Files installation page, shown in Figure 4-12. Click Install to install these support files.
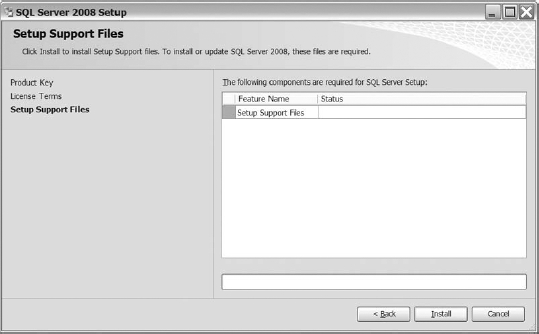
Figure 4-12. The Setup Support Files installation screen
The validations of the remainder of the System Configuration Checker rules occur on the summary screen once the installation of the setup support files is complete. All of the rules should pass, as shown in Figure 4-13, unless you've skipped checking your system configuration earlier as we suggested.
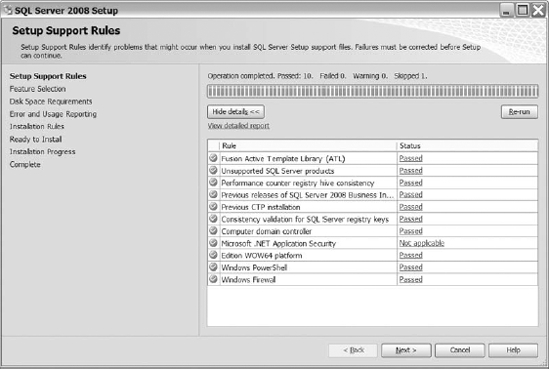
Figure 4-13. Passing the setup support rules
Choosing Your Features
Click Next and look at the Feature Selection screen (shown in Figure 4-14), which lists the options available to install. We don't cover all options in this chapter. We do, however, cover installing the database engine and many of the shared features.
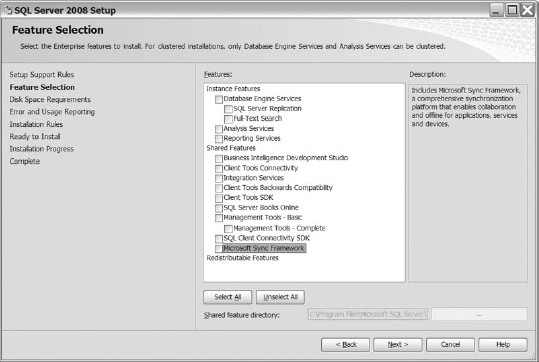
Figure 4-14. The selectable features available for install
Select the features that you want to install. If you are trying to determine what the functionality of a feature is, then highlight the feature and review the displayed description. The feature's description should provide you with enough information to help you determine whether to install it.
Once you select all the features that you want installed, click Next. If you select Database Engine Services, the steps on the left of the screen will change from those shown in Figure 4-14 to those in Figure 4-15 in the next section.
Configuring the Instance
The Instance Configuration screen (see Figure 4-15) allows you to specify a name for the instance of SQL Server that you are installing. You can specify a default instance or a named instance, depending on the pre-installation decisions that you made. This screen also allows you to change the location of the root directory for the instance of SQL Server that you are installing. Therefore, if you are installing a named or second instance of SQL Server, you may want to change the installation directory of the files. We'll talk later about doing that in the section called “Installing More Than One Instance.” Luckily, SQL Server 2008 creates directories based upon the instance name by default. So if you forget to change the installation directory of the files, then SQL Server will make sure the files from different instances don't reside in the same location. That would cause problems during the installation process. The Instance Configuration screen will also display any installed instances that already exist on the server or machine.
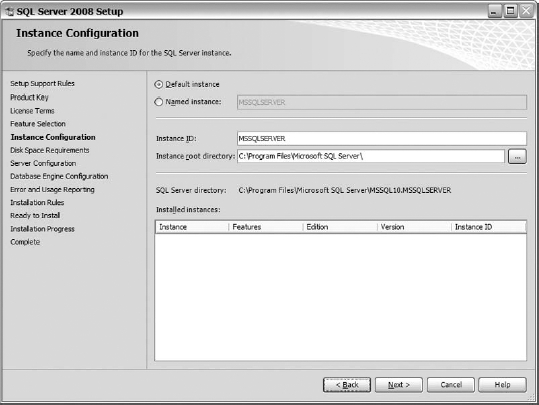
Figure 4-15. The Instance Configuration screen
After you have determined the installation directory and the instance name, then click Next to arrive at the Disk Space Requirements screen, shown in Figure 4-16. This screen shows you the disk usage summary of the drives selected on the Instance Configuration screen. The summary shows the chosen drives, the required space from each of those drives, and the available space on each. Then the drive summary breaks down the required space into separate sections, allowing you to see how much space each component of the install will consume. You'll see a green check mark icon by each drive with enough space. If you see any red X icons, you should free up space before moving on.

Figure 4-16. A sample Disk Space Requirements screen
After selecting Next from the Disk Space Requirements screen, the Server Configuration page (see Figure 4-17) is where you determine the service account names and passwords to be used for the database engine, as well as the other services you want installed.
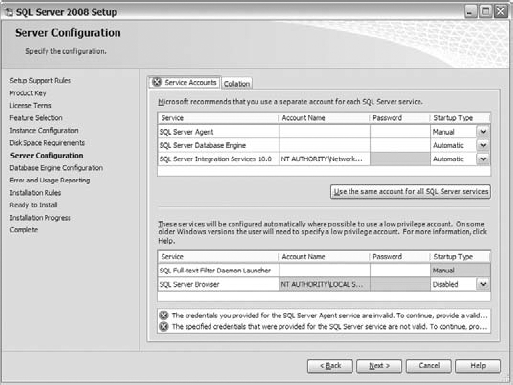
Figure 4-17. The Service Accounts tab in the Server Configuration screen
For each service, populate the account name, the password, and the startup type. The startup type configures the behavior of the service after the restart of your server. An option exists to use the same account for all services that you are installing. In the “User Accounts” section at the beginning of this chapter, we provided recommendations for account names and usage for the different services. Depending upon your requirements and environment, the Use Same Accounts for All SQL Server Services button is available if your environment fits that model.
The Server Configuration screen also allows you to set up the collation of the database engine. Based on your application needs and business requirements, choose the collation that meets those needs and select Next.
Configuring the Database Engine
After you have completed the server configuration, the Database Engine Configuration options shown in Figure 4-18 are next. First, decide the authentication mode for your database engine. You can choose between Windows Authentication Mode or Mixed Mode options. Windows authentication allows users to connect to SQL Server 2008 using their Windows user credentials. Mixed mode authentication allows users to connect to SQL Server using either Windows authentication or SQL Server authentication. You manage SQL Server authentication from within the database engine. Essentially, you can create database users that are independent from any existing Windows user accounts.
If you select mixed mode authentication, then SQL Server forces you to create a password for the system administrator (SA) account. Choose a strong password for the SA account!
In SQL Server 2008, administrators for the server at the Windows level are not necessarily administrators within SQL Server. You can use the Specify SQL Server Administrators option shown in Figure 4-18 to designate certain Windows users and groups as SQL Server administrators.
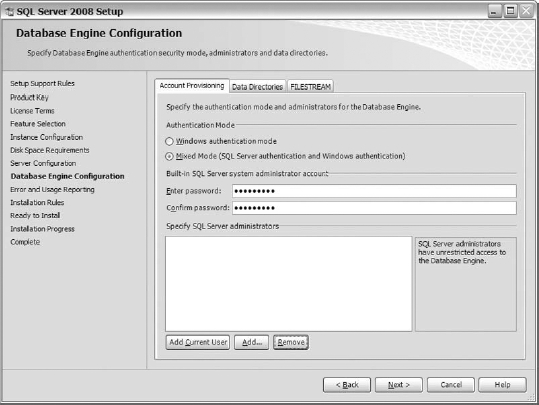
Figure 4-18. The Account Provisioning tab in the Database Engine Configuration screen
![]() Note If you do not designate any Windows users (or groups) as having SQL Server administration rights, then you will need to login into SQL Server using the SA account and create at least one administrative user from within SQL Server. If you forget to grant a Windows user access and misplace the SA password, then you will not to be able to log in to SQL Server.
Note If you do not designate any Windows users (or groups) as having SQL Server administration rights, then you will need to login into SQL Server using the SA account and create at least one administrative user from within SQL Server. If you forget to grant a Windows user access and misplace the SA password, then you will not to be able to log in to SQL Server.
The next tab within the Database Engine Configuration screen is Data Directories (shown in Figure 4-19), which helps you apply the best practice of laying out your database files to multiple locations. In historical versions of SQL Server, the option did not exist to place tempdb and backups in separate directories during the install. Therefore, after you would finish the installation process, part of your post-configuration process included moving tempdb and your backup directory to separate drives. With the options available within the installation process, you can now place your files in the directories of your choice from the beginning and save time post-installation.
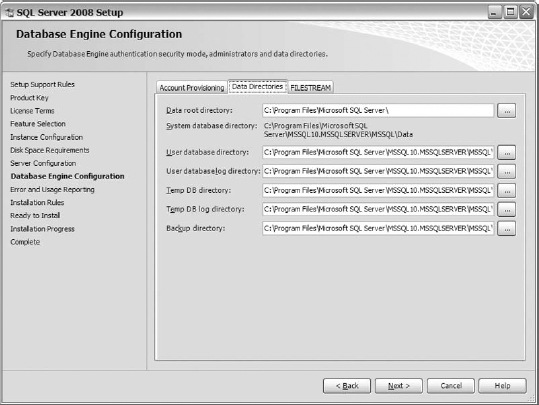
Figure 4-19. The Data Directories tab within the Database Engine Configuration screen
Remember, we discussed file layouts and placement in Chapter 2. Create the directories for data, log, tempdb data, tempdb log, and backup directories on the disks specified in your previous documentation. Populate the fields in Figure 4-19 with the appropriate paths.
The final tab for database engine configuration concerns FILESTREAM (shown in Figure 4-20). The FILESTREAM option is a new feature in SQL Server 2008 that allows binary large objects (or BLOBs) data to be stored as files within the file system. According to Microsoft, you should use FILESTREAM when storing files that will consistently be greater than 1 MB, and when fast-read access of large varbinary (max) files is important.
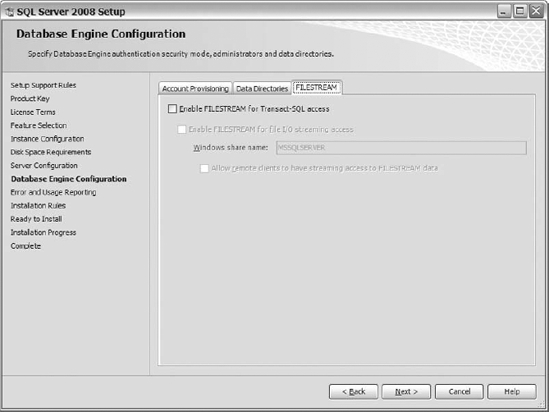
Figure 4-20. The FILESTREAM tab within the Database Engine Configuration screen
FILESTREAM data is stored in data containers, or file groups, designed to interface the database engine and file system together. Nevertheless, during the install, you just need to worry about whether you want to enable FILESTREAM for Transact-SQL access. Enabling FILESTREAM permits you to execute INSERT, UPDATE, and DELETE statements on FILESTREAM data via Transact-SQL. After selecting that option, you can also decide whether you want to allow access to FILESTREAM functions like ReadFile() and WriteFile(), and if you want to allow remote users to have similar functionality. See Figure 4-20 for a sample screen shot of the options you have available.
Allowing for Error and Usage Reporting
After database engine configuration comes the Error and Usage Reporting screen, shown in Figure 4-21. This screen allows you to select the information you would like to send to Microsoft to help improve their product. The options include sending Windows and SQL Server error reports, as well as sending feature usage data, including hardware configuration and usages of the software and services. It's up to you as the administrator to determine whether and how much to report to Microsoft.

Figure 4-21. Options available for error and usage reporting
Validating and Installing
Now that you have selected any Error Usage and Reporting options that you want to enable, you can click Next and let the Installation Rules validation process begin. Figure 4-22 shows the output from that process.
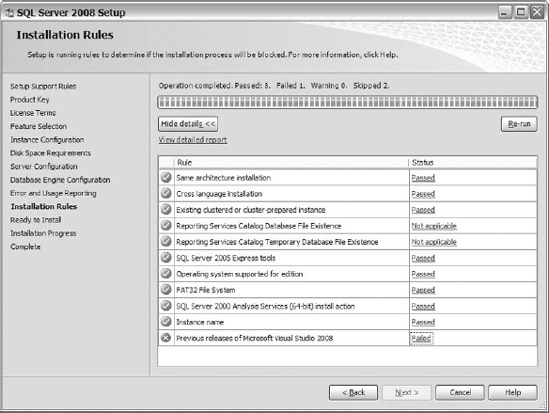
Figure 4-22. Example results of the Installation Rules test showing a Failed status
The purpose of the Installation Rules process is to ensure that nothing prevents the installation from completing successfully. Just as before, each rule will receive a status, and you must correct all Failure statuses before moving forward. Keep in mind that you can click the Failed links to see suggestions on resolving any failures.
After resolving any outstanding rule failures, click on the Next button to continue with the installation process. The next screen, Ready to Install (shown in Figure 4-23), will provide you with a summary of all the features that will be installed.
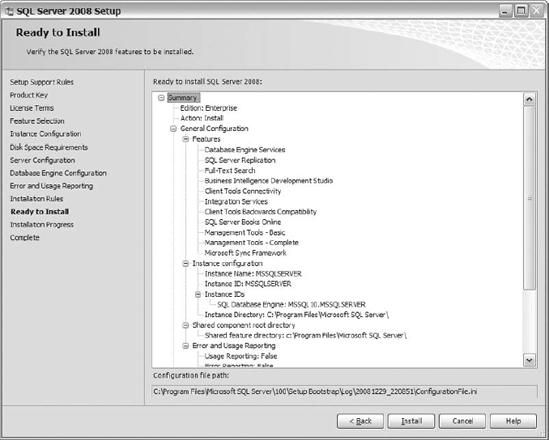
Figure 4-23. The Ready to Install screen showing a summary of features to be installed
Review the Ready to Install screen closely. Validate all of your selections and ensure that all of the components you want installed are selected. Also, confirm that the file paths for the data, log, backup, tempdb data, and log files all point to the correct locations. Granted, you can always go back, add missing components, and move your data files around, but getting the details correct now will save you time in the future.
Once you have reviewed the summary, click on the Install button. You can monitor the process from the Installation Progress screen shown in Figure 4-24. The installer checks off each feature with either a Failed or Success status during the process. Installation time will vary, depending on the speed of your server or computer.
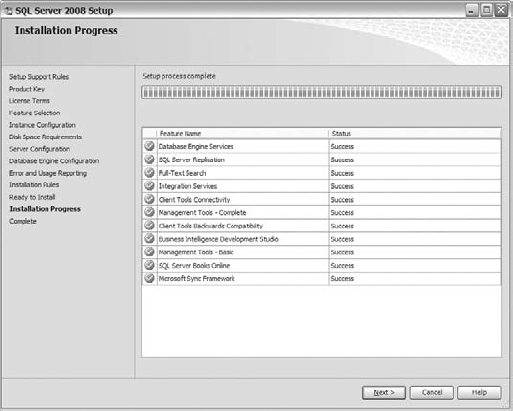
Figure 4-24. The Installation Progress screen showing successful process completion
Finally, you'll reach the Complete screen, shown in Figure 4-25. This screen provides two important pieces of information: the destination of the log files and information about the setup process and potential next steps. If issues occurred during the install, or if you are curious about the installation process, then spend a little time reading the log files. We hope that your last screen looks similar to Figure 4-25, indicating a successful database engine install.
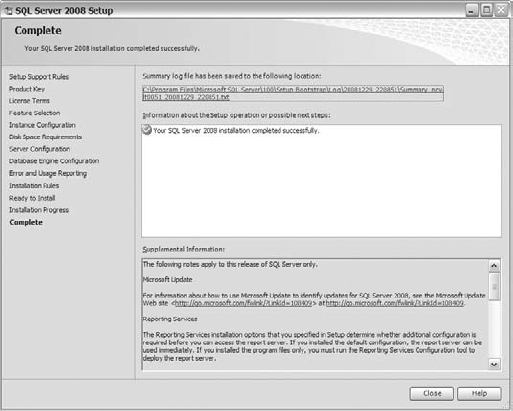
Figure 4-25. The Complete screen after a successful install of SQL Server 2008
Installing More Than One Instance
You're not limited to installing just one instance of SQL Server on a given physical server machine. You can install up to 50 instances, giving you the ability to support multiple instances of SQL Server on one server. In this section, we walk through the installation of a separate instance of SQL Server 2008 on machines that already contain an instance.
![]() Caution We have never supported a server with more than three instances of SQL Server installed on it, so we are not familiar with the performance metrics on a server with 50 instances. We would be hesitant to place a server in production with that many instances on it. If you try it out, then please let us know how it goes.
Caution We have never supported a server with more than three instances of SQL Server installed on it, so we are not familiar with the performance metrics on a server with 50 instances. We would be hesitant to place a server in production with that many instances on it. If you try it out, then please let us know how it goes.
When creating multiple instances of SQL Server on the same server, each instance must have a separate instance ID. By default, the instance ID is the name you create when naming your instance. Although SQL Server shares some common files, the data files, which have the same names, must exist in separate folders. By default, SQL Server creates separate directories for each instance and places instance-specific program and data files into those directories. The rest of this section discusses a few points that will get you ready to install multiple SQL Server instances.
Preparing to Install Another Instance
Prior to installing an instance of SQL Server 2008 on a server, you will need to determine how you would like the instance set up. That way, when prompted with questions during the install, you know exactly how to address each question. Some pre-planning addresses questions like the following:
- What is the instance name?
- What should be the instance root directory?
- Where should program files be located?
- Where do you want your data files?
Getting Your System Ready
To get started, double-click on setup.exe from the disk or network share and navigate to the SQL Server Installation Center. From the Installation Center, rerun the System Configuration Checker to ensure nothing has changed on the server or within the software that would cause your installation to fail. (Remember, you can access the System Configuration Checker from two locations: the Planning category and the Tools category).
After the System Configuration Checker has completed its scan, we like to run the Install SQL Server Features Setup Discovery Report, which you first saw back in Figure 4-6. Figure 4-26 shows a more complete discovery report that includes a SQL Server 2008 instance name. The discovery report helps you review and validate the components and instance names that currently exist on your machine.
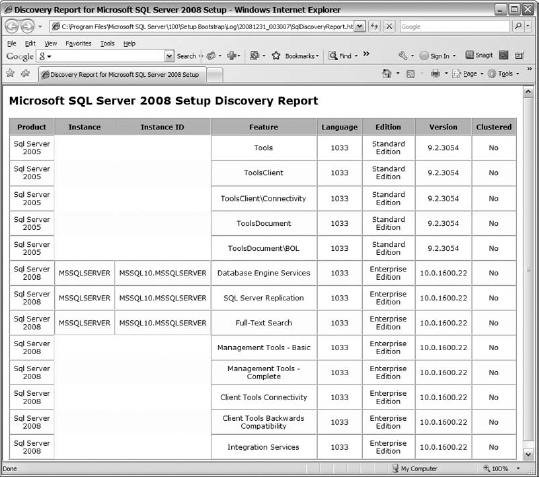
Figure 4-26. A discovery report showing a SQL Server 2008 installation
After you have reviewed the discovery report and determined the file locations and instance name that you would like to use for the new instance you want to create, then proceed to the New SQL Server Stand-Alone Installation or Add Features to an Existing Installation link under the Installation category. Once you click on this link, the System Configuration Checker, mentioned earlier, runs to make sure that your new install can proceed without error. Since you already should have executed the complete System Configuration Checker, you should not have any problems going through this mini system check process. Once the setup support files have installed, the System Configuration Checker will scan your system. After the scan completes successfully, you will land on the screen shown in Figure 4-27, asking about the type of installation you want. Because you are trying to install a separate instance of SQL Server, you should select the option to perform a new installation of SQL Server 2008.
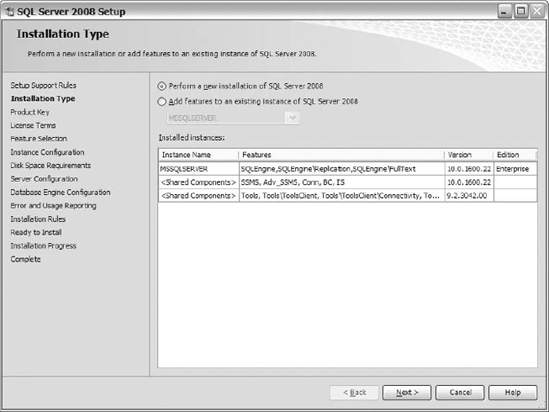
Figure 4-27. The Installation Type screen asking whether you want to perform a new install or add features to an existing install
![]() Note The Installation Type screen in Figure 4-27 also shows you the instance and any other shared components installed on the machine. Keep this screen in mind when you are looking to add additional features to an existing instance.
Note The Installation Type screen in Figure 4-27 also shows you the instance and any other shared components installed on the machine. Keep this screen in mind when you are looking to add additional features to an existing instance.
After your selection, you advance to a series of steps similar to those that we reviewed earlier. You insert your product key, accept the license agreement, and choose the features that you want installed on your new instance. Figure 4-28 shows the Feature Selection screen. Notice that the Shared Feature Directory options are grayed out, preventing you from modifying the location of the shared files. That's because you already have the shared files installed, and you cannot move them as part of installing a new instance.
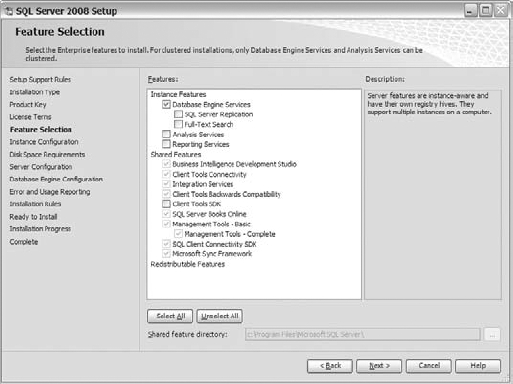
Figure 4-28. The Feature Selection screen showing installed shared features and the Shared Feature Directory field grayed out
Configuring the Instance
Next, you have to configure the instance, which you do from the screen shown in Figure 4-29. Using the planning documentation you already created, you can easily supply the values for the instance name, instance ID and the instance root directory. You will also see installed instances on your server listed at the bottom of the screen to ensure you do not duplicate instance names or IDs.
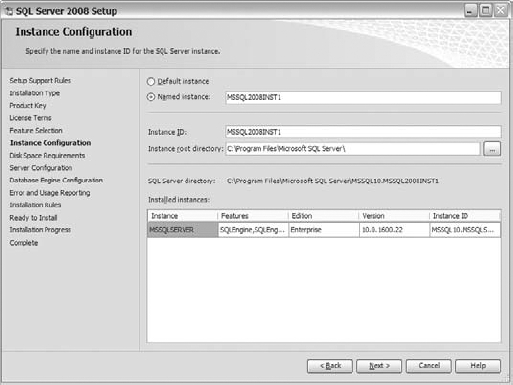
Figure 4-29. The Instance Configuration screen showing a currently installed instance of SQL Server 2008
After configuring the instance, you'll move through the following steps, which are essentially the same as for installing your first instance:
- Review disk space requirements from the screen for that purpose.
- Plug in usernames and passwords on the Server Configuration screen. These are for the services of the new instance of SQL Server that you are installing.
- Visit the three tabs on the Database Engine Configuration screen: Account Provisioning, Data Directories, and
FILESTREAM. The Account Provisioning tab is the same from the initial install; determine if the instance will be Windows or Mixed Mode authentication and select the option accordingly. Do not forget to add Windows users to the administrator role if you want them administering the instance.
The Data Directories tab is definitely something that we would suggest you pay attention to. The default file structure will consist of your root directory followed by MSSQL10.InstanceNameData. Keep in mind the folder structure of your original instance. You may want to lay out your files in the same pattern as your original instance. That way, your file structure is consistent, making it easy for you and anyone else to determine where your files are located.
![]() Tip The projected input and output (IO) usage for an instance will determine the placement of the instance files. For low usage, you may want to use the same drives for the instances, separating the files into multiple folders by instance name. For high IO, you may want to utilize a separate disk subsystem. Regardless of the method used, use the IO subsystem stress tools discussed in Chapter 2 to ensure that your disk subsystem can deal with the IO of the newly added instances.
Tip The projected input and output (IO) usage for an instance will determine the placement of the instance files. For low usage, you may want to use the same drives for the instances, separating the files into multiple folders by instance name. For high IO, you may want to utilize a separate disk subsystem. Regardless of the method used, use the IO subsystem stress tools discussed in Chapter 2 to ensure that your disk subsystem can deal with the IO of the newly added instances.
The FILESTREAM tab, Error and Usage Reporting, Installation Rules, and Ready to Install screens are the same as for your initial instance installation. One screen you should spend a little extra time reviewing is the Ready to Install screen. That screen provides a summary of the components you are installing for that instance, including the location of the data files, the instance name, and other information. Make sure that information coincides with the outcome you expect before you proceed.
Click Next to start the installation processes once you complete the summary review. Next you will see the Installation Progress screen, and then the Complete screen. Before you close the Complete screen, pay attention to the link to the log file. Document the location of the log file just in case you need to review it later. Finally, you can run the SQL Server Features Setup Discovery Report and see the newly installed instance, as shown in Figure 4-30.
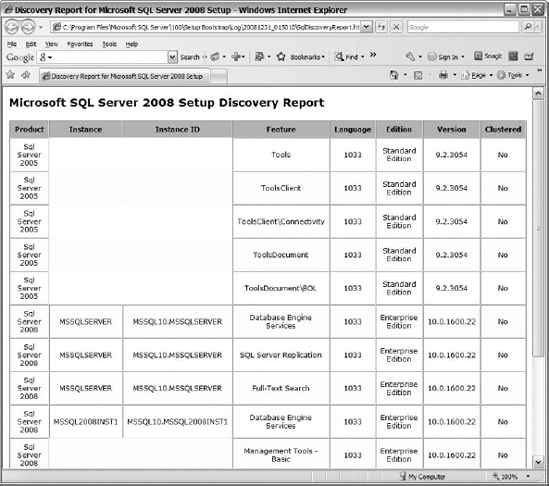
Figure 4-30. The SQL Server Features Setup Discovery Report showing the installation of a second instance
Command-Line Installation
Command-line installs provide an effective method of ensuring consistency among the SQL Server installations within your environment. Once you've defined parameters and their values, you can run installs from the command line to ensure that every SQL Server installation is identical. Think about it'what better way to make sure that all database administrators within your organization follow the same rules and install SQL Server instances identically than to provide a method for executing the same install script with the same commands and values for multiple servers?
![]() Note While command-line installs are very useful, we do recommend that you do your first few installs through the GUI. Doing so helps you get familiar with the available install options. It's a matter of learning one thing at a time. Learn to install SQL Server, and then learn the command-line installer. Don't try to learn both at once.
Note While command-line installs are very useful, we do recommend that you do your first few installs through the GUI. Doing so helps you get familiar with the available install options. It's a matter of learning one thing at a time. Learn to install SQL Server, and then learn the command-line installer. Don't try to learn both at once.
Learning the Parameters
In order to install SQL Server 2008 from the command line, you must become familiar with the parameters passed to the executable. We will use the following parameter options throughout the section to discuss command-line installs.
Q: An optional parameter that allows for no interaction during the install. It is called Quiet mode.QS: An optional parameter that allows the setup to run without user input but show progress.ACTION: A required parameter that tells the executable what you are getting ready to do, such as install, upgrade, and so on.FEATURES: The required parameter that defines the components you want installed.CONFIGURATIONFILE: An optional parameter that identifies the configuration file to use for the install.INSTANCENAME: The required parameter that identifies the name of the instance.INSTANCEDIR: An optional parameter that defines the location of components for a given instance.INSTANCEID: An optional parameter that allows you to change the default instance ID.INSTALLSHAREDDIR: An optional parameter that defines the non-default directory for 64-bit shared components.INSTALLSHAREDWOWDIR: An optional parameter that defines the non-default for 32-bit shared components.AGTSVCACCOUNT: The required parameter that specifies the user account for a SQL Server Agent.AGTSVCPASSWORD: The required parameter for the password of the SQL Server Agent.AGTSVCSTARTUPTYPE: The optional parameter that determines how the SQL Server Agent starts after a reboot. The values are automatic, disabled, or manual.BROWSERSVCSTARTUPTYPE: The optional parameter that determines how the SQL Server Browser service starts after a reboot. The values are automatic, disabled, or manual.SQLSVCACCOUNT: The required parameter that specifies the user account for the SQL Server service.SQLSVCPASSWORD: The required parameter for the password of the SQL Server service.SQLSVCSTARTUPTYPE: The optional parameter that determines how SQL Server service starts after a reboot. The values are automatic, disabled, or manual.ISSVCACCOUNT: The required parameter that specifies the user account for Integration service. The default value is NT AuthorityNetwork Service.ISSVCPassword: The required parameter for the password of Integration service.ISSVCSTARTUPTYPE: The optional parameter that determines how Integration service starts after a reboot.SQLCOLLATION: An optional parameter that specifies the collation of your SQL Server instance. The default value is SQL_Latin1_General_CP1_CS_AS.SQLSYSADMINACCOUNTS: The required parameter that allows you to grant user access to SQL Server for members of thesysAdmingroup.SECURITYMODE: An optional parameter that identifies the authentication method for your SQL Server instance. Windows authentication is the default value if a parameter is not supplied. SQL is a supported value.SAPWD: The required parameter for when Mixed Mode authentication is selected. It sets the password for the SA account.INSTALLSQLDATADIR: The optional parameter that defines the location for the data files. The default location is Program Files%Microsoft SQL Server.SQLBACKUPDIR: An optional parameter that specifies the location of the backup directory. The default value is INSTALLSQLDATADIRINSTANCEIDMSSQLBackup.SQLTEMPDBDIR: The optional parameter that defines the location for the data files oftempdb. The default value is INSTALLSQLDATADIRINSTANCEIDMSSQLData.SQLTEMPDBLOGDIR: The optional parameter that defines the location for the log files oftempdb. The default value is INSTALLSQLDATADIRINSTANCEIDMSSQLData.SQLUSERDBDIR: The optional parameter that defines the location for the data files of user databases. The default value is INSTALLSQLDATADIRINSTANCEIDMSSQLData.SQLUSERDBLOGDIR: The optional parameter that defines the location for the log files of user databases. The default value is INSTALLSQLDATADIRINSTANCEIDMSSQLData.USESYSDB: The optional parameter that specifies the location of the system databases to use for the installation. Do not add the Data extension to the file path.FILESTREAMLEVEL: The optional parameter that enables or disables theFILESTREAMfeature. The values are 0 − disable, 1 − Enable T-SQL Access, 2 − Enable T-SQL access and I/O streaming access, and 3 − Remote access toFILESTREAMdata. The default value is 0.FILESTREAMSHARENAME: The optional parameter that specifies the directory whereFILESTREAMdata will be stored.ERRORREPORTING: An optional parameter that determines if you will participate in Microsoft error reporting or not. The supported values are 1 or 0 and enabled or disabled.SQMREPORTING: The optional parameter that determines if you will participate in Microsoft error reporting or not for feature usage. The supported values are 1 or 0 and enabled or disabled.INDICATEPROGRESS: An optional parameter that allows the log file to be written to the screen.PID: Surprisingly, an optional parameter that sets the product key. If you do not provide a product key, the evaluation product key for the Enterprise Edition will be used.HIDECONSOLE: The optional parameter that determines the visibility of the console window.
This list of parameters may look a little overwhelming, but if you have installed SQL Server 2008 already from the GUI, then the parameter names and choices really make sense. We even list the parameters in the order that you make decisions within the GUI installer.
Passing Parameters to the Installer
The installer executable is setup.exe. You use the same executable for all types of installs, whether GUI-based or command-line based. You can pass parameters in several formats. Some parameters are simple switches. You pass these by just listing them after the command line. For example, you can specify the Q parameter if you want your install to proceed silently, with no status or progress messages displayed. Here's how to do that:
setup.exe /Q
That's it. Just specify the Q parameter, and you turn on the “silent” switch. Also notice that you precede parameter names with forward slash characters.
Next, some parameters allow for true/false values. Specifying the parameter name without following text implies that a parameter is set to true. Excluding a parameter implies the parameter value is false. You can explicitly specify true/false for some of the parameters. For example:
setup.exe /Q=true /QS=false
Other parameters require that you pass specific numeric or text values. Pass numeric values simply by specifying a number. Pass text values by placing those values within quotes. For example:
setup.exe /FILESTREAMLEVEL=0 /INSTALLSQLDATADIR="C:ScrapFiles"
Technically, you do not have to enclose text values within quotes unless those values contain spaces or other special characters. Use quotes if you have any doubts about needing them. You can also quote numeric values, if you like.
Running a Command-Line Install
Now that you're familiar with the parameters and how to pass them, you can begin to put together your first command-line install. The following subsections walk you through an example.
First, though, you may want to “cheat” and run the System Configuration Checker from the Planning category in the SQL Server Installation Center. Yes, that's in the GUI, but we like to run it anyway. We like it because the resulting report helps us identify and head off problems that would cause installation failures.
Choosing the Level of Silence
The first thing you have to decide is whether you want to see the status of the installation as it proceeds, or whether you want the installation to run silently. Specify /Q as a parameter to get a quiet install, or one that runs without user interaction and status bars. Specify /QS if you want to see status bars only, while avoiding user input.
When developing a new command-line script, we generally execute the script using the /QS parameter to enable us to monitor the progress of the install. As our comfort level increases with our installation script, we modify the script to use /Q.
Specifying the Action and the Components
Next, you have to specify the action to perform. For this discussion, you are installing SQL Server 2008. Therefore, the action portion of the process is /ACTION=Install. After the action, you have to determine the components that you want installed. The available options are as follows:
SQL: Installs the database engine, replication, and Full-Text components.SQLENGINE: Just installs the database engine services.REPLICATION: Installs SQL Server replication. The database engine has to be specified in order to install replication.FULLTEXT: Installs the Full-Text Search service. The database engine has to be specified in order to install Full-Text components.Tools: Installs client tools and SQL Server Books Online.BC: Installs backward compatibility.BOL: Installs SQL Server Books Online.BIDS: Installs Business Intelligence Development Studio.Conn: Installs client tools connectivity.SSMS: Installs Management Tools (Basic).ADV_SSMS: Installs Management Tools (Complete).SDK: Installs the Software Development Toolkit.
For this walkthrough, let's install the database engine and the tools. To do that, specify install /Features = SQL, Tools.
Configuring the Instance
After the feature selection, you should set up the instance name and instance ID. For this example, specify the instance name using /INSTANCENAME=MSSQLCMDLINE. The instance ID is an optional parameter that you can change here if you want. For example, you can specify something like /INSTANCEID=MSSQLCMDLINEID.
In the GUI setup, options exist to change the location of the instance root directory. You can do the same thing from the command-line installer using the /INSTALLSHAREDDIR option. For example:
/INSTALLSHAREDDIR="c:program filesSQLCMDINSTALL"
or
/INSTALLSHAREDWOWDIR="c:program filesSQLCMDINSTALL"
Which of these parameters to use depends upon the hardware and edition of SQL Server 2008 you are installing. (Use the WOW version of the parameter for 32-bit systems). Personally, using the default locations for the shared file directories is a good choice.
Next, you have to populate the usernames and passwords for the services that you are installing. However, you do not need to populate the password parameter for services using system accounts in the form NT AuthorityNetwork Service. The following list shows the parameters used to specify the usernames and passwords for the services, along with their startup types:
/AGTSVCACCOUNT="NT Authority Network Service"/AGTSVCPASSWORD/AGTSVCSTARTUPTYPE=automatic/BROWSERSVCSTARTUPTYPE=manual/SQLSVCACCOUNT="DomainUserName"/SQLSVCPASSWORD=P@55w0rd!/SQLSVCSTARTUPTYPE=automatic/ISSVCACCOUNT="NT Authority Network Service"/ISSVCPassword/ISSVCSTARTUPTYPE=automatic/SQLSYSADMINACCOUNTS="DomainUserName"
After setting up usernames and passwords for your services, your next step is to set up the collation for SQL Server. You set the collation using the /SQLCOLLATION parameter. For example:
setup.exe /SQLCOLLATION="SQL_Latin1_General_CP1_CI-AI"
Next, you set up the authentication mode for the SQL Server instance. Specify /SECURITYMODE=SQL for Mixed Mode authentication. Once you set the authentication level to mixed, you have to set up the SA passwords by using the /SAPWD="P@ssw0rd!" parameter.
Specifying the Data Directories
After getting all the instance-related items out of the way, you can set up the data directories for the database files. The following list shows one approach that you might take:
/SQLUSERDBDIR="g:sqldata"

/SQLUSERDBLOGDIR="h:sqlLogs"

/SQLBACKUPDIR="j:ackups"

/SQLTEMPDBDIR="i:sqldata"

/SQLTEMPDBLOGDIR="i:sqldata"
After setting up the data directories, decide if you want to turn on FILESTREAM. Specify /FILESTREAMLEVEL=1 to enable it. Finally, decide if want to participate in Microsoft reporting. There are two reporting parameters: /ERRORREPORTING and /SQMREPORTING. Set these parameters to 1 if you want to enable their corresponding reporting options.
Running Your Install
Now put all the parameters together and install SQL Server. Following is an example command line:
setup.exe /QS /ACTION=install /FEATURES=SQL /INSTANCENAME=MSSQLCMDLN _

 /SQLSVCACCOUNT="NT AUTHORITYNetwork Service" /SQLSYSADMINACCOUNTS="NT_

 AUTHORITYNetwork Service" /SQLSVCSTARTUPTYPE="automatic" /AGTSVCACCOUNT="NT_

AUTHORITYNetwork Service" /AGTSVCSTARTUPTYPE="automatic" /SQLCOLLATION=_

"SQL_Latin1_General_CP1_CI_AI" /SECURITYMODE=SQL /SAPWD="P@ssw0rd!"_

/SQLUSERDBDIR="c:sqldata" /SQLUSERDBLOGDIR="c:sqlLogs" SQLBACKUPDIR=_

"c:ackups" /SQLTEMPDBDIR="c:sqldata" /SQLTEMPDBLOGDIR="c:sqldata"_

 /FILESTREAMLEVEL=1 /ERRORREPORTING=0 /SQMREPORTING=0
![]() Note Make sure there are no spaces before or after the equals (=) sign for any of the parameters. Place the entire command in one line before pasting it in the command line. You can use batch files to execute the command.
Note Make sure there are no spaces before or after the equals (=) sign for any of the parameters. Place the entire command in one line before pasting it in the command line. You can use batch files to execute the command.
Having a command, you can now execute it. First, navigate using the command line to the directory containing setup.exe. Then paste in the command line that you have created and watch it run. Do not be alarmed if you receive some errors. The messages are pretty straightforward and are easy to debug. The script that we are supplying works in our environment, so you should be able to run it with only a few modifications for your environment. Do not forget: The supplied script uses NT AuthorityNetwork Service for service accounts, which do not require passwords, does not include a product key, and the folder directories may not exist. So you will have to modify the script to include those items to work on your system.
After you start the command-line install, a series of checks and validation will occur. The /QS parameter in our example causes the installer to open a GUI window, from which you can monitor installation progress. Figure 4-31 shows the progress screen that you'll see during the installation of support files.
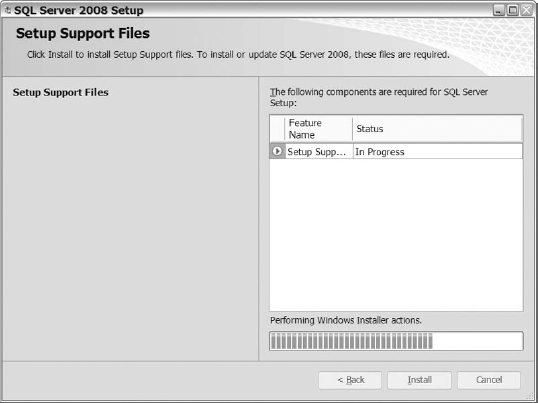
Figure 4-31. The Setup Support Files screen during a command-line installation
Figure 4-32 shows the progress screen for the subsequent instance install.
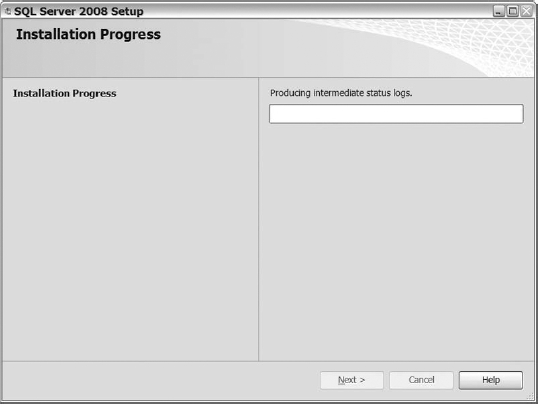
Figure 4-32. Progress of a command-line installation
If an error occurs during the install, then the GUI will close and the installer will display an error message in the command-line window (see Figure 4-33).
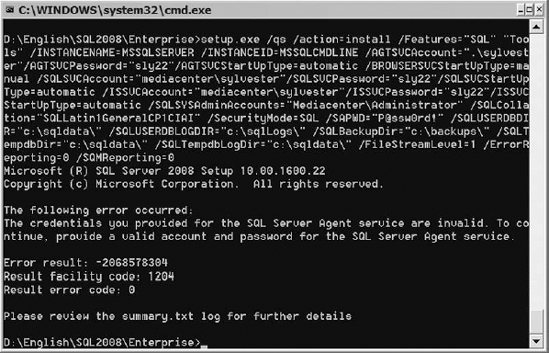
Figure 4-33. Encountering an error during a command-line install
For even more detail about the error, you can review the summary.txt file (see Figure 4-34) in the shared install directory. That file is located in Program FilesMicrosoft SQL Server100Setup BootstrapLog.
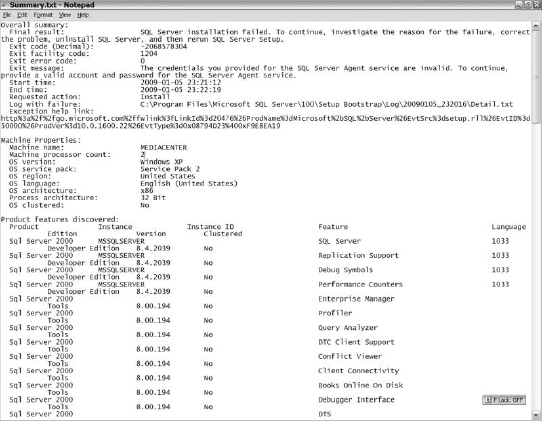
Figure 4-34. Sample summary file following an error
Configuration File Installation
Installing SQL Server from a configuration file is another option available to you in SQL Server 2008. Configuration file installs are command-line installs with a parameter change that points setup.exe to a file containing the installation parameters. One major advantage of a configuration file install is that successful completion of a SQL Server 2008 install, such as from the GUI, creates a configuration file for you. The file is placed in the following folder: Program FilesMicrosoft SQL Server100Setup BootstrapLogTimeOfSuccessfulInstall. So you can install SQL Server 2008 from the GUI version of setup.exe, and then utilize the configuration file created by the installer to install SQL Server 2008 consistently on any other server that you build.
Configuration file installs are extremely simple compared to command-line installs and require only a couple of changes to implement. Since you understand the command-line parameters, reviewing and modifying a configuration file, like Listing 4-1, is not a challenging task.
Listing 4-1. Sample Configuration File
;SQLSERVER2008 Configuration File

[SQLSERVER2008]


; Specifies the instance ID for the SQL Server features you have specified. _

SQL Server directory structure, registry structure, and service names will _

reflect the instance ID of the SQL Server instance.


INSTANCEID="MSSQLCMDLINE"


; Specifies a setup workflow, like INSTALL, UNINSTALL, or UPGRADE._

 This is a required parameter.


ACTION="Install"


; Specifies features to install, uninstall, or upgrade. The list of top-level _

features include SQL, AS, RS, IS, and Tools. The SQL feature will install _

the database engine, replication, and Full-Text. The Tools feature will install _

Management Tools, Books Online, Business Intelligence Development Studio, _

and other shared components.


FEATURES=SQLENGINE,REPLICATION,FULLTEXT


; Displays the command-line parameters usage


HELP="False"


; Specifies that the detailed setup log should be piped to the console.


INDICATEPROGRESS="False"


; Setup will not display any user interface.
QUIET="False"
; Setup will display progress only without any user interaction.
QUIETSIMPLE="True"
; Specifies that setup should install into WOW64. This command-line argument _
is not supported on an IA64 or a 32-bit system.
X86="False"
; Specifies the path to the installation media folder where setup.exe is located.
MEDIASOURCE="D:EnglishSQL2008Enterprise"
; Specifies if errors can be reported to Microsoft to improve future SQL Server
releases. Specify 1 or True to enable and 0 or False to disable this feature.
ERRORREPORTING="False"
; Specifies the root installation directory for native shared components.
INSTALLSHAREDDIR="C:Program FilesMicrosoft SQL Server"
; Specifies the installation directory.
INSTANCEDIR="C:Program FilesMicrosoft SQL Server"
; Specifies that SQL Server feature usage data can be collected and sent to
Microsoft. Specify 1 or True to enable and 0 or False to disable this feature.
SQMREPORTING="False"
; Specifies a default or named instance. MSSQLSERVER is the default instance
for non-Express Editions and SQLExpress for Express Editions. This parameter_
is required when installing the SQL Server Database Engine (SQL),
Analysis Services (AS), or Reporting Services (RS).
INSTANCENAME="MSSQLCMDLINE"
; Agent account name
AGTSVCACCOUNT="NT AUTHORITYNETWORK SERVICE"
; Auto-start service after installation.
AGTSVCSTARTUPTYPE="Manual"; Startup type for Integration services.
ISSVCSTARTUPTYPE="Automatic"
; Account for Integration services: DomainUser or system account.
ISSVCACCOUNT="NT AUTHORITYNetworkService"
; Controls the service startup type setting after the service has been created.
ASSVCSTARTUPTYPE="Automatic"
; The collation to be used by Analysis Services.
ASCOLLATION="Latin1_General_CI_AS"
; The location for the Analysis Services data files.
ASDATADIR="Data"
; The location for the Analysis Services log files.
ASLOGDIR="Log"
; The location for the Analysis Services backup files.
ASBACKUPDIR="Backup"
; The location for the Analysis Services temporary files.
ASTEMPDIR="Temp"
; The location for the Analysis Services configuration files.
ASCONFIGDIR="Config"
; Specifies whether or not the MSOLAP provider is allowed to run in process.
ASPROVIDERMSOLAP="1"
; Startup type for the SQL Server service.
SQLSVCSTARTUPTYPE="Automatic"
; Level to enable FILESTREAM feature at (0, 1, 2 or 3).
FILESTREAMLEVEL="0"; Set to “1” to enable RANU for SQL Server Express.
ENABLERANU="False"
; Specifies a Windows collation or a SQL collation to use for the database engine.
SQLCOLLATION="SQL_Latin1_General_CP1_CI_AS"
; Account for SQL Server service: DomainUser or system account.
SQLSVCACCOUNT="NT AUTHORITYNetwork Service"
; Windows account(s) to provision as SQL Server system administrators.
SQLSYSADMINACCOUNTS="NT AUTHORITYNetwork Service"
; Provision current user as a database engine system administrator for
SQL Server 2008 Express.
ADDCURRENTUSERASSQLADMIN="False"
; Specify 0 to disable or 1 to enable the TCP/IP protocol.
TCPENABLED="1"
; Specify 0 to disable or 1 to enable the Named Pipes protocol.
NPENABLED="0"
; Startup type for Browser Service.
BROWSERSVCSTARTUPTYPE="Automatic"
; Specifies how the startup mode of the report server NT service. When
Manual - Service startup is manual mode (default).
Automatic - Service startup is automatic mode.
Disabled - Service is disabled
RSSVCSTARTUPTYPE="Automatic"
; Specifies which mode report server is installed in.
Default value: "FilesOnly"
RSINSTALLMODE="FilesOnlyMode"
Notice that the configuration file options look similar to the parameters used in the previous section's command-line install. Before installing SQL Server 2008 with a configuration file, review the file to ensure that the options you want installed are enabled. If you are installing SQL Server 2008 from a configuration file created by a previous GUI install that you are happy with, then you only have to change a couple of the configuration options.
You have to modify the configuration file to change your GUI install, where you supply all the options, to a command-line install that uses the /Q or /QS parameters. Change the either QUIET or QUIETSIMPLE option to true in the configuration file. Both of those options are set to false during a GUI install.
After modifying the QUIET and QUIETSIMPLE options within the configuration file, you may want to validate that the INSTANCENAME and INSTANCEID will not cause a conflict on the server. Besides those two changes, you should be able to execute a configuration file install using the configuration file from the previous install without problems.
To perform a configuration file installation, open a command prompt and navigate to the directory where the setup.exe file exists. Then execute setup.exe /CONFIGURATIONFILE="file path and file name" and sit back and watch the installation run without you inputting anything. If you are using Mixed Mode authentication or if the service account users need passwords, then adding additional parameters for the appropriate passwords is required. For example, the SA password is required in Mixed Mode authentication. So to install SQL Server 2008 using a configuration file with the SA password parameter supplied, you need to execute setup.exe /CONFIGURATIONFILE="file path and file name" /SAPWD="Password". Then you are all set. Figure 4-35 is a sample command-line interface when the configurations file installation starts.
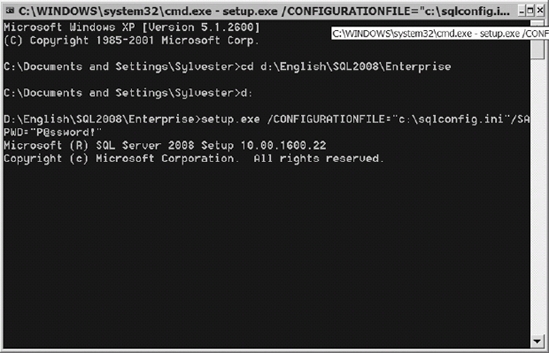
Figure 4-35. The command-line interface executing a configuration file installation
Figure 4-36 shows the progress screen that you will see in QUIETSIMPLE mode during the install.

Figure 4-36. Installation progress of a configuration file installation with QUIETSIMPLE option set to true
The completion of the install shows messages in the command-line window (see Figure 4-37).
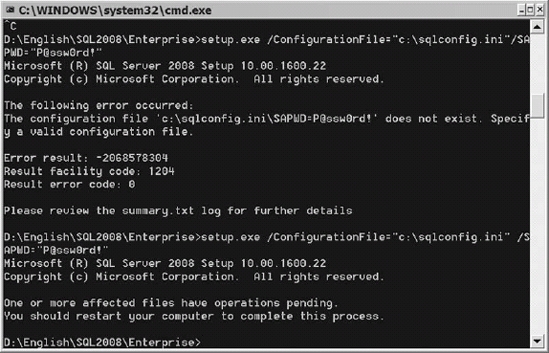
Figure 4-37. The completion of a configuration file installation
Summary
In this chapter, we reviewed three methods for installing SQL Server 2008: the GUI version of setup.exe, a command-line install, and the configuration file install. Command-line and configuration file install methods enable you to install SQL Server 2008 with identical options and decrease the amount of user time required for the install. In environments where multiple members of the organization install SQL Server, determining the script for command-line or configuration file installation should be beneficial. Get together with the database administration team, agree on installation options for the database engine and its components, and utilize that configuration file or command-line script on all of your SQL Server installs.
A large number of you will be installing SQL Server 2008 with the intension of upgrading from SQL Server 2000 or SQL Server 2005. This chapter gives you the first half of the upgrade process, but Chapter 5 will provide you with the detailed information for the second half of the migration process.