
C H A P T E R 10
![]()
Indexing for Performance
Effectively creating indexes within your databases will single handedly provide the largest increase in application performance. Unfortunately, creating indexes incorrectly or without regard for the application&s behavior can actually hinder performance. A good database administrator will pay close attention to the actions of the application and understand that you may have to be flexible with regard to the index creation tips, recommendations, and guidelines that you have researched. The purpose of this chapter is to enhance your understanding of indexes and help you with the development of your rules for creating indexes.
Index Vocabulary, Structure, and Concepts
Before we start discussing index creation and all the various tips to consider, let&s make sure that we are on the same page in terms of the terminology used when discussing indexes. The next several sections on terminology will lay the groundwork for the examples and conversations regarding indexes that come later on in this chapter.
Heaps
When data is stored for a table within your database when no clustered indexes are present, the table is stored in what is called a heap. System objects, like sys.indexes and sys.partitions, with index ID values of zero identify the table as a heap table. In most instances, heaps are not the preferred method of storing your tables because of the access method required for retrieving data. When no indexes exist on a table, then scanning the entire table is the only method for retrieving data from the table. After the execution of a query against the table, SQL Server has to check every row in the table to determine if it meets the conditions of the query. The method of scanning an entire heap table is referred to as a table scan. Most of the time, table scans are not the most efficient method of retrieving data from a table; however, there are times when SQL Server optimizer will determine that a table scan is the most efficient method to retrieve the data. (We will review samples of the performance difference of table scans in the “Putting It All Together” section later in this chapter.)
Clustered Indexes
Clustered indexes are one of the two main types of indexes supported in SQL Server. A clustered index stores the rows of its underlying table in the sorted order of the clustered index keys. The clustered index keys are the column(s) you select to represent how you want data ordered on disk. Since the order of the table is determined by the clustered index, only one clustered index can be defined on a table. Clustered indexes are represented in system tables and views, like sys.objects and sys.partitions, by the value 1 in the index ID column.
Queries against tables that contain clustered indexes may perform at extremely fast rates or dreadfully slow rates. When indexes are involved, you can scan an entire index looking for the data that meets your criteria or seek a record based on the supplied criteria. In other words, if you are looking for an employee with an identification number of 100 and the table has a clustered index on the identification number, then SQL Server will seek employee 100, which is very fast. However, if you are looking for every employee who has a first name of Joe and you have a clustered index on an identification number, then SQL Server is going to scan the entire clustered index looking for every Joe. That can take a while if you have a large number of employees in the table. You will see multiple examples of clustered index scan performance later in the “Putting It All Together” section.
Nonclustered Indexes
Nonclustered indexes are the second main type of index supported in SQL Server. A nonclustered index contains the index key value and the row identifier for finding the rest of the data for every row in the table. Nonclustered indexes can be created on clustered index and heap tables. When a nonclustered index is created on a clustered index table, the row identifier holds the clustered index key and that key points to the actual data. If the nonclustered index exists on a heap table, then the row identifier points to the address of the data pages. Regardless of the table type, clustered or heap, retrieving the actual data pages requires additional steps, thus increasing IO. Ideally, you want to decrease IO, not increase it.
SQL Server 2008 allows you to create up to 999 clustered indexes on a given table, and you can specify the list of columns for each of those. But keep this in mind: Just because SQL Server 2008 allows you to perform certain actions does not mean that you are required to do so.
Nonclustered indexes are represented in SQL Server 2008 system tables and views with an index ID greater than 1. SQL Server 2008 will scan or seek on a nonclustered index when the index keys are useful in finding the data based on the criteria of the query being executed. We will cover index selection in more detail later in this chapter, but it is important to understand at this point that SQL Server 2008&s query optimizer will determine the most useful index to return the results of the query in the fastest or an acceptable amount of time.
Structure of Indexes and the Heap
Indexes within SQL Server 2008 are stored in B-tree data structure. The B-tree data structure is divided into three basic parts: the root (top-most level of the tree), the leaf level (bottom-most portion of the tree), and the intermediate level (everything in between). The root and intermediate levels contain the keys specified during creation and depending on the index type, clustered or nonclustered index, the row identifier with the clustered index key or the address of the data pages. On the intermediate and leaf level pages, SQL Server uses a double linked list to navigate from page to page. Based on the search criteria of the query, SQL Server will traverse the tree starting at the root heading downward until it reaches the leaf level pages. Let&s take a closer look at the structure of both types of indexes.
Clustered Index Structure
Keep in mind that clustered indexes determine the order of the data on disk. The key of a clustered index will be sorted in ascending or descending order. For the next couple of examples, let&s assume that you have a table with over 300 employees in it. The employee table has several columns that include employee ID, first name, and last name. If you cluster the employee table on the employee ID, then Figure 10-1 demonstrates the structure of that clustered index on disk. The root level page contains employee ID 100 and 200, with pointers to the pages that are greater than 200 or less than 200. The intermediate level contains the key value of employee IDs 1 and 100 and 200 and 300, along with pointers to the page where that data is stored. The leaf level pages actually contain all the data of each employee ID within the table.
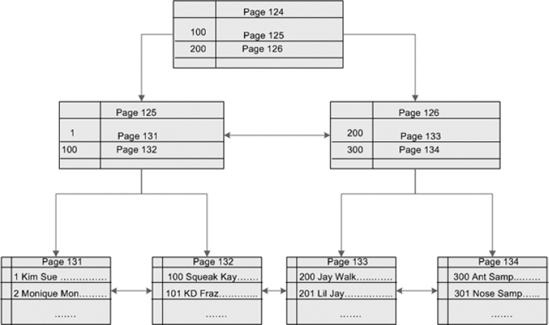
Figure 10-1. The clustered index structure
The following steps list the process that SQL Server goes through to retrieve data from clustered index structures.
- Query the
sys.system_internals_allocation_unitsto identify the root node page address for the index. - Compare the value from the query to the values on the root page.
- Identify the uppermost key value that is less than or equal to the value from the query.
- Trace the pointer to the page specified key value down to the next level.
- Repeat steps 3 and 4 until you reach the leaf level pages.
- Once the leaf level pages are reached, SQL Server searches through data pages looking for the query value. If no data pages are found, the query will return no results.
Nonclustered Index Structure
Nonclustered index structures look highly similar to the clustered index structures. Nonclustered indexes have three main levels as well: the root level, the leaf level, and the intermediate levels. The main difference between the clustered index structure and the nonclustered index structure is the data stored within the leaf level and the data row locator within the structure. Remember that the leaf level pages in a nonclustered index contain references to data pages or to index keys instead of the actual data.
Figure 10-2 shows the structure of the nonclustered index. The example uses a first name for the index key. The root level of the nonclustered index contains the first name along with the pointer to the next page and the data row locator. The intermediate level has the first name ranges divided evenly, as well as the next page and data row locators. The leaf level pages contain the keys, or first names, in this example. If the underlying table is organized by a clustered index, then the leaf level pages of the nonclustered index will contain clustered index keys (also called data row locators). If the underlying table is a heap, then the leaf level pages will contain pointers to data pages in the heap.
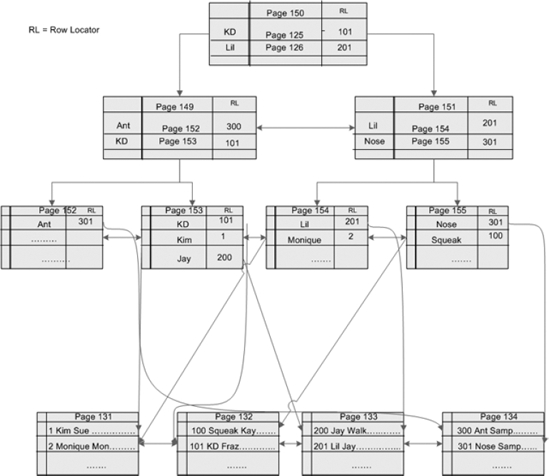
Figure 10-2. The nonclustered indexes with pointers to the clustered index
Heap Structure
We would like to briefly mention the structure of heaps in this section. Unlike clustered and nonclustered indexes, the data stored within a heap table has no structure. The data stored within a heap table is linked by the index allocation map (IAM) pages that are allocated for the object. The sys.system_internals_allocation_units systems object points to the first IAM page where the data is stored. Because of the lack of order within the heap, SQL Server has to scan each page of the entire heap to determine what data meets the criteria of any given query. Because of this, table scans on heaps are often times inefficient. You should avoid scans on heaps as much as possible.
Indexes Created by Constraints
In Chapter 9, we discussed constraints and the creation of their corresponding indexes. This section ensures you understand the terminology used when people mention primary and unique indexes.
Primary Indexes
What in the world is a primary index? I really don&t know, but I have heard this term used frequently by non-database administrators. (Well, that&s my story and I&m sticking to it.) Generally, most people who use the term primary index are actually referring to the index created after they specify the primary key for a table. The primary key can create a clustered or nonclustered index that forces uniqueness within the key values and does not allow null values. When someone says that the primary index is the main index used for retrieving data, just smile and say yes; the clustered index will determine the order of the data and will be used frequently. You can correct the person if you want, but we often find it easier to be subtle and slide the correct terms in there when you get the chance.
Unique Indexes
Unique indexes are created on the key columns of an index. A unique index forces distinctness among the data for the specified columns. Tables can have multiple unique indexes. Unique indexes allow nulls to exist in the key columns. From a SQL Server perspective, it does not matter if a unique index or a unique constraint is created first; the validation process of the data is the same, and the result will consist of a unique index. After creating the index, validation of the index keys occur for the data in the table to ensure that the values are unique.
The validation of the key values of a unique index happens before you insert data into the table. If you are attempting to insert multiple records into a table and one record violates the unique index, then none of the data will be inserted and the entire statement will fail unless you set the IGNORE_DUP_KEY option to ON.
In batches where unique indexes are violated, the IGNORE_DUP_KEY option allows insertion of the records that don&t violate the unique index, while only the offenders fail. See “Creating Clustered and Nonclustered Indexes” later in this chapter for more information about the IGNORE_DUP_KEY option.
Other Ways to Categorize Indexes
There are many ways to categorize index types. The distinction between clustered and nonclustered is fundamental, and you&ll commonly encounter the terms primary index and unique index. But there are other ways to divide indexes into different types. The following sections describe some of the types you&ll encounter in your work as a DBA.
Composite Indexes
Composite indexes are those created on objects that contain multiple columns. Composite indexes may include up to 16 columns that are all from the same table or view. The combined column values of a composite index cannot be greater than 900 bytes. Pay close attention to the structure of your columns while creating your indexes. Make sure the index keys are in the same order as the WHERE clause of your queries. SQL Server is more likely to use the index when the two are in the same order.
Filtered Indexes
Filtered indexes are a new feature of SQL Server 2008 whereby you can create nonclustered indexes on subsets of data from the table. Think about a WHERE clause on a table: If you want to minimize the number of records retrieved from a table, then you specify a condition within the WHERE clause to prevent that data from being returned. Well, the filtered index works in a similar fashion—you specify the rules to exclude data from an index. Remember, nonclustered indexes contain rows for all the data within a table. Filtered indexes will prevent all of the data from being stored within the index.
Filtered indexes provide benefits like improved query performance and data storage. From a performance perspective, looking for data within a smaller subset of records will decrease the seek time and increase query performance. Filtered indexes will also utilize less space on disk because the index does not have to store a record for every row within the table. We will discuss some tips and recommendations in the “Creating Filtered Indexes” section later in this chapter.
XML Indexes
SQL Server 2008 supports indexes on the XML data type. XML indexes support two types: a primary index and a secondary index. The primary XML index must be created first and represents all of the tags, data, and paths for each row in the XML column within the table. To increase performance, you can create secondary XML indexes on the path, value, and properties of the XML column depending on how the XML columns are queried. Once you understand the data that will be retrieved from the XML column, spend some time designing the appropriate index strategy on the column.
Compressed Indexes
In Chapter 9, we discussed compression in great detail. We just want to reiterate that data compression is a configurable option for clustered and nonclustered indexes. The configurable options allow both row and page compression. Please review the “Compression” section in Chapter 9 for additional information.
Other Index Concepts and Terminology
The following sections describe other terms and concepts that you&ll encounter when talking about indexes. Understanding and applying these concepts will increase your chances of creating effective and useful indexes.
Include Columns
Include columns are non-key columns stored on the leaf level of nonclustered indexes. Keep in mind that key columns of nonclustered indexes are stored at the intermediate and leaf levels of indexes, while include columns are only stored on the leaf levels. Include columns also allow you to bypass the restrictions set for the composite keys by allowing you to have more than 16 columns of a size larger than 900 bytes. You can have 1023 columns in an INCLUDE statement without a size limit on disk. The primary benefit of include columns and composite keys stem from the usefulness of covering your queries.
Covering Queries
Covering your query generally means having the values needed for the SELECT clause and the WHERE clause available in your nonclustered indexes. Because the data is available in your nonclustered indexes, SQL Server does not have to perform costly lookup operations to gather the remaining information needed for the query. Your first thought may be to cover all queries, but there is a cost associated with that. You have to be careful and determine just which queries you want to cover based on the priority of the queries within your system.
Searchable Arguments
Searchable arguments (SARGs) are mentioned in SQL Server when discussing methods for minimizing or filtering the results of a query. In other words, a searchable argument is used when comparing a constant to columns in WHERE clauses and ON statements in a JOIN clause. Examples of searchable arguments include the following:
LastName = 'carstarphen'income > 50000birthMonth between 'January' and 'February'jobTitle like '%Administrator%'
Using SARGs are the methods SQL Server uses to identify an index to aid in data retrieval. When creating indexes, you definitely want to think about the frequently accessed searchable arguments used by the application.
Cardinality
When creating indexes in SQL Server, you always want to think about the cardinality of your data. Cardinality in SQL Server refers to the uniqueness of the data within the columns. The higher the cardinality, the less the data is duplicated in a given column. The lower the cardinality, the more the data is the same within the column. The query optimizer will utilize the cardinality of the data when determining the most efficient execution plan to use.
Indexes that have a lot of duplication, or low cardinality, will not be nearly as useful as an index with very little duplication, or a high cardinality. Think about a person table that has three columns in it: Social Security Number, Age, and Favorite Color (only basic colors). The Social Security Number column will have a higher cardinality than the Age column, which will have a higher cardinality than Favorite Color. When creating your indexes, you want to create them on Social Security number first, followed by age, and then by color if you absolutely have to. Clearly, looking for someone&s Social Security number will be faster than finding a person by their favorite color. You are going to return more rows when searching by colors, requiring some additional filtering after returning the data.
Creating Indexes via T-SQL
The terminology discussed in the previous section is important for understanding the rest of the chapter, as well as for conversation and training sessions that you attend with other database administrators. However, there is more to creating indexes then just knowing the syntax and following tips and recommendations that you find from various sources. As a database administrator, you must ensure that the indexes created on your system do not hinder performance rather than improve it.
Understanding the usage patterns of your applications significantly improves your decision making when determining the indexes you create on your system. Because of the volume of queries executed on a system, covering every query with an exact index is usually not the best thing to do. When you understand the usage patterns of an application, you can make better decisions in terms of prioritizing the importance of frequently executed queries. Determining the indexes to create on your system then becomes an easier task.
Creating Clustered and Nonclustered Indexes
Creating clustered and nonclustered indexes in SQL Server is one of the fundamental tasks of database administrators. The general syntax is the same for creating each type. However, the issues to think about when you&re in the planning stage can be different.
Issues When Creating Clustered Indexes
As discussed earlier, clustered indexes determine the order of the data for each table and are accessed frequently. When choosing your clustered indexes, think about the following points:
- Data accessibility: Think about how the data within the table is utilized and accessed. Are you going to be adding, updating, and deleting records often? Are you going to be bulk loading data daily or monthly and then retrieving data from the table all day long? Understanding the accessibility of the data will help you determine the key value.
- Narrow keys: Remember that every nonclustered index will contain the clustered index key. So large clustered index keys could potentially cause fragmentation problems in nonclustered index pages. Just keep narrow keys in mind while determining the clustered index key.
- Uniqueness: Unique values for clustered index keys enable queries that use the clustered index (as well as queries that use the nonclustered index and need to lookup the data associated with the data row locator) more efficient. SQL Server has to force uniqueness when data is inserted into a clustered index, which cost IO and processing time. Creating a unique key yourself is the preferred method.
- Sequential keys: Consider choosing a clustered index key that is sequential in terms of time or numbers. If the order of your clustered key is sequential, then inserting data will always occur in a fashion that minimizes page splits. The data is added to the end of pages, minimizing the cost of ordering all of your data.
- Static keys: Choose clustered index keys that will not be modified. If the modification of the clustered index key occurs, then all of the nonclustered indexes associated with the key will also require updates. The table will also have to reorder the data if the key value moves to another page. Clearly, you can see how costly this operation would be on your system if updates happened frequently.
- Order By columns: Columns that are often used in
ORDER BYclauses may be candidates for clustered indexes. Remember, the data will be ordered based on the key values in the clustered index creation. JOINclauses: The primary table that contains the column used for joining multiple tables together may prove to be beneficial for clustered indexes. This option really coincides with understanding your data and usage patterns.
Think seriously about these issues when creating a clustered index because the performance of your application depends on your making correct and reasonable choices.
Issues When Creating Nonclustered Indexes
There are a number of items to consider before creating nonclustered indexes. Nonclustered indexes are equally important as the clustered indexes that we just discussed. In fact, you might find that you rely on nonclustered indexes more than on your clustered indexes to fulfill the requests of queries. Following are some things to think about:
- Data accessibility: Yes, accessibility is important for nonclustered indexes, too. Think about your data access patterns a step further than you did with the clustered indexes. Clustered indexes focus on the structure of your data. Nonclustered indexes should focus on the various types of questions that the data will answer. For example, how many accounts were opened in the past week?
- Priority queries: Make sure you start creating indexes for the highest priority, most frequently accessed queries first. If you focus on the highest priority queries first, you will ensure that the response time of the application is sufficient while you work on the other queries over time.
- Cover your queries: When determining the index keys for your high-priority queries, think about covering your queries. Depending on the query, you may want to cover the
SELECTandWHEREclauses of those queries. Spend some time analyzing your queries and determining what the best strategy is to cover the queries. - Don&t cover everything: Although SQL Server allows you to cover every column in a query, that doesn&t mean you should. Just because you increase the performance of one query does not mean you will not impact the other queries that write to that table.
- Don&t over index: Remember, all the data for the key values that you choose will be stored in the nonclustered index as well as in the table. Every time the table is inserted, updated, or deleted, every nonclustered index whose key columns are modified will be impacted. Be careful not to over index a table such that performance is impacted. Review the “Post-Index Creation” section for more information on determining the cost of writes to indexes.
- Uniqueness: Try to create nonclustered indexes on key columns where the cardinality or selectivity is high. The query optimizer will be more likely to use those nonclustered indexes instead of doing a table scan.
JOINclauses: Pay attention to columns listed inJOINclauses. Parent/child joins are common. Parent tables are typically accessed through their primary keys, which often correspond to their clustered indexes. What is often overlooked, though, are the foreign key values in the child tables. Consider indexing those using nonclustered indexes. For example, you might create a nonclustered index on the order_number column in a line_items table.
Nonclustered indexes will be utilized frequently within your application and can provide significant performance improvements. Just keep in mind that adding nonclustered indexes incorrectly could potentially cause performance problems. So plan your indexes before implementation.
Creating an Index
Finally, we will actually create some indexes. The syntax for index creation is fairly straightforward. The following script shows the create index syntax:
CREATE [CLUSTERED | NONCLUSTERED] INDEX index_name

ON <object>(column [ASC | DESC], [,...])

[INCLUDE ( column_name [,...n])

[WITH (relational_index_options [,...n])
The preceding code shows you how to build composite indexes, which are indexes with multiple columns. You can also see the syntax for specifying the relational index options that you want to use. Let&s go ahead and use the syntax in some examples. The first two examples create a clustered and nonclustered index with the default option values:
USE AdventureWorks2008

GO


CREATE CLUSTERED INDEX ix_bookId

ON apWriter.Books(bookId)


CREATE NONCLUSTERED INDEX ix_Title

ON apWriter.Books(Title)
As you create more indexes, you should take advantage of relational index options. When you create an index, you can specify the following:
ALLOW_ROW_LOCKS: Allows the Database Engine to use row locks if it deems them necessary.ALLOW_PAGE_LOCKS: Allows the Database Engine to use page locks if necessary.DATA_COMPRESSION: Identifies the type of compression you want used for the clustered and nonclustered indexes. The available options are as follows:NONE(indicating that you don&t want the data compressed),ROW(to compress data row by row), andPAGE(to compress entire pages at a time).DROP_EXISTING: Allows the dropping of a named index prior to rebuilding the index. The index names must be identical, even though you can change the definition of the index. We have mixed feelings about using this option. It removes the benefit of online index operations, which allow the index to still be used during the rebuild process. If you need to change the definition of an index, you can create another index and drop the previous one once you are done. On the other hand, this option is helpful if you are recreating an index mentioned in any hints that your application places into its queries. Obviously, you would want your newly rebuilt index to have the same name in that case. Regardless of our opinion, the choice exists for you to use.FILLFACTOR: Determines how much free space remains on a leaf level page when creating and rebuilding indexes. The default value is 0, or 100% full. We generally specify a lesserFILLFACTORoption on indexes that are going to have records inserted within the index instead of at the bottom or end of the page. That&s because writes that result in new index entries in the middle of a page can lead to page splits. Frequent page splits will influence performance because of the cost of the split and fragmentation created within the index.IGNORE_DUP_KEY: Prevents records that violate a unique constraint from causing the entire batch inserts or updates to fail. Without enabling this option, one record that violates the unique constraint will cause all the records not to be written to the table.MAXDOP: Gives you the opportunity to override the server setting for the maximum degree of parallelism used for the index operations. The available options are as follows: 1 (prevents parallel execution), any number greater than 1 (specifies the number of parallel executions allowed up to 64), and 0 (uses the appropriate number of processors based on the current load of the system).ONLINE: Allows you to create, rebuild, or drop indexes without preventing user access to the data in the underlying table. By default, this option is set to off, which causes the underlying table to be locked, thereby preventing user access. Tables that contain large object (LOB) data types like Varchar(Max), Varchar(Binary), and XML, cannot be rebuilt while online. There are also a couple of other conditions that prevent online index maintenance. Consider usingONLINEwhere possible to limit the impact of index maintenance to your application users. Online index operations are Enterprise Edition features only.PAD_INDEX: When specified withFILLFACTOR, determines the amount of free space stored on the intermediate level pages of an index. ThePAD_INDEXoption will use the same percentage specified in theFILLFACTORoption. The intermediate level page has to be large enough to store at least two records, and if theFILLFACTORis not large enough, then the Database Engine will override theFILLFACTORpercentage internally.SORT_IN_TEMPDB: Identifies the location where the temporary sorting of the index will take place. Iftempdbis stored on a separate physical drive from the data, then the index creation process should complete in a shorter amount of time. Bear in mind, though, that sorting the data in a separate database requires that SQL Server move the data to that target database. For that reason, sorting intempdbincreases the amount of disk space needed over the default behavior.STATISTICS_NORECOMPUTE: Gives you the option not to update statistics after the index is created or rebuilt. The default value is no, which forces the statistics to update automatically. You may want to experiment with this option ifAUTO UPDATE STATISTICSis giving you a problem, specifically on larger tables.
Now let&s create some covering indexes with composite keys and include columns. You can also play with some of the relational index options. The following code example demonstrates the creation of a composite key with the FILLFACTOR option set to 75% and online operations turned on. The FILLFACTOR for this index is set because you can easily see new people being added and the index having to make room for their last names to fit on the respective pages. The goal is to minimize the page splits every time a new person is added, so we leave some free space on the leaf level pages at creation time.
USE AdventureWorks2008

GO


CREATE NONCLUSTERED INDEX ix_peronName

ON person.Person(LastName, FirstName, MiddleName)

WITH (FILLFACTOR = 75, ONLINE = ON, MAXDOP = 2)
Now, let&s say you have decided that you want the middle name as a key value for the previously created index. Since the middle name is returned in most of the queries, you decide to include the middle name to reduce lookups on the primary key. You also don&t want to break the index hints that are in place, so you keep the same name. The following code shows an example of the DROP_EXISITNG option with an INCLUDE option:
USE AdventureWorks2008

GO


CREATE NONCLUSTERED INDEX ix_peronName

ON person.Person(LastName, FirstName)

INCLUDE (MiddleName)

WITH (FILLFACTOR = 75, ONLINE = ON, MAXDOP = 2, DROP_EXISTING = ON)
Lastly, we want to show you an example of using data compression with your index creation statement. The following code creates an index with page data compression enabled:
USE AdventureWorks2008

GO

CREATE NONCLUSTERED INDEX ix_peronName6

ON person.Person(LastName, FirstName, MiddleName)

INCLUDE (Suffix,Title)

WITH (FILLFACTOR = 75, ONLINE = ON, DATA_COMPRESSION = PAGE)
Compression not only saves disk space, but sometimes it can actually increase performance. That&s because using compression means more entries can fit on a page, resulting in fewer pages of IO.
Creating Unique and Primary Key Indexes
Creating unique and primary key indexes are methods of ensuring distinctness within key columns. Remember a table can have only one primary key but multiple unique indexes. Unique indexes can exist as both clustered and nonclustered indexes. Frequently, the primary key is the clustered index on a table. Creating unique indexes requires you to understand the data. The following list provides some things you should consider before creating primary keys and unique indexes:
- Uniqueness within the data: Make sure the keys of an index will truly be unique within the context of the data. Think through as many scenarios as possible prior to implementing a unique index. When designing a database environment, some things sound like they should be unique when in actuality opportunities for duplication exist. For example, you may decide that every Social Security number will be unique within your environment. That sounds great until you get a duplicated Social Security number. (Trust us, it happens.) Make sure you think through your unique keys so that you don&t create a constraint that will come back to haunt you down the road.
- Nulls in key columns: Keep in mind that primary keys force uniqueness and don&t allow nulls in the key columns, whereas unique indexes do allow nulls.
- Updates to keys: You can update the key of a unique index, but not the key of a primary index.
- Query optimizations: Don&t overlook possible query optimizations that can come about from choices you make at index creation time. For example, when you are creating an index on one or more columns and your data is such that it is valid to create that index as a unique index, then do so. A unique index helps the query optimizer by letting the it know that the data within the key will be unique. Don&t miss out on the opportunity to improve the performance of your system by not taking advantage of unique index creation opportunities.
The syntax for creating a unique clustered or nonclustered index is similar to that for creating clustered and nonclustered indexes. The only difference comes from the keyword UNIQUE. By default, primary key constraints create unique clustered indexes, and unique constraints create unique indexes. However, you are the one in control. If you want the primary key represented by a unique nonclustered index, then you can create the index that way. The following code demonstrates how to create unique indexes:
CREATE UNIQUE [CLUSTERED | NONCLUSTERED] INDEX index_name

ON <object>(column [ASC | DESC], [,...])

[INCLUDE ( column_name [,...n])

[WITH (relational_index_options [,...n])
Now that you understand the syntax, review the following code and create a unique clustered and nonclustered index:
USE AdventureWorks2008

GO


CREATE UNIQUE CLUSTERED INDEX ix_bookId

ON apWriter.Books2(bookId)

WITH(ONLINE = ON, FILLFACTOR = 95, DROP_EXISTING = ON)


USE AdventureWorks2008

GO

CREATE UNIQUE NONCLUSTERED INDEX ix_AuthorTitle

ON apWriter.Books2(Title)

WITH(IGNORE_DUP_KEY = ON, ONLINE = ON, DROP_EXISTING = ON)
The first code example re-creates a clustered index on the example database, specifying the FILLFACTOR and an online index operation. The second example re-creates an index, using the same name but removing a key column. The re-creation is done with the index online. The option IGNORE_DUP_KEY is enabled, preventing records that violate unique constraints from causing the entire batch modification to fail.
Creating Filtered Indexes
With the introduction of filtered indexes in SQL Server 2008, you can create indexes for subsets of data. The data stored within a filtered index is restricted only to rows meeting the WHERE clause that you specify. Consider filtered indexes as nonclustered indexes optimized for performance. With a smaller subset of data, retrievals from a filtered index will be faster, storage of the index on disk will be smaller, and maintenance of the index will cost less and happen less frequently because writes only occur when data meeting the filter specification is modified. The following list describes some things that you should consider before creating filtered indexes.
- Data accessibility: When creating filtered indexes, understanding your data is even more important. Make sure that your filtered indexes will be for subsets of data that are meaningful for your application. If you frequently query only Ford automobiles by the number of seating positions, then a filtered index on
number_of_seatsspecifying wheremake="Ford"might make sense. But specifyingwhere make="GM"in that case would be silly. - Choose subsets wisely: When deciding to create a filtered index on a subset of data, make sure the query optimizer will find the filtered index useful. Think about using filtered indexes to help queries that filter through unpopulated key values or useless values that the application does not care about. Have you ever supported an application that stopped using a particular value in a field? The primary type of data queried used to be 1-3, but now the new version of the application only populates and retrieves values 5-7. Filtered indexes are useful in such scenarios because they keep currently unused key values out of your nonclustered indexes.
- Cover your queries: Make sure the query optimizer utilizes your filtered indexes by ensuring that they cover the intended queries. Limit the number of includes and key columns that exist in the filtered indexes. If the performance of your queries is fast enough just from creating filtered indexes alone, then you may not even have to add any include columns to those indexes. The bottom line: Make sure unused columns are not added to your indexes.
To create a filtered index, write a WHERE clause into your creation statement. The following syntax shows how and where to do that:
CREATE [CLUSTERED | NONCLUSTERED] INDEX index_name

ON <object>(column [ASC | DESC], [,...])

[INCLUDE ( column_name [,...n])

WHERE <filter_predicate>

[WITH (relational_index_options [,...n])
One example to demonstrate the usefulness of filtered indexes comes from an invoice system. Companies often provide goods and services for their customers and bill them later. These companies keep track of the invoices that they mail their customers and often generate reports or retrieve information pertaining to the unpaid invoices. With filtered indexes, you can create an index that only contains unpaid invoices. Such an index might be very useful when created on a table containing all invoices. Imagine a collection group that queries the table a number of times to contact customers for payment. Having a small index specifically covering customers with amounts due will tend to make the collection&s groups queries run faster than they would if they each had to slog through an index including all of the older, paid-for orders.
The following code is an example of a script that creates a table and the appropriate indexes for the scenario we&ve just described:
USE AdventureWorks2008

CREATE TABLE dbo.Invoice

(

 InvoiceId INT IDENTITY(1,1),

 CompanyName VARCHAR(200),

 isPaid smallint

)

GO


CREATE CLUSTERED INDEX ix_Invoice

ON dbo.Invoice(InvoiceId)

GO


CREATE NONCLUSTERED INDEX ix_FilterUnPaid

ON dbo.Invoice(inVoiceStatus) include(companyName)

WHERE isPaid = 0
Reviewing this code, you can see that it creates an invoice table, a clustered index, and a nonclustered index. The nonclustered index is the filtered index that restricts data to rows where isPaid = 0. If you want to see the indexes work, use the following code to add data to the table:
INSERT INTO dbo.Invoice

(CompanyName,isPaid)

VALUES('Apress',0),

('Apress1',0),

('Sylvester123',1)
Once you have inserted the data, execute the query in Listing 10-1. Results of the query are shown in Figure 10-3.
Listing 10-1. SQL Query Used to Retrieve Information from the Invoice Table with isPaid = 1.
SELECT CompanyName

FROM dbo.Invoice

WHERE isPaid = 1
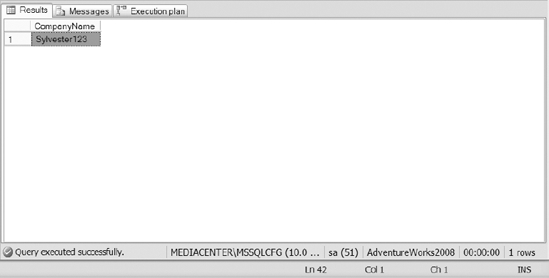
Figure 10-3. The results of Listing 10-1
To view the indexes utilized during execution of the query, turn on the option to Include the Actual Execution Plan and re-run the preceding query. Figure 10-4 shows the execution plan used for the query.
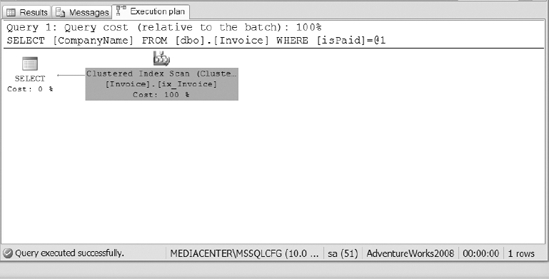
Figure 10-4. The execution plan from Listing 10-1
The plan in Figure 10-4 shows that the query executed using the clustered index on the invoice table. The filtered index was not used because it only covers the case where isPaid=0, not where isPaid=1.
So the index scan has to be performed on the clustered index. Now let&s see what happens when you modify the query to retrieve data that has not been paid. Execute the query in Listing 10-2 and see the results in Figure 10-5.
Listing 10-2. SQL Statement to Retrieve the Invoices from the Invoice Table Where isPaid = 0
SELECT CompanyName

FROM dbo.Invoice

WHERE isPaid= 0
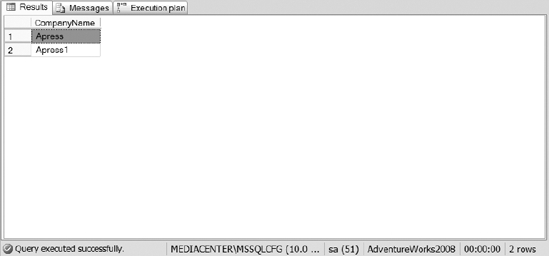
Figure 10-5. The results of Listing 10-2
Now, review the execution plan of Listing 10-2, as shown in Figure 10-6. This time it shows that the optimizer was able to use the filtered index.
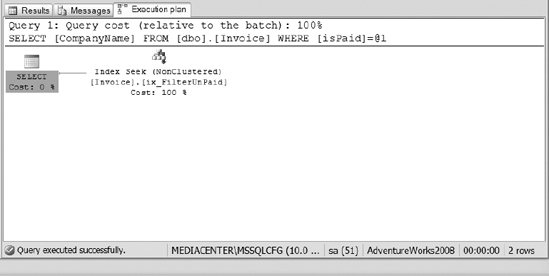
Figure 10-6. The execution plan for Listing 10-2
Filtered indexes can be very powerful. Don&t go crazy with them, but it&s worth researching to see whether you have opportunity to use them in your own environment.
Creating XML Indexes
SQL Server 2008 allows you to create two types of indexes on your XML data types: a primary XML index and a secondary XML index. Combined, the two index types cover the paths, values, properties, and tags within your XML column. Before creating XML indexes on a table, you must first create a clustered index. The clustered index is required in XML indexes to make sure that XML indexes can fit into existing partition schemas. Keep in mind that XML columns are large, as large as 2 GB, and that they are stored in binary large objects (BLOBs). If your application is utilizing XML columns frequently, you may want to spend some time understanding how XML indexes can benefit your system. The syntax for creating a primary and secondary index is straightforward:
CREATE [PRIMARY] XML INDEX index_name

     ON <object> (xml_column_name)

   [USING XML INDEX xml_index_name

    [ FOR { VALUE| PATH | PROPERTY} ] ]

[ WITH ( <xml_index_option> [ ,...n] ]
You will notice that an option exists to specify whether you are creating a primary XML index. When creating a secondary XML index, you simply employ the USING XML INDEX option to identify which primary XML index you are associating the index to. Then specify the FOR option to say whether your secondary index will be a value, path, or property index.
Let&s create a table that stores XML execution plans. We&ll use that table as the basis for creating primary and secondary XML indexes. Remember, we need a clustered, primary key on the table in order to create a primary XML index. Here&s the table creation statement:
CREATE TABLE execPlans

( execPlanId INT IDENTITY(1,1),

 executionPlan XML


CONSTRAINT [PK_execPlans] PRIMARY KEY CLUSTERED

(

 [execPlanId] ASC

))

GO
Primary XML Indexes
You must create a primary XML index before creating any secondary indexes. A primary XML index arranges all tags, paths, and values of the data stored in the XML column. A primary XML index breaks an XML string down into multiple rows that represent the nodes of the XML BLOB. The values of the tags are returned when the XML column is queried. Because primary XML indexes contain the values of the tags, using primary XML indexes increases the performance of your queries when looking for values within the XML column.
The following example shows you how to create a primary XML index on the recently created table:
CREATE PRIMARY XML INDEX pindexExecPlan

ON execPlans(executionPlan)


GO
Secondary XML Indexes
After you have created a primary XML index on a column, you have the option of creating one or more secondary XML indexes on the same column. There are three types of secondary XML indexes that you can create: path, value, and property. The type of queries executed against the column should drive the secondary index types that you create. For example:
- Creating a path index may increase the performance of application queries searching for paths within an XML document.
- A secondary index on a specific property can help queries that look at specific property values within one or more XML tags.
- Create value indexes to support queries that look at specific values enclosed by XML tags.
Now, let&s create a secondary index that is a path index because we frequently look for missing index tags within the XML string. Here is our secondary index creation statement:
CREATE XML INDEX sindexExecPlan

ON execPlans(executionPlan)

 USING XML INDEX pindexExecPlan

 FOR PATH
Creating Indexes Using the GUI
SQL Server Management Studio (SSMS) allows you to create clustered and nonclustered indexes from a GUI interface. Often times, we utilize SSMS to review the include columns of an index or to modify an index quickly. The purpose of this section is to ensure that you can create and modify clustered and and nonclustered indexes from within SSMS.
Creating an Example Table
First connect to an instance of SQL Server 2008 using SSMS and navigate to the database of your choice. To make sure you have a common starting point, create a table with five columns. Review the GUI creation of the table, shown in Figure 10-7. For simplicity, the name of the table is table1 with column1, column2, and so on. Make one of the columns (say, column1) an integer, and specify it as the identity column. The remaining data types of the other columns are not important, but for demo purposes, make sure the columns are not BLOB data types.
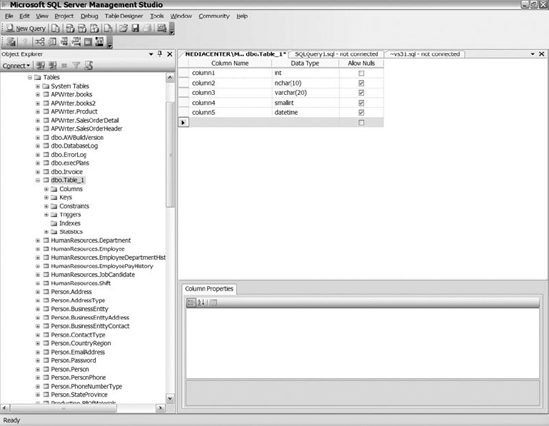
Figure 10-7. Column creation within the GUI
Once you have added the columns, save the table, name it, and exit the column creation screen. Next, navigate to the table you just created by expanding the Tables folder. Once you arrive at the table, click on the plus sign next to the table name and select the Indexes folder. That section should be empty.
Creating a Clustered Index via the GUI
To create a new index, right-click on the Indexes folder and select New Index. Figure 10-8 shows the General section of the index creation screen.
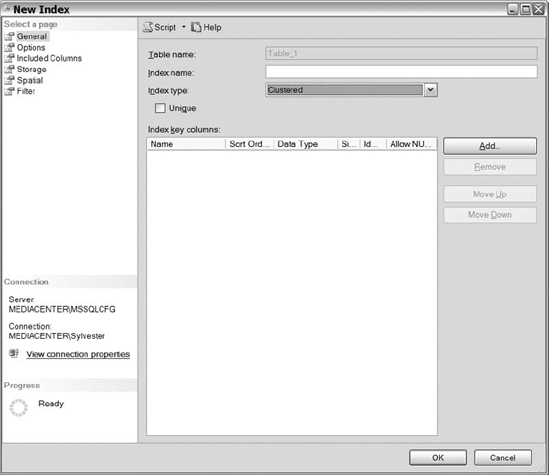
Figure 10-8. The General section in the New Index dialog box
In the General section, name your index by populating the Index Name text box. Then, click on the Index Type drop-down list and select the type of index. You can choose from Clustered, Nonclustered, Primary XML, and Spatial. For the current example, select the Clustered index option, and then click on the Add button. You&ll be taken to a Select Columns dialog, resembling Figure 10-9. The dialog displays all the columns within the table. Select the identity column that you created for your clustered index and click OK.
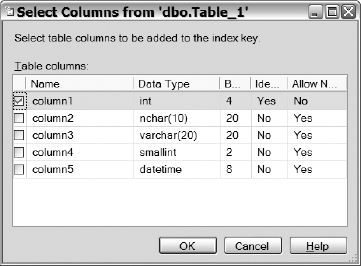
Figure 10-9. The Select Columns dialog for adding columns to an index
After you have selected the columns that you want added to the index, there should be information about the column(s) displayed for you under the Index Key Columns area, shown in Figure 10-10. Review that area and determine if additional columns are needed and that you have selected the correct columns. If you want the key columns to be unique, check the box for that option.

Figure 10-10. The New Index dialog after you have selected the index columns
Once you reviewed the information in the General section, select Options. The Options section (see Figure 10-11) lists the relational index options that we discussed earlier. Select the relational options that you want enabled on your indexes. Remember, you must enable the Set Fill Factor option in order to select the Pad Index box. Leave the fill factor at 100% for this example because the clustered index key has been created as an identity column. An identity column always increases in value, meaning that new entries will always be added to the end of the index, never into the middle.
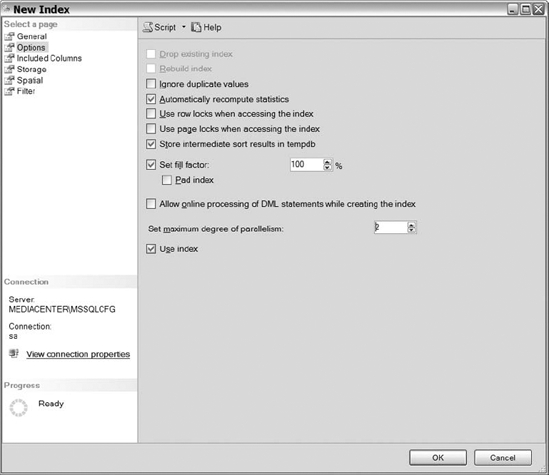
Figure 10-11. The Options section in the New Index dialog
The next set of configurable options available for the clustered index is in the Storage section, shown in Figure 10-12. The Storage section allows you to determine what filegroup an index will be stored on. You can also enable online index operations by checking the box Allow Online Processing of DML Statements While Creating the Index. (Remember that online index processing is an Enterprise Edition feature.)
![]() Note As discussed in the Chapter 2, spreading your indexes across multiple physical drives may provide performance improvements. To do this, create separate filegroups and then assign different indexes to different filegroups.
Note As discussed in the Chapter 2, spreading your indexes across multiple physical drives may provide performance improvements. To do this, create separate filegroups and then assign different indexes to different filegroups.
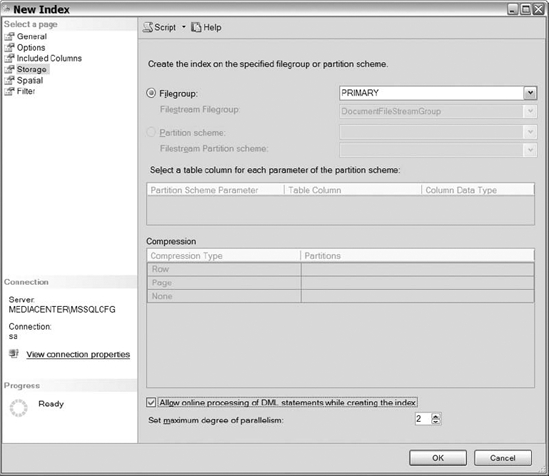
Figure 10-12. The Storage section in the new index creation process
There are three remaining sections: Included Columns, Spatial, and Filter, but they don&t apply to clustered indexes. Ignore those, and click on OK to create your new index. You should see the created index under the Indexes folder on the left side of your SSMS screen. You may have to refresh the folder before the index shows up.
Creating a Nonclustered Index via the GUI
Now that you have created a clustered index, let&s go through the process of creating a nonclustered index. Right-click on the Indexes folder and select New Index. In the General section, shown in Figure 10-13, populate the name of your index and select Nonclustered as the index type from the drop-down list. Click on the Add button, and select the columns that you want for the index key. For this demonstration, select two columns: column2 and column3. Click on the OK button, and you will see the two columns that you added listed in the Index Key Columns area. You will also notice that the Move Up and Move Down buttons are now active. They allow you to place the index keys in the order of your choosing for improved efficiency when covering your queries. Pay close attention to the order of your index keys—the usefulness of an index depends on it.
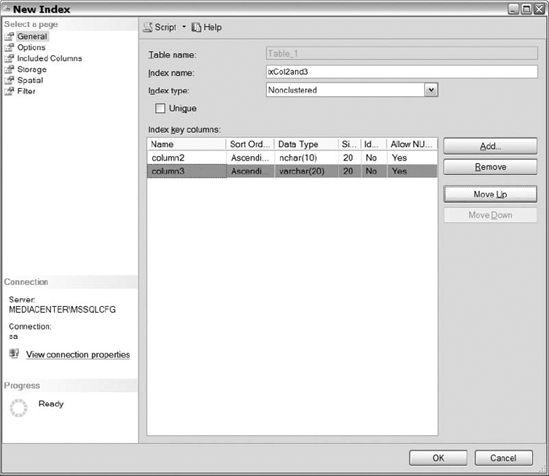
Figure 10-13. The General section of the New Index dialog during creation of a composite nonclustered index
The Options section lets you specify relational index options for nonclustered indexes. Because we talked about this section already, we are going to move on to the Included Columns section. Keep in mind, included columns are those that are stored on the leaf level pages of a nonclustered index to aid in covering your queries.
Figure 10-14 displays the Included Columns page. Click on the Add button to specify columns that you want included. Adding nonkey columns to the Included Columns section works the same as adding key columns to the index. Click Add, choose the columns you want, click OK, and the nonkey columns area is populated with the columns you selected. Remember that the clustered index key is stored on all leaf level pages, so there is no need to include the clustered index column.
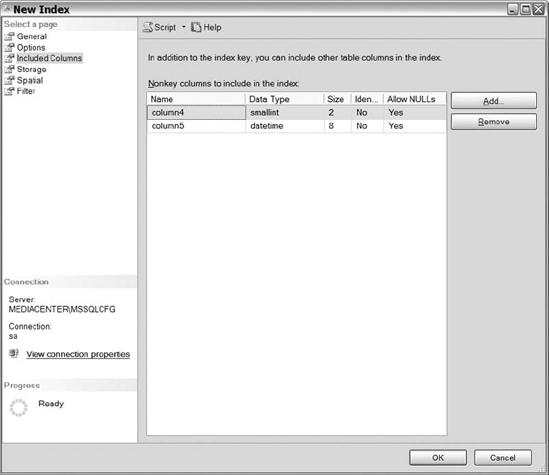
Figure 10-14. The Included Columns section of the new index creation process
The last section of the New Index dialog is the Filtered section, shown in Figure 10-15. The Filtered section enables you to designate the FILTER clause to apply to a nonclustered index. The area consists of a big white box for you to add your filter, which is essentially a WHERE clause that you would write in any SQL query. However, do not write the word “where.” Simply write one or more conditions, such as the one shown in Figure 10-15. Separate those conditions using keywords like AND and OR.
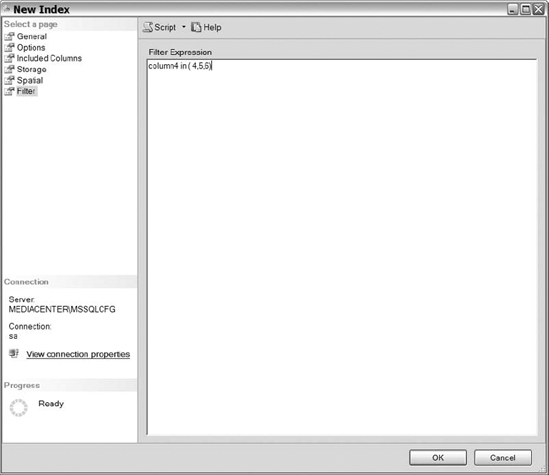
Figure 10-15. The Filter section in the new index creation process
Post-Index Creation
Creating indexes within SQL Server is an art, not a science. The tips, tricks and recommendations for creating indexes are useful starting points. If you think you can just follow that information, create the indexes in your environment, and not have to worry about indexes again, then you are mistaken. The more complex the system, the harder it is to apply best practices without your personal modification. As the database administrator, your role is to add your own flavor, the artistic piece to your database system to make sure everything runs as smoothly as possible. We would love to provide you with some gold nuggets, some guaranteed rules that will work in every environment, but the truth is that everything depends on the environment you are supporting. However, we will provide you with some processes that we do before and after creating indexes to ensure that they are helping our environment and not hurting it.
Performance of Insert, Update, and Delete Statements
Keep an eye on the performance of insert, update, and delete statements before and after adding indexes to a table. To that end, be sure to gather statistical data about a table before adding an index to it. Following is some of the information that we gather before adding indexes:
- The row count and size of the table in bytes: The number of rows and the table&s projected growth in terms of rows and size helps you determine the amount of time that you spend analyzing the creation of the index. If the table is relatively small, and will remain small, but there is just a slow application query running against it, then you should quickly add an index and move on. If the poorly performing query is on a large table with a large number of records, then you should spend more time in the analysis phase.
- The current list of indexes that exist on the table: The indexes that exist on the table are important for a couple of different reasons. You want to make sure you know what indexes exists so you don&t duplicate an index. Reviewing the current indexes on a table may also lead you down the path that determines that you don&t need to create an additional index. You may be able to add an additional clause in your query to take advantage of an existing index or just include a column to an existing index.
- The average response times of frequent queries against the table: The response times of the queries that are frequently executed against the object in question are important. With them, you can determine what the performance of those queries is after the index addition. The last thing you want is to speed up one query and dramatically slow down the other queries.
- The frequency and type of access to the table: For example, is the table used for a lot of reads, or does it experience heavy write volumes? Understanding the type of access against the table will ultimately help drive your indexing strategy. If the table is heavily used for reads and very little for writes, then you can cover more queries and over index because of the little cost of writes. If the table is heavily used for writes or both reads and writes, then you have to consider the cost of the writes and be careful when covering your queries.
- The projected growth rate of the table: The projected growth rate just helps you plan your indexing strategy better. Just because a table is small today, doesn&t mean it will be small three, six, or 12 months from now. Make sure the index strategy that you deploy considers those facts.
Determining the speed of the writes on a table is essential prior to index creation. In SQL Server 2008, there are several methods for capturing this information. Those who control data access via stored procedures have it easy. You can query the system catalog for stored procedures that reference the table in question. Then you can capture the statistics on those stored procedures before and after you have created an index on the table and compare the results.
In order to gather the stats on your procedures or capture the queries executed against the objects, you can utilize SQL Server Profiler for access to that table, or you can query SYS.DM_EXEC_QUERY_STATS Dynamic Management View (DMV) and search for the queries that access those tables. Once you find the queries in the DMV, you can use the execution count along with total_elapsed_time and a series of other columns to quickly compute the average runtime of queries against the table. It doesn&t matter if you use SYS.DM_EXEC_QUERY_STATS or the Profiler—you should be able capture some statistics to use before and after the index creation on the table. Armed with information, go ahead and create the index that you plan to create, preferably in a test environment. For those who have good QA environments with load testing tools, then your environment may be a good place to verify that the index creation will not negatively affect the application. Set up your load testing tool to simulate a series of application functions, including the one that you plan on fixing with the addition of the new index. Hopefully, your tool will enable you to see the response times of all the queries giving you a good baseline. After you apply the index, re-run the test and compare your results. If the difference in response times is acceptable, then apply the index to your production environment and monitor your system. Monitor the averages of your queries to ensure their durations are acceptable to the application users. Monitor your indexes for as long as you need to make sure the performance is what you expected.
![]() Note One other useful DMV is
Note One other useful DMV is SYS.DM_DB_INDEX_USAGE_STATS. This view allows you to see how often a newly created index is actually used. We cover useful dynamic management views in the following section.
Useful Dynamic Management Views
When determining the usefulness of your indexes, identifying statistics on the queries that execute against objects, and validating some of the suggestions for index creations, we frequently use DMVs. The DMVs in question are SYS.DM_EXEC_QUERY_STATS, SYS.DM_DB_INDEX_USAGE_STATS, and the series of DMVs associated with the missing index feature in SQL Server 2008.
SYS.DM_EXEC_QUERY_STATS
The SYS.DM_EXEC_QUERY_STATS view captures the queries executed against SQL Server. The view gives information about CPU usage, the physical reads and writes, the execution times in terms of how long a query runs, the number of times it runs, and much more. See Figure 10-16 for some sample output from querying SYS.DM_EXEC_QUERY_STATS.
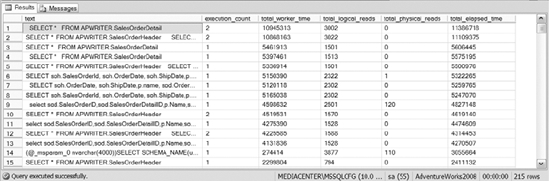
Figure 10-16. The output of the SYS.DM_EXEC_QUERY_STATS DMV
One of the most useful aspects of SYS.DM_EXEC_QUERY_STATS is that it provides you with the statistical information needed to determine whether write queries are performing in an acceptable time frame before and after index creation. Spend some time with this view to make sure you completely understand its usefulness.
SYS.DM_DB_INDEX_USAGE_STATS
SYS.DM_DB_INDEX_USAGE_STATS is extremely powerful when it comes to determining the usage of the indexes that exist on a table. The view provides the number of index scans, index seeks, lookups, and writes for each of the indexes that are queried in your system.
Using SYS.DM_DB_INDEX_USAGE_STATS, you can determine whether the indexes on a table are heavy on reads, heavy on writes, or both. The view will also show you how an index is performing right after creation. It is rewarding to create a new index, and then watch the number of seeks on that index skyrocket. That leaves you feeling like you are doing your job. See Figure 10-17 for sample output from querying this very useful view.
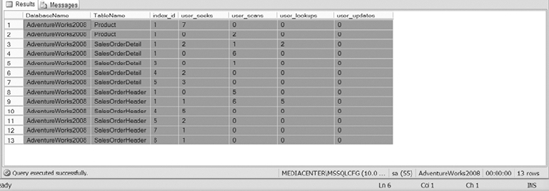
Figure 10-17. The output of the SYS.DM_DB_INDEX_USAGE_STATS DMV
Missing Index Dynamic Management Views
In SQL Server 2008, the missing index feature identifies opportunities for indexes to be created on your system. The query optimizer determines that an index would be utilized if an index that met certain criteria existed. The missing index views provide the recommended index key, include columns, and some usage statistics that indicate the index should be created.
Hopefully, you can see the performance implications of using the missing index DMVs, but for this section we would like to discuss another purpose. You can use the missing index views to help validate if the system agrees with an index that you want to create on your database. Granted, what the system thinks and what you think will be different from time to time, but there should be some similarities as well. Don&t go out and create every index suggested by the missing index views. Use the missing index views as a method by which you can validate your index creation ideas against what the system thinks prior to creation.
Using the SYS.DM_DB_MISSING_INDEX_DETAILS DMV, you can query the view to see all of the identified missing indexes for the instance or for a particular object. When you are evaluating the index that you want to create, take a quick peek at the results of the DMV to see if the system has identified that index as well. The following query retrieves the table name and columns that the system has identified as useful for queries.
SELECT OBJECT_NAME(object_id,database_id) TableName,

equality_columns,inequality_columns,included_columns

FROM SYS.DM_DB_MISSING_INDEX_DETAILS
Figure 10-18 shows the sample output of the preceding query. The equality_columns are column names that are used in queries with an equals sign, like title ='Pro SQL Server Administration'. The inequality_columns are column names that are utilized in queries with an inequality, like date < '2009-01-01'. The included_columns are columns that should be included in the index.
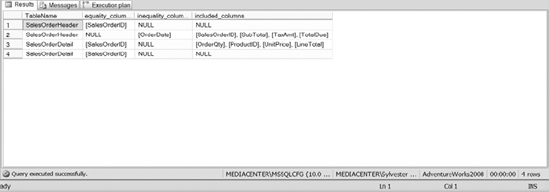
Figure 10-18. The results of SYS.DM_DB_MISSING_INDEX_DETAILS DMV
Putting It All Together
Throughout this chapter, we have covered numerous terms, strategies, and best practices for creating indexes. Understanding the tips and recommendations are important for creating an index strategy that increases the performance of your system. Reading words are helpful, but in our opinion, working with and seeing the examples are more beneficial.
This section demonstrates the terms and strategies discussed throughout this chapter. For each example, we show you the queries and their execution plans. The goal of this section is not to show you how to read execution plans, but to show you the performance difference displayed within execution plans for the various indexing options. There are entire books dedicated to nothing but indexing, so we won&t show you every indexing method example. However, this glimpse into the performance improvements for the various types of indexing should enable you to play with the different strategies within your environment.
Setting Up the Scenario
For the demonstrations in this section, we use a series of sales tables within the Adventure-Works2008 database. We would like you to create copies of those tables, move data into those copies, and create some indexes on them. We are going to use three tables: the sales header table, sales details table, and the product table. The following code sample creates the tables in a separate schema and moves data into them:
USE AdventureWorks2008

GO


SELECT *

INTO AdventureWorks2008.APWRITER.Product

FROM AdventureWorks2008.Production.Product


SELECT *

INTO AdventureWorks2008.APWRITER.SalesOrderDetail

FROM AdventureWorks2008.Sales.SalesOrderDetail


SELECT *

INTO AdventureWorks2008.APWRITER.SalesOrderHeader

FROM AdventureWorks2008.Sales.SalesOrderHeader
If you do not have the APWRITER schema created, then use a schema that exists on your system or create a separate schema just for the tables. Before we begin, let&s make sure you understand the relationship between the tables. The SalesOrderHeader table contains the information about when a sale was created. The SalesOrderDetail table contains a list of all of the details related to the sale. The Product table has the products that exist within each sale detail. In other words, SalesOrderHeader tables have order details and the order details have products. Enable the Include Actual Execution Plan option before you execute the following queries.
Table Scans
The first thing you notice if you query the three newly created tables is that the query optimizer does a table scan. As you can see, to retrieve all the data from a table, the table scan is not necessarily a bad option; however, retrieving specific records from within a heap table may prove costly. Enable execution plans in your query window, and execute the following queries. You&ll see their execution plans displayed in Figure 10-19.
USE AdventureWorks2008

GO


SELECT *

FROM APWRITER.SalesOrderHeader


SELECT *

FROM APWRITER.SalesOrderDetail


SELECT *

FROM APWRITER.Product
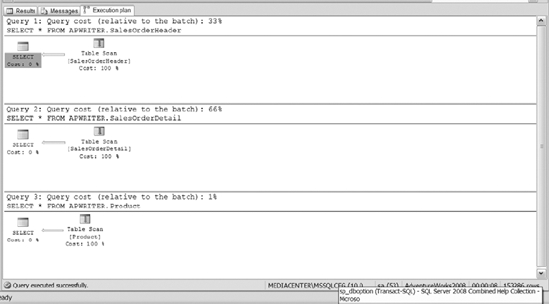
Figure 10-19. The execution plan of querying the three tables
Now instead of just retrieving all the data from the tables, you may want to retrieve specific results from each one of the tables. The following code retrieves specific information from joining the newly created tables. Figure 10-20 shows the resulting execution plan.
SELECT soh.SalesOrderId, soh.OrderDate, soh.ShipDate,p.Name, sod.OrderQty,

 sod.UnitPrice, sod.LineTotal

FROM apWriter.SalesOrderHeader soh JOIN apWriter.SalesOrderDetail sod

ON  soh.SalesOrderId = sod.SalesOrderId

 JOIN apWriter.Product p on sod.ProductId = p.ProductId

WHERE soh.SalesOrderId = 60941
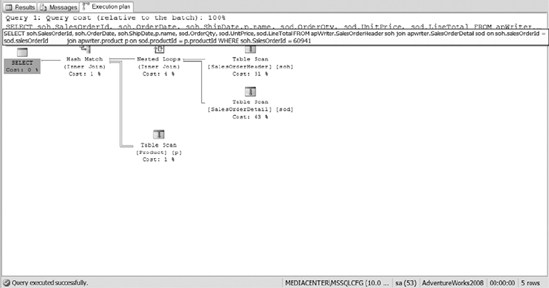
Figure 10-20. Joining multiple tables without any indexes
The execution plan and the response time suggest that joining multiple tables together via table scan is not the most efficient way to retrieve data. So the first rule that we would like to demonstrate is the benefit of creating clustered indexes on tables.
Clustered Index Seeks
The first two index creations in Listing 10-3 create clustered indexes on the SalesOrderHeader and Product tables. Then comes a query. Then the listing creates a clustered index on the SalesOrderDetail table. Finally, the query is executed again, showing the improvement from using a clustered index over the table scan.
Listing 10-3. SQL Script to Create Clustered Indexes and Retrieve Data from the Newly Created Tables
CREATE CLUSTERED INDEX ix_SalesOrderId ON

apWriter.SalesOrderHeader(SalesOrderId)


CREATE CLUSTERED INDEX ix_ProductId ON apWriter.Product(ProductId)
SELECT *
FROM apWriter.SalesOrderDetail
WHERE SalesOrderId = 74853
CREATE CLUSTERED INDEX ix_SalesOrderIdDetailId
ON apWriter.SalesOrderDetail(SalesOrderId,SalesOrderDetailId)
SELECT *
FROM apWriter.SalesOrderDetail
WHERE SalesOrderId = 74853
Figure 10-21 shows the execution plans from executing Listing 10-3. Notice the missing index message. You are notified of missing indexes by default in SQL Server 2008. The information in that message is the same that you could get manually by querying the missing index views described earlier.
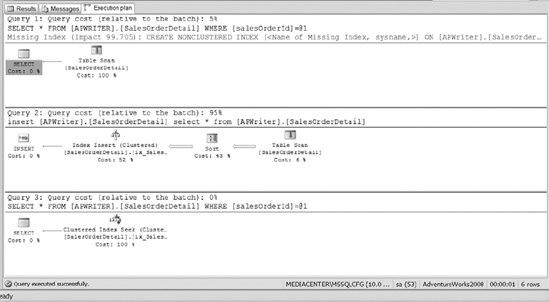
Figure 10-21. The execution plan of a table scan versus a clustered index seek
Also notice the cost difference between the table scan and the clustered index seek. If you run your multiple table query for a sales order, you will see that clustered index seeks are used instead of table scans. For example, execute the following query. You should see an execution plan like that shown in Figure 10-22.
SELECT soh.SalesOrderId, soh.OrderDate, soh.ShipDate,p.Name, sod.OrderQty,

 sod.UnitPrice, sod.LineTotal

FROM apWriter.SalesOrderHeader soh

 JOIN apWriter.SalesOrderDetail sod ON soh.SalesOrderId = sod.salesOrderId

 JOIN apWriter.Product p ON sod.ProductId = p.ProductId

WHERE soh.SalesOrderId = 74853
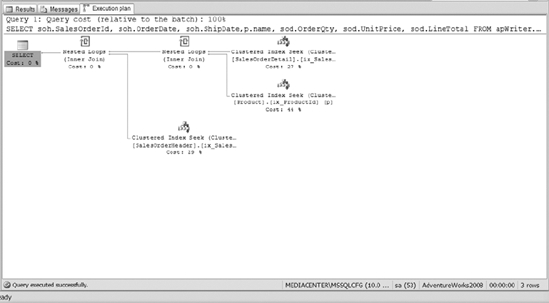
Figure 10-22. The execution plan of joining multiple tables using clustered index seeks
Covering Your Queries
Now that you have your clustered indexes created, think about what will happen if you want to retrieve all of the orders in a given time frame. Let&s run the following query. Figure 10-23 shows the execution plan.
SELECT soh.SalesOrderID,soh.SubTotal, soh.TaxAmt, soh.TotalDue

FROM apWriter.SalesOrderHeader soh

WHERE soh.OrderDate > '2003-12-31'

Figure 10-23. The execution plan of a query that retrieves a date range of orders
From looking at the execution plan in Figure 10-23, you can see that the query optimizer decided to do a clustered index scan to retrieve the data. That&s the same as scanning the entire table. The query optimizer decided that it was faster to scan the entire table than to use any of the indexes defined on the table. Of course, the only index that we&ve defined so far is not useful for the query we&ve just executed.
We can improve things by helping the query optimizer out. Execute the code example in Listing 10-4 to create a nonclustered index on the OrderDate column. Then the listing executes the query that was ran previously. Listing 10-4 adds an additional query to the listing to prove another point. You should see the same execution plan as shown in Figure 10-24.
Listing 10-4. SQL Script to Create Nonclustered Index and Query the Data for a Given Date Range
CREATE NONCLUSTERED INDEX ix_OrderDate ON apWriter.SalesOrderHeader(OrderDate)


SELECT soh.SalesOrderID,soh.SubTotal, soh.TaxAmt, soh.TotalDue

FROM apWriter.SalesOrderHeader soh

WHERE soh.OrderDate > '2003-12-31'


SELECT OrderDate,soh.SalesOrderID,soh.SubTotal, soh.TaxAmt, soh.TotalDue

FROM AdventureWorks2008.apWriter.SalesOrderHeader soh

WHERE soh.OrderDate = '2004-01-01'

Figure 10-24. The execution plan from the same query on which Figure 10-23 was based, but this time with a supporting index in place
After running the first query, you should have noticed that the query optimizer still uses the clustered index to retrieve the data in the date range and the nonclustered index for an equal query. Why is that? To help answer that question, let&s examine the execution plan of the second query in Listing 10-5. The query optimizer determines that it is faster to use the nonclustered index to find the specific order date and then do a lookup for the additional information required to fulfill the query results. Remember, the nonclustered index only contains the nonclustered index key and a row locator for the remainder of the data. The queries are looking for the subtotal, the tax amount, and the total due for an order. So when the query is looking for specific indexed data, like the second query, the query optimizer can quickly find that information using the nonclustered index.
On the other hand, the first query is looking for a range of data. The query optimizer decided that with the number of records that will be retrieved, it&s faster to scan the clustered index for the date range since no lookup is required. To prove the cost difference between the two indexes, the query in Listing 10-5 forces the query optimizer to use the nonclustered index on the order date for the first query. Figure 10-25 shows the resulting execution plan.
Listing 10-5. SQL Script That Forces SQL Server to Use the Nonclustered Index for the Date Range Scan
SELECT soh.SalesOrderID,soh.SubTotal, soh.TaxAmt, soh.TotalDue

FROM apWriter.SalesOrderHeader soh with(index(ix_OrderDate))

WHERE soh.OrderDate > '2003-12-31'


SELECT soh.SalesOrderID,soh.SubTotal, soh.TaxAmt, soh.TotalDue

FROM apWriter.SalesOrderHeader soh

WHERE soh.OrderDate > '2003-12-31'
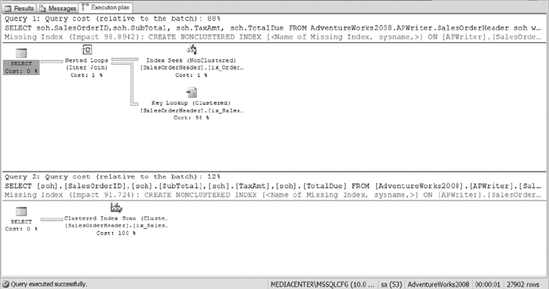
Figure 10-25. The difference between using the nonclustered index versus the clustered index for querying the OrderDate range
As you can see, the use of the nonclustered index included the bookmark lookups, and that plan is more costly than just scanning the clustered index. One thing you can do to increase the performance impact of the nonclustered index is to cover the query completely. Listing 10-6 shows an example of a nonclustered index created on OrderDate that includes the subtotal, the tax amount, and the total due columns.
To show the cost difference between using each index, the code forces the use of each of the different indexes that we&ve created. That way, you can see the difference between using a clustered index, the nonclustered index on order date, and the nonclustered index on order date with the include columns. Figure 10-26 shows the resulting execution plans. Clearly, you can see that the nonclustered index with include columns covering the query provides the most efficient method for accessing the data.
Listing 10-6. SQL Script That Creates a Nonclustered Index and Uses the Different Indexes That Exist on the Table
CREATE NONCLUSTERED INDEX ix_OrderDatewInclude

ON apWriter.SalesOrderHeader(OrderDate) INCLUDE (SubTotal, TaxAmt, TotalDue)


SELECT soh.SalesOrderID,soh.SubTotal, soh.TaxAmt, soh.TotalDue

FROM apWriter.SalesOrderHeader soh WITH (index(ix_OrderDate))

WHERE soh.OrderDate > '2003-12-31'
SELECT soh.SalesOrderID,soh.SubTotal, soh.TaxAmt, soh.TotalDue
FROM apWriter.SalesOrderHeader soh WITH(index(ix_OrderDatewInclude))
WHERE soh.OrderDate > '2003-12-31'
SELECT soh.SalesOrderID,soh.SubTotal, soh.TaxAmt, soh.TotalDue
FROM apWriter.SalesOrderHeader soh WITH(index(ix_SalesOrderId))
WHERE soh.OrderDate > '2003-12-31'
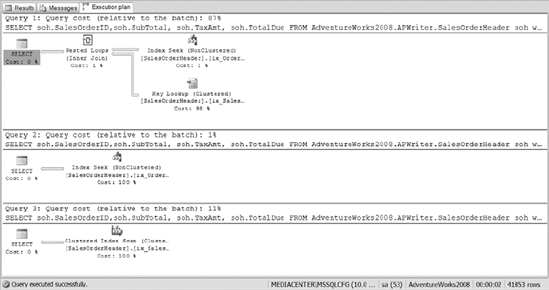
Figure 10-26. The comparison of the clustered index, the nonclustered index, and the nonclustered index with include columns
Indexing JOIN Criteria
Next, you want to retrieve all the orders that contain a certain product. Let&s query the SalesOrderDetail table to identify the records. Execute the following code sample. The resulting plan is shown in Figure 10-27.
SELECT sod.SalesOrderID,sod.SalesOrderDetailID,p.Name,sod.OrderQty

FROM apWriter.SalesOrderDetail sod JOIN apWriter.Product p

 ON sod.ProductId = p.ProductId

WHERE p.ProductId = 843
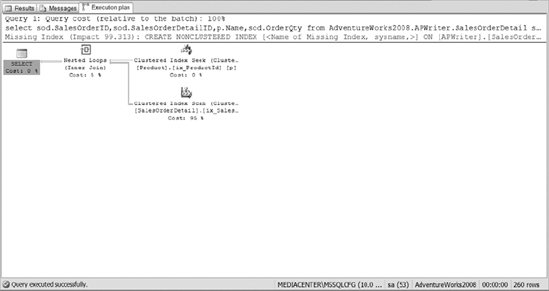
Figure 10-27. The execution plan of joining the SalesOrderDetail and Product tables
As you review the execution plan, you should see that the bulk of the cost of the query comes from the clustered index scan on the SalesOrderDetail table. If you follow some of the tips discussed in this chapter, then you need to create a nonclustered index on the foreign key within the SalesOrderDetail table.
Since you are also querying the data for the order quantity, you may want to cover the query and include the OrderQty column in the index creation. For demo purposes, Listing 10-7 creates two indexes: a nonclustered index on just the product ID and a nonclustered index on the product ID that includes the OrderQty column as well.
Listing 10-7. SQL Code That Creates Nonclustered Indexes and Queries Multiple Tables
CREATE NONCLUSTERED INDEX ix_ProductId

ON apWriter.SalesOrderDetail(ProductId)


CREATE NONCLUSTERED INDEX ix_ProductIdInclude

ON apWriter.SalesOrderDetail(ProductId) INCLUDE (OrderQty)


SELECT sod.SalesOrderID,sod.SalesOrderDetailID,p.Name,sod.OrderQty

FROM AdventureWorks2008.apWriter.SalesOrderDetail sod

WITH (index(ix_ProductIdInclude)) JOIN AdventureWorks2008.apWriter.Product p

 ON sod.ProductId = p.ProductId

WHERE p.ProductId = 843


SELECT sod.SalesOrderID,sod.SalesOrderDetailID,p.Name,sod.OrderQty

FROM apWriter.SalesOrderDetail sod with(index(ix_ProductId))

JOIN apWriter.Product p on sod.ProductId = p.ProductId

WHERE p.ProductId = 843
After creating the indexes, Listing 10-7 executes two queries to demonstrate the impact of those indexes. Figure 10-28 shows the resulting execution plans.
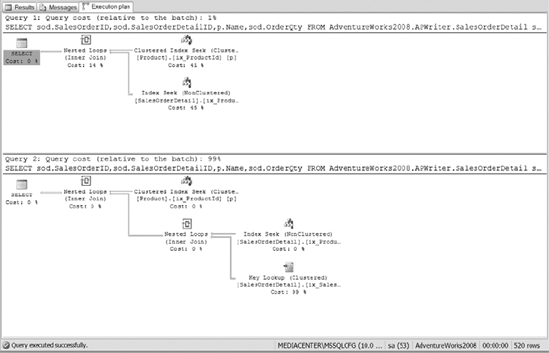
Figure 10-28. The execution plan of Listing 10-7 using the nonclustered index compared to the nonclustered index with include column
The execution plan in Figure 10-28 shows the nonclustered index with the include columns, or the first query in the execution plan. The query cost is less because the index covers the query. Pop quiz: Why don&t you have to include the SalesOrderId in the index in order to cover the query? Keep in mind that nonclustered indexes contain the clustered index key on the intermediate and leaf level pages. So the query optimizers already have those values and no lookup is required.
Filtered Indexes
For the last example, we would like to create a filtered index. Assume that the corporate office exists in territory 4, and you want all of your queries for the VIPs of the company to be extremely fast. For demonstration purposes, assume that the director of sales runs a daily report to see the number of sales and the Totaldue of sales for his region, and every time that query runs slowly, your boss gets a phone call. So instead of creating a nonclustered index on the Territory column, you&re going to create a filtered index on the Territory column just for his area. The code in Listing 10-8 creates a nonclustered index on TerritoryID and a filtered nonclustered index for territory 4.
Listing 10-8. SQL Script That Creates a Filtered Index
CREATE NONCLUSTERED INDEX ix_Territory ON

apWriter.SalesOrderHeader(TerritoryID) INCLUDE (OrderDate,TotalDue)


CREATE NONCLUSTERED INDEX ix_TerritoryFiltered

ON apWriter.SalesOrderHeader(TerritoryID) INCLUDE (OrderDate,TotalDue)

WHERE TerritoryID = 4


GO


SELECT SalesOrderId, OrderDate,TotalDue

FROM apWriter.SalesOrderHeader soh WITH(index(ix_Territory))

WHERE TerritoryID = 4


SELECT SalesOrderId, OrderDate,TotalDue

FROM apWriter.SalesOrderHeader soh WITH (index(ix_TerritoryFiltered))

WHERE TerritoryID = 4
The listing queries the SalesOrderHeader table for a particular territory. The execution plan will show the difference between a filtered index and a nonclustered index. The execution plan of Listing 10-8 is shown in Figure 10-29. After reviewing the execution plan, you can easily see the benefit of using filtered indexes instead of just nonclustered indexes.
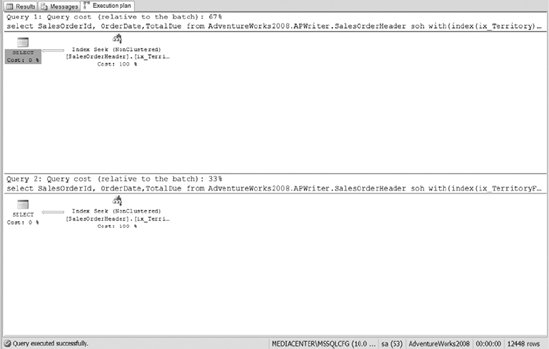
Figure 10-29. The performance benefit of using a filtered index compared to a nonclustered index
Summary
As we conclude this chapter, we hope you spend some time playing with some of the indexing tips and recommendations within your environment. Obviously, we cannot demonstrate every tip or recommendation discussed throughout this chapter. The goal was to show you how to determine the best or most efficient method for creating indexes within your environment. Test, test, and test a little more using the methods discussed in this chapter to make sure that the indexes won&t negatively impact performance. Granted, you are going to make mistakes, and you won&t be perfect the first time, but taking time with the various options will help you with index creation.
As important as indexes are for maintaining the performance of the application, backing up the data is even more important. As a database administrator, one of your most important roles is to make sure you don&t lose data. In the next chapter, we will discuss the various backup solutions that exist within SQL Server 2008.