
C H A P T E R 5
![]()
Upgrading to Microsoft SQL Server 2008
There are several things that need to be addressed when upgrading to SQL Server 2008. Once you have decided to upgrade, you have to make sure that all the features implemented in the prior version are compatible with SQL Server 2008. We will be discussing several tools in this chapter to help guide you through the upgrade process. This chapter will also explain the different upgrade strategies to help you decide the best method for your environment. Finally, we will look at configuration changes that need to be made after the upgrade to ensure that you are taking full advantage of the features offered in SQL Server 2008.
Upgrade Tools
There are two main tools available to assist you in the upgrade process to SQL Server 2008. These tools help you to resolve any possible compatibility and performance issues that might exist. These tools are the Upgrade Advisor and the Upgrade Assistant.
Microsoft SQL Server 2008 Upgrade Advisor
The Microsoft SQL Server 2008 Upgrade Advisor analyzes your SQL Server 2000 and SQL Server 2005 instances and identifies configuration items that may impact your upgrade process. The Upgrade Advisor then provides links to web pages that will provide you with the information needed to resolve the conflicts before the upgrade.
The Upgrade Advisor can be installed from the first page of the SQL Server 2008 install screen or downloaded from the following URL: www.microsoft.com/downloads/details.aspx?familyid=F5A6C5E9-4CD9-4E42-A21C-7291E7F0F852&displaylang=en.
The install is pretty straightforward (accepting the defaults should be fine). Once you have completed the install, use the following steps to produce your analysis report:
- Open the application and select Launch Upgrade Advisor Analysis Wizard.
- This brings you to the Welcome screen, as shown in Figure 5-1. Select Next to continue.
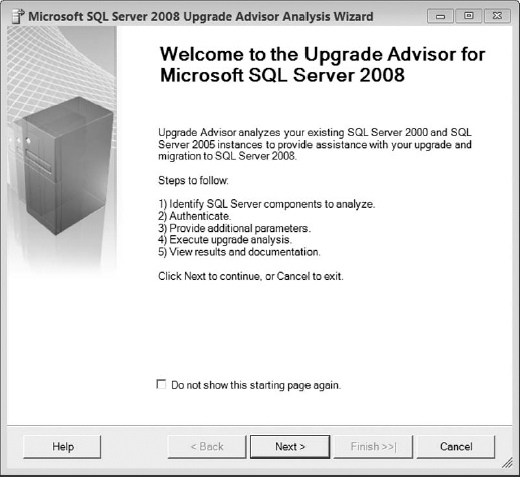
Figure 5-1. Upgrade Advisor Analysis Wizard Welcome screen
- Enter the server name and select the components you would like to analyze, as shown in Figure 5-2. Select Next to continue.
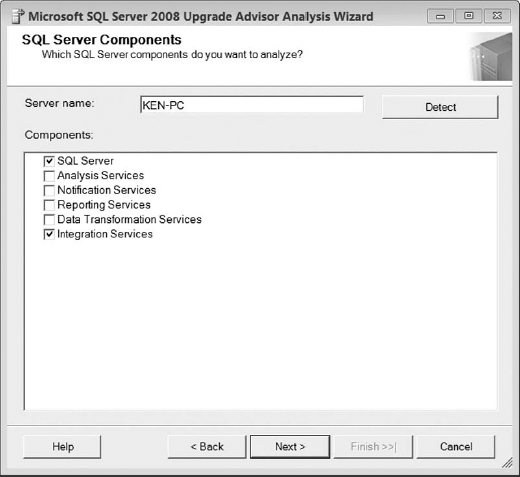
Figure 5-2. Upgrade Advisor server and components selection
- This brings you to the authentication page, shown in Figure 5-3, from where you can select the instance name and enter your credentials. Select Next to continue.
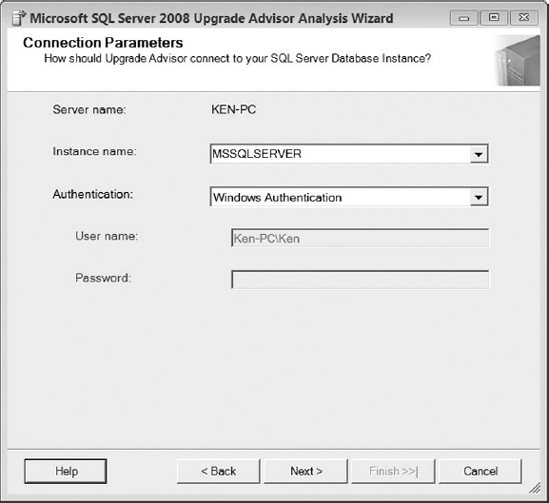
Figure 5-3. Upgrade Advisor authentication
- After authenticating, you can now select the databases you would like to analyze. Figure 5-4 shows three databases selected. You may also choose to analyze trace or batch files as well. Select Next to continue. If you have selected other components (refer to Figure 5-2), such as Analysis Services or Reporting Services, there will be authentication screens for each of those as well. Also, if you have selected Data Transformation Services (DTS) packages or SQL Server Integration Services (SSIS), you will be given the option to analyze packages for the server or select a path containing package files on subsequent screens.
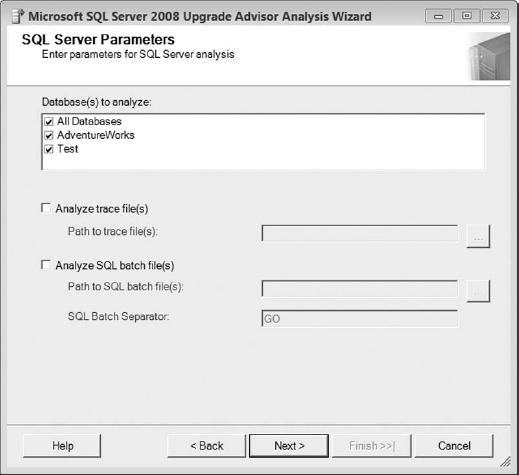
Figure 5-4. Upgrade Advisor SQL Server parameters
- The confirmation screen in Figure 5-5 is then displayed. Confirm the options and select Run to begin the analysis.

Figure 5-5. Upgrade Advisor confirmation screen
- Figure 5-6 shows the analysis in progress. As you can see, certain rules are analyzed for each selected component.
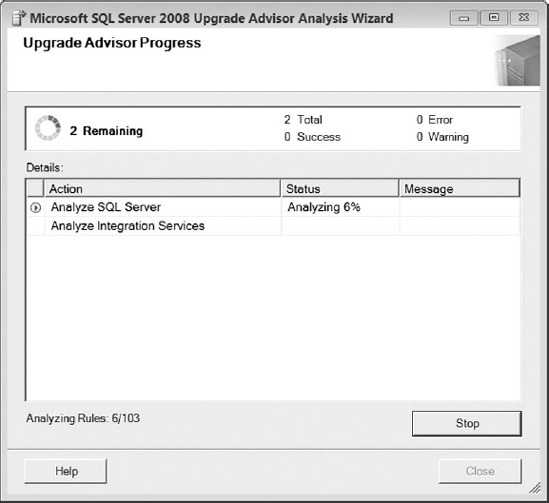
Figure 5-6. Upgrade Advisor rule analysis
- After the analysis has completed, warnings will be displayed for those components needing attention. Figure 5-7, for example, shows a warning pertaining to SQL Server itself. Select Launch Report to display an analysis showing the details behind the warning.
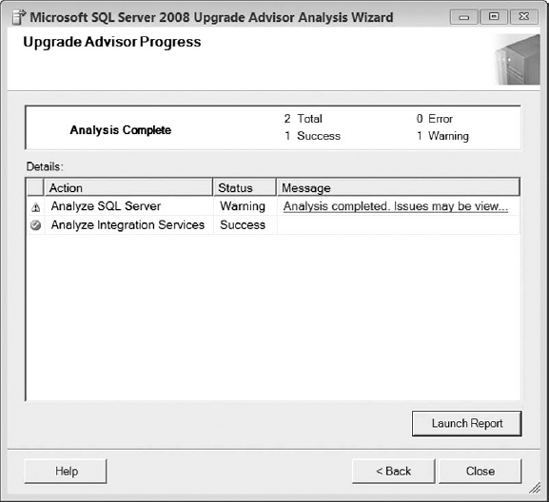
Figure 5-7. Upgrade Advisor rule analysis completed
- Figure 5-8 shows a detailed analysis report. Notice the red circles with X-marks in the Importance column. This report is showing that you will encounter a problem relating to a change in storage format for types xs:dateTime, xs:date, and xs:time. Three objects are affected. Click the Show Affected Objects link, and you'll get the screen shown in Figure 5-9, which lists those objects. Click the Tell Me More About This Issue and How to Resolve It link if you want to see the Upgrade Advisor help page explaining how to resolve the problem.
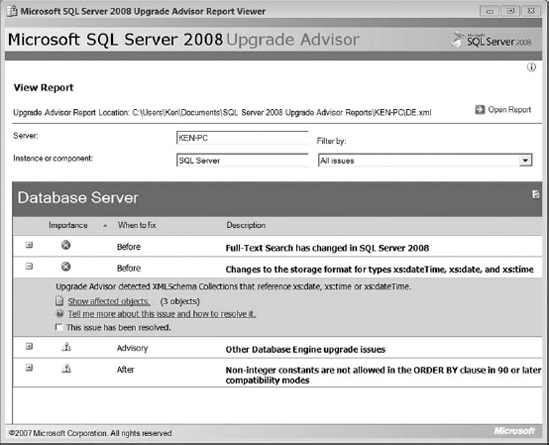
Figure 5-8. Upgrade Advisor analysis report
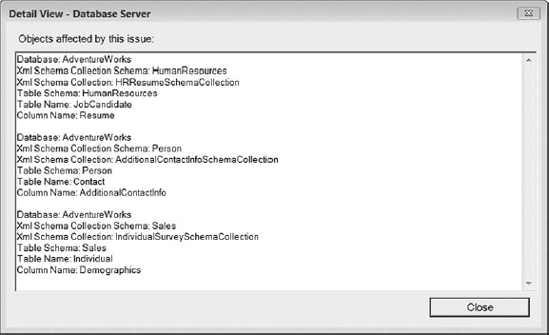
Figure 5-9. Upgrade Advisor affected objects
Upgrade Advisor is helpful in planning an upgrade, and you'll find yourself returning to it often. You don't have to rerun reports, however. You can review the reports again without rerunning the analysis by selecting Launch Upgrade Advisor Report Viewer from the application home screen.
Upgrade Assistant
The Upgrade Assistant is a free third-party tool you can use to determine how a database will perform after it has been upgraded from SQL Server 2000 or SQL Server 2005 to SQL Server 2008. The Upgrade Assistant also identifies compatibility issues that may not have been detected using the Upgrade Advisor. The Upgrade Assistant will create a baseline by running a trace on the SQL Server 2000 or SQL Server 2005 database that is going to be upgraded. It will then run the trace against the upgraded SQL Server 2008 database in a controlled test environment and generate a report comparing the two traces. The Upgrade Assistant and user guide can be downloaded from the scalability experts download page located at www.scalabilityexperts.com/default.asp?action=article&ID=45.
Following is a list of the general steps involved when running the Upgrade Assistant:
- Set up a test environment.
- Capture a playback. (Capturing a playback consists of backing up the databases and running a trace.)
- Restore the database to the test environment using the original version of SQL Server.
- Run the Upgrade Advisor as described in the previous section and resolve any conflicts.
- Replay the trace on the test environment against the original version.
- Restore the database on a SQL Server 2008 instance.
- Replay the trace against the SQL Server 2008 instance.
- Compare the traces and analyze the results using the report viewer.
![]() Caution The Upgrade Assistant should be run in a test environment to ensure that the tests will not affect the production system. A production system may be used to capture adequate trace information, but the capture process could impact performance just as any trace on a production server could. More importantly, the Upgrade Assistant takes a backup of all of the databases (including the system databases) on the instance during the capture process. This backup by the Upgrade Assistant will break the backup sequence of each of the databases and could impact any high-availability processes you have in place.
Caution The Upgrade Assistant should be run in a test environment to ensure that the tests will not affect the production system. A production system may be used to capture adequate trace information, but the capture process could impact performance just as any trace on a production server could. More importantly, the Upgrade Assistant takes a backup of all of the databases (including the system databases) on the instance during the capture process. This backup by the Upgrade Assistant will break the backup sequence of each of the databases and could impact any high-availability processes you have in place.
When capturing a playback, try to perform as many actions as possible in the application to generate a trace with proper coverage. You should start the trace as soon as the backup process has completed to prevent transactions from occurring that will cause rerunning the playback on the test system to fail. Since the initial playback process backs up all the databases on the instance, make sure you have sufficient disk space to store the backups and the trace file. The trace file is generated in the same location as the backup files. You can use a network share if the server does not have enough disk space. You must be a member of the sysadmin role to capture a playback.
![]() Tip You can take any databases offline that you do not want backed up as a result of the playback process.
Tip You can take any databases offline that you do not want backed up as a result of the playback process.
SQL Server Integration Services
SQL Server Integration Services (SSIS) was introduced in SQL Server 2005 and uses a completely different architecture than its predecessor Data Transformation Services (DTS). SSIS provides a much more robust environment for moving and transforming data, but it also provides difficulties when upgrading packages from SQL Server 2000. You basically have two choices: You can rewrite each package to run in SSIS or use the old DTS DLLs to continue running each package. If you have a small number of fairly simple packages, it may be easy enough to rewrite the packages manually. If not, there are a few tools available to help you with the conversion process.
Running DTS in SQL Server 2008
SQL Server 2008 provides the ability to run and manage DTS packages by downloading a couple of add-ons. We would use this approach as a last resort and use the upgrade as an opportunity to migrate your packages to SSIS. SSIS performs much more efficiently, and the add-ons may not be available in the next version of SQL Server. For more information, search for the topic “How to: Install Support for Data Transformation Services Packages” in SQL Server Books Online or MSDN (http://msdn.microsoft.com).
Runtime Support
In order to run DTS packages in SQL Server 2008, you must install the runtime support add-on. To install runtime support for DTS packages in SQL Server 2008, download and install the Microsoft SQL Server 2005 backward compatibility components from the Microsoft SQL Server 2008 Feature Pack web page from the Download Center located at www.microsoft.com/downloads/details.aspx?FamilyID=228de03f-3b5a-428a-923f-58a033d316e1&DisplayLang=en.
Design-Time Support
In order to design and manage DTS Packages in SQL Server 2008, you must install the design-time support add-on. To install design-time support for DTS packages in SQL Server 2008, download the Microsoft SQL Server 2000 DTS designer components from the Feature Pack for Microsoft SQL Server 2005 web page from the Download Center located at www.microsoft.com/downloads/details.aspx?FamilyID=50b97994-8453-4998-8226-fa42ec403d17&displaylang=en.
DTS Package Migration Wizard
The DTS Package Migration Wizard is installed when you select Integration Services as a feature during your SQL Server 2008 install. The Migration Wizard allows you to upgrade existing DTS packages to an SSIS format, as long as all the objects are compatible. The Upgrade Advisor can be used to identify some of the issues that need to be resolved before migrating the packages.
![]() Note DTS xChange is a third-party tool that can be used to migrate DTS packages to SSIS. DTS xChange does a better job than the DTS Migration Wizard. It can also convert packages that the Migration Wizard will be unable to convert. DTS xChange is not a free tool, but if you have many complex DTS packages to convert, it may be well worth the investment. The demo version can be used to migrate up to five packages and can be downloaded from the Pragmatic Works web site at
Note DTS xChange is a third-party tool that can be used to migrate DTS packages to SSIS. DTS xChange does a better job than the DTS Migration Wizard. It can also convert packages that the Migration Wizard will be unable to convert. DTS xChange is not a free tool, but if you have many complex DTS packages to convert, it may be well worth the investment. The demo version can be used to migrate up to five packages and can be downloaded from the Pragmatic Works web site at www.pragmaticworks.com.
Use the following steps to convert DTS packages to SSIS using the DTS Package Migration Wizard:
- Start the DTS Package Migration Wizard in one of three ways.
- Navigate to the Legacy folder under Management in SQL Server Management Studio. Right-click Data Transformation Services and select Migration Wizard.
- Open an Integration Services project in the Business Intelligence Development Studio (BIDS). Right-click on SSIS Packages in the Solution Explorer and select Migrate DTS 2000 Package.
- Start the DTSMigrationWizard.exe located in the C:Program FilesMicrosoft SQL Server100DTSBinn folder.
- Select the source of the packages.
- Select the destination for the packages.
- Select the available packages from the source that you wish to migrate.
- If any of the packages are password protected, you will be prompted for their passwords. It is not possible to migrate a package that has been password protected without knowing the password. If none of the packages is password protected, the wizard will skip this step.
- You can specify a log file to capture any errors that were encountered during the migration.
- The packages are then upgraded one by one, and you can view the progress of each migration. If a package cannot be migrated, you can opt to end the migration process for the remaining packages or to skip just the package that cannot be migrated.
- Once the migration process is complete, open the packages using BIDS and check for any validation errors. If possible, run each package to make sure it executes successfully and that the results are as you expect.
Upgrade Strategies
Once you have determined that your databases are compatible with SQL Server 2008, you are ready to perform an upgrade. There are two ways to perform an upgrade. The first is known as an in-place upgrade, and as the name implies, it upgrades an entire instance “in place” by converting the data files to the new format. The second approach is known as a side-by-side upgrade, which consists of installing a second instance of SQL Server and moving the data files to the new version. Both methods have their pros and cons, and the best method for one application may not be the best method for another. An in-place upgrade provides simplicity but lacks the flexibility offered by a side-by-side upgrade.
In-Place Upgrade
An in-place upgrade can be used to upgrade an instance of SQL Server 2000 or SQL Server 2005 directly to SQL Server 2008. Search for “Version and Edition Upgrades” on MSDN for specifics on the supported upgrade paths for each version and edition.
One of the benefits of performing an in-place upgrade is that you can use the same server and instance names. This may save you from having to track down all the connections to the database and point them to a new server or instance name. It is a fairly simple process, much like performing an installation. You do not need extra disk space to make a copy of the data files because they will be converted to the new format during the upgrade. The downside is that there is a point during the upgrade process where there is no turning back. The only back out is to reinstall the prior version of SQL Server and restore the databases from a backup that was made prior to the upgrade. You cannot restore a backup of a database that has been converted to SQL Server 2008 on a previous version. If you determine that a problem has been caused a week later by the upgrade, you will have to restore the database from a backup prior to the upgrade and hope you have a way to recover the transactions that have occurred since the upgrade.
![]() Caution It is important to have a tested backup in a safe location, since that is the only way to back out of an in-place upgrade. You may want to take an image of the server as well and store it in a safe location to reduce the backout time.
Caution It is important to have a tested backup in a safe location, since that is the only way to back out of an in-place upgrade. You may want to take an image of the server as well and store it in a safe location to reduce the backout time.
The steps to performing an in-place upgrade include the following:
- Make sure you have current backups in a safe location.
- Run SQL Server setup.exe. Install any prerequisites and exit the install. If a reboot is required due to the prerequisites, reboot and run setup.exe again.
- From the SQL Server Installation Center, select Upgrade from SQL Server 2000 or SQL Server 2005, as shown in Figure 5-10.
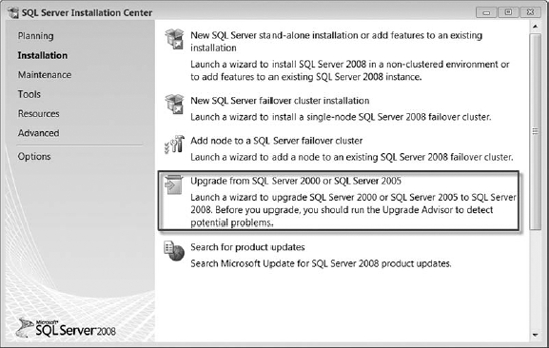
Figure 5-10. SQL Server Installation Center
- SQL Server will install any required support files, and you may be required to reboot and start setup.exe again.
- The System Configuration Checker will run a discovery and setup log files will be created for the installation. The Setup Support Rules screen, shown in Figure 5-11, identifies any problems that you may encounter when installing the setup support files. These errors will need to be resolved in order to continue.
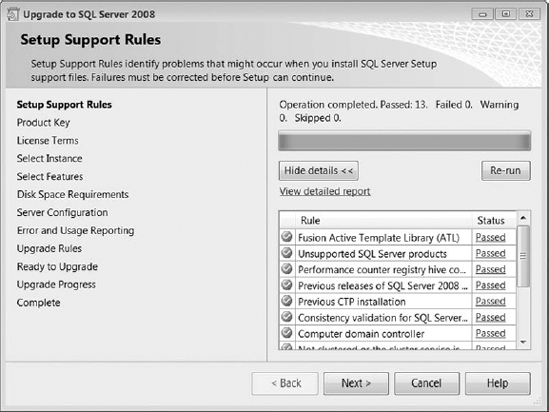
Figure 5-11. Upgrade Setup Support Rules
- On the Product Key screen (see Figure 5-12), enter the product key or indicate that you are upgrading to a free version.
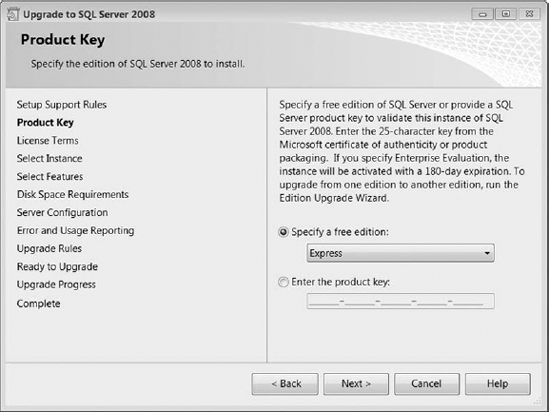
Figure 5-12. Upgrade to a free edition or enter a product key.
- Accept the license agreement, as shown in Figure 5-13.
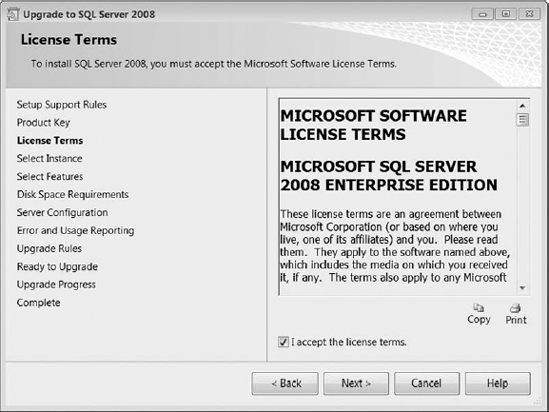
Figure 5-13. Upgrade license agreement
- Select the instance of SQL Server you will be upgrading. You'll be presented with a list like that shown in Figure 5-14.
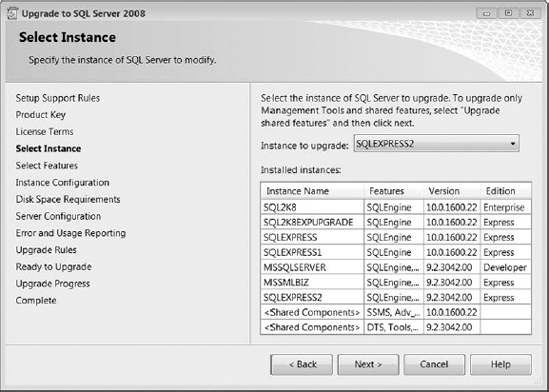
Figure 5-14. Upgrade instance selection
- The feature selections will be preselected and cannot be changed. The checklist of features will be grayed out, as shown in Figure 5-15. If you need to add additional features, you will need to rerun setup.exe after the upgrade.
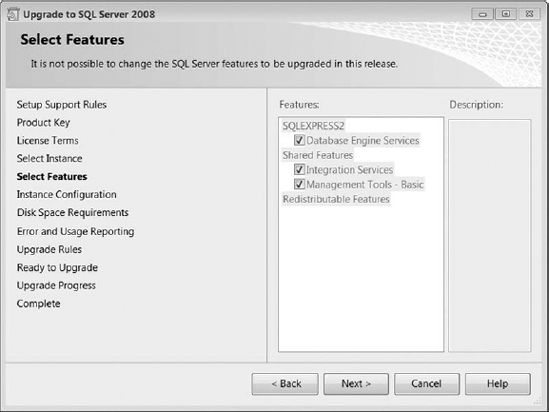
Figure 5-15. Upgrade features selection
- Specify the name of the new instance. In Figure 5-16, we specified SQLEXPRESS2 as our instance name.
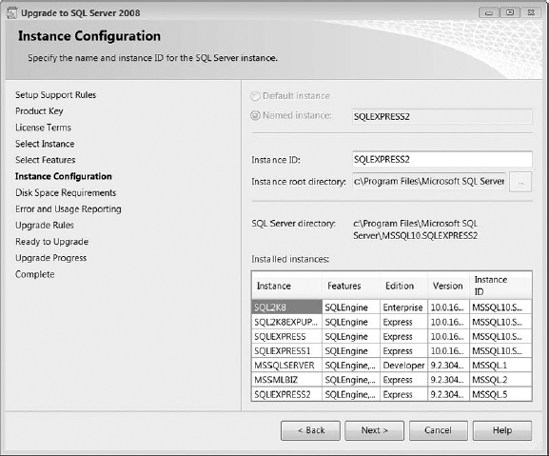
Figure 5-16. Upgrade the instance configuration
- Continue through the upgrade screens, validating the disk space requirements and selecting Error and Usage Reporting.
- The installer will do a final check to make sure the upgrade process will not be blocked. You'll be presented with upgrade rules like those in Figure 5-17. You'll be able to see which rules you pass, and which require some action on your part.
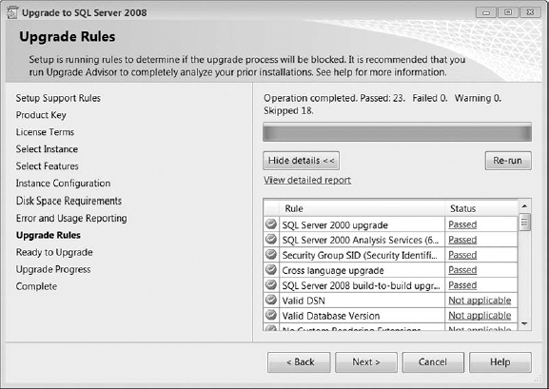
Figure 5-17. Upgrade rules
- The Ready to Upgrade screen in Figure 5-18 allows you to verify all the features that will be upgraded prior to performing the upgrade.
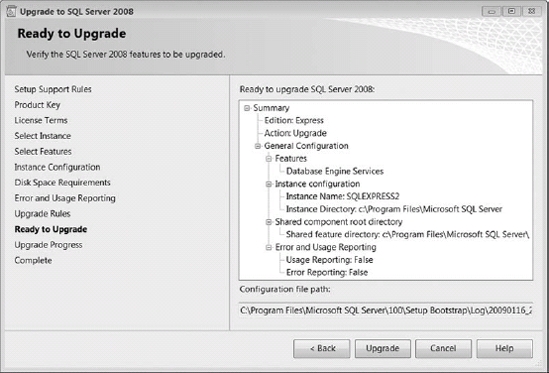
Figure 5-18. Upgrade features verification
- Next, the Upgrade Progress screen in Figure 5-19 allows you to view the status of the upgrade as it progresses.
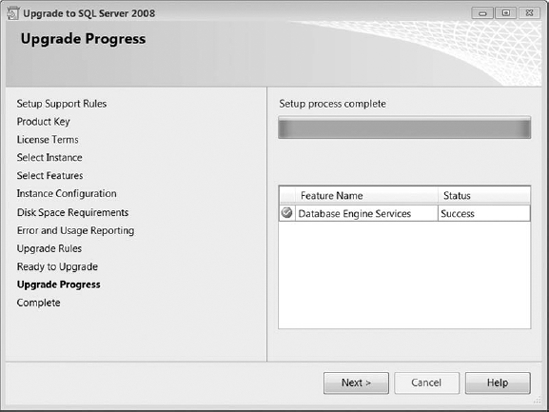
Figure 5-19. Upgrade Progress screen
- Review the log file after the upgrade has completed. The installer will provide a link to the log file on the Complete screen, shown at the upper right of Figure 5-20.
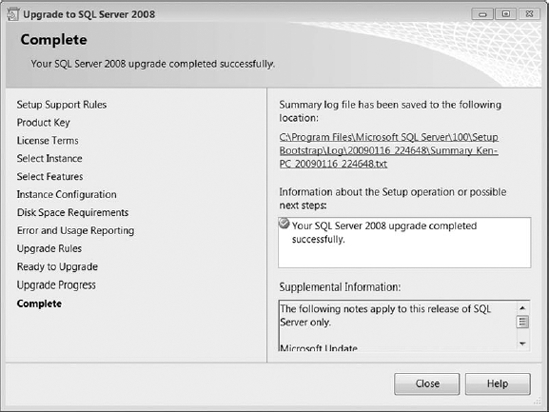
Figure 5-20. Upgrade completion
Once you have completed the upgrade, it is always a good idea to log in to the application and run some tests to make sure the upgrade was truly a success before releasing the database back into production. It will help if you have some baseline performance statistics prior to the upgrade that you can use to compare to the upgraded database. Unfortunately, some people are reluctant to change and think everything used to work better on the old version. In rare cases, some queries may actually perform worse after the upgrade. Having a baseline will help you determine if there is actually an issue, or if it is just user perception.
Side-by-Side Upgrade
A side-by-side upgrade consists of installing SQL Server 2008 and moving the databases from the old instance to the new instance. The side-by-side method gives you a chance to test the effects SQL Server 2008 will have on an application before severing the ties with the old version. The new instance can be installed on a second server, or you can use the same server provided it meets the install requirements. Generally, you should take advantage of the upgrade process to upgrade the hardware as well. If the same server is used, you will need sufficient disk space to store a duplicate copy of the databases during the upgrade.
Log shipping can also be useful when performing an upgrade. If you have a large database, you can set up log shipping in advance to keep the databases in sync on the new system while the old system is still active. This will keep the downtime to a minimum, since you can keep your system online while you wait for a large data file to copy to a new server. You can copy the database to the new server and perform the upgrade in advance, so the application will only need to be offline while you restore a few transaction logs on the new server. More information about this approach can be found in SQL Server Books Online by searching for the topics “Migrating a SQL Server 2000 Log Shipping Configuration to SQL Server 2008” or “Migrating a SQL Server 2005 Log Shipping Configuration to SQL Server 2008.”
Once you have installed the new instance of SQL Server 2008, there are three methods for moving the databases to the new instance:
- Detach the old database and attach it to the new instance.
- Back up the old database and restore it on the new instance.
- Use the Copy Database Wizard to copy the database to the new instance.
![]() Note You will also need to copy any objects outside the database, such as logins and jobs, since you cannot restore system databases to a newer version of SQL Server.
Note You will also need to copy any objects outside the database, such as logins and jobs, since you cannot restore system databases to a newer version of SQL Server.
The steps to performing a side-by-side upgrade include the following:
- Make sure you have a current backup. (This should be the first step before making any modifications to any databases.)
- Script the logins.
- Script the jobs.
- Install SQL Server 2008.
- Copy the database to the new instance by using one of the methods previously listed. (These will be described in detail in the subsections that follow.)
- Create the logins on the new instance by running the login script.
- Create the jobs on the new instance by running the job script.
- Check database connectivity and functionality.
Installing SQL Server 2008 in this side-by-side approach is no different from doing a fresh install (described in Chapter 4). However, with a side-by-side upgrade, you also have to worry about migrating your database afterward. The following sections cover the three ways to perform that migration.
The Detach/Attach Migration Method
We prefer the detach and attach method when permanently moving databases to a new instance of SQL Server. By moving each file itself instead of a copy of the file at any given point in time, you can be sure you have captured the exact state of the database as it existed on the previous instance. Since the database is detached, it will be inaccessible for any transactions, ensuring that no data will be committed on the old system during the upgrade. Detaching the database also helps to validate that all the connections have been reconfigured to point to the new system. If a connection was missed and is still pointing to the old instance, you will encounter an error instead of actually making a connection that you think is pointing to the new instance.
You can use the sp_detach_db stored procedure to detach a database. You should also set the database to single-user mode and immediately roll back any transactions before trying to detach the database. Listing 5-1 contains a script invoking sp_detach_db that you can use to detach a database.
Listing 5-1. T-SQL Script to Detach a Database
USE [master]

GO

ALTER DATABASE [DatabaseName] SET SINGLE_USER WITH ROLLBACK IMMEDIATE

GO

EXEC master.dbo.sp_detach_db 'DatabaseName'

GO
To attach a database in SQL Server 2008, you should use the CREATE DATABASE statement with the FOR ATTACH clause. This statement and clause replace the sp_attach_db stored procedure that was previously used to attach a database. The sp_attach_db stored procedure has been deprecated and will be removed in a future release. You will also need to specify the locations of the data files that are going to be attached. The complete syntax for attaching a database is shown in Listing 5-2.
Listing 5-2. T-SQL Script to Attach a Database
USE [master]

GO

CREATE DATABASE [DatabaseName] ON

( FILENAME = N'C:MSSQLDATADatabaseName.mdf' ),

( FILENAME = N'C:MSSQLDATADatabaseName_log.ldf' )

 FOR ATTACH

GO
Alternatively, you can detach and attach databases using the GUI in SQL Server Management Studio. To detach a database using the GUI, you can right-click on the database you want to detach, select Tasks, and then select Detach from the context menu. This will bring up the Detach Databases screen. Select OK to detach the database. To attach a database using the GUI, you can right-click on the Databases folder and select Attach from the context menu. This will bring you to the Attach Databases screen. Selecting Add will bring up the Locate Database Files screen, which will allow you to navigate to the data file you would like to attach. Once you have selected the data file, select OK to close the Locate Database Files screen and OK once again on the Attach Databases screen to close the screen and attach the database.
Backup/Restore Migration Method
Using the backup and restore method is a good way to copy the database to the new instance without impacting the availability of the current database. All you need to do is take a full backup of the current database, copy that backup to the new location, and restore it (backup and restore will be covered in Chapters 11 and 12). SQL Server will upgrade the database during the restore process. The result will be a SQL Server 2008 database that you will not be able to move back to an earlier release.
![]() Note You won't be able to move a 2008 database back to an earlier release, even when you are running that database in a prior compatibility mode. You cannot back up and restore to go from 2008 to an earlier release, nor can you detach and attach. You can only move a database forward. You cannot migrate backward.
Note You won't be able to move a 2008 database back to an earlier release, even when you are running that database in a prior compatibility mode. You cannot back up and restore to go from 2008 to an earlier release, nor can you detach and attach. You can only move a database forward. You cannot migrate backward.
Copy Database Wizard Migration Method
You can use the Copy Database Wizard to provide a user-friendly interface to copy your database to an upgraded instance of SQL Server 2008. You are given the option to make a copy of the database or completely move the database. You may also choose to copy the database by using the detach and attach method, or by using SQL Management Objects (SMO). If you use the detach and attach method from the wizard, make sure there are no users trying to access the database before running the wizard. If you use SMO, the database will remain online during the entire process. You can also choose to move any database-related objects, such as logins and jobs. We should point out that while you can copy logins using the Copy Database Wizard, for security reasons, the wizard creates the login on the destination server with a random password and then disables the login.
![]() Note The Copy Database Wizard creates a SQL Server Agent job that executes an SSIS package. Make sure you have Integration Services installed and the SQL Server Agent running on the destination server prior to executing the Copy Database Wizard.
Note The Copy Database Wizard creates a SQL Server Agent job that executes an SSIS package. Make sure you have Integration Services installed and the SQL Server Agent running on the destination server prior to executing the Copy Database Wizard.
Use the following steps to upgrade a database using the Copy Database Wizard:
- Start the Copy Database Wizard by right-clicking the Management folder in the SQL Server 2008 Management Studio Object Explorer and selecting Copy Database. As you can see in Figure 5-21, you can use the Copy Database Wizard to move or copy databases from an instance of SQL Server 2000 or later to SQL Server 2008. Select Next to continue.
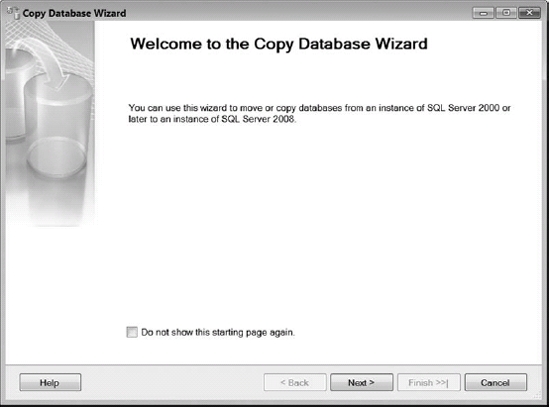
Figure 5-21. Copy Database Wizard Welcome screen
- Choose the source server and instance name that contains the database you will be upgrading. See Figure 5-22 for an example. Provide the appropriate authentication and select Next to continue.
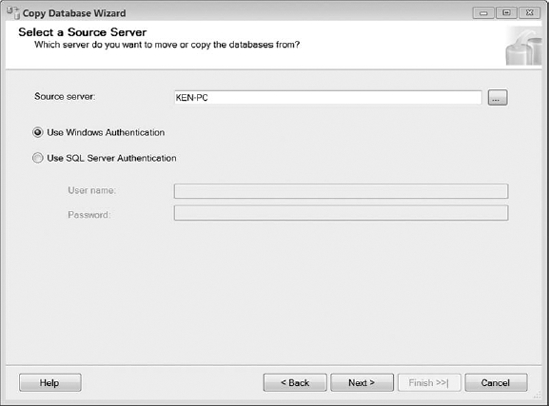
Figure 5-22. Selecting a source server
- Choose the destination server and instance name that will host the new database. The destination server in Figure 5-23 is KEN-PCSQL2K8. Provide the appropriate authentication and select Next to continue.
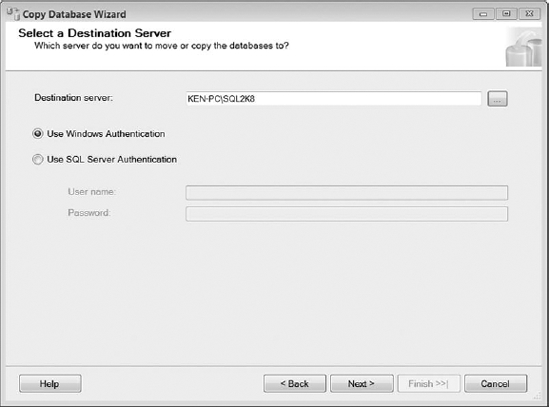
Figure 5-23. Selecting a destination server
- Choose the method that should be used to transfer the database to the new server and select Next to continue. If you use the detach and attach method, the database will be offline during the process. Taking the database offline can be a good thing if you want to make sure no data is being processed during the upgrade; but if you are making a copy of the database for test purposes, you may need to use SMO to ensure that the database remains online, as shown in Figure 5-24.
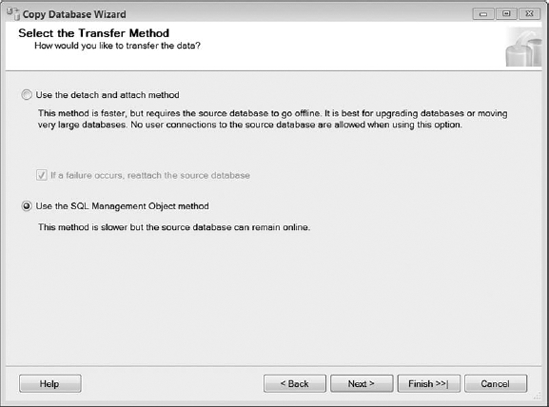
Figure 5-24. Selecting a transfer method
- Select the database or databases from the source server that you would like to transfer (see Figure 5-25), and select Next to continue. Pay special attention to the option that you choose to transfer the database. If you select Move, the database will no longer exist on the source server after the wizard has completed. Also notice that there is no option to move or copy the system databases to the new instance.
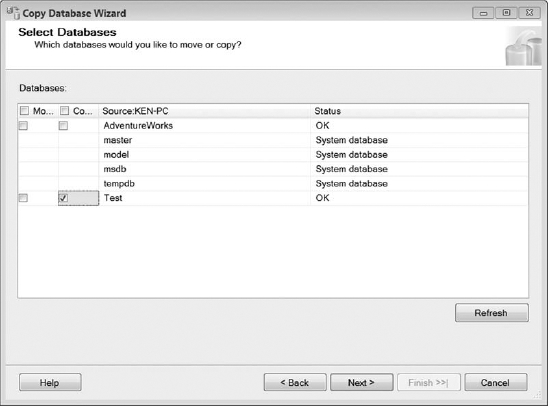
Figure 5-25. Copy Database Wizard database selection
- Specify the name and location of the destination database. As you can see in Figure 5-26, you have the option of stopping the transfer or dropping the database if it already exists on the destination server. Select the appropriate option and select Next to continue. This step will be repeated for each database that has been selected for transfer to the destination server.
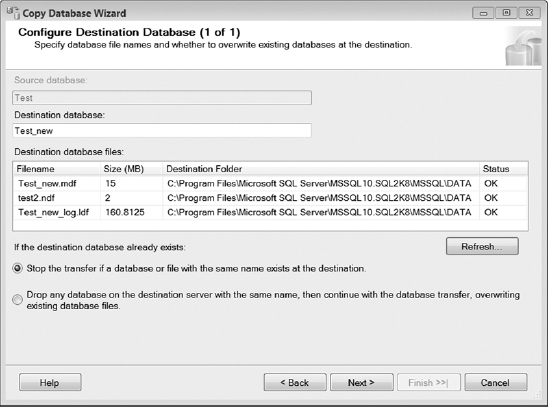
Figure 5-26. Configuring the destination database
- On the left side of the screen, select the related server objects that you would like to transfer to the new instance (shown in Figure 5-27) and click the arrow to move them to the right side of the screen. Once you have selected to move the objects, you can click the ellipsis to the right of each object to specify detailed copy instructions for each object type, as shown in Figure 5-28. Select Next to continue.
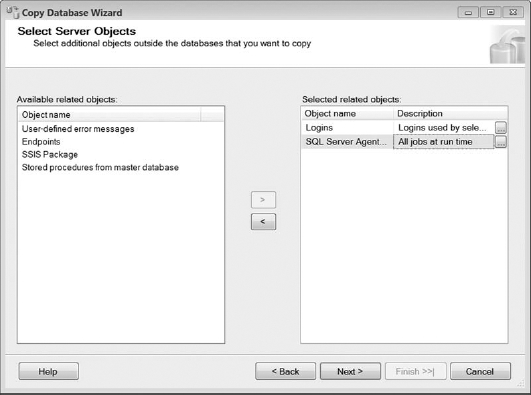
Figure 5-27. Select related server objects
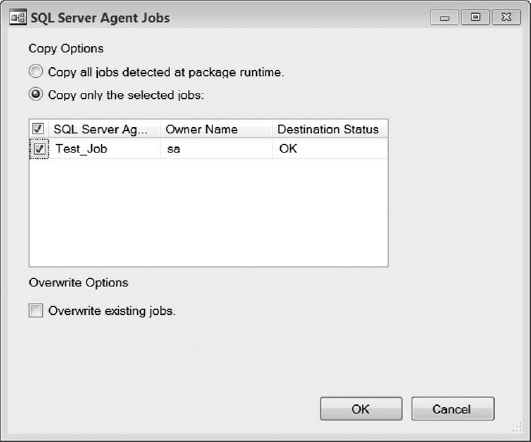
Figure 5-28. Select server objects copy options
- As shown in Figure 5-29, specify the name of the SSIS package that will be created to transfer the databases. (This name will also be used for the SQL Server Agent job that will be created.) Configure the appropriate logging options by choosing Windows Event Log or Text File from the drop-down menu. If you choose to log to a text file, you can also choose the path where you would like to store the logs. Select Next to continue.

Figure 5-29. Configuring the package
- You can choose to execute the package immediately following the wizard or schedule the package to run at a later time. In Figure 5-30, we chose to run the package immediately. If you choose to schedule the package, click the Change Schedule button to open the New Job Schedule dialog box and specify when you would like to execute the package. Select the proxy account that will be used to perform the transfer. There must be a proxy account available to the user with the SQL Server Integration Services package execution permission on the destination server. You can create a new proxy account if needed by expanding the SQL Server Agent, right-clicking on the Proxies folder, and selecting New Proxy. Select Next to continue.
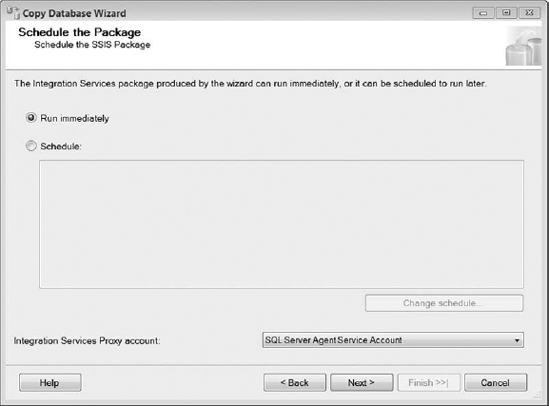
Figure 5-30. Scheduling the SSIS package
- Review the options you have selected on the Complete the Wizard screen (shown in Figure 5-31) and select Finish to start the transfer.
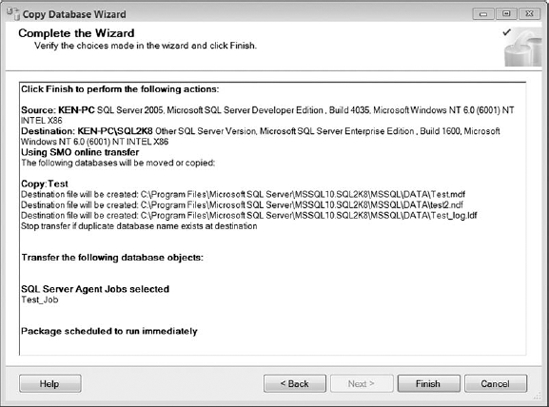
Figure 5-31. Copy Database Wizard completion
- You can monitor the progress on the Performing Operation screen shown in Figure 5-32. The time it takes to complete the transfer depends on the size of the databases being transferred and the options that were chosen during the wizard process. For example, SMO will take longer than detaching and attaching the databases. Click Close once the wizard has completed. If the wizard encounters any errors, you will be able to select the link in the Message column to help you troubleshoot the issue.
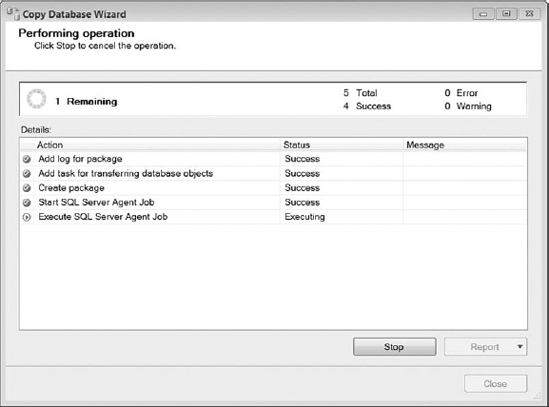
Figure 5-32. Copy Database Wizard operation progress
Post-Upgrade Procedures
In order to take advantage of everything that SQL Server 2008 has to offer, there are a few steps that need to be taken after an upgrade has occurred. We will discuss each change that needs to be made and explain how it benefits you after the upgrade. Following are the steps that you should perform after any upgrade:
- Change the compatibility level
- Check the integrity of the objects in your database
- Correct inaccurate row and page counts for tables and indexes
- Set your page verification method to
CHECKSUM - Update statistics
Changing Compatibility Level
The first thing you should do after the upgrade is change the compatibility level of the database, assuming it is supported by the application. We have had some vendors allow us to upgrade the database, as long as we left the compatibility level set to the prior version. When upgrading a database to SQL Server 2008, the database maintains the current compatibility level. In order to take advantage of the new features offered in SQL Server 2008, you should change the compatibility level to SQL Server 2008 (100).
![]() Note If the database compatibility level is below SQL Server 2000 (80), it will be changed automatically to SQL Server 2000 (80) during the upgrade, which is the minimum level supported in SQL Server 2008.
Note If the database compatibility level is below SQL Server 2000 (80), it will be changed automatically to SQL Server 2000 (80) during the upgrade, which is the minimum level supported in SQL Server 2008.
To view the current compatibility level, you can query the sys.databases catalog view:
Select name, compatibility_level FROM sys.databases
The ALTER DATABASE command replaces the sp_dbcmptlevel procedure that was previously used to change the compatibility level. You can also change the compatibility level in the Options tab of the Database Properties dialog box that is displayed by right-clicking the database and selecting Properties.
Run the following statement to change the compatibility level to SQL Server 2008:
ALTER DATABASE [DatabaseName] SET COMPATIBILITY_LEVEL = 100
![]() Caution Changing the compatibility level while the database is currently in use could result in the generation of an incorrect query plan and unpredictable queries. The faulty query plan may also be stored in the cache and used for multiple queries. It is recommended that you change the compatibility level when the database is in single-user mode.
Caution Changing the compatibility level while the database is currently in use could result in the generation of an incorrect query plan and unpredictable queries. The faulty query plan may also be stored in the cache and used for multiple queries. It is recommended that you change the compatibility level when the database is in single-user mode.
Checking Object Integrity
The next thing you should do is run DBCC commands to test for object integrity. The DBCC CHECKDB command checks the integrity of the objects in a database and should be run on a regular basis. One thing that this command does not check in databases created in versions prior to SQL Server 2005 is the integrity of the data in the columns. Adding the DATA_PURITY option causes the CHECKDB command to look for column values that are invalid or out of range. Any database that was created in SQL Server 2005 or later will include the DATA_PURITY check by default; but if the database is being upgraded from an earlier version, you must run the command with the DATA_PURITY option at least once and fix any issues. Once the command has executed successfully and the issues have been resolved, an entry is made in the database header and the DATA_PURITY option will be included by default as a part of the normal CHECKDB operation.
The following command should be executed to perform a CHECKDB with DATA_PURITY:
DBCC CHECKDB ([DatabaseName]) WITH DATA_PURITY
Correct Row and Page Counts
The DBCC UPDATEUSAGE command corrects inaccurate row and page counts for tables and indexes. Invalid counts are common in previous versions of SQL Server and can skew the results of certain commands, such as sp_spaceused. You should always run the UPDATEUSAGE command on databases that have been upgraded from SQL Server 2000. You do not need to run the command on a regular basis unless frequent Data Definition Language (DDL) modifications are made in the database.
The following command should be executed to update the usage counts for a given database:
DBCC UPDATEUSAGE ([DatabaseName])
Setting the Page Verification Method
When upgrading a database, the PAGE_VERIFY option will remain the same as it was in the prior version. You should make sure this option is set to CHECKSUM after the upgrade. The CHECKSUM option was introduced in SQL Server 2005 and provides the highest level of integrity for the data files. When the CHECKSUM option is enabled, a checksum of the whole page is computed and stored in the page header when the page is written to disk. When the page is read from disk, the checksum is recalculated and compared with the value in the header.
To view the current PAGE_VERIFY option, you can query the sys.databases catalog view:
SELECT name, page_verify_option_desc FROM sys.databases
Use the ALTER DATABASE command to change the PAGE_VERIFY option to CHECKSUM:
ALTER DATABASE [DatabaseName] SET PAGE_VERIFY CHECKSUM WITH NO_WAIT
Updating Statistics
Updating the statistics after the upgrade allows the database engine to take advantage of the enhancements made in SQL Server 2008 to optimize query performance. The statistics that reside in the database were created with an earlier version of SQL Server. By recreating them with SQL Server 2008, you are allowing SQL Server to create more intelligent statistics to work with. This ultimately results in a better execution plan and faster, more efficient queries.
To update statistics, run the following script against each of the databases that have been upgraded:
USE [DatabaseName]

GO

sp_msforeachtable 'UPDATE STATISTICS ON ? WITH FULLSCAN; '
Summary
Several processes and tools are in place to help make your upgrade a success. Using the tools provided, you should be able to find and resolve any issues and conflicts that would prevent a successful upgrade. Understanding all the upgrade options will also prevent costly mistakes during the upgrade. Remember, the best upgrade method depends on the circumstances; what may work for some systems may not be the best strategy for others. Understanding all the available upgrade paths will ultimately lead to a seamless and painless upgrade.