
![]()
Configuring the Instance
The installation and configuration of your SQL Server instance does not end when setup successfully completes. There are many other considerations that you should take into account, both inside the database engine and outside of it, using tools such as SQL Server Configuration Manager. In this chapter, we will discuss many of the most important instance-level configuration options, including SQL Server’s new buffer pool extension technology and important configuration choices for system databases. We will also look at how your instance can communicate through a firewall before finally demonstrating how to uninstall an instance, both from Windows Server Core and through the GUI.
At the instance level, there countless settings and flags that can be configured. In the following sections, we will look at viewing and configuring these settings using tools such as sp_configure, sys.configurations, DBCC TRACEON, and ALTER SERVER.
Using sp_configure
You can change many of the settings that you can configure at the instance level using the system stored procedure sp_configure. You can use the sp_configure procedure to both view and change instance level settings. This procedure will be used in many examples throughout this book, so it is important that you understand how it works. If a procedure is the first statement in the batch, you can run it without the EXEC keyword, but you must use the EXEC keyword if there are any preceding statements. If the procedure is run with no parameters, then it will return a five-column result set. The meaning of these columns is detailed in Table 4-1.
Table 4-1. Result Set Returned by sp_configure
|
Column |
Description |
|---|---|
|
Name |
The name of the instance level setting. |
|
Minimum |
The minimum value that is acceptable for this setting. |
|
Maximum |
The maximum value that is accepted for this setting. |
|
Config_value |
The value that has been configured for this value. If this value differs from the value in the Run_value column, then the instance will need to be either restarted or reconfigured for this configuration to take effect. |
|
Run_value |
The value that is currently being used for this setting. |
If you wish to use sp_configure to change the value of a setting, as opposed to just viewing it, then you must run the procedure with two parameters being passed in. The first of these parameters is called configname and is defined with a VARCHAR(35) data type. This parameter is used to pass the name of the setting that you wish to change. The second parameter is called configvalue and is defined as an integer. This parameter is used to pass the new value for the setting. After you have changed an instance level setting using sp_configure, it will not immediately take effect. To activate the setting, you will need to either restart the Database Engine Service, or reconfigure the instance.
There are two options for reconfiguring the instance. The first is a command called RECONFIGURE. The second is a command called RECONFIGURE WITH OVERRIDE. The RECONFIGURE command will change the running value of the setting as long as the newly configured value is regarded as “sensible” by SQL Server. For example, RECONFIGURE will not allow you to disable contained databases when they exist on the instance. If you use the RECONFIGURE WITH OVERRIDE command, however, this action would be allowed, even though your contained databases will no longer be accessible. Even with this command, however, SQL Server will still run checks to ensure that the value you have entered is between the Min and Max values for the setting. It will also not allow you to perform any operations that will cause serious errors. For example, it will not allow you to configure the Min Server Memory (MB) setting to be higher than the Max Server Memory (MB) setting, since this would cause a fatal error in the Database Engine.
The first time you run the sp_configure stored procedure with no parameters in SQL Server 2014, it will return 18 rows. These rows contain the basic configuration options for the instance. One of the options is called Show Advanced Options. If you turn on this option and then reconfigure the instance, as demonstrated is Listing 4-1, then an additional 52 advanced settings will be displayed when you run the procedure. If you try to change the value of one of the advanced options before turning on the Show Advanced Options setting, then the command will fail.
As an alternative to viewing these settings with sp_configure, you can also retrieve the same information by querying sys.configurations. If you use sys.configurations to return the information, then two additional columns will be returned. One of these columns is called is_dynamic and it designates if the option can be configured with the RECONFIGURE command (1), or if the instance needs to be restarted (0). The other column is called is_Advanced, and it indicates if the setting is configurable without Show Advanced Options being turned on.
Processor and Memory Configuration
When configuring your instance, one of your first considerations should be the configuration of processor and memory resources. There are two main considerations that you should give to the processor. One is processor affinity and the other is MAXDOP (maximum degree of parallelism).
By default, your instance will be able to use all of the processor cores within your server. If you use Processor affinity, however, specific processor cores will be aligned with your instance and these will be the only cores that the instance has access to. There are two main reasons for limiting your instance in this way. The first is when you have multiple instances running on the same server. With this configuration, you may find that the instances are competing for the same processor resources and therefore blocking each other. Processor affinity is controlled via a setting called affinity mask.
Imagine you had a server with four physical processors, each of which had two cores. Assuming that hyperthreading is turned off for the purpose of this example, there would be a total of eight cores available to SQL Server. If you had four instances on the server, then to avoid the instances competing for resources, you could align cores 0 and 1 with instance 1, cores 2 and 3 with instance 2, cores 4 and 5 with instance 3, and cores 6 and 7 with instance 4.
If you have other services running on the server, such as SQL Server Integration Services (SSIS), you may wish to leave a core available for Windows and other applications, which cannot be used by any of the instances. In this case, you may have identified that instance 4 uses less processor resources than the other instances. It may be an instance dedicated to ETL (extract, transform, and load), for example, and be used primarily for hosting the SSIS Catalog. In this case, you may align instance 4 with core 6 only. This would leave core 7 free for other purposes. This design is illustrated in Figure 4-1.

Figure 4-1. Processor afinity diagram
![]() Note SSIS is incorporated into the Database Engine. However, when SSIS packages run, they run in a separate DTSHost process and are, therefore, not aligned with the processor and memory configuration of the instance.
Note SSIS is incorporated into the Database Engine. However, when SSIS packages run, they run in a separate DTSHost process and are, therefore, not aligned with the processor and memory configuration of the instance.
When using processor affinity, it is important for performance to align an instance with cores on the same NUMA (non-uniform memory access) node. This is because, if a processor needs to remotely access the memory of a different NUMA node, it needs to go via an interconnect, which is a lot slower than accessing the local NUMA node. In the example shown in Figure 4-1, if we had aligned instance 1 with cores 0 and 7, then we would have breached the NUMA boundary and performance would have been impaired.
![]() Caution Although it is not recommended for SQL Server, some virtual environments use a technique called over-subscribed processors. This means that more cores are allocated to guests than actually exist on the physical hosts. When this is the case, you should not use processor affinity because NUMA boundaries will not be respected.
Caution Although it is not recommended for SQL Server, some virtual environments use a technique called over-subscribed processors. This means that more cores are allocated to guests than actually exist on the physical hosts. When this is the case, you should not use processor affinity because NUMA boundaries will not be respected.
The affinity mask reducing contention also holds true for clustered environments. Imagine you have a two-node cluster with an Active/Active configuration. Each node of the cluster is hosting a single instance. It may be important for your business that you can guarantee consistent performance in the event of a failover. In this case, assuming that each of your nodes has eight cores, then on node 1, you could configure instance 1 to use cores 0, 1, 2, and 3. On node 2, you could configure instance 2 to use cores 4, 5, 6, and 7. Now, in the event of failover, your instances will continue to use the same processor cores and not fight for resources.
The second reason for using processor affinity is to avoid the overhead associated with threads being moved between processors at the operating system level. When your instance is under heavy load, you may see a performance improvement by aligning SQL Server threads with specific cores. In this scenario, it would be possible to separate standard SQL Server tasks from SQL Server IO related tasks.
Imagine that you have a server with a single processor, which has two cores. Hyperthreading is turned off and you have a single instance installed. You may choose to align tasks associated with IO affinity, such as Lazy Writer, with core 0, while aligning other SQL Server threads with core 1. To align IO tasks with specific processors, you need to use an additional setting, called Affinity I/O Mask. When this setting is enabled, a hidden scheduler is created, which is used purely for Lazy Writer. Therefore, it is important that you do not align the affinity and affinity IO masks with the same core. Otherwise you will inadvertently create the contention that you are trying to avoid.
![]() Caution It is very rare that Affinity I/O Mask is required. To align workloads from multiple instances, Affinity Mask is sufficient. It is normally only appropriate for very large databases running on 32-bit systems. With 64-bit systems with larger amounts of RAM, IO churn is less, hence there is less context switching.
Caution It is very rare that Affinity I/O Mask is required. To align workloads from multiple instances, Affinity Mask is sufficient. It is normally only appropriate for very large databases running on 32-bit systems. With 64-bit systems with larger amounts of RAM, IO churn is less, hence there is less context switching.
Both Affinity Mask and Affinity I/O Mask can be set through the GUI in SQL Server Management Studio by selecting the Processors tab in the Instance Properties dialog box, as shown in Figure 4-2.

Figure 4-2. The Processors tab
Processor affinity works based on bit maps. Therefore, if you wish to use sp_configure to set processor affinity, then you first need to calculate the integer representation of the bit map value. This is made more complex because the INT data type is a 32-bit signed integer, meaning that some of the representations will be negative numbers. The value assigned to each processor is listed in Table 4-2.
Table 4-2. Processor Affinity Bit Maps
|
Processor Number |
Bit Mask |
Signed Integer Representation |
|---|---|---|
|
0 |
0000 0000 0000 0000 0000 0000 0000 0001 |
1 |
|
1 |
0000 0000 0000 0000 0000 0000 0000 0010 |
2 |
|
2 |
0000 0000 0000 0000 0000 0000 0000 0100 |
4 |
|
3 |
0000 0000 0000 0000 0000 0000 0000 1000 |
8 |
|
4 |
0000 0000 0000 0000 0000 0000 0001 0000 |
16 |
|
5 |
0000 0000 0000 0000 0000 0000 0010 0000 |
32 |
|
6 |
0000 0000 0000 0000 0000 0000 0100 0000 |
64 |
|
7 |
0000 0000 0000 0000 0000 0000 1000 0000 |
128 |
|
8 |
0000 0000 0000 0000 0000 0001 0000 0000 |
256 |
|
9 |
0000 0000 0000 0000 0000 0010 0000 0000 |
512 |
|
10 |
0000 0000 0000 0000 0000 0100 0000 0000 |
1024 |
|
11 |
0000 0000 0000 0000 0000 1000 0000 0000 |
2028 |
|
12 |
0000 0000 0000 0000 0001 0000 0000 0000 |
4096 |
|
13 |
0000 0000 0000 0000 0010 0000 0000 0000 |
8192 |
|
14 |
0000 0000 0000 0000 0100 0000 0000 0000 |
16384 |
|
15 |
0000 0000 0000 0000 1000 0000 0000 0000 |
32768 |
|
16 |
0000 0000 0000 0001 0000 0000 0000 0000 |
65536 |
|
17 |
0000 0000 0000 0010 0000 0000 0000 0000 |
131072 |
|
18 |
0000 0000 0000 0100 0000 0000 0000 0000 |
262144 |
|
19 |
0000 0000 0000 1000 0000 0000 0000 0000 |
524288 |
|
20 |
0000 0000 0001 0000 0000 0000 0000 0000 |
1048576 |
|
21 |
0000 0000 0010 0000 0000 0000 0000 0000 |
2097152 |
|
22 |
0000 0000 0100 0000 0000 0000 0000 0000 |
4194304 |
|
23 |
0000 0000 1000 0000 0000 0000 0000 0000 |
8388608 |
|
24 |
0000 0001 0000 0000 0000 0000 0000 0000 |
16777216 |
|
25 |
0000 0010 0000 0000 0000 0000 0000 0000 |
33554432 |
|
26 |
0000 0100 0000 0000 0000 0000 0000 0000 |
67108864 |
|
27 |
0000 1000 0000 0000 0000 0000 0000 0000 |
134217728 |
|
28 |
0001 0000 0000 0000 0000 0000 0000 0000 |
268435456 |
|
29 |
0010 0000 0000 0000 0000 0000 0000 0000 |
536870912 |
|
30 |
0100 0000 0000 0000 0000 0000 0000 0000 |
1073741824 |
|
31 |
1000 0000 0000 0000 0000 0000 0000 0000 |
-2147483648 |
![]() Tip Many free calculators are available on the Internet that will assist you in converting binary to signed integer.
Tip Many free calculators are available on the Internet that will assist you in converting binary to signed integer.
On a 32-core server, there are 2.631308369336935e+35 possible combinations for processor affinity, but a few examples are included in Table 4-3.
Table 4-3. Examples of Affinity Masks
|
Aligned Processors |
Bit Mask |
Signed Integer Representation |
|---|---|---|
|
0 and 1 |
0000 0000 0000 0000 0000 0000 0000 0011 |
3 |
|
0, 1, 2, and 3 |
0000 0000 0000 0000 0000 0000 0000 1111 |
15 |
|
8 and 9 |
0000 0000 0000 0000 0000 0011 0000 0000 |
768 |
|
8, 9, 10, and 11 |
0000 0000 0000 0000 0000 1111 0000 0000 |
3840 |
|
30 and 31 |
1100 0000 0000 0000 0000 0000 0000 0000 |
-1073741824 |
|
28, 29, 30, and 31 |
1111 0000 0000 0000 0000 0000 0000 0000 |
-268435456 |
Because of the nature of the affinity mask and the integer data type having a maximum range of 2^32, if your server has between 33 and 64 processors, then you will also need to set the Affinity64 Mask and Affinity64 I/O Mask settings. These will provide the masks for the additional processors.
The settings discussed in this section can all be configured using sp_configure. The example in Listing 4-2 demonstrates aligning the instance with cores 0 to 3.
Even with the 64-bit masks, there is still a limitation of aligning the first 64 cores using this method, and SQL Server will support up to 256 logical processors. For this reason, newer versions of SQL Server have introduced an enhanced method of setting processor affinity. This is through a command called ALTER SERVER CONFIGURATION. Listing 4-3 demonstrated two ways that this command can be used. The first aligns the instance with specific processors in the way that we have seen up until now. In this example, the alignment is with CPUs 0, 1, 2, and 3. The second aligns the instance with all processors within two NUMA nodes, in this case, nodes 0 and 4. Just as when you make changes using sp_configure, changes made using ALTER SERVER CONFIGURATION will be reflected in sys.configurations.
MAXDOP
MAXDOP will set the maximum number of cores that will be made available to each individual execution of a query. The thought of this may initially sound counterintuitive. Surely you would want every query to be parallelized as much as possible? Well, this is not always the case.
Although some data warehousing queries may benefit from high levels of parallelization, many OLTP (Online Transaction Processing) workloads may perform better with a lower degree of parallelization. This is because if a query executes over many parallel threads, and one thread takes much longer than the others to complete, then the other threads may sit waiting for the final thread to finish so that their streams can be synchronized. If this is occurring, you are likely to see a high number of waits with the wait type CXPACKET.
In many OLTP systems, high levels of parallelization being chosen by the Query Optimizer actually indicate issues such as missing or highly fragmented indexes. Resolving these issues will improve performance far more than running queries with a high degree of parallelism.
For instances that support heavy data warehousing workloads, different MAXDOP configurations should be tested and set accordingly, with the understanding that MAXDOP can also be set at the query level, through the use of a Query Hint, if a handful of queries would benefit from a different setting to the majority of the instance’s workload. In the vast majority of cases, however, the instance level setting for MAXDOP should be configured to the lowest of the following three values:
- 8
- Number of cores available to the instance (the default value for MAXDOP)
- The number of cores within a NUMA node
The default value for MAXDOP is 0, which means that queries are only limited by the number of cores that are visible to the instance. You can configure MAXDOP via the GUI by configuring the Max Degree of Parallelism setting on the Advanced tab of the Server Properties. Figure 4-3 illustrates this setting being configured to 8.

Figure 4-3. The Advanced tab
You can also configure MAXDOP using sp_configure. Listing 4-4 demonstrates using sp_configure to set MAXDOP to a value of 8.
An alternative to lowering the MAXDOP setting is to increase the threshold at which the Query Optimizer will choose a parallel plan over a serial plan. The default setting for this is an estimated serial execution time of 5 seconds, but you can configure this to anything between 0 and 32767 seconds. The cost threshold for the parallelism option will be ignored, however, if you have MAXDOP configured to 1, or if there is only one core available to the instance. The script in Listing 4-5 will increase the cost threshold for parallelism to 10 seconds.
Min and Max Server Memory
The Min Server Memory (MB) and Max Server Memory (MB) settings are used to control how much memory SQL Server has available for its memory pool. The memory pool contains many components. Some of the largest components are detailed in Table 4-4.
Table 4-4. SQL Server Memory Pool
|
Component |
Description |
|---|---|
|
Buffer cache |
The buffer cache stores data and index pages before and after being read from or written to disk. Even if the pages your query requires are not in the cache, they will still be written to the buffer cache first and then retrieved from memory, as opposed to been written directly from disk. |
|
Procedure cache |
The procedure cache contains execution plans, not just for stored procedures, but also for ad-hoc queries, prepared statements, and triggers. When SQL Server begins to optimize a query, it first checks this cache to see if a suitable plan already exists. |
|
Log cache |
The log caches stores log records before they are written to the transaction log. |
|
Log pool |
A hash table that allows HA/DR and data distribution technologies, such as AlwaysOn, Mirroring, and Replication, to quickly access required log records. |
|
CLR |
CLR refers to .NET code that is used inside the instance. In older versions of SQL Server, CLR sat outside of the main memory pool, as the memory pool only dealt with single, 8KB page allocations. From SQL Server 2012 onward, the memory pool now deals with both single and multipage allocations, so CLR has been brought in. |
In many environments, it is likely that you will want to provide the same value, for both Min and Max Server Memory. This will avoid the overhead of SQL Server dynamically managing the amount of memory it has reserved.
If you have multiple instances, however, then dynamic memory management may be beneficial so that the instance with the heaviest workload at any given time can consume the most resources. You must give extra consideration if your instances are hosted on an Active/Active cluster. I have seen one example of a client turning on Lock Pages In Memory and then configuring the min and max memory for the instances on each node as if they were stand-alone boxes. At the point of failover, the remaining node crashed, because there was not enough RAM to support the memory requirements of all instances on one box.
No matter how your environment is configured, you will always want to leave enough memory for the operating system. Assuming that you have one instance and no other applications, such as SSIS packages, running on the server, you would normally set both the min and max memory setting to be the lowest value from the following:
- RAM - 2GB
- (RAM / 8) * 7
If you have multiple instances, you would, of course, divide this number appropriately between the instances, depending on their requirements. If you have other applications running on the server, then you must also take their memory requirements into account and add those to the operating system requirements.
Min Server Memory (MB) and Max Server Memory (MB) can both be configured by using the Memory tab in the Server Properties dialog box, as shown in Figure 4-4.

Figure 4-4. The Memory tab
You can also configure both the settings through T-SQL by using the sp_configure stored procedure. Listing 4-6 demonstrates this.
Trace flags are switches within SQL Server that can be used to toggle functionality on and off. Within the instance, they can be set at the session level, or they can be applied to the instance globally, using a DBCC command called DBCC TRACEON. Not all trace flags can be set at the session level due to their nature. An example of this is trace flag 634. Setting this flag turns off the background thread responsible for periodically compressing rowgroups within columnstore indexes. Obviously, this would not apply to a specific session. The sample in Listing 4-7 uses DBCC TRACEON to set trace flag 634 globally. It also turns on 1211 for the current session only. Trace flag 1211 disables lock escalation based on memory pressure or number of locks. The script then uses DBCC TRACESTATUS to show the status of the flags before finally using DBCC TRACEOFF to toggle the behavior back to default. You can see that to specify the global scope, we use a second parameter of -1. The default is to set the flag at the session level.
![]() Caution Trace flag 1211 is used here for the purpose of demonstrating DBCC TRACEON. However, it may cause an excessive number of locks and should be used with extreme caution. It may even cause SQL Server to throw errors due to lack of memory for allocating locks.
Caution Trace flag 1211 is used here for the purpose of demonstrating DBCC TRACEON. However, it may cause an excessive number of locks and should be used with extreme caution. It may even cause SQL Server to throw errors due to lack of memory for allocating locks.
Figure 4-5 shows the results screen that is produced from running this script, assuming that no other trace flags have currently been toggled away from their default setting. There are no results to display from the DBCC TRACEON and DBCC TRACEOFF commands. The messages windows, however, will display execution completed messages or inform you of any errors.

Figure 4-5. DBCC TRACESTATUS results
The limitation of using DBCC TRACEON, even with a global scope, is that the settings are transient and will not be persisted after the instance has been restarted. Therefore, if you wish to make permanent configuration changes to your instance, then you must use the -T startup parameter on the SQL Server service.
Startup parameters can be configured in SQL Server Configuration Manager. Expanding Service in the left hand window will display a list of all SQL Server–related services on the server. Entering the properties for the Database Engine service and selecting the Startup Parameters tab will then allow you to add or remove startup parameters. Figure 4-6 illustrates setting trace flag 1118.

Figure 4-6. Startup parameters
If your instance is running on Windows Server Core, or if you want to script the configuration on a GUI-based server, then you could achieve the same results by running the PowerShell script in Listing 4-8. This script allows you to specify the instance name and trace flag to be configured in the top two variables. These could also be parameterized if you wish to create a reusable script. Similarly, the script could be added to the automatic installation script that we created in Chapter 2.
The PowerShell script works by determining the Registry path to the startup parameters and then by counting the number of arguments that already exist. Counting the arguments allows the next argument number in sequence to be determined. It then adds the new argument, specifying the required trace flag.
Many trace flags can be specified as startup parameters and the vast majority of them are only helpful in very specific circumstances. There are a few that stand out, however, as having the potential for more widespread use. These trace flags are detailed in the following sections.
Trace Flag 1118
SQL Server stores data in 8KB chunks, known as pages. These pages are organized into extents. An extent is eight continuous pages and is the smallest amount of data that SQL Server ever reads or writes to disk. There are two types of extent: mixed and uniform. A mixed extent holds data from multiple objects. These objects could include tables and indexes. A uniform extent, on the other hand, only stores data from a single object. Every new table is initially created on a mixed extent. When the size of the table grows to more than 64K, then the table begins to use uniform extents, even if row deletion or table truncation brings it back down below 64K. When you create a new index, if the initial size of the index is less than 64K, then the same rules will apply. If the initial size is greater than 64K, however, it will immediately be placed in uniform extents.
SQL Server keeps track of which extents are in use and if they are mixed or uniform with the use of GAM (Global Allocation Map) and SGAM (Shared Global Allocation Map) pages. These are special data pages, stored with the data files of each database, that store one bit for every extent in their range, and flip this bit, depending on the usage of a specific extent. If you have a database where many objects are created and dropped, such as TempDB, then these GAM and SGAM pages can become a bottleneck, due to multiple processes needing to access them simultaneously in order for space to be allocated for new objects.
Trace flag 1118 will turn off the use of mixed extents. This means that all new objects will be placed onto uniform extents. This can help reduce the contention on systems pages. It is important to note, however, that this flag will apply to all databases on the instance, not just TempDB. This means that the trade-off is less efficient storage if you have databases that contain many very small tables (less than 64KB).
![]() Caution Although well-known and well documented, even by Microsoft, this trace flag does not appear in Books Online. This means that it is regarded as an undocumented feature. This is important, because if you open a support ticket with Microsoft, they may ask you to turn this off before continuing an investigation.
Caution Although well-known and well documented, even by Microsoft, this trace flag does not appear in Books Online. This means that it is regarded as an undocumented feature. This is important, because if you open a support ticket with Microsoft, they may ask you to turn this off before continuing an investigation.
When there are multiple files within a filegroup, SQL Server uses a proportional fill algorithm to assign extents to the file with the most available space. This works well, but when a file becomes full, it will grow, whereas the other files in the filegroup stay the same size. This skews the proportional fill algorithm.
If your instance is hosting certain types of database, such as a large data warehouse with large sequential scans, then this can cause a performance issue because the IO will not be evenly distributed. In order to avoid this problem, you can turn on trace flag 1117. Doing so will cause all of the files with a filegroup to grow at the same time.
The trade-off is that without proper configuration, you will use up free space on disk more quickly. However, if you think ahead about your initial file configuration, you can easily resolve this. For example, if you have four files within a filegroup and you would normally set an auto growth increment of 2048MB, you would simply alter the auto growth increment to be 512MB, if you wish to use this trace flag,
Of course, it is always beneficial to initially size all of you data files so that they will be the correct size and never have to grow. With even the best capacity planning, however, this is often not possible. Imagine a scenario where you anticipate, based upon natural growth, that your Sales data warehouse will grow to 2TB within five years, which is the anticipated lifecycle of the application. A year after, however, your company buys out two smaller firms. Suddenly, your capacity planning will be way out of sync with reality. Therefore, it always pays to have auto growth enabled as a fail-safe.
![]() Caution Although well-known and even specifically recommended in some of Microsoft’s reference architectures, Trace Flag 1117 is not official documented by Microsoft. This is important, because if you open a support ticket with Microsoft, they may ask you to turn this off before continuing an investigation.
Caution Although well-known and even specifically recommended in some of Microsoft’s reference architectures, Trace Flag 1117 is not official documented by Microsoft. This is important, because if you open a support ticket with Microsoft, they may ask you to turn this off before continuing an investigation.
Trace Flag 3042
When you are performing backups using backup compression in SQL Server, a preallocation algorithm is used to allocate a defined percentage of the database size to the backup file. This gives you a performance advantage, over growing the size of the backup file, as required, on the fly. On the flip side, however, if you need to preserve disk space on your backup volume and use only the minimum amount of space required, then you can use trace flag 3042 to turn off this behavior and grow the file as required.
Trace Flag 3226
By default, every time you take a backup, a message will be recorded in the SQL Server log. If you take frequent log backups, however, then this can very quickly cause so much “noise” in the log, that troubleshooting issues can become more difficult and time consuming. If this is the case, then you can turn on trace flag 3226. This will cause successful backup messages to be suppressed in the log, resulting in a smaller, more manageable log.
Trace Flag 3625
SQL Server enforces tight controls on the visibility of metadata. Users can only view metadata for objects they own, or where they have explicitly been granted permissions to view metadata. This method of protection is still fallible, however, and a skilled attacker could still gain information. One way in which they could achieve this is by manipulating the order of precedence in queries in order to produce error messages.
In order to mitigate this risk, you can set trace flag 3625. This trace flag will limit the amount of metadata visible in error messages by masking certain data with asterisks. The downside of this defensive tactic, however, is that error messages become less meaningful and harder to understand. This can make troubleshooting issues more difficult.
In modern enterprise topologies, it is likely that your SQL Server instance will need to communicate through at least two firewalls. One of these will be a hardware firewall and the other will be the Windows Firewall, also known as the local firewall. In order for your instance to communicate with other interfaces—whether those are applications or other instances on the network—while still maintaining the security provided by a firewall, ports will need to be opened so that SQL Server can communicate through those ports.
Process of Communication
In order to understand which ports will need to be opened to allow SQL Server traffic, you must first understand how clients communicate with SQL Server. Figure 4-7 illustrates the process flow for TCP/IP connections. This example assumes that the instance is listening on Port 1433—this will be discussed in more detail later in this chapter. It also assumes that the client is running on Windows Vista/Windows Server 2008 or higher.

Figure 4-7. Communication process flow
If you wish clients to access the instance via named pipes, as opposed to TCP/IP, then SQL Server will communicate over port 445. This is the same port used by file and printer sharing.
Ports Required By SQL Server
If you install a default instance of SQL Server, then setup will automatically assign port 1433, which is the port registered for SQL Server in IANA (Internet Assigned Numbers Authority). Many DBAs choose to change this port number, however, for enhanced security. An attacker will know that you are likely to have instances running on port 1433 and will therefore know which port to attack. In smaller estates, unless you are confident of the security of your network, using nonstandard port numbers may be a good idea to add an extra layer of obfuscation. In larger enterprises, however, you will need to consider the impact on operational supportability. For example, if each instance has a different port number, you will need a method of recording and very quickly obtaining the port number for a given instance in case of failure of the browser service. This will be less of a concern in environments where multiple named instances are permitted on each server, since you will already have the inventory tooling for recording these port numbers.
![]() Note IANA, the Internet Assigned Numbers Authority, is responsible for coordinating the allocation of Internet protocol resources, such as IP addresses, domain names, protocol parameters, and port numbers of network services. Its website is www.internetassignednumbersauthority.org/.
Note IANA, the Internet Assigned Numbers Authority, is responsible for coordinating the allocation of Internet protocol resources, such as IP addresses, domain names, protocol parameters, and port numbers of network services. Its website is www.internetassignednumbersauthority.org/.
If you install a named instance of SQL Server, then setup will configure the instance to use dynamic ports. When dynamic ports are configured, then every time the instance starts, it will request a port number from the operating system. The OS will then assign it a random available port from the dynamic range, which is from 49152 to 65535, assuming that you are running on Windows Server 2008 or above. In earlier versions of Windows, the dynamic port range was from 1024–5000, but Microsoft changed this in Windows Vista and Windows Server 2008 to comply with IANA.
If your instance is configured to use dynamic ports, then configuring firewalls can be challenging. At the Windows Firewall level, it is possible to configure a specific service to communicate on any port, but this can be hard to replicate at the hardware firewall level. Alternatively, you need to keep the full dynamic port range open bidirectionally. Therefore, I recommend that the instance is configured to use a specific port.
It is important to remember that SQL Server uses many other ports for various features. The full set of ports that may be required by the Database Engine is listed in Table 4-5. If you install features outside of the Database Engine, such as SSAS or SSRS, then additional ports will be required. There will also be additional requirements if you plan to use additional services with your instance, such as IPSec for encryption, MSDTC (Microsoft Distributed Transaction Coordinator) distributed transactions, or SCOM (System Centre Operations Manager) for monitoring.
Table 4-5. Ports Required by the Database Engine
|
Feature |
Port |
|---|---|
|
Browser Service |
UDP 1433. |
|
Instance over TCP/IP |
TCP 1433, dynamic or static configured. |
|
Instance over named pipes |
TCP 445. |
|
DAC (Dedicated Administrator Connection) |
TCP 1434. If TCP 1434 already in use, the port will be printed to the SQL Server log during instance startup. |
|
Service Broker |
TCP 4022 or as per configuration. |
|
AlwaysOn Availability Groups |
TCP 5022 or as per configuration. |
|
Database Mirroring |
TCP 7022 or as per configuration. |
|
Merge Replication with Web Sync |
TCP 21, TCP 80, UDP 137, UDP 138, TCP 139, TCP 445. |
|
T-SQL Debugger |
TCP 135. |
Configuring the Port That the Instance Will Listen On
As mentioned earlier in this chapter, if you have a named instance, then before configuring your firewall, it is likely that you will want to configure a static port for the instance. The port can be configured within the TCP/IP Properties dialog box of the TCP/IP protocol in SQL Server Configuration Manager. To navigate to this dialog box, drill down through SQL Server Network Configuration | Protocols for INSTANCENAME (where INSTANCENAME is the name of your instance) in the left hand pane of SQL Server Configuration Manager. Entering TCP/IP in the right hand pane will display the dialog box.
On the Protocol tab, you will notice a setting named Listen All, which has a default value of Yes, as shown in Figure 4-8. The significance of this setting will become apparent shortly.

Figure 4-8. The Protocol tab
In the IP Addresses tab, you will notice that there are configuration details for multiple IP addresses. Because the Listen All setting is set to Yes, however, SQL Server will ignore all of these configurations. Instead, it will look solely at the settings specified for IP All at the very bottom of the dialog box. The TCP dynamic ports field will display the random port that has been assigned by the operating system and the TCP Port field will be blank, as illustrated in Figure 4-9. To assign a static port number, we need to flip this around. We will need to clear the TCP Dynamic Port field and populate the TCP Port field with 1433, which is our chosen port number. The SQL Server service will need to be restarted before this change can take effect.
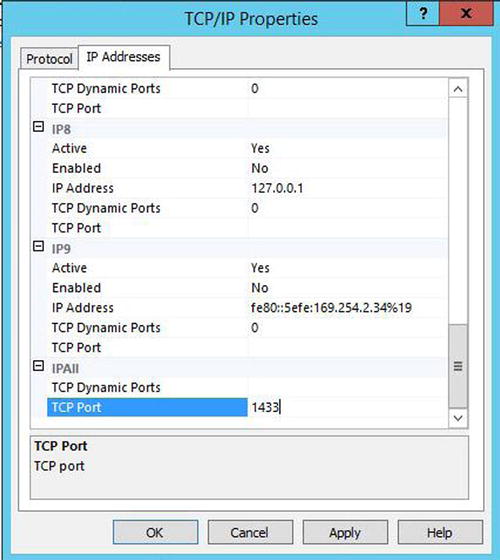
Figure 4-9. IP Addresses tab
![]() Tip Remember that the Default instance will take port 1433 by default. Therefore, if a Default instance already exists on the server, when you create the named instance, you must use a different port.
Tip Remember that the Default instance will take port 1433 by default. Therefore, if a Default instance already exists on the server, when you create the named instance, you must use a different port.
We could achieve the same result from PowerShell by running the script in Listing 4-9. This script has two variables at the top where you should insert the name of your instance and the port number you want to assign. These could also be parameterized to create a reusable script. The script loads the relevant SMO Assembly. It then creates a new SMO object and connects to the TCP properties of the object to configure the port. The script must be run As Administrator.
Implementing Windows Firewall Rules
Windows Firewall rules can be implemented through the GUI by using the Windows Firewall with Advanced Security console, which can be found in Control Panel. In the following example, we will assume that we have an instance that will connect on port 1433 and that we also plan to use AlwaysOn Availability Groups. We will also assume that the browser service will be disabled and applications will be specifying a port number in the connection string.
This means that we will need to create a new inbound rule for dynamic ports TCP 1433 and TCP 5022. We will also need a new outbound rule for ports TCP 1433 and TCP 5022. When you choose to create a new inbound rule, the New Inbound Rule Wizard will be displayed. You should select Port as the rule type, as shown in Figure 4-10.

Figure 4-10. The Rule Type page
On the next screen of the wizard, ensure that TCP is selected and enter the required port numbers and range, as shown in Figure 4-11.
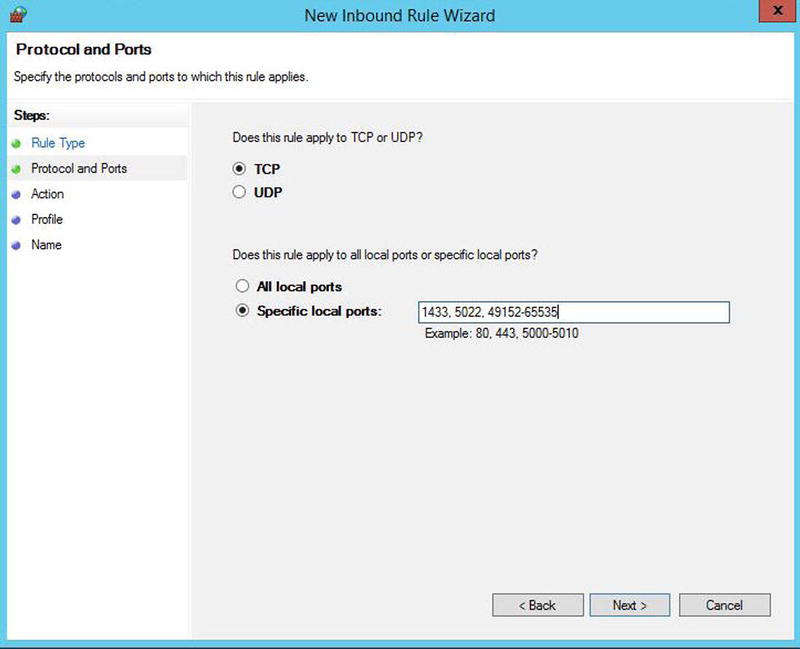
Figure 4-11. The Protocols And Ports page
On the Action page of the wizard, we will ensure that the Allow The Connection option is selected, as illustrated in Figure 4-12, and click Next to move on.
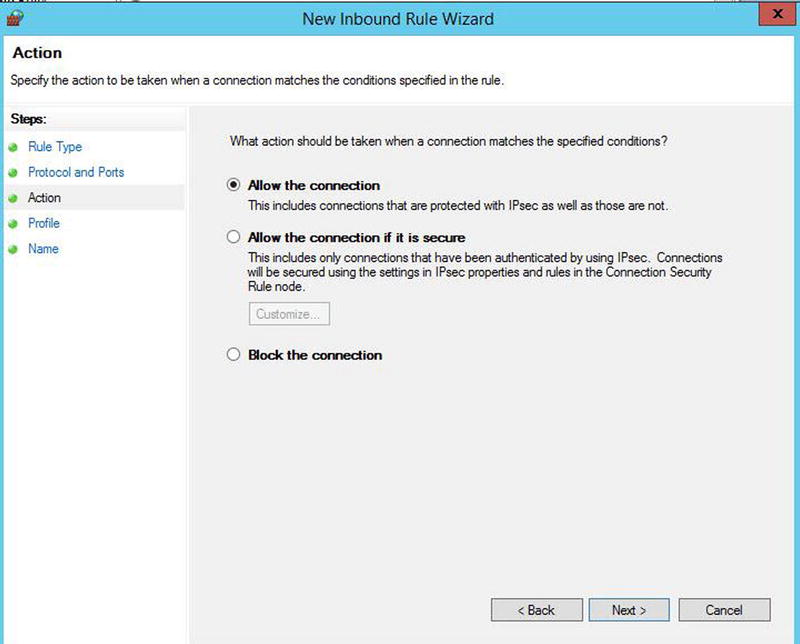
Figure 4-12. The Action page
As illustrated in Figure 4-13, the Profile page of the wizard will allow us to select which type of network connection our rule will apply to. In most environments, we would only want domain authenticated users connecting to our instance, so we will deselect the options for Private and Public networks.

Figure 4-13. The Profile page
On the final page of the wizard, we will specify the name of our rule. This name should be descriptive and you should also add a description, specifying the ports that you are opening. This is illustrated in Figure 4-14.

Figure 4-14. The Name page
After creating the inbound rule, you would need to repeat the process for an outbound rule. Following our example, we would need to specify ports TCP 1433 and TCP 5022. There would be no need to specify dynamic ports. If we decided to use the browser service, we would need to create additional rules for the UDP 1434 Port.
The inbound rule just demonstrated could also be created by using the PowerShell script in Listing 4-10.
SQL Server maintains five system databases, each of which is important to the efficient running of your instance. The following sections describe each of these databases and details any special considerations for configuring them.
mssqlsystemresource (Resource)
Although referred to as Resource, the full name of the Resource database is mssqlsystemresource. It is the physical repository used to store the system objects that appear within the sys schema of every database. It is read-only and should never be modified, except under guidance from Microsoft. It is not visible within Management Studio, and if you try to connect to it from a query window, it will fail, unless you are in Single User Mode. There are no considerations for configuring Resource.
MSDB
MSDB is used as a metadata repository for many SQL Server features, including Server Agent, Backup/Restore, Database Mail, Log Shipping, Policies, and more. Although this is obviously a critical and useful database, there are no specific configuration options to consider. That being said, in a very large instance consisting of a very large number of databases, all with frequent log backups, the database can grow very large. This means that you will need to purge old data and sometimes consider indexing strategies. Historic backup data can be purged using the sp_deletebackuphistory stored procedure or the History Cleanup Task in a Maintenance Plan. Automating routine maintenance tasks will be discussed in more detail, in Chapter 21.
Master
Master is the system database that contains metadata for instance level objects, such as Logins, Linked Servers, TCP endpoints, and master keys and certificates for implementing encryption. The biggest consideration for the Master database is the backup policy. Although it does not need to be backed up as frequently as user databases do, you should always ensure that you do have a current backup. At a minimum, the database should be backed up after creating or altering logins, linked servers, and system configurations; creating or altering keys and certificates; or after creating or dropping user databases. Many people select a weekly, full backup schedule for Master, but this will depend on your operational requirements, such as how often you create new users.
![]() Note Logins and users will be discussed in Chapter 9, backups will be discussed in Chapter 15, and keys and certificates will be discussed in Chapter 10.
Note Logins and users will be discussed in Chapter 9, backups will be discussed in Chapter 15, and keys and certificates will be discussed in Chapter 10.
Although technically possible, it is considered bad practice to store user objects in the Master database. I have seen clients implement this for stored procedures that need to be shared by all databases on the instance, but it adds complexity, because they are fragmenting the storage of user objects and also increasing the frequency with which they must backup Master.
Model
Model is used as a template for all new databases that are created on the instance. This means that spending some time configuring this database can save you time and reduce human error when you are creating user databases. For example, if you set the Recovery Model to be Full on the Model database, then all new user databases will automatically be configured in the same way. You still have the option to override this in your CREATE DATABASE statement. Additionally, if you need a specific object to exist in all databases, such as a maintenance-stored procedure or a database role, then creating this in Model will mean that the object will automatically be created inside every new database. Model is also used for creating TempDB every time the instance starts. This means that if you create objects in the Model database, they will automatically be added to TempDB when the instance restarts.
![]() Tip When you are configuring or adding new objects to Model, existing databases will not be updated. Changes will only apply to new databases that you create subsequently.
Tip When you are configuring or adding new objects to Model, existing databases will not be updated. Changes will only apply to new databases that you create subsequently.
TempDB
TempDB is a workspace used by SQL Server when it needs to create temporary objects. This applies to temporary tables created by users, and less commonly known, it also applies to table variables. Table variables always cause an object to be created in TempDB, but data is only spooled to disk if it breaches size thresholds. There are also many internal reasons why SQL Server will require temporary objects to be created. Some of the key reasons are as follows:
- Sorting and spooling data
- Hashing data, such as for joins and aggregate grouping
- Online index operations
- Index operations where results are sorted in TempDB
- Triggers
- DBCC commands
- The OUTPUT clause of a DML statement
- Row versioning for snapshot isolation, read-committed snapshot isolation, queries over MARS, and so on
Because TempDB is responsible for so many tasks, in high-volume instances, it is likely to have a very high throughput. For this reason, it is the system database that you should spend the most time configuring in order to ensure the best performance for your data-tier applications.
The first thing you should consider is the size of TempDB. Ideally, TempDB will be subject to capacity planning for large or highly transactional instances. A full discussion of capacity planning is beyond the scope of this book, but ideally, this will involve using a test server to expand all of the user databases on the instance out, to the size that they are expected to grow to, discovered through their own capacity planning exercises. You would then run representative workloads through those databases and monitor the usage of TempDB. Additionally, you should also perform administrative tasks against the databases that you have expanded to their expected size. Specifically, this would include activities such as rebuilding indexes so that you can examine the usage profile of TempDB during these activities. There are a number of DMVs (dynamic management views) that can help you with this planning. Some of the most useful are described in Table 4-6.
Table 4-6. DMVs for TempDB Capacity Planning
|
DMV |
Description |
|---|---|
|
sys.dm_db_session_space:usage |
Displays the number of pages allocated for each current session. This will include page counts for the following objects: • User and system tables • User and system indexes • Temporary tables • Temporary indexes • Table variables • Tables returned by functions • Internal objects for sorting and hashing operations • Internal objects for spools and large object operations |
|
sys.dm_db_task_space:usage |
Displays the number of pages allocated by tasks. This will include page counts from the same object types as sys.dm_db_session_space:usage. |
|
sys_dm_db_file_space:usage |
Displays full usage information for all files in the database, including page counts and extent counts. To return data for TempDB, you must query this DMV from the context of the TempDB database, since it can also return data from user databases. |
|
sys.dm_tran_version_store |
Returns a row for every record within the version store. You can view this data raw or aggregate it to get size totals. |
|
sys.dm_tran_active_snapshot_database_transactions |
Returns a row for every current transaction that may need to access the version store, due to isolation level, triggers, MARS (Multiple Active Results Sets), or online index operations. |
In addition to the size of TempDB, you should also carefully consider the number of files that you will require. This is important, because due to the nature of many objects being very rapidly created and dropped, if you have too few files, then you can suffer contention of the GAM and SGAM pages, even with trace flag 1118 turned on. If you have too many files, on the other hand, you may experience increased overhead. This is because SQL Server allocates pages to each file within the filegroup in turn in order to maintain proportional fill. With a large number of files, there will be an extra synchronization effort to determine if the allocation weighting for each file should be altered.
The current, general recommendation is that you should have one TempDB file for every core available to the instance, with a minimum of two files and a maximum of eight files. You should only add more than eight files if you specifically witness GAM/SGAM contention. This will manifest itself as PAGELATCH waits occurring against TempDB. You will find a discussion of how to add files and alter their size in Chapter 5.
![]() Tip PAGEIOLATCH waits indicate a different issue than PAGELATCH waits. If you see PAGEIOLATCH waits against TempDB, this indicates that the underlying storage is the bottleneck. Wait types will be discussed in more detail in Chapter 17.
Tip PAGEIOLATCH waits indicate a different issue than PAGELATCH waits. If you see PAGEIOLATCH waits against TempDB, this indicates that the underlying storage is the bottleneck. Wait types will be discussed in more detail in Chapter 17.
Buffer Pool Extension
As already mentioned, the buffer pool is an area of memory that SQL Server uses to cache pages before they are written to disk and after they have been read from disk. There are two distinct types of pages that exist in the buffer cache: clean pages and dirty pages. A clean page is a page to which no modifications have been made. Clean pages usually exist in the cache because they have been accessed by read operations, such as SELECT statements. Once in the cache, they can support all statements. For example, a DML statement can access the clean page, modify it, and then update its dirty page marker.
Dirty pages are pages that have been modified by statements such as INSERT, UPDATE, and DELETE among others. These pages need to have their associated log record written to disk and subsequently, the dirty pages themselves will be flushed to disk, before they are regarded as clean. The process of writing the log record first is known as WAL (write-ahead logging), and it is how SQL Server ensures that no committed data can ever be lost, even in the event of a system failure.
Dirty pages are always kept in the cache until they are flushed to disk. Clean pages, on the other hand, are kept in cache for as long as possible, but are removed when space is required for new pages to be cached. SQL Server evicts pages based on a least-recently-used policy. This means that read-intensive workloads can rapidly start to suffer from memory pressure if the buffer cache is not correctly sized.
The issue here is that RAM is expensive and it may not be possible to keep throwing more and more memory at the problem. In order to address this, Microsoft has introduced a new technology in SQL Server 2014 called buffer pool extensions.
A buffer pool extension is designed to be used with very fast SSDs, which will normally be locally attached to the server, as opposed to being located on a SAN. In short, the storage needs to operate as fast as possible. The extension will then become a secondary cache for clean pages only. When clean pages are evicted from the cache, they will be moved to the buffer pool extension, where they can be retrieved faster than by going back to the main IO subsystem.
This is a very useful feature, but it is not a magic bullet. First, it is important to remember that the buffer pool extension will never be able to provide the same performance improvement as a correctly sized buffer cache will without an extension. Second, the performance gain that you will experience from using a buffer pool extension is workload specific. For example, a read-intensive OLTP workload will probably benefit substantially from buffer pool extensions, whereas a write-intensive workload will see little benefit at all. This is because dirty pages cannot be flushed to the extension. Large data warehouses are also unlikely to benefit dramatically from buffer pool extensions. This is because the tables are likely to be so large that a full table scan, which is common with this workload scenario, is likely to consume the majority of the both the cache and the extension. This means that it will wipe out other data from the extension and will be unlikely to benefit subsequent queries.
It is sensible to use a resilient SSD volume such as a RAID 10 stripe. This is because if the volume were to fail, with no resilience, your server would immediately see a drop in performance. In the event that the SSD drive that your extension is stored on fails, SQL Server will automatically disable the extension. It can be re-enabled manually, or it will automatically attempt to re-enable itself when the instance is restarted.
I also recommend that you size the extension between four and eight times the size of your Max Server Memory setting in order to obtain optimum performance. The maximum possible size of the extension is thirty-two times the size of the Max Server Memory setting.
Buffer pool extension can be enabled using the statement shown in Listing 4-11. This script assumes that the SSD drive that you wish to use is mapped as the S: volume. It also assumes that we have 32GB set as the Max Server Memory setting, so we will configure the extension to be 128GB, which is four times the size.
If required, the buffer pool extension can be disabled by using the command in Listing 4-12. Be warned, however, that removing a buffer pool extension is likely to result in a sudden drop in performance.
Uninstall an Instance
SQL Server Installation Center has no option for uninstalling an instance. This means that if you wish to remove either an instance or shared features from your server, you will need to use either Control Panel or the command line. The following sections will demonstrate how to remove SQL Server using both of these methods.
Uninstall from Control Panel
To uninstall SQL Server from the GUI, you should open the Programs And Features console in Control Panel. The program that we will initially be removing is Microsoft SQL Server 2014 (64-bit). When you select this application, you are prompted to Add, Repair, or Remove the program, as show in Figure 4-15. You should select the option to Remove.

Figure 4-15. The Programs And Features console
After choosing to remove the program, SQL Server will run the Global Rules check to ensure that it will be able to complete the action. You should review the rules check and ensure that there are no issues. The Global Rules screen is illustrated in Figure 4-16.

Figure 4-16. The Global Rules page
After the rules have been checked, you will need to select which instance you want to remove. In this example, we will be uninstalling an instance called PROSQLADMINREM, so we should ensure that this instance is selected, as shown in Figure 4-17; then we click Next to move on.

Figure 4-17. The Select Instance page
Our next task is to select specifically which features we want to remove from the instance. We can also select individual shared features to remove on this screen, as illustrated in Figure 4-18. In this example, however, we plan to remove all aspects of SQL Server, so we have selected all shared features as well as all features of the instance.

Figure 4-18. The Select Features page
Setup will now run an additional rules check for the specific features that you will be uninstalling. You should ensure that there are no issues identified before you continue. The Feature Rules screen is illustrated in Figure 4-19.

Figure 4-19. The Feature Rules page
Finally, setup will provide you with a summary of the features that will be removed. Just like it does when you are installing an instance, setup will also provide a link to a configuration file that it will use during the uninstall process. This screen is illustrated in Figure 4-20.

Figure 4-20. The Read To Remove page
After completing the removal process of SQL Server, you may diskover that when you refresh the Programs And Features console in Control Panel, there are still elements of SQL Server that have not been uninstalled. Figure 4-21 shows that, in our example, Microsoft ODBC Driver 11 for SQL Server, Microsoft SQL Server 2008R2 Management Objects, SQL Server 2012 Native Client, and Microsoft SQL Server CLR Types still exist on the Server. These need to be removed manually.
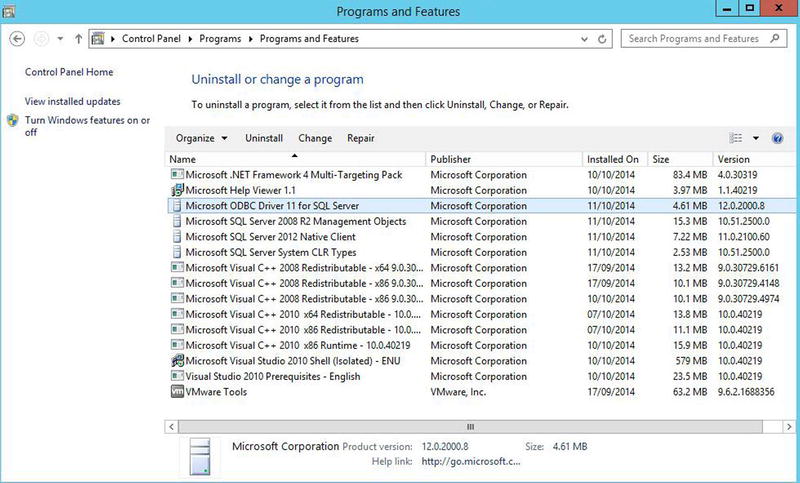
Figure 4-21. Remaining features
If you navigate to the root directory of the instance, you will also notice that some of the instance’s folder structure also still exists. This is because setup does not remove the error logs, health traces, and so on. If you do not need these logs, you should manually delete the instance directory structure. You may also find that the instance is still referenced within the Registry. Many generic SQL Server references will remain, but your instance will still be referenced by name in the following areas of the Registry.
- AutoRecoverMOFs
- Installer Folders
- ProfileImagePath
- EventLog | Application
Uninstall from PowerShell
Removing a SQL Server instance on Windows Server Core is a relatively straightforward process. You can run setup.exe from the root of the installation media, specifying an action of Uninstall. To perform an uninstall from an instance on Windows Server Core, which has the Database Engine, Replication, and connectivity components installed, you would run the PowerShell command in Listing 4-13. The command could also be used to script the uninstall process on GUI-based servers.
Summary
You should consider how you should configure your processor and memory for the instance. With regard to the processor, these considerations should include affinity mask settings for multiple instances, or avoiding context switching during IO operations. You should also consider the appropriate settings for MAXDOP in your environment.
With regard to memory, you should consider the most appropriate usage of Min and Max Server Memory and if it is appropriate to configure these to the same value. You should also consider if buffer pool extensions would help your system performance and if so, you should use Max Server Memory as the base for calculating the correct size of this warm cache.
Trace flags toggle settings on and off, and adding them as startup parameters will ensure that your instance is always configured as you require it to be. Many trace flags are for very specific purposes, but some have more generic usage, such as 1118, which will force uniform extents, which can help optimize TempDB.
For your SQL Server instance to be able to communicate with applications and other instances on the network, you should configure the instance port and local firewall appropriately. It is generally considered bad practice to use a dynamic port for SQL Server connections, so you should configure the instance to use a specific TCP port.
All five of the system databases are critical to the proper functioning of the instance. In terms of configuration, however, you should give most consideration to TempDB. TempDB is heavily used by many SQL Server features, and therefore it can quickly become a bottleneck in busy systems. You should ensure that you have the correct number of files and that they are sized correctly.
Uninstalling an instance or removing features from an instance can be done either from Control Panel, or from the command line. You should be mindful of the fact that even after an instance is uninstalled, there will still be a residue left in the file system and also in the Registry.