
![]()
Cloud Backups and Restores
Traditionally, enterprise environments rely on backups taken either directly to tape, or first to disk, and then offloaded to tape by an enterprise-level backup tool. These tapes are often sent to an offsite location where they are retained for a period of time before they are recycled. However, this practice can cause issues related to the cost of secure offsite storage and the length of time it can take to restore a backup if you must retrieve the backup from an offsite location.
In SQL Server 2014, Microsoft has introduced the ability to back up your SQL Server databases to Windows Azure. This solution can offer many benefits, including cost savings and the rapid availability of backups. SQL Server lets you manually take or schedule backups that you want taken to Windows Azure, but it also supplies you with the functionality to simplify and automate the process. On the flip side, retrieving large backup files from the Internet is likely to be slower than retrieving the files from on-premises disks.
After discussing the fundamentals behind cloud backups, this chapter demonstrates how you can manually back up databases to Windows Azure and how to automate the backup process.
In order to perform backups to Windows Azure, you must first have a Windows Azure account and a Windows Azure storage account. The Windows Azure storage account includes an account name and two access keys. This means that if you have an issue with your primary access key, you can still access your account using the secondary access key. You can create a Windows Azure account by visiting https://account.windowsazure.com, and then you can go on to create a Windows Azure storage account by subsequently visiting the Windows Azure management portal.
A container is a group that contains files. Each Windows Azure storage account must have at least one container, and there is no upper limit on the number of containers an account can have. The files stored within a container are known as blobs. Windows Azure supports two types of blob: one is known as a block blob and the other as a page blob. A block blob is optimized for efficient uploads, whereas a page blob is optimized for efficient read/write activity.
![]() Caution SQL Server only supports page blobs. If you create your backup as a block blob, you will be unable to restore it.
Caution SQL Server only supports page blobs. If you create your backup as a block blob, you will be unable to restore it.
Each container can contain multiple blobs, and no upper limits are imposed on the number of blobs you can store within a container. However, there is a maximum file size of 1TB for each individual page blob. This means that if your database is larger than 1TB, you need to maintain a file or filegroup backup strategy. You can access blobs via a URL by using the following URL format: https://MyStorageAccount.blob.core.windows.net/MyContainer/MyBlob. SQL Server uses credentials to access the URL, because it is, of course, an external resource to SQL Server. The credential uses the storage account name and access key to connect to the URL.
![]() Note The demonstrations in this chapter assume that you have created a Windows Azure account and a Windows Azure storage account. These demonstrations use a storage account named prosqladmin.
Note The demonstrations in this chapter assume that you have created a Windows Azure account and a Windows Azure storage account. These demonstrations use a storage account named prosqladmin.
Simple Back Up and Restore to Windows Azure
The following sections discuss how to create a container, how to back up a database to Windows Azure, how to view your backups from SQL Server Management Studio, and how to restore a database that has been backed up to Windows Azure.
Creating a Container
The first step in enabling backups to Windows Azure is to create your storage container. To do this, navigate to the Storage pane and then drill through your storage account in the Windows Azure management portal, which you can find at https://manage.windowsazure.com. You should then select the Containers tab, displayed in Figure 25-1.

Figure 25-1. The Containers tab
Next, choose the Create A Container option. This invokes the New Container dialog box (see Figure 25-2). Here, enter a name for your container and select the access level. We call our container chapter25 and select the access level of Private. This means that only our account can view the container or its contents. Other access levels that you can choose include Public, which makes the container and its contents accessible to anybody who knows the URL; and Public Blob, which keeps the container metadata private but makes the blobs it contains public.

Figure 25-2. The New Container dialog box
![]() Tip When choosing a name for your container, be aware that it can consist of letters and numbers, but all letters must be lowercase. The only special character allowed is a hyphen, but you are not permitted to use two consecutive hyphens. A hyphen is also not permitted as the first character.
Tip When choosing a name for your container, be aware that it can consist of letters and numbers, but all letters must be lowercase. The only special character allowed is a hyphen, but you are not permitted to use two consecutive hyphens. A hyphen is also not permitted as the first character.
![]() Caution For the security of your data, you should know that Private is the only appropriate access level for SQL Server backups.
Caution For the security of your data, you should know that Private is the only appropriate access level for SQL Server backups.
Our container now displays under our account, along with the URL that we can use to access it, as illustrated in Figure 25-3.

Figure 25-3. Container displayed in Windows Azure management portal
![]() Tip Windows Azure Storage does not support container hierarchies. All containers are stored at the same level.
Tip Windows Azure Storage does not support container hierarchies. All containers are stored at the same level.
Backing Up a Database
Now that our container is ready, we need to prepare our instance of SQL Server. To do this, we create a database called Chapter25. We then create a SQL Login called URLBackupOperator, which is a member of the db_backupoperator for the Chapter25 database, and also grant it permission to alter any credential. This is the minimum set of permissions that allows the account to perform the backup to a URL. The script in Listing 25-1 performs these activities.
![]() Tip ALTER ANY CREDENTIAL permissions are a technical requirement for the login that takes the backups. If you have multiple credentials, however, you can explicitly deny the login ALTER permissions to those credentials.
Tip ALTER ANY CREDENTIAL permissions are a technical requirement for the login that takes the backups. If you have multiple credentials, however, you can explicitly deny the login ALTER permissions to those credentials.
Our next task is to create the credential that SQL Server uses to connect to the URL. When we create the credential, we use the name of our storage account as the identity for the credential, and we should use our primary access key as the secret to secure the credential. The command in Listing 25-2 creates a credential for the prosqladmin Windows Azure account. If you are following the demonstration, change the script to use your own Windows Azure account name and access key. You can find your access key by navigating to Storage in the Windows Azure management portal and selecting the Manage Keys option.
![]() Tip You can find more details regarding credentials in Chapter 21.
Tip You can find more details regarding credentials in Chapter 21.
We can now take a backup of our Chapter25 database. Be aware that with SQL Server 2014, it is only possible to back up to a single URL. It is not possible to stripe a backup in the same way that you can stripe a backup to disk or tape. We will need to specify the credential we just created. The command in Listing 25-3l performs the backup. You can also place this statement within a T-SQL job step of a SQL Server Agent job to schedule the backup process. If you are following the demonstrations, remember to change the URL to match your own configuration.
![]() Tip When deciding upon a name for your backup file, bear in mind that the maximum number of characters allowed for the entire URL is 259. The uniform aspects of the URL consume 36 characters and, in our case, the account name consumes another 11. This means that the maximum length of the filename is 212 characters.
Tip When deciding upon a name for your backup file, bear in mind that the maximum number of characters allowed for the entire URL is 259. The uniform aspects of the URL consume 36 characters and, in our case, the account name consumes another 11. This means that the maximum length of the filename is 212 characters.
![]() Note You must create the container before you back up the database or a 404 Error is thrown.
Note You must create the container before you back up the database or a 404 Error is thrown.
Chapter 15 discusses the syntax of the BACKUP command completely. You should know, however, that when you are backing up to URL, specifying the BLOCKSIZE, MAXTRANSFERSIZE, RETAINDAYS, and EXPIRYDAYS options is not supported. Creating a logical device name is also not supported.
INIT and NOINIT are valid syntax for a backup operation to a URL; however, they will be ignored. This is because you cannot append a backup to a blob. If you specify a URL that includes a blob that already exists, the operation fails, unless you specify FORMAT, which causes the blob to be overwritten.
Viewing Backup Files from SQL Server Management Studio
As long as you are using the 2014 version of SQL Server Management Studio, it is possible to connect to Azure Storage and view the backups that you have taken to the cloud. To do this, use the Connect drop-down in Object Explorer to connect to Azure Storage, as illustrated in Figure 25-4.

Figure 25-4. Using the Object Explorer to connect to Azure Storage
Following these steps causes the Connect To Windows Azure Storage dialog box to display, as illustrated in Figure 25-5. In this dialog box, you should enter your storage account name and access key. You can also choose whether the connection should be made with HTTPS, which is not required, but highly recommended. You can also specify if the access key should be saved. Saving it can save time, but it can also widen the security footprint of the solution, and if a malicious user gained access to the DBA’s desktop, they could potentially access the backup files.

Figure 25-5. The Connect To Windows Azure Storage dialog box
Now that you have connected to Windows Azure Storage, you can browse the account in Object Explorer. This allows you to drill down through your containers and see the blobs that you have stored in them, as shown in Figure 25-6. It is also possible to delete a blob, or even an entire container, from the object’s context menu.

Figure 25-6. Browse Windows Azure Storage
![]() Tip Your backup files are also visible in the Windows Azure management portal. To see them, drill through your account and then you container.
Tip Your backup files are also visible in the Windows Azure management portal. To see them, drill through your account and then you container.
Restoring from a Backup
When you restore from a backup file that you saved to Windows Azure Storage, all restore options are valid. If you choose to restore from a disk or tape restore operation, the only difference is that you must specify FROM URL and the credential that has access to the account. The command in Listing 25-4 restores the Chapter25 database from the backup we took earlier in this chapter. If you are following the demonstrations, remember to change the URL to match your own configuration.
SQL Server Managed Backup to Windows Azure
SQL Server 2014 introduces Managed Backup to Windows Azure to ease the burden of configuring schedules on DBAs and to lessen the risk that they would lose date when they were baking up to Windows Azure Storage. When DBAs use Managed Backup, they only need to configure a retention period—SQL Server does everything else. This means that DBAs do not need to spend their time creating maintenance plans or SQL Server Agent jobs to manage backup routines.
The following sections discuss the concepts of SQL Server Managed Backup to Windows Azure before they demonstrate how to configure this feature for an individual database and for the instance. Finally, you see how to perform advanced configuration of Managed Backup.
![]() Note If you are using a version of SQL Server older than SQL Server 2014, Microsoft provides a tool named SQL Server Backup to Windows Azure Tool, which you can download from http://www.microsoft.com/en-gb/download/details.aspx?id=40740 and use to help simplify the process of managing backups to the cloud.
Note If you are using a version of SQL Server older than SQL Server 2014, Microsoft provides a tool named SQL Server Backup to Windows Azure Tool, which you can download from http://www.microsoft.com/en-gb/download/details.aspx?id=40740 and use to help simplify the process of managing backups to the cloud.
Understanding Managed Backup to Windows Azure
You can configure Managed Backup for an individual database or at the instance level. When you configure Managed Backup at the instance level, you get an additional advantage: any new databases created on the instance automatically fall under the management of Managed Backups. This reduces the risk of losing data when you accidentally forget to configure backups for a new database.
![]() Caution If you enable Managed Backup to Windows Azure at the instance level, all new databases are managed automatically; however, you must configure Managed Backup for any existing databases manually.
Caution If you enable Managed Backup to Windows Azure at the instance level, all new databases are managed automatically; however, you must configure Managed Backup for any existing databases manually.
The primary limitation of Managed Backup to Windows Azure is that the SIMPLE recovery model is not supported. Databases can only be managed if they are configured to use the FULL recovery model or are temporarily using the BULK LOGGED recovery model. This means that the feature is more suitable for OLTP databases than it is for data warehouses or VLDBs. For more information of the recovery models, please refer to Chapter 15.
When you configure Managed Backup to Windows Azure, the database(s) managed by the tool all share the same backup strategy both for full backups and for transaction log backups. For full backups, the rules of this strategy are as follows:
- A backup will be taken when Managed Backup to Windows Azure is enabled for the database or instance
- A backup will be taken when the transaction log has grown by 1GB since the last full backup was taken
- A backup will be taken when one week has elapsed since the last full backup was taken
- A backup will be taken if the log chain becomes broken
For transaction log backups, these are the rules of the strategy:
- A backup will be taken when no log backup history can be found
- A backup will be taken when 5MB of transaction log space has been used since the last time a transaction log backup was taken
- A backup will be taken when two hours have elapsed since the last transaction log backup was taken
- A backup will be taken when there has been a full backup since the last transaction log backup
For stand-alone databases, Managed Backup to Windows Azure creates a container based uponthe name of the server name and SQL Server instance name. It creates the blobs using the convention <First 40 characters of database name>_<Database GUID>_<Timestamp>.bak for full backups and <First 40 characters of database name>_<Database GUID>_<Timestamp>.log for transaction log backups.
When you want to enable Managed Backup to Windows Azure for a database that participates in an AlwaysOn Availability Group, Managed Backup to Windows Azure creates a container based upon the GUID of the availability group. It creates the blobs using the convention <First 40 characters of database name>_<Availability Group GUID>_<Database GUID>_<Timestamp>.bak for full backups and <First 40 characters of database name>_<Availability Group GUID>_<Database GUID>_<Timestamp>.log for transaction log backups.
Configuring Managed Backup to Windows Azure for an Individual Database
You can use the msdb.smart_admin.sp_set_db_backup system stored procedure to enable Managed Backup to Windows Azure for an individual database. This procedure accepts the parameters detailed in Table 25-1.
Table 25-1. msdb. smart_admin.sp_set_db_backup Parameters
|
Parameter |
Description |
|---|---|
|
@database_name |
The name of the database to be managed by Managed Backup to Windows Azure. |
|
@enable_backup |
Specifies if the feature should be enabled for the database.
|
|
@retention_days |
Specifies the number of days for which backups should be retained. This value should be between 1 and 30. |
|
@credential_name |
Specifies the name of the credential used to access the URL. |
|
@encryption_algorithm |
Specifies the encryption algorithm that you should use to encrypt the backup. The following are acceptable values:
|
|
@encryptor_type |
Specifies the type of encryptor used to encrypt the backup. The following are acceptable values:
Asymmetric keys are only supported when stored in an EKM (Extensible Key Management) provider. |
|
@encryptor_name |
Specifies the name of the certificate or asymmetric key used to encrypt the backup. |
![]() Tip Full details of keys and certificates can be found in Chapter 10.
Tip Full details of keys and certificates can be found in Chapter 10.
The command in Listing 25-5 demonstrates how to configure the Chapter25 database so it is backed up using Managed Backup to Windows Azure without being encrypted.
![]() Tip Make sure SQL Server Agent is running before you perform this procedure, otherwise it will fail.
Tip Make sure SQL Server Agent is running before you perform this procedure, otherwise it will fail.
![]() Tip Retention settings you specify at the database level override retention settings you specify at the instance level.
Tip Retention settings you specify at the database level override retention settings you specify at the instance level.
After we configure the Managed Backup to Windows Azure for the Chapter25 database, when we connect to Windows Azure Storage in Object Explorer, we see that a new container has been created and that both a full backup and a transaction log backup of the Chapter25 database have been taken, as shown in Figure 25-7. The full backup was taken because of the rule that states that a full backup is taken when Managed Backup to Windows Azure is enabled for the database or instance. The transaction log backup was taken because of the following two rules:
- A transaction log backup is taken when no log backup history can be found.
- A transaction log backup is taken when a full backup has been performed since the last transaction log backup.
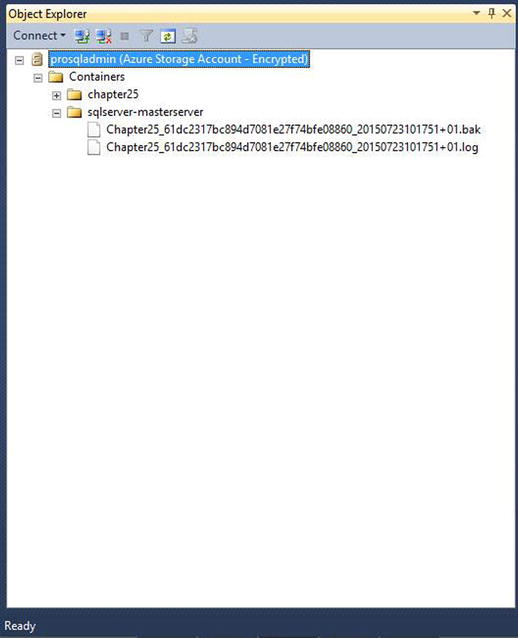
Figure 25-7. Backups displayed in Object Explorer
![]() Tip If you are configuring Managed Backup to Windows Azure for databases that participate in an Availability Group, you should configure the feature on all replicas using the msdb.smart-admin.sp_set_db_backup procedure. Managed Backup uses the preferred backup replica settings to determine from which replica to take the backup.
Tip If you are configuring Managed Backup to Windows Azure for databases that participate in an Availability Group, you should configure the feature on all replicas using the msdb.smart-admin.sp_set_db_backup procedure. Managed Backup uses the preferred backup replica settings to determine from which replica to take the backup.
Configuring Managed Backup to Windows Azure for an Instance
You can configuring Managed Backup to Windows Azure at the instance level either through the GUI or by using T-SQL. To configure the feature using the GUI, drill through Management in Object Explorer and select Configure from the Managed Backup context menu. This invokes the Managed Backup dialog box, as illustrated in Figure 25-8.
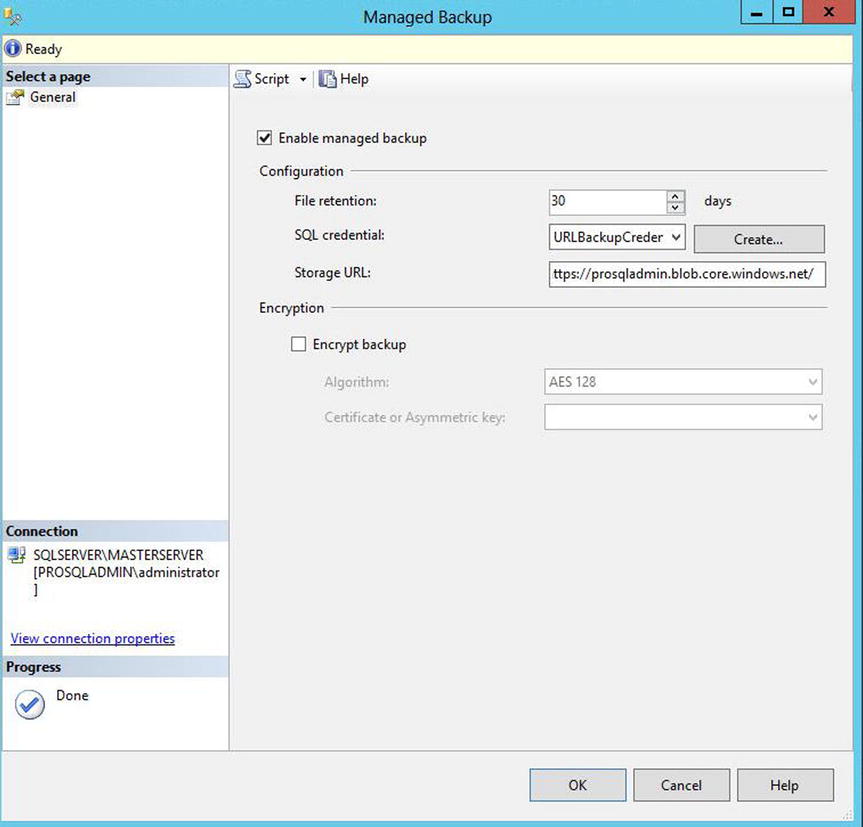
Figure 25-8. Managed Backup Dialog Box
In this dialog box, we enable Managed Backup using the check box at the top of the screen. We then configure the feature by specifying a file retention and selecting our URLBackupCredential credential from the drop-down list. If we have not already created a credential, then we can use the Create button to invoke the Create Credential - Authenticate To Azure Storage dialog box. We also need to make sure the Storage URL box is populated with the URL to our Windows Azure storage account. The URL should not include the container name since this is created by SQL Server. Optionally, we can also use this dialog box to configure encryption for our backups by checking the Encrypt Backup check box before specifying the appropriate algorithm and encryptor to use.
To configure Managed Backup to Windows Azure at the instance level by using T-SQL, you need to use the msdb.smart_admin.sp_set_instance_backup system stored procedure. This procedure accepts the parameters detailed in Table 25-2.
Table 25-2. msdb.smart_admin.sp_set_instance_backup Parameters
|
Parameter |
Description |
|---|---|
|
@enable_backup |
Specifies if the feature should be enabled for the instance.
|
|
@storage_url |
The URL of the Windows Azure storage account. This should not include the container name, since the container is created automatically. |
|
@retention_days |
Specifies the number of days for which backups should be retained. This value should be between 1 and 30. |
|
@credential_name |
Specifies the name of the credential used to access the URL. |
|
@encryption_algorithm |
Specifies the encryption algorithm that you should use to encrypt the backup. These are acceptable values:
|
|
@encryptor_type |
Specifies the type of encryptor used to encrypt the backup. These are acceptable values:
Asymmetric keys are only supported when stored in an EKM (Extensible Key Management) provider. |
|
@encryptor_name |
Specifies the name of the certificate or asymmetric key used to encrypt the backup. |
The command in Listing 25-6 enables Managed Backup for our instance without using encryption.
Let’s now create a new database on the instance, called NewDB, by using the command in Listing 25-7.
Now that we have created a new database, we can connect to Windows Azure Storage in Object Explorer to make sure that a backup of the new database has been taken. In Figure 25-9, you can see that Managed Backup has used the container we created when we configured Managed Backup for the Chapter25 database and taken a full backup and transaction log backup of the NewDB database to this location.

Figure 25-9. View backups in Object Explorer
![]() Tip If your database is not backed up instantly, it is because the default setting for how often the instance is scanned for new databases is every 15 minutes. We discuss changing this value in the following section.
Tip If your database is not backed up instantly, it is because the default setting for how often the instance is scanned for new databases is every 15 minutes. We discuss changing this value in the following section.
Managed Backup to Windows Azure Advanced Configuration
SQL Server supplies a system stored procedure named msdb.smart_admin.sp_set_parameter that allows you to configure advanced aspects of Managed Backup to Windows Azure. The procedure accepts the parameters detailed in Table 25-3.
Table 25-3. msdb.smart_admin.sp_set_parameter Parameters
|
Parameter |
Description |
|---|---|
|
@parameter_name |
The name of the parameter that you wish to configure |
|
@parameter_value |
The value that you would like to configure for the parameter |
The parameters that you can configure using this system stored procedure are described in Table 25-4.
Table 25-4. Managed Backup Parameters
|
Parameter |
Description |
|---|---|
|
SSMBackup2WANotificationEmailId |
Specifies a semicolon-delimited list of e-mail addresses to which errors and warnings should be sent. |
|
FileRetentionDebugXevent |
Specifies if file retention debug events should be captured. The value can be True or False. |
|
FileRetentionOperationalXevent |
Specifies if file retention operational events should be captured. The value can be True or False. |
|
StorageOperationDebugXevent |
Specifies if the storage operation debug events should be captured. The value can be True or False. |
|
SSMBackup2WAFrequency |
This is an undocumented parameter that allows you to configure how often Managed Backup scans the instance for new databases. The value is specified in seconds. |
![]() Caution The SSMBackup2WAFrequency parameter is undocumented and, therefore, unsupported by Microsoft.
Caution The SSMBackup2WAFrequency parameter is undocumented and, therefore, unsupported by Microsoft.
Listing 25-8 demonstrates how to use the msdb.smart_admin.sp_set_parameter procedure to make Managed Backup to Windows Azure scan for new databases more frequently (every five minutes).
Currently you can view configured settings by using the msdb.smart_admin.fn_get_parameter() system function, as demonstrated in Listing 25-9. This function accepts one parameter that specifies the name of the parameter that you wish to view the configuration of. If you want to view all configured values, pass NULL.
![]() Note If a setting has never been configured, it will not appear in the results.
Note If a setting has never been configured, it will not appear in the results.
Disabling Managed Backup to Windows Azure
You can disable Managed Backup to Windows Azure for a specific database or for any new databases created on the instance. To do so for a specific database, use the MSDB.smart_admin.sp_set_db_backup system stored procedure. The command in Listing 25-10 disables Managed Backup to Windows Azure for the Chapter25 database.
To disable Managed Backup to Windows Azure so it is not the default setting for any new databases created on the instance, use the MSDB.smart_admin.sp_set_instance_backup system stored procedure. The command in Listing 25-11 disables Managed Backup to Windows Azure for any new databases.
Summary
Cloud backups can provide a highly available and cost-effective alternative to disk or tape backups. In order to harness backups to Windows Azure, you must first have a Windows Azure account and a Windows Azure storage account. Once you have created these accounts, you must create a container, which is a grouping for blobs. Blobs are the files that you store within Windows Azure.
Within SQL Server, you must create a credential so that the instance can connect to the URL, where the backup will be stored. This credential should use your Windows Azure storage account name as the identity, and the access key as the secret for securing the Credential. When you take the backup, this credential is used to authenticate to Windows Azure.
SQL Server also allows backups to be managed automatically with the Managed Backup to Windows Azure feature. You can configure this feature for specific databases or for an entire instance. This feature reduces pressure on DBAs by backing up databases using a predefined strategy. This way the only thing that a DBA has to configure is the retention period and, optionally, encryption. The retention period at the database level overrides the retention period at the instance level.