
![]()
Scaling Workloads
SQL Server provides multiple technologies that allow DBAs to horizontally scale their workloads between multiple databases to avoid lock contention or to scale them horizontally between servers to spread resource utilization. These technologies include database snapshots, replication, and AlwaysOn Availability Groups. This chapter discusses the considerations for these technologies and demonstrates how to implement them.
Database Snapshots
A database snapshot is a point-in-time view of a database that never changes after it is generated. It works using copy-on-write technology; this means that if a page is modified in the source database, the original version of the page is copied to an NTFS sparse file, which is used by the database snapshot. A sparse file is a file that starts off empty, with no disk space allocated. As pages are updated in the source database and these pages are copied to the sparse file, it grows to accommodate them. This process is illustrated in Figure 16-1.

Figure 16-1. Database snapshots
If a user runs a query against the database snapshot, SQL Server checks to see if the required pages exist in the database snapshot. Any pages that do exist are returned from the database snapshot, whereas any other pages are retrieved from the source database, as illustrated in Figure 16-2. In this example, to satisfy the query, SQL Server needs to return Page 1:100 and Page 1:101. Page 1:100 has been modified in the source database since the snapshot was taken. Therefore, the original version of the page has been copied to the sparse file and SQL Server retrieves it from there. Page 1:101, on the other hand, has not been modified in the source database since the snapshot was created. Therefore it does not exist in the sparse file, and SQL Server retrieves it from the source database.

Figure 16-2. Querying a database snapshot
If your data-tier application is suffering from contention caused by locking, then you can scale-out reporting to a database snapshot. It is important to note, however, that because a database snapshot must reside on the same instance as the source database, it does not help overcome resource utilization issues. In fact, the opposite is true. Because any modified pages must be copied to the sparse file, the IO overhead increases. The memory footprint also increases, since pages are duplicated in the buffer cache for each database.
![]() Tip It may not be appropriate to have a database snapshot present while IO-intensive tasks are carried out. I have seen a couple of scenarios—one involving index rebuilds on a VLDB and the other involving a snapshot on the Subscriber database in a Replication topology—where the copy-on-write thread and the ghost clean-up thread have blocked each other so badly that processes never complete. If you encounter this scenario and you must have a snapshot present during IO-intensive tasks, then the only workaround is to disable the ghost clean-up task using Trace Flag 661. Be warned, however, that if you take this approach, deleted rows are never automatically removed, and you must clean them up in another way, such as by rebuilding all indexes.
Tip It may not be appropriate to have a database snapshot present while IO-intensive tasks are carried out. I have seen a couple of scenarios—one involving index rebuilds on a VLDB and the other involving a snapshot on the Subscriber database in a Replication topology—where the copy-on-write thread and the ghost clean-up thread have blocked each other so badly that processes never complete. If you encounter this scenario and you must have a snapshot present during IO-intensive tasks, then the only workaround is to disable the ghost clean-up task using Trace Flag 661. Be warned, however, that if you take this approach, deleted rows are never automatically removed, and you must clean them up in another way, such as by rebuilding all indexes.
In addition to the resource overhead of database snapshots, another issue you encounter when you use them to reduce contention for reporting is that data becomes stale as pages in the source database are modified. To overcome this, you can create a metadata-driven script to periodically refresh the snapshot. This is demonstrated in Chapter 17.
The issue of data becoming stale can also be an advantage however, because it gives you two benefits: first, it means that you can use snapshots for historic reporting purposes; and second, it means that you can use database snapshots to recover data after user error has occurred. Be warned, however, that these snapshots provide no resilience against IO errors or database failures, and you cannot use them to replace database backups.
Implementing Database Snapshots
Before demonstrating how to create a database snapshot, we first create the Chapter16 database, which we use for demonstrations throughout this chapter. The script in Listing 16-1 creates this database and populates it with data.
To create a database snapshot on the Chapter16 database, we use the CREATE DATABASE syntax, adding the AS SNAPSHOT OF clause, as demonstrated in Listing 16-2. The number of files must match the number of files of the source database, and the snapshot must be created with a unique name. The .ss file extension is standard, but not mandatory. I have known some DBAs to use an .ndf extension if they cannot gain an antivirus exception for an additional file extension. I recommend using the .ss extension if possible, however, because this clearly identifies the file as being associated with a snapshot.
The fact that each database snapshot must have a unique name can cause an issue for connecting applications if you plan to use multiple snapshots; this is because the applications do not know the name of the database to which they should connect. You can resolve this issue by programmatically pointing applications to the latest database snapshot. You can find an example of how to do this in Listing 16-3. This script creates and runs a procedure that returns all data from the Contacts table. It first dynamically checks the name of the most recent snapshot that is based on the Chapter16 database, which means that the data will always be returned from the most recent snapshot.
Recovering Data from a Snapshot
If user error leads to data loss, then a database snapshot can allow a DBA to recover data without needing to restore a database from a backup, which can reduce the RTO for resolving the issue. Imagine that a user accidently truncates the Contacts table in the Chapter16 database; we can recover this data by reinserting it from the snapshot, as demonstrated in Listing 16-4.
If a large portion of the source database has been damaged by user error, then instead of fixing each data issue individually, it may be quicker to recover the entire database from the snapshot. You can do this using the RESTORE command with the FROM DATABASE_SNAPSHOT syntax, as demonstrated in Listing 16-5.
![]() Note If more than one snapshot of the database that you wish to recover exists, then you must drop all the snapshots but the one you are going to restore from before you run this script.
Note If more than one snapshot of the database that you wish to recover exists, then you must drop all the snapshots but the one you are going to restore from before you run this script.
SQL Server provides a suite of replication technologies, which you can use to disperse data between instances. You can use replication for many purposes, including offloading reporting, integrating data from multiple sites, supporting data warehousing, and exchanging data with mobile users.
Replication Concepts
Replication draws its terminology from the publishing industry. The components of a Replication topology are described in Table 16-1.
Table 16-1. Replication Components
Figure 16-3 illustrates how the replication components fit together within a Replication topology. In this example, two subscribers each receiving the same publication and the distributor has been separated from the publisher. This is known as a remote distributor. If the publisher and distributor shared an instance, then it is known as a local distributor.

Figure 16-3. Replication component overview
Types of Replication
SQL Server offers three broad types of replication: snapshot, transactional, and merge. These replication technologies are introduced in the following sections.
Snapshot
Snapshot replication works by taking a complete copy of all articles at the point when synchronizations occurs; therefore, it does not need to track data changes between synchronizations. If you have defined a filter on the article, then only the filtered data is copied. This means that snapshot replication has no overhead, except when synchronization is occurring. When synchronization does occur, however, the resource overhead can be very high if there is a large amount of data to replicate.
The Snapshot Agent creates a system view and system stored procedure for each article in the publication. It uses these objects to generate the contents of the articles. It also creates schema files, which it applies to the subscription database before it uses BCP (Bulk Copy Program) to bulk copy the data.
Because of the resource utilization profile, snapshot replication is most suited to situations in which the dataset being replicated is small and changes infrequently, or in cases in which many changes happen in a short time period. (An example of this may include a price list, which is updated monthly.) Additionally, snapshot replication is the default mechanism you use to perform the initial synchronization for transactional and merge replication.
When you are using snapshot replication, the Snapshot Agent runs on the publisher to generate the publication. The Distribution Agent (which runs either on the distributor or on each subscriber) then applies the publication to the subscribers. Snapshot replication always works in a single direction only, meaning that the subscribers can never update the publisher.
Transactional
Transactional replication works by reading transactions from the transaction log on the publisher and then sending these transactions to be reapplied on the subscribers. The Log Reader Agent, which runs at the publisher, reads the transactions, and a VLF is not truncated until all log records marked for replication have been processed. This means that if there is a long period between synchronizations and many data modifications occur, there is a risk that your transaction log will grow or even run out of space. After the transactions have been read from the log, the Distribution Agent applies the transactions to the subscribers. This agent runs at the distributor in a push subscription model or at each of the subscribers in a pull subscription model. Synchronization is scheduled by SQL Server Agent jobs, which are configured to run the replication agents, and you can configure synchronization so it happens continuously or periodically, depending on your requirements. The initial data synchronization is performed using the Snapshot Agent by default.
Transactional replication is normally used in server-to-server scenarios where there is a high volume of data modifications at the publisher and there is a reliable network connection between the publisher and subscriber. A global data warehouse is an example of this, having subsets of data replicated to regional data warehouses.
Standard transactional replication always works in a single direction only, which means that it is not possible for the subscribers to update the publisher. SQL Server also offers peer-to-peer transactional replication, however. In a Peer-to-Peer topology, each server acts as a publisher and a subscriber to the other servers in the topology. This means that changes you make on any server are replicated to all other servers in the topology.
Because all servers can accept updates, it is possible for conflicts to occur. For this reason, peer-to-peer replication is most suitable when each peer accepts updates on a differ partition of data. If a conflict does occur, you can configure SQL Server to apply the transaction with the highest OriginatorID (a unique integer that is assigned to each node in the topology), or you can choose to resolve the conflict manually, which is the recommended approach.
![]() Tip If you are unable to partition the updateable data between nodes, and conflicts are likely, you may find merge replication to be a better choice of technology.
Tip If you are unable to partition the updateable data between nodes, and conflicts are likely, you may find merge replication to be a better choice of technology.
Merge
Merge replication allows you to update both the publisher and the subscribers. This is a good choice for client-server scenarios, such as mobile sales persons who can enter orders on their laptops and then have them sync with the main sales database. It can also be useful in some server-server scenarios—for example, regional data warehouses that are updated via ETL processes and then rolled up into a global data warehouse.
Merge replication works by maintaining a rowguid on every table that is an article within the publication. If the table does not have a uniquiidentifier column with the ROWGUID property set, then merge replication adds one. When a data modification is made to a table, a trigger fires, which maintains a series of change-tracking tables. When the Merge Agent runs, it applies only the latest version of the row. This means that resource utilization is high for tracking changes that occur, but the tradeoff is that merge replication has the lowest overhead for actually synchronizing the changes.
Because the subscribers, as well as the publisher, can be updated, there is a risk that conflicts between rows will occur. You manage these using conflict resolvers. Merge replication offers 12 conflict resolvers out of the box, including earliest wins, latest wins, and subscriber always wins. You can also program your own COM-based conflict resolvers or choose to resolve conflicts manually.
Because you can use merge replication in client-server scenarios, it offers you a technology called Web synchronization for updating subscribers. When you use Web synchronization, after extracting the changes, the Merge Agent makes an HTTPS request to IIS and sends the data changes to the subscribers in the form of an XML message. Replication Listener and Merge Replication Reconciler, which are processes running on the subscriber, process the data changes, after sending any data modifications made at the subscriber back to the publisher.
Implementing Transactional Replication
The most appropriate type of replication for scaling workloads is standard transactional replication. We discuss how to implement this technology in the following sections.
![]() Note For the demonstrations in this section, we use two instances: WIN-KIAGK4GN1MJPROSQLADMIN and WIN-KIAGK4GN1MJPROSQLADMIN2.
Note For the demonstrations in this section, we use two instances: WIN-KIAGK4GN1MJPROSQLADMIN and WIN-KIAGK4GN1MJPROSQLADMIN2.
Implementing the Distributor and Publisher with SSMS
To begin configuring transaction replication for the Chapter16 database, we select New Publication from the context menu of Replication | Local Publications in Object Explorer, within the PROSQLADMIN instance. This causes the New Publication Wizard to be invoked. After passing through the welcome screen, we see the Distributor page of the wizard, as illustrated in Figure 16-4. On this page, we can choose to use the publisher instance as the distributor or specify a different instance. If you specify a different instance, then you must already have configured the instance as a distributor, but in our case, we use the same instance, thereby configuring a local distributor.

Figure 16-4. The Distributor page
Because our instance is not currently configured for SQL Server Agent service to start automatically, we now see the SQL Server Agent Start page, which warns us of this situation. This is because replication agents rely on SQL Server Agent to be scheduled and run. We choose the option for SQL Server Agent to be configured to start automatically, as shown in Figure 16-5.

Figure 16-5. The SQL Server Agent Start page
On the Snapshot Folder page of the wizard, we select the location the Snapshot Agent will use to store the initial data for synchronization. This can be a local folder or a network share, but if you specify a local folder, then pull subscriptions are not supported, since the subscribers are unable to access it. In our case, we use a network share. The Snapshot Folder page is illustrated in Figure 16-6.
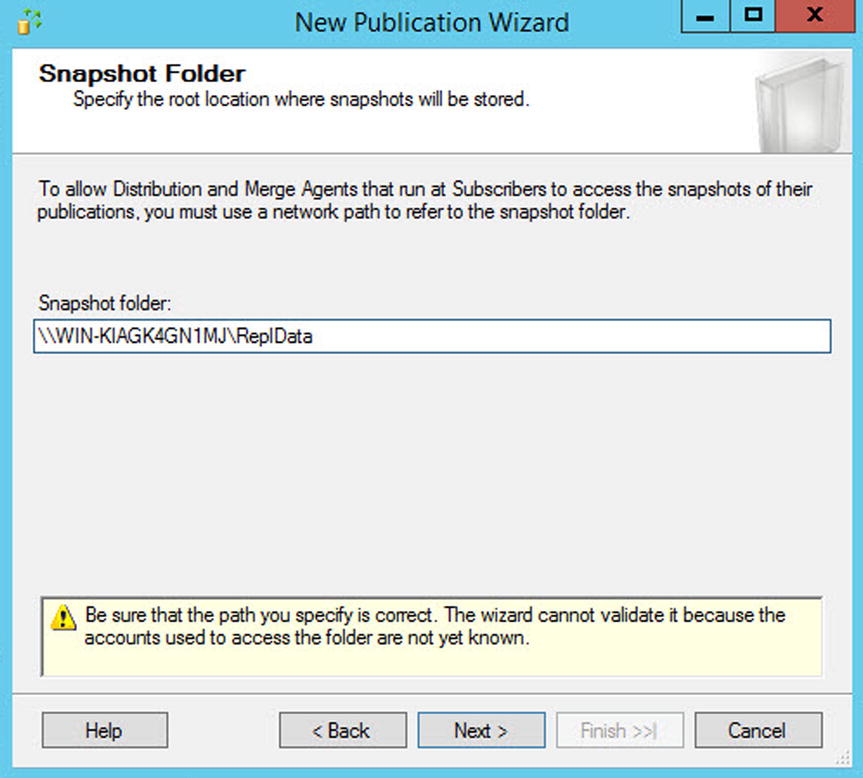
Figure 16-6. Snapshot Folder page
On the Publication Database page, shown in Figure 16-7, we select the database that contains the objects that we wish to use as articles in our publication. All articles within a publication must reside in the same database, so we can only select one database on this screen. To replicate articles from multiple databases, we must have multiple publications.

Figure 16-7. The Publication Database page
On the Publication Type page, shown in Figure 16-8, we select the type of replication we wish to use for the publication—in our case, transactional.
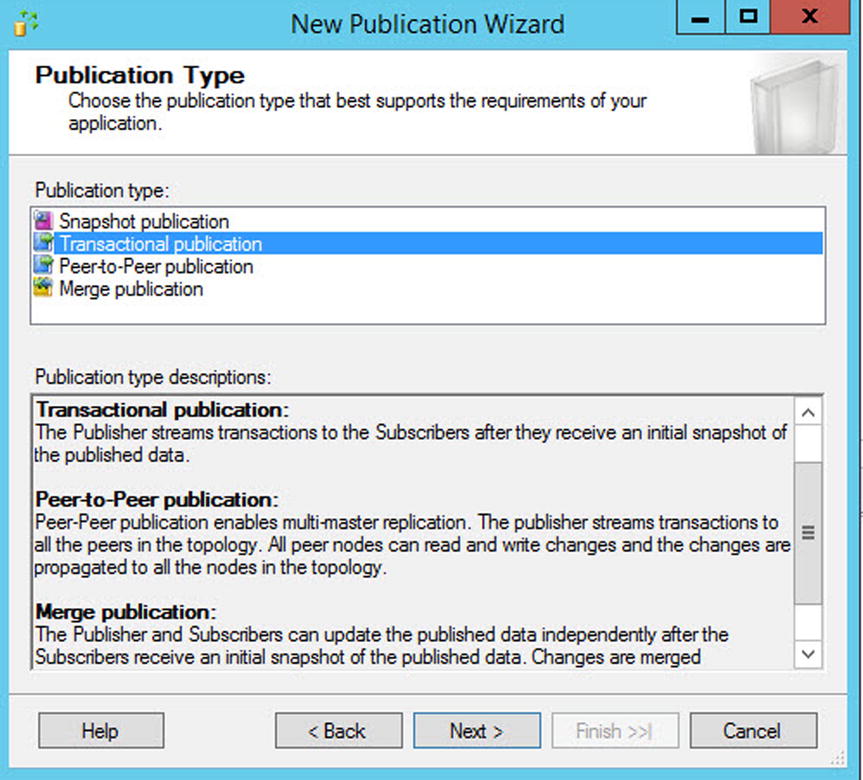
Figure 16-8. The Publication Type page
On the Articles page of the wizard, illustrated in Figure 16-9, we select the objects that we wish to include in our publication. All tables that you wish to publish must have a primary key, or you are not able to select them. Within a table, you can also select individual columns to replicate, if you need to.

Figure 16-9. The Articles page
The Article Properties button allows us to alter the properties, either for the selected article or for all articles within the Article Properties dialog box, which is shown in Figure 16-10. You should usually leave most properties as the default unless you have a specific reason to change them. However, you should pay particular attention to some properties.

Figure 16-10. The Article Properties dialog box
You use the Action If Name Is In Use property to determine the behavior if a table with the same name already exists in the subscriber database. The possible options are as follows:
- Keep the existing object unchanged.
- Drop the existing object and create a new one.
- Delete data. If the article has a row filter, delete only the data that matches the filter.
- Truncate all data in the existing object.
The Copy Permissions property demines if object-level permissions are copied to the subscriber. This is important, since you may or may not want to configure the permissions the same as they are for the publisher depending on how you are using the environment.
On the Filter Table Rows page of the wizard, shown in Figure 16-11, we can use the Add, Edit, and Delete buttons to manage filters. Filters essentially add a WHERE clause to the article so that you can limit the number of rows that are replicated. You’ll find this is especially useful for partitioning the data across multiple subscribers.

Figure 16-11. The Filter Table Rows page
Figure 16-12 illustrates the Add Filter dialog box. In our case, we are creating a filter so that only customers with an ID > 500 are replicated. The ways you can use this in production scenarios include filtering based on region, account status, and so on.

Figure 16-12. The Add Filter dialog box
On the Snapshot Agent page, illustrated in Figure 16-13, you can configure the initial snapshot to be created immediately, as we have done here, or you can schedule the Snapshot Agent to run at a specific time.

Figure 16-13. The Snapshot Agent page
On the Agent Security page, illustrated in Figure 16-14, you are invited to configure the accounts that are used for running each of the replication agents. At a minimum, the account that runs the Snapshot Agent should have the following permissions:
- Be a member of the db_owner database role in the distribution database
- Have read, write, and modify permissions on the share that contains the snapshot

Figure 16-14. The Agent Security page
At a minimum, the account that runs the Log Reader Agent must have the following permissions:
- Be a member of the db_owner database role in the distribution database
When you create the subscription, choose the sync_type. This configuration choice affects the Log Reader account’s required permissions in the following ways:
- Automatic—No additional permissions required
- Anything else—sysadmin on the distributor
Clicking the Security Settings button for the Snapshot Agent causes the Snapshot Agent Security dialog box to display, as shown in Figure 16-15. In this dialog box, you can choose to run the Snapshot Agent under the context of the Server Agent service account, or you can specify a different Windows account to use. To follow the principle of least privilege, you should use a separate account. It is also possible to specify a different account from which to make connections to the publisher instance. In our case though, we specify that the same account should make all the connections.
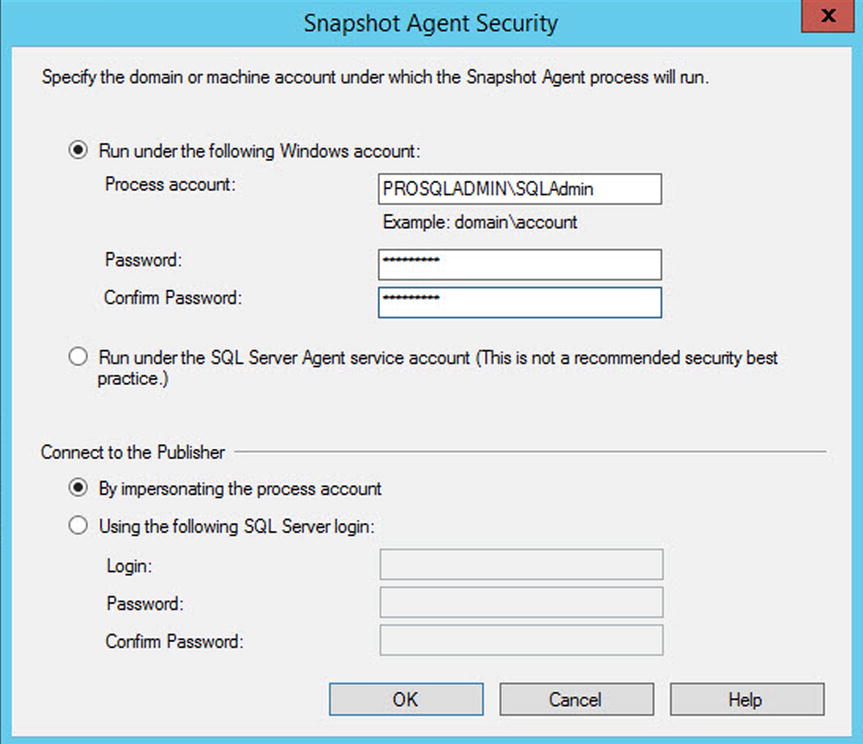
Figure 16-15. The Snapshot Agent Security dialog box
Back on the Agent Security page, you can elect to either specify the details for the account that will run the Log Reader Agent, or you can clone the information you have already entered for the account that will run the Snapshot Agent.
On the Wizard Actions page, you can elect to either generate the publication, as we have done, script the generation of the publication, or both. This page is illustrated in Figure 16-16.

Figure 16-16. The Wizard Actions page
Finally, on the Complete The Wizard page, shown in Figure 16-17, a summary of the actions that the wizard will perform displays. You also need to enter a name for the publication on this screen.

Figure 16-17. The Complete The Wizard page
Implementing the Distributor and Publisher with T-SQL
It is important that, as a DBA, you master the ability to script a Replication topology, because at times, you need to tear down and rebuild the environment, such as when you are performing a major code deployment. Also, not all options are available when you are adding replication from the wizard. To perform the same actions via T-SQL, we first need to configure the instance as a distributor. The first step in this process is to register and mark the instance as a distributor. You can do this using the sp_adddistributor system stored procedure, which accepts the parameters described in Table 16-2.
Table 16-2. sp_adddistributor Parameters
|
Parameter |
Description |
|---|---|
|
@distributor |
Specifies the serverinstance that you are configuring as a distributor. |
|
@heartbeat_interval |
Specifies the maximum amount of time that can elapse without a running agent reporting a progress message, in minutes. The default is 10 minutes. |
|
@password |
Used to specify the password for the distributor_Admin login. Because we are using a local distributor, we can pass a NULL value, and a random password is generated. We do not need to configure a password unless we are configuring a remote distributor. |
![]() Note Replication parameters that are no longer supported, such as those that are used for implementing updating subscribers, have been omitted from the tables within the Replication section of this chapter.
Note Replication parameters that are no longer supported, such as those that are used for implementing updating subscribers, have been omitted from the tables within the Replication section of this chapter.
We can run the procedure in our scenario by using the command in Listing 16-6.
Our next step is to create the Distribution database. We can perform this task by running the sp_adddistributiondb system stored procedure. This procedure accepts the parameters detailed in Table 16-3.
Table 16-3. sp_adddistributiondb Parameters
|
Parameter |
Description |
|---|---|
|
@database |
Specifies the name of the Distribution database. |
|
@data_folder |
Specifies the folder in which the data file of the Distribution database is created. |
|
@data_file |
Specifies the name of the data file that is created. |
|
@data_file_size |
Specifies the initial size of the data file, in megabytes. |
|
@log_folder |
Specifies the folder in which the transaction log of the Distribution database is created. |
|
@log_file |
Specifies the name of the transaction log file that is created. |
|
@log_file_size |
Specifies the initial size of the transaction log file, in megabytes. |
|
@min_distretention |
Specifies the minimum period of time that transactions are held in the Distribution database, before they are deleted, in hours. |
|
@max_distretention |
Specifies the maximum period of time that transactions are held in the Distribution database before they are deleted, in hours. The default is 72 hours. |
|
@history_retention |
Specifies the duration for which the performance history is retained in the Distribution database, in hours. The default is 48 hours. |
|
@security_mode |
Specifies the authentication mode used to connect to the distributor to create the Distribution database. • 0 specifies SQL authentication. • 1 specifies Windows authentication, which is the default behavior. |
|
@login |
Specifies the name of the login used to connect to the distributor. |
|
@password |
Specifies the password of the login used to connect to the distributor. |
|
@createmode |
• The default value of 1 indicates that the database will be created or that the existing database will be reused and that the instaldist.sql file will be used to create the replication objects. • The other possible values of 0 or 2 are undocumented and should not be used. |
We can use the command in Listing 16-7 to run the sp_adddistributiondb stored procedure for our configuration. Before running the script, be sure to change the file paths to match your own configuration.
We now need to register our instance as a publisher within the Distribution database. We can achieve this using the sp_adddistpublisher system stored procedure. This procedure accepts the parameters described in Table 16-4.
Table 16-4. sp_adddistpublisher Parameters
|
Parameter |
Description |
|---|---|
|
@publisher |
Specifies the serverinstance of the publisher. |
|
@distribution_db |
Specifies the name of the Distribution database. |
|
@security_mode |
Used for heterogeneous replication, which is beyond the scope of this book. • 0 specifies that agents connect to the publisher via SQL authentication. • 1 specifies the agents connect to the publisher using Windows authentication. |
|
@login |
Specifies the login that is used to connect to the publisher. |
|
@password |
Specifies the password of the login that is used to connect to the publisher. |
|
@working_directory |
Specifies the folder that stores the snapshot. |
|
@thirdparty_flag |
Specifies if the publisher is a SQL Server instance. • 0 indicates that it is. • 1 indicates that the publisher is a third-party instance. |
|
@publisher_type |
Specifies the type of heterogeneous publisher. These are acceptable values: • ORACLE • ORACLE GATEWAY • MSSQLSERVER (The default value, which indicates a homogeneous publisher.) |
For our environment, we can run the sp_adddistpublisher by using the command in Listing 16-8.
We now need to enable the Chapter16 database for replication. We do this using the sp_replicationdboption system stored procedure, which accepts the parameters detailed in Table 16-5.
Table 16-5. sp_replicationdboption Parameters
|
Parameter |
Description |
|---|---|
|
@dbname |
The name of the database from which the publication is generated. |
|
@optname |
The option that is enabled or disabled. These are the possible values: • Merge Publish (which configures a database as a publisher in merge replication) • Publish (which configures a database as publisher for other replication types) • Subscribe (which configures a database as a subscription database) • Sync with backup (which enables coordinated backups) • Coordinated backups (which enforce that, in the event of a backup at the publisher, the transaction log will not be truncated until the transaction has been received by the distributor and the Distribution database has been backed up. This option only applies to transactional replication.) |
|
@value |
Specifies true or false to determine if the option is being turned on or off. |
|
@ignore_distributor |
Specifies if the procedure can execute without being connected to the distributor and update its status. • 0 means that it must be connected. • 1 specifies that it does not have to connect. 1 should only be used in exceptional circumstances in which the distributor is not available. |
The sp_replicationdboption procedure can be run to achieve our goals by using the script in Listing 16-9.
Our next step is to configure the Log Reader Agent. We can do this using the sys.sp_addlogreader_agent system stored procedure. This procedure accepts the parameters detailed in Table 16-6.
Table 16-6. sp_addlogreader_agent Parameters
|
Parameter |
Description |
|---|---|
|
@job_login |
The name of the Windows account that runs the Log Reader Agent. |
|
@job_password |
The password of the Windows account that runs the Log Reader Agent. |
|
@job_name |
The name of the SQL Server Agent job that runs the agent. You should only use this parameter if the SQL Server Agent job already exists. |
|
@publisher_security_mode |
Specifies how the agent authenticates to the publisher. • 0 indicates SQL authentication. • 1 indicates Windows authentication, which is the default behavior. |
|
@publisher_login |
Specifies the login that connects to the publisher. If the @publisher_security_mode parameter is set to 1 and this parameter is not supplied, then the agent connects under the account specified in @job_login. |
|
@publisher_password |
The password of the login that is used to connect to the publisher. |
|
@publisher |
The name of the publisher. Should only be specified for a heterogeneous publisher. |
For the purpose of configuring our environment, we can use the command in Listing 16-10 to execute the sp_addlogreader_agent procedure.
![]() Caution Do not store the password in your script, because this is an obvious security vulnerability. Either enter the password at runtime or store the password in an encrypted table and create a script to decrypt the password and add it to the script dynamically. This advice applies to all scripts, so please heed the same caution for other scripts within this chapter.
Caution Do not store the password in your script, because this is an obvious security vulnerability. Either enter the password at runtime or store the password in an encrypted table and create a script to decrypt the password and add it to the script dynamically. This advice applies to all scripts, so please heed the same caution for other scripts within this chapter.
Our next step in configuring replication is to add the publisher. You can perform this task using the sp_addpublication system stored procedure. sp_addpublication accepts the parameters described in Table 16-7.
Table 16-7. sp_addpublication Parameters
|
Parameter |
Description |
|---|---|
|
@publication |
Specifies the name of the publication that is being created. |
|
@sync_method |
Specifies how the publication is synchronized. Use this parameter to configure what BCP output is generated. For example, native produces native mode BCP output, while character produces character mode BCP output, and concurrent produces native mode BCP output without locking tables. Passing concurrent_c produces character mode BCP output without locking tables, databasesnapshot produces the native mode BCP output from a database snapshot, and databasesnapshotcharacter produces character mode BCP output from a database snapshot. The default is to use native. |
|
@repl_freq |
Specifies if replication should happen continuously by passing continuous, which is the default behavior, or by using pass snapshot to specify that synchronization events should be scheduled. |
|
@description |
Specifies a description for the publication. |
|
@status |
Specifies if publication data is made immediately available to subscribers. Specify active to make the data available immediately, or inactive to allow subscribers to connect, but without processing the subscription, which is the default behavior. |
|
@independent_agent |
Specifies if the publication uses a dedicated distribution agent. The default is false, which means that all publication/subscription pairs on the publisher share a distribution agent. |
|
@immediate_sync |
Specifies if the subscribers resynchronize with the snapshot every time the Snapshot Agent runs. • If this is set to true, then you must use an independent distribution agent for the publication. • If set to false, which is the default behavior, only new subscriptions are automatically synchronized with the latest snapshot. |
|
@enabled_for_internet |
Specifies that you can use FTP to transfer snapshot data to the subscriber. |
|
@allow_push |
Specifies if push subscriptions can be configured against the publication. |
|
@allow_pull |
Specifies if pull subscriptions can be configured against the publication. |
|
@allow_anonymous |
Specifies if anonymous subscriptions are permitted. If set to true, you must use an independent distribution agent. |
|
@retention |
Specifies the duration for which subscription activity is retained, in hours. If a subscription has not become active after this period of time, it is removed. The default is 336 hours (2 weeks). |
|
@snapshot_in_defaultfolder |
• If set to true, snapshots are stored in the default location. • If set to false, snapshots are stored in the location specified in @alt_snapshot_folder. • If set to true and a value is specified for @alt_snapshot_folder, the snapshot is stored in both locations. |
|
@alt_snapshot_folder |
Specifies an alternate file location for snapshots. This can be a folder, a network location, or even an FTP site. |
|
@pre_snapshot_script |
Specifies the location of a .sql file that you should run before you take the snapshot. This can be useful if you want to add custom logic to the process—such as checking to see if a specific process is running and looping until it is complete—before you take the snapshot. |
|
@post_snapshot_script |
Specifies the location of a .sql file that you should run immediately after you take the snapshot. This can be useful if you are implementing custom logic, such as logging custom details about the snapshot execution. |
|
@compress_snapshot |
Specifies that the copy of the snapshot written to the alternate snapshot location will be compressed into a CAB file. Snapshot files are uncompressed at the location at which the Distribution Agent runs. |
|
@ftp_address |
If the publication is enabled for FTP, specify the FTP service where the snapshot files are located for the Distribution Agent. |
|
@ftp_port |
Specifies the FTP port to use. The default is 21. |
|
@ftp_subdirectory |
Specifies the folder path of the FTP service for the snapshot files. |
|
@ftp_login |
Specifies the login to use to connect to the FTP service. |
|
@ftp_password |
Specifies the password of the login used to connect to the FTP service. |
|
@allow_dts |
When creating the subscription, it is possible to specify an SSIS package to perform data transformations on the data. If this is required, you should specify true for this parameter. To enable this option, you must configure the sync_method as character or concurrent_c. |
|
@allow_subscription_copy |
Specifies if copies of the Subscription database should be allowed. |
|
@logreader_job_name |
Specifies the name of the SQL Server Agent job that runs the Log Reader Agent. You should only use this parameter if the job already exists. |
|
@publisher |
Specifies the name of a heterogeneous publisher. Do not use this parameter for homogeneous replication. |
|
@allow_initialize_from_backup |
Specifies if subscriptions are allowed to be initialized from a backup, as opposed to from the Snapshot Agent. |
|
@replicate_ddl |
Specifies if the publication supports schema replication. |
|
@enabled_for_p2p |
Specifies if the publication can be used for peer-to-peer replication. |
|
@enabled_for_het_sub |
Specifies if heterogeneous subscriptions are allowed for the publication. |
|
@p2p_conflictdetection |
Specifies if conflict resolution is enabled for the publication. This is only appropriate if @enabled_for_p2p if set to true. |
|
@p2p_originator_id |
The unique integer that identifies the publication in a peer-to-peer topology. This is only appropriate if @enabled_for_p2p is set to true. |
|
@p2p_continue_onconflict |
When set to true, the publication with the highest OriginatorID wins in the event of a conflict. This is only appropriate if @enabled_for_p2p is set to true. |
|
@allow_partition_switch |
Specifies if you can perform partition switching on the publication database. Please see Chapter 6 for more details on partition switching. |
|
@replicate_partition_switch |
Specifies if Partition Switch statements should be replicated to the subscriber. |
To add the publication to our topology using the sp_addpublication procedure, we could run the command in Listing 16-11.
Our next task is to configure the Snapshot Agent for the publication. We can perform this task by using the sp_addpublication_snapshot system stored procedure. This procedure accepts the parameters detailed in Table 16-8.
Table 16-8. sp_addpublication_snapshot Parameters
|
Parameter |
Description |
|---|---|
|
@publication |
Specifies the name of the publication. |
|
@frequency_type |
Specifies the type of schedule to use. • 1 indicates it should be run once. • 4 indicates it should be run daily. • 8 indicates weekly. • 16 indicates monthly. • 32 indicates it should run on a specific day of the month. • 64 indicates it should run when SQL Server Agent starts. • 128 indicates that it should run when the server is idle. |
|
@frequency_interval |
Specifies when the schedule should run, relative to the type of schedule used. Details of how to calculate this value can be found in Table 16-9. |
|
@frequency_subday |
Specifies how @frequently_type, within a day, the schedule should run in relation to the subday interval. • 1 indicates once. • 2 indicates seconds. • 4 indicates minutes. • 8 indicates hours. |
|
@frequency_subday_interval |
The frequency, within a day, that the schedule should run. For example, if @frequency_subday is configure as hours and @frequency_subday_interval is configured as 2, then the schedule runs every two hours. |
|
@active_start_date |
Specifies the date that the agent is first scheduled to run. |
|
@active_end_date |
Specifies the date that the agent stops being scheduled. |
|
@active_start_time_of_day |
Specifies the time that the agent is first scheduled to run. |
|
@active_end_time_of_day |
Specifies the time that the agent stops being scheduled. |
|
@snapshot_job_name |
Specifies the name for the SQL Server Agent job that runs the Snapshot Agent. |
|
@publisher_security_mode |
Specifies the authentication mechanism that the Snapshot Agent uses when connecting to the publisher. • 0 specifies SQL authentication. • 1 specifies Windows authentication. |
|
@publisher_login |
Specifies the name of the login that the Snapshot Agent uses to connect to the publisher. |
|
@publisher_password |
Specifies the password of the login that the Snapshot Agent uses to connect to the publisher. |
|
@job_login |
Specifies the name of the Windows account that runs the SQL Server Agent job that schedules the Snapshot Agent. |
|
@job_password |
Specifies the password of the account that runs the SQL Server Agent job that schedules the Snapshot Agent. |
|
@publisher |
Specifies the name of a heterogeneous publisher. You should not use this parameter for a homogeneous publisher. |
Table 16-9 describes how to calculate the correct value for @frequency_interval based on the value specified for @frequency_type.
Table 16-9. @frequency_interval Values
|
@frequency_type value |
Usage of @frequency_interval |
|---|---|
|
1 |
Unused. |
|
4 |
Specifies the number of days that should elapse before the schedule repeats. For example, 10 would mean the schedule runs every ten days. |
|
8 |
Specifies: • 1 for Sunday • 2 for Monday • 4 for Tuesday • 8 for Wednesday • 16 for Thursday • 32 for Friday • 64 for Saturday The value is a bitmask, converted to an int, so if you need multiple days of the week, combine the values with a bitwise OR operator. For example, if you want it to run every weekday, the value would be 62. |
|
16 |
The day of the month. |
|
32 |
Specify: • 1 for Sunday • 2 for Monday • 3 for Tuesday • 4 for Wednesday • 5 for Thursday • 6 for Friday • 7 for Saturday • 8 for day • 9 for weekday • 10 for weekend day |
|
4 |
Unused. |
|
128 |
Unused. |
To use the sp_addpublication_snapshot procedure to create the Snapshot Agent for our environment, we can use the command in Listing 16-12.
Our next step is to add the Customers article to our publication. To do this, we use the sp_addarticle system stored procedure. This procedure accepts the parameters described in Table 16-10.
Table 16-10. sp_addarticle Parameters
|
Parameter |
Description |
|---|---|
|
@publication |
Specifies the name of the publication that contains the article. |
|
@article |
Specifies a name for the article. |
|
@source_table |
Specifies the table in the Publication database on which the article is based. |
|
@destination_table |
Specifies the name of the subscription table to which the article is replicated. |
|
@vertical_partition |
Specifies if filtering is enabled on the article. |
|
@type |
Specifies the type of article. Possible values are described in Table 16-11. |
|
@filter |
Specifies the name of the stored procedure that is used to filter the rows. |
|
@sync_object |
Specifies the name of the view that is used to generate the data file for this article, in the snapshot. |
|
@ins_cmd |
Specifies the command that is used to insert data on the subscriber. By default, this uses CALL to run a stored procedure on the subscriber, with the name format sp_MSIns_Table, where Table is the name of the table on which the article is based. You can configure it to use CALL to run a custom stored procedure, implementing your own logic, or you can specify SQL to replicate an INSERT statement. |
|
@del_cmd |
Specifies the command that is used to delete data on the subscriber. By default, this uses CALL to run a stored procedure on the subscriber, with the name format sp_MSDel_Table, where Table is the name of the table on which the article is based. You can configure it to use CALL to run a custom stored procedure, implementing your own logic, or you can use XCALL syntax instead. You can also specify SQL to replicate a DELETE statement. |
|
@upd_cmd |
Specifies the command that is used to update data on the subscriber. By default, this uses SCALL to run a procedure on the subscriber with the name format sp_MSUpd_Table, where Table is the name of the table on which the article is based. You can also configure it to use SCALL to run a custom stored procedure implementing your own logic, or you can use CALL, MCALL, or XCALL syntax. |
|
@creation_script |
Specifies the name and file path to the .sch file, which is used to create the article at the subscriber. |
|
@description |
Specifies a description of the article. |
|
@pre_creation_cmd |
Specifies what action you should take if a table with the same name already exists in the Subscription database. • DELETE deletes all data in the table before applying the snapshot; if there is a filter, only data that matches the filter is deleted. • TRUNCATE truncates the table before applying the snapshot. • DROP removes the table, which is the default behavior. |
|
@filter_clause |
Specifies the WHERE clause to apply to the filter. |
|
@schema_option |
A bitmask that is used to specify the properties of the article. If you pass NULL for this parameter, then a bitmask is generated based on the other property options that you have specified. |
|
@destination_owner |
Specifies the owner of the object in the Subscription database. |
|
@status |
Specifies the status of the article and how changes are propagated. • 0 indicates that the article is inactive. • 1 indicates the article is active. • 8 indicates that column names should be included in INSERT statements. • 16 indicates parameterized statements should be used. All settings, with the exception of 0, can be added together to specify multiple values. For example, a value of 24 indicates that parameterized statements should be used and that column names should be included in INSERT statements. |
|
@source_owner |
Specifies the owner of the object in the Publication database. This parameter applies to heterogeneous publishers. |
|
@sync_object_owner |
Specifies the owner of the view that is created for the published article. |
|
@filter_owner |
Specifies the owner of the filter. |
|
@source_object |
Specifies the name of the table that will be published through this article. |
|
@identityrangemanagementoption |
Specifies how identity ranges should be managed. • MANUAL indicates that the identity column is marked as NOT FOR REPLICATION. • AUTO indicates that ranges are handled automatically. |
|
@pub_identity_range |
Specifies the range size at the publisher. Only valid if @identityrangemanagementoption is set to AUTO. |
|
@identity_range |
Specifies the range size at the subscriber. Only valid if @identityrangemanagementoption is set to AUTO. |
|
@threshold |
Specifies a percentage value that defines when a new identity range is assigned by the Distribution Agent. |
|
@force_invalidate_snapshot |
Specifies if existing snapshots will be invalidated. • 0 indicates that they are still valid. • 1 indicates they will be invalidated. |
|
@use_default_datatypes |
Controls the data type mappings for heterogeneous replication. |
|
@publisher |
Specifies the name of the publisher. This parameter should only be used for heterogeneous replication. |
|
@fire_triggers_on_snapshot |
Specifies if replicated triggers should fire when the snapshot is applied. |
|
@artid |
An OUTPUT parameter that specifies the ID of the article that is created. |
When you use CALL syntax to update a subscriber, all values for inserted and updated columns are passed. When you use SCALL, which is valid for updates, only values for updated columns are passed, along with the original primary key values. When you use XCALL syntax, which you can use for updates or deletes, both the old value and the new value for every column are passed. When you use MCALL syntax, which is valid for updates, the update values are passed, along with the original primary key values.
Possible values for the article type are described in Table 16-11.
Table 16-11. Article Types
|
Type |
Description |
|---|---|
|
Aggregate schema only |
Replicates the schema of an aggregate function. |
|
Func schema only |
Replicates the schema of a function. |
|
Indexed view logbased |
Replicates an indexed view based on log records. |
|
Indexed view logbased manualboth |
Replicates an indexed view based on a view and a filter. |
|
Indexed view logbased manualfilter |
Replicates an indexed view based on a filter. |
|
Indexed view logbased manualview |
Replicates an indexed view based on a view. |
|
Indexed view schema only |
Replicates the schema of an indexed view. |
|
Logbased |
Replicates a table based on log records, which is the default behavior. |
|
Logbased manualboth |
Replicates a table based on log records with a filter and a view. |
|
Logbased manualfilter |
Replicates a table based on log records with a filter. |
|
Logbased manualview |
Replicates a table based on log records with a view. |
|
Proc exec |
Replicates the execution of a stored procedure. |
|
Proc schema only |
Replicates the schema of a stored procedure. |
|
Serializable proc exec |
Replicates the execution of a stored procedure, but only if that execution happened within the context of a serializable transaction. Full details of isolation levels can be found in Chapter 18. |
|
View schema only |
Replicates the schema of a view. |
To use sp_addarticle to create an article for the Customers table with the same filter that we created through the GUI, we can use the command in Listing 16-13.
Our next step is to add the filter to the article, which we do by using the sp_articlefilter system stored procedure. This procedure accepts the parameters detailed in Table 16-12.
Table 16-12. sp_articlefilter Parameters
|
Parameter |
Description |
|---|---|
|
@publication |
Specifies the publication that contains the article. |
|
@article |
Specifies the article to which the filter will be applied. |
|
@filter_name |
Specifies a name for the filter. |
|
@filter_clause |
Specifies the WHERE clause that defines the filter. |
|
@force_invalidate_snapshot |
Specifies if adding the filter invalidates existing snapshots. • 1 indicates that it invalidates snapshots. • 0 indicates that it does not. |
|
@force_reinit_subscription |
Specifies if adding the filter causes existing subscriptions to be reinitialized. • 1 indicates that they do. • 0 indicates that they do not. |
|
@publisher |
Specifies the name of the publisher. Only use this parameter for heterogeneous replication. |
To use the sp_articlefilter to add the filter to our Chapter16 article, we can use the command in Listing 16-14.
Finally, we need to create the view that we use to synchronize the article. We can achieve this with the sp_articleview system stored procedure. This procedure accepts the parameters detailed in Table 16-13.
Table 16-13. sp_articleview Parameters
|
Parameter |
Description |
|---|---|
|
@publication |
Specifies the publication that contains the article. |
|
@article |
Specifies the name of the article that the view supports. |
|
@view_name |
Specifies a name for the view. |
|
@filter_clause |
Specifies a WHERE clause that defines a filter for the view. |
|
@change_active |
Specifies if changes to the view’s schema are permitted when there are active subscriptions. • 1 indicates that views can be created or re-created. • 0 indicates that they cannot, which is the default behavior. |
|
@force_invalidate_snapshot |
Specifies if adding the view invalidates existing snapshots. • 1 indicates that it invalidates snapshots. • 0 indicates that it does not. |
|
@force_reinit_subscription |
Specifies if adding the view causes existing subscriptions to be reinitialized. • 1 indicates that they do. • 0 indicates that they do not. |
|
@publisher |
Specifies the name of the publisher. Only use this parameter for heterogeneous replication. |
|
@refreshsynctranprocs |
Specifies if the procedures used to synchronize replication will be re-created. • 1 indicates that they will, which is the default behavior. • 0 indicates that they will not. |
We can use the sp_articleview procedure to create a view for our article by using the command demonstrated in Listing 16-15.
Implementing the Subscriber with SSMS
Now that the PROSQLADMIN instance is configured as a distributor and publisher and our publication has been created, we need to configure our PROSQLADMIN2 instance as a subscriber. We can perform this task from either the publisher or from the subscriber. From the subscriber, we perform this task by connecting to the PROSQLADMIN2 instance and then by drilling through replication and selecting New Subscription from the context menu of Local Subscriptions. This causes the New Subscription Wizard to be invoked. After passing through the Welcome page of this wizard, you are presented with the Publication page, as illustrated in Figure 16-18. On this page, you use the Publisher drop-down box to connect to the instance that is configured as the publisher, and then you select the appropriate publication from the Databases And Publications area of the screen.

Figure 16-18. The Publication page
On the Distribution Agent Location page, you choose if you want to use push subscriptions or pull subscriptions. The appropriate choice here depends on your topology. If you have many subscribers, then you may choose to implement a remote distributor. If this is the case, then it is likely that you will use push subscriptions so that the server configured as the distributor has the impact of agents running. If you have many subscribers and you are using a local distributor, however, then it is likely that you will use pull subscriptions so that you can spread the cost of the agents between the subscribers. In our case, we have a local distributor, but we also only have a single subscriber, so from a performance perspective, it is an obvious choice of which server is most equipped to deal with the workload. We also have to consider security when we place the distribution agent, however; we discuss this later in this section. For this demonstration, we use push subscriptions. The Distribution Agent Location page is illustrated in Figure 16-19.
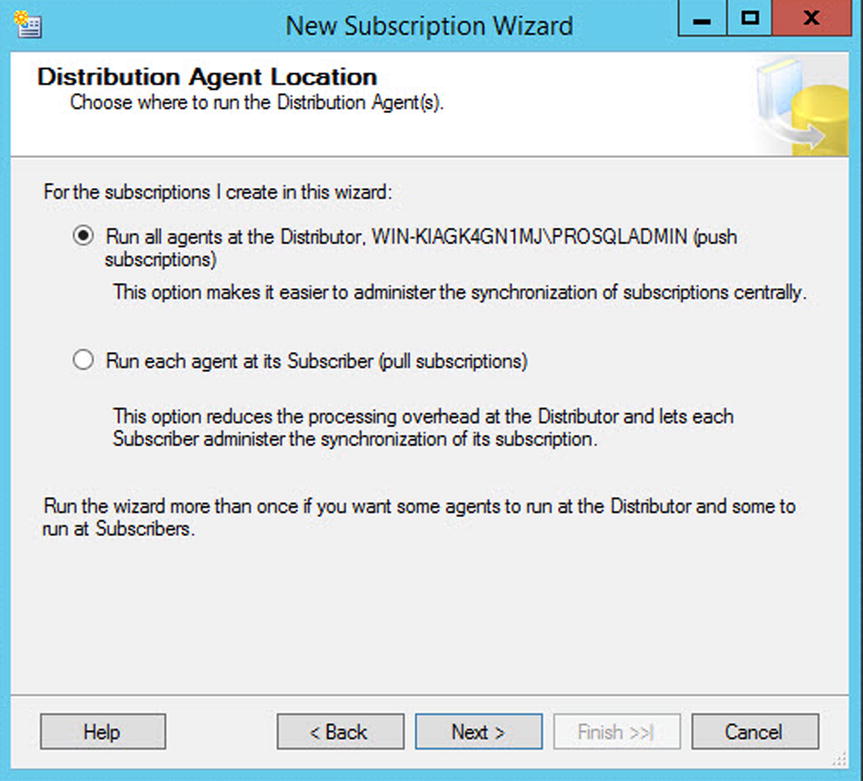
Figure 16-19. The Distribution Agent Location page
On the Subscribers page, we can select the name of our subscription database from the drop-down list. Because our subscription database doesn’t already exist, however, we select New Database, as shown in Figure 16-20, which causes the New Database dialog box to be invoked.

Figure 16-20. The Subscribers page
On the General page of the New Database dialog box, shown in Figure 16-21, you need to enter appropriate settings for the subscription database based upon its planned usage. If you need to, you can configure many of the database properties on the Options page.

Figure 16-21. The General page
On the Distribution Agent Security page, illustrated in Figure 16-22, click the ellipses to invoke the Distribution Agent Security dialog box.

Figure 16-22. The Distribution Agent Security page
In the Distribution Agent Security dialog box, illustrated in Figure 16-23, specify the details of the account that runs the Distribution Agent. When you are using push subscription, at a minimum, the account that runs the Distribution Agent should have the following permissions:
- Be a member of the db_owner role on the Distribution database
- Be a member of the publication access list (We discuss configuring publication access later in this chapter.)
- Have read permissions on the share where the snapshot is located

Figure 16-23. The Distribution Agent Security dialog box
The account that is used to connect to the subscriber must have the following permissions:
- Be a member of the db_owner role in the subscription database
- Have permissions to view server state on the subscribers (This only applies if you plan to use multiple subscription streams, which we discussed later in this chapter.)
When you are using pull subscriptions, at a minimum, the account that runs the distribution agent needs the following permissions:
- Be a member of the db_owner role on the subscription database
- Be a member of the publication access list (We discuss configuring publication access later in this chapter.)
- Have read permissions on the share where the snapshot is located
- Have permissions to view server state on the subscriber (This only applies if you plan to use multiple subscription streams; we discuss this later in this chapter.)
In the first section of the dialog box, you select if you want to impersonate the SQL Server service account or specify a different account on which to run the agent. To enforce the principle of least privilege, you should use a different account. In the second section of the dialog box, you specify how the Distribution Agent connects to the distributor. If you are using push subscriptions, then the agent must use the account that runs the Distribution Agent. In the third section of the dialog box, you specify how the Distribution Agent connects to the subscriber. If you are using pull subscriptions, then you must use the same account that is running the Distribution Agent.
On the Synchronization Schedule page, you define a schedule for the Distribution Agent to run. You can choose to run the agent continuously, run the agent only on demand, or define a new server agent schedule on which to run the Distribution Agent, as illustrated in Figure 16-24. We choose to run the agent continuously.

Figure 16-24. The Synchronization Schedule page
On the Initialize Subscriptions page, depicted in Figure 16-25, you choose if you want the subscription to be initialized immediately, or if you want to wait for the first synchronization, and then initialize it from the snapshot at that point. For this demonstration, we initialize the subscription immediately.

Figure 16-25. The Initialize Subscriptions page
On the Wizard Actions page, you need to choose between whether you want to create the subscription immediately or if you want to script the process. We choose to create the subscription immediately. This page is shown in Figure 16-26.

Figure 16-26. The Wizard Actions page
Finally, on the Complete The Wizard page, illustrated in Figure 16-27, you are given a summary of the actions that the wizard performs.

Figure 16-27. The Complete The Wizard page
Implementing the Subscriber with T-SQL
When you are implementing the subscriber with T-SQL, as opposed to with the GUI, your first task is to add the subscription to the publication and set its status. We perform this task by using the sp_addsubscriber system stored procedure. This procedure accepts the parameters describer in Table 16-14.
Table 16-14. sp_addsubscription Parameters
|
Parameter |
Description |
|---|---|
|
@publication |
Specifies the name of the publication to which the subscription is linked. |
|
@article |
Specifies the name of an article to which the subscriber is linked. Pass a value of all to indicate that it is linked to all articles in the publication. |
|
@subscriber |
Specifies the name of the subscriber. |
|
@destination_db |
Specifies the name of the subscription database. |
|
@sync_type |
Specifies how the subscriber is initialized. • Automatic (default) indicates that the schema and data is synchronized using a snapshot; replication support only indicates that procedures required at the subscriber are created, but it assumes that the data is already synchronized. • Initialize with backup indicates that the subscriber is initialized with a backup of the publication database, as opposed to with the Snapshot Agent. • Initialize from LSN can be used with peer-to-peer replication. |
|
@status |
Specifies the status of the subscription. • Active indicates that the subscription is initialized and ready to accept changes. • Subscribed indicates that the subscription has yet to be initialized. |
|
@subscription_type |
Specifies if the subscription is a push subscription or a pull subscription. |
|
@frequency_type |
Specifies the frequency type for the Distribution Agent’s schedule. Please see Table 16-8 for further details. |
|
@frequency_interval |
Specifies the frequency interval for the Distribution Agent’s schedule. Please see Table 16-8 for further details. |
|
@frequency_subday |
Specifies the subday frequency for the Distribution Agent’s schedule. Please see Table 16-8 for further details. |
|
@frequency_subday_interval |
Specifies the subday frequency interval for the Distribution Agent’s schedule. Please see Table 16-8 for further details. |
|
@active_start_date |
Specifies the date that the agent is first scheduled to run. |
|
@active_end_date |
Specifies the date that the agent stops being scheduled. |
|
@active_start_time_of_day |
Specifies the time that the agent is first scheduled to run. |
|
@active_end_time_of_day |
Specifies the time that the agent stops being scheduled. |
|
@optional_command_line |
Optionally, use this parameter to specify a command-line command that should be executed. |
|
@enabled_for_syncmgr |
Specifies if the subscription can be synchronized using Windows Synchronization Manager. |
|
@dts_package_name |
When creating the subscription, it is possible to specify an SSIS package that performs data transformations on the data. If you have enabled this for the publication, then you can specify the name of the SSIS package in this parameter. |
|
@dts_package_password |
Specifies the password that has been used to encrypt the SSIS package. |
|
@dts_package_location |
Specifies the file path to the SSIS package. |
|
@publisher |
Specifies the name of the publisher. Only use this parameter for heterogeneous replication. |
|
@backupdevicetype |
If you are initializing a subscription from a backup, then use this parameter to specify the type of backup device: DISK or TAPE. |
|
@backupdevicename |
If you are initializing a subscription from a backup, then use this parameter to specify the name of the backup device. |
|
@password |
If you are initializing a subscription from a backup, then use this parameter to specify the password of the backup device, if it has one. |
|
@fileidhint |
If you are initializing a subscription from a backup, then use this parameter to specify the number of the backup set within the media set to be restored. |
|
@unload |
If you are initializing a subscription from a backup and the backup device type is TAPE, then use this parameter to specify that the tape should be unloaded. |
|
@subscriptionlsn |
Used for peer-to-peer replication. |
|
@subscriptionstreams |
Specifies the number of connections allowed to the subscriber by the Distribution Agent for applying batches. This is discussed in more detail later in this chapter. |
|
@subscriber_type |
Specifies the type of subscriber for heterogeneous subscriptions. • 0 indicates SQL Server, which is the default behavior. • 1 indicates an ODBC Data Source. • 2 indicates Microsoft Jet Engine. • 3 indicates OLEDB Provider. |
To use the sp_addsubscription procedure to add the subscriber as we did through the GUI, we can use the command in Listing 16-16. This command should be run on the publisher. We do not specify the details for the SQL Server Agent job, because we configure this job in the next step.
Finally, we need to configure the SQL Server Agent job that runs the Distribution Agent. We can do this using the sp_addpushsubscription_agent system stored procedure, which accepts the parameters detailed in Table 16-15.
Table 16-15. sp_addpushsubscription_agent Parameters
|
Parameter |
Description |
|---|---|
|
@publication |
Specifies the name of the publication to which the subscription is linked. |
|
@subscriber |
Specifies the name of the subscriber. |
|
@subscriber_db |
Specifies the name of the subscription database. |
|
@subscriber_security_mode |
Specifies the authentication method for connecting to the subscriber. • 0 indicates SQL authentication. • 1 indicates Windows authentication. |
|
@subscriber_login |
Specifies the name of the login to use when connecting to the subscriber. |
|
@subscriber_password |
Specifies the password of the login that is used for connecting to the subscriber. |
|
@job_login |
Specifies the Windows account that runs the SQL Server Agent job that is used to schedule the Distribution Agent. |
|
@job_password |
Specifies the password of the Windows account that is used to schedule the Distribution Agent. |
|
@job_name |
Specifies the name of the SQL Server Agent job that is used to schedule the Distribution Agent. Only use this parameter if the job already exists. |
|
@frequency_type |
Specifies the frequency type for the Distribution Agent’s schedule. Please see Table 16-8 for further details. |
|
@frequency_interval |
Specifies the frequency interval for the Distribution Agent’s schedule. Please see Table 16-8 for further details. |
|
@frequency_subday |
Specifies the subday frequency for the Distribution Agent’s schedule. Please see Table 16-8 for further details. |
|
@frequency_subday_interval |
Specifies the subday frequency interval for the Distribution Agent’s schedule. Please see Table 16-8 for further details. |
|
@active_start_time_of_day |
Specifies the date that the agent is first scheduled to run. |
|
@active_end_time_of_day |
Specifies the date that the agent stops being scheduled. |
|
@active_start_date |
Specifies the time that the agent is first scheduled to run. |
|
@active_end_date |
Specifies the time that the agent stops being scheduled. |
|
@dts_package_name |
When creating the subscription, it is possible to specify a SSIS package to perform data transformations on the data. If you have enabled this for the publication, then you can specify the name of the SSIS package in this parameter. |
|
@dts_package_password |
Specifies the password that has been used to encrypt the SSIS package. |
|
@dts_package_location |
Specifies the file path to the SSIS package. |
|
@enabled_for_syncmgr |
Specifies if the subscription can be synchronized using Windows Synchronization Manager. |
|
@publisher |
Specifies the name of the publisher. Only use this parameter for heterogeneous replication. |
|
@subscriber_provider |
Specifies the PROGID of the OLEDB provider. Only used for heterogeneous subscribers. |
|
@subscriber_datasrc |
Specifies the name of the data source used by the OLEDB provider. Only used for heterogeneous subscriptions. |
|
@subscriber_location |
Specifies the location of the subscriber database used by the OLEDB provider. Only used for heterogeneous subscribers. |
|
@subscriber_provider_string |
Specifies the OLEDB provider–specific connection string. Only used for heterogeneous subscribers. |
|
@subscriber_catalog |
The catalog to be used when connecting to the OLEDB provider. Only used for heterogeneous subscriptions. |
To use the sp_addpushsubscription_agent procedure to configure the SQL Server Agent job, which runs the Distribution Agent in our environment, we can use the command in Listing 16-17.
Replicating to Memory-Optimized Tables
Transactional replication is the only form of replication that supports memory-optimized tables. It does not allow memory-optimized tables to be used as articles in the publication, but it does allow data to be replicated to memory-optimized tables in the subscription database.
In order to demonstrate the configuration of this functionality, we first create a copy of the Chapter16 database, called Chapter16MemOpt, and populate the table with the data from the Chapter16 database. We then create a new publication with an independent agent and generate the snapshot. These tasks are performed in Listing 6-18.
Instead of immediately adding the subscriber, we first need to perform some manual configuration. This involves manually creating the subscription database and then modifying the .SCH file for the article. The script in Listing 16-19 creates the database when run on the subscriber. In the script, we configure the database collation to be Kana sensitive and Width sensitive, as well as Case and Accent sensitive. We also configure the database to default to the SNAPSHOT isolation level for transactions involving memory-optimized tables. Transaction isolation levels are discussed in Chapter 18. The script also manually creates the table in the subscription database.
We now manually synchronize the data between the publication and subscription databases. It is important to ensure that no further data changes are made in the publication database from this point until replication is fully configured and synchronizing the data. The script in Listing 16-20 uses BCP to synchronize the data, so run it from the command line.
Our next task is to reconfigure the article in order to avoid schema changes. This is because we are not able to use a snapshot to regenerate the schema. We can achieve this using the sp_changearticle system stored procedure, which accepts the parameters detailed in Table 16-16.
Table 16-16. sp_changearticle Parameters
|
Parameter |
Description |
|---|---|
|
@publication |
Specifies the name of the publication that contains the article. |
|
@article |
Specifies the name of the article to modify. |
|
@property |
Specifies which property of the article you wish to change. |
|
@value |
Specifies the value that you wish to configure for the property. |
|
@force_invalidate_snapshot |
Specifies if existing snapshots are invalidated. • 0 indicates that they are still valid. • 1 indicates they are invalidated. |
|
@force_reinit_subscription |
Specifies if adding the filter causes existing subscriptions to be reinitialized. • 1 indicates that they are. • 0 indicates that they are not. |
|
@publisher |
Specify the name of the publisher. Only use this parameter for heterogeneous publishers. |
Therefore, to use the sp_changearticle procedure to stop schema changes from being made to our article, we can use the command in Listing 16-21.
Finally, we can create a subscription, which is configured to not be synchronized with a snapshot, along with the SQL Server Agent job to run the independent Distribution Agent. We do this using the sp_addsubscription and sp_addpushsubscription_agent system stored procedures as demonstrated in Listing 16-22.
Configuring Replication
After replication has been set up, a DBA may need to perform various maintenance activities. Two of the most common tasks are modifying the permissions of the PAL (publication access list) and optimizing the performance of replication. These topics are covered in the following sections.
Modifying the PAL
The PAL is used to control access security to the publication. When agents connect to the publication, their credentials are compared to the PAL to ensure they have the correct permissions. The benefit of the PAL is that it abstracts security from the publication database and prevents client applications from needing to modify it directly.
To view the PAL of the Chapter16_Customers_Filtered publication in SSMS and add a login called ReplicationAdmin, you must drill through Replication | Local Publishers and select Properties from the context menu of the Chapter16_Customers_Filtered publication. This causes the Properties dialog box to be invoked, and you should navigate to the Publication Access List page, which is illustrated in Figure 16-28.

Figure 16-28. The Publication Access List page
You can now use the Add button to display a list of logins that do not have current access to the publication. You should select the appropriate login from the list to add it to the PAL, as shown in Figure 16-29.

Figure 16-29. Add Publication Access
To view the PAL via T-SQL, you can use the sp_help_publication_access system stored procedure. This parameter accepts the parameters describer in Table 16-17.
Table 16-17. sp_help_publication_access Parameters
|
Parameter |
Description |
|---|---|
|
@publication |
Specifies the name of the publication. |
|
@return_granted |
Specifies if logins with or without access should be returned. • 0 indicates logins without access. • 1 indicates logins with access, which is the default behavior. |
|
@login |
Specifies a specific login name to check. By default, a wildcard is used. |
|
@initial_list |
Specifies if all logins should be returned or only those that originally had access. |
We can run this stored procedure, passing in the name of the publication, to retrieve a list of logins with access, as demonstrated in Listing 16-23.
To add the ReplicationAdmin login to the PAL using T-SQL, we can use the sp_grant_publication_access system stored procedure, passing the name of the publication and the name of the login, which are the only two parameters accepted by this procedure. This is demonstrated in Listing 16-24.
Optimizing Performance
Out of the box, the performance of transaction replication is not always optimal. You can view the current performance of your topology by using Replication Monitor. To invoke Replication Monitor, select Launch Replication Monitor from the Replication context menu in Object Explorer.
In Replication Monitor, drill through the publisher and select the appropriate publication from the list to display the All Subscriptions tab, illustrated in Figure 16-30. In this tab, the status of each subscription displays, along with the average latency and the current performance level, based on predefined thresholds. The date and time of the last synchronization also display.

Figure 16-30. The All Subscriptions tab
To check the latency for a single packet between the publication and distribution database, and between the distribution database and the subscription database, you can insert a tracer token by navigating to the Tracer Tokens tab and selecting Insert Tracer, as shown in Figure 16-31. This causes a special token to be sent through the topology, and the time it takes to reach each component is recorded.

Figure 16-31. The Tracer Tokens tab
To configure the latency threshold, as well alerts, navigate to the Warnings tab, as illustrated in Figure 16-32. Here, you can alter the thresholds of the default warnings, or select the Alert check box, to create a SQL Server Agent alert.

Figure 16-32. Warnings tab
SQL Server Agent alerts can be configured by using the Configure Alerts button and then by selecting the appropriate alert from the list, as illustrated in Figure 16-33.

Figure 16-33. The Configure Replication Alerts dialog box
The Alerts Properties dialog box is now invoked, prepopulated with relevant information. Figure 16-34 illustrates the General page of the Alert Properties dialog box, which is prepopulated with an appropriate name and the correct error number.

Figure 16-34. The General page
On the Response page of the dialog box, shown in Figure 16-35, you are able to configure a SQL Server Agent job, which is fired in response to the failure. You can also configure which operators are notified of the condition. In this case, they are notified of the agent failure.

Figure 16-35. The Response page
On the Options page, illustrated in Figure 16-36, you can specify if you want the error message to be included in the text of the alert; you can specify any other information that you want to appear in the text. You can also configure a delay between invocations of the response to avoid multiple alerts from being triggered for the same event.

Figure 16-36. The Options page
For troubleshooting performance-related issues, it can help to turn on verbose logging for the Distribution Agent. To do this, select Agent Profile from the subscriber’s context menu in the All Subscriptions tab of Replication Monitor before you select VerboseHistoryAgentProfile from the Agent Profile dialog box, as illustrated in Figure 16-37.

Figure 16-37. Enable verbose logging
Now, after restarting the Distribution Agent, take a look at the Distributor To Subscriber History in Replication Monitor; this exposes a row that gives you the statistics since the agent last started. Hovering over the row shows the complete message, similar to what appears in the illustration in Figure 16-38.

Figure 16-38. Verbose statistics
If you discover that the performance of your Transactional Replication topology is poor, you can improve performance in various ways. Two of the most effective ways are to optimize the Log Reader Agent by increasing the size of batches that the agent reads, and to optimize the Distribution Agent by increasing the size of batches that are committed and parallelizing the update of the subscribers.
By default, the Log Reader Agent reads 500 transactions at a time. If your publication has a high transactional throughput, but only a smaller subset of those transactions are being replicated, then you can improve the performance of the Log Reader Agent by increasing the batch size of transactions read. You can do this by configuring the -ReadBatchSize property.
You can change the -ReadBatchSize of the Log Reader Agent by adding the switch to the command that runs the Log Reader Agent in the second job step of the SQL Server Agent job that runs the Log Reader Agent. If we want to change the -ReadBatchSize of our Log Reader Agent to 1000, we change the command being executed to be the same as the command in Listing 16-25.
Applying a set of transactions on the subscriber has a fixed overhead. Therefore, if you increase the number of transactions being committed in a single batch, you can improve the overall performance of the synchronization. By default, 100 transactions are committed as a single batch. We can increase this value by using the -CommitBatchSize property of the Distribution Agent.
You can change the -CommitBatchSize of the Distribution Agent. To do so, we add the -CommitBatchSize switch to the command in the second job step of the SQL Server Agent job that runs the Distribution Agent. If we want to change the –CommitBatchSize switch of the Distribution Agent that we are using to synchronize the Chapter16_Customers_Filtered publication so that 250 transactions are grouped together, we can change the command being executed to match the command in Listing 16-26.
We can further improve the performance of the Distribution Agent by allowing the subscriptions to be updated in parallel. By default, only a single connection is made to the subscriber, in order to apply changes. If we allow multiple connections, however, then we can greatly increase throughput.
To enable parallel updates, we need to set the -SubscriptionStreams parameter of the Distribution Agent. If we want to allow four parallel connections, for example, we can update the command run by the second job step of the SQL Server Agent job running the Distribution Agent to mirror the command in Listing 16-27.
![]() Caution Over-optimizing the throughput to the subscribers can lead to timeouts if the subscriber cannot keep up. Therefore, when applying optimizations to the Distribution Agent, you should move up in small increments, and stop, when the performance begins to level off.
Caution Over-optimizing the throughput to the subscribers can lead to timeouts if the subscriber cannot keep up. Therefore, when applying optimizations to the Distribution Agent, you should move up in small increments, and stop, when the performance begins to level off.
Adding AlwaysOn Readable Secondary Replicas
![]() Note For the demonstrations in this chapter, we use the AlwaysOn topology, which we built in Chapter 13.
Note For the demonstrations in this chapter, we use the AlwaysOn topology, which we built in Chapter 13.
It can be very useful to add readable secondary replicas to an AlwaysOn Availability Group topology in order to implement vertically scaled reporting. When you use this strategy, the databases are kept synchronized, with variable, but typically low latency, using log streaming. The additional advantage of readable secondary replicas from SQL Server 2014 onward is that they stay online, even if the primary replica is offline. The limitation here, however, is that users must connect directly to the instance, as opposed to the Availability Group Listener.
You can further improve read performance in readable secondary replicas by using temporary statistics, which you can also use to optimize read-only workloads. Also, snapshot isolation is also used exclusively on readable secondary replicas, even if other isolation levels or locking hints are explicitly requested. This helps avoid contention, but it also means that TempDB should be suitably scaled and on a fast disk array.
The main risk of using readable secondary replicas is that implementing snapshot isolation on the secondary replica can actually cause deleted records not to be cleaned up on the primary replica. This is because the ghost record cleanup task only remove rows from the primary once they are no longer required at the secondary. In this scenario, log truncation is also delayed on the primary replica. This means that you potentially risk having to kill long-running queries that are being satisfied against the readable secondary. This issue can also occur if the secondary replica becomes disconnected from the primary. Therefore, there is a risk that you may need to remove the secondary replica from the Availability Group and subsequently re-add it.
To make a secondary replica readable, you need to perform three tasks. First configure the secondary replica to allow read-only connections. Second, specify a read-only URL for reporting. The Availability Group Listener then directs appropriate traffic to this URL. The final task is to update the read-only routing list on the primary replica. These tasks are performed by the script in Listing 16-28.
Summary
Database snapshots use copy-on-write technology to create a point-in-time copy of a database. The snapshot must exist on the same instance as the source database, so although you cannot use them to distribute load between servers, you can use them to reduce contention between read and write operations.
Snapshots can be used to recover data that has been lost due to human error as well as for reporting purposes. You can either copy the data back to the source database, or you can restore the source database from a snapshot, as long as it is the only snapshot linked with the source database. Snapshots do not offer a protection against failure or corruption, however, and they are not a suitable alternative to backups.
Replication is a suite of technologies, offered by SQL Server, that allow you to distribute data between systems. For the purpose of scaling workloads, transactional replication is the most appropriate choice. Transactional replication can be implemented by configuring a distributor, which will hold replication metadata and potentially take the weight off the synchronization; a publisher, which hosts the data that is synchronized; and subscribers, which are the targets for synchronization. Replication is a complex technology, and as a DBA, you should understand how to implement it using T-SQL, as well as the GUI, since you will encounter situations in which you need to tear down and rebuild replication. Replication also exposes the RMO (Replication Management Objects) API, which is a replication programming interface for .NET.
You can configure readable secondary replicas within an AlwaysOn Availability Group topology; these allow for vertical scaling of read-only workloads. From SQL Server 2014 on, readable secondary replicas stay online even if the primary replica goes offline. The caveat here is that connections must be made directly to the instance.
In order to implement readable secondary replicas, you must configure read-only routing. This involves giving the secondary a URL for read-only reporting and then updating the read-only routing list on the primary replica. The risk of using this strategy for scale-out reporting is that long-running transactions at the secondary, or the secondary becoming disconnected, can lead to log truncation delays and delays in ghost records being cleaned up.