
![]()
Migrating to the Cloud
Windows Azure offers you the ability to host SQL Server databases to the cloud using either Windows Azure SQL Server virtual machines (VMs), which offer an IaaS (Infrastructure as a Service), or Azure SQL Database, which offers DaaS (Database as a Service).
When migrating to an IaaS offering, you remove the overheads associated with managing a physical or virtual infrastructure on premises. Instead, the infrastructure is contained and managed in Microsoft data centers. Your company only needs to manage the platforms used by the VMs. In the case of SQL Server VMs, this means Windows Server and SQL Server.
When migrating to a DaaS offering, your company no longer needs to manage the infrastructure or the platform. Not only does Microsoft manage the hardware platform, it also manages the operating system and SQL Server instance as part of the offering. In fact, you only need staff to maintain the databases themselves. Although the latest versions of Azure SQL Database are very mature, they do not completely overlap with on-premises SQL Server offerings. This means that you should be careful not to try to migrate any databases that use functionality not offered by Azure SQL Database. Take a look at https://azure.microsoft.com/en-gb/documentation/articles/sql-database-transact-sql-information/ to find features that are not supported, or that are only partially supported by Azure SQL Database.
This chapter discusses how to work with databases in Azure, which offers DaaS, and how to work with Azure SQL VMs, which offer IaaS.
![]() Note Demonstrations in this chapter use the Windows Azure management portal. This portal is subject to updates from Microsoft and may change, although it is likely that concepts will change more slowly than the GUI.
Note Demonstrations in this chapter use the Windows Azure management portal. This portal is subject to updates from Microsoft and may change, although it is likely that concepts will change more slowly than the GUI.
Working with Azure SQL Database
The following sections describe how to work with DaaS by creating an Azure SQL Database and by migrating an existing database to it; how to deploy a new database to Azure SQL Database; and how to migrate an existing database to Azure SQL Database.
Creating an Azure SQL Database
When creating your first Azure SQL Database, you will also need to configure the SQL instance with a login name and password. To create the database, navigate to SQL Databases in the Azure management portal and choose the option to create a new database. This invokes the New SQL Database dialog box, as displayed in Figure 27-1. You can find the Azure management portal at manage.windowsazure.com.

Figure 27-1. The New SQL Database dialog box
In this dialog box, we first specify a name for our database before going on to define the subscription that we plan to use (if we have multiple subscriptions). We then need to choose the service tier that we need for our database. In Figure 27-1, we select the Basic tier, since this is the recommended level for development and test environments. You can find details of the available service tiers in Chapter 1; however, these tiers are subject to change.
The performance level you select depends on the service tier that you choose. Performance levels are defined in DTUs (database throughput units). This measure represents the overall power of the database engine based on CPU, memory, and IO rates. The performance levels are subject to change, but Table 27-1 details the current performance level for the Basic service tier.
Table 27-1. Basic Tier Performance Level
|
Configuration |
Basic Level |
|---|---|
|
DTU (database throughput unit) |
5 |
|
Max DB size |
2GB |
|
Max concurrent requests |
30 |
|
Max concurrent logins |
30 |
|
Max sessions |
300 |
|
Benchmark transaction rate |
16,600 transactions/hour |
|
Predictability |
Good |
If you select the Standard tier, then the performance levels detailed in Table 27-2 are available.
Table 27-2. Standard Tier Performance Levels

If you select the Premium tier, then the performance levels detailed in Table 27-3 are available.
Table 27-3. Premium Performance Levels

![]() Note Service levels are subject to alteration. They are also meant to be representative and indicative benchmarks, as opposed to guaranteed performance levels.
Note Service levels are subject to alteration. They are also meant to be representative and indicative benchmarks, as opposed to guaranteed performance levels.
We also need to specify a collation for our database. If the database is part of a hybrid solution, then you should ensure, where possible, that the collation matches your on-premises collation. In this scenario, the collation is configured as Latin1_General_CI_AS, although if possible, you should consider configuring your collation globally to Latin1_General_100_CI_AS, since this newer collation handles all Unicode characters correctly. For more information on collations, please refer to Chapter 2. Finally, you need to choose whether the database should be created on a new database server, or on an existing server, if you already have one configured.
Because we are choosing the option to create a new server, a second page of the dialog box becomes available, as illustrated in Figure 27-2.

Figure 27-2. The Create Server dialog box
On this page, we specify a login name and password for authenticating to the server. We also choose the most appropriate region for the server to be hosted. The Allow Windows Azure Service To Access The Server check box determines whether other Azure services are able to access the database server, and the Enable Latest SQL Database Update option specifies if the server should be configured with the latest version of Azure SQL Database. At the time of writing, this is Version 12. Checking this box is generally a good idea, unless you have a specific compatibility issue.
![]() Note After you click the check at the bottom right, the database starts being created. This may take a few minutes, and during this time, you may receive pop-ups. I suggest that you select Not Now to any pop-ups that appear if you are following this demonstration, as they may change the flow of your work.
Note After you click the check at the bottom right, the database starts being created. This may take a few minutes, and during this time, you may receive pop-ups. I suggest that you select Not Now to any pop-ups that appear if you are following this demonstration, as they may change the flow of your work.
Once the database has been created, it displays in the SQL Databases tab of Azure management portal. Drilling through the database causes the Quick Start menu for the database to display, which is shown in Figure 27-3. Here, you can see the full connection string for the database server.
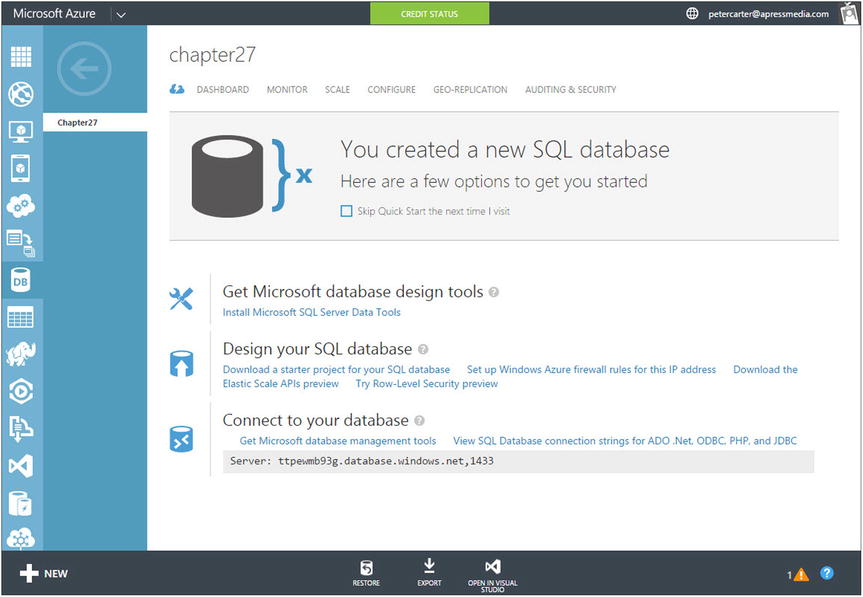
Figure 27-3. SQL Database Quick Start page
We can use this page to configure the firewall rules for this server by clicking Set Up Windows Azure Firewall Rules For This IP Address under Design Your SQL Database. Clicking this causes us to be prompted to add the current IP address of the server into the firewall rule, as displayed in Figure 27-4. We select Yes to make the server accessible.

Figure 27-4. Add the firewall rules
We now need to configure the firewall to allow clients to access this server. To do this, we navigate to the Servers tab of the SQL Databases page in Azure management portal. We then drill through our server and navigate to the Configure tab, as shown in Figure 27-5. Here, we use the Add To Allowed IP Addresses button in the Current Client IP Address section to create a rule for our current workstation. Alternatively, we can use the text boxes in the lower section of the screen to enter a rule name and an IP Address range manually.

Figure 27-5. Configure the client IP address
Now that the firewall has been configured for our server, we can open the new database in SQL Server Management Studio (SSMS), or SSQL Server Data Tools (SSDT), from any client for which a firewall rule has been created. To connect to the server in SSMS, use the connection string, which is displayed on the Home tab of the Chapter27 database, and specify SQL Server authentication using the login name and password you created when you set up the server.
Figure 27-6 shows the server open in SSMS. In Object Explorer, you can see that logins are the only instance-level feature available. This is by design, because the Chapter27 database uses a DaaS model. Also, notice that Extended Events are available, but they are displayed at the database level, as opposed to the instance level. You may also notice a node in Object Explorer for Federation—this feature is being retired and you should not use it. By the time you are reading this book, it may not even appear in Object Explorer. Instead, use Azure SQL Database’s elastic database tools to scale your database. A full discussion of elastic database tools is beyond the scope of this book, but you can find further information at https://azure.microsoft.com/en-gb/documentation/articles/sql-database-elastic-scale-get-started/.

Figure 27-6. Object Explorer
Migrating a Database to Azure SQL Database
If you have an existing database that you would like to migrate to the cloud, you can use the wizard SQL Server Management Studio provides to simplify this process. Before we discuss how to use the wizard, let’s first use the script in Listing 27-1 to create the Chapter27Migrate database. Make sure you run this script on an on-premises instance of SQL Server.
Now that we’ve created the Chapter27Migrate database, we can access the wizard by selecting Tasks | Deploy Database To Windows Azure SQL Database from the context menu of the Chapter27Migrate database in Object Explorer. This invokes the Introduction page of the Deploy Database Wizard. This wizard copies the database to the cloud, while maintaining the original copy on-premises. When you pass through this page, you will see the Deployment Settings page, which is illustrated in Figure 27-7.

Figure 27-7. The Deployment Settings page
![]() Tip For the wizard to work, you must have Management Tools CU (Cumulative Update) 4 or higher installed for SQL Server 2014 RTM (Release to Manufacture), or SP1. If you do not have this CU level, then you are only able to see the Web and Business editions of Azure SQL Database, neither of which are under continued support. Choosing one of these options will cause the deployment to fail. You can find CU 4 for SQL Server 2014 RTM at https://support.microsoft.com/en-us/kb/2999197. To check your current build version, run SELECT @@VERSION. This returns the build number, which you can check against Microsoft’s list of build versions, which is published for SQL Server 2014 at https://support.microsoft.com/en-us/kb/2936603.
Tip For the wizard to work, you must have Management Tools CU (Cumulative Update) 4 or higher installed for SQL Server 2014 RTM (Release to Manufacture), or SP1. If you do not have this CU level, then you are only able to see the Web and Business editions of Azure SQL Database, neither of which are under continued support. Choosing one of these options will cause the deployment to fail. You can find CU 4 for SQL Server 2014 RTM at https://support.microsoft.com/en-us/kb/2999197. To check your current build version, run SELECT @@VERSION. This returns the build number, which you can check against Microsoft’s list of build versions, which is published for SQL Server 2014 at https://support.microsoft.com/en-us/kb/2936603.
On this page of the wizard, you can use the Connect button to connect to the database server. You do this using the connection string provided on the Home page of the Azure SQL Database and the login name and password that you used when you created the server. You then specify a name for your database in the New Database Name field. This field defaults to the name of the existing database, but you can change this if you need to.
In the Windows Azure SQL Database Settings section, specify a maximum size for your Azure SQL Database; when choosing this, make sure to consider the service tier you plan to use. Depending on the version of Management Tools you have installed, you may or may not see a complete list of tiers in the Edition Of Windows Azure SQL Database drop-down box. If you see the tier you wish to use, select it. If the tier that you wish to use is not listed, leave the field blank. You can change this setting at a later date in the Windows Azure Management Portal.
You can use the Temporary File Name field to specify a location for the intermediate .bacpac file that will be created on the local machine. This intermediate file is created because the wizard uses SQL Server’s Data-Tier Application feature to extract the database. Data tier applications are beyond the scope of this book.
Figure 27-8 shows the Summary page of the wizard. You should use this page to review the actions that are performed by the wizard.

Figure 27-8. The Summary page
The Results page of the wizard, illustrated in Figure 27-9, displays the progress of the deployment. You should review this page for any issues that may have occurred and respond appropriately.

Figure 27-9. The Results page
Managing Azure SQL Database
Azure management portal provides tools for monitoring and managing your Azure SQL Databases. The following sections discuss how to monitor your Azure SQL Databases, how to audit them, and how to restore one from a backup.
Monitoring Azure SQL Databases
Azure provides tools for monitoring key metrics on Azure SQL Databases. These metrics include data and log file IO, CPU usage, and database size. This section demonstrates how to use this monitoring capability.
When you drill through the Chapter27Migrate database in the Azure SQL Databases page of Windows Azure Management Studio and then navigate to the Monitor tab, you cause an overview of the database’s utilization to display. The lower half of the tab displays the minimum, maximum, average, and total values for each currently selected counter, whereas the upper half of the tab displays the counter values in a graphical format. Because we have not used the Chapter27Migrate database since we uploaded, the values are currently static.
Before we fully explore Azure SQL Database’s monitoring functionality, let’s first generate some activity in the database by running the script in Listing 27-2 from a query windows in SSMS, which is connected to the Chapter27Migrate database.
![]() Tip USE statements are not supported against Azure SQL Database, since it is not possible to connect to, or reference, multiple databases.
Tip USE statements are not supported against Azure SQL Database, since it is not possible to connect to, or reference, multiple databases.
To show activity against the database, navigate to the Monitor tab of the Chapter27Migrate database. Figure 27-10 illustrates this activity after the Duration drop-down on the top right of the tab has been changed to 1 Hour. This change causes the graph to rescale.

Figure 27-10. Chapter27Migrate performance metrics
Imagine that we are interested in analyzing the CPU usage and IO that is generated from our load. We can add these metrics to the output using the Add Metrics button at the bottom of the tab. This causes the Choose Metrics dialog box to display, as illustrated in Figure 27-11.

Figure 27-11. The Choose Metrics dialog box
In this dialog box, we check the Log IO Percentage, Data IO Percentage, and CPU Percentage metrics before we return to the Monitor tab. The other selected items are checked by default.
Once we have navigated back to the Monitor tab, we can uncheck the metrics that we do not need in the lower half of the screen. This causes the graph to update, as shown in Figure 27-12.

Figure 27-12. Updated metrics
When using Windows Azure Management Studio, you can also issue alerts based on specific metrics, by emailing administrators, or by emailing other specific users that you choose. For example, imagine that we want to create an alert if the CPU usage rises above 75 percent of our limit. This is useful in that it warns us that we may need to upgrade our service level to a higher DTU. We can achieve this by highlighting the CPU Percentage metric in the lower half of the screen and then by clicking the Add Rule button. This invokes the Create Alert Rule dialog box, as shown in Figure 27-13.

Figure 27-13. The Create Alert Rule dialog box
On the first page of this dialog box, we define a name and a description for the rule. The alert name and description may only contain letters, number, commas, spaces, and periods.
On the second page of the dialog box, illustrated in Figure 27-14, we define the conditions that cause the alert to be fired and the actions that should be taken if it does fire.

Figure 27-14. Defining alert conditions and actions
The Metric field is automatically set to the metric that you selected in the Monitor tab. You can configure the Condition drop-down with the following operators, depending on your requirements:
- Greater Than
- Greater Than Or Equal To
- Less Than
- Less Than Or Equal To
In our case, Greater Than is the logical choice, since we want to be alerted if CPU usage rises above 75 percent.
In the Threshold Value field, we specify the value that will be used in conjunction with the operator. In our case, that is 75. Because the CPU Usage metric is a percentage, percent (%) is the only unit of measurement available. For some other metrics, you can specify an absolute value.
The Average Evaluation Window field specifies the duration that should be used for averaging the metric. Evaluating the average is very useful, because it avoid alerts being raised by temporary spikes. Longer periods of high utilization are more likely to be what you will be concerned with. We want SQL Server to use 100 percent of the CPU to respond to queries more quickly, but if we are constantly using large amounts of CPU, it could mean we need to do some optimization or consider increasing our DTUs. The Alert Evaluation Window field can be configured as one of the following:
- Average Over The Last 5 Minutes
- Average Over The Last 10 Minutes
- Average Over The Last 15 Minutes
- Average Over The Last 30 Minutes
- Average Over The Last 45 Minutes
- Average Over The Last Hour
Configuring Auditing for Azure SQL Databases
You can configure auditing for the Azure SQL Database by navigating to the Auditing & Security tab of the database in Azure management portal. On this tab, you can enable auditing for the database by setting Auditing to Enabled. This causes the events that can be logged to display in the Auditing section of the tab, followed by configuration options for how you would like your audit logs to be stored, as displayed in Figure 27-15.

Figure 27-15. Configuring auditing
![]() Tip You can also configure auditing from the Auditing & Security tab of the database server. In this case, you can use the Inherit Auditing Settings From Server check box to help ensure consistent auditing for your Azure SQL Databases.
Tip You can also configure auditing from the Auditing & Security tab of the database server. In this case, you can use the Inherit Auditing Settings From Server check box to help ensure consistent auditing for your Azure SQL Databases.
In this dialog box, we can first use the check boxes, next to the event categories, to define what success criteria and what failure criteria will be audited. In the lower section of the screen, we need to specify a storage account to use to store the audit logs, since they will be stored in Azure tables. We can also specify the retention period for the logs. It is worth noting that the retention period specified is the minimum retention period; logs may be stored for up to 30 days longer than that threshold. The table name defaults to the configurable part of the name of the server, followed by the name of the database. This is prefixed with SQLDBAuditLogs and is given a suffix relating to the date that the log was created if you specify retention. The name is important, because you use this to access the log. The tables are cycled between 10 and 30 days, depending on the retention period you specify. Finally, specify if the logs should be updated using the primary or secondary storage access key. The reason this feature is helpful is because if you need to regenerate your storage access keys, you can switch to use you secondary access key, regenerate the primary access key, switch back to the primary key and then finally regenerate your secondary access key.
![]() Tip Please refer to Chapter 25 for further details on the storage access key.
Tip Please refer to Chapter 25 for further details on the storage access key.
Once audit data has been captured, you can view the audit logs by using the Azure SQL DB Audit Logs Report template, which you can downloaded from the Auditing & Security tab of the database in Azure Management Studio. This Excel workbook provides a rich template for analyzing audit data.
Restoring Azure SQL Databases
Azure SQL Databases are automatically subject to geo-redundant backups. If you need to restore a database, navigate to the Servers tab within the SQL Databases area of Azure Management Studio before you drill through your server and navigate to the Backups tab, which is displayed in Figure 27-16.

Figure 27-16. The Backups tab
On this tab, select the database that you want to restore, and use the Restore button at the bottom of the screen to invoke the Restore dialog box. This dialog box is illustrated in Figure 27-17.

Figure 27-17. The Restore dialog box
In this dialog box, you first need to specify a name for the restored database. Because Azure SQL Database is a DaaS offering, you will not be restoring your database due to a hardware or platform failure or for DR invocation. Instead, you will most likely be restoring your database to resolve a data corruption. Therefore, the name of the database to be restored defaults to the database name followed by the timestamp. This allows you to restore your database side by side with the original and merge the two datasets appropriately.
You then select your server from the list of target servers that are available. You also have the option of creating a new server for the restore, if you need to. When you exit the dialog box using the check mark at the bottom right, your database is restored.
Migrating to an Azure VM
To migrate a database to an Azure VM, you first need to create the VM and then run the Deploy Database To Windows Azure VM Wizard from SSMS. The following sections discuss these activities.
Creating a VM
If you plan to migrate your databases to an Azure VM, you first need to create the VM. You can achieve this by navigating to the VM page of Azure Management Studio and selecting the Create New Virtual Machine option. This cause the New | Compute | VM menu to open. Here, choose the From Gallery option. This invokes the Choose An Image page of the Create A Virtual Machine dialog box, as shown in Figure 27-18.

Figure 27-18. The Choose An Image page
On this page, you navigate to the SQL Server branch and then select the most appropriate image for your needs. In this example, we choose the SQL Server 2014 RTM Standard image. After you make your choice, you then navigate to the Virtual Machine Configuration page, which is displayed in Figure 27-19.

Figure 27-19. The Virtual Machine Configuration page
![]() Tip We have chosen the RTM version for consistency with other builds in this book. Unless you have a specific reason to choose the RTM edition, however, you will probably choose to select the version with the highest service pack level.
Tip We have chosen the RTM version for consistency with other builds in this book. Unless you have a specific reason to choose the RTM edition, however, you will probably choose to select the version with the highest service pack level.
On this page, we first choose the version of the image that we would like to use to build our machine. The best practice here is to use the most recent version. We also need to give our VM a descriptive name. The options that are available for the size of the VM depend on the service tier that you select; the Standard tier allows higher spec VMs than the Basic tier allows. We also need to provide a user name and password, which are created during the setup of the VM.
![]() Tip The minimum size that Microsoft recommends for a production workload is A1, or A3 if you are running SQL Server Enterprise Edition.
Tip The minimum size that Microsoft recommends for a production workload is A1, or A3 if you are running SQL Server Enterprise Edition.
Figure 27-20 shows the second Virtual Machine Configuration page. On this page, you first choose if you want to create a new cloud service or use an existing one. A cloud service is a container for one or more VMs. If you place multiple VMs inside a cloud service, the traffic can be load-balanced between them. You also need to choose a name for your VM, which is added to the cloudapp.net domain. This computer name must, of course, be unique. You should also choose the region that the VM should reside in and either select an existing storage account to use, or specify that a new one should be created. If you choose Create An Availability Set, then the VM is placed in a fault domain and there is no single point of failure. Finally, enter the details of the ports that you need opened for the VM. The RDP (Remote Desktop Protocol) and PowerShell ports are listed automatically, but here, we have also added the port 11435. This allows the Deploy Database To A Windows Azure VM to connect the virtual machine.

Figure 27-20. The second Virtual Machine Configuration page
On the third Virtual Machine Configuration page, illustrated in Figure 27-21, you are able to select extensions that you can install on the VM. The VM Agent is the tool you need to use to install and manage extensions, so it makes sense to install this tool, even if you do not need any extensions immediately.

Figure 27-21. The third Virtual Machine Configuration page
Once the Virtual Machine has been created, you can use the Connect button in Azure Management Studio to download the RDP file, which allows you to remote onto the server, or (because you opened the SQL port publicly), you are able to connect to the instance via your local SSMS. This may take a few minutes to complete.
Deploying a Database
Before deploying a database, you need a management certificate. You can either create a certificate using Visual Studio before you save this certificate to your local certificate store and upload it to Azure, or you need to generate a publishing profile in Azure. For demonstrations in this section, we work with a publishing profile. This profile is generated and downloaded automatically when you are logged into Windows Azure and visit https://manage.windowsazure.com/publishsettings/index?client=powershell.
![]() Note To use the Deploy Database To A Windows Azure VM wizard, ensure that you are running SQL Server 2012 SP1 CU2 or higher. Otherwise the wizard may not recognize your virtual machine size.
Note To use the Deploy Database To A Windows Azure VM wizard, ensure that you are running SQL Server 2012 SP1 CU2 or higher. Otherwise the wizard may not recognize your virtual machine size.
Now that you have your publishing profile, you can use the Deploy Database To A Windows Azure VM wizard to deploy your database. In this section, we deploy our Chapter27Migrate database to the VM we created in the previous section. You can access this wizard by drilling through Databases in SSMS and selecting Tasks | Deploy Database To A Windows Azure VM, from the context menu of the database that you wish to migrate. After you pass through the Introduction page, the Source Settings page displays, as illustrated in Figure 27-22.

Figure 27-22. The Source Settings page
On this page, specify the name of the instance that the database currently resides in, as well as the name of the database itself. In the Other Settings section of the screen, specify a directory where backup files can temporarily be stored, since this is how the wizard moves the data. A sensible location to choose is the instance backup folder.
On the Windows Azure Sign-In page, shown in Figure 27-23, either select a certificate or browse to the file location of your publishing profile. Because we are using a publishing profile, the certificate and field are automatically populated and the Subscription field is populated with a list of active Subscription IDs that are linked to the account.

Figure 27-23. The Windows Azure Sign-In page
![]() Tip If you have not generated a publishing profile, you can use the Sign In button to sign into Azure and download a publishing profile.
Tip If you have not generated a publishing profile, you can use the Sign In button to sign into Azure and download a publishing profile.
On the Deployment Settings page of the wizard, illustrated in Figure 27-24, specify the name of the cloud service you created or selected when you created the VM. This populates the Virtual Machine Name field with a list of VMs within that cloud service and the Storage Account field with a list of possible storage accounts that can be used. Then use the Settings button to specify the user name and password that will be used to access the VM. After successfully connecting to the VM, the SQL Instance Name and Database Name fields are automatically populated. You can amend these, however, if you have multiple instances installed on the VM or if you wish the database to have a different name post migration.

Figure 27-24. The Deployment Settings page
After you review the actions that are performed on the Summary page of the wizard, the database is migrated to the VM.
![]() Tip If you have not already created your VM, then the Settings button provides you with the opportunity to create one, as opposed to connecting to your existing VM.
Tip If you have not already created your VM, then the Settings button provides you with the opportunity to create one, as opposed to connecting to your existing VM.
Summary
You can create an empty database in Azure management portal. If you do this, you are prompted to create a server at the same time. This provides you with an instance on which to host your database. You can then connect to this server using SQL Server Management Studio (SSMS). Alternatively, you can deploy a Greenfield database to an Azure SQL Database directly from SQL Server Data Tools.
![]() Tip A Greenfield database implies a new project, where you are not bound by the constraints of upgrading an existing database
Tip A Greenfield database implies a new project, where you are not bound by the constraints of upgrading an existing database
If you wish to migrate an existing database from an on-premises instance of SQL Server to an Azure SQL Database, then SSMS provides a wizard to assist you. This wizard packages the database as a data tier application before deploying it to the cloud.
Azure management portal provides you with tools for managing Azure SQL Databases. This functionality allows you to monitor key performance metrics and configure endpoints. Because Azure SQL Database offers DaaS, all databases are backed up automatically and you can easily restore these backup files from the Azure management portal.
If you plan to migrate databases to a Windows Azure VM, you have multiple SQL Server VM images and sizing options to choose from.
Once you have created you virtual machine, you can use the Deploy A Database To A Windows Azure VM wizard in SSMS to deploy your database. This wizard uses a backup and restore to migrate the data to the cloud. Before running the wizard, ensure that you have generated a management certificate. You can do this by either creating a certificate in Visual Studio and importing this to your certificate store, or alternatively, by downloading a publishing profile from Azure.