
![]()
SQL Data Files in Windows Azure
SQL Server offers you the ability to natively store SQL Server data files and log files as page blobs in Windows Azure, which in turn helps you increase the portability of your databases—for example, if you need to move databases between on-premises instances, or between an on-premises instance and a Windows Azure SQL virtual machine (VM). This chapter discusses the concepts of this functionality before demonstrating how to implement it.
Understanding SQL Data Files in Windows Azure
SQL Server Data Files in Windows Azure is a new feature of SQL Server 2014 that allows you to store data and log files in the cloud, while maintaining on-premises compute nodes. This hybrid cloud functionality can offer advantages in many business cases. For example, it offers limitless storage without the overheads of SAN (Storage Area Network) management. It can also help you improve the availability of your systems because it is possible for the database to be attached to more than one server at a time. It is important to note, however, that the database must be offline on all but one node. This is because SQL Server Data Files in Windows Azure does not support connections from multiple servers, and if you accidently bring the database online on both servers at the same time, queries fail. However, this means that if your primary server crashes, you can bring the database online on your secondary server and the data becomes immediately accessible.
![]() Tip If you have a database attached to multiple instances, then the database must be offline on one of the instances.
Tip If you have a database attached to multiple instances, then the database must be offline on one of the instances.
The ability to attach a database to multiple servers also makes your databases very portable. If you need to migrate a database between servers, or even migrate from an on-premises server to a Windows Azure VM, you can do so with a very small amount of downtime.
One of the most interesting benefits of storing data files in Windows Azure, however, is a security enhancement. It is possible to use TDE (Transparent Data Encryption) with SQL Data Files in Windows Azure. When you combine these technologies, the data is encrypted at rest, in the cloud. When data is accessed, it is decrypted at the on-premises compute node. Because the certificates are stored on the compute node, in the unlikely event that your account is compromised, your data is still safe.
Another very interesting hybrid solution that SQL Server Data Files in Windows Azure makes available to you is the ability to store some data files on premises and others in the cloud. For example, imagine that you have a large database comprised of 20 percent live data and 80 percent historical data. You need maximum performance for the live data, but you are reaching your maximum on-premises storage capacity. In this scenario, you can implement a solution in which the live data is stored in data files on premises and the historic data is stored in files that are hosted in Windows Azure. A sliding-windows implementation of partitioning, which is discussed in Chapter 6, allows you to maintain this data split with minimal effort.
SQL Server Data Files in Windows Azure also has its limitations, however. One of the most notable limitations is that FILESTREAM, FileTable, and In-Memory OLTP are not supported.
Additionally, if you use this feature, then your Windows Azure storage account will not support the use of geo-replication. This is because of the risk of data corruption in the event that a geo-failover is invoked. The 1TB max blob size limit within Windows Azure also applies. This means that if your database is larger than 1TB, you need to split it down into multiple files.
In order to use SQL Server Data Files in Windows Azure, you must have a Windows Azure account and a Windows Azure storage account. Once these are in place, you must create a container that you will use to store you data files. I highly recommend using the Private access level for this container, meaning that no anonymous authentication is permitted to the URL of you container or the blobs within it.
![]() Note Demonstrations in this chapter assume that you have created a Windows Azure account and a Windows Azure storage account.
Note Demonstrations in this chapter assume that you have created a Windows Azure account and a Windows Azure storage account.
In order to use SQL Data Files in Windows Azure, you must generate a SAS (shared access signature) on the container where your data files will be stored. A SAS is a URI (uniform resource indicator) that is generated on the server side and provides a mechanism for granting a limited set of permissions against your container to the clients who use them. Clients can then access the container without needing to know your Windows Azure storage access key. When you generate a SAS, you specify the start time and end time and also the granular permissions that the client needs. SQL Server then requires that you create a credential within the instance, which allows SQL Server to connect to the URL using the signature, as opposed to the standard URL.
Implementing SQL Data Files in Windows Azure
The following sections first discuss how to prepare Windows Azure Storage to support SQL Server Data Files in Windows Azure. They then go on to discuss how to prepare the SQL Server instance, and finally, they demonstrate how to create and manage data files in Windows Azure.
![]() Note Demonstrations in this section use the Windows Azure management portal. This portal is occasionally updated by Microsoft and, therefore, subject to change.
Note Demonstrations in this section use the Windows Azure management portal. This portal is occasionally updated by Microsoft and, therefore, subject to change.
Preparing Windows Azure
The first step in implementing SQL Server Data Files in Windows Azure is to create a container in which to store the files. This is a different container than the one we created in Chapter 25. To do this, we navigate to the Storage pane and drill through our storage account in the Windows Azure management portal. We then select the Containers tab, which is displayed in Figure 26-1.

Figure 26-1. The Containers tab
We then choose the option to create a new container, which invokes the New Container dialog box, displayed in Figure 26-2. This is where you can enter a name for your container and select the access level. We have called our container chapter26 and have selected the access level of Private. This means that only our account can view the container or its contents.
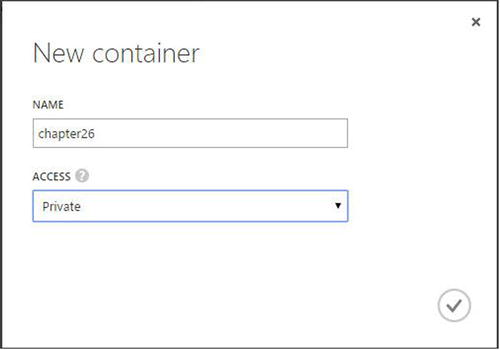
Figure 26-2. The New Container dialog box
The next task is to generate a SAS for the chapter26 container. Unfortunately, at the time of writing, this functionality has not been implemented within the Windows Azure management portal. Instead, you must either write custom code to generate the key by using the CloudBlobContainer.GetSharedAccessSignature method in the Windows Azure SDK, or by using the Create Container, Set Container ACL, and Get Container ACL Window Azure REST APIs.
Alternatively you can use a third-party Windows Azure Storage management tool. You can find a list of third-party management tools at http://blogs.msdn.com/b/windowsazurestorage/archive/2010/04/17/windows-azure-storage-explorers.aspx.
![]() Note Demonstrations in this section use the Azure Management Studio tool, which you can downloaded from http://www.cerebrata.com.
Note Demonstrations in this section use the Azure Management Studio tool, which you can downloaded from http://www.cerebrata.com.
In the Connection Group windows of Azure Management Studio, we select the Add Storage Account Connection hyperlink, which causes the Add Storage Account Connection dialog box to display, as illustrated in Figure 26-3.

Figure 26-3. The Add Storage Account Connection dialog box
Here, we choose Add A Windows Azure Storage Account, which invokes the Add Storage Account Connection dialog box, illustrated in Figure 26-4. If you are following the demonstrations, please substitute the account name for your own account.

Figure 26-4. The Add Storage Account Connection dialog box
In this dialog box, we enter the name of our Windows Azure storage account and copy the primary access key of the account into the Storage Account Key field. We now need to specify the type of account that we have, which in our case is a Standard Local Redundant account. (Remember that Windows Azure geo-replication is not compatible with SQL Server Data Files in Windows Azure.) Optionally, you can specify your preferences for the account within Azure Management Studio. In our case, we have left the default settings.
In the Connection Group window of Windows Azure Management Studio, we drill through Storage Accounts | [Your Account] | Blob Containers and select Access Policies from the context menu of the chapter26 container. This invokes the Access Policies dialog box. Here, you should use the plus (+) icon on the right of the screen to create a new access policy. You can then give the policy a name and specify the start time and end time of the policy as well as use the check boxes to define the permissions that it should be given, as shown in Figure 26-5.

Figure 26-5. Access Policies Dialog Box
You can see that we have named our policy Chapter26 and have assign Read, Write, Delete, and List permissions. MSDN documentation currently states that only Read, Write, and List permissions are required to use SQL Server Data Files in Windows Azure. This is true until you need to drop a database. At this point, Delete permissions are also required.
Now that we have created the access policy, we need to generate the shared access signature. To do this, we select Generate Signed URL from the context menu of the chapter26 container. This invokes the Generate Shared Access Signature dialog box, as illustrated in Figure 26-6.
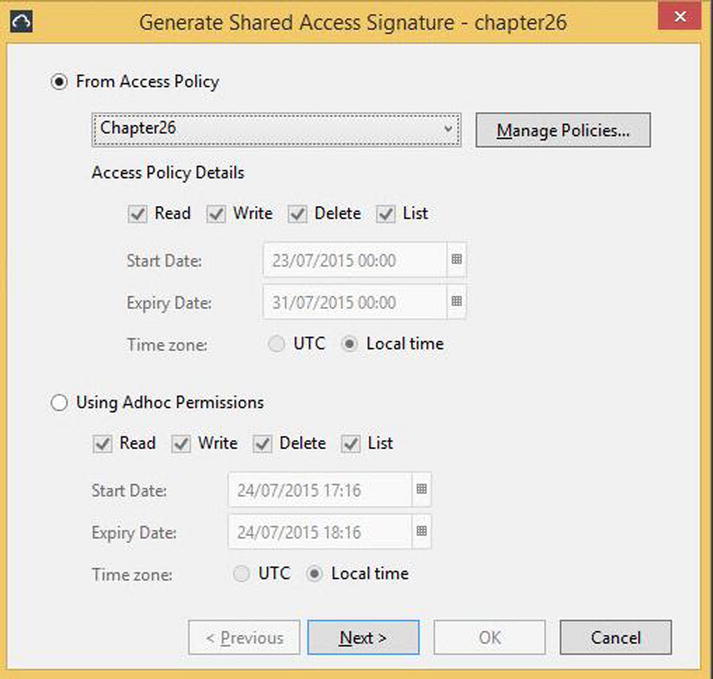
Figure 26-6. The Generate Shared Access Signature dialog box
![]() Tip I highly recommend generating the signed URL from an access policy as opposed to using ad-hoc permissions. This is because if you use ad-hoc permissions, then you need to alter the credential in SQL Server every time you update the expiry date, because when you use this approach, the expiry date is included in the query string.
Tip I highly recommend generating the signed URL from an access policy as opposed to using ad-hoc permissions. This is because if you use ad-hoc permissions, then you need to alter the credential in SQL Server every time you update the expiry date, because when you use this approach, the expiry date is included in the query string.
On this tab, we select the radio button to generate the signature from an access policy and then selected our policy from the drop-down list. We then click the next button to generate the signature. On the next page of the dialog box, shown in Figure 26-7, we see three boxes. The first displays the entire URL, the second displays the query string, which is made up of the components listed in Table 26-1, and the third box displays a C# code sample for using the signature. Each box has a copy to clipboard button next to it, and we use this button to copy the URL to a file, which can be stored securely.

Figure 26-7. The Generate Shared Access Signature dialog box
Table 26-1. Query String Components
|
Component |
Description |
Example From Our URL |
|---|---|---|
|
Entire URL |
The entire URL |
|
|
Container URI |
The address of the container |
|
|
Query String |
Designates the beginning of the query string |
? |
|
Parameter Separator |
Delimitates parameters |
& |
|
Resource |
Defines the resource that has been secured—in our case, a container |
sr=c |
|
Storage Services Version |
Indicates the version of storage services to use |
sv=2015-02-21 |
|
Access Policy |
Defines the policy used to create the signature |
si=Chapter26 |
|
Signature |
The key, generated on the server side, that is used to authenticate to the URL |
si=Chapter26&sig=VwyIjeonRnuItpjDKgtle2V%2B%2F4ja%2BO%2FZkJcDJGLLrrM%3D |
If you were to generate an ad-hoc SAS as opposed to create one from an access policy, then the Access Policies properties would not be inherited; therefore, the query string components detailed in Table 26-2 would replace the Access Policy component.
Table 26-2. Ad-hoc Query String Components
|
Component |
Description |
|---|---|
|
Start Time |
The start time of the SAS, specified in ISO 8061 format. Begins st=. |
|
Expiry Time |
The expiry time of the SAS, specified in ISO 8061 format. Begins se=. |
|
Permissions |
The permissions assigned to the signature. R indicates read, w indicate write, l indicates list, and d indicates delete. Begins sp=. For example, if read, write, and list permissions are granted, then the component reads sp=rwl. |
![]() Tip The security best practice for shared access signatures is to create them for a short time period and then regenerate them; it is usually recommended to specify an expiry date (which avoids making an infinite lease). However, the more frequently SASs are regenerated, the higher the administrative overhead, since you will need to change the credential every time the signature expires. Therefore, make sure to balance security against manageability when you are choosing an appropriate expiry date. Personally, I tend to recommend a lease of one year. It is important that you set a reminder to update the credential with a new signature before the lease expires, however, or your database will be inaccessible until the issue is resolved.
Tip The security best practice for shared access signatures is to create them for a short time period and then regenerate them; it is usually recommended to specify an expiry date (which avoids making an infinite lease). However, the more frequently SASs are regenerated, the higher the administrative overhead, since you will need to change the credential every time the signature expires. Therefore, make sure to balance security against manageability when you are choosing an appropriate expiry date. Personally, I tend to recommend a lease of one year. It is important that you set a reminder to update the credential with a new signature before the lease expires, however, or your database will be inaccessible until the issue is resolved.
Preparing the SQL Server Instance
Now that our Windows Azure storage is ready for SQL Server Data Files in Windows Azure, we need to prepare our SQL Server instance. This preparation consists of creating a credential that uses the SAS to authenticate to our storage account. The advantage of the credential using a SAS is that we do not need to store our access key within the instance.
When we create the credential, we need to use the URL of our container as the name. We use an arbitrary string, ’SHARED ACCESS SIGNATURE’, as the identity, and we use the query string (excluding the leading question mark) that we generated as the secret. Therefore, to create a certificate that can authenticate to our container, we use the command in Listing 26-1. If you are following the demonstration, remember to change the values for name and secret to match your own environment.
Creating a Database
Once we have created the credential, we can create a database the way we would create any other, and SQL Server automatically uses the credential to authenticate to our container. For example, the script in Listing 26-2 creates a database called Chapter26, which resides in the cloud. The database contains one table, called Title, which we populate with data.
Next we create a hybrid database, called Chapter26Hybrid. This database contain a table called Orders, and we configure partitioning so that orders taken before 1st Jan 2015 are stored on premises and historic orders are stored in Windows Azure. For further details of implementing partitioning, please see Chapter 6.
First, we create the database, with two filegroups, using the script in Listing 26-3. If you are following the demonstrations, remember to change the file locations to match your own configuration.
We now create the partitioning objects that are required to implement our solution. Listing 26-4 contains a script to achieve this.
Finally, we create the Orders table by using the script in Listing 26-5.
Now that we have created the database, we can optionally encrypt it using TDE. The script in Listing 26-6 encrypts the Chapter26Hybrid database. As discussed earlier in this chapter, because the certificate is stored in the Master database, which is on premises, using TDE protects your data, even in the event that your Windows Azure storage account is compromised. If you are following the demonstrations, remember to change the file locations to match your own configuration.
![]() Note Chapter 10 discusses TDE in detail.
Note Chapter 10 discusses TDE in detail.
![]() Caution After creating the certificate, back it up; failing to do so may result in data loss. You can find details on how to do this in Chapter 10.
Caution After creating the certificate, back it up; failing to do so may result in data loss. You can find details on how to do this in Chapter 10.
Monitoring and Managing SQL Server Data Files in Windows Azure
After implementing SQL Data Files for Windows Azure, DBAs need to monitor and manage the solution. This is because, in addition to existing on-premises monitoring and management, DBAs need to monitor the performance of their Windows Azure blobs and renew the SAS keys when they expire. The following sections discuss how to monitor the feature before going on to discuss common maintenance scenarios.
Monitoring SQL Server Data File in Windows Azure
A new performance object has been added to allow DBAs to monitor the performance of SQL Server Data Files in Windows Azure. This object is called HTTPS Storage and it contains the following counters:
- Read Bytes/Sec
- Write Bytes/Sec
- Total Bytes/Sec
- Reads/Sec
- Writes/Sec
- Transfers/Sec
- Avg. Bytes/Read
- Avg. Bytes/Write
- Avg. Bytes/Transfer
- Avg. microsec/Read—(The average amount of time for each read in microseconds)
- Avg. microsec/Write—(The average amount of time for each write in microseconds)
- Avg. microsec/Transfer—(The average amount of time for each transfer in microseconds)
- Outstanding HTTP Storage IO
- HTTP Storage IO retry/sec
These counters are exposed through Perfmon and also through the DMV sys.dm_os_performance_counters. You can find full details of how to query sys.dm_os_performance_counters in Chapter 17. An instance of each counter is available for each Windows Azure storage account and a _Total instance of each counter is also available. The query in Listing 26-7 demonstrates how to obtain the current number of outstanding IOs against the prosqladmin Windows Azure storage account.
![]() Tip If you remove the filter on instance_name, then you can view totals across all of your storage accounts.
Tip If you remove the filter on instance_name, then you can view totals across all of your storage accounts.
Managing SQL Server Data Files in Windows Azure
When your SAS is reaching its expiry date, alter the access policy to extend the end date. To do this using the Azure Management Studio tool (from Cerebrata), drill through My Connection Group | Storage Accounts | [Storage Account Name] | Blob Containers in Azure Management Studio, and then select Access Policies from the context menu of the chapter26 container. This invokes the Access Policies dialog box. Here, you can change the end date of the policy, as illustrated in Figure 26-8.

Figure 26-8. Access Policies dialog box
![]() Note If you generated an ad-hoc signed URL, as opposed to using an access policy, then you also need to update the credential. This is because the query string includes the end date and time.
Note If you generated an ad-hoc signed URL, as opposed to using an access policy, then you also need to update the credential. This is because the query string includes the end date and time.
If you do not change the end date of the access policy before it expires, then any databases that use the SAS are placed in Recovery Pending mode, and any attempt to access them will receive the error message shown in Figure 26-9. This error message is thrown in response to the query in Listing 26-8.

Figure 26-9. Error if access policy expires
![]() Tip This error message can have multiple causes, but if you are using SQL Data Files in Windows Azure, first check that your lease has not expired.
Tip This error message can have multiple causes, but if you are using SQL Data Files in Windows Azure, first check that your lease has not expired.
If this situation occurs, then after you change the expiry date of the SAS, you need to take the affected database(s) offline and then bring them back online. You can achieve this for the Chapter26 database by using the script in Listing 26-9 or by restarting the SQL Server service.
Summary
You can use the SQL Server Data Files in Windows Azure feature to store your database data and log files in Windows Azure while keeping the compute node on premises. It is also possible to keep some data files on premises while moving other data files to Windows Azure. This gives you the flexibility of a hybrid database, where some data, such as historical data, is stored in the cloud, while the most frequently accessed data remains on premises.
In order to implement SQL Server Data Files in Windows Azure, you must first have a Windows Azure account and a Windows Azure storage account. You must then create a container that you will use for your data files and generate a shared access key for this container. Unfortunately, Windows Azure management portal does not allow you to create a SAS (shared access signature) natively, so you must either write custom code, or use a third-party Windows Azure management tool, such as Windows Azure Management Studio. The SAS is a way of providing a limited set of permissions to a client without needing to expose your Windows Azure storage access key.
Once Windows Azure Storage has been configured for SQL Server Data Files in Windows Azure, you need to create a credential within the instance. You use this credential to access the blob container via the SAS. You should create the credential using the URL of the container as the name. The credential’s identity should be the arbitrary string "SHARED ACCESS SIGNATURE" and the credential’s secret should be configured as the query string generated when you are creating the SAS.
A new performance object, HTTP Storage, has been created to help DBAs monitor SQL Server Data Files in Windows Azure. This performance object is exposed through Performance Monitor and the sys.dm_os_performance_counters dynamic management view (DMV). An instance of the object is exposed for each Windows Azure storage account, and a _Total object is also exposed.
Make sure to extend the expiry date of the access policy you use to create the SAS before it is due to expire. If you do not, the databases(s) you access using the SAS are placed in Recovery Pending and all your attempts to access them will fail. To resolve this issue, update the expiry date of the access policy and then take the database(s) offline before you bring them back online.