
One of the scenarios the scaffolding will handle is the edit scenario for an album. This scenario begins when the user clicks the Edit link in the Index view from Figure 4.8. The edit link sends an HTTP GET request to the web server with a URL like /StoreManager/Edit/8 (where 8 is the ID of a specific album). You can think of the request as “get me something to edit album #8.”
Building a Resource to Edit an Album
The default MVC routing rules deliver the HTTP GET for /StoreManager/Edit/8 to the Edit action of the StoreManager controller (shown in the following code):
//
// GET: /StoreManager/Edit/8

public ActionResult Edit(int id)
{
    Album album = db.Albums.Find(id);
    ViewBag.GenreId = new SelectList(db.Genres, "GenreId", "Name", album.GenreId);
    ViewBag.ArtistId = new SelectList(db.Artists, "ArtistId",
                                      "Name", album.ArtistId);
    return View(album);
}
The Edit action has the responsibility of building a model to edit album #8. It uses the MusicStoreDB class to retrieve the album, and hands the album to the view as the model. But what is the purpose of the two lines of code putting data into the ViewBag? The two lines of code might make more sense when you look at the page a user will see for editing an album shown in Figure 4.9.
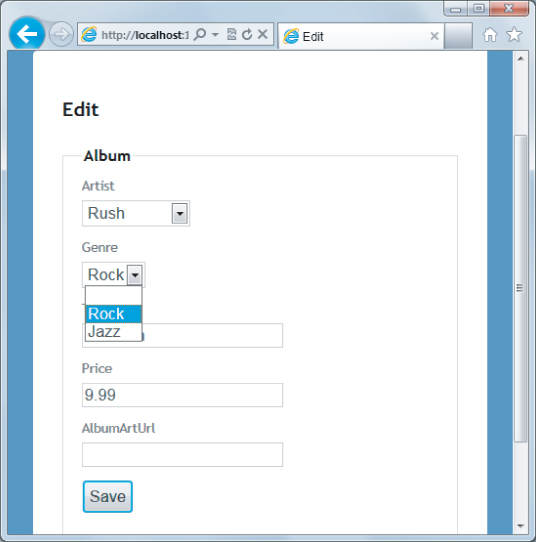
When users edit an album, you don't want them to enter freeform text for the genre and artist values. Instead, you want them to select a genre and artist that are already available from the database. The scaffolding was smart enough to realize this too, because the scaffolding understood the association between album, artist, and genre.
Instead of giving the user a textbox to type into, the scaffolding generated an edit view with a drop-down list to select an existing genre. The following code is from the store manager's Edit view, and it is the code that builds the drop-down list for genre (shown opened with the two available genres in Figure 4.9):
<div class="editor-field">
    @Html.DropDownList("GenreId", String.Empty)
    @Html.ValidationMessageFor(model => model.GenreId)
</div>
You look at the DropDownList helper in more detail in the next chapter, but for now, picture yourself building a drop-down list from scratch. To build the list, you need to know what all the available list items are. An Album model object does not keep all the available genres from the database—an Album object holds only the one genre associated with itself. The two extra lines of code in the Edit action are building the lists of every possible artist and every possible genre, and storing those lists in the ViewBag for the DropDownList helper to retrieve later.
    ViewBag.GenreId = new SelectList(db.Genres, "GenreId", "Name", album.GenreId);
    ViewBag.ArtistId = new SelectList(db.Artists, "ArtistId", "Name", album.ArtistId);
The SelectList class that the code is using represents the data required to build a drop-down list. The first parameter to the constructor specifies the items to place in the list. The second parameter is the name of the property containing the value to use when the user selects a specific item (a key value, like 52 or 2). The third parameter is the text to display for each item (like “Rock” or “Rush”). Finally, the third parameter contains the value of the initially selected item.
Models and View Models Redux
Remember the preceding chapter talked about the concept of a view-specific model? The album edit scenario is a good example where your model object (an Album object) doesn't quite contain all the information required by the view. You need the lists of all possible genres and artists, too. There are two possible solutions to this problem.
The scaffolding generated code demonstrates the first option: pass the extra information along in the ViewBag structure. This solution is entirely reasonable and easy to implement, but some people want all the model data to be available through a strongly typed model object.
The strongly typed model fans will probably look at the second option: build a view-specific model to carry both the album information and the genre and artists information to a view. Such a model might use the following class definition:
public class AlbumEditViewModel
{
    public Album AlbumToEdit { get; set; }
    public SelectList Genres { get; set; }
    public SelectList Artists { get; set; }
}
Instead of putting information in ViewBag, the Edit action would need to instantiate the AlbumEditViewModel, set all the object's properties, and pass the view model to the view. I can't say one approach is better than the other. You have to pick the approach that works best with your personality (or your team's personality).
The Edit View
The following code isn't exactly what is inside the Edit view, but it does represent the essence of what is in the Edit view:
@using (Html.BeginForm()) {
    @Html.DropDownList("GenreId", String.Empty)
    @Html.EditorFor(model => model.Title)
    @Html.EditorFor(model => model.Price)
    <p>
        <input type="submit" value="Save" />
    </p>
}
The view includes a form with a variety of inputs for a user to enter information. Some of the inputs are drop-down lists (HTML <select> elements), and others are textbox controls (HTML <input type=“text”> elements). The essence of the HTML rendered by the Edit view looks like the following code:
<form action="/storemanager/Edit/8" method="post">
    <select id="GenreId" name="GenreId">
        <option value=""></option>
        <option selected="selected" value="1">Rock</option>
        <option value="2">Jazz</option>
    </select>
    <input class="text-box single-line" id="Title" name="Title"
           type="text" value="Caravan" />
    <input class="text-box single-line" id="Price" name="Price"
           type="text" value="9.99" />
    <p>
        <input type="submit" value="Save" />
    </p>
</form>
The HTML sends an HTTP POST request back to /StoreManager/Edit/8 when the user clicks the Save button on the page. The browser automatically collects all the information a user enters into the form and sends the values (and their associated names) along in the request. Notice the name attributes of the input and select elements in the HTML. The names match the property names of your Album model, and you'll see why the naming is significant shortly.
Responding to the Edit POST Request
The action accepting an HTTP POST request to edit album information also has the name Edit, but is differentiated from the previous Edit action you saw because of an HttpPost action selector attribute:
//
// POST: /StoreManager/Edit/8

[HttpPost]
public ActionResult Edit(Album album)
{
    if (ModelState.IsValid)
    {
        db.Entry(album).State = EntityState.Modified;
        db.SaveChanges();
        return RedirectToAction("Index");
    }
    ViewBag.GenreId = new SelectList(db.Genres, "GenreId",
                                     "Name", album.GenreId);
    ViewBag.ArtistId = new SelectList(db.Artists, "ArtistId",
                                     "Name", album.ArtistId);
    return View(album);
}
The responsibility of this action is to accept an Album model object with all the user's edits inside, and save the object into the database. You might be wondering how the updated Album object appears as a parameter to the action, but I am going to defer the answer to this question until you get to the next section of the chapter. For now, let's focus on what is happening inside the action itself.
The Edit Happy Path ![]()
The happy path is the code you execute when the model is in a valid state and you can save the object in the database. An action can check the validity of a model object by checking the ModelState.IsValid property. I talk more about this property later in the chapter, and also in Chapter 6 where you learn how to add validation rules to a model. For now, you can think of ModelState.IsValid as a signal to ensure the user entered usable data for an album's attributes.
If the model is in a valid state, the Edit action then executes the following line of code:
db.Entry(album).State = EntityState.Modified;
This line of code is telling the data context about an object whose values already live in the database (this is not a brand new album, but an existing album), so the framework should apply the values inside to an existing album and not try to create a new album record. The next line of code invokes SaveChanges on the data context, and at this point the context formulates a SQL UPDATE command to persist the new values.
The Edit Sad Path ![]()
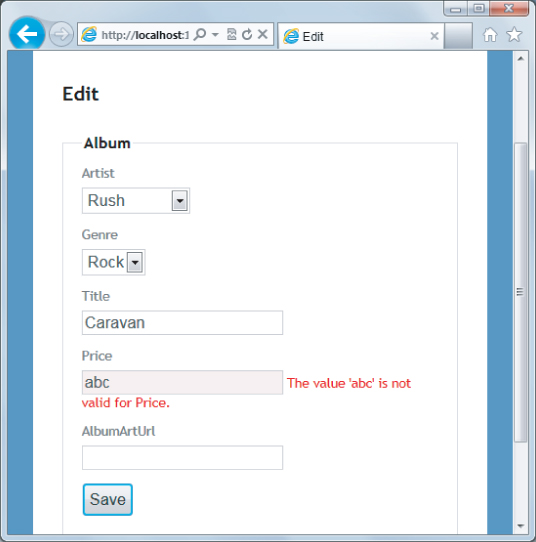
The sad path is the path the action takes if the model is invalid. In the sad path, the controller action needs to re-create the Edit view so the user can fix the errors he or she produced. For example, say the user enters the value abc for the album price. The string abc is not a valid decimal value, and model state will not be valid. The action rebuilds the lists for the drop-down controls and asks the Edit view to re-render. The user will see the page shown in Figure 4.10.
You are probably wondering how the error message appears. Again, I cover model validation in depth in Chapter 6. For now, you want to understand how this Edit action receives an Album object with all of the user's new data values inside. The process behind the magic is model binding, and model binding is a central feature of ASP.NET MVC.