
HTML helpers are methods you can invoke on the Html property of a view. You also have access to URL helpers (via the Url property), and AJAX helpers (via the Ajax property). All these helpers have the same goal: to make views easy to author.
Most of the helpers, particularly the HTML helpers, output HTML markup. For example, the BeginForm helper you saw earlier is a helper you can use to build a robust form tag for your search form, but without using lines and lines of code:
@using (Html.BeginForm("Search", "Home", FormMethod.Get)) {
    <input type="text" name="q" />
    <input type="submit" value="Search" />
}
Chances are the BeginForm helper will output the same markup you had previously when you first implemented the search form. However, behind the scenes the helper is coordinating with the routing engine to generate a proper URL, so the code is more resilient to changes in the application deployment location.
Note the BeginForm helper outputs both the opening <form> and the closing </form>. The helper emits the opening tag during the call to BeginForm, and the call returns an object implementing IDisposable. When execution reaches the closing curly brace of the using statement in the view, the helper emits the closing tag thanks to the implicit call to Dispose. The using trick makes the code simpler and elegant. For those who find it completely distasteful, you can also use the following approach, which provides a bit of symmetry:
@{Html.BeginForm("Search", "Home", FormMethod.Get);}
    <input type="text" name="q" />
    <input type="submit" value="Search" />
@{Html.EndForm();}
At first glance it might seem the helpers like BeginForm are taking the developer away from the metal—the low-level HTML many developers want to control. Once you start working with the helpers, you'll realize they keep you close to metal while remaining productive. You still have complete control over the HTML without writing lines and lines of code to worry about small details. Helpers do more than just churn out angle brackets. Helpers also correctly encode attributes, build proper URLs to the right resources, and set the names of input elements to simplify model binding. Helpers are your friends!
Automatic Encoding
Like any good friend, an HTML helper can keep you out of trouble. Many of the HTML helpers you will see in this chapter are helpers you use to output model values. All the helpers that output model values will HTML encode the values before rendering. For example, later you'll see the TextArea helper which you can use to output an HTML textarea element.
@Html.TextArea("text", "hello <br/> world")
The second parameter to the TextArea helper is the value to render. The previous example embeds some HTML into the value, but the TextArea helper produces the following markup:
<textarea cols="20" id="text" name="text" rows="2"> hello <br /> world </textarea>
Notice how the output value is HTML encoded. Encoding by default helps you to avoid cross site scripting attacks (XSS). You'll have more details on XSS in Chapter 7.
Make Helpers Do Your Bidding
While protecting you, helpers can also give you the level of control you need. As an example of what you can achieve with helpers, look at another overloaded version of the BeginForm helper:
@using (Html.BeginForm("Search", "Home", FormMethod.Get,
        new { target = "_blank" }))
{
    <input type="text" name="q" />
    <input type="submit" value="Search" />
}
In this code, you are passing an anonymously typed object to the htmlAttributes parameter of BeginForm. Nearly every HTML helper in the MVC framework includes an htmlAttributes parameter in one of the overloaded versions. You'll also find an htmlAttributes parameter of type IDictionary<string, object> in a different overload. The helpers take the dictionary entries (or, in the case of the object parameter, the property names and property values of an object) and use them to create attributes on the element the helper produces. For example, the preceding code produces the following opening form tag:
<form action="/Home/Search" method="get" target="_blank">
You can see you've set target=“_blank” using the htmlAttributes parameter. You can set as many attribute values using the htmlAttributes parameter as necessary. There are a few attributes you might find problematic at first.
For example, setting the class attribute of an element requires you to have a property named class on the anonymously typed object, or as a key in the dictionary of values. Having a key value of “class” in the dictionary is not a problem, but it is problematic for an object, because class is a C# reserved keyword and not available to use as a property name or identifier, so you must prefix the word with an @ sign:
@using (Html.BeginForm("Search", "Home", FormMethod.Get,
        new { target = "_blank", @class="editForm" }))
Another problem is setting attributes with a dash in the name (like data-val). You'll see dashed attribute names in Chapter 8 when you look at AJAX features of the framework. Dashes are not valid in C# property names, but fortunately, all HTML helpers convert an underscore in a property name to a dash when rendering the HTML. The following view code:
@using (Html.BeginForm("Search", "Home", FormMethod.Get,
        new { target = "_blank", @class="editForm", data_validatable=true }))
produces the following HTML:
<form action="/Home/Search" class="editForm" data-validatable="true"
      method="get" target="_blank">
In the next section, you take a look at how the helpers work, and see some of the other built-in helpers.
Inside HTML Helpers
Every Razor view inherits an Html property from its base class. The Html property is of type System.Web.Mvc.HtmlHelper<T>, where T is a generic type parameter representing the type of the model for the view (dynamic by default). The class provides a few instance methods you can invoke in a view, such as EnableClientValidation (to selectively turn client validation on or off on a view-by-view basis). However, the BeginForm method you used in the previous section is not one of the methods you'll find defined on the class. Instead, the framework defines the majority of the helpers as extension methods.
You know you are working with an extension method when the IntelliSense window shows the method name with a blue down arrow to the left (see Figure 5.3). AntiForgeryToken is an instance method, whereas BeginForm is an extension method.

Extension methods are a wonderful approach to building HTML helpers for two reasons. First, extension methods in C# are available only when the namespace of the extension method is in scope. All of MVC's extension methods for HtmlHelper live in the System.Web.Mvc.Html namespace (which is in scope by default thanks to a namespace entry in the Views/web.config file). If you don't like the built-in extension methods, you can remove this namespace and build your own.
The phrase “build your own” brings us to the second benefit of having helpers as extension methods. You can build your own extension methods to replace or augment the built-in helpers. You can learn how to build a custom helper in Chapter 14.
Setting Up the Album Edit Form
If you need to build a view that will let a user edit album information, you might start with the following view code:
@using (Html.BeginForm()) {
    @Html.ValidationSummary(excludePropertyErrors: true)
    <fieldset>
        <legend>Edit Album</legend>

        <p>
            <input type="submit" value="Save" />
        </p>
    </fieldset>
}
The two helpers in this code have some additional descriptions in the following sections.
Html.BeginForm
You've used the BeginForm helper previously. The version of BeginForm in the preceding code, with no parameters, sends an HTTP POST to the current URL, so if the view is a response to /StoreManager/Edit/52, the opening form tag will look like the following:
<form action="/StoreManager/Edit/52" method="post">
An HTTP POST is the ideal verb for this scenario because you are modifying album information on the server.
Html.ValidationSummary
The ValidationSummary helper displays an unordered list of all validation errors in the ModelState dictionary. The Boolean parameter you are using (with a value of true) is telling the helper to exclude property-level errors, however. In other words, you are telling the summary to display only the errors in ModelState associated with the model itself, and exclude any errors associated with a specific model property. We will be displaying property-level errors separately.
Assume you have the following code somewhere in the controller action rendering the edit view:
ModelState.AddModelError("", "This is all wrong!");
ModelState.AddModelError("Title", "What a terrible name!");
The first error is a model-level error, because you didn't provide a key to associate the error with a specific property. The second error you associated with the Title property, so in your view it will not display in the validation summary area (unless you remove the parameter to the helper method, or change the value to false). In this scenario, the helper renders the following HTML:
<div class="validation-summary-errors">
    <ul>
        <li>This is all wrong!</li>
    </ul>
</div>
Other overloads of the ValidationSummary helper enable you to provide header text, and, as with all helpers, set specific HTML attributes.
By convention, the ValidationSummary helper renders the CSS class validation-summary-errors along with any specific CSS classes you provide. The default MVC project template includes some styling to display these items in red, which you can change in styles.css. See Chapter 9 for more information.
Adding Inputs
Once you have the form and validation summary in place, you can add some inputs for the user to enter album information into the view. One approach would use the following code (you'll start by editing only the album title and genre, but the following code will work with the real version of the music store's Edit action):
@using (Html.BeginForm())
{
    @Html.ValidationSummary(excludePropertyErrors: true)
    <fieldset>
        <legend>Edit Album</legend>
        <p>
            @Html.Label("GenreId")
            @Html.DropDownList("GenreId", ViewBag.Genres as SelectList)
        </p>
        <p>
            @Html.Label("Title")
            @Html.TextBox("Title", Model.Title)
            @Html.ValidationMessage("Title")
        </p>
        <input type="submit" value="Save" />
    </fieldset>
}
The new helpers will give the user the display shown in Figure 5.4.
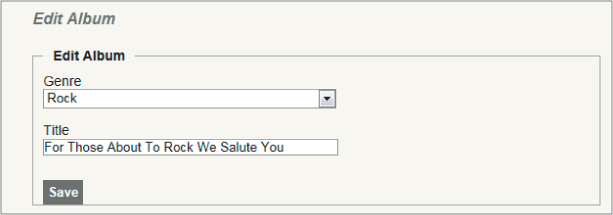
There are four new helpers in the view: Label, DropDownList, TextBox, and ValidationMessage. I'll talk about the TextBox helper first.
Html.TextBox (and Html.TextArea)
The TextBox helper renders an input tag with the type attribute set to text. You commonly use the TextBox helper to accept free-form input from a user. For example, the call to:
@Html.TextBox("Title", Model.Title)
results in:
<input id="Title" name="Title" type="text"
       value="For Those About To Rock We Salute You" />
Just like nearly every other HTML helper, the TextBox helper provides overloads to let you set individual HTML attributes (as demonstrated earlier in the chapter). A close cousin to the TextBox helper is the TextArea helper. Use TextArea to render a <textarea> element for multi-line text entry. The following code:
@Html.TextArea("text", "hello <br/> world")
produces:
<textarea cols="20" id="text" name="text" rows="2">hello <br /> world </textarea>
Notice again how the helper encodes the value into the output (all helpers encode the model values and attribute values). Other overloads of the TextArea helper enable you to specify the number of columns and rows to display in order to control the size of the text area.
@Html.TextArea("text", "hello <br /> world", 10, 80, null)
The preceding code produces the following output:
<textarea cols="80" id="text" name="text" rows="10">hello <br /> world </textarea>
Html.Label
The Label helper returns a <label/> element using the string parameter to determine the rendered text and for attribute value. A different overload of the helper enables you to independently set the for attribute and the text. In the preceding code, the call to Html.Label(“GenreId”) produces the following HTML:
<label for="GenreId">Genre</label>
If you haven't used the label element before, then you are probably wondering if the element has any value. The purpose of a label is to attach information to other input elements, such as text inputs, and boost the accessibility of your application. The for attribute of the label should contain the ID of the associated input element (in this example, the drop-down list of genres that follows in the HTML). Screen readers can use the text of the label to provide a better description of the input for a user. Also, if a user clicks the label, the browser will transfer focus to the associated input control. This is especially useful with checkboxes and radio buttons in order to provide the user with a larger area to click on (instead of being able to click only on the checkbox or radio button itself).
The attentive reader will also notice the text of the label did not appear as “GenreId” (the string you passed to the helper), but as “Genre.” When possible, helpers use any available model metadata in building a display. We'll return to this topic once you've looked at the rest of the helpers in the form.
Html.DropDownList (and Html.ListBox)
Both the DropDownList and ListBox helpers return a <select /> element. DropDownList allows single item selection, whereas ListBox allows for multiple item selection (by setting the multiple attribute to multiple in the rendered markup).
Typically, a select element serves two purposes:
- To show a list of possible options
- To show the current value for a field
In the Music Store, you have an Album class with a GenreId property. You are using the select element to display the value of the GenreId property, as well as all other possible categories.
There is a bit of setup work to do in the controller when using these helpers because they require some specific information. A list needs a collection of SelectListItem instances representing all the possible entries for the list. A SelectListItem object has Text, Value, and Selected properties. You can build the collection of SelectListItem objects yourself, or rely on the SelectList or MultiSelectList helper classes in the framework. These classes can look at an IEnumerable of any type and transform the sequence into a sequence of SelectListItem objects. Take, for example, the Edit action of the StoreManager controller:
public ActionResult Edit(int id)
{
    var album = storeDB.Albums.Single(a => a.AlbumId == id);

    ViewBag.Genres = new SelectList(storeDB.Genres.OrderBy(g => g.Name),
                                    "GenreId", "Name", album.GenreId);

    return View(album);
}
You can think of the controller action as building not only the primary model (the album for editing), but also the presentation model required by the drop-down list helper. The parameters to the SelectList constructor specify the original collection (Genres from the database), the name of the property to use as a value (GenreId), the name of the property to use as the text (Name), and the value of the currently selected item (to determine which item to mark as selected).
If you want to avoid some reflection overhead and generate the SelectListItem collection yourself, you can use the LINQ Select method to project Genres into SelectListItem objects:
public ActionResult Edit(int id)
{
    var album = storeDB.Albums.Single(a => a.AlbumId == id);

    ViewBag.Genres =
        storeDB.Genres
               .OrderBy(g => g.Name)
               .AsEnumerable()
               .Select(g => new SelectListItem
                             {
                                 Text = g.Name,
                                 Value = g.GenreId.ToString(),
                                 Selected = album.GenreId == g.GenreId
                             });
    return View(album);
}
Html.ValidationMessage
When there is an error for a particular field in the ModelState dictionary, you can use the ValidationMessage helper to display that message. For example, in the following controller action, you purposefully add an error to model state for the Title property:
[HttpPost]
public ActionResult Edit(int id, FormCollection collection)
{
    var album = storeDB.Albums.Find(id);

    ModelState.AddModelError("Title", "What a terrible name!");

    return View(album);
}
In the view, you can display the error message with the following code:
@Html.ValidationMessage("Title")
which results in:
<span class="field-validation-error" data-valmsg-for="Title"
      data-valmsg-replace="true">
    What a terrible name!
</span>
This message appears only if there is an error in the model state for the key “Title”. You can also call an override that allows you to override the error message from within the view:
@Html.ValidationMessage("Title", "Something is wrong with your title")
which results in:
<span class="field-validation-error" data-valmsg-for="Title"
     data-valmsg-replace="false">Something is wrong with your title
By convention, this helper renders the CSS class field-validation-error (when there is an error), along with any specific CSS classes you provide. The default MVC project template includes some styling to display these items in red, which you can change in style.css.
@Html.ValidationMessage("Title", "Something is wrong with your title")
In addition to the common features I've described so far, such as HTML encoding and the ability to set HTML attributes, all the form input features share some common behavior when it comes to working with model values and model state.
Helpers, Models, and View Data
Helpers give you the fine-grained control you need over your HTML while taking away the grunge work of building a UI to show the proper controls, labels, error messages, and values. Helpers such as Html.TextBox and Html.DropDownList (as well as all the other form helpers) check the ViewData object to obtain the current value for display (all values in the ViewBag object are also available through ViewData).
Let's take a break from the edit form you are building and look at a simple example. If you want to set the price of an album in a form, you could use the following controller code:
public ActionResult Edit(int id)
{
    ViewBag.Price = 10.0;
    return View();
}
In the view you can render a textbox to display the price by giving the TextBox helper the same name as the value in the ViewBag:
@Html.TextBox("Price")
The TextBox helper will then emit the following HTML:
<input id="Price" name="Price" type="text" value="10" />
When the helpers look inside ViewData, they can also look at properties of objects inside ViewData. Change the previous controller action to look like the following:
public ActionResult Edit(int id)
{
    ViewBag.Album = new Album {Price = 11};
    return View();
}
You can use the following code to display a textbox with the album's price:
@Html.TextBox("Album.Price")
Now the resulting HTML looks like the following code:
<input id="Album_Price" name="Album.Price" type="text" value="11" />
If no values match “Album.Price” in ViewData, the helper attempts to look up a value for the portion of the name before the first dot, (Album), and in this case finds an object of type Album. The helper then evaluates the remaining portion of the name (Price) against the Album object, and finds the value to use.
Notice the id attribute of the resulting input element uses an underscore instead of a dot (while the name attribute uses the dot). Dots are not legal inside an id attribute, so the runtime replaces dots with the value of the static HtmlHelper.IdAttributeDotReplacement property. Without valid id attributes, it is not possible to perform client-side scripting with JavaScript libraries such as jQuery.
The TextBox helper also works well against strongly typed view data. For example, change the controller action to look like the following code:
public ActionResult Edit(int id)
{
    var album = new Album {Price = 12.0m};
    return View(album);
}
Now you can return to supplying the TextBox helper with the name of the property for display:
@Html.TextBox("Price");
For the preceding code, the helper now renders the following HTML:
<input id="Price" name="Price" type="text" value="12.0" />
Form helpers also enable you to supply an explicit value to avoid the automatic data lookup, if you want. Sometimes the explicit approach is necessary. Return to the form you are building to edit album information. Remember, the controller action looks like the following:
public ActionResult Edit(int id)
{
    var album = storeDB.Albums.Single(a => a.AlbumId == id);

    ViewBag.Genres = new SelectList(storeDB.Genres.OrderBy(g => g.Name),
                                    "GenreId", "Name", album.GenreId);

    return View(album);
}
Inside the edit view, which is strongly-typed to an Album, you have the following code to render an input for the album title:
@Html.TextBox("Title", Model.Title)
The second parameter provides the data value explicitly. Why? Well in this case Title is a value already in ViewData, because the music store's album edit view, like many views, places the page title into the ViewBag.Title property. You can see this happen at the top of the Edit view:
@{
    ViewBag.Title = "Edit - " + Model.Title;
}
The _Layout.cshtml view for the application can retrieve ViewBag.Title to set the title of the rendered page. If you invoked the TextBox helper passing only the string “Title”, it would first look in the ViewBag and pull out the Title value inside (the helpers look inside the ViewBag before they check the strongly-typed model). Thus, in the form you provide the explicit value.
Strongly-Typed Helpers
If you are uncomfortable using string literals to pull values from view data, ASP.NET MVC also provides an assortment of strongly-typed helpers. With the strongly-typed helpers you pass a lambda expression to specify a model property for rendering. The model type for the expression will be the same as the model specified for the view (with the @model directive). As an example, you can rewrite the album edit form you've been working on so far with the following code (assuming the view is strongly-typed with an Album model):
@using (Html.BeginForm())
{
    @Html.ValidationSummary(excludePropertyErrors: true)
    <fieldset>
        <legend>Edit Album</legend>
        <p>
            @Html.LabelFor(m => m.GenreId)
            @Html.DropDownListFor(m => m.GenreId, ViewBag.Genres as SelectList)
        </p>
        <p>
            @Html.TextBoxFor(m => m.Title)
            @Html.ValidationMessageFor(m => m.Title)
        </p>
        <input type="submit" value="Save" />
    </fieldset>
}
Notice the strongly-typed helpers have the same names as the previous helpers you've been using, but with a “For” suffix. The preceding code produces the same HTML you saw previously; however, replacing strings with lambda expressions provides a number of additional benefits. The benefits include IntelliSense, and easier refactoring (if you change the name of a property in your model, Visual Studio can automatically change the code in the view). You can generally find a strongly-typed counterpart for every helper that works with model data, and the built-in scaffolding we saw in Chapter 4 uses the strongly-typed helpers wherever possible.
Notice also how you didn't explicitly set a value for the Title textbox. The lambda expression gives the helper enough information to go directly to the Title property of the model to fetch the required value.
Helpers and Model Metadata
Helpers do more than just look up data inside ViewData; they also take advantage of available model metadata. For example, the album edit form uses the Label helper to display a label element for the genre selection list:
@Html.Label("GenreId")
The helper produces the following output:
<label for="GenreId">Genre</label>
Where did the Genre text come from? The helper asks the runtime if there is any model metadata available for GenreId, and the runtime provides information from the DisplayName attribute decorating the Album model:
[DisplayName("Genre")]
public int GenreId    { get; set; }
The data annotations you saw in Chapter 4 can have a dramatic influence on many of the helpers, because the annotations provide metadata the helpers use when constructing HTML. Templated helpers can take the metadata one step further.
Templated Helpers
The templated helpers in ASP.NET MVC build HTML using metadata and a template. The metadata includes information about a model value (its name and type), as well as model metadata (added through data annotations). The templated helpers are Html.Display and Html.Editor (and their strongly-typed counterparts are Html.DisplayFor and Html.EditorFor, respectively).
As an example, the Html.TextBoxFor helper renders the following HTML for an album's Title property:
<input id="Title" name="Title" type="text"
       value="For Those About To Rock We Salute You" />
Instead of using Html.TextBoxFor, you can switch to using the following code:
@Html.EditorFor(m => m.Title)
The EditorFor helper will render the same HTML as TextBoxFor, however, you can change the HTML using data annotations. If you think about the name of the helper (Editor), the name is more generic than the TextBox helper (which implies a specific type of input). When using the templated helpers, you are asking the runtime to produce whatever “editor” it sees fit. Let's see what happens if you add a DataType annotation to the Title property:
[Required(ErrorMessage = "An Album Title is required")]
[StringLength(160)]
[DataType(DataType.MultilineText)]
public string   Title      { get; set; }
Now the EditorFor helper renders the following HTML:
<textarea class="text-box multi-line" id="Title" name="Title">
    Let There Be Rock
</textarea>
Because you asked for an editor in the generic sense, the EditorFor helper looked at the metadata and determined the best HTML element to use was the textarea element (a good guess because the metadata indicates the Title property can hold multiple lines of text). Of course, most album titles won't need multiple lines of input, although some artists do like to push the limit with their titles.
Additional templated helpers include DisplayForModel and EditorForModel, which build the HTML for an entire model object. Using these helpers, you can add new properties to a model object and instantly see changes in the UI without making any changes to the views.
You can control the rendered output of a template helper by writing custom display or editor templates (a topic for Chapter 13).
Helpers and ModelState
All the helpers you use to display form values also interact with ModelState. Remember, ModelState is a byproduct of model binding and holds all validation errors detected during model binding. Model state also holds the raw values the user submits to update a model.
Helpers used to render form fields automatically look up their current value in the ModelState dictionary. The helpers use the name expression as a key into the ModelState dictionary. If an attempted value exists in ModelState, the helper uses the value from ModelState instead of a value in view data.
The ModelState lookup allows “bad” values to preserve themselves after model binding fails. For example, if the user enters the value “abc” into the editor for a DateTime property, model binding will fail and the value “abc” will go into model state for the associated property. When you re-render the view for the user to fix validation errors, the value “abc” will still appear in the DateTime editor, allowing the users to see the text they tried as a problem and allowing them to correct the error.
When ModelState contains an error for a given property, the form helper associated with the error renders a CSS class of input-validation-error in addition to any explicitly specified CSS classes. The default style sheet, style.css, included in the project template contains styling for this class.