
If you send your browser to http://plugin.jquery.com, you'll find thousands of jQuery extensions. Some of these extensions are graphically oriented and can make things explode (in an animated way). Other extensions are widgets like date pickers and grids.
Using a jQuery plugin usually involves downloading the plugin, extracting the plugin, and then adding the plugin to your project. A few of the jQuery plugins are available as NuGet packages, which makes it trivially easy to add the plugin to your project. In addition to at least one JavaScript file, many plugins, particularly the UI-oriented plugins, might also come with images and a style sheet you'll need to use.
Every new ASP.NET MVC project starts with two plugins: jQuery Validation (which you've used) and jQuery UI (which you will look at now).
jQuery UI
jQuery UI is a jQuery plugin that includes both effects and widgets. Like all plugins it integrates tightly with jQuery and extends the jQuery API. As an example, let's return to the first bit of code in this chapter—the code to animate album items on the front page of the store:
$(function () {
    $("#album-list img").mouseover(function () {
        $(this).animate({ height: ‘+=25’, width: ‘+=25’ })
               .animate({ height: ‘-=25’, width: ‘-=25’ });
    });
});
Instead of the verbose animation, use jQuery UI to make the album bounce. The first step is to include jQuery UI across your application by adding a new script tag to the layout view:
    <script src="@Url.Content("∼/Scripts/jquery-1.4.4.min.js")"
            type="text/javascript"></script>
    <script  src="@Url.Content("∼/Scripts/jquery.unobtrusive-ajax.min.js")"
             type="text/javascript"></script>
    <script src="@Url.Content("∼/Scripts/jquery-ui.min.js")"
            type="text/javascript"></script>
Now, you can change the code inside the mouseover event handler:
$(function () {
    $("#album-list img").mouseover(function () {
        $(this).effect("bounce");
    });
});
When users run their mouse across an album image, the album bounces up and down for a short time. As you can see, the UI plugin extended jQuery by giving you additional methods to execute against the wrapped set. Most of these methods take a second “options” parameter, which allows you to tweak the behavior.
$(this).effect("bounce", { time: 3, distance: 40 });
You can find out what options are available (and their default values) by reading the plugin documentation on jQuery.com. Additional effects in jQuery UI include explode, fade, shake, and pulsate.
Options, Options, Everywhere
The “options” parameter is pervasive throughout jQuery and jQuery plugins. Instead of having a method that takes six or seven different parameters (like time, distance, direction, mode, and so on), you pass a single object with properties defined for the parameters you want to set. In the previous example, you want to set just time and distance.
The documentation will always (well, almost always) tell you what the available parameters are, and what the defaults are for each parameter. You only need to construct an object with properties for the parameters you want to change.
jQuery UI isn't just about effects and eye candy. The plugin also includes widgets like accordion, autocomplete, button, datepicker, dialog, progressbar, slider, and tabs. The next section looks at the autocomplete widget as an example.
Autocomplete with jQuery UI
As a widget, autocomplete needs to position new user interface elements on the screen. These elements need colors, font sizes, backgrounds, and all the typical presentation details every user interface element needs. jQuery UI relies on themes to provide the presentation details. A jQuery UI theme includes a style sheet and images. Every new MVC project starts with the “base” theme underneath the Content directory. This theme includes a style sheet (jquery-ui.css) and an images folder full of .png files.
Before you use autocomplete, you can set up the application to include the base theme style sheet by adding it to the layout view:
    <link href="@Url.Content("∼/Content/Site.css")" rel="stylesheet"
          type="text/css" />
    <link href="@Url.Content("∼/Content/themes/base/jquery-ui.css")"
          rel="stylesheet")"
                type="text/css" />
    <script src="@Url.Content("∼/Scripts/jquery-1.4.4.min.js")"
            type="text/javascript"></script>
    <script  src="@Url.Content("∼/Scripts/jquery.unobtrusive-ajax.min.js")"
             type="text/javascript"></script>
    <script src="@Url.Content("∼/Scripts/jquery-ui.min.js")"
            type="text/javascript"></script>
If you start working with jQuery and decide you don't like the base theme, you can go to http://jqueryui.com/themeroller/ and download any of two dozen or so prebuilt themes. You can also build your own theme (using a live preview) and download a custom-built jquery-ui.css file.
Adding the Behavior
First, remember the artist search scenario you worked on in the section “AJAX Forms” earlier in the chapter? Now, you want the search input to display a list of possible artists when the user starts typing inside the input. You'll need to find the input element from JavaScript and attach the jQuery autocomplete behavior. One approach to do this is to borrow an idea from the MVC framework and use a data dash attribute:
    <input type="text" name="q"
           data-autocomplete-source="@Url.Action("QuickSearch", "Home")" />
The idea is to use jQuery and look for elements with the data-autocomplete-source attribute present. This will tell you what inputs need an autocomplete behavior. The autocomplete widget requires a data source it can use to retrieve the candidates for auto completion. Autocomplete can consume an in-memory data source (an array of objects) as easily as it can consume a remote data source specified by a URL. You want to use the URL approach, because the number of artists might be too large to reasonably send the entire list to the client. You've embedded the URL that autocomplete should call into the data dash attribute.
In MusicScripts.js, you can use the following code during the ready event to attach autocomplete to all inputs with the data-autocomplete-source attribute:
$("input[data-autocomplete-source]").each(function () {
    var target = $(this);
    target.autocomplete({ source: target.attr("data-autocomplete-source") });
});
The jQuery each function iterates over the wrapped set calling its function parameter once for each item. Inside the function, you invoke the autocomplete plugin method on the target element. The parameter to the autocomplete method is an options parameter, and unlike most options one property is required—the source property. You can also set other options, like the amount of delay after a keypress before autocomplete jumps into action, and the minimum number of characters needed before autocomplete starts sending requests to the data source.
In this example, you've pointed the source to a controller action. Here's the code again (just in case you forgot):
    <input type="text" name="q"
           data-autocomplete-source="@Url.Action("QuickSearch", "Home")" />
Autocomplete expects to call a data source and receive a collection of objects it can use to build a list for the user. The QuickSearch action of the HomeController needs to return data in a format autocomplete will understand.
Building the Data Source
Autocomplete expects to call a data source and receive objects in JSON format. Fortunately, it's easy to generate JSON from an MVC controller action, as you'll see soon. The objects must have a property called label, or a property called value, or both a label and value. Autocomplete uses the label property in the text it shows the user. When the user selects an item from the autocomplete list, the widget will place the value of the selected item into the associated input. If you don't provide a label, or don't provide a value, autocomplete will use whichever property is available as both the value and label.
To return the proper JSON, you'll implement QuickSearch with the following code:
public ActionResult QuickSearch(string term)
{
    var artists = GetArtists(term).Select(a => new {value = a.Name});

    return Json(artists, JsonRequestBehavior.AllowGet);
}

private List<Artist> GetArtists(string searchString)
{
    return storeDB.Artists
        .Where(a => a.Name.Contains(searchString))
        .ToList();
}
When autocomplete calls the data source, it passes the current value of the input element as a query string parameter named term, so you receive this parameter by having a parameter named term on the action. Notice how you transform each artist into an anonymously typed object with a value property. The code passes the resulting collection into the Json method, which produces a JsonResult. When the framework executes the result, the result serializes the objects into JSON.
JSON Hijacking
By default, the ASP.NET MVC framework does not allow you to respond to an HTTP GET request with a JSON payload. If you need to send JSON in response to a GET, you'll need to explicitly allow the behavior by using JsonRequestBehavior.AllowGet as the second parameter to the Json method.
However, there is a chance a malicious user can gain access to the JSON payload through a process known as JSON Hijacking. You do not want to return sensitive information using JSON in a GET request. For more details, see Phil's post at http://haacked.com/archive/2009/06/25/json-hijacking.aspx.
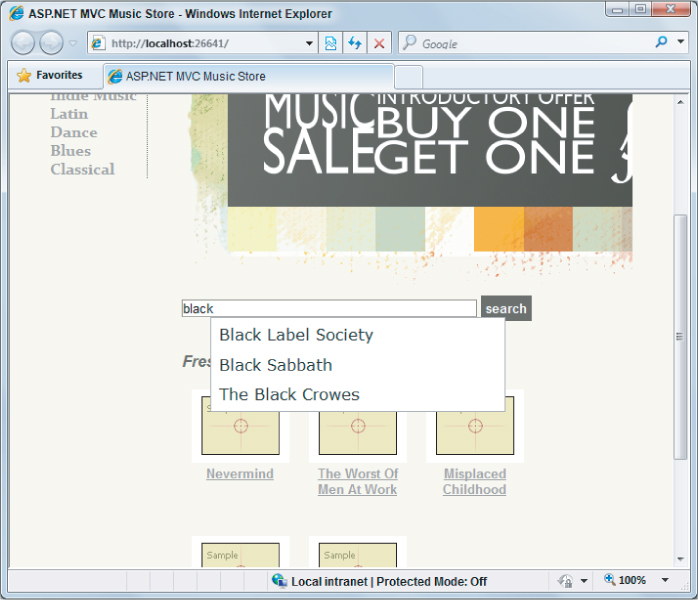
The fruits of your labor are shown in Figure 8.4.
JSON is not only fantastically easy to create from a controller action, it's also lightweight. In fact, responding to a request with JSON generally results in a smaller payload than responding with the same data embedded into HTML or XML markup. A good example is the search feature. Currently, when the user clicks the search button, you ultimately render a partial view of artists in HTML. You can reduce the amount of bandwidth you use if you return JSON instead.
To run the autocomplete example in your own MVC Music Store project, use NuGet to install the package Wrox.ProMvc3.Ajax.Autocomplete and navigate to /Autocomplete.
The classic problem with retrieving JSON from the server is what to do with the deserialized objects. It's easy to take HTML from the server and graft it into the page. With raw data you need to build the HTML on the client. Traditionally this is tedious, but templates are here to make the job easy.
JSON and jQuery Templates
jQuery Templates is a jQuery plugin that is not in an MVC 3 project by default, but you can easily add the plugin with NuGet. Templates allow you to build HTML on the client. The syntax is similar to Razor views, in the sense you have HTML markup and then placeholders with special delimiters where the data is to appear. The placeholders are called binding expressions. The following code is an example:
<span class="detail">
        Rating: ${AverageReview}
        Total Reviews: ${TotalReviews}
</span>
The preceding template would work against an object with AverageReview and TotalReviews properties. When rendering templates with jQuery, the templates place the values for those properties in their proper location. You can also render templates against an array of data. The full documentation for jQuery Templates is available at http://api.jquery.com/category/plugins/templates/.
In the following section, you rewrite the search feature to use JSON and templates.
The Origin of jQuery Templates
Although jQuery Templates is an open source project and an official jQuery plugin, it was authored by Microsoft. In fact, Microsoft is committing several plugins to the jQuery ecosystem, including jQuery Templates, jQuery Data Link, and jQuery Globalization.
Adding Templates
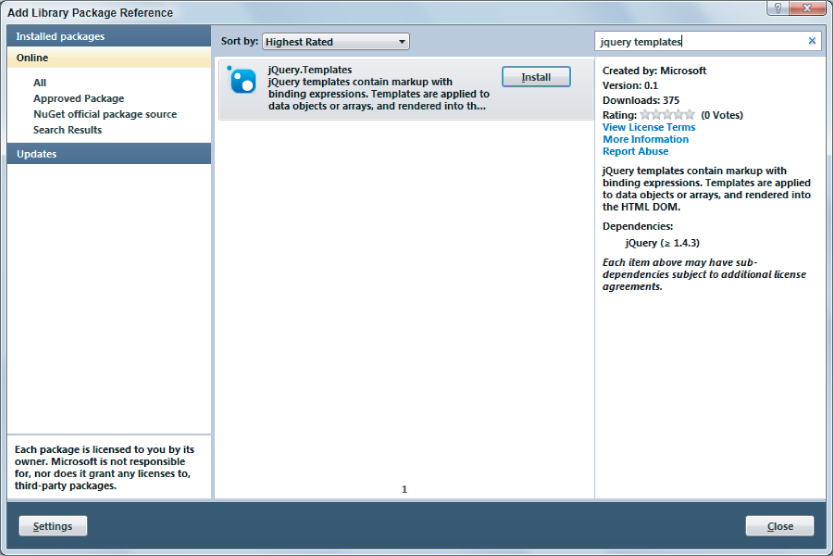
To install jQuery templates, right-click the MvcMusicStore project and select Add Library Package Reference. When the dialog appears (as shown in Figure 8.5), search online for jQuery Templates.
When NuGet is finished adding the package to the project, you should have two new scripts on your Scripts folder: jQuery.tmpl.js and jQuery.tmpl.min.js. Once again, it's the minified version of the plugin you want to send to the client by adding a script tag to the layout view.
    <script src="@Url.Content("∼/Scripts/jquery-1.4.4.min.js")"
            type="text/javascript"></script>
    <script  src="@Url.Content("∼/Scripts/jquery.unobtrusive-ajax.min.js")"
             type="text/javascript"></script>
    <script src="@Url.Content("∼/Scripts/jquery-ui.min.js")"
            type="text/javascript"></script>
    <script src="@Url.Content("∼/Scripts/jquery.tmpl.min.js")"
            type="text/javascript"></script>
With the plugin in place, you can start using templates in your search implementation.
Modifying the Search Form
The artist search feature you built in the section “AJAX Forms” earlier in the chapter uses an AJAX helper:
@using (Ajax.BeginForm("ArtistSearch", "Home",
    new AjaxOptions {
     InsertionMode=InsertionMode.Replace,
     HttpMethod="GET",
     OnFailure="searchFailed",
     LoadingElementId="ajax-loader",
     UpdateTargetId="searchresults",
}))
{
    <input type="text" name="q"
           data-autocomplete-source="@Url.Action("QuickSearch", "Home")" />
    <input type="submit" value="search" />
    <img id="ajax-loader"
         src="@Url.Content("∼/Content/Images/ajax-loader.gif")"
         style="display:none"/>
}
Although the AJAX helper provides a lot of functionality, you're going to remove the helper and start from scratch. jQuery provides various APIs for retrieving data from the server asynchronously. You've been taking advantage of these features indirectly by using the autocomplete widget, and now you'll take a direct approach.
You first want to change the search form to use jQuery directly instead of the AJAX helper, but you'll make things work with the existing controller code (no JSON yet). The new markup inside Index.cshtml looks like the following:
<form id="artistSearch" method="get" action="@Url.Action("ArtistSearch", "Home")">
    <input type="text" name="q"
           data-autocomplete-source="@Url.Action("QuickSearch", "Home")" />
    <input type="submit" value="search" />
    <img id="ajax-loader" src="@Url.Content("∼/Content/Images/ajax-loader.gif")"
         style="display:none"/>
</form>
The only change in the preceding code is how you are building the form tag explicitly instead of using the BeginForm AJAX helper. Without the helper you'll also need to write your own JavaScript code to request HTML from the server. You'll place the following code inside MusicScripts.js:
$("#artistSearch").submit(function (event) {
    event.preventDefault();

    var form = $(this);
    $("#searchresults").load(form.attr("action"), form.serialize());
});
This code hooks the submit event of the form. The call to preventDefault on the incoming event argument is the jQuery technique to prevent the default event behavior from occurring (in this case, prevent the form from submitting itself to the server directly; instead, you'll take control of the request and response).
The load method retrieves HTML from a URL and places the HTML into the matched element (the searchresults element). The first parameter to load is the URL—you are using the value of the action attribute in this example. The second parameter is the data to pass in the query string. The serialize method of jQuery builds the data for you by taking all the input values inside the form and concatenating them into a string. In this example you only have a single text input, and if the user enters black in the input, serialize uses the input's name and value to build the string “q=black”.
Get JSON!
You've changed the code, but you are still retuning HTML from the server. Let's change the ArtistSearch action of the HomeController to return JSON instead of a partial view:
public ActionResult ArtistSearch(string q)
{
    var artists = GetArtists(q);
    return Json(artists, JsonRequestBehavior.AllowGet);
}
Now you'll need to change the script to expect JSON instead of HTML. jQuery provides a method named getJSON that you can use to retrieve the data:
$("#artistSearch").submit(function (event) {
    event.preventDefault();

    var form = $(this);
    $.getJSON(form.attr("action"), form.serialize(), function (data)
        // now what?
    });
});
The code didn't change dramatically from the previous version. Instead of calling load, you call getJSON. The getJSON method does not execute against the matched set. Given a URL, and some query string data, the method issues an HTTP GET request, deserializes the JSON response into an object, and then invokes the callback method passed as the third parameter. What do you do inside of the callback? You have JSON data—an array of artists—but no markup to present the artists. This is where templates come into play. A template is markup embedded inside a script tag. The following code shows a template, as well as the search result markup where the results should display:
<script id="artistTemplate" type="text/x-jquery-tmpl">
    <li>${Name}</li>
</script>

<div id="searchresults">
    <ul id="artist-list">

    </ul>
</div>
Notice the script tag is of type text/x-jquery-tmpl. This type ensures the browser does not try to interpret the contents of the script tag as real code. The ${Name} syntax is a binding expression. The binding expression tells the template engine to find the Name property of the current data object and place it between <li> and </li>. The result will make presentation markup from JSON data.
To use the template, you need to select it inside the callback for getJSON:
$("#artistSearch").submit(function (event) {
    event.preventDefault();

    var form = $(this);
    $.getJSON(form.attr("action"), form.serialize(), function (data) {
        $("#artistTemplate").tmpl(data).appendTo("#artist-list");
    });
});
The tmpl method combines the template with the JSON data to produce real DOM elements. Because the JSON data is an array of artists, the template engine renders the template once for each artist in the array. The code takes the template output and appends the output to the artist list.
Client-side templates are a powerful technology, and this section is only scratching the surface of the template engine features. However, the code is not on par with the behavior of the AJAX helper from earlier in the chapter. If you remember from the “AJAX Helpers” section earlier in the chapter, the AJAX helper had the ability to call a method if the server threw an error. The helper also turned on an animated gif while the request was outstanding. You can implement all these features, too; you just have to remove one level of abstraction.
jQuery.ajax for Maximum Flexibility
When you need complete control over an AJAX request, you can turn to the jQuery ajax method. The ajax method takes an options parameter where you can specify the HTTP verb (such as GET or POST), the timeout, an error handler, and more. All the other asynchronous communication methods you've seen (load and getJSON) ultimately call down to the ajax method.
Using the ajax method, you can achieve all the functionality you had with the AJAX helper and still use client-side templates:
$("#artistSearch").submit(function (event) {
    event.preventDefault();

    var form = $(this);
    $.ajax({
        url: form.attr("action"),
        data: form.serialize(),
        beforeSend: function () {
            $("#ajax-loader").show();
        },
        complete: function () {
            $("#ajax-loader").hide();
        },
        error: searchFailed,
        success: function (data) {
            $("#artistTemplate").tmpl(data).appendTo("#artist-list");
        }
    });
});
The call to ajax is verbose because you customize quite a few settings. The url and data properties are just like the parameters you passed to load and getJSON. What the ajax method gives you is the ability to provide callback functions for beforeSend and complete. You will respectively show and hide the animated, spinning gif during these callbacks to let the user know a request is outstanding. jQuery will invoke the complete callback even if the call to the server results in an error. Of the next two callbacks, error and success, however, only one can win. If the call fails, jQuery calls the searchFailed error function you already defined in the “AJAX Forms” section. If the call succeeds you will render the template as before.
If you want to try the code in your own MVC Music Store project, use NuGet to install the Wrox.ProMvc3.Ajax.Templates package, then navigate to /Templates to see the “improved” home page.