
Annotating Orders for Validation
A user who tries to purchase music from the ASP.NET MVC Music Store will go through a typical shopping cart checkout procedure. The procedure requires payment and shipping information. The Order class (presented in the following code), represents everything the application needs to complete a checkout:
public class Order
{
    public int OrderId { get; set; }
    public System.DateTime OrderDate { get; set; }
    public string Username { get; set; }
    public string FirstName { get; set; }
    public string LastName { get; set; }
    public string Address { get; set; }
    public string City { get; set; }
    public string State { get; set; }
    public string PostalCode { get; set; }
    public string Country { get; set; }
    public string Phone { get; set; }
    public string Email { get; set; }
    public decimal Total { get; set; }
    public List<OrderDetail> OrderDetails { get; set; }
}
Some of the properties in the Order class require user input (such as FirstName and LastName), while the application derives other property values from the environment, or looks them up from the database (such as the Username property, because a user must log in before checking out, thus the application will already have the value).
The application builds the checkout page using the EditorForModel HTML helper. The following code is from the AddressandPayment.cshtml view in the Views/Checkout folder:
<fieldset>
    <legend>Shipping Information</legend>
    @Html.EditorForModel()
</fieldset>
The EditorForModel helper builds out editors for every property in a model object, resulting in the form shown in Figure 6.1.
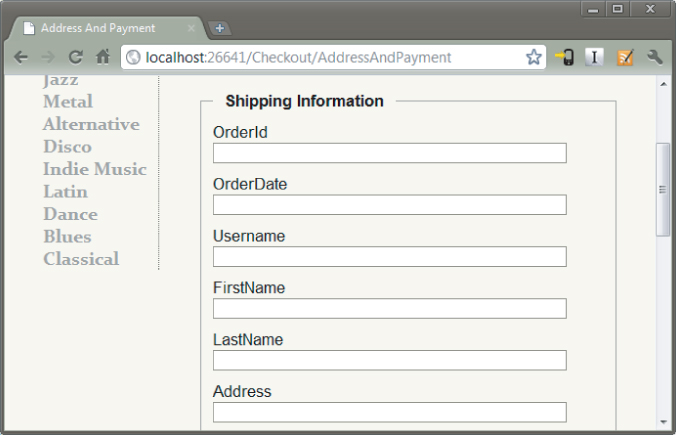
The form has some visible problems. For example, you do not want the customer to enter an OrderId or OrderDate. The application will set the values of these properties on the server. Also, though the input labels might make sense to a developer (FirstName is obviously a property name), the labels will probably leave a customer bewildered (was someone's spacebar broken?). You'll fix these problems later in the chapter.
For now, there is a more serious problem you can't see reflected in the screenshot of Figure 6.1. The problem is, customers can leave the entire form blank and click the Submit Order button at the bottom of the form. The application will not tell them how they need to provide critically important information like their name and address. You'll fix this problem using data annotations.
Using Validation Annotations
Data annotations are attributes you can find in the System.ComponentModel.DataAnnotations namespace (although a couple attributes are defined outside this namespace, as you will see). These attributes provide server-side validation and the framework also supports client-side validation when you use one of the attributes on a model property. You can use four attributes in the DataAnnotations namespace to cover common validation scenarios. We'll start by looking at the Required attribute.
Required
Because you need the customer to give you his first and last name, you can decorate the FirstName and LastName properties of the Order model with the Required attribute:
[Required]
public string FirstName { get; set; }

[Required]
public string LastName { get; set; }
The attribute raises a validation error if either property value is null or empty (I talk about how to deal with validation errors in just a bit).
Like all the built-in validation attributes, the Required attribute delivers both server-side and client-side validation logic (although internally, it is another component in the MVC framework that delivers the client-side validation logic for the attribute through a validation adapter design).
With the attribute in place, if the customer tries to submit the form without providing a last name, he'll see the default error in Figure 6.2.

However, even if the customer does not have JavaScript enabled in his browser, the validation logic will catch an empty name property on the server, too. Assuming your controller action is implemented correctly (which I promise I will talk about in just a bit), the user will still see the error message in the preceding screenshot.
StringLength
Now, you've forced the customer to enter his name, but what happens if he enters a name of enormous length? Wikipedia says the longest name ever used belonged to a German typesetter who lived in Philadelphia. His full name is more than 500 characters long. Although the .NET string type can store (in theory) gigabytes of Unicode characters, the MVC Music Store database schema sets the maximum length for a name at 160 characters. If you try to insert a larger name into the database, you'll have an exception on your hands. The StringLength attribute can ensure the string value provided by the customer will fit in the database:
[Required]
[StringLength(160)]
public string FirstName { get; set; }

[Required]
[StringLength(160)]
public string LastName { get; set; }
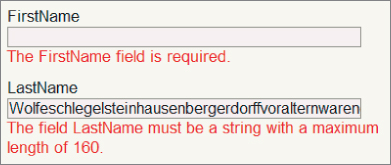
Notice how you can stack multiple validation attributes on a single property. With the attribute in place, if a customer enters too many characters, he'll see the default error message shown below the LastName field in Figure 6.3.
MinimumLength is an optional, named parameter you can use to specify the minimum length for a string. The following code requires the FirstName property to contain a string with three or more characters (and less than or equal to 160 characters) to pass validation:
[Required]
[StringLength(160, MinimumLength=3)]
public string FirstName { get; set; }
RegularExpression
Some properties of Order require more than a simple presence or length check. For example, you'd like to ensure the Email property of an Order contains a valid, working e-mail address. Unfortunately, it's practically impossible to ensure an e-mail address is working without sending a mail message and waiting for a response. What you can do instead is ensure the value looks like a working e-mail address using a regular expression:
[RegularExpression(@"[A-Za-z0-9._%+-]+@[A-Za-z0-9.-]+.[A-Za-z]{2,4}")]
public string Email { get; set; }
Regular expressions are an efficient and terse means to enforce the shape and contents of a string value. If the customer gives you an e-mail address and the regular expression doesn't think the string looks like an e-mail address, the customer will see the error in Figure 6.4.
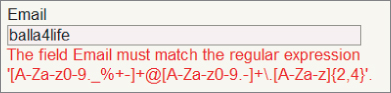
To someone who isn't a developer (and even to some developers, too), the error message looks like someone sprinkled catnip on a keyboard before letting a litter of Norwegian Forest cats run wild. You see how to make a friendlier error message in the next section.
Range
The Range attribute specifies minimum and maximum constraints for a numerical value. If the Music Store only wanted to serve middle-aged customers, you could add an Age property to the Order class and use the Range attribute as in the following code:
[Range(35,44)]
public int Age { get; set; }
The first parameter to the attribute is the minimum value, and the second parameter is the maximum value. The values are inclusive. The Range attribute can work with integers and doubles, and another overloaded version of the constructor will take a Type parameter and two strings (which can allow you to add a range to date and decimal properties, for example).
[Range(typeof(decimal), "0.00", "49.99")]
public decimal Price { get; set; }
Validation Attributes from System.Web.Mvc
The ASP.NET MVC framework adds two additional validation attributes for use in an application. These attributes are in the System.Web.Mvc namespace. One such attribute is the Remote attribute.
The Remote attribute enables you to perform client-side validation with a server callback. Take, for example, the UserName property of the RegisterModel class in the MVC Music Store. No two users should have the same UserName value, but it is difficult to validate the value on the client to ensure the value is unique (to do so you would have to send every single username from the database to the client). With the Remote attribute you can send the UserName value to the server, and compare the value against the values in the database.
[Remote("CheckUserName", "Account")]
public string UserName { get; set; }
Inside the attribute you can set the name of the action, and the name of the controller the client code should call. The client code will send the value the user entered for the UserName property automatically, and an overload of the attribute constructor allows you to specify additional fields to send to the server.
public JsonResult CheckUserName(string username)
{
    var result = Membership.FindUsersByName(username).Count == 0;
    return Json(result, JsonRequestBehavior.AllowGet);

}
The controller action will take a parameter with the name of the property to validate, and return a true or false wrapped in JavaScript Object Notation (JSON). We'll see more JSON, AJAX, and client-side features in Chapter 8.
The second attribute is the Compare attribute. Compare ensures two properties on a model object have the same value. For example, you might want to force a customer to enter his e-mail address twice to ensure he didn't make a typographical error:
[RegularExpression(@"[A-Za-z0-9._%+-]+@[A-Za-z0-9.-]+.[A-Za-z]{2,4}")]
public string Email { get; set; }

[Compare("Email")]
public string EmailConfirm { get; set; }
If the user doesn't enter the exact e-mail address twice, he'll see the error in Figure 6.5.

Remote and Compare only exist because data annotations are extensible. You look at building a custom annotation later in the chapter. For now, let's look at customizing the error messages on display for a failed validation rule.
Custom Error Messages and Localization
Every validation attribute allows you to pass a named parameter with a custom error message. For example, if you don't like the default error message associated with the RegularExpression attribute (because it displays a regular expression), you could customize the error message with the following code:
[RegularExpression(@"[A-Za-z0-9._%+-]+@[A-Za-z0-9.-]+.[A-Za-z]{2,4}",
                   ErrorMessage="Email doesn't look like a valid email address.")]
public string Email { get; set; }
ErrorMessage is the name of the parameter in every validation attribute.
[Required(ErrorMessage="Your last name is required")]
[StringLength(160, ErrorMessage="Your last name is too long")]
public string LastName { get; set; }
The custom error message can also have a single format item in the string. The built-in attributes format the error message string using the friendly display name of a property (you see how to set the display name in the display annotations later in this chapter). As an example, consider the Required attribute in the following code:
[Required(ErrorMessage="Your {0} is required.")]
[StringLength(160, ErrorMessage="{0} is too long.")]
public string LastName { get; set; }
The attribute uses an error message string with a format item ({0}). If a customer doesn't provide a value, he'll see the error message in Figure 6.6.

In applications built for international markets, the hard-coded error messages are a bad idea. Instead of literal strings, you'll want to display different text for different locales. Fortunately, all the validation attributes also allow you to specify a resource type and a resource name for localized error messages:
[Required(ErrorMessageResourceType=typeof(ErrorMessages),
          ErrorMessageResourceName="LastNameRequired")]
[StringLength(160, ErrorMessageResourceType = typeof(ErrorMessages),
              ErrorMessageResourceName = "LastNameTooLong")]
public string LastName { get; set; }
The preceding code assumes you have a resource file in the project by the name ErrorMessages.resx with the appropriate entries inside (LastNameRequired and LastNameTooLong). For ASP.NET to use localized resource files, you have to have the UICulture property of the current thread set to the proper culture. See “How To: Set the Culture and UI Culture for ASP.NET Page Globalization” at http://msdn.microsoft.com/en-us/library/bz9tc508.aspx for more information.
Looking Behind the Annotation Curtain
Before looking at how to work with validation errors in your controller and views, and before you look at building a custom validation attribute, it's worthwhile to understand what is happening with the validation attributes behind the scenes. The validation features of ASP.NET MVC are part of a coordinated system involving model binders, model metadata, model validators, and model state.
Validation and Model Binding
As you were reading about the validation annotations, you might have asked a couple obvious questions: When does validation occur? How do I know if validation failed?
By default, the ASP.NET MVC framework executes validation logic during model binding. As discussed in Chapter 4, the model binder runs implicitly when you have parameters to an action method:
[HttpPost]
public ActionResult Create(Album album)
{
    // the album parameter was created via model binding
    // ..
}
You can also explicitly request model binding using the UpdateModel or TryUpdateModel methods of a controller:
[HttpPost]
public ActionResult Edit(int id, FormCollection collection)
{
    var album = storeDB.Albums.Find(id);

    if(TryUpdateModel(album))
    {
// ...
    }
}
Once the model binder is finished updating the model properties with new values, the model binder uses the current model metadata and ultimately obtains all the validators for the model. The MVC run time provides a validator to work with data annotations (the DataAnnotationsModelValidator). This model validator can find all the validation attributes and execute the validation logic inside. The model binder catches all the failed validation rules and places them into model state.
Validation and Model State
The primary side effect of model binding is model state (accessible in a Controller-derived object using the ModelState property). Not only does model state contain all the values a user attempted to put into model properties, but model state also contains all the errors associated with each property (and any errors associated with the model object itself). If there are any errors in model state, ModelState.IsValid returns false.
As an example, imagine the user submits the checkout page without providing a value for LastName. With the Required validation annotation in place, all the following expressions will return true after model binding occurs:
ModelState.IsValid == false
ModelState.IsValidField("LastName") == false
ModelState["LastName"].Errors.Count > 0
You can also look in model state to see the error message associated with the failed validation:
var lastNameErrorMessage = ModelState["LastName"].Errors[0].ErrorMessage;
Of course, you rarely need to write code to look for specific error messages. Just as the run time automatically feeds validation errors into model state, it can also automatically pull errors out of model state. As discussed in Chapter 5, the built-in HTML helpers use model state (and the presence of errors in model state) to change the display of the model in a view. For example, the ValidationMessage helper displays error messages associated with a particular piece of view data by looking at model state.
@Html.ValidationMessageFor(m => m.LastName)
The only question a controller action generally needs to ask is this: Is the model state valid or not?
Controller Actions and Validation Errors
Controller actions can decide what to do when model validation fails, and what to do when model validation succeeds. In the case of success, an action generally takes the steps necessary to save or update information for the customer. When validation fails, an action generally re-renders the same view that posted the model values. Re-rendering the same view allows the user to see all the validation errors and to correct any typos or missing fields. The AddressAndPayment action shown in the following code demonstrates a typical action behavior:
[HttpPost]
public ActionResult AddressAndPayment(Order newOrder)
{
    if (ModelState.IsValid)
    {
        newOrder.Username = User.Identity.Name;
        newOrder.OrderDate = DateTime.Now;
        storeDB.Orders.Add(newOrder);
        storeDB.SaveChanges();

         // Process the order
        var cart = ShoppingCart.GetCart(this);
        cart.CreateOrder(newOrder);
        return RedirectToAction("Complete", new { id = newOrder.OrderId });
    }
    // Invalid -- redisplay with errors
    return View(newOrder);
}
The code checks the IsValid flag of ModelState immediately. The model binder will have already built an Order object and populated the object with values supplied in the request (posted form values). When the model binder is finished updating the order, it runs any validation rules associated with the object, so you'll know if the object is in a good state or not. You could also implement the action using an explicit call to UpdateModel or TryUpdateModel.
[HttpPost]
public ActionResult AddressAndPayment(FormCollection collection)
{
    var newOrder = new Order();
    TryUpdateModel(newOrder);
    if (ModelState.IsValid)
    {
        newOrder.Username = User.Identity.Name;
        newOrder.OrderDate = DateTime.Now;
        storeDB.Orders.Add(newOrder);
        storeDB.SaveChanges();

         // Process the order
        var cart = ShoppingCart.GetCart(this);
        cart.CreateOrder(newOrder);
        return RedirectToAction("Complete", new { id = newOrder.OrderId });
    }
    // Invalid -- redisplay with errors
    return View(newOrder);
}
There are many variations on the theme, but notice that in both implementations the code checks if model state is valid, and if model state is not valid the action re-renders the AddressAndPayment view to give the customer a chance to fix the validation errors and resubmit the form.
I hope that you can see how easy and transparent validation can be when you work with the annotation attributes. Of course, the built-in attributes cannot cover all of the possible validation scenarios you might have for your application. Fortunately, it is easy to create your own custom validations.