
Chapter 3
Configuring SharePoint Integration
What's in this chapter?
Understanding the SharePoint technologies
Getting PowerPivot going in SharePoint
Installing Reporting Services in Integrated mode
Understanding the Reporting Services settings in SharePoint
Native and Integrated mode topologies for SharePoint
This chapter explores the integration of SQL Server 2012 Reporting Services with the SharePoint technologies. In recent years, SharePoint has become a web-portal centerpiece for collaboration and information sharing. As a result, Microsoft has tightly integrated its reporting solution with the SharePoint technologies.
Integrating SQL Server 2012 Reporting Services and SharePoint allows a user to navigate to his or her intranet portal. There the user has instant access to company information, as well as personalized business reports and key performance indicators (KPIs). The reports can be embedded directly into web portal pages for seamless integration for the user. In addition, the exciting new Power View technology can be used to explore data in an ad hoc fashion.
SQL Server 2012 Reporting Services can be installed in either Native mode or SharePoint Integrated mode. In Native mode, a user interacts with Reporting Services using two web parts (Report Explorer and Report Viewer). In Integrated mode, SharePoint takes over all the duties of Report Manager. It also adds SharePoint document management values such as a consistent and friendly user experience, versioning, security trimming, alerts, enterprise search, and, when properly configured, the meeting of regulatory compliance requirements, to name just a few. Viewing reports in Integrated mode and Native mode using web parts is explored in detail in Chapter 18.
![]()
The SharePoint Technologies
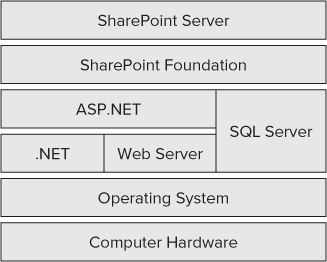
The SharePoint technologies are made up of SharePoint Foundation and SharePoint Server. SharePoint Foundation is a framework built on the .NET framework and is included with Windows Server 2008. SharePoint Server, on the other hand, is a finished product built on top of the SharePoint Foundation framework and thus requires its own licensing. Figure 3.1 shows how SharePoint Foundation is built on .NET and ASP.NET and SharePoint Server is built on SharePoint Foundation. Also shown is the fact that both SharePoint Foundation and SharePoint Server use SQL Server to store configuration and content databases.
SharePoint sites are Web-based applications that provide a single point of entry for information across an enterprise. Better yet, sites can be created without any programming. Microsoft SharePoint sites can be created by anyone with sufficient permissions. The functionality is made available using nothing more than a web browser.
SharePoint Foundation
SharePoint Foundation is included with Windows Server 2008 and provides a simple portal solution with minimal overhead. SharePoint Foundation does not include as many components as SharePoint Server and is designed for basic communication and collaboration within an organization. As a result, customization is generally required to meet specific business needs. SharePoint Foundation is built on the .NET framework and thus provides endless customization options for .NET developers.
SharePoint Server
SharePoint Server is a Microsoft product that was built as a finished product and extends SharePoint Foundation with a great deal of functionality. Some of the key features found in SharePoint Server include Excel Services, the Business Intelligence Center, and PowerPivot. SharePoint Server is released in two versions: Standard Edition and Enterprise Edition. Table 3.1 lists the functionality provided, out-of-the-box, by the three versions of SharePoint (the information is from the Microsoft SharePoint web site).
| SharePoint Foundation | SharePoint Server Standard Edition | SharePoint Server Enterprise Edition |
| Accessibility | Ask Me About | Access Services |
| Blogs | Audience Targeting | Advanced Content Processing |
| Browser-Based Customizations | Basic Sorting | Advanced Sorting |
| Business Connectivity Services | Best Bets | Business Data Integration with the Office Client |
| Business Data Connectivity Services | Business Connectivity Services Profile Page | Business Data Web Parts |
| Claims-Based Authentication | Click Through Relevancy | Business Intelligence Center |
| Client Object Model (OM) | Colleague Suggestions | Calculated KPIs |
| Configuration Wizards | Colleagues Network | Chart Web Parts |
| Connections to Microsoft Office Clients | Compliance Everywhere | Contextual Search |
| Connections to Office Communication Server and Exchange | Content Organizer | Dashboards |
| Cross-Browser Support | Document Sets | Data Connection Library |
| Developer Dashboard | Duplicate Detection | Decomposition Tree |
| Discussions | Enterprise Scale Search | Deep Refinement |
| Event Receivers | Enterprise Wikis | Excel Services |
| External Data Column | Federated Search | Excel Services and PowerPivot for SharePoint |
| External Lists | Improved Governance | Extensible Search Platform |
| High-Availability Architecture | Keyword Suggestions | Extreme Scale Search |
| Improved Backup and Restore | Managed Metadata Service | InfoPath Forms Services |
| Improved Setup and Configuration | Memberships | PerformancePoint Services |
| Language Integrated Query (LINQ) for SharePoint | Metadata-Driven Navigation | Rich Web Indexing |
| Large List Scalability and Management | Metadata-Driven Refinement | Similar Results |
| Managed Accounts | Mobile Search Experience | Thumbnails and Previews |
| Mobile Connectivity | Multistage Disposition | Tunable Relevance with Multiple Rank Profiles |
| Multilingual User Interface | My Content | Visio Services |
| Multi-Tenancy | My Newsfeed | Visual Best Bets |
| Out-of-the-Box Web Parts | My Profile | (Includes all Foundation and Standard features as well) |
| Patch Management | Note Board | |
| Permissions Management | Organization Browser | |
| Photos and Presence | People and Expertise Search | |
| Quota Templates | Phonetic and Nickname Search | |
| Read-Only Database Support | Query Suggestions, “Did you mean?”, and Related Queries | |
| Remote Blog Storage (SQL Feature) | Ratings | |
| REST and ATOM Data Feeds | Recent Activities | |
| Ribbon and Dialog Framework | Recent Authored Content | |
| Sandboxed Solutions | Relevancy Tuning | |
| SharePoint Designer | Rich Media Management | |
| SharePoint Health Analyzer | Search Scopes | |
| SharePoint Lists | Secure Store Service | |
| SharePoint Ribbon | Shared Content Types | |
| SharePoint Service Architecture | SharePoint 2010 Search Connector Framework | |
| SharePoint Timer Jobs | Status Updates | |
| SharePoint Workspace | Tag Clouds | |
| Silverlight Web Part | Tag Profiles | |
| Site Search | Tags | |
| Solution Packages | Tags and Notes Tool | |
| Streamlined Central Administration | Unique Document IDs | |
| Support for Office Web Apps | Web Analytics | |
| Unattached Content Database Recovery | Windows 7 Search | |
| Usage Reporting and Logging | Word Automation Services | |
| Visual Studio 2010 SharePoint Developer Tools | Workflow Templates | |
| Visual Upgrade | (Includes all Foundation features as well) | |
| Web Parts | ||
| Wikis | ||
| Windows 7 Support | ||
| Windows PowerShell Support | ||
| Workflow | ||
| Workflow Models |
SharePoint Web Parts
A fundamental SharePoint concept is the web part. Web parts can be thought of as modular elements containing functionality that is added to the user interface. Typically, web parts display specific information and can be moved around the web page. For example, SharePoint comes with web parts that can display images and list files. They have a consistent format, with a customizable title bar and a web part drop-down menu available in the upper-right corner. The web parts used for Reporting Services are covered in detail in Chapter 18.
Installation and Configuration
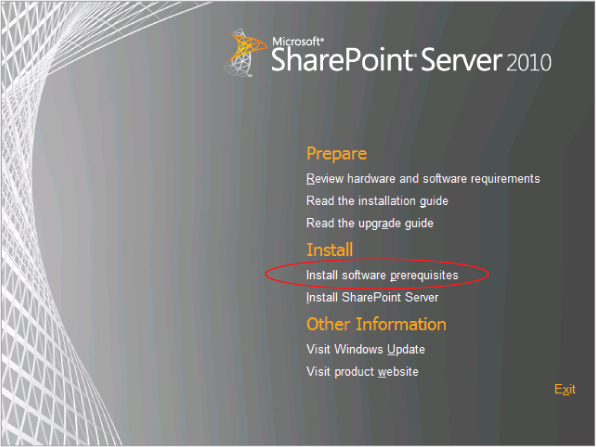
Configuring Report Services in SharePoint Integrated mode creates a tightly coupled technology that provides a seamless, user-friendly experience. To achieve Integrated mode in SQL Server 2008, an administrator had to use the separate configuration utilities that are part of the SQL Server product. This created confusion since an administrator also had to be extremely familiar with SQL Server configuration in order to configure SharePoint integration. In SQL Server 2012, after installation, all configuration is completed from within SharePoint. There is no need to access the SQL Server configuration utilities, as was required in SQL Server 2008. In addition, the Reporting Services Add-In for SharePoint can be installed directly from the SQL Server installation media. In previous versions of SQL Server this was a separate download and configuration. All in all, SharePoint integration with SharePoint has greatly improved in SQL Server 2012. To get the most out of Reporting Services and the new and exciting technology known as Power View (see Chapter 13), you will also be required to install PowerPivot for SharePoint (which is covered in this chapter).
![]()
![]()
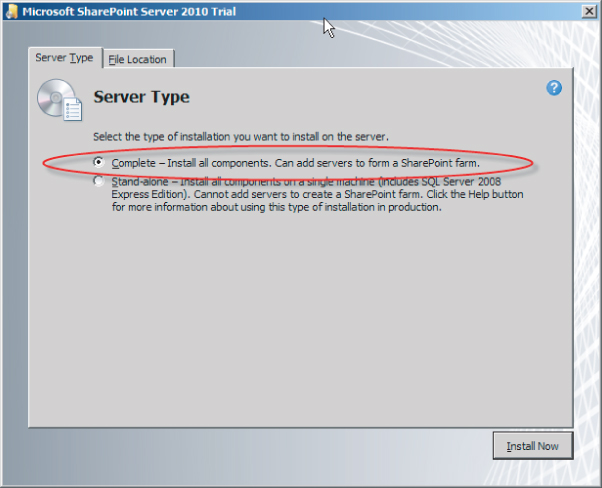
Installing SharePoint Server 2010
To get your environment up and running as quickly as possible, you will want to install SharePoint Server 2010, but hold off on configuring it until later in the process.
![]()

![]()

Installing Service Pack (SP) 1
The SQL Server 2012 product requires SP1 be installed in your SharePoint environment. You do so by first downloading the installation media and then installing the service pack:
![]()
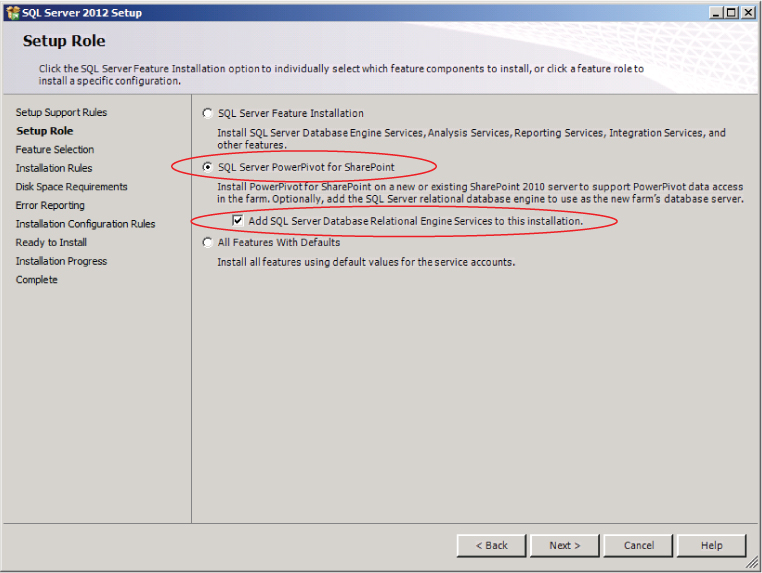
Installing and Configuring PowerPivot for SharePoint
Now that SharePoint and Service Pack 1 are installed, you are ready to install some of the integrated components that come with SQL Server 2012. The first step is to install PowerPivot. You will also configure your SharePoint farm to work with the SQL Server 2012 integrated components.
![]()


Installing and Configuring Reporting Services for SharePoint
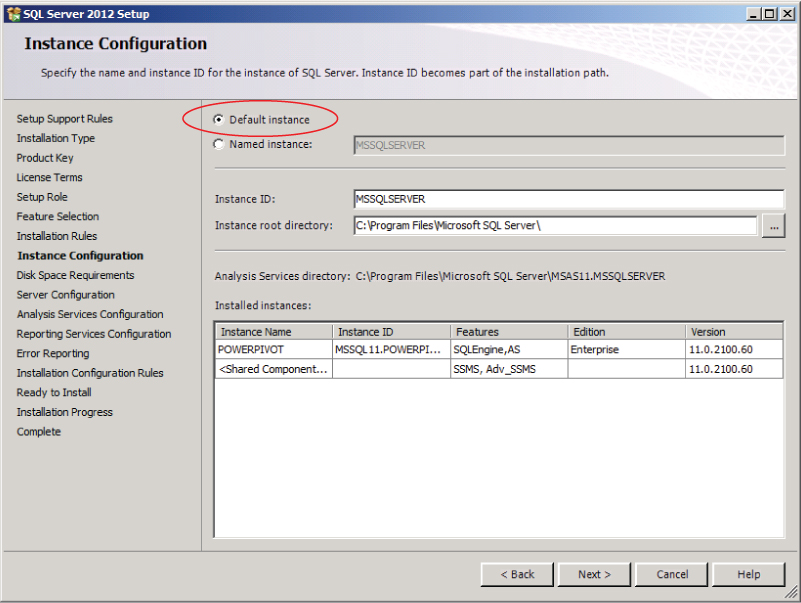
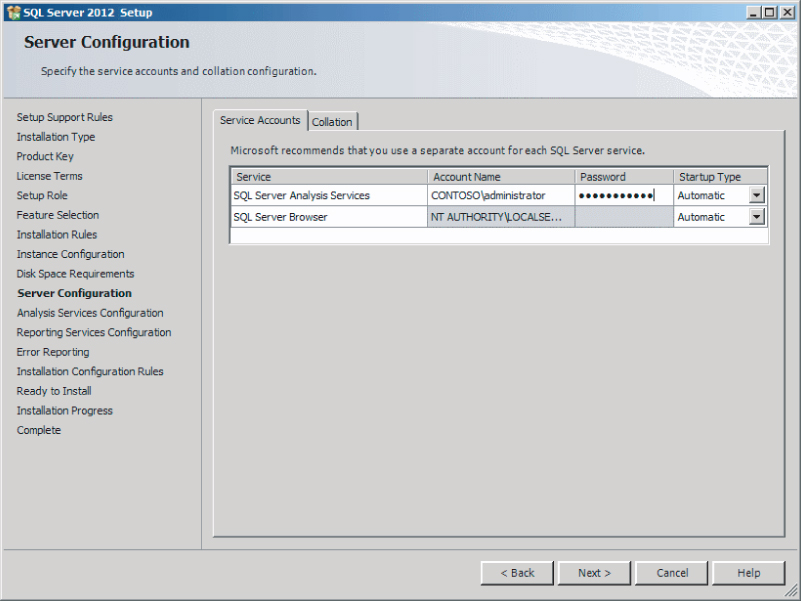
Now that PowerPivot for SharePoint has been installed and the configuration utility has configured your farm, you are ready to install the Reporting Services for SharePoint components. You will also install a SQL Server Analysis Services (SSAS) instance in VertiPaq mode, which will be used to support Power View reports (see Chapter 13). To install and configure Reporting Services for SharePoint as well as SSAS for Power View, follow these steps:


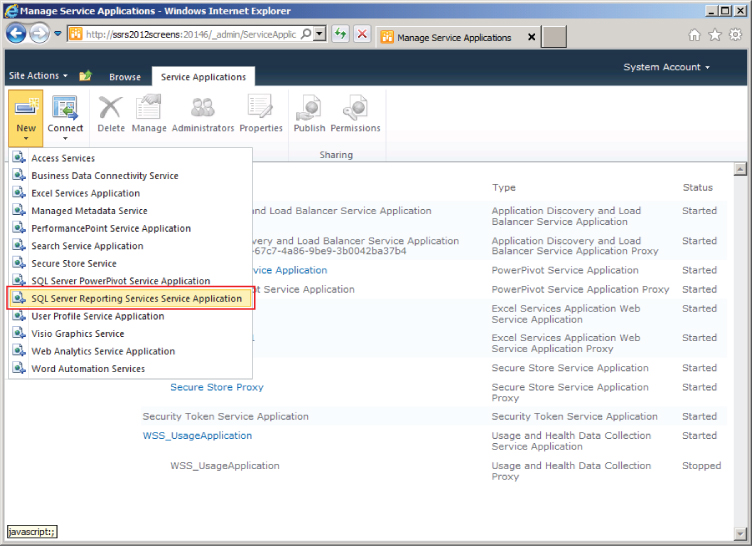
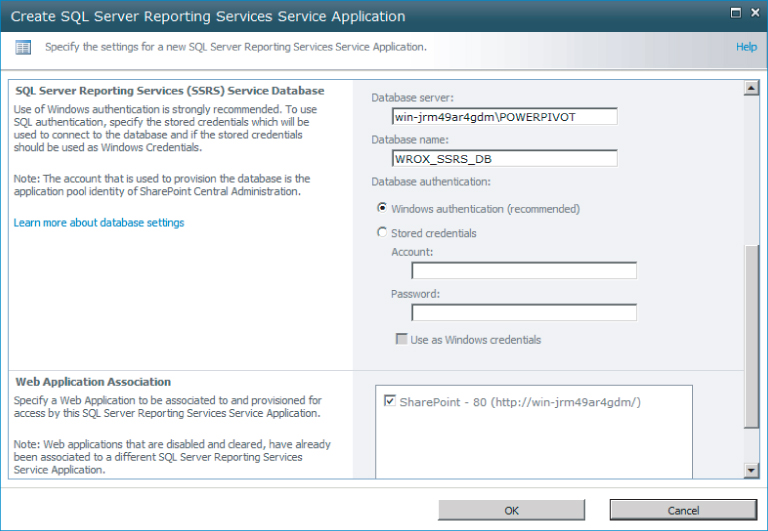
Now that Reporting Services is installed in SharePoint Integrated mode, you need to create a Reporting Services service application in your SharePoint environment. To do so, follow these steps:


The Reporting Services service application provides the integration with Reporting Services and, as a result, provides a number of different configuration screens. You can access the configuration section of the service application by clicking the SSRS service application you just created. The service application settings page provides the configuration settings shown in Table 3.2.
| Configuration Section | Description |
| System Settings | Defines the overall system settings for the Reporting Services service application. Includes configuration items such as the report settings, session settings, logging settings, security settings, and client settings. |
| Manage Jobs | Lets you view and delete running reporting jobs. |
| Key Management | Lets you view and manage encryption keys, including the ability to back up, restore, change, and delete keys. |
| Execution Account | Lets you set credentials for data sources where a logged-in user will not be executing the report. It is best practice to maintain a unique account for this execution account and provide only the minimum credentials required to access the needed data sources. |
| E-mail Settings | Reporting Services can deliver reports using e-mail. The settings on this page let you configure e-mail so that reports, processing notifications, and alerts can be sent to end users through e-mail. Using this screen, you can instruct Reporting Services to use an SMTP server and then provide the outgoing server information and FROM information. The FROM information is who the e-mail will appear to be coming from to end users. |
| Provision Subscriptions and Alerts | For subscriptions, alerts, and scheduled reports to work with SQL Server 2012 and SharePoint, you must have the SQL Server Agent running, and Reporting Services must have access to it. A detailed description of this feature can be found in Microsoft's TechNet library: http://msdn.microsoft.com/en-us/library/hh231725(v=sql.110).aspx. |
SharePoint Site Settings
When SSRS is installed in Integrated mode, a new section called Reporting Services is created in the SharePoint Site Settings, as shown in Figure 3.20. The new section allows the administrator to manage the server's shared schedules, manage the site's reporting services settings, and manage data alerts.

Table 3.3 describes the configuration of each of these features.
| Configuration Section | Description |
| Manage Shared Schedules | Provides an interface for adding and managing scheduled reports. In addition, you can pause currently running schedules and start selected schedules on an ad hoc basis. |
| Reporting Services Site Settings | Allows you to configure settings for the SharePoint site, including allowing client-side printing, showing detailed error messages on remote computers, and enabling accessibility metadata in the HTML of the generated reports. |
| Manage Data Alerts | Provides an interface for administrators to view and manage the alerts set on reports by users. Using this screen, an administrator can both view and delete alerts. In addition, all the alerts for a specific report or all the alerts for a specific user can be viewed. |
Architecture
When SQL Server 2012 Reporting Services is installed in Native mode, it runs in its own completely separate database. It uses an application called Report Manager to manage the database and does not share any database elements with the SharePoint environment. In this situation the SharePoint environment is simply a viewer of the reports. As described in Chapter 18, the Report Viewer web part and the Report Explorer web part are used to view and explore the report server. The architecture of Reporting Services in Native mode was covered in Chapter 2.
When Reporting Services is installed in Integrated mode, the integration is achieved through tightly coupled data sharing among the Reporting Services databases and the SharePoint databases. In this configuration SharePoint becomes the primary mechanism for displaying, managing, and securing not only reports and models but data sources as well.
In the simplest form, everything can be installed on one server. To review, the following components are used in Integrated mode:
- SharePoint (object model)
- SQL Server Engine (hosting SharePoint databases)
- SQL Server Engine (hosting report server databases)
- SQL Server Analysis Services (VertiPaq)
- SharePoint databases
- SQL Server Reporting Services databases
- SQL Server Reporting Services SharePoint add-in
![]()
The SharePoint Service Application architecture (new in SharePoint 2010) allows you to distribute the load of different services to different physical machines. The consumers of the service in your SharePoint farm do not care where the service is physically located. An example of this distribution might be putting the PowerPivot service on a different server from the Reporting Services service and then putting the Excel service on yet another server. This allows you to mix and match services and physical hardware, depending on what you have available and what your load requirements will be for each service.
The distribution can continue as the organization's needs multiply. A very large organization usually has several servers that host various pieces of the SharePoint and Reporting Services scenario. A common approach is to distribute SharePoint among application servers and Web front-end servers. Generally, a large, failsafe SQL Server cluster is used to host the multiple configuration and content databases of the SharePoint farm. There is also a computer that hosts the Reporting Services service and another server for the PowerPivot service.
Each of these scenarios breaks apart the pieces to gain stability and performance. In every scenario, however, the underlying architecture remains the same. The SharePoint database takes control of the Reporting Services objects. The objects are stored in the SharePoint databases but are synced with the Reporting Services database to improve report rendering performance.
One of the key benefits of SharePoint is that it provides users with a single access point to store all their business documents. A SharePoint site could be set up for the executive leadership team that includes all documents they require on a daily basis. With Reporting Services in SharePoint Integrated mode, reports are also stored in these same document libraries and are easily accessed and managed. One of the main benefits of storing the reports in the SharePoint libraries is that end users only have to go to their specific SharePoint site to obtain all their business documents, including their reports. The world of modern information workers has become increasingly chaotic in a digital sense. Microsoft has made great strides in consolidating this chaos into a single point of reference with the SharePoint site.
Summary
SharePoint is a technology that organizations have come to rely on for their intranet, extranet, and Internet web sites. Integrating SQL Server 2012 Reporting Services and the SharePoint technologies is a natural fit and provides an attractive solution for delivering reports to end users throughout the organization. As Microsoft continues to add and integrate functionality with SharePoint, the installation process grows in complexity.
This chapter looked at the following topics:
- The SharePoint technologies in general, including Windows SharePoint Services and Microsoft Office SharePoint Server, and SQL Server Engine (hosting SharePoint databases)
- Installing PowerPivot for SharePoint, including configuring the SharePoint farm from the PowerPivot configuration screen
- Installing and configuring SQL Server Reporting Services for SharePoint, including creating the Reporting Services Service Application in Central Administration
- The Reporting Services section of the Site Settings screen in SharePoint 2010
- The architecture of SQL Server Reporting Services integration with SharePoint