
Chapter 17
Content Management
What's in this chapter?
Using Report Manager
Content management activities
Item-level security
Content management automation
As discussed in Chapter 2, reports are made available through a three-phase process of authoring, management, and delivery called the reporting life cycle.
Much of the material in the preceding chapters focused on the authoring phase of the life cycle. This chapter marks the book's transition to focusing on the management and delivery phases. The goal of this and the subsequent chapters is to show you how to effectively put content you have spent hours, days, or even weeks developing into the hands of your users. Even if you're focused primarily on report authoring, you are encouraged to understand this material.
In this chapter, you explore the management of Reporting Services content. Reporting Services content includes reports, report models, shared data sources, and report resources as well as the folder structure within which these are maintained. Shared schedules, used by reports for subscriptions, history, and snapshots, are also addressed in this chapter even though these items are maintained at the site level, outside the folder structure.
In Native mode, Reporting Services content management is performed primarily through the Report Manager application. Scripts executed through the RS utility provide an alternative means of performing these tasks.
In SharePoint Integrated mode, content management activities are performed in a similar manner but through the SharePoint site or through the ReportServer web services endpoint. In this mode, Report Manager and the RS utility are unavailable.
Using Report Manager
Report Manager is the primary content management tool for Reporting Services installations running in Native mode. The application provides an easy-to-use graphical interface to navigate the Reporting Services site. Through Report Manager, various items can be accessed or even altered, assuming you have the appropriate permissions.
For default installations, Report Manager is accessed through the following URL:
http://<servername>/reports
If you've installed Reporting Services as a named instance, the URL you will use has this form:
http://<servername>/reports_<instancename>
If you are unable to connect to Report Manager, verify with your administrator that the application has not been explicitly disabled or that its URL reservation is not configured for an alternative address.
When you first connect to Report Manager, you see the Contents page of the Home folder, as shown in Figure 17.1. A number of Report Manager's basic features are on display.
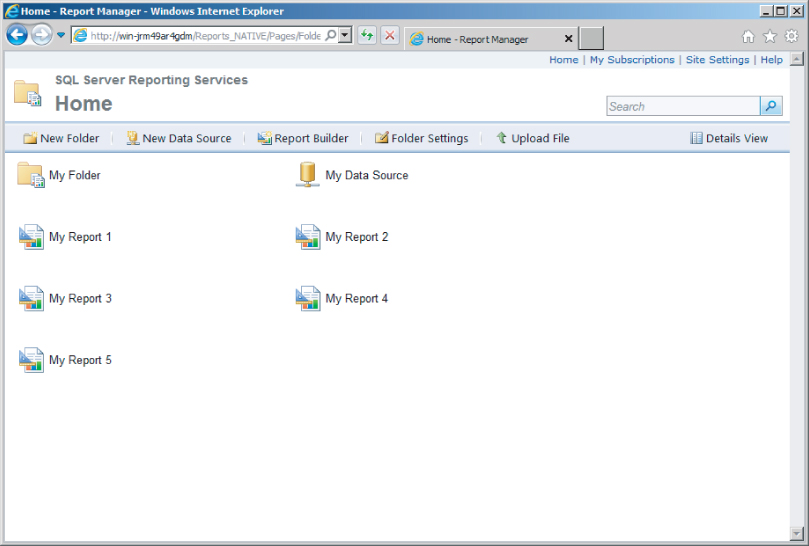
At the top of the page is the header. The header provides navigational assistance and access to site-level functionality. On the main page you see a list of reports, folders, and data sources contained in the current Report Manager environment.
By clicking an item on the page, you can navigate to that item. For example, if you click a report, the report loads for you to view. If you click a folder, you enter that folder. Clicking the Home link always takes you back to the Home page.
On the right side of the header, you will notice a series of links. Which links appear depend on your rights on the system. Table 17.1 lists potentially available links.
| Link | Description |
| Home | Takes you to the Content page of the Home folder. |
| My Subscriptions | Takes you to the My Subscriptions site-level page. This page displays all the subscriptions on the site that you own. |
| Site Settings | Provides access to the Site Settings pages. From these pages you can modify general site-level settings, site-level security, and shared schedules. |
| Help | Opens a separate browser window displaying the Report Manager Help and Support pages. |
Just below these links is a Search box. When you enter text in the box and click the button to its right, Report Manager performs a case-insensitive search for items with names and descriptions matching the text you entered. The search, as presented through Report Manager, does not support wildcards or Boolean operators.
Below the header is the page body. The header varies little across the site, but the page body varies significantly based on the type of item being accessed. The type of item and its characteristics identify the Report Manager page. Each type of item in Reporting Services supports one or more Report Manager pages.
You access a page by first selecting a particular item. That item's default page is presented. Other pages are accessible through tabs.
Figure 17.2 shows the Properties page of the My Folder folder. You access this page by selecting the My Folder folder from the Home page and then clicking the Folder Settings button.

Back on the Home page, the Details View link in the gray bar above the list provides a more detailed view of the items on the page. In Figure 17.3 the page has been reloaded, with content displayed in a tabular format. Also notice that more options are available through the gray bar.

The gray bar gives you access to various actions throughout the Report Manager application. Notice in Figure 17.3 that the Delete and Move buttons are disabled. Many buttons on the gray bar are disabled until one or more items on the page are selected. You select an item by clicking the checkbox to its left. You can select all items by checking the checkbox in the table heading.
Report Manager frequently displays information using columns and rows as shown in Figure 17.3. The topmost row identifies field names, and the rows below represent individual items. Each column is a data field such as Type, Name, Description, Last Run, Modified Date, and Modified By as shown in Figure 17.3.
Many tables allow you to sort their contents by clicking individual fields. Not all fields are sortable, but you can easily identify which ones are by placing the cursor just above a field name and watching the cursor change to indicate that a link is present.
Content Management Activities
Now that you are familiar with Report Manager basics, it's time to look at the management of various Reporting Services items through the application. If you skipped the preceding section, please review it quickly so that you are familiar with the terminology used here.
The following sections explore the management of these items:
- Folders
- Shared data sources
- Report models
- Reports
- Report resources
- Shared schedules
Folders
Most Reporting Services items are housed within a folder hierarchy. This provides a simple, familiar structure for organizing content.
The folder hierarchy is a virtual structure; in other words, you will not find it recreated on a Reporting Services server's drives. Instead, the structure exists as a set of self-referencing records in the ReportServer database.
The default page for the Home folder and every folder in Reporting Services is the Contents page. On the Contents page, items within the folder including any child folders are presented in a list.
The items on the Contents page are identified by name, an optional description, and an icon denoting the item's type, such as Folder, Report, Linked Report, Report Model, Shared Data Source, Resource, Standard Subscriptions, or Data-Driven Subscriptions.
The gray bar at the top of the folder Contents page list presents buttons for creating new folders and shared data sources and uploading items to the folder. You will explore creating new shared data sources and uploading items later in this chapter. Of interest now is the New Folder button.
Clicking the New Folder button takes you to the New Folder page, as shown in Figure 17.4. On this page, you enter a name and description for your new folder. Selecting the “Hide in tile view” option makes the folder hidden in its parent folder's list view.

Clicking OK submits the request to create the new folder. If a folder or other item with the same name already exists under the parent folder, an error message is presented. If the request is successful, you are taken back to the Contents page from which you originally clicked the New Folder button, as shown in Figure 17.5.

If the folder is configured to be hidden in list view, you need to switch to the parent folder's detail view to see the new folder. To switch to detail view, click the Details View button in the gray bar.
![]()
In detail view, all the folder's contents are displayed in a tabular format, as discussed in the preceding section. The table supports Edit, Type, Name, Description, Last Run, Modified Date, and Modified By fields, with all but the Edit selection checkbox being sortable.
Clicking an individual item's Name field takes you to that item's Properties page. Clicking an item's Type icon or name takes you to that item's default page. For reports and reporting resources, the default page is the View page. For folders, the default page is the Contents page in list mode. For all other items, the default page is the Properties page.
Selecting one or more items enables the Delete and Move buttons in the gray bar. The Delete button confirms and then drops the items you have selected. The Move button takes you to Move Items page, which requires you to select where in the site's folder structure the items are to be moved. If you are deleting or moving a folder, the operation succeeds only if you have the required permissions on each item it contains.
Now that you know how to create, alter, and remove folders, what kind of folder structure should you build for your site? There are a variety of reasoned opinions on this subject, providing guidance on naming conventions, standard folder locations, and the balance of the breadth and width of the site's hierarchy.
However you ultimately decide to organize your site, we recommend that it be driven by a set of guidelines adopted before site construction. In developing those guidelines, we further recommend that you keep the end-user experience at the forefront of your thought process and consider the maintenance and security implications of your scheme. (Security is discussed later in this chapter.) You should review the guidelines with administrators, report developers, and end-user representatives not only to obtain support but also to begin the process of educating those who will be working with the guidelines.
Shared Data Sources
Shared data sources hold connection information in a secure manner, allowing this information to be centrally administered while being shared among reports and report models throughout the site.
Report authors often create shared data sources as part of the report development process. In SQL Server Data Tools (SSDT), you can add these to the Report Server project by right-clicking the Shared Data Sources folder in the Solution Explorer, selecting Add New Data Source, and providing the required information in the Shared Data Source dialog. The shared data source item is deployed to the site folder identified by the project's TargetDataSourceFolder property. You can access this property by right-clicking the project in Solution Explorer and selecting Properties.
To create a shared data source item without the help of a report-authoring tool, open Report Manager and navigate to the folder within which the item will be housed. Click the New Data Source button on the gray bar of the folder's Contents page. In the resulting New Data Source page, shown in Figure 17.6, enter a name and description for the new item. Set the options that control whether the item is displayed in its parent folder's Contents page list view and/or enabled for use on the site. Then select the registered data extension to be used, and enter an appropriate connection string. Which data extension you select determines the syntax of the connection string.

![]()
Below the connection string, set the security context to be used when establishing the connection. You have four basic options, a couple of which support one or more variations.
The “Credentials supplied by the user running the report” option allows you to configure a prompt to be presented to the user. The check box associated with this option instructs Reporting Services whether to treat these as Windows user credentials.
The “Credentials stored securely in the report server” option allows you to enter a username/password combination that will be encrypted and stored in the primary Reporting Services application database. Again, you have the option to have Reporting Services treat these as Windows or source-specific credentials. The associated “Impersonate the authenticated user after a connection has been made to the data source” option allows database-user impersonation to be employed after the connection has been established. This option provides support for the use of SETUSER functionality within SQL Server.
The “Windows integrated security” option allows the user to be impersonated when making the connection to the external data source. For this feature to work, the external data source must be local to the Reporting Services server, or Kerberos must be enabled on the domain.
![]()
The final option, “Credentials are not required,” instructs Reporting Services to use the Unattended Execution Account when establishing the connection. This account is not enabled by default and is not recommended for use against most data sources. Whether or not the Unattended Execution Account is enabled, the “Credentials are not required” option is provided. If you attempt to leverage a data source with this option set and the unattended execution account not enabled, you receive an error indicating an invalid data source credential setting. The unattended execution account is covered in more detail in Chapter 19.
Clicking OK creates the data source item. Clicking the new shared data source item takes you to its Properties page.
On the Properties page, you can move, rename, or delete the data source. Moving or renaming a shared data source does not impact the Reporting Services items that refer to it. Deleting a shared data source breaks the reports, report models, and subscriptions that depend on it. To view items that refer to the shared data source before deleting it, click the shared data source's Dependent Items and Subscriptions tabs on the left. If the shared data source is deleted, the listed items are broken until they are pointed to a new data source.
![]()
Report Models
Report models provide the data layer for ad hoc reporting. They record metadata about the structures of an external data source in a manner that makes interaction with these easier for less-technical users. In Reporting Services 2012, report models support SQL Server, Analysis Services, and Oracle (9.2.0.3 or later) data sources. Chapter 18 has more information about report models.
A report model is typically constructed through a report model project in SSDT. As an alternative to using SSDT to construct a report model, you can assemble one from within Report Manager. To do this, locate a SQL Server, Analysis Services, or Oracle shared data source on the site. On the shared data source's Properties page, verify that the data source uses stored credentials or Windows Integrated security. Then click the Generate Model button at the top of the screen to open the New Model page, shown in Figure 17.7. Enter a name and description for your model. If you want to place the model somewhere else on the site, use the Change Location button to set an alternative location.
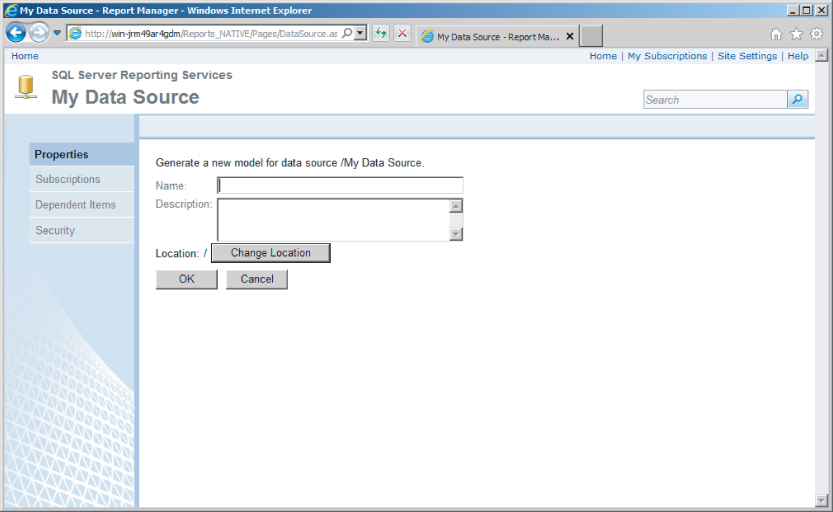
Clicking OK starts the model generation process. Depending on the data source used, model generation can be an intensive process, taking quite a bit of time. When it is done, you see the new report model's Properties page.
From here you can edit the report model's properties and perform basic item management. Before deleting a report model, be sure to review the Dependent Items and Subscriptions pages to identify which Reporting Services items will be impacted by this operation.
The model's Properties page also provides functionality to regenerate the model. You need to regenerate the model when structural changes have occurred in the external data source that need to be reflected in the model. Like model generation, model regeneration can take quite a bit of time.
If a report model is in use when you attempt to regenerate it, an error occurs. To prevent this, locate the shared data source used by the model and disable it from its Properties page. Reenable it as soon as model regeneration is complete.
The Properties page also provides access to the model definition. Clicking the Edit link returns an SMDL file that you can add to a SSDT Report Model project for modification. SSDT separates the data source view and model definition components, so you need to redeploy the model from SSDT after making changes to it.
In addition to the Properties page, Report Manager provides Data Sources Properties, Clickthrough Reports Properties, Model Item Security Properties, and Security Properties pages to help you manage report models.
The Data Sources Properties page allows you to select the data source used by the report model. As mentioned, report models are limited to SQL Server, Analysis Services, and Oracle 9.2.0.3 (or later) and must use stored credentials or Windows integrated security.
The Clickthrough Properties page allows you to replace the pages Report Builder generates when users click interactive data elements in reports based on report models. Through this interface you can specify which custom reports are used when one or multiple elements are engaged.
The Model Item Security Properties page allows you to specify a finer level of access to data provided through the report model. By enabling the “Secure individual model items independently for this model” option, you can select which model elements inherit permissions from their parent items and which grant read access to a custom list of groups and users. Books Online provides much more information on the use of this feature.
Reports
Reports present data to end users in an easy-to-consume manner. They consist of a set of instructions encoded in Report Definition Language (RDL) that is processed by Reporting Services to retrieve data from one or more sources and present this data in various report elements.
The Report Designer interface accessed through a Report Server project in SSDT is commonly used to assemble reports. The Report Server project's TargetReportFolder property defines where on the Reporting Services site the report will be deposited when the project is deployed. To access this property, right-click the project in the Solution Explorer window and select Properties.
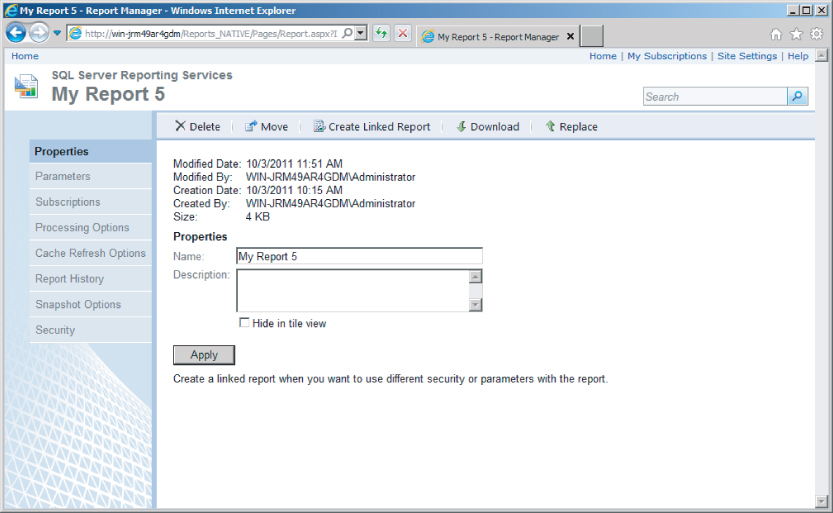
As an alternative to using SSDT (or another report authoring tool) to deploy a report to the site, you can use Report Manager's file upload functionality. To do this, open the folder within which you want to place the report, and click the Upload File button on the gray bar of the folder's Contents page. Through the resulting Upload File page, shown in Figure 17.8, identify the RDL file for the report and set the basic report properties. Click OK to upload the file. The file now appears as an item in the folder's list and/or detail views, depending on how it is configured.

Clicking a report item takes you to its View page, which presents an HTML rendered version of the report. It's a good idea to review your report here after publication to identify any discrepancies between the published report and how it was presented in Preview mode of your report authoring tool.
Hovering the mouse cursor over the report displays a context menu that allows you to perform other actions on the report, as shown in Figure 17.9:
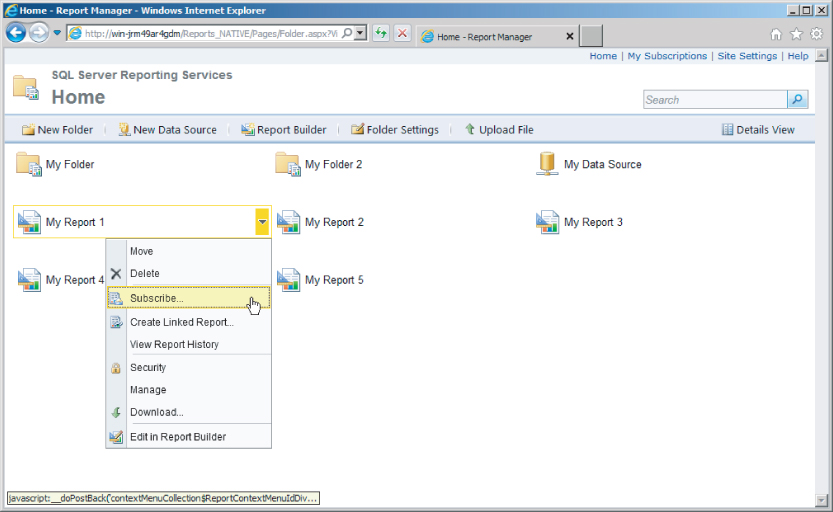
- Moving the report
- Deleting the report
- Subscribing to the report
- Creating a linked report
- Viewing the report's history
- Managing security
- Managing the report's properties
- Downloading a copy of the report
- Editing the report in Report Builder
The Delete and Move buttons do just what you would expect. Deleting a report removes any subscriptions and history for it and makes orphans of any linked reports built from it.
You can subscribe to the report, which provides you with updates via e-mail or to a shared file location. Using this functionality you can choose to run the report at a specific time or select a shared schedule that is already set up.
Clicking the Subscriptions tab opens the report's Subscriptions page. On this page, existing subscriptions associated with the report are presented in a sortable table.
Clicking the New Subscription button allows you to set up a new standard subscription. On the New Subscription page, you specify the subscription delivery mechanism for the report, which then determines which additional information is needed. Table 17.2 lists the settings for e-mail and file share subscription delivery.
| Delivery Method | Setting | Description |
| To | A semicolon-delimited list of e-mail addresses to which the report will be delivered. These addresses will be listed on the To line of the e-mail message. | |
| Cc | A semicolon-delimited list of e-mail addresses to which the report will be delivered. These addresses will be listed on the Cc line of the e-mail message. | |
| Bcc | A semicolon-delimited list of e-mail addresses to which the report will be delivered. These addresses will not be listed in the e-mail message. | |
| Reply-To | The e-mail address to which replies should be directed. | |
| Subject | The subject line of the e-mail message. The default subject line includes two variables that will be replaced with appropriate values at the time of execution. | |
| Include Report | Indicates whether the report should be rendered and included in the e-mail message. | |
| Render Format | Specifies the format to which the report should be rendered if it is to be included in the e-mail message. If you specify Web Archive, the report is embedded in the message body. For any other format, the report is included as an attachment. | |
| Include Link | Indicates whether a link to the report on the Reporting Services site should be included in the e-mail message. | |
| Priority | Indicates the flag to be used for the message's importance. | |
| Comment | A message to be included in the body of the e-mail message. | |
| Windows file share | File Name | The name of the file to deliver. You can supply an extension or select the “Add a file extension when a file is created” option to add an extension based on the rendering format you select. |
| Path | The UNC path of the folder to which the file will be delivered. | |
| Render Format | A rendering format selected from a drop-down list of those available on the site. | |
| Credentials Used to Access the File Share | The username/password combination used as credentials when accessing the file share specified in the Path setting. | |
| Overwrite Options | One of three options indicating how to respond to the existence of a file with the name identified in the File Name setting. Options allow the file to be overwritten; the subscription to fail if the file exists; or the file to be written to the share but under a name with a sequential, numeric value appended. |
Below the delivery method options are the subscription processing options. These determine whether the subscription is delivered based on a subscription-specific or shared schedule. If the report includes parameters, values for these are entered in the Report Parameter Values section at the bottom of the New Subscription page. Clicking OK creates the new subscription.
Clicking the New Data-Driven Subscription button from the report Subscriptions page opens the Create Data-Driven Subscription Step 1 page. On this page, you give the subscription a name and identify its delivery type. All subscribers to this data-driven subscription will use this delivery method.
The Step 1 page requires you to specify the data source through which subscription data will be retrieved. You can use a shared data source or elect to create a subscription-specific data source. The data source is then either selected or configured on the Step 2 page.
On the Step 3 page, you enter a query that retrieves the information required by the subscription, along with a time-out. What information is required depends on how you intend to map fields to various options in the next step. A list of delivery method settings and report parameters is provided toward the middle of the page to assist you in developing your query.
Just below these lists, you can specify the query time-out and use the Validate button to test your query against the data source. Clicking the Next button automatically validates the query before taking you to the Step 4 page.
On the Step 4 page, you map delivery method settings to fields returned by your query. Alternatively, you can map these settings to constants or, in some cases, elect to provide no value.
If the report contains parameters, clicking the Next button takes you to the Step 5 page, where you map parameters in the report to fields in the query. Again, you can also map a parameter to a constant or elect to provide no value if appropriate.
Clicking Next takes you to the Step 6 page. Here you specify whether a subscription-specific or shared schedule will be used to control the timing of subscription delivery. You can also elect to have the subscription delivered whenever data for the snapshot associated with the report is updated. If you choose to use a subscription-specific schedule, you click Next to be taken to the Step 7 page, where this schedule is defined. Otherwise, you click the Finish button on the Step 6 page to complete the setup of the data-driven subscription.
![]()
The Create Linked Report context menu item takes you to the New Linked Report page, as shown in Figure 17.11. You can think of a linked report as a kind of shortcut to a standard report, except that you can configure the linked report's properties differently from those of the report it references. This includes setting alternative processing options, cache refresh options, snapshot options, and security options. In addition, if the report has parameters or uses a shared data source, you also see pages to configure those.

The View Report History context menu item takes you to a page that shows you the report's history, such as the most recent snapshots and subscriptions. In addition, you can use this page to create a new snapshot of the report.
![]()
The Security functionality allows you to manage the report's security, including assigning roles to users or groups. By default the report's security is inherited from the parent container. You can break this inheritance to create item-level security, or you can restore this inheritance for an item with unique security settings.
If a report, linked or otherwise, has parameters, a Parameters Properties page is available on the left for that report's management page. On this page, you can set the default value, nullability, visibility, and prompt settings for each report parameter. These settings can be different from those specified during the report authoring phase.
If a report uses a data source, the Data Sources Properties page is available on the left. On this page, you can configure the report-specific and shared data sources that a report uses. You can also swap out report-specific and shared data sources in use by the report.
The Processing Options tab is used to configure a report's use of the Reporting Services caching features. By default, the “Do not cache temporary copies of this report” option is selected, which means that neither report execution caching nor snapshots are employed. (Session caching, discussed in Chapter 2 and configured at the site level, is still in effect.)
Selecting either of the “Cache a temporary copy of the report” suboptions enables report execution caching. With either of these options set, a copy of the report is cached when the report is run unless a valid cached copy already exists. That cached copy is held in the ReportServerTempDB database to fulfill subsequent requests until the cache expires. The first of the two “Cache a temporary copy of the report” options instructs Reporting Services to expire the cached copy after a fixed number of minutes. The second option instructs Reporting Services to expire the cached copy at a fixed point in time. This allows you to set a report-specific schedule or use a shared schedule.
The set of suboptions under the “Render this report from a report execution snapshot” option instruct Reporting Services to create and render the report from a snapshot. The snapshot is a scheduled execution of the report. Snapshots eliminate the potentially long run times experienced by the first user of a report when a cached copy has expired. You can specify a report-specific or shared schedule for the timing of the snapshot and can elect to run the snapshot immediately following its configuration. The snapshot remains valid until the next snapshot is executed.
![]()
The bottom of the Processing Options page contains settings affecting report execution time-out. The default for a report is to use the system-level setting (which is set to a default value of 1800 seconds). The “Do not timeout report execution” option specifies that the report will not use a time-out. The “Limit report execution to the following number of seconds” option allows you to specify a report-specific time-out, overriding the system-level setting.
It is generally recommended that you use an execution time-out, whether system- or report-specific. The time-out should be sufficient for data to be retrieved and the report to be fully rendered. If you find you must set long time-outs for your report, consider using caching or snapshots as well as subscription features unless you want your users to stare at their screens, waiting for the report to render.
The Cache Refresh Options tab allows you to create a caching plan if one does not exist. When creating a new plan, you are required to set default parameters, if any exist, and specify a time or schedule for refreshing the cached report. Since report parameters require a default value with caching, this can limit your ability to use snapshots as an execution option. However, the well-thought-out use of dataset filters can allow you to make wider use of a report snapshot.
The Snapshot Options tab allows you to manage the snapshots for this particular report. The “Store all report execution snapshots in history” option stores all snapshots configured in the Execution Properties page as part of the report history. The “Use the following schedule to add snapshots to report history” option allows you to configure an alternative schedule for recording snapshots to history.
Storing the report history can start to add up within the ReportServer database. The History Properties page provides a set of options to limit the number of historical snapshots maintained for a report. The “Use default setting” option instructs Reporting Services to retain history for this report according to the site-level history setting. This setting has a default value of 10 days. The other two options override the site-level setting with a report-specific value, allowing you to keep history indefinitely or for simply an alternative number of days.
To actually see historical snapshots for a report, navigate to the Report History page by clicking the report's Report History tab. Report snapshots recorded to history are presented here in a detailed, tabular view. You can sort the table by the When Run and Size field headers.
Clicking an entry's When Run value opens a new window showing the report rendered using data from this snapshot. You can remove a snapshot from the history by clicking the checkbox to the far left of an item and then clicking the Delete button in the gray bar above the table. The New Snapshot button is presented in the gray bar if the “Allow report history to be created manually” option is set on the History Properties page. This button generates an on-demand report snapshot for inclusion in the report history.
Report Resources
Resources are files referenced by a report. Image files are the most commonly used reporting resources, but HTML, XML, XSLT, text, PDF, and Microsoft Office files are often employed as well. Reporting Services does not restrict what kind of resource a report can leverage, so the possibilities are endless. That said, there are practical limitations to what may be used as a reporting resource.
Reporting Services is simply a way to store and return the binary image of a resource file. The consuming application, whether the Reporting Services report processor or a custom report processing extension, must understand how to consume the resource item for it to be incorporated into the report. Otherwise, your only option is to provide a link to the resource and depend on the report-viewing tool, typically a web browser, to handle the binary image for you.
In addition, the binary image of the resource file is stored in an Image data type field in the ReportServer database. This imposes a 2 GB limitation on the file size. If you exceed this limit, an error is returned as you attempt to upload it to the site.
To upload a resource to Reporting Services, open the parent folder's Contents page and click the Upload File button. Locate the file to upload, and click the OK button. After it is uploaded, you should see the item displayed within the folder.
Clicking the item takes you to the resource's View page. If your web browser can render a resource, such as a JPEG or GIF file, the item is displayed within the body of the Report Manager page. If your web browser cannot render a resource, such as a TIFF file, the browser prompts you to save the file to your local system.
Clicking a resource's Properties tab takes you to the resource item's General Properties page. Through this page you can perform basic maintenance on the item.
Shared Schedules
Shared schedules allow you to define and administer schedules in a centralized manner for use throughout the site.
Shared schedules are managed at the site level, outside the folder structure. To access these, click the Site Settings link in the upper-right corner of the Report Manager header. Move to the Schedules page to see a tabular representation of Shared Schedules on the system.
The table on the Schedules page shows Name, Schedule (description), Creator, Last Run, Next Run, and Status fields, all of which can be used to sort the table's contents. Selecting one or more items in the table enables the Delete, Pause, and Resume buttons within the gray bar.
Clicking the New Schedule button in the gray bar on this page takes you to the New/Edit Schedule page. This page allows you to enter a name for the schedule and set its frequency of execution. You can also set a date range during which this schedule is executed, as shown in Figure 17.12.

Clicking the OK button submits the request to create the schedule. Behind the scenes, Reporting Services attempts to create a scheduled job through SQL Agent. If the SQL Agent Windows service is not started, you receive an error message.
Back on the Schedules page, clicking a schedule item's name or schedule value takes you back to the New/Edit Schedule page, where you can edit the item's configuration. Before making changes, it is a good idea to review the schedule's Reports page to identify reports dependent on it.
Shared schedules can also be created and managed through SQL Server Management Studio. Open SQL Server Management Studio, connect to the Reporting Services instance, and locate the Shared Schedules folder under the instance icon. You can right-click the Shared Schedules folder to create or delete a shared schedule. You can also right-click an individual schedule to delete it or access its properties page. The properties page provides access to the same properties presented through Report Manager.
Item-Level Security
To perform an action against a Reporting Services item, you must have been granted the permissions to do so. Reporting Services supports a fixed set of permissions associated with each type of item, as shown in Table 17.3.
| Item | Permissions |
| Report | Create Any Subscription
Create Link Create Report History Create Subscription Delete Any Subscription Delete Report History Delete Subscription Delete Update Properties Execute Read Policy List Report History Read Any Subscription Read Content Read Data Sources Read Properties Read Report Definition Read Report Definitions Read Security Policies Read Subscription Update Any Subscription Update Data Sources Update Parameters Update Policy Update Report Definition Update Security Policies Update Subscription |
| Report Model | Delete Update Content
Delete Update Properties Read Content Read Data Sources Read Model Item Authorization Policies Read Properties Update Data Sources Update Model Item Authorization Policies |
| Shared Data Source | Delete Update Content
Read Properties Read Security Policies Update Properties Update Security Policies |
| Reporting Resource | Delete Update Content
Read Content Read Properties Read Security Policies Update Properties Update Security Policies |
| Folder | Create Data Source
Create Folder Create Model Create Report Create Resource Delete Update Properties Execute and View List Report History Read Properties Read Security Policies Update Security Policies |
Explicitly assigning the right combinations of permissions required to perform an action on the site would be challenging. To simplify things, Reporting Services organizes these permissions into a more condensed set of item-level tasks. These tasks more naturally align with the kinds of activities users need to perform. Table 17.4 lists the task-to-permission mappings. Although it's important to understand these permissions as the underlying mechanism behind item-level security, Reporting Services does not expose these permissions and does not allow tasks to be created or altered.
| Item | Task | Permissions |
| Folder | Manage data sources | Create Data Source |
| Manage folders | Create Folder
Delete Update Properties Read Properties |
|
| Manage models | Create Model | |
| Manage reports | Create Report | |
| Manage resources | Create Resource | |
| Set security for individual items | Read Security Policies
Update Security Policies |
|
| View folders | Read Properties
Execute and View List Report History |
|
| Reports | Consume reports | Read Content
Read Report Definitions Read Properties |
| Create linked reports | Create Link
Read Properties |
|
| Manage all subscriptions | Read Properties
Read Any Subscription Create Any Subscription Delete Any Subscription Update Any Subscription |
|
| Manage individual subscriptions | Read Properties
Create Subscription Delete Subscription Read Subscription Update Subscription |
|
| Manage individual subscriptions | Read Properties
Create Subscription Delete Subscription Read Subscription Update Subscription |
|
| Manage report history | Read Properties
Create Report History Delete Report History Execute Read Policy Update Policy List Report History |
|
| Manage reports | Read Properties
Delete Update Properties Update Parameters Read Data Sources Update Data Sources Read Report Definition Update Report Definition Execute Read Policy Update Policy |
|
| View reports | Read Content
Read Properties |
|
| Set security for individual items | Read Security Policies
Update Security Policies |
|
| Data Sources | Manage data sources | Update Properties
Delete Update Content Read Properties |
| View data sources | Read Content
Read Properties |
|
| Set security for individual items | Read Security Policies
Update Security Policies |
|
| Models | Manage models | Read Properties
Read Content Delete Update Content Read Data Sources Update Data Sources Read Model Item Authorization Policies Update Model Item Authorization Policies Delete Update Properties |
| View models | Read Properties
Read Content Read Data Sources |
|
| Resources | Set security for individual items | Read Security Policies
Update Security Policies |
| Manage resources | Update Properties
Delete Update Content Read Properties |
|
| View resources | Read Content
Read Properties |
Take a moment to consider the users of a particular section of your Reporting Services site, such as a folder. Some users will simply need to browse the folder's contents. Others may need to both browse and publish items to the folder. A few may even need the rights to manage the folder's security. These users can be described as having one or more roles within this portion of the site. Each of those roles requires a set of rights for its members to perform their expected tasks. This is the basic model for applying item-level security in Reporting Services.
In Reporting Services, roles are defined at the site level and are assigned tasks, as described earlier. Reporting Services comes with five preconfigured item-level roles, as described in Table 17.5.
| Role | Description | Tasks |
| Browser | Run reports and navigate through the folder structure. | View reports
View resources View folders View models Manage individual subscriptions |
| Content Manager | Define a folder structure for storing reports and other items, set security at the item level, and view and manage the items stored by the server. | Consume reports
Create linked reports Manage all subscriptions Manage data sources Manage folders Manage models Manage individual subscriptions Manage report history Manage reports Manage resources Set security policies for items View data sources View reports View models View resources View folders |
| Report Builder | Build and edit reports in Report Builder. | Consume reports
View reports View resources View folders View models Manage individual subscriptions |
| Publisher | Publish content to a report server. | Create linked reports
Manage data sources Manage folders Manage reports Manage models Manage resources |
| My Reports | Build reports for personal use or store reports in a user-owned folder. | Create linked reports
Manage folders Manage data sources |
To modify the tasks assigned to these roles, open SQL Server Management Studio and connect to the Reporting Services instance. In the Object Explorer pane, expand the Security folder and its Roles subfolder. The Reporting Services item-level roles are listed, as shown in Figure 17.13.

Right-click a role and select Properties to open its User Role Properties dialog. Here you may change the role's description and tasks assigned to it. Clicking OK saves your changes.
To create a new role, right-click the Roles subfolder in the SQL Server Management Studio Object Explorer pane and select New Role. In the resulting New User Role dialog, provide the name, description, and task assignments for this role. Click OK to create the role.
To drop a role, right-click it and select Delete. You are asked to confirm this action before the role is dropped. You can drop both custom and predefined Reporting Services roles.
Because roles are simply named sets of tasks (which themselves are nothing more than named sets of permissions), item-level security is implemented by linking users with one or more roles for a given Reporting Services item.
In Report Manager, you implement this “linking” by first navigating to an item and engaging its Security page from the context menu for an item, such as a report. Note that you need to break the inheritance from the parent to manage item-level security. Clicking the New Role Assignment button takes you to the New Role Assignment page, as shown in Figure 17.14.

Here, you enter the account name for the user or group to which you want to assign this access and then select one or more of the roles as appropriate. Clicking OK submits the assignment to Reporting Services.
Creating item-user-role assignments for every item on the site would get old quickly. So, instead, Reporting Services uses inheritance for item-level security. When a user is assigned to one or more roles on a folder, this assignment is inherited by that folder's child items. If these child items include folders, the inheritance cascades down the folder hierarchy.
Inheritance makes administering security much easier, but you may need to break inheritance to assign permissions on an item appropriately. To do this, navigate to the item's Security page in Report Manager. When inheritance is in place, you see an Edit Item Security button. Clicking this button causes a warning about breaking inheritance to appear. After you click OK, the item has separate security from the parent, and you can edit security for the item, as shown in Figure 17.15.

After inheritance is broken, you will notice that the New Role Assignment button is available, allowing you to create user-role assignments for this item.
Also notice that the user-role assignments that would have been inherited from this folder's parent are preassigned to this item. Selecting the checkbox for any unnecessary assignments and clicking the Delete button on the gray bar removes these.
Finally, if you want to reset this item's security to use inheritance, again click the Revert to Parent Security button in the gray bar. The item reverts to inherited security, and any noninherited assignments are dropped.
Content Management Automation
Content management consists of many repetitive actions. Performing these manually can be time-consuming and can risk introducing errors. Scripts allow these frequently performed actions to be automated. If implemented correctly, scripts can produce significant time savings and minimize the risks associated with changes to your environment. To support automation through scripts, Reporting Services comes with the rs.exe command-line application, also known as the RS utility.
The RS Utility
The RS utility, rs.exe, allows scripts to be run against local and remote instances of Reporting Services. The application is typically located in the drive:Program Files (x86)Microsoft SQL Server110ToolsBinn folder. It is responsible for creating an environment within which a Reporting Services script can be executed.
As part of this responsibility, the RS utility handles communications with an instance of the Reporting Services web service. It also handles the declaration and instantiation of variables supplied through the command-line call. These features allow flexible scripts to be developed with relative ease.
The following is a simple call to the RS utility. Note the use of the -i parameter to identify the Reporting Services script. The script file is a simple text file with an RSS file extension. The contents of the text file is Visual Basic .NET code.
![]()
Also note the identification of the web service URL with the -s parameter. In this example, the script is pointed to the web service presented by the local, default instance of Reporting Services.
rs.exe -i "c:my scriptsmy script.rss" -s http://localhost/reportserver
The connection to the web service is established using the current user's identity. To specify an alternative identity, a username/password combination can be specified with the -u and -p parameters. In the next example, the connection is made through the fictional MyDomainSomeUser account, which has a password of pass@word:
rs.exe -i "c:my scriptsmy script.rss" -s http://localhost/reportserver
-u MyDomainSomeUser -p pass@word
In Native mode, the Reporting Services web service presents an endpoint with the name ReportService2010.
![]()
![]()
As mentioned at the start of this section, the RS utility declares and instantiates variables on behalf of the script. Variables are specified with the -v parameter followed by one or more variable/value combinations. Variable/value combinations are separated by an equals sign. Values containing spaces should be enclosed in double quotes. These quotation marks are not part of the variable's value. Here is a sample call to the utility with three variables that illustrates these concepts:
rs.exe -i "c:my scriptsmy script.rss" -s http://localhost/reportserver
-v VarA=1 VarB=apple VarC="keeps the doctor away"
Table 17.6 is a complete list of parameters that the rs.exe command-line utility supports.
| Parameter | Description |
| -i | Identifies the script file to execute. |
| -s | Identifies the URL of the Reporting Services web service. |
| -u | Supplies the username used to log in to the Reporting Services site. |
| -p | Supplies the password associated with the username used to log in to the Reporting Services site. |
| -e | Identifies which Reporting Services web service endpoint to employ:
Mgmt2010: Used in SQL Server 2012 to customize report processing and rendering. This endpoint can be used in either mode of Reporting Services. Mgmt2006: Used in previous versions of SQL Server to manage objects when Reporting Services is installed in Native mode. Mgmt2005: Used in previous versions of SQL Server to manage objects when Reporting Services is installed in Integrated mode. Exec2005: Used in previous versions of SQL Server to customize report processing and rendering. This endpoint can be used in either mode of Reporting Services. |
| -l | Specifies the number of seconds before the connection with Reporting Services times out. The default is 60 seconds. A value of 0 indicates an infinite connection time-out. |
| -b | Indicates that the script should be executed as a batch. |
| -v | Provides variables and values to pass to the script. |
| -t | Instructs the utility to include trace information in error messages. |
Reporting Services Scripts
Reporting Services scripts are implemented in VB.NET. Only a few namespaces are supported, making the scripts fairly limited but still powerful enough to handle most content-management tasks. Supported namespaces include System, System.Diagnostics, System.IO, System.Web.Services, and System.Xml.
Every script must contain a Sub Main code block. This serves as the script's entry point. The Sub Main block does not have to be the first or only code block in the script. This allows you to move code to additional subroutines and functions you declare in the script.
Within the script, the Reporting Services web service is engaged through the rs object. You do not need to declare this object. The RS utility handles the details of setting up a web reference to a particular endpoint presented by a specific instance of the Reporting Services web service. More details are provided in the preceding section.
The requirement for the script developer is to call the appropriate classes and methods exposed by this endpoint through the rs object. To understand the classes and methods available for each endpoint, refer to the documentation available through Books Online.
Variables specified at the command line are automatically declared and initialized for use within the script. Variables in the script are aligned with those at the command line using a case-insensitive name match. If a variable is not declared in the script or does not match a variable supplied from the command line, you receive an undeclared variable error. All variables passed from the command line are passed in as strings.
The following code sample is a simple demonstration of these concepts. The script consists of a single code block, Sub Main. The ReportService2010 endpoint is accessed through the rs object to recursively read the site's contents starting from a folder identified by the MyFolder variable. The MyFolder variable is passed in from the command line.
Sub Main

    ‘Write the starting folder to the screen
    Console.WriteLine("The starting folder is " + MyFolder)

    ‘Open the Output File
    Dim OutputFile As New IO.StreamWriter( _
                              "c:my scriptscontents.txt", False)

    ‘Obtain an array of Catalog Items
    Dim Contents As CatalogItem() = rs.ListChildren(MyFolder, True)

    ‘Loop through Array of CatalogItems
    For i As Int32 = 0 To Contents.GetUpperBound(0)

        ‘Write CatalogItem Type & Path to Output File w/ Pipe Delimiter
        OutputFile.Write(Contents(i).Type.ToString)
        OutputFile.Write("|")
        OutputFile.WriteLine(Contents(i).Path)
    Next

    ‘Close Output File
    OutputFile.Close()

End Sub
This script is saved to a file named List Contents.RSS located in the C:my scripts folder and is executed against the local Reporting Services instance through the following command-line call:
rs.exe -i "c:my scriptslist contents.rss" -s http://localhost/reportserver
-v MyFolder="/"
The “/” value represents the Home folder in the Reporting Services folder hierarchy.
This is a simple script. It is presented in this form simply to demonstrate the basics of Reporting Services script development. More information about building applications for Reporting Services using the web services can be found at the following URL or by searching for the text “Building Applications Using the Web Service and the .NET Framework”:
http://msdn.microsoft.com/en-us/library/ms154699(v=SQL.110).aspx
![]()
Summary
In this chapter, you explored various aspects of Report Manager. You saw how Report Manager works and how it is used to manage Reporting Services content. You learned that Report Manager is available only when Reporting Services is installed in Native mode. You looked at how security works in Report Manager, including item-level security. You also looked at some of the endpoints that are available when scripting and automating tasks.
This chapter covered the following topics:
- Managing reports using Report Manager
- Viewing reports, models, and other content in Report Manager
- Configuring the Report Manager environment
- Automating reporting services with the RS utility
- Configuring Report Manager, including caching, schedules, and subscriptions