
WHAT'S IN THIS CHAPTER?
Using T4 templates to generate text and code
Troubleshooting T4 templates
Creating Preprocessed T4 template to include templating in your projects
Frequently, when writing software applications you will come across large areas of boilerplate code in which the same pattern is repeated over and over. Working on these areas of code can be time-consuming and tedious, which leads to inattention and easily avoidable errors. Writing this code is a task best suited to automation.
Code generation is a common software engineering practice where some mechanism, rather than a human engineer, is used to write program components automatically. The tool used to generate the code is known as a code generator. A number of commercial and free code generators are available in the market from the very general in nature to those that are targeted toward a very specific task.
Visual Studio 2010 includes a code generator that can generate files from simple template definitions. This code generator is known as the Text Template Transformation Toolkit, or more commonly, T4.
T4 was originally introduced as part of the Domain Specific Languages Toolkit, which was an add-in for Visual Studio 2005. T4 was included out of the box in Visual Studio 2008 but it was poorly documented and there were very few hints in the IDE that it existed. Visual Studio 2010 makes T4 a first-class citizen so that Text Template is now one of the options in the File
This chapter explores the creation, configuration, and execution of T4 templates. You also see how to troubleshoot templates when they go wrong. Finally, you create a Preprocessed Text Template that allows you to create reusable T4 templates that you can easily call from your own code.
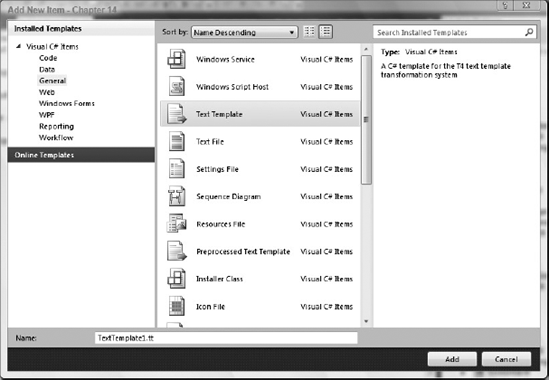
In previous versions of Visual Studio, creating a new T4 template was a hidden feature that involved creating a text file with the .tt extension. In Visual Studio 2010 you can create a T4 template simply by selecting Text Template from the General page of the Add New Item dialog shown in Figure 14-1.
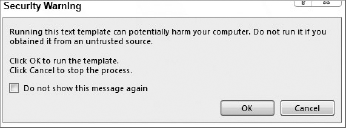
When a new T4 template is created or saved, Visual Studio displays the warning dialog shown in Figure 14-2. T4 templates execute normal .NET code and can theoretically be used to run any sort of .NET code. T4 templates are executed every time they are saved so you will likely see this warning a lot. There is an option to suppress these warnings but it is global to all templates in all solutions. If you do turn it off and decide you'd rather have the warnings, you can reactivate them by changing Show Security Message to True in Tools
Once the template has been created it appears in the Solution Explorer window as a file with the .tt extension. The template file can be expanded to reveal the file it generates. Each template generates a single file, which will have the same name as the template file itself and a different extension. Figure 14-3 shows a template file and the file it generates in Solution Explorer.
Note
If you are using VB you need to enable Show All Files for the project to see the generated file.
The generated file is initially empty because no output has been defined in the template file. The template file is not empty, however. When it is first generated it contains the following two lines:
<#@ template debug="false" hostspecific="false" language="C#" #>
<#@ output extension=".txt" #>
Each of these two lines is a T4 directive, which controls some aspect of the way in which the template is executed. T4 directives are discussed later in the chapter but there are a few things of interest here. The template directive contains an attribute specifying which language the template will use. Each template file can include code statements that are executed to generate the final file and this attribute tells Visual Studio which language those statements will be in.
Note
The template language has no impact on the file being generated. You can generate a C# file from a template that uses the VB language and vice versa. This defaults to the language of the current project but can be changed. Both C# and VB templates are supported in projects of either language.
The second thing of note is the extension attribute on the output directive. The name of the generated file is always the same as that of the template file except that the .tt extension is replaced by the contents of this attribute. If Visual Studio recognizes the extension of the generated file, it treats it the same as if you had created it from the Add New Item dialog. In particular, if the extension denotes a code file, such as .cs or .vb, Visual Studio adds the generated file to the build process of your project.
Note
When the output extension of a template is changed, the previously generated file is deleted the next time the template is run. As long as you are not editing the generated file this shouldn't be an issue.
At the bottom of the template file add a single line containing the words Hello World and save the template.
- C#
<#@ template debug="false" hostspecific="false" language="C#" #>
<#@ output extension=".txt" #>
Hello World
- VB
<#@ template debug="false" hostspecific="false" language="VB" #>
<#@ output extension=".txt" #>
Hello World
As was mentioned previously, templates are run every time they are saved, so the generated file will be updated with the new contents of the template. Open up the generated file and you will see the text Hello World in there.
Although each individual template file can always be regenerated by opening it and saving it again, Visual Studio also has a button at the top of the Solution Explorer tool window to Transform All Templates (see Figure 14-4). Clicking this button transforms all of the templates in the solution.
As was mentioned previously, if the output directive specifies an extension that matches the language of the current project, the resulting generated file is included in the project. You will get full IntelliSense from types and members declared within generated files. The next code snippet shows a T4 template along with the code that it generates. The generated class can be accessed by other parts of the program and a small console application demonstrating this follows.
- C#
<#@ template debug="false" hostspecific="false" language="C#" #> <#@ output extension=".cs" #> namespace AdventureWorks { class GreetingManager { public static void SayHi() { System.Console.WriteLine("Aloha Cousin!"); } } }namespace AdventureWorks { class GreetingManager { public static void SayHi() {
System.Console.WriteLine("Aloha Cousin!"); } } }namespace AdventureWorks { class Program { static void Main(string[] args) { GreetingManager.SayHi(); } } }

- VB
<#@ template debug="false" hostspecific="false" language="VB" #> <#@ output extension=".vb" #> Public Class GreetingManager Public Shared Sub SayHi System.Console.WriteLine( "Aloha Cousin!" ) End Sub End ClassPublic Class GreetingManager Public Shared Sub SayHi() System.Console.WriteLine("Aloha Cousin!") End Sub End Class Module Module1 Sub Main() GreetingManager.SayHi() End Sub End Module

Note
Although the rest of your application will get IntelliSense covering your generated code, the T4 template files themselves have no IntelliSense or syntax highlighting in Visual Studio 2010. A few third-party editors and plug-ins are available that provide a richer design-time experience for T4.
This example works, but it doesn't really demonstrate the power and flexibility that T4 can offer. This is because the template is completely static. To create useful templates, more dynamic capabilities are required.
Each T4 template consists of a number of blocks which affect the generated file. The line Hello World from the first example is a Text block. Text blocks are copied verbatim from the template file into the generated file. They can contain any kind of text and can contain other blocks.
In addition to Text blocks, three other types of blocks exist: Expression blocks, Statement blocks, and Class Feature blocks. Each of the other types of block is surrounded by a specific kind of markup to identify it. Text blocks are the only type of block that have no special markup.
An Expression block is used to pass some computed value to the generated file. Expression blocks normally appear inside of Text blocks and are denoted by <#= and #> tags. Here is an example of a template that outputs the date and time that the file was generated.
- C#
<#@ template debug="false" hostspecific="false" language="C#" #>
<#@ output extension=".txt" #>
This file was generated: <#=System.DateTime.Now #>

- VB
<#@ template debug="false" hostspecific="false" language="VB" #>
<#@ output extension=".txt" #>
This file was generated: <#=System.DateTime.Now #>

The expression inside the block may be any valid expression in the template language that is specified in the template directive. Every time it is run the template evaluates the expression and then calls ToString() on the result. This value is then inserted into the generated file.
A Statement block is used to execute arbitrary statements when the template is run. Code inside a Statement block might log the execution of the template, create temporary variables, or delete a file from your computer, so you need to be careful. In fact, the code inside a Statement block can consist of any valid statement in the template language. Statement blocks are commonly used to implement flow control within a template, manage temporary variables, and interact with other systems. A Statement block is denoted by <# and #> tags which are similar to Statement block delimiters but without the equals sign. The following example produces a file with all 99 verses of a popular drinking song.
- C#
<#@ template debug="false" hostspecific="false" language="C#" #>
<#@ output extension=".txt" #>
<#
for( int i = 99; i > = 1; i-- ){ #><#=i #> Bottles of Non-alcoholic Carbonated Beverage on the wall <#=i #> Bottles of Non-alcoholic Carbonated Beverage Take one down And pass it around<# if( i-1 == 0 ) { #>There's no Bottles of Non-alcoholic Carbonated Beverage on the wall<# } else { #>There's <#=i-1 #> Bottles of Non-alcoholic Carbonated Beverage on the wall<# } #><# } #>
- VB
<#@ template debug="false" hostspecific="false" language="VB" #> <#@ output extension=".txt" #>
<# For i As Integer = 99 To 1 Step −1 #><#= i #> Bottles of Non-alcoholic Carbonated Beverage on the wall <#= i #> Bottles of Non-alcoholic Carbonated Beverage Take one down And pass it around<# If i - 1 = 0 Then #>There's no Bottles of Non-Alcoholic Carbonated Beverage on the wall.<# Else #>There's <#= i-1 #> Bottles of Non-alcoholic Carbonated Beverage on the wall.<# End If #><# Next #>
Note
In the preceding example the Statement block contains another Text block, which in turn contains a number of Expression blocks. Using these three block types alone enables you to create some very powerful templates.
Although the Statement block in the example contains other blocks, it doesn't need to. From within a Statement block you can write directly to the generated file using the Write() and WriteLine() methods. Here is the example again using this method.
- C#
<#@ template debug="false" hostspecific="false" language="C#" #> <#@ output extension=".txt" #> <#
for( int i = 99; i > 1; i-- ) {WriteLine( "{0} Bottles of Non-alcoholic Carbonated Beverage on the wall", i);WriteLine( "{0} Bottles of Non-alcoholic Carbonated Beverage", i );WriteLine( "Take one down" );WriteLine( "And pass it around" );if( i - 1 == 0 ) {WriteLine("There's no Bottles of Non-alcoholic Carbonated Beverage on the wall." );} else {WriteLine("There's {0} Bottles of Non-alcoholic Carbonated Beverage on the wall.",i-1);}WriteLine( "" );} #>
- VB
<#@ template debug="false" hostspecific="false" language="VB" #> <#@ output extension=".txt" #> <# For i As Integer = 99 To 1 Step −1
Me.WriteLine("{0} Bottles of Non-alcoholic Carbonated Beverage on the wall", i)Me.WriteLine("{0} Bottles of Non-alcoholic Carbonated Beverage", i)Me.WriteLine("Take one down")Me.WriteLine("And pass it around")If i - 1 = 0 ThenWriteLine("There's no Bottles of Non-Alcoholic Carbonated Beverage on the" &_" wall.")ElseWriteLine("There's {0} Bottles of Non-alcoholic Carbonated Beverage on the" &_" wall.",i-1)End IfMe.WriteLine( "" )Next #>
The final generated results for these two templates are the same. Depending on the template, you might find one technique or the other easier to understand. It is recommended that you use one technique exclusively in each template to avoid confusion.
The final type of T4 block is the Class Feature block. These blocks contain arbitrary code that can be called from Statement and Expression blocks to help in the production of the generated file. This often includes custom formatting code or repetitive tasks. Class Feature blocks are denoted using <#+ and #> tags which are similar to those that denote Expression blocks except that the equals sign in the opening tag becomes a plus character. The following template writes the numbers from −5 to 5 using a typical financial format where every number has two decimal places, is preceded by a dollar symbol, and negatives are written as positive amounts but are placed in brackets.
- C#
<#@ template debug="false" hostspecific="false" language="C#" #> <#@ output extension=".txt" #> Financial Sample Data <# for( int i = −5; i <= 5; i++ ) { WriteFinancialNumber(i); WriteLine( "" ); } #> End of Sample Data<#+void WriteFinancialNumber(decimal amount){if( amount < 0 )Write("(${0:#0.00})", System.Math.Abs(amount) );elseWrite("${0:#0.00}", amount);}#>
- VB
<#@ template debug="true" hostspecific="false" language="VB" #> <#@ output extension=".txt" #> Financial Sample Data <# For i as Integer = −5 To 5 WriteFinancialNumber(i) WriteLine( "" ) Next #> End of Sample Data
<#+Sub WriteFinancialNumber(amount as Decimal)If amount < 0 ThenWrite("(${0:#0.00})", System.Math.Abs(amount) )ElseWrite("${0:#0.00}", amount)End IfEnd Sub#>
Class Feature blocks can contain Text blocks and Expression blocks but they cannot contain Statement blocks. In addition to this, no Statement blocks are allowed to appear once the first Class Feature block is encountered.
Now that you know the four different types of T4 blocks that can appear within a template file, it's time to see how Visual Studio 2010 is able to use them to generate the output file.
The process of generating a file from a T4 template comprises two basic steps. In the first step, the .tt file is used to generate a standard .NET class. This class inherits from the abstract (MustInherit) Microsoft.VisualStudio.TextTemplating.TextTransformation class and overrides a method called TransformText().
In the second step, an instance of this class is created and configured, and the TransformText method is called. This method returns a string that is used as the contents of the generated file.
Normally, you won't see the generated class file but you can configure the T4 engine to make a copy available by turning debugging on for the template. This simply involves setting the debug attribute of the template directive to true and saving the template file.
After a T4 template is executed in Debug mode a number of files are created in the temporary folder of the system. One of these files will have a random name and a .cs or a .vb extension (depending on the template language). This file contains the actual generator class.
Note
You can find the temporary folder of the system by opening a Visual Studio command prompt and entering the command echo %TEMP%.
This code contains a lot of pre-processor directives that support template debugging but make the code quite difficult to read. Here are the contents of the code file generated from the FinancialSample.tt template presented in the previous section reformatted and with these directives removed.
- C#
namespace Microsoft.VisualStudio.TextTemplatingBE7601CBE8A6858147D586FD8FC4C6F9
{
  using System;
  public class GeneratedTextTransformation :
         Microsoft.VisualStudio.TextTemplating.TextTransformation
  {
    public override string TransformText()
    {
      try
      {
        this.Write("
Financial Sample Data
");

        for( int i = −5; i <= 5; i++ )
        {
          WriteFinancialNumber(i);
          WriteLine( "" );
        }

        this.Write("End of Sample Data

 ");
} catch (System.Exception e) { System.CodeDom.Compiler.CompilerError error = new~CA System.CodeDom.Compiler.CompilerError(); error.ErrorText = e.ToString(); error.FileName = "C:\dev\Chapter 14\Chapter 14\Finance.tt"; this.Errors.Add(error); } return this.GenerationEnvironment.ToString(); } void WriteFinancialNumber(decimal amount) { if( amount < 0 ) Write("({0:#0.00})", System.Math.Abs(amount) ); else Write("{0:#0.00}", amount); } } }- VB
Imports System
Namespace Microsoft.VisualStudio.TextTemplating2739DD4202E83EF5273E1D1376F8FC4E
  Public Class GeneratedTextTransformation
    Inherits Microsoft.VisualStudio.TextTemplating.TextTransformation
    Public Overrides Function TransformText() As String
      Try
        Me.Write(""&Global.Microsoft.VisualBasic.ChrW(13) _
          & Global.Microsoft.VisualBasic.ChrW(10) _
          & "Financial Sample Data" _
          & Global.Microsoft.VisualBasic.ChrW(13) _
          & Global.Microsoft.VisualBasic.ChrW(10)) _

        For i as Integer = −5 To 5
          WriteFinancialNumber(i)
          WriteLine( "" )
        Next

        Me.Write("End of Sample Data" _
          & Global.Microsoft.VisualBasic.ChrW(13) _
          & Global.Microsoft.VisualBasic.ChrW(10) _
          & Global.Microsoft.VisualBasic.ChrW(13) _
          & Global.Microsoft.VisualBasic.ChrW(10)&" ")
      Catch e As System.Exception
        Dim [error] As System.CodeDom.Compiler.CompilerError = _
           New System.CodeDom.Compiler.CompilerError()
        [error].ErrorText = e.ToString
        [error].FileName = "C:\dev\Chapter 14\Chapter 14\Finance.tt"
        Me.Errors.Add([error])
      End Try
      Return Me.GenerationEnvironment.ToString
End Function Sub WriteFinancialNumber(amount as Decimal) If amount < 0 Then Write("(${0:#0.00})", System.Math.Abs(amount) ) Else Write("${0:#0.00}", amount) End If End Sub End Class End Namespace
Note a few things of interest in this code. First, the template is executed by running the TransformText() method. The contents of this method run within the context of a try-catch block where all errors are captured and stored. Visual Studio 2010 knows how to retrieve these errors and displays them in the normal errors tool window.
The next interesting thing is the use of Write(). You can see that each Text block has been translated into a single string, which is passed to the Write() method. Under the covers this is added to the GenerationEnvironment property, which is then converted into a string and returned to the T4 engine.
The Statement blocks and the Class Feature blocks are copied verbatim into the generated class. The difference is in where they end up. Statement blocks appear inside the TransformText() method but Class Feature blocks appear after it and exist at the same scope. This should give you some idea as to the kinds of things you could declare within a Class Feature block.
Finally, Expression blocks are evaluated and the result is passed into Microsoft.VisualStudio.TextTemplating.ToStringHelper.ToStringWithCulture(). This method returns a string, which is then passed back into Write() as if it were a Text block. Note that the ToStringHelper takes a specific culture into account when producing a string from an expression. This culture can be specified as an attribute of the template directive.
When the TransformText() method finishes execution it passes a string back to the host environment, which in this case is Visual Studio 2010. It is up to the host to decide what to do with it. Visual Studio uses the output directive for this task. Directives are the subject of the next section.
Note
Before moving on, the previous paragraph implied that T4 does not need to run inside Visual Studio. There is a command-line tool called TextTransform.exe, which you can find in the %CommonProgramFiles%microsoft sharedTextTemplating10.0 folder (C:Program Files(x86)Common Filesmicrosoft sharedTextTemplating10.0 on 64-bit machines). Although you can use this to generate files during a build process, T4 itself relies on the presence of certain libraries that are installed with Visual Studio to run. This means that if you have a separate build machine you will need to install Visual Studio on it. Within Visual Studio, files with the .tt extension are processed with a custom tool referred to as TextTemplatingFileGenerator.
A T4 template can communicate with its execution environment by using directives. Each directive needs to be on its own line and is denoted with <#@ and #> tags. This section discusses the five standard directives.
The template directive controls a number of diverse options about the template itself. It contains the following attributes:
language: Defines the .NET language used throughout the template inside of Expression, Statement, and Class Feature blocks. Valid values areC#andVB.inherits: Determines the base class of the generated class used to produce the output file. This can be overridden to provide additional functionality from within template files. Any new base class must derive fromMicrosoft.VisualStudio.TextTemplating.TextTransformation, which is the default value for the attribute.
Note
If you want to inherit from a different base class, you will need to use an assembly directive (see the "Assembly Directive" section later in this chapter) to make it available to the T4 template.
culture: Selects a localization culture for the template to be executed within. Values should be expressed using the standard xx-XX notation (en-US, ja-JP, and so on). The default value is a blank string that specifies the Invariant Culture.debug: Turns on Debug mode. This causes the code file containing the generator class to be dumped into the temporary folder of the system. Can be set totrueorfalse. Defaults tofalse.hostspecific: Indicates that the template file is designed to work within a specific host. If set totrue, aHostproperty is exposed from within the template. When running in Visual Studio 2010 this property is of typeMicrosoft.VisualStudio.TextTemplating.VSHost.TextTemplatingService. Defaults tofalse. It is beyond the scope of this book but you can write your own host for T4 and use it to execute template files.
The output directive is used to control the file that is generated by the template. It contains two properties.
extension:The extension that will be added to the generator name to create the filename of the output file. The contents of this property basically replace.ttin the template filename. By default, this is.csbut it may contain any sequence of characters that the underlying file system will allow.encoding: Controls the encoding of the generated file. This can be the result of any of the encodings returned by
System.Text.Encoding.GetEncodings(); that is, UTF-8, ASCII, and Unicode. The default, value is Default, which makes the encoding equal to the current ANSI code page of the system the template is being run on.
The assembly directive is used to give code within the template file access to classes and types defined in other assemblies. It is similar to adding a reference to a normal .NET project. It has a single attribute called name, which should contain one of the following items:
The filename of the assembly: The assembly will be loaded from the same directory as the T4 template.
The absolute path of the assembly: The assembly will be loaded from the exact path provided.
The relative path of the assembly: The assembly will be loaded from the relative location with respect to the directory in which the T4 template is located.
The strong name of the assembly: The assembly will be loaded from the Global Assembly Cache (CAG).
The import directive is used to provide easy access to items without specifying their full namespace qualified type name. It works in the same way as the Import statement in VB or the using statement from C#. It has a single attribute called namespace. By default, the System namespace is already imported for you. The following example shows a small Statement block both with and without an import directive.
- C#
<#
  var myList = new System.Collections.Generic.List<string>();
  var myDictionary = new System.Collections.Generic.Dictionary<string,
 System.Collections.Generic.List <string>>();
#>

- VB
<#
Dim myList As New System.Collections.Generic.List(Of String)
Dim myDictionary As New System.Collections.Generic.Dictionary(Of System.String,
System.Collections.Generic.List(Of String))
#>

- C#
<#@ import namespace="System.Collections.Generic" #>
<#
  var myList = new List<string>();
  var myDictionary = new Dictionary<string, List<string>>();
#>

- VB
<#@ import namespace="System.Collections.Generic" #>

<#
Dim myList As New List(Of String)
Dim myDictionary As New Dictionary(Of String, List(Of String))
#>

Note
The code that benefits from the import and assembly directives is the code that is executed when the T4 template is run, not the code that is contained within the final output file. If you want to access resources in other namespaces in the generated output file, you must include using or Import statements of your own into the generated file and add references to your project as normal.
The include directive allows you to copy the contents of another file directly into your template file. It has a single attribute called file, which should contain a relative or absolute path to the file to be included. If the other file contains T4 directives or blocks, they are executed as well. The following example inserts the BSD License into a comment at the top of a generated file.
' Copyright (c) <#=DateTime.Now.Year#>, <#=CopyrightHolder#>
' All rights reserved.

' Redistribution and use in source and binary forms, with or without
...
- C#
<#@ template debug="false" hostspecific="false" language="C#" #>
<#@ output extension=".generated.cs" #>

<# var CopyrightHolder = "AdventureWorks Inc."; #>
/*
<#@ include file="License.txt" #>
*/
namespace AdventureWorks {
  // ...
}
- VB
<#@ template debug="false" hostspecific="false" language="VB" #>
<#@ output extension=".vb" #>

<# Dim CopyrightHolder = "AdventureWorks Inc." #>

<#@ include file="License.txt" #>

Namespace AdventureWorks
  ' ...
End Namespace

As template files get bigger and more complicated, the potential for errors grows significantly. This is not helped by the fact that errors might occur at several main stages, and each needs to be treated slightly differently. Remember that even though T4 runs these processes one at a time, any might occur when a template file is executed, which occurs every time the file is saved.
When making any changes to T4 template files it is highly recommended that you take small steps to regenerate often and immediately reverse out any change that breaks things.
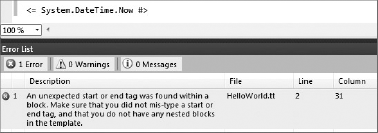
The first place where errors might occur is when Visual Studio attempts to read a T4 template and use it to create the temporary .NET class. In Figure 14-5 there is a missing hash symbol in the opening tag for the Expression block. The resulting template is invalid. The Error List window at the bottom of Figure 14-5 shows Visual Studio identifying this sort of issue quite easily. It is even able to correctly determine the line number where the error occurs.
The other type of error that is commonly encountered at design time relates to directive issues. In many cases when a problem arises with an attribute of a directive a warning is raised and the default value is used. When there are no sensible defaults, such as with the import, include, and assembly directives, an error is raised instead.
Note
One interesting exception to the way that Visual Studio handles invalid directives is the extension attribute of the output directive. If the value supplied is invalid in any way, a warning is raised but the generated file is not produced at all. If you have other code that depends on the contents of the generated file, the background compilation process will quickly find a cascade of errors, which can be overwhelming. Check to see if the file is being generated at all before attempting to fix the template by temporarily removing all the contents of the template file except for the template and output directives.
The next step in the T4 pipeline where an error might occur is when the temporary .NET code file containing the code generator class is compiled into an assembly. Errors that occur here typically result from malformed code inside Expression, Statement, or Class Feature blocks. Again, Visual Studio does a good a job of finding and exposing these errors but the file and line number references point to the generated file. Each error that is found by the engine at this point is prefixed with the string Compiling Transformation which make them easy to identify.
The first step to fixing these errors is to turn Debug mode on in the template directive. This forces the engine to dump copies of the files that it is using to try and compile the code into the temporary folder. When these files are dumped out, double-clicking the error line in the Error List window opens the temporary file and you can see what is happening. Because this file will be a .cs or .vb file Visual Studio is able to provide syntax highlighting and IntelliSense to help isolate the problem area. Once the general issue has been discovered it is then much easier to find and update the relevant area of the template.
Note
One of the other files generated by turning debugging on is a .cmdline file, which contains arguments that are passed to csc.exe or vbc.exe when T4 compiles the template. You can use this file to re-create the compilation process. There is also a file with the .out extension, which contains the command line call to the compiler and its results.
The final step in the T4 pipeline that might generate errors is when the code generator is actually instantiated and executed to produce the contents of the generated file. This stage is essentially running arbitrary .NET code and is the most likely to encounter trouble with environmental conditions or faulty logic. Like Compiling Transformation errors, errors found during this stage have a prefix of Executing Transformation, which makes them easy to spot.
The best way of handling Executing Transformation errors is to code defensively. From within the T4 template, if you can detect an error condition such as a file missing or being unable to connect to a database, you can use the Error() method to notify the engine of the specific problem. These errors will appear as Executing Transformation errors just like all of the others, only they'll have a more contextual, and hence, more useful message associated with them:
if( !File.Exists(fileName) ) {
  this.Error("Cannot find file");
}
In addition to Error() there is an equivalent Warning() method to raise warnings.
If the T4 template encounters an error that is catastrophic, such as not being able to connect to the database that it gets its data from, it is able to throw an exception to halt the execution process. The details about the exception are gathered and included in the Error List tool window.
Although not technically a part of the T4 process, the generated file can just as easily contain compile-time or run time errors. In the case of compile-time errors, Visual Studio is simply able to detect these as normal. For run time errors it is probably a good idea to unit test complex types anyway, even those that have been generated.
Now that you know what to do when things go wrong, it is time to look at a larger example.
When you develop enterprise applications, you will frequently come across reference data that rarely changes and is represented in code as an enumeration type. The task of keeping the data in the database and the values of the enumerated type in sync is time-consuming and repetitive, which makes it a perfect candidate to automate with a T4 template. The template presented in this section connects to the AdventureWorks example database and creates an enumeration based on the contents of the Sales.ContactType table.
- C#
<<#@ template debug="false" hostspecific="false" language="C#" #>
<#@ output extension=".generated.cs" #>

<#@ assembly name="System.Data" #>
<#@ import namespace="System.Data.SqlClient" #>
<#@ import namespace="System.Text.RegularExpressions" #>

<#
var connectionString = "Data Source=.\SQLEXPRESS; Initial Catalog=AdventureWorks;"
   + "Integrated Security=true;";
var sqlString = "SELECT ContactTypeID, [Name] FROM [Person].[ContactType]";
#>

// This code is generated. Please do not edit it directly
// If you need to make changes please edit ContactType.tt instead
namespace AdventureWorks {
public enum ContactType { <# using(var conn = new SqlConnection(connectionString)) using(var cmd = new SqlCommand(sqlString, conn)) { conn.Open(); var contactTypes = cmd.ExecuteReader(); while( contactTypes.Read() ) { #> <#= ValidIdentifier( contactTypes[1].ToString() ) #> = <#=contactTypes[0]#>, <#} conn.Close(); } #> } } <#+ public string ValidIdentifier(string input) { return Regex.Replace(input, @"[^a-zA-Z0-9]", String.Empty ); } #>
- VB
<#@ template debug="false" hostspecific="false" language="VB" #>
<#@ output extension=".generated.vb" #>

<#@ assembly name="System.Data" #>
<#@ import namespace="System.Data.SqlClient" #>
<#@ import namespace="System.Text.RegularExpressions" #>

<#
Dim ConnectionString as String = "Data Source=.SQLEXPRESS; " _
& "Initial Catalog=AdventureWorks; Integrated Security=true;"
Dim SqlString as String = "SELECT ContactTypeID,[Name] FROM [Person].[ContactType]"
#>

' This code is generated. Please do not edit it directly
' If you need to make changes please edit ContactType.tt instead
Namespace AdventureWorks
  Enum ContactType

<#
Using Conn As New SqlConnection(ConnectionString), _
Cmd As New SqlCommand(SqlString, Conn)

   Conn.Open()

   Dim ContactTypes As SqlDataReader = Cmd.ExecuteReader()

   While ContactTypes.Read()
#>
    <#= ValidIdentifier( contactTypes(1).ToString() ) #> = <#=contactTypes(0)#>
<#
  End While
  Conn.Close()
End Using
#>
  End Enum
End Namespace

<#+
  Public Function ValidIdentifier(Input as String) As String
    Return Regex.Replace(Input, "[^a-zA-Z0-9]", String.Empty )
  End Function
#>
The first section is made up of T4 directives. The first two specify the language for the template and the extension of the output file. The third attaches an assembly to the generator (to provide access to the System.Data.SqlClient namespace), and the final two import namespaces into the template that the template code requires.
The next section is a T4 Statement block. It contains some variables that the template will be using. Putting them at the top of the template file makes them easier to find later on in case they need to change.
After the variable declarations there is a T4 Text block containing some explanatory comments along with a namespace and an enumeration declaration. These are copied verbatim into the generated output file. It's usually a good idea to provide a comment inside the generated file explaining where they come from and how to edit them. This prevents nasty accidents when changes are erased after a file is regenerated.
The bulk of the rest of the template is taken up by a Statement block. This block creates and opens a connection to the AdventureWorks database using the variables defined in the first Statement block. It then queries the database to retrieve the desired data with a data reader.
For each record retrieved from the database a Text block is produced. This Text block consists of two Expression blocks separated by an equals sign. The second expression merely adds the ID of the Contact Type to the generated output file. The first one calls a helper method called ValidIdentifier, which is defined in a Class Feature block that creates a valid identifier for each contact type by removing all invalid characters from the Contact Type Name.
The generated output file is shown in the following listing. The end result looks fairly simple in comparison to the script that is used to generate it, but this is a little deceiving. The T4 template can remain the same as rows of data are added to and removed from the ContactType table. In fact, the items in the database can be completely re-ordered and your code will still compile. With a little modification this script can even be used to generate enumerated types from a number of different tables at once.
- C#
// This code is generated. Please do not edit it directly
// If you need to make changes please edit ContactType.tt instead
namespace AdventureWorks {
  public enum ContactType {
      AccountingManager = 1,
      AssistantSalesAgent = 2,
      AssistantSalesRepresentative = 3,
      CoordinatorForeignMarkets = 4,
      ExportAdministrator = 5,
      InternationalMarketingManager = 6,
      MarketingAssistant = 7,
      MarketingManager = 8,
      MarketingRepresentative = 9,
      OrderAdministrator = 10,
      Owner = 11,
      OwnerMarketingAssistant = 12,
      ProductManager = 13,
      PurchasingAgent = 14,
      PurchasingManager = 15,
      RegionalAccountRepresentative = 16,
      SalesAgent = 17,
      SalesAssociate = 18,
      SalesManager = 19,
      SalesRepresentative = 20,
    }
}
- VB
' This code is generated. Please do not edit it directly
' If you need to make changes please edit ContactType.tt instead
Namespace AdventureWorks
  Enum ContactType

    AccountingManager = 1
    AssistantSalesAgent = 2
    AssistantSalesRepresentative = 3
    CoordinatorForeignMarkets = 4
    ExportAdministrator = 5
    InternationalMarketingManager = 6
    MarketingAssistant = 7
    MarketingManager = 8
    MarketingRepresentative = 9
    OrderAdministrator = 10
    Owner = 11
    OwnerMarketingAssistant = 12
ProductManager = 13 PurchasingAgent = 14 PurchasingManager = 15 RegionalAccountRepresentative = 16 SalesAgent = 17 SalesAssociate = 18 SalesManager = 19 SalesRepresentative = 20 End Enum End Namespace
Text Template Transformation is a powerful technique and it shouldn't be restricted to a design-time activity. Visual Studio 2010 makes it easy to take advantage of the T4 engine to create your own text template generators to use in your own projects. These generators are called Preprocessed Text Templates.
To create a new Preprocessed Text Template, open the Add New Item dialog, select the General page, and select Preprocessed Text Template from the list of items. The newly created file has the same .tt extension as normal T4 template files and contains a single T4 directive:
- C#
<#@ template language="C#" #>
- VB
<#@ template language="VB" #>
Note that there is no output directive. The generated file will have the same filename as the template file but the .tt will be replaced with .vb or .cs depending on your project language. When this file is saved, it generates an output file like the following.
- C#
// ----------------------------------------------------------------------------
// <auto-generated>
//     This code was generated by a tool.
//     Runtime Version: 10.0.0.0
//
//     Changes to this file may cause incorrect behavior and will be lost if
//     the code is regenerated.
// </auto-generated>
// ----------------------------------------------------------------------------
namespace Chapter_14
{
using System; public partial class NewTemplate { // region Fields // region Properties // region Transform-time helpers public virtual string TransformText() { return this.GenerationEnvironment.ToString(); } } }
- VB
Imports System
'------------------------------------------------------------------------------
'<auto-generated>
'    This code was generated by a tool.
'    Runtime Version: 10.0.0.0
'
'    Changes to this file may cause incorrect behavior and will be lost if
'    the code is regenerated.
'</auto-generated>
'------------------------------------------------------------------------------
Namespace My.Templates
  Partial Public Class NewTemplate
    ' Region "Fields"
    ' Region "Properties"
    ' Region "Transform-time helpers"
    Public Overridable Function TransformText() As String
      Return Me.GenerationEnvironment.ToString
    End Function
  End Class
End Namespace
This is very much like the interim code file that is produced by T4 for a normal template. This generated class is now just a class inside the project, which means you can instantiate it, fill in its properties, and call TransformText() on it.
Note
Just as with a normal Text Template, Visual Studio uses a Custom Tool to generate the output file of a Preprocessed Text Template. Instead of using the TextTemplatingFileGenerator custom tool, Preprocessed Text Templates are transformed using the TextTemplatingFilePreprocessor custom tool, which adds the code generator class to your project instead of the results of executing the code generator.
To demonstrate how to use a Preprocessed Text Template within your own code, this section presents a simple scenario. The project needs to be able to send a standard welcome letter to new club members when they join the AdventureWorks Cycle club. The following Preprocessed Text Template contains the basic letter that is to be produced.
- C#
<#@ template language="C#" #>
Dear <#=Member.Salutation#> <#=Member.Surname#>,

  Welcome to our Bike Club!

Regards,
The AdventureWorks Team
<#= Member.DateJoined.ToShortDateString() #>
<#+ public ClubMember Member { get; set; } #>
- VB
<#@ template language="VB" #>
Dear <#=Member.Salutation#> <#=Member.Surname#>,

  Welcome to our Bike Club!

Regards,
The AdventureWorks Team
<#= Member.DateJoined.ToShortDateString() #>
<#+ Public Member as ClubMember #>

This file generates a class called WelcomeLetter and relies on the following simple data class, which is passed into the template via its Member property.
- C#
public class ClubMember
{
  public string Salutation { get; set; }
  public string Surname { get; set; }
  public DateTime DateJoined { get; set; }
}
- VB
Public Class ClubMember
    Public Surname As String
Public Salutation As String Public DateJoined As Date End Class
Finally, to create the letter you instantiate a WelcomeLetter object, set the Member property to a ClubMember object, and call TransformText().
- C#
// ...
var member = new ClubMember
{
  Surname = "Fry",
  Salutation = "Mr",
  DateJoined = DateTime.Today
};

var letterGenerator = new WelcomeLetter();

letterGenerator.Member = member;

var letter = letterGenerator.TransformText();
// ...
- VB
' ...
Dim NewMember As New ClubMember
With NewMember
  .Surname = "Fry"
  .Salutation = "Mr"
  .DateJoined = Date.Today
End With

Dim LetterGenerator As New WelcomeLetter

LetterGenerator.Member = NewMember

Dim Letter = LetterGenerator.TransformText()
' ...

This can look a little awkward but WelcomeLetter is a partial class so you can change the API to be whatever you want. Often you will find yourself making the constructor of the generator private and create a few static methods to handle the creation and use of generator instances.
- C#
public partial class WelcomeLetter
{
  private WelcomeLetter() { }
public static string Create(ClubMember member) { return new WelcomeLetter { Member = member }.TransformText(); } }
- VB
Namespace My.Templates
  Partial Public Class WelcomeLetter
    Private Sub New()
    End Sub

    Public Shared Function Create(ByVal Member As ClubMember) As String
      Dim LetterGenerator As New WelcomeLetter()
      LetterGenerator.Member = Member
      Return LetterGenerator.TransformText()
    End Function

  End Class
End Namespace
Note
The generator contains a StringBuilder, which it uses internally to build up the input when TransformText is executed. This StringBuilder is not cleared out when you run the TransformText method, which means that each time you run it the results are appended to the results of the previous execution. This is why the Create method presented creates a new WelcomeLetter object each time instead of keeping one in a static (Shared) variable and re-using it.
Aside from which aspect of the generation process is included in your project, a few other key differences exist between a Preprocessed Text Template and a standard T4 template. First, Preprocessed Text Templates are completely standalone classes. They do not inherit from a base class by default and therefore do not rely on Visual Studio to execute. The TransformText() method of the generator class does not run within a try/catch block so you will need to watch for and handle errors yourself when executing the generator.
Not all T4 directives will make sense in a Preprocessed Text Template, and for those that do some attributes will no longer make much sense. Here is a quick summary.
The template directive is still used but not all of the attributes make sense. The culture and language attributes are fully supported. The language attribute must match that of the containing language or the generator class cannot be compiled. The debug attribute is ignored because you can control the debug status of the generator class by setting the project configuration as you would with any other class.
The inherits attribute is supported and has a significant impact on the generated class. If you do not specify a base class, the generated file will be completely standalone and will contain implementations of all of the helper functions such as Write and Error. If you do specify a base class, it is up to the base class to specify these implementations and the generated class will rely on those implementations to perform the generation work.
The hostspecific attribute is supported and generates a Host property on the generator class. This property is of the Microsoft.VisualStudio.TextTemplating.ITextTemplatingEngineHost type, which resides in the Microsoft.VisualStudio.TextTemplating assembly. It is up to you to add a reference to this assembly to your project and to provide a member of the appropriate type before calling the TransformText method.
The import directive works as normal. The referenced namespaces are included in the generator code file with using statements in C# and Import statements in VB. The include directive is also fully supported.
The output and assembly directives are ignored. To add an assembly to the template you simply add a reference to the project as normal. The output filename is selected based on the template filename and the selected language.
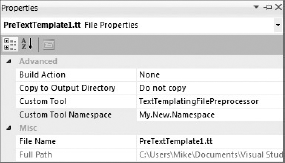
Finally, you can set the namespace of the generator class in the Properties window of the template file shown in Figure 14-6. The namespace is normally based on the project defaults and the location of the template file within the folder structure of the project.
Following are a few things that might help you to take full advantage of T4:
Write the code you intend to generate first for one specific case as a normal C# or VB code file. Once you are satisfied that everything is working as intended, copy the entire code file into a
.ttfile. Now start slowly making the code less specific and more generic by introducing Statement blocks and Expression blocks, factoring out Class Feature blocks as you go.Save frequently as you make changes. As soon as a change breaks the generated code or the generator, simply reverse it and try again.
Never make changes directly to a generated file. The next time the template is saved those changes will be lost.
Make generated classes partial. This makes the generated classes extensible, allowing you to keep some parts of the class intact and regenerate the other parts. In fact this is one of the reasons that the partial class functionality exists.
Use an extension that includes the word generated such as
.generated.csand.generated.vb. This is a convention used by Visual Studio itself and will discourage other users from making changes to template files.Similarly, include a comment toward the top of the generated file stating that the file is generated along with instructions for how to change the contents and regenerate the file.
Make T4 template execution a part of your build process. This ensures that the content of the generated files doesn't get stale with respect to the metadata used to generate it.
If you don't have a lot of things dependent upon the generated code produced by a normal T4 Text Template, switch the custom tool over to make the template a Preprocessed Template while you develop it. This brings the code generator into your project and allows you to write unit tests against it.
Don't use T4 to generate
.ttfiles. If you are trying to use a code generator to generate template files, the level of complexity when things go wrong increases substantially. At this point it might be wise to consider a different strategy for your project.Finally, an absolutely invaluable resource for anyone getting started with T4 is
http://www.olegsych.com. Oleg is a Visual C# MVP who maintains a blog with a very large collection of articles about T4.
Code generation can be a fantastic productivity gain for your projects and Visual Studio 2010 includes some powerful tools for managing the process out of the box. In this chapter you have seen how to create and use T4 templates to speed up common and generic coding tasks. Learning when and how to apply T4 to your projects increases your productivity and makes your solutions far more flexible.