
Application design has gone through many extremes, ranging from standalone applications that don't share data, to public web applications in which everyone connects to the same data store. More recently, we have seen a flurry of peer-to-peer applications in which information is shared between nodes but no central data store exists. In the enterprise space, key buzzwords such as Software as a Service (SaaS) and Software and Services (S+S) highlight the transition from centralized data stores, through an era of outsourced data and application services, toward a hybrid model where data and services are combined within a rich application.
One of the reasons organizations have leaned toward web applications in the past has been the need to rationalize their data into a single central repository. Although rich client applications can work well across a low-latency network using the same data repository, they quickly become unusable if every action requires data to be communicated between the client and server over a slow public network. To reduce this latency, an alternative strategy is to synchronize a portion of the data repository to the client machine and to make local data requests. This will not only improve performance, because all the data requests happen locally, but it will also reduce the load on the server. In this chapter, you discover how building applications that are only occasionally connected can help you deliver rich and responsive applications using the Microsoft Synchronization Services for ADO.NET.
An occasionally connected application is one that can continue to operate regardless of connectivity status. You have a number of different ways to access data when the application is offline. Passive systems simply cache data that is accessed from the server, so that when the connection is lost at least a subset of the information is available. Unfortunately, this strategy means that a very limited set of data is available and is really only suitable for scenarios where there is an unstable or unreliable connection, rather than completely disconnected applications. In the latter case, an active system that synchronizes data to the local system is required. The Microsoft Synchronization Services for ADO.NET (Sync Services) is a synchronization framework that dramatically simplifies the problem of synchronizing data from any server to the local system.
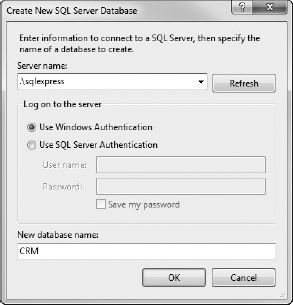
To get familiar with the Sync Services, you will use a simple database that consists of a single table that tracks customers. You can create this using the Server Explorer within Visual Studio 2010. Right-click the Data Connections node and select Create New SQL Server Database from the shortcut menu. Figure 34-1 shows the Create New SQL Server Database dialog in which you can specify a server and a name for the new database.
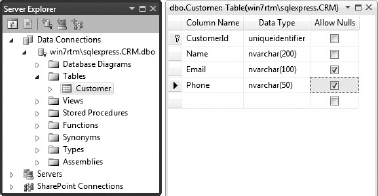
When you click OK, a database with the name CRM is added to the SQL Server Express instance and a data connection is added to the Data Connections node in the Server Explorer. From the Tables node, under the newly created data connection, select Add New Table from the right-click shortcut menu and create columns for CustomerId (primary key), Name, Email, and Phone so that the table matches what is shown in Figure 34-2.
Now that you have a simple database to work with, it's time to create a new Windows Forms Application. In this case the application is titled QuickCRM, and in the Solution Explorer tool window of Figure 34-3 you can see that we have renamed Form1 to MainForm and added two additional forms, ServerForm and LocalForm.

MainForm has two buttons, as shown in the editor area of Figure 34-3, and has the following code to launch the appropriate forms:
- VB
Public Class MainForm
    Private Sub ServerButton_Click(ByVal sender As System.Object,
                                   ByVal e As System.EventArgs) _
                          Handles ServerButton.Click
        My.Forms.ServerForm.Show()
    End Sub

    Private Sub LocalButton_Click(ByVal sender As System.Object,
                                  ByVal e As System.EventArgs) _
                           Handles LocalButton.Click
        My.Forms.LocalForm.Show()
    End Sub
End Class
- C#
public partial class MainForm : Form {
    public MainForm(){
        InitializeComponent();
    }

    private void ServerButton_Click(object sender, EventArgs e){
        (new ServerForm()).ShowDialog();
    }
    private void LocalButton_Click(object sender, EventArgs e){
        (new LocalForm()).ShowDialog();
    }
}
Before looking at how you can use Sync Services to work with local data, take a look at how you might have built an always-connected, or server-bound, version. From the Data menu, select Add New Data Source and step through the Data Source Configuration Wizard, selecting the DataSet option, followed by the CRM database created earlier, saving the connection string to the application configuration file, and adding the Customer table to the CRMDataSet.
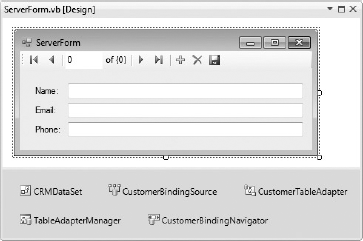
Open the ServerForm designer by double-clicking it in the Solution Explorer tool window. If the Data Sources tool window is not already visible, select Show Data Sources from the Data menu. Using the drop-down on the Customer node, select Details and then select None from the CustomerId node. Dragging the Customer node across onto the design surface of the ServerForm adds the appropriate controls so that you can locate, edit, and save records to the Customer table of the CRM database, as shown in Figure 34-4.
You will recall from the table definition that the CustomerId can't be null, so you need to ensure that any new records are created with a new ID. To do this you tap into the CurrentChanged event on the CustomerBindingSource object. You can access this either directly in the code-behind of the ServerForm or by selecting CustomerBindingSource and finding the CurrentChanged event in the Properties tool window.
- VB
Private Sub CustomerBindingSource_CurrentChanged _
                     (ByVal sender As System.Object, ByVal e As System.EventArgs) _
                                      Handles CustomerBindingSource.CurrentChanged
    If Me.CustomerBindingSource.Current Is Nothing Then
        Return
    End If

    Dim c As CRMDataSet.CustomerRow = CType(CType(Me.CustomerBindingSource.Current,
                                         DataRowView).Row,CRMDataSet.CustomerRow)
    If c.RowState = DataRowState.Detached Then
        c.CustomerId = Guid.NewGuid
    End If
End Sub
- C#
private void customerBindingSource_CurrentChanged(object sender, EventArgs e){
    if (this.customerBindingSource.Current == null){
        return;
    }

    var c = (this.customerBindingSource.Current as DataRowView)
                   .Row as CRMDataSet.CustomerRow;
if (c.RowState == DataRowState.Detached){ c.CustomerId = Guid.NewGuid(); } }
This completes the part of the application that connects directly to the database to access the data. You can run the application and verify that you can access data while the database is online. If the database goes offline or the connection is lost, an exception is raised by the application when you attempt to retrieve from the database or save new changes.
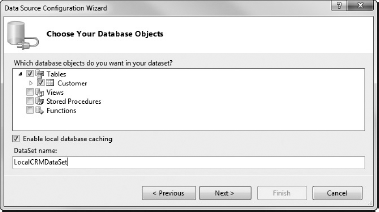
To get started with Sync Services you need to add a Local Database Cache item to your project. In the past you would have done this via the Add New Item dialog. However, in Visual Studio 2010 you can do this using the same process as you would for adding a data source that connects to a SQL Server database. Run the Data Source Configuration Wizard by selecting Add New Data Source from either the Data Sources tool window or the Data menu. Step through the wizard specifying the connection string and selecting the Customer table. On what would normally be the final screen, where you specify the name of the dataset to be created, check the Enable Local Database Caching box, as shown in Figure 34-5.
Now when you select Next you are presented with a new step in the wizard that allows you to configure the way that data is synchronized between the server and your local database cache. In Figure 34-6 you can see that for each table you can toggle the synchronization mode between Incremental and Snapshot. The former is better for tables that contain a large quantity of data that changes frequently; the latter is for tables that contain small reference sets that change infrequently and don't require change tracking.
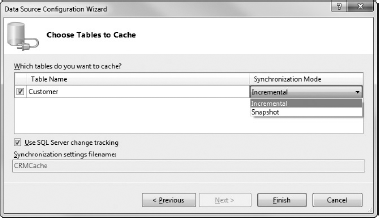
The other option presented in Figure 34-6 is whether to enable SQL Server change tracking. Sync Services relies on being able to track changes to the data in order to synchronize those changes between the server and the client. Out of the box it supports two mechanisms for doing this. You can either enable change tracking, in which case changes on the server are automatically tracked by the SQL Server database, or you can configure Sync Services to track changes within your database tables. The former is only available with SQL Server 2008, and the latter requires additional fields, triggers, and tables in order to provide equivalent change tracking capabilities. If you are going to be deploying the database to SQL Server 2008, it is recommended that you enable change tracking.
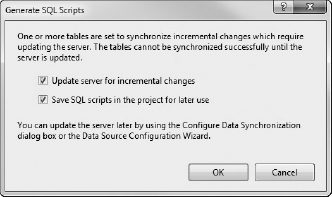
When you click Finish you are prompted to confirm that you want to apply the server changes immediately (Figure 34-7). If you're working on a database shared by others, you may want to review the generated scripts before allowing them to execute. For this example leave both checkboxes checked, which will create the database scripts (including undo scripts) and add them to your project, as well as execute them on the server database, to either enable change tracking or to create the additional change tracking columns, triggers, and tables.
Clicking OK both persists this configuration in the form of synchronization classes and invokes a synchronization between the server and the local data file, as shown in Figure 34-8.
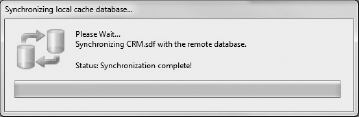
Forcing synchronization at this point means that the newly created SQL Server Compact (SSC) database file is populated with the correct schema and any data available on the server. The LocalCRMDataSet is also added to your project.
If you now look at the Data Sources tool window, you will see that there is a LocalCRMDataSet node that contains a Customer node. As you did previously, set the Customer node to Details and the CustomerId node to None. Then drag the Customer node across onto the designer surface of the LocalForm. The result should be a form similar to the one shown in Figure 34-9.
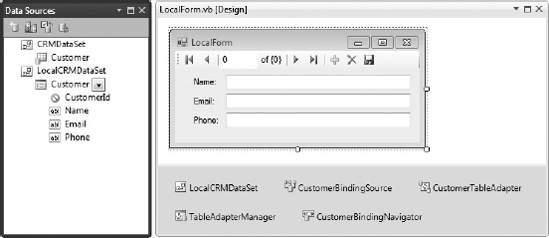
Adding these components brings the same components to the design surface and the same code to the form as when you were connecting directly to the server. The difference here is that a CustomerTableAdapter connects to the local database instead of the server. As before, you need to add the code to specify the CustomerId for new records in the CurrentChanged event of the CustomerBindingSource.
The last thing you need to add to this part of the project is a mechanism to invoke the synchronization process. Simply add a button, SynchronizeButton, to the bottom of the LocalForm and double-click it to generate the click-event handler. Then add the following code to trigger a synchronization.
- VB
Private Sub SynchronizeButton_Click(ByVal sender As System.Object,
                                    ByVal e As System.EventArgs)
                                                  Handles SynchronizeButton.Click
    Dim syncAgent As New CRMCacheSyncAgent()
    Dim syncStats As Microsoft.Synchronization.Data.SyncStatistics =
                                                  syncAgent.Synchronize()

    Me.CustomerTableAdapter.Fill(Me.LocalCRMDataSet.Customer)
End Sub
- C#
private void SynchronizeButton_Click(object sender, EventArgs e){
    var syncAgent = new CRMCacheSyncAgent();
    var syncStats = syncAgent.Synchronize();

    this.customerTableAdapter.Fill(this.localCRMDataSet.Customer);
}
Pay particular attention to the next-to-last line of this snippet, in which you use the CustomerTableAdapter to fill the Customer table. This is important: without this line the user interface will not reflect changes in the SSC database that have been made by the synchronization process.
So far, the entire synchronization process is conducted within the client application with a direct connection to the server. One of the objectives of an occasionally connected application is to be able to synchronize data over any connection, regardless of whether it is a corporate intranet or the public Internet. Unfortunately, with the current application you need to expose your SQL Server so that the application can connect to it. This is clearly a security vulnerability, which you can solve by taking a more distributed approach. Sync Services has been designed with this in mind, allowing the server components to be isolated into a service that can be called during synchronization.
Sync Services supports separating the synchronization process so that the client application communicates via a WCF service, instead of directly to the server database. To do this, you need to create a WCF service that implements the four methods that makes up Sync Service, as shown in the following IServiceCRMCacheSyncContract interface.
VB
<ServiceContractAttribute()>  _
Public Interface IServiceCRMCacheSyncContract
    <OperationContract()>  _
    Function ApplyChanges(ByVal groupMetadata As SyncGroupMetadata, _
                           ByVal dataSet As DataSet, _
                           ByVal syncSession As SyncSession) As SyncContext
    <OperationContract()>  _
    Function GetChanges(ByVal groupMetadata As SyncGroupMetadata, _
                         ByVal syncSession As SyncSession) As SyncContext
    <OperationContract()>  _
    Function GetSchema(ByVal tableNames As Collection(Of String), _
                        ByVal syncSession As SyncSession) As SyncSchema
    <OperationContract()>  _
    Function GetServerInfo(ByVal syncSession As SyncSession) As SyncServerInfo
End Interface
The WCF Service essentially acts as a remote proxy for the server provider used by Sync Service. To use the WCF Service, you first need to add it to the client project using Add Service Reference (right-click your project and select this option from the context menu). Then you need to set the Remote Provider on the Sync Agent to be a new instance of the ServerSyncProviderProxy. The constructor for the ServerSyncProviderProxy class takes a single parameter which should be the proxy class that was generated for the WCF Service using Add Service Reference. Now, when you call Synchronize, Sync Services will use the Remote Provider to call the methods on the WCF Service. The WCF Service will in turn communicate with the server database carrying out the synchronization logic.
You may have noticed that when you click the synchronize button, the user interface appears to hang until the synchronization completes. Clearly this wouldn't be acceptable in a real-world application, so you need to synchronize the data in the background, thereby allowing the user to continue working. By adding a BackgroundWorker component (in the Components group in the Toolbox) to the LocalForm, you can do this with only minimal changes to your application. The following code illustrates how you can wire up the events of the BackgroundWorker, which has been named bgWorker, to use the Sync Service implementation. This makes use of an additional button, SynchronizeInBackgroundButton, that was added to the LocalForm:
- VB
Private Sub SynchronizeInBackgroundButton_Click(ByVal sender As System.Object,
                                                ByVal e As System.EventArgs) _
                        Handles SynchronizeInBackgroundButton.Click
    Me.SynchronizeButton.Enabled = False
    Me.SynchronizeInBackgroundButton.Enabled = False
Me.bgWorker.RunWorkerAsync(New CRMCacheSyncAgent()) End Sub Private Sub bgWorker_DoWork(ByVal sender As System.Object, ByVal e As System.ComponentModel.DoWorkEventArgs) _ Handles bgWorker.DoWork Dim syncAgent As Microsoft.Synchronization.SyncAgent = TryCast(e.Argument, Microsoft.Synchronization.SyncAgent) If syncAgent Is Nothing Then Return syncAgent.Synchronize() End Sub Private Sub bgWorker_RunWorkerCompleted(ByVal sender As System.Object, _ ByVal e As System.ComponentModel.RunWorkerCompletedEventArgs) _ Handles bgWorker.RunWorkerCompleted Me.CustomerTableAdapter.Fill(Me.LocalCRMDataSet.Customer) Me.SynchronizeInBackgroundButton.Enabled = True Me.SynchronizeButton.Enabled = True End Sub
- C#
private void SynchronizeInBackgroundButton_Click(object sender, EventArgs e){
    this.SynchronizeButton.Enabled =false;
    this.SynchronizeInBackgroundButton.Enabled = false;
    this.bgWorker.RunWorkerAsync(new CRMCacheSyncAgent());
}

private void bgWorker_DoWork(object sender, DoWorkEventArgs e){
    var syncAgent = e.Argument as Microsoft.Synchronization.SyncAgent;
    if (syncAgent == null) return;
    syncAgent.Synchronize();
}

private void bgWorker_RunWorkerCompleted(object sender,
                                         RunWorkerCompletedEventArgs e){
    this.customerTableAdapter.Fill(this.localCRMDataSet.Customer);

    this.SynchronizeInBackgroundButton.Enabled = true;
    this.SynchronizeButton.Enabled = true;
}
In this snippet you are not reporting any progress, but Sync Services does support quite a rich event model that you can hook into in order to report on progress. If you want to report progress via the BackgroundWorker component, you need to enable its WorkerReportsProgress property. The following code illustrates how you can hook into the ApplyChanges event on the client component of Sync Services in order to report progress (in this case to a label called "SyncProgressLabel" added to the form). Other events correspond to different points in the synchronization process.
- VB
Private Sub bgWorker_DoWork(ByVal sender As System.Object, _ ByVal e As System.ComponentModel.DoWorkEventArgs) _ Handles bgWorker.DoWork Dim syncAgent As Microsoft.Synchronization.SyncAgent = _ TryCast(e.Argument, Microsoft.Synchronization.SyncAgent) If syncAgent Is Nothing Then ReturnDim clientProvider As _Microsoft.Synchronization.Data.SqlServerCe.SqlCeClientSyncProvider = _ CType(syncAgent.LocalProvider, _ Microsoft.Synchronization.Data.SqlServerCe.SqlCeClientSyncProvider) AddHandler clientProvider.SyncProgress, AddressOf SyncProgress syncAgent.Synchronize() End SubPrivate SubSyncProgress(ByVal sender As Object, _ByVal e As Microsoft.Synchronization.Data. SyncProgressEventArgs) Dim progress = 0 If (e.GroupProgress.TotalChanges > 0) Then progress = (e.GroupProgress.TotalChanges - e.GroupProgress.TotalChangesPending) _ * 100 / e.GroupProgress.TotalChanges End If Me.bgWorker.ReportProgress(progress, e.SyncStage.ToString()) End Sub Private Sub bgWorker_ProgressChanged(ByVal sender As Object, _ ByVal e As System.ComponentModel.ProgressChangedEventArgs) _ Handles bgWorker.ProgressChanged Me.SyncProgressLabel.Text = e.UserState.ToString End Sub
- C#
private void bgWorker_DoWork(object sender, DoWorkEventArgs e){
    var syncAgent = e.Argument as Microsoft.Synchronization.SyncAgent;
    if (syncAgent == null) return;
    var clientProvider = syncAgent.LocalProvider as
          Microsoft.Synchronization.Data.SqlServerCe.SqlCeClientSyncProvider;
    clientProvider.SyncProgress += SyncProgress;

    syncAgent.Synchronize();
}

private void SyncProgress(object sender,
                          Microsoft.Synchronization.Data.SyncProgressEventArgs e){
    var progress = 0;
    if(e.GroupProgress.TotalChanges>0){
        progress = (e.GroupProgress.TotalChanges -
                    e.GroupProgress.TotalChangesPending)
*100 /e.GroupProgress.TotalChanges; } this.bgWorker.ReportProgress(progress, e.SyncStage.ToString()); } private void bgWorker_ProgressChanged(object sender, ProgressChangedEventArgs e){ this.SyncProgressLabel.Text = e.UserState.ToString(); }
Working through the example so far, you may have been wondering why none of the changes you have made on the client are being synchronized to the server. If you go back to Figure 34-6, you will recall that you selected Incremental from the top drop-down, which might lead you to believe that changes from both the client and server will be synchronized. This is not the case and it is the wording above this control that gives it away. For whatever reason, this control only enables you to select options pertaining to "Data to download." To get changes to propagate in both directions, you have to override the default behavior for each table that is going to be synchronized. Again, right-click the CRMCache object in the Solution Explorer and select View Code. In the following code, we have set the SyncDirection property of the CustomerSyncTable to be bidirectional. You may also want to do this for the ServerCRMCache item so that both synchronization mechanisms will allow changes to propagate between client and server.
- VB
Partial Public Class CRMCacheSyncAgentPartial Class CustomerS yncTablePrivate Sub OnInitialized() Me.SyncDirection = _ Microsoft.Synchronization.Data.SyncDirection.Bidirectional End Sub End Class End Class
- C#
partial class CRMCacheSyncAgent{
    partial class CustomerSyncTable{
        private void OnInitialized(){
            this.SyncDirection =
                       Microsoft.Synchronization.Data.SyncDirection.Bidirectional;
        }
    }
}
If you were synchronizing other tables, you would need to set SyncDirection on each of the corresponding SyncTables. An alternative implementation would be to place this code in the OnInitialized method of the SyncAgent itself, setting the SyncDirection on each sync table (for example the CustomerSyncTable). Whichever way you choose, you still need to apply the Bidirectional value to all tables you want to synchronize in both directions.
In this chapter you have seen how to use the Microsoft Synchronization Services for ADO.NET to build an occasionally connected application. While you have other considerations when building such an application, such as how to detect network connectivity, you have seen how to perform synchronization as a background task and how to separate the client and server components into different application tiers. With this knowledge, you can begin to work with this new technology to build richer applications that will continue to work regardless of where they are being used.