
Documentation is a critical, and often overlooked, feature of the development process. Without documentation, other programmers, code reviewers, and project managers have a more difficult time analyzing the purpose and implementation of code. You can even have problems with your own code once it becomes complex, and having good internal documentation can aid in the development process.
XML comments are a way of providing that internal documentation for your code without having to go through the process of manually creating and maintaining a separate document. Instead, as you write your code, you include metadata at the top of every definition to explain the intent of your code. Once the information has been included in your code, it can be consumed by Visual Studio to provide Object Browser and IntelliSense information.
GhostDoc is a free third-party add-in for Visual Studio that can automatically insert an XML comment block for a class or member.
Sandcastle is a set of tools that act as a documentation compiler. These tools can be used to easily create standalone documentation in Microsoft compiled HTML help or Microsoft Help 2 format from the XML comments you have added to your code.
All programming languages supported by Visual Studio provide a method for adding inline documentation. By default, all inline comments are highlighted in green.
C# supports both single line comments and comment blocks. Single line comments are denoted by // at the beginning of the comment. Block comments typically span multiple lines and are opened by /* and closed off by */, as shown in the following code:
- C#
// Calculate the factorial of an integer
public int Factorial(int number)
{
   /* This function calculates a factorial using an
    * iterative approach.
    */
    int intermediateResult = 1;
    for (int factor = 2; factor <= number; factor++)
    {
       intermediateResult = intermediateResult * factor;
    }
    return intermediateResult;   //The calculated factorial
}
VB just uses a single quote character to denote anything following it to be a comment, as shown in the following code:
- VB
' Calculate the factorial of an integer
Public Function Factorial(ByVal number As Integer) As Integer
   ' This function calculates a factorial using an
   ' iterative approach.
   '
   Dim intermediateResult As Integer = 1
   For factor As Integer = 2 To number
      intermediateResult = intermediateResult * factor
   Next
   Return intermediateResult 'The calculated factorial
End Function
XML comments are specialized comments that you include in your code. When the project goes through the build process, Visual Studio can optionally include a step to generate an XML file based on these comments to provide information about user-defined types such as classes and individual members of a class (user defined or not), including events, functions, and properties.
XML comments can contain any combination of XML and HTML tags. Visual Studio performs special processing on a particular set of predefined tags, as you see throughout the bulk of this chapter. Any other tags are included in the generated documentation file as is.
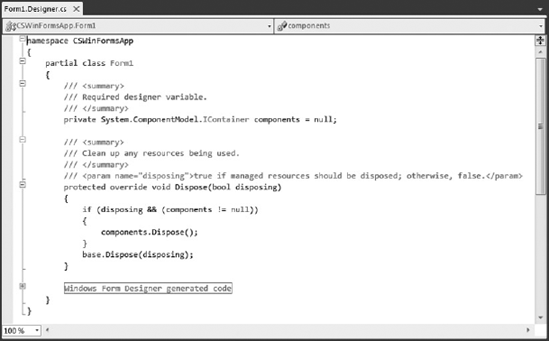
XML comments are added immediately before the property, method, or class definition they are associated with. Visual Studio automatically adds an XML comment block when you type the shortcut code /// in C# before a member or class declaration. In some cases the XML comments will already be present in code generated by the supplied project templates, as shown in Figure 12-1.
Note
The automatic insertion of the summary section can be enabled or disabled in the Visual Studio options. Select Tools
Adding an XML comment block to VB is achieved by using the ''' shortcut code. In this way it replicates the way C# documentation is generated.
In both languages, once the comments have been added, Visual Studio automatically adds a collapsible region to the left margin so you can hide the documentation when you're busy writing code. Hovering over the collapsed area displays a tooltip message containing the first few lines of the comment block.
Though you can use any kind of XML comment structure you like, including your own custom XML tags, Visual Studio's XML comment processor recognizes a number of predefined tags and automatically formats them appropriately. The Sandcastle document compiler, which is discussed later in this chapter, has support for a number of additional tags, and you can supplement these further with your own XML schema document.
Note
If you need to use angle brackets in the text of a documentation comment, use the entity references < and >.
Because documentation is so important, the next section of this chapter details each of these predefined tags, their syntax, and how you would use them in your own documentation.
The <c> tag indicates that the enclosed text should be formatted as code, rather than normal text. It's used for code that is included in a normal text block. The structure of <c> is simple, with any text appearing between the opening and closing tags being marked for formatting in the code style.
<c>code-formatted text</c>
The following example shows how <c> might be used in the description of a property:
- C#
/// <summary>
/// The <c>UserId</c> property is used in conjunction with other properties/// to setup a user properly. Remember to set the <c>Password</c> field too. /// </summary> public string UserId { get; set; }- VB
''' <summary>
''' The <c>UserId</c> property is used in conjunction with other properties''' to setup a user properly. Remember to set the <c>Password</c> field too. ''' </summary> Public Property UserId() As String
If the amount of text in the documentation you need to format as code is more than just a phrase within a normal text block, you can use the <code> tag instead of <c>. This tag marks everything within it as code, but it's a block-level tag, rather than a character-level tag. The syntax of this tag is a simple opening and closing tag with the text to be formatted inside, as shown here:
<code>
Code-formatted text
Code-formatted text
</code>
The <code> tag can be embedded inside any other XML comment tag. The following code shows an example of how it could be used in the summary section of a property definition:
- C#
/// <summary> /// The <c>UserId</c> property is used in conjunction with other properties /// to setup a user properly. Remember to set the <c>Password</c> field too. /// For example:
/// <code>/// myUser.UserId = "daveg" /// myUser.Password = "xg4*Wv" /// </code> /// </summary> public string UserId { get; set; }- VB
''' <summary> ''' The <c>UserId</c> property is used in conjunction with other properties ''' to setup a user properly. Remember to set the <c>Password</c> field too. ''' For example:
''' <code>''' myUser.UserId = "daveg" ''' myUser.Password = "xg4*Wv" ''' </code> ''' </summary> Public Property UserId() As String
A common requirement for internal documentation is to provide an example of how a particular procedure or member can be used. The <example> tags indicate that the enclosed block should be treated as a discrete section of the documentation, dealing with a sample for the associated member. Effectively, this doesn't do anything more than help organize the documentation, but used in conjunction with an appropriately designed XML style sheet or processing instructions, the example can be formatted properly.
The other XML comment tags, such as <c> and <code>, can be included in the text inside the <example> tags to give you a comprehensively documented sample. The syntax of this block-level tag is simple:
<example>
Any sample text goes here.
</example>
Using the example from the previous discussion, the following code moves the <code> formatted text out of the <summary> section into an <example> section:
- C#
/// <summary> /// The <c>UserId</c> property is used in conjunction with other properties /// to setup a user properly. Remember to set the <c>Password</c> field too. /// </summary>
/// <example>/// <code> /// myUser.UserId = "daveg" /// myUser.Password = "xg4*Wv" /// </code> /// </example> public string UserId { get; set; }- VB
''' <summary> ''' The <c>UserId</c> property is used in conjunction with other properties ''' to setup a user properly. Remember to set the <c>Password</c> field too. ''' </summary>
''' <example>''' <code> ''' myUser.UserId = "daveg" ''' myUser.Password = "xg4*Wv" ''' </code> ''' </example> Public Property UserId() As String
The <exception> tag is used to define any exceptions that could be thrown from within the member associated with the current block of XML documentation. Each exception that can be thrown should be defined with its own <exception> block, with an attribute of cref identifying the fully qualified type name of an exception that could be thrown. Note that the Visual Studio 2010 XML comment processor checks the syntax of the exception block to enforce the inclusion of this attribute. It also ensures that you don't have multiple <exception> blocks with the same attribute value. The full syntax is as follows:
<exception cref="exceptionName">
Exception description.
</exception>
Extending the examples from the previous tag discussions, the following code adds two exception definitions to the XML comments associated with the UserId property: System.TimeoutException, and System.UnauthorizedAccessException.
- C#
/// <summary>
/// The <c>UserId</c> property is used in conjunction with other properties
/// to setup a user properly. Remember to set the <c>Password</c> field too.
/// </summary>
/// <exception cref="System.TimeoutException">/// Thrown when the code cannot determine if the user is valid within a reasonable /// amount of time. /// </exception> /// <exception cref="System.UnauthorizedAccessException"> /// Thrown when the user identifier is not valid within the current context. /// </exception> /// <example> /// <code> /// myUser.UserId = "daveg" /// myUser.Password = "xg4*Wv" /// </code> /// </example> public string UserId { get; set; }- VB
''' <summary> ''' The <c>UserId</c> property is used in conjunction with other properties ''' to setup a user properly. Remember to set the <c>Password</c> field too. ''' </summary>
''' <exception cref="System.TimeoutException">''' Thrown when the code cannot determine if the user is valid within a reasonable ''' amount of time. ''' </exception> ''' <exception cref="System.UnauthorizedAccessException"> ''' Thrown when the user identifier is not valid within the current context. ''' </exception> ''' <example> ''' <code> ''' myUser.UserId = "daveg" ''' myUser.Password = "xg4*Wv" ''' </code> ''' </example> Public Property UserId() As String
You'll often have documentation that needs to be shared across multiple projects. In other situations, one person may be responsible for the documentation while others are doing the coding. Either way, the <include> tag will prove useful. The <include> tag enables you to refer to comments in a separate XML file so they are brought inline with the rest of your documentation. Using this method, you can move the actual documentation out of the code, which can be handy when the comments are extensive.
The syntax of <include> requires that you specify which part of the external file is to be used in the current context. The path attribute is used to identify the path to the XML node, and uses standard XPath terminology:
<include file="filename" path="XPathQuery" />
The external XML file containing the additional documentation must have a path that can be navigated with the attribute you specify, with the end node containing an attribute of name to uniquely identify the specific section of the XML document to be included.
You can include files in either VB or C# using the same tag. The following code takes the samples used in the <exception> tag discussion and moves the documentation to an external file:
- C#
/// <include file="externalFile.xml" path="MyDoc/Properties[@name='UserId']/*" />public string UserId { get; set; }- VB
''' <include file="externalFile.xml" path="MyDoc/Properties[@name='UserId']/*" />Public Property UserId() As String
The external file's contents would be populated with the following XML document structure to synchronize it with what the <include> tag processing expects to find:
<MyDoc>
  <Properties name="UserId">
    <summary>
      The <c>sender</c> object is used to identify who invoked the procedure.
    </summary>
    <summary>
      The <c>UserId</c> property is used in conjunction with other properties
      to setup a user properly. Remember to set the <c>Password</c> field too.
    </summary>
    <exception cref="System.TimeoutException">
      Thrown when the code cannot determine if the user is valid within a
      reasonable amount of time.
    </exception>
    <exception cref="System.UnauthorizedAccessException">
      Thrown when the user identifier is not valid within the current context.
    </exception>
    <example>
      <code>
        myUser.UserId = "daveg"
        myUser.Password = "xg4*Wv"
      </code>
    </example>
  </Procedures>
</MyDoc>Some documentation requires lists of various descriptions, and with the <list> tag you can generate numbered and unnumbered lists along with two-column tables. All three take two parameters for each entry in the list — a term and a description — represented by individual XML tags, but they instruct the processor to generate the documentation in different ways.
To create a list in the documentation, use the following syntax, where type can be one of the following values — bullet, numbered, or table:
<list type="type">
   <listheader>
      <term>termName</term>
      <description>description</description>
   </listheader>
   <item>
      <term>myTerm</term>
      <description>myDescription</description>
   </item>
</list>
The <listheader> block is optional, and is usually used for table-formatted lists or definition lists. For definition lists, the <term> tag must be included, but for bullet lists, numbered lists, or tables the <term> tag can be omitted.
The XML for each type of list can be formatted differently using an XML style sheet. An example of how to use the <list> tag appears in the following code. Note how the sample has omitted the listheader tag, because it was unnecessary for the bullet list:
- C#
/// <summary> /// This function changes a users password. The password change could fail for /// several reasons:
/// <list type="bullet">/// <item> /// <term>Too Short</term> /// <description>The new password was not long enough.</description> /// </item> /// <item> /// <term>Not Complex</term> /// <description>The new password did not meet the complexity requirements. It /// must contain at least one of the following characters: lowercase, uppercase, /// and number. /// </description> /// </item> /// </list> /// </summary> public bool ChangePwd(string oldPwd, string newPwd) { //...code... return true; }- VB
''' <summary> ''' This function changes a users password. The password change could fail for ''' several reasons:
''' <list type="bullet">''' <item>''' <term>Too Short</term> ''' <description>The new password was not long enough.</description> ''' </item> ''' <item> ''' <term>Not Complex</term> ''' <description>The new password did not meet the complexity requirements. It ''' must contain at least one of the following characters: lowercase, uppercase, ''' and number. ''' </description> ''' </item> ''' </list> ''' </summary> Public Function ChangePwd(ByVal oldPwd As String, ByVal newPwd As String) _ As Boolean '...code... Return True End Function
Without using the various internal block-level XML comments such as <list> and <code>, the text you add to the main <summary>, <remarks>, and <returns> sections all just runs together. To break it up into readable chunks, you can use the <para> tag, which simply indicates that the text enclosed should be treated as a discrete paragraph. The syntax is simple:
<para>This text will appear in a separate paragraph.</para>
To explain the purpose of any parameters in a function declaration, you can use the <param> tag. This tag will be processed by the Visual Studio XML comment processor with each instance requiring a name attribute that has a value equal to the name of one of the properties. Enclosed between the opening and closing <param> tag is the description of the parameter:
<param name="parameterName">Definition of parameter.</param>
The XML processor will not allow you to create multiple <param> tags for the one parameter, or tags for parameters that don't exist, producing warnings that are added to the Error List in Visual Studio if you try. The following example shows how the <param> tag is used to describe two parameters of a function:
- C#
/// <param name="oldPwd">Old password-must match the current password</param>/// <param name="newPwd">New password-must meet the complexity requirements</param> public bool ChangePwd(string oldPwd, string newPwd) { //...code... return true; }- VB
''' <param name="oldPwd">Old password-must match the current password</param>''' <param name="newPwd">New password-must meet the complexity requirements</param> Public Function ChangePwd(ByVal oldPwd As String, ByVal newPwd As String) _ As Boolean '...code... Return True End Function
Note
The <param> tag is especially useful for documenting preconditions for a method's parameters, such as if a null value is not allowed.
If you are referring to the parameters of the method definition elsewhere in the documentation other than the <param> tag, you can use the <paramref> tag to format the value, or even link to the parameter information depending on how you code the XML transformation. The compiler does not require that the name of the parameter exist, but you must specify the text to be used in the name attribute, as the following syntax shows:
<paramref name="parameterName" />
Normally, <paramref> tags are used when you are referring to parameters in the larger sections of documentation such as the <summary> or <remarks> tags, as the following example demonstrates:
- C#
/// <summary> /// This function changes a users password. This will throw an exception if
/// <paramref name="oldPwd" /> or <paramref name="newPwd" /> are nothing./// </summary> /// <param name="oldPwd">Old password-must match the current password</param> /// <param name="newPwd">New password-must meet the complexity requirements</param> public bool ChangePwd(string oldPwd, string newPwd) { //...code... return true; }- VB
''' <summary> ''' This function changes a users password. This will throw an exception if
''' <paramref name="oldPwd" /> or <paramref name="newPwd" /> are nothing.''' </summary> ''' <param name="oldPwd">Old password-must match the current password</param> ''' <param name="newPwd">New password-must meet the complexity requirements</param> Public Function ChangePwd(ByVal oldPwd As String, ByVal newPwd As String) _ As Boolean'...code... Return True End Function
To describe the code access security permission set required by a particular method, use the <permission> tag. This tag requires a cref attribute to refer to a specific permission type:
<permission cref="permissionName">
   description goes here
</permission>
If the function requires more than one permission, use multiple <permission> blocks, as shown in the following example:
- C#
/// <permission cref="System.Security.Permissions.RegistryPermission">/// Needs full access to the Windows Registry. /// </permission> /// <permission cref="System.Security.Permissions.FileIOPermission"> /// Needs full access to the .config file containing application information. /// </permission> public string UserId { get; set; }- VB
''' <permission cref="System.Security.Permissions.RegistryPermission">''' Needs full access to the Windows Registry. ''' </permission> ''' <permission cref="System.Security.Permissions.FileIOPermission"> ''' Needs full access to the .config file containing application information. ''' </permission> Public Property UserId() As String
The <remarks> tag is used to add an additional comment block to the documentation associated with a particular method. Discussion on previous tags has shown the <remarks> tag in action, but the syntax is as follows:
<remarks>
   Any further remarks go here
</remarks>
Normally, you would create a summary section, briefly outline the method or type, and then include the detailed information inside the <remarks> tag, with the expected outcomes of accessing the member.
When a method returns a value to the calling code, you can use the <returns> tag to describe what it could be. The syntax of <returns> is like most of the other block-level tags, consisting of an opening and closing tag with any information detailing the return value enclosed within:
<returns>
   Description of the return value.
</returns>
A simple implementation of <returns> might appear like the following code:
- C#
/// <summary> /// This function changes a user's password. /// </summary>
/// <returns>/// This function returns: /// <c>True</c> which indicates that the password was changed successfully, /// or <c>False</c> which indicates that the password change failed. /// </returns> public bool ChangePwd(string oldPwd, string newPwd) { //...code... return true; }- VB
''' <summary> ''' This function changes a user's password. ''' </summary>
''' <returns>''' This function returns: ''' <c>True</c> which indicates that the password was changed successfully, ''' or <c>False</c> which indicates that the password change failed. ''' </returns> Public Function ChangePwd(ByVal oldPwd As String, ByVal newPwd As String) _ As Boolean '...code... Return True End Function
Note
In addition to return value of a function, the <returns> tag is especially useful for documenting any post-conditions that should be expected.
You can add references to other items in the project using the <see> tag. Like some of the other tags already discussed, the <see> tag requires a cref attribute with a value equal to an existing member, whether it is a property, method, or class definition. The <see> tag is used inline with other areas of the documentation such as <summary> or <remarks>. The syntax is as follows:
<see cref="memberName" />
When Visual Studio processes the <see> tag it produces a fully qualified address that can then be used as the basis for a link in the documentation when transformed via style sheets. For example, referring to an application with a class containing a function named ChangePwd would result in the following cref value:
<see cref="applicationName.className.ChangePwd"/>
The following example uses the <see> tag to provide a link to another function called CheckUser:
- C#
/// <remarks>
/// Use <see cref="CheckUser" /> to verify that the user exists before calling/// ChangePwd./// </remarks> public bool ChangePwd(string oldPwd, string newPwd) { //...code... return true; }- VB
''' <remarks>
''' Use <see cref="CheckUser" /> to verify that the user exists before calling''' ChangePwd.''' </remarks> Public Function ChangePwd(ByVal oldPwd As String, ByVal newPwd As String) _ As Boolean '...code... Return True End Function
Note
In VB only, if the member specified in the cref value does not exist, Visual Studio will use IntelliSense to display a warning and add it to the Error List.
The <seealso> tag is used to generate a separate section containing information about related topics within the documentation. Rather than being inline like <see>, the <seealso> tags are defined outside the other XML comment blocks, with each instance of <seealso> requiring a cref attribute containing the name of the property, method, or class to which to link. The full syntax appears like so:
<seealso cref="memberName" />
Modifying the previous example, the following code shows how the <seealso> tag can be implemented in code:
- C#
/// <remarks> /// Use <see cref="CheckUser" /> to verify that the user exists before calling /// ChangePwd. /// </remarks>
/// <seealso cref="ResetPwd" />public bool ChangePwd(string oldPwd, string newPwd) { //...code... return true; }- VB
''' <remarks> ''' Use <see cref="CheckUser" /> to verify that the user exists before calling ''' ChangePwd. ''' </remarks>
''' <seealso cref="ResetPwd" />Public Function ChangePwd(ByVal oldPwd As String, ByVal newPwd As String) _ As Boolean '...code... Return True End Function
The <summary> tag is used to provide the brief description that appears at the top of a specific topic in the documentation. As such it is typically placed before all public and protected methods and classes. In addition, the <summary> area is used for Visual Studio's IntelliSense engine when using your own custom-built code. The syntax to implement <summary> is as follows:
<summary>
   A description of the function or property goes here.
</summary>
The <typeparam> tag provides information about the type parameters when dealing with a generic type or member definition. The <typeparam> tag expects an attribute of name containing the type parameter being referred to:
<typeparam name="typeName">
   Description goes here.
</typeparam>
You can use <typeparam> in either C# or VB, as the following code shows:
- C#
/// <typeparam name="T">/// Base item type (must implement IComparable) /// </typeparam> public class myList<T> where T : IComparable { //...code... }- VB
''' <typeparam name="T">''' Base item type (must implement IComparable) ''' </typeparam> Public Class myList(Of T As IComparable) '...code... End Class
If you are referring to a generic type parameter elsewhere in the documentation other than the <typeparam> tag, you can use the <typeparamref> tag to format the value, or even link to the parameter information depending on how you code the XML transformation.
<typeparamref name="parameterName" />
Normally, <typeparamref> tags are used when you are referring to parameters in the larger sections of documentation such as the <summary> or <remarks> tags, as the following code demonstrates:
- C#
/// <summary>
/// Creates a new list of arbitrary type <typeparamref name="T"/>/// </summary> /// <typeparam name="T"> /// Base item type (must implement IComparable) /// </typeparam> public class myList<T> where T : IComparable { //...code... }- VB
''' <summary>
''' Creates a new list of arbitrary type <typeparamref name="T"/>''' </summary> ''' <typeparam name="T"> ''' Base item type (must implement IComparable) ''' </typeparam>Public Class myList(Of T As IComparable) '...code... End Class
Normally used to define a property's purpose, the <value> tag gives you another section in the XML where you can provide information about the associated member. The <value> tag is not used by IntelliSense.
<value>The text to display</value>
When used in conjunction with a property, you would normally use the <summary> tag to describe what the property is for, whereas the <value> tag is used to describe what the property represents:
- C#
/// <summary> /// The <c>UserId</c> property is used in conjunction with other properties /// to setup a user properly. Remember to set the <c>Password</c> field too. /// </summary>
/// <value>/// A string containing the UserId for the current user /// </value> public string UserId { get; set; }- VB
''' <summary> ''' The <c>UserId</c> property is used in conjunction with other properties ''' to setup a user properly. Remember to set the <c>Password</c> field too. ''' </summary>
''' <value>''' A string containing the UserId for the current user ''' </value> Public Property UserId() As String
Once you have the XML comments inline with your code, you'll most likely want to generate an XML file containing the documentation. In VB this setting is on by default, with an output path and filename specified with default values. However, C# has the option turned off as its default behavior, so if you want documentation you'll need to turn it on manually.
To ensure that your documentation is being generated where you require, open the property pages for the project through the Solution Explorer's right-click context menu. Locate the project for which you want documentation, right-click its entry in the Solution Explorer, and select Properties.
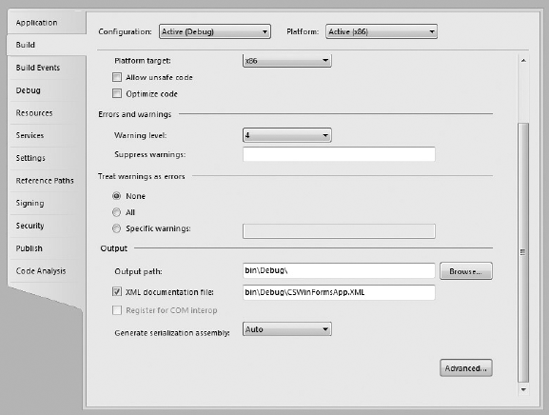
The XML documentation options are located in the Build section (see Figure 12-2). Below the general build options is an Output section that contains a checkbox that enables XML documentation file generation. When this checkbox is checked, the text field next to it becomes available for you to specify the filename for the XML file that will be generated.
For VB applications, the option to generate an XML documentation file is on the Compile tab of the project properties.
Once you've saved these options, the next time you perform a build, Visual Studio adds the /doc compiler option to the process so that the XML documentation is generated as specified.
Note
Generating an XML documentation file will slow down the compile time. If this is impacting your development or debugging cycle, you can disable it for the Debug build while leaving it enabled for the Release build.
The XML file that is generated will contain a full XML document that you can apply XSL transformations against, or process through another application using the XML document object model. All references to exceptions, parameters, methods, and other "see also" links will be included as fully addressed information, including namespace, application, and class data. Later in this chapter you see how you can make use of this XML file to produce professional-looking documentation using Sandcastle.
The other useful advantage of using XML comments is how Visual Studio consumes them in its own IntelliSense engine. As soon as you define the documentation tags that Visual Studio understands, it will generate the information into its IntelliSense, which means you can refer to the information elsewhere in your code.
You can access IntelliSense in two ways. If the member referred to is within the same project or is in another project within the same solution, you can access the information without having to build or generate the XML file. However, you can still take advantage of IntelliSense even when the project is external to your current application solution.
The trick is to ensure that when the XML file is generated by the build process, it must have the same name as the .NET assembly being built. For example, if the compiled output is MyApplication.exe, the associated XML file should be named MyApplication.xml. In addition, this generated XML file should be in the same folder as the compiled assembly so that Visual Studio can locate it.
Although most developers will agree that documentation is important, it still takes a lot of time and commitment to write. The golden rule of "if it's easy the developer will have more inclination to do it" means that any additional enhancements to the documentation side of development will encourage more developers to embrace it.
Note
You can always take a more authoritarian approach to documentation and use a source code analysis tool such as StyleCop to enforce a minimum level of documentation. StyleCop ships with almost 50 built-in rules specifically for verifying the content and formatting of XML documentation. StyleCop is discussed in more detail in Chapter 13.
GhostDoc is an add-in for Visual Studio that attempts to do just that, providing the capability to set up a keyboard shortcut that automatically inserts the XML comment block for a class or member. However, the true power of GhostDoc is not in the capability to create the basic stub, but to automate a good part of the documentation itself.
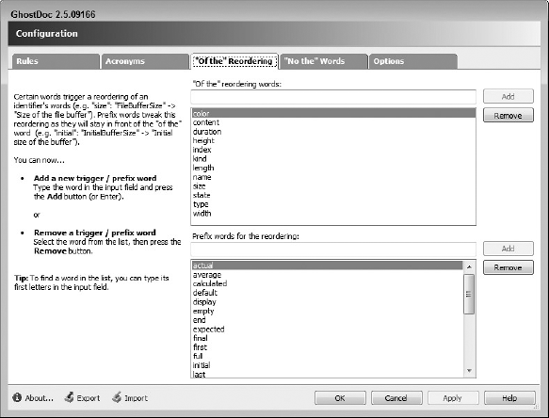
Through a series of lists that customize how different parts of member and variable names should be interpreted, GhostDoc generates simple phrases that get you started in creating your own documentation. For example, consider the list shown in Figure 12-3, where words are defined as trigger points for "Of the" phrases. Whenever a variable or member name has the string "color" as part of its name, GhostDoc attempts to create a phrase that can be used in the XML documentation.
For instance, a property called NewBackgroundColor will generate a complete phrase of New color of the background. The functionality of GhostDoc also recognizes common parameter names and their purpose. Figure 12-4 shows this in action with a default Click event handler for a button control. The sender and e parameters were recognized as particular types in the context of an event handler, and the documentation that was generated by GhostDoc reflects this accordingly.

GhostDoc is an excellent resource for those who find documentation difficult. You can find it at its official web site, http://submain.com/ghostdoc.
Sandcastle is a set of tools published by Microsoft that act as documentation compilers. These tools can be used to easily create very professional-looking external documentation in Microsoft compiled HTML help (.chm) or Microsoft Help 2 (.hsx) format.
The primary location for information on Sandcastle is the Sandcastle blog at http://blogs.msdn.com/sandcastle/. There is also a project on CodePlex, Microsoft's open source project hosting site, at http://sandcastle.codeplex.com/. You can find documentation, a discussion forum, and a link to download the latest Sandcastle installer package on this site.
By default, Sandcastle installs to c:Program FilesSandcastle. When it is run, Sandcastle creates a large number of working files and the final output file under this directory. Unfortunately all files and folders under Program Files require administrator permissions to write to, which can be problematic particularly if you are running on Windows Vista with UAC enabled. Therefore it is recommended that you install it to a location where your user account has write permissions.
Out of the box, Sandcastle is used from the command line only. A number of third-parties have put together GUI interfaces for Sandcastle, which are linked to on the Wiki.
To begin, open a Visual Studio 2010 Command Prompt from Start Menu
Note
The Visual Studio 2010 Command Prompt is equivalent to a normal command prompt except that it also sets various environment variables, such as directory search paths, which are often required by the Visual Studio 2010 command-line tools.
In this directory you will find an example class file, test.cs, and an MSBuild project file, build.proj. The example class file contains methods and properties that are commented with the standard XML comment tags that were explained earlier in this chapter, as well as some additional Sandcastle-specific XML comment tags. You can compile the class file and generate the XML documentation file by entering the following command:
csc /t:library test.cs /doc:example.xml
Once that has completed, you are now ready to generate the documentation help file. The simplest way to do this is to execute the example MSBuild project file that ships with Sandcastle. This project file has been hard-coded to generate the documentation using test.dll and example.xml. Run the MSBuild project by entering the following command:
msbuild build.proj
The MSBuild project will call several Sandcastle tools to build the documentation file including MRefBuilder, BuildAssembler, and XslTransform.
Note
Rather than manually running Sandcastle every time you build a release version, it would be better to ensure that it is always run by executing it as a post-build event. Chapter 6 describes how to create a build event.
You may be surprised at how long the documentation takes to generate. This is partly because the MRefBuilder tool uses reflection to inspect the assembly and all dependant assemblies to obtain information about all of the types, properties, and methods in the assembly and all dependant assemblies. In addition, anytime it comes across a base .NET Framework type, it will attempt to resolve it to the MSDN online documentation in order to generate the correct hyperlinks in the documentation help file.
Note
The first time you run the MSBuild project, it generates reflection data for all of the .NET Framework classes, so you can expect it to take even longer to complete.
By default, the build.proj MSBuild project generates the documentation with the vs2005 look-and-feel, as shown in Figure 12-4, in the directory <Sandcastle Install Directory>Examplessandcastlechm. You can choose a different output style by adding one of the following options to the command line:
/property:PresentationStyle=vs2005
/property:PresentationStyle=hana
/property:PresentationStyle=prototype
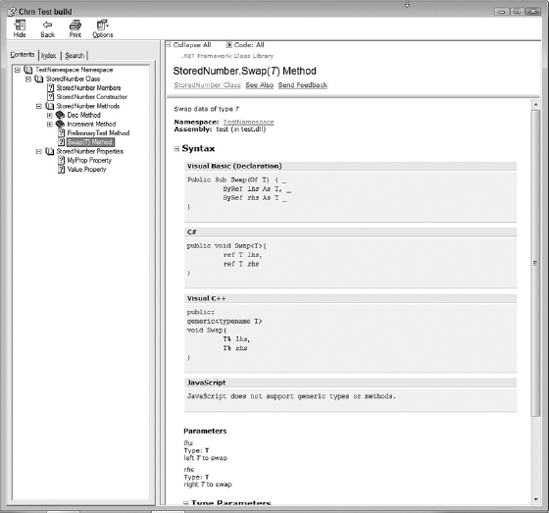
The following code shows the source code section from the example class file, test.cs, which relates to the page of the help documentation shown in Figure 12-5.
/// <summary>
/// Swap data of type <typeparamref name="T"/>
/// </summary>
/// <param name="lhs">left <typeparamref name="T"/> to swap</param>
/// <param name="rhs">right <typeparamref name="T"/> to swap</param>
/// <typeparam name="T">The element type to swap</typeparam>
public void Swap<T>(ref T lhs, ref T rhs)
{
    T temp;
    temp = lhs;
    lhs = rhs;
    rhs = temp;
}
The default target for the build.proj MSBuild project is "Chm," which builds a CHM compiled HTML Help file for the test.dll assembly. You can also specify one of the following targets on the command line:
/target:Clean  - removes all generated files
/target:HxS    - builds HxS file for Visual Studio in addition to CHM
Note
The Microsoft Help 2 (.HxS) is the format that the Visual Studio help system uses. You must install the Microsoft Help 2.x SDK in order to generate .HxS files. This is available and included as part of the Visual Studio 2010 SDK.
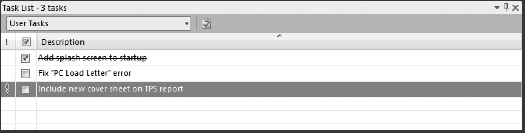
The Task List window is a feature of Visual Studio 2010 that allows you to keep track of any coding tasks or outstanding activities you have to do. Tasks can be manually entered as User Tasks, or automatically detected from the inline comments. You can open the Task List window by selecting View
Note
User Tasks are saved in the solution user options (.suo) file, which contains user-specific settings and preferences. It is not recommended that you check this file into source control and, as such, User Tasks cannot be shared by multiple developers working on the same solution.
Note
The Task List has a filter in the top-left corner that toggles the code between Comment Tasks and manually entered User Tasks.
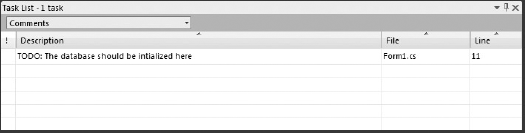
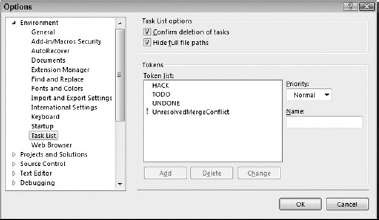
When you add a comment into your code that begins with a comment token, the comment will be added to the Task List as a Comment Task. The default comment tokens that are included with Visual Studio 2010 are TODO, HACK, UNDONE, and UnresolvedMergeConflict.
The following code shows a TODO comment. Figure 12-7 shows how this comment appears as a task in the Task List window. You can double-click the Task List entry to go directly to the comment line in your code.
- C#
using System;
using System.Windows.Forms;

namespace CSWindowsFormsApp
{
    public partial class Form1 : Form
    {
        public Form1()
        {
            InitializeComponent();
            //TODO: The database should be initialized here
        }
    }
}
You can edit the list of comment tokens from an options page under Tools
In addition to User Tasks and Comments, you can also add shortcuts to code within the Task List. To create a Task List Shortcut, place the cursor on the location for the shortcut within the code editor and select Edit

If you now go to the Task List window you will see a new category called Shortcuts listed in the drop-down list, as shown in Figure 12-10. By default the description for the shortcut will contain the line of code; however, you can edit this and enter whatever text you like. Double-clicking an entry takes you to the shortcut location in the code editor.
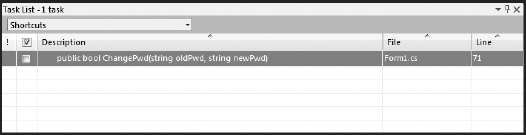
As with User Tasks, Shortcuts are stored in the .suo file, and aren't typically checked into source control or shared among users. Therefore, they are a great way to annotate your code with private notes and reminders.
XML comments are not only extremely powerful, but also very easy to implement in a development project. Using them enables you to enhance the existing IntelliSense features by including your own custom-built tooltips and Quick Info data. You can automate the process of creating XML comments with the GhostDoc Visual Studio add-in. Using Sandcastle, you can generate professional-looking standalone documentation for every member and class within your solutions. Finally, Task List comments are useful for keeping track of pending coding tasks and other outstanding activities.