
Versioning Assemblies
Signing an Assembly to give it a Strong Name
Managing Strongly Named Assemblies in the Global Assembly Cache
When you create a .NET assembly, you can optionally sign it to provide it with a strong name. An assembly without a strong name is identified by its filename, which often is not enough to uniquely identify it. This means that other projects that depend on your assembly cannot be guaranteed to consume the correct version. A strongly named assembly can be uniquely identified by dependent projects and even system administrators, who can apply a security policy to your assembly.
In this chapter, you learn how to use Visual Studio 2010 to set the assembly version number, and how you can use a digital signature to sign your assembly so that it can't be tampered with. This will also result in a strongly named assembly, which can be added to the Global Assembly Cache.
Every .NET assembly, whether it is an executable or a class library, contains a manifest that has information about the assembly's identity. Primarily this includes the name and version number of the assembly, but also includes culture and public key if it is a strongly named assembly. This information can be easily viewed by opening an assembly in Red Gate's .NET Reflector, as shown in Figure 46-1.
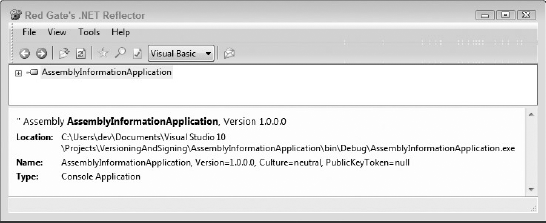
In Figure 46-1, the assembly AssemblyInformationApplication.exe does not have a public key. Other assemblies, such as System.Data, have a full name such as:
System.Data, Version=2.0.0.0, Culture=neutral, PublicKeytoken=b77a5c561934e089
You specify the name of your assembly in Visual Studio 2010 via the project properties editor, as shown in Figure 46-2. You can see in this figure the Assembly Name field on the main Application tab and the Assembly Version in the inset, which is accessible via the Assembly Information button.
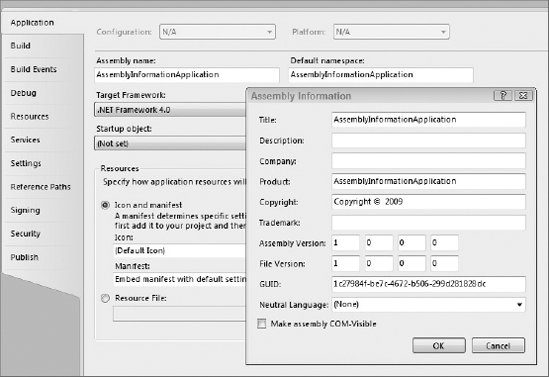
The assembly properties that are presented in the inset dialog in Figure 46-2 all appear in the AssemblyInfo file that is added to your project by default.
Note
If you are using a C# project, you can find the AssemblyInfo.cs file by expanding the Properties item found underneath the project in Solution Explorer. If you are using VB, you can find the AssemblyInfo.vb file under My Project but only once Show All Files has been checked for the project.
The following snippet illustrates the AssemblyVersion and AssemblyFileVersion assembly attributes that are used to define the version and file version of the assembly:
- VB
' Version information for an assembly consists of the following four values: ' ' Major Version ' Minor Version ' Build Number ' Revision ' ' You can specify all the values or you can default the Build and Revision Numbers ' by using the '*' as shown below: ' <Assembly: AssemblyVersion("1.0.*")> <Assembly: AssemblyVersion("1.0.0.0")> <Assembly: AssemblyFileVersion("1.0.0.0")>- C#
// Explanatory comments removed
[assembly: AssemblyVersion("1.0.0.0")]
[assembly: AssemblyFileVersion("1.0.0.0")]
In case you were wondering what the difference is between the version and file version of an assembly, it comes down to usage. The assembly version information is used by the .NET Framework when resolving assembly and type information. On the other hand, the file version is what is displayed in Windows Explorer when you look at the file properties.
Note
There is much debate over whether the assembly version and file version number should be in sync, but essentially it is up to you. Some developers prefer keeping them in sync because it means that they can determine the assembly version via Windows Explorer. Alternatively, other organizations use the file version to represent changes to an assembly (for example, a hotfix or service pack), whereas the assembly version is used for new versions of the application.
As the comments in the VB snippet explain, assembly version numbers have four components — Major, Minor, Build, and Revision. Again, how you increment these is completely up to you. In fact, you could even elect for Visual Studio 2010 to increment them for you by specifying an * for the build and/or revision numbers. One fairly common strategy is to use the Major and Minor numbers to represent the actual version of the product being worked on. Incrementing just the Minor number would perhaps represent minor fixes and minimal new functionality (similar to a service pack), whereas the Major number would represent new core functionality.
This leaves the Build and Revision numbers that can be used to perhaps tie into the build process. For example, the Build number might represent the week number into development for a particular release, whereas the Revision number might represent the most recent revision number in the source repository. This last value then becomes very important because it can be used, in isolation, to access the exact source code from the repository that was used to build a particular version.
The default project configuration doesn't lend itself easily to having a consistent version number across all projects within a solution. However, using the ability to include linked files in a project, you can coerce Visual Studio 2010 into giving you version consistency. This is particularly important if you have an automated build system that automatically increments the version number. Instead of having to update any number of AssemblyInfo files, it can simply modify a single file and have all projects be updated.
You need to start by creating an additional AssemblyInfo file, say GlobalAssemblyInfo.vb, in the solution folder. To do this, right-click the Solution node and select Add New Item. The new item will be added to a Solution Items folder in your solution. Into this file you need to move the AssemblyVersion and AssemblyFileVersion attributes from the AssemblyInfo file in your projects (you will also need to import the System.Reflection namespace unless you fully qualify the attribute names).
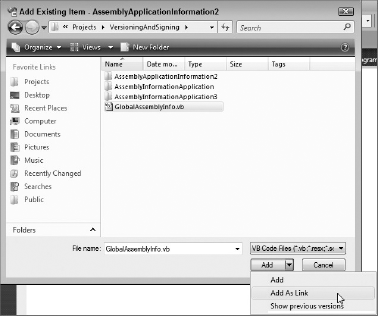
Once you have done this, you then need to add this file into each of your projects. You do this via the Add Existing Item right-click menu item for the projects in the Solution Explorer tool window. When you have located the GlobalAssemblyInfo.vb or GlobalAssemblyInfo.cs file, make sure you select the Add As Link item from the Add drop-down, as shown in Figure 46-3.
This one GlobalAssemblyInfo file can be used in any number of projects, the one limitation being that it is specific to VB or C#. If you have a solution that uses a mix of VB and C# projects, you will need to have a central GlobalAssemblyInfo file for each language — this is still better than having to maintain the version information in a separate file for each project. Note that you can include other assembly attributes in these central files, such as the AssemblyCopyright, AssemblyCompany, and AssemblyTrademark, if appropriate.
A strong name consists of the parts that uniquely identify an assembly's identity. This includes the plain-text name and a version number. Added to these elements are a public key and a digital signature. These are generated with a corresponding private key. Because of this private/public key system coupled with a digital signature, strong names can be relied on to be completely unique. Further, by signing your assembly you are preventing someone from maliciously tampering with your code. .NET assemblies are relatively easy to reverse engineer, modify, and compile as a modified assembly. The hash that is created as part of the signing process changes as the assembly is modified — in effect providing a security mechanism against unauthorized modifications.
Using a strong name can also ensure that the version of your assembly is the one that has been shipped. No modification can be made to it without affecting its signature and thus breaking its compatibility with the generated strong name.
As mentioned previously, using strong names also gives administrators the ability to explicitly set security policy against your solutions by referring to their unique names. This can give a corporation confidence that once deployed, the software will run as expected because it cannot be tampered with without affecting the signing of the strong name.
Note
Once you start using strong-named assemblies in your solution, you will have to use strong-named files right down the chain of references, because allowing an unsigned assembly as part of the chain would break the very security that strong-naming your assembly was intended to implement.
Every computer that has the .NET Framework installed has a system-wide cache, called the Global Assembly Cache (GAC), which can be used to store assemblies that are to be shared by multiple applications. Assemblies that are added to the GAC are accessible from any .NET application on the same system. This itself can be a huge saving for organizations where you have common functionality that you want to share between applications.
In this cache (usually stored in a folder within the Windows directory) you'll find the common language run time components as well as other globally registered binary files that you, and anyone else, can consume. If an assembly is only going to be used by a single application, it should be deployed in that application's folder.
Note
It is important to note here that adding assemblies to the GAC is not recommended unless you really need to share assemblies between applications, and they are too large to redistribute alongside each application.
If you do decide to share the assembly between applications, you will need to know how to store it in the GAC. Your assembly must also be strong-named. You don't have a choice in the matter, because the cache interrogates all files to ensure that their integrity is valid; hence, it needs the strong-name versioning to compare against. Instructions on how to strongly name your assemblies appear at the end of this chapter.
Once you have a strongly named assembly you can add it to the GAC by using the gacutil.exe command-line tool like this:
gacutil.exe /i AssemblyInformationApplication.dll
If an assembly with the same strong name already exists, you can force a reinstall with the /f option. To uninstall the assembly you use this command:
gacutil.exe /u AssemblyInformationApplication
Note
Gacutil.exe is a part of the Microsoft .NET Framework Software Developer Kit (SDK) and not a part of the standard redistributable. This means that you can only rely on it being present in development environments. For deployment to the GAC on client machines, you should use an MSI file. See Chapter 48 for more details.
Previously, signing an assembly in Visual Studio required the generation of a strong-name key (.snk) file via an external utility and then editing the assembly attributes of your application's configuration file. Thankfully, Visual Studio has built-in support for signing all managed code projects using the Signing tab in the project properties editor, as you can see from Figure 46-4.
The Signing tab enables you to sign the assembly in the lower half of the page. You first should select the Sign the Assembly checkbox to indicate that you will be generating a strong name. You will then need to select the strong-name key file to use when signing the assembly.
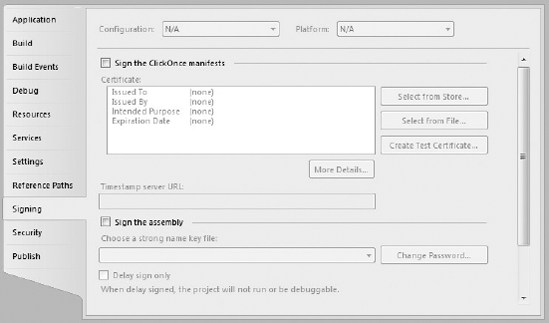
Existing key files in either the older .snk paired key file format or the new .pfx format can be used. From the drop-down list, select the Browse option to locate the file in your file system and click OK in the dialog to save the key file to the Signing page settings.
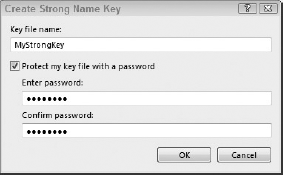
Alternatively, you can create a new strong-named key by selecting the New option from the drop-down list. When you choose New, you will be able to create a new .pfx formatted strong-named file. Figure 46-5 shows the Create Strong Name Key dialog. You can simply choose a filename to use for the key or you can additionally protect the key file with a password. If you do decide to add a password, you will be prompted to enter the password if you build your application on any other computer the first time. Thereafter, Visual Studio will remember the password.
Either way, once you've created and selected the key file, it will be added to your project in the Solution Explorer, enabling you to easily include it for deployment projects.
One of the main reasons you might want to sign your assemblies is to ensure that they cannot be modified. For this reason, most organizations place a high level of security around the strong-name key file that is used to sign their assemblies. As such, it is likely that you won't have access to the private key to successfully sign the assembly. When you're in this situation, you still need to dictate that the application be digitally signed. However, instead of providing the full strong-name key file, which contains the public and private key information, you provide only a file containing the public key information and select the Delay Sign Only checkbox. Later, perhaps as part of your build process, you would need to sign the assemblies using the full key:
sn -R AssemblyInformationApplication MyOrganisationsStrongkey.snk
If you select to delay the signing of your assemblies, you won't be able to debug or even run the application, because it will fail the assembly verification process that is part of the pre-execution checks that the .NET Framework does on assemblies. Actually, this is a little inaccurate because it is possible to register your assembly (or in fact any assembly signed with the same public key) so that the verification step will be skipped:
sn -Vr AssemblyInformationApplication.exe
Note
You should only ever register assemblies to skip verification on development machines. Further, you can unregister an assembly (or all assemblies signed with the same public key) using the sn command with the -Vu parameter.
Strongly naming your assembly and thus safeguarding it from improper use is now straightforward to implement, and can be done completely from within the Visual Studio 2010 IDE. The Signing page gives you the ability to both create and set the key file without having to edit the application's assembly attributes directly.