
Architecting extensible applications
Hosting the Managed Extensibility Framework in your applications
Understanding the Visual Studio 2010 Editor components
Extending the Visual Studio 2010 Editor
Importing Visual Studio Services
Creating loosely coupled applications that can be extended after deployment can be a difficult process. You have many design decisions to make, including identifying and loading extensions that have been deployed, and making application services available to loaded extensions. The Managed Extensibility Framework (MEF) is an open source library created by Microsoft designed to reduce the complexity of creating extensible applications. It allows you to expose reusable parts of your application to plug-ins or extensions that are discovered and loaded at run time and design your application in a very loosely coupled fashion.
Visual Studio 2010 uses the MEF library to provide extension points for the main editor control. It is expected that in future versions of Visual Studio, more areas will be exposed for this kind of extension.
This chapter is split into three sections. The first section is an introduction to how MEF works and how to use it in your own applications. The middle section describes the components of the new Visual Studio 2010 Editor control and how they interact. The final section describes the process of extending the editor with MEF and provides a complete sample which emphasizes certain types of comment in your code.
Note
At the time of writing, the MEF library is still in development so some details may have changed. For the latest information about MEF, check http://mef.codeplex.com.
In this section, you create a simple application that demonstrates the manner in which most applications will utilize the capabilities offered by MEF. The MEF library is contained within the System.ComponentModel.Composition assembly, which is installed in the GAC as a part of the .NET Framework 4.0.
The key component of MEF is the CompositionContainer, which is found in the System.ComponentModel.Composition.Hosting namespace. A composition container is responsible for creating composable parts of your application, which in the default MEF implementation are just normal .NET objects. These parts might be a core aspect of your application or they might come from externally deployed extension assemblies that are loaded dynamically at run time.
Each part is able to provide one or more exports that other composable parts need and may require one or more externally provided imports that other parts provide. Imports and exports can be simple properties or fields, or they can be entire classes. When you request a part from the composition container, it will attempt to locate the part and satisfy any import dependencies it might have. Each of these imports must be provided (exported) by other parts that the container is aware of and may have import requirements of their own, which in turn must also be satisfied.
To build a bare-bones MEF application, create a new command-line project, add a reference to the System.ComponentModel.Composition assembly, and replace the contents of Program.cs (C#) or Module1.vb (VB) with the following:
- C#
using System.ComponentModel.Composition;
using System.ComponentModel.Composition.Hosting;

namespace GettingStartedCS
{
    class Program
    {
        static void Main(string[] args)
        {
            var app = new ApplicationRoot();
            app.Run();
        }
    }

    class ApplicationRoot
    {
        public void Run()
        {
Compose(); } private void Compose() {var compositionContainer = new CompositionContainer();compositionContainer.ComposeParts(this);} } }
- VB
Imports System.ComponentModel.Composition Imports System.ComponentModel.Composition.Hosting Module Module1 Sub Main() Dim app As New ApplicationRoot app.Run() End Sub End Module Class ApplicationRoot Sub Run() Compose() Console.WriteLine("OK") End Sub Private Sub Compose()Dim compositionContainer As New CompositionContainercompositionContainer.ComposeParts(Me)End Sub End Class
Note
The ComposeParts method is an extension method in the System.ComponentModel .Composition namespace, so if you do not have this namespace included, this code will not compile.
All the sample does is create a CompositionContainer and then ask it to compose the Application Root class. The ComposeParts method, satisfies the import requirements of the parts that you provide it. If it cannot satisfy these requirements it will throw a System.ComponentModel.Composition. CompositionException. As the ApplicationRoot class has no import requirements, the application simply writes OK to the console and ends. This is not very exciting, but it does provide a base on which you can add functionality.
The previous code sample asks the container to satisfy the import requirements of the ApplicationRoot class. Before you add an import requirement to that class, you will need an exported class to satisfy the dependency. The ApplicationRoot class prints a status message once composition is complete. You can delegate this responsibility to another class and then ask the composition container to provide an instance of that class during composition.
To make a part available to the rest of your program you can export it by applying an ExportAttribute to it. This code snippet creates a simple class and exports it:
- C#
[System.ComponentModel.Composition.Export]class StatusNotificationService { public void ShowStatus(string statusText) { System.Console.WriteLine(statusText); } }
- VB
<System.ComponentModel.Composition.Export()>Public Class StatusNotificationService Public Sub ShowStatus(ByVal statusText As String) System.Console.WriteLine(statusText) End Sub End Class
By adding an ExportAttribute onto the StatusNotificationService class, MEF is able to treat it as a composable part. Note, however, that the Export attribute is just metadata and MEF is still not aware of this part and will not use it. The simplest way to make the part available to MEF during part composition is to provide an instance of the exported class to the ComposeParts method. Change the Compose method of the ApplicationRoot class to instantiate an instance of the StatusNotification class and pass it into the ComposeParts method call as a second parameter.
Finally, to specify that the ApplicationRoot class requires an instance of this part, add a property to the ApplicationRoot class and mark it up with an ImportAttribute. Following is the full listing for the ApplicationRoot class. There is some code added after the call to Compose in the Run method that uses the newly imported part.
- C#
class ApplicationRoot { public void Run() { Compose();NotifcationService.ShowStatus("Composition Complete");} public void Compose() { var compositionContainer = new CompositionContainer();var statusNotificationService = new StatusNotificationService();compositionContainer.ComposeParts(this, statusNotificationService);}[System.ComponentModel.Composition.Import]public StatusNotificationService NotifcationService { get; set; }}
- VB
Class ApplicationRoot Sub Run() Compose()NotificationService.ShowStatus("Composition Complete")End Sub Private Sub Compose() Dim compositionContainer As New CompositionContainerDim statusNotificationService As New StatusNotificationServicecompositionContainer.ComposeParts(Me, statusNotificationService)End Sub<System.ComponentModel.Composition.Import()>Property NotificationService() As StatusNotificationServiceEnd Class
When the composition container is attempting to resolve dependencies during a composition, it uses a string called a contract to match imports up to exports. By default, if no contract is supplied, MEF will use the fully qualified type name of the exported item as the contract. You can override this contract by supplying either a string or a type to the constructor of either the ImportAttribute or the ExportAttribute. The following code snippet shows three exports that all have the same contract:
- C#
class Settings
{
  [Export]
  public string Username;

  [Export(typeof(string))]
  public string Password;

  [Export("System.String")]
  public string Server;
}
- VB
Public Class Settings
    <Export()>
    Dim Username As String

    <Export(GetType(String))>
    Dim Password As String

    <Export("System.String")>
    Dim Server As String
End Class
Note
It is recommended to use a type for the contract, because a fully qualified type name is more likely to be unique. If you need to use string contracts, you should come up with a way of ensuring they are all unique.
You can specify a contract that is different than the type of the export, if required. The best reason to do this is if the type implements an interface or inherits from an abstract base class. In the following sample, the SaveOperation class is not aware of the concrete message sender it will use and instead imports an abstraction: IMessageService. The CommandLineMessageService exports itself under the contract of the IMessageService interface. In this way, the SaveOperation class is able to take advantage of message sending without worrying about the details of how these messages are being sent. If you wanted to change the way the application worked later, you could implement a new IMessageService and then change which concrete type exported the contract.
- C#
public interface IMessageService
{
  void SendMessage(string message);
}

[Export(typeof(IMessageService))]
public class CommandLineMessageService : IMessageService
{
  public void SendMessage(string message)
  {
    Console.WriteLine(message);
  }
}

public class SaveOperation
{
  [Import]
  public IMessageService MessageService { get; set; }

  public void DoSave()
  {
    MessageService.SendMessage("Saving...");
    // Perform the save operation
    MessageService.SendMessage("Saved");
  }
}
- VB
Public Interface IMessageService
    Sub SendMessage(ByVal message As String)
End Interface

<Export(GetType(IMessageService))>
Public Class CommandLineMessageService
    Implements IMessageService

    Public Sub SendMessage(ByVal message As String) _
      Implements IMessageService.SendMessage
        Console.WriteLine(message)
    End Sub
End Class

Public Class SaveOperation
    <Import()>
    Public Property MessageService As IMessageService

    Public Sub DoSave()
MessageService.SendMessage("Saving...") ' Perform the save operation MessageService.SendMessage("Saved") End Sub End Class
Note
Exporting abstractions and strings raises a potential issue. If there are many exports with the same contract, MEF will not know which one to use to satisfy any given import. If this is the case, you can import an enumerable collection for a contract instead of a single instance using the ImportMany attribute. It is also possible to attach more metadata to an export, which you can use to refine the imports. See http://mef.codeplex.com for more information on this technique.
In the sample code so far, the only way that the CompositionContainer is made aware of parts is by passing instances into the ComposeParts method. This means that your application will need to know about each part added to the container, which will not work for extensions that need to be deployed after release. It also gets a little tedious after a while.
Locating parts is the job of a catalog, which can be provided to the CompositionContainer constructor. If a composition container is constructed with a catalog, it will consult the catalog whenever it needs to locate an export. MEF ships with four catalogs:
A
TypeCatalogis created with a list of part types. The parts will be instantiated as required by the composition container to fulfill the import requirements during part composition.An
AssemblyCatalogis similar to theTypeCatalogexcept that it scans an entire assembly looking for part types.A
DirectoryCatalogscans a folder structure looking for assemblies, which can be examined for part types.An
AggregateCatalogcollects the parts from a number of other catalogs. This is useful because the composition container constructor is only able to accept a single catalog.
The following code sample demonstrates creating a composition container that will look for parts in the currently executing assembly and in all of the assemblies in the /Extensions folder:
- C#
var assemblyCatalog = new AssemblyCatalog(Assembly.GetExecutingAssembly());
var directoryCatalog = new DirectoryCatalog(@".Extensions");
var aggregateCatalog = new AggregateCatalog(assemblyCatalog, directoryCatalog);

var compositionContainer = new CompositionContainer(aggregateCatalog);
- VB
Dim assemblyCatalog As New AssemblyCatalog(Assembly.GetExecutingAssembly())
Dim directoryCatalog As New DirectoryCatalog(".Extensions")
Dim aggregateCatalog As New AggregateCatalog(assemblyCatalog, directoryCatalog)

Dim compositionContainer As New CompositionContainer(AggregateCatalog)
Note
You can create your own catalog by creating a new class that inherits from ComposablePartCatalog and overriding the Parts property.
MEF supports a number of advanced scenarios that can be useful to you when you are creating host applications, or when you are creating add-ons or extensions for another host application. These include:
Exporting properties, fields, and methods
Importing fields, methods, and constructor arguments
Importing collections
Composition batches and recomposition
Lazy imports
Catalog filtering
Part lifetimes
Importing and exporting custom metadata
See the MEF Programming Guide on http://mef.codeplex.com for more information about these topics.
One of the most significant changes in Visual Studio 2010 is the new code and text editor control, which is written in managed code. This new editor uses MEF to manage its structure, which means that it imports many predefined contracts. In addition to this, it exports a number of services under predefined contracts that provide access to the presentation layer and the underlying model of the editor. The new editor is made up of four main subsystems.
The Text Model subsystem is used to represent text and enable its modification. It is a logical model only, which doesn't have any responsibility for displaying pixels on the screen.
The chief component of this subsystem is the ITextBuffer, which represents a sequence of characters that should be displayed by the editor. The ITextBuffer can be persisted to the file system as an ITextDocument, but it doesn't need to be. It can be an entirely in-memory representation. To create new ITextBuffer instances, you can use an ITextBufferFactoryService. Any number of threads can make changes to an ITextBuffer until one of them calls the TakeThreadOwnership method.
Whenever an ITextBuffer is changed, a new version is created. Each version is represented as an immutable ITextSnapshot. Because these snapshots cannot change, any number of threads can refer to them safely, even if the ITextBuffer that they refer to is still changing.
To make a change to an ITextBuffer, you can use the CreateEdit method to create an instance of the ITextEdit interface. ITextEdit allows you to replace a span of text in the buffer with a new set of characters. The ITextEdit instance can be applied to the ITextBuffer by calling its Apply method. It can be abandoned by calling either the Cancel or Dispose method. Only one ITextEdit can be instantiated for an ITextBuffer at any given time, and if the buffer is owned by a particular thread, only that thread can create the edits.
Note
The ITextBuffer interface contains Insert, Replace, and Delete convenience methods, which just wrap up the creation and application of an ITextEdit instance.
All operations within a single ITextEdit occur relative to the initial state of the ITextBuffer at the time when the edit was created. Because of this you cannot insert some text and then remove it again within a single edit.
When an ITextEdit is applied, new instances of ITextVersion and ITextSnapshot are created and a Changed event is raised. The ITextVersion represents the changes between the current state of the ITextBuffer and the previous state, whereas the ITextSnapshot is a read-only view of the ITextBuffer after the edit has been applied. The changes in an ITextVersion are represented as a list of ITextChange instances which, if they are applied to a snapshot, would produce the subsequent snapshot. This collection is always null (Nothing) for the most recent version.
The Text View subsystem is responsible for managing the display of text on the screen. This includes which lines should be displayed and how text should be formatted. It is also responsible for enhancing the text with visual adornments such as the squiggly line, which notifies you of compilation errors. Finally, this subsystem manages the borders around the edges of the editor, which can be enhanced with additional information.
The main part of this subsystem is the ITextView interface. Instances of this interface are used to represent text visually on the screen. This is used for the main editor window but also for things like tooltip text. The ITextView keeps track of three different text buffers through its TextViewModel property. These are:
The data buffer, which is the actual text
The edit buffer in which text edits occur
The visual buffer, which is actually displayed
Text is formatted based on classifiers (see "The Classification Subsystem") and decorated with adornments, which come from adornment providers attached to the text view.
The part of the text that is displayed on the screen is the view port. The view port relies on a logical coordinate system that has (0,0) as the top left of the text. If the editor is not zoomed or transformed in any way, each unit of distance in the view is the equivalent of a single pixel. Each line of text that is displayed on the screen is an instance of the ITextViewLine interface. This interface can be used to map from pixel points to characters.
Finally, the entire editor and all adornments and margins are contained within an IWpfTextViewHost.
Note
The Text View subsystem comes in two parts. One part is technology agnostic and is found in the Microsoft.VisualStudio.Text.UI assembly. The other part is the WPF implementation and is found in the Microsoft.VisualStudio .Text.UI.WPF assembly. In most cases, the WPF-specific items contain the text "Wpf" in the name.
The Classification subsystem manages the recognition and formatting of different types of text. It is also responsible for tagging text with additional metadata, which will be used by the Text View subsystem for attaching glyphs and adornments as well as text highlighting and text outlining (such as collapsed regions of code).
Editor extensions are .vsix packages, which export contracts that Visual Studio components will import. When Visual Studio loads these packages, it adds their contents to a MEF catalog, which is then used to compose parts of the editor control. The Visual Studio Integration SDK comes with a number of templates to get you started creating editor controls. These appear under the Extensibility page of the New Project dialog shown in Figure 53-1.

Note
The Visual Studio 2010 SDK is not installed with Visual Studio 2010. You can download a copy from http://msdn.microsoft.com/en-us/vsx/default.aspx.
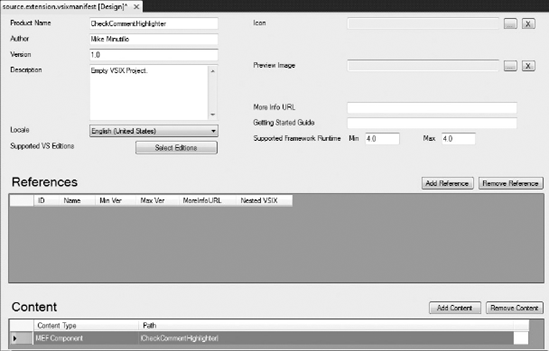
If you want to start with a clean slate, you need to use the VSIX Project template. To expose editor extensions via this package, edit the source.extension.vsixmanifest file, and use the Add Content button to add the current project as an MEF Component as in Figure 53-2.
Once your project is set up to contain MEF content, all you need to do is to create classes that export known extension contracts and Visual Studio will pick them up. In addition to this, you can import service contracts from Visual Studio that will provide you with access to the full capabilities of the editor.
During development, editor extensions can be run and debugged in the Experimental Instance of Visual Studio. The Experimental Instance behaves like a separate installation of Visual Studio with its own settings and registry. It also manages a separate set of extensions. When you are ready to deploy your extension to the normal instance of Visual Studio, you can double-click the .vsix package, which is created as a part of the build process. This package is entirely self-contained, so you can use it to deploy your extension to other machines as well.
The Visual Studio 2010 Editor looks for a number of contracts, which it uses to extend the editor behavior at run time. Usually you need to create at least two classes for each type of extension that you are exposing. One class will perform the work of the extension and the other will typically be imported by Visual Studio and asked to provide instances of your main extension class when required.
Each ITextBuffer is assigned a content type when it is created that identifies the type of text it contains. Examples of content types include Text, Code, CSharp, or Basic. Content types are used as filters for the various editor extensions that you can create by adding a ContentTypeAttribute to the exported extension. An example would be an IntelliSense provider that is only valid for Xml content.
Note
Even though content type is assigned to an ITextBuffer when it is created, it can be changed by calling the ChangeContentType method.
You can create your own content types by exporting a property or field with the ContentTypeDefinition contract. Each content type can have multiple parent content types, which are defined by adding a BaseDefinitionAttribute to the exported content type for each parent type. To get a full list of content types you can import the IContentTypeRegistryService, which maintains a list of registered content types.
Note
A content type can be associated with a file extension using a FileExtensionAttribute. Note that the file extension must be one that has been registered with Visual Studio already. Search for "ProvideLanguageExtension Attribute Class" on MSDN for more information on how to do this.
A classification type is metadata that can be applied to any span of text. Some examples of classification types include "keyword" or "comment," both of which inherit from the classification type "code." You can create your own classification types by exporting a property or field of the ClassificationTypeDefinition class. This allows you to attach custom behavior to the text.
Note
Classification types are not the same thing as content types. Each ITextBuffer has a single content type but may contain spans of text that have many different classifications.
Classification types are attached to spans of text using an IClassifier instance. A classifier aggregator collects the classifications from a number of different classifiers for a text buffer and creates a unique non-overlapping set of classifications from that buffer. In effect, a classifier aggregator is a classifier itself because it also provides classifications for a span of text. To get the classifier aggregator for a particular ITextBuffer instance of text you can import the IClassificationAggregatorService and call its GetClassifier method, passing in the text buffer.
You can define a format for a specific classification type by deriving a new class from ClassificationFormatDefinition and exporting it with an EditorFormatDefinition contract. The base class contains a number of properties that you can use to change the way text is rendered. You associate the format definition with the classification type by using the ClassificationTypeAttribute on the exported class. This attribute accepts a string that is a comma-separated list of classification types that the format applies to. You can also use DisplayNameAttribute and UserVisibleAttribute to show this classification format in the Fonts and Settings page of the Options dialog. You can also specify a PriorityAttribute, which will help to determine when the format is applied.
A margin is a piece of UI around the edges of the main editor window. There are four predefined margins names: Top, Bottom, Left, and Right, which act as containers for other margins that you can define. You could define a margin that turns red when a generated file is opened to warn the user that they should not edit the file.
To create a margin, you need to make a new class that implements IWpfTextViewMargin, which contains properties for the margin size as well as for the actual UIElement that draws the margin on the screen. To register your margin with Visual Studio, you need to export a class with the IWpfTextViewMarginProvider contract. This interface contains a single method that should return an instance of your IWpfTextViewMargin. In addition to the MEF export, the margin provider can also provide the following:
A
NameAttribute, which is used to give the provider a human-readable name.A
ContentTypeAttribute, which identifies the content type that the margin should be made available for.An
OrderAttributeand aMarginContainerAttribute, which are both used to determine where the margin should be drawn. The order is specified by supplying the string name of another margin to run eitherBeforeorAfter. The container identifies which border the margin should be displayed against (top, bottom, left, or right).
A tag is a piece of metadata that is applied to a specific span of text. Examples of tags include SquiggleTag, TextMarkerTag, and OutliningRegionTag. Tags are associated with spans of text using instances of the ITagger interface. To register an ITagger, you need to create a class that implements the ITaggerProvider interface, override the CreateTagger method, and then export the new class with the ITaggerProvider contract. Your tagger provider should also be marked up with the TagTypeAttribute, which identifies the type of tag its taggers will produce.
Note
Classification is a special case of tagging provided by a ClassifactionTag.
An adornment is a special effect that can be applied to a span of text or to the editor surface itself. You can define your own adornments, which are just standard WPF UIElements. Each type of adornment gets rendered in a separate layer so that different adornment types don't interfere with each other. To specify a layer on which your adornment belongs, your adornment class should export an AdornmentLayerDefinition along with a NameAttribute and an OrderAttribute. The Order can be defined as Before or After one of four built-in adornment layers: Selection, Outlining, Caret, and Text. When the adornment wants to display itself, it can request an instance of the IAdornmentLayer from the IWpfTextView by name. This interface exposes methods to add UIElements to the layer and clear all adornments out of the layer.
To create your adornment, you need to export a class with the IWpfTextViewCreationListener contract. This class should simply instantiate a new adornment whenever a text view is created. It is up to the adornment to wire itself up to events that it needs to use to redraw its contents. This class can be marked up with a standard ContentTypeAttribute to filter the content types on which it will appear. It can also include a TextViewRoleAttribute that defines for which kind of text view it should appear. The PredefinedTextViewRoles contains a list of valid values.
Mouse processors are able to capture events from the mouse. Each mouse processor should derive from MouseProcessorBase and override the event handlers that they want to handle. To expose your mouse processor to Visual Studio, you must export a class under the IMouseProcessorProvider contract. You also need to apply a ContentTypeAttribute to identify the types of content for which the mouse processor is available.
Drop handlers customize the behavior of the Visual Studio editor when content is dropped into it. Each drop handler should implement IDropHandler and you will need an IDropHandlerProvider to provide your drop handler to Visual Studio. This provider class should export the IDropHandlerProvider contract along with the following metadata:
A
NameAttributeto identify your drop handler.A
DropFormatAttribute, which specifies the format of text for which this handler is valid. Twenty-three built-in formats are supported, which are all handled in a specific order. Check the MSDN documentation for the full list.An
OrderAttribute, which identifies where in the order of drop handlers this handler should execute. You do this by providingBeforeandAftercomponents of theOrder. Each component is just a text name for the handler. The default drop handler provided by Visual Studio is calledDefaultFileDropHandler.
Editor options allow your extensions to expose settings. These settings can be imported into other components of the system and used to alter their behavior. This type of export is used to expose the value of your option to other components, but Visual Studio does nothing to expose these options to the user. If you want the user to be able to manage these options, you need to create your own UI.
To create a new editor option, you must derive from one of the three abstract base classes EditorOptionDefinition<T>, ViewOptionDefinition<T>, or WpfViewOptionDefintion<T> and specify the type of the option value being created (that is, Boolean or String). These base classes provide abstract properties for you to implement containing information about the option, including its current value and its default value. To make the editor option available to Visual Studio, you should export it with the EditorOptionDefinition contract.
IntelliSense is a term that is used to describe a set of features that provide contextual information and statement completion services. No matter what type of IntelliSense extension you are providing, the components and the process are always the same:
A broker controls the overall process.
A session represents the sequence of events, which typically start with a user gesture triggering the presenter and end with the committal or cancellation of the selection.
A controller determines when a session should begin and end. It also decides the manner in which the session ends.
A source provides content for the IntelliSense session and determines the best match for display.
A presenter is responsible for displaying the content of a session.
It is recommended that you provide at least a source and a controller when defining IntelliSense extensions. You should only provide a presenter if you want to customize the display of your feature.
To provide an IntelliSense source, you need to create a class that implements one (or more) of these interfaces: ICompletionSource, IQuickInfoSource, ISignatureHelpSource, or ISmartTagSource. Each of these interfaces defines methods that provide you with the context for the session and allow you to return the information that will be displayed.
For each of the interfaces implemented you need another class that implements the corresponding provider interface: ICompletionSourceProvider, IQuickInfoSourceProvider, ISignatureHelpSourceProvider, or ISmartTagSourceProvider. This provider class must be exported using its provider interface as a contract. In addition to the export, you can specify a NameAttribute, an OrderAttribute, and a ContentTypeAttribute.
To provide an IntelliSense controller, you need a class that implements IIntellisenseController. This interface provides methods for the controller to attach and detach ITextBuffers. When the controller senses an event that should begin an IntelliSense session, it requests one from the correct type of broker: ICompletionBroker, IQuickInfoBroker, ISignatureHelpBroker, or ISmartTagBroker. The easiest way to get access to a broker is to import one into the controller provider (defined next) and pass it into the constructor of the IntelliSense controller.
Finally, you need an IIntellisenseControllerProvider that is exported along with a NameAttribute, an OrderAttribute, and a ContentTypeAttribute.
Visual Studio exposes a large number of editor services under well-known contracts that you can import into your extension classes. Here are a few common ones (see the MSDN documentation for a complete list):
IContentTypeRegistryServicemanages the collection of content types that are available to be assigned toITextBuffers. This service allows you add and remove content types, as well as query the currently registered content types.ITextDocumentFactoryServiceprovides the ability to create new documents and load existing documents from the file system. It also has events for whenITextDocumentsare created and disposed.IClassifierAggregatorServicecontains only a single method,GetClassifier, that returns a classifier for a givenITextBuffer. It will create and cache classifiers if they don't already exist.ITextSearchServiceis responsible for locating specific text within a defined region of text. It has methods to find all instances or just find the next instance.IWpfKeyboardTrackingServiceallows you to switch the keyboard tracking over to WPF in the editor. Normally Visual Studio performs its own keyboard tracking, so if you are using WPF controls that listen for keyboard events they will never be detected. This service allows you toggle the ability for WPF to have the first shot at handling keyboard events. Keyboard events that are left unhandled by WPF will be passed to Visual Studio and handled as normal.
This section shows the complete source code for a sample extension with explanations along the way. In our office, whenever we come across something that doesn't seem to be quite right we attach a comment asking for an explanation using the special token check: followed by a few sentences going into what aspect we think is wrong. Normally, if we encounter a piece of code with a check comment and we can answer the query, we will try and find a way to refactor the code so that the answer is obvious or supply a comment explaining why the code is the way it is (on the rare occasion that the check comment exposes an error, we fix it). Using this technique, our code becomes more maintainable over time as it gets easier to read and understand. We have tools that allow us to extract a list of these comments from the code base, but it would be really handy if we could highlight them within the code editor itself. The Check Comment Margin Highlighter does just that by adding a glyph in the margin on the left (where breakpoints normally appear) for any line that contains a comment that contains the token check:.
The code comes in two parts: a tagger and a glyph factory. Here is the complete code listing for the tagger:
- C#
using System;
using System.Collections.Generic;
using System.ComponentModel.Composition;

using Microsoft.VisualStudio.Text;
using Microsoft.VisualStudio.Text.Classification;
using Microsoft.VisualStudio.Text.Editor;
using Microsoft.VisualStudio.Text.Tagging;
using Microsoft.VisualStudio.Utilities;

namespace CheckCommentHighlighter
{
    class CheckCommentTag : IGlyphTag { }

    class CheckCommentTagger : ITagger<CheckCommentTag>
    {
        private readonly IClassifier _classifier;

        public CheckCommentTagger(IClassifier classifier)
        {
            _classifier = classifier;
        }

        public IEnumerable<ITagSpan<CheckCommentTag>> GetTags(
             NormalizedSnapshotSpanCollection spans)
        {
            foreach (var span in spans)
            {
                foreach (var classification in
                         _classifier.GetClassificationSpans(span))
                {
                    var isComment = classification.ClassificationType
                                                  .Classification
                                                  .ToLower()
                                                  .Contains("comment");

                    if (isComment)
                    {
                        var index = classification.Span.GetText()
                                                  .ToLower().IndexOf("check:");
                        if (index != −1)
                        {
                            var tag = new CheckCommentTag();
                            var snapshotSpan = new SnapshotSpan(
                                        classification.Span.Start + index, 6);
                            yield return new TagSpan<CheckCommentTag>(
                                                     snapshotSpan,
                                                     tag);
                        }
                    }
                }
            }
        }

        public event EventHandler<SnapshotSpanEventArgs> TagsChanged;
} [Export(typeof(ITaggerProvider))] [TagType(typeof(CheckCommentTag))] [ContentType("code")] class CheckCommentTaggerProvider : ITaggerProvider { [Import] private IClassifierAggregatorService AggregatorService; public ITagger<T> CreateTagger<T>(ITextBuffer buffer) where T : ITag { if( buffer == null ) throw new ArgumentNullException("buffer"); var classifier = AggregatorService.GetClassifier(buffer); return new CheckCommentTagger(classifier) as ITagger<T>; } } }
- VB
Imports System.ComponentModel.Composition
Imports Microsoft.VisualStudio.Text
Imports Microsoft.VisualStudio.Text.Tagging
Imports Microsoft.VisualStudio.Text.Editor
Imports Microsoft.VisualStudio.Text.Classification
Imports Microsoft.VisualStudio.Utilities

Friend Class CheckCommentTag
  Inherits IGlyphTag

End Class


Friend Class CheckCommentTagger
  Implements ITagger(Of CheckCommentTag)

  Private m_classifier As IClassifier

  Friend Sub New(ByVal classifier As IClassifier)
    m_classifier = classifier
  End Sub

  Private Function GetTags(ByVal spans As NormalizedSnapshotSpanCollection)
    As IEnumerable(Of ITagSpan(Of CheckCommentTag))
Implements ITagger(Of CheckCommentTag).GetTags Dim Tags As New List(Of ITagSpan(Of CheckCommentTag)) For Each span As SnapshotSpan In spans For Each classification As ClassificationSpan In m_classifier.GetClassificationSpans(span) If classification.ClassificationType.Classification.ToLower() .Contains("comment") Then Dim index As Integer = classification.Span.GetText().ToLower() .IndexOf("check:") If index <> −1 Then Dim snapshotSpan As New SnapshotSpan(classification.Span.Start + index, 6) Dim tag As New CheckCommentTag Tags.Add(New TagSpan(Of CheckCommentTag)(snapshotSpan, tag)) End If End If Next classification Next span Return Tags End Function Public Event TagsChanged As EventHandler(Of SnapshotSpanEventArgs) Implements ITagger(Of CheckCommentTag).TagsChanged End Class <Export(GetType(ITaggerProvider)), ContentType("code"), TagType(GetType(CheckCommentTag))> Friend Class CheckCommentTaggerProvider Implements ITaggerProvider <Import()> Friend AggregatorService As IClassifierAggregatorService Public Function CreateTagger(Of T As ITag)(ByVal buffer As ITextBuffer) As ITagger(Of T) Implements ITaggerProvider.CreateTagger If buffer Is Nothing Then Throw New ArgumentNullException("buffer") End If Dim Classifier = AggregatorService.GetClassifier(buffer) Dim tagger As New CheckCommentTagger(Classifier) Return TryCast(tagger, ITagger(Of T)) End Function End Class
Three classes are defined here. The first is the CheckCommentTag class. It inherits from IGlyphTag but has no implementation on its own. It is purely a marker that identifies when a particular span of text should have this glyph applied. We could have supplied some properties on the tag class to pass information to the glyph factory later that could be used to affect the type of UIElement displayed.
The second class is the CheckCommentTagger class. This class is responsible for identifying spans of text that should have the CheckCommentTag applied. It does this by implementing the ITagger<CheckCommentTag> interface. This interface consists of a method called GetTags and a TagsChanged event. GetTags takes a collection of spans and returns a collection of ITagSpans. In this implementation, it finds all of the comments with the help of a classifier and searches for the string check:. If it finds this string, it creates a new TagSpan<CheckCommentTag> item, which it applies to just the span of text that covers the check: string.
The final class is CheckCommentTaggerProvider, which contains the MEF export metadata that Visual Studio is looking for in the extension. This class is exported using the ITaggerProvider contract, which means that Visual Studio will add it to an internal list of tagger providers to be called upon whenever taggers are required. Two other pieces of metadata are also attached to this class. The TagTypeAttribute specifies the type of tags that will be produced by any taggers that this provider creates. The ContentTypeAttribute supplies a filter on the kinds of content on which this tagger provider should be used. In this case, the attribute specifies that this tagger provider should only be called upon when the editor contains code, which is a common base content type provided by the editor.
The tagger provider class also has an import requirement for an IClassifierAggregatorService. This service is used in the construction of taggers, which occurs in the CreateTagger<T> method. This method is passed an ITextbuffer for which it is to provide a tagger. It uses the AggregatorService to retrieve a classifier and then uses the classifier to construct the CheckCommentTagger defined in the previous code snippet.
This code is enough to allow Visual Studio to mark up check comments as requiring a glyph, but if you deploy the extension as it is right now you won't see anything because there are no components offering to draw a CheckCommentTag. For that you need a glyph factory, which is the other half of the extension. Here is the code:
- C#
using System.ComponentModel.Composition;
using System.Windows;
using System.Windows.Media;
using System.Windows.Shapes;

using Microsoft.VisualStudio.Text.Editor;
using Microsoft.VisualStudio.Text.Formatting;
using Microsoft.VisualStudio.Text.Tagging;
using Microsoft.VisualStudio.Utilities;

namespace CheckCommentHighlighter
{
    class CheckCommentGlyphFactory : IGlyphFactory
    {
        public UIElement GenerateGlyph(IWpfTextViewLine line, IGlyphTag tag)
        {
var validTag = tag as CheckCommentTag != null; if (!validTag) return null; return new Polygon { Fill = Brushes.LightBlue, Stroke = Brushes.DarkBlue, StrokeThickness = 2, Points = new PointCollection { new Point(0, 0), new Point(16, 8), new Point(0, 16) } }; } } [Export(typeof(IGlyphFactoryProvider))] [TagType(typeof(CheckCommentTag))] [Name("CheckCommentGlyph")] [ContentType("code")] [Order(After="VSTextMarker")] class CheckCommentGlyphFactoryProvider : IGlyphFactoryProvider { public IGlyphFactory GetGlyphFactory(IWpfTextView view, IWpfTextViewMargin margin) { return new CheckCommentGlyphFactory(); } } }
- VB
Imports System.ComponentModel.Composition
Imports System.Windows
Imports System.Windows.Media
Imports System.Windows.Shapes

Imports Microsoft.VisualStudio.Text.Editor
Imports Microsoft.VisualStudio.Text.Formatting
Imports Microsoft.VisualStudio.Text.Tagging
Imports Microsoft.VisualStudio.Utilities

Friend Class CheckCommentGlyphFactory
    Implements IGlyphFactory
Public Function GenerateGlyph(ByVal line As IWpfTextViewLine, ByVal tag As IGlyphTag) As UIElement Implements IGlyphFactory.GenerateGlyph If tag Is Nothing OrElse Not (TypeOf tag Is CheckCommentTag) Then Return Nothing End If Dim triangle As New System.Windows.Shapes.Polygon() With triangle .Fill = Brushes.LightBlue .Stroke = Brushes.DarkBlue .StrokeThickness = 2 .Points = New PointCollection() With .Points .Add(New Point(0, 0)) .Add(New Point(16, 8)) .Add(New Point(0, 16)) End With End With Return triangle End Function End Class <Export(GetType(IGlyphFactoryProvider)), Name("CheckCommentGlyph"), Order(After:="VsTextMarker"), ContentType("code"), TagType(GetType(CheckCommentTag))> Friend NotInheritable Class TodoGlyphFactoryProvider Implements IGlyphFactoryProvider Public Function GetGlyphFactory( ByVal view As Microsoft.VisualStudio.Text.Editor.IWpfTextView, ByVal margin As Microsoft.VisualStudio.Text.Editor.IWpfTextViewMargin) As Microsoft.VisualStudio.Text.Editor.IGlyphFactory Implements Microsoft.VisualStudio.Text.Editor.IGlyphFactoryProvider.GetGlyphFactory Return New CheckCommentGlyphFactory() End Function End Class
Just as with the code to expose the check comment tagger to Visual Studio, two classes are at work here: one class that actually creates glyphs and another class that provides instances of this glyph factory to Visual Studio on demand. The CheckCommentGlyphFactory is very simple. It just checks to ensure that the tag is of the correct type and then creates the visual element that is to be displayed. This can be any WPF UIElement. In this implementation, it is a light blue triangle pointing to the right with a dark blue border.
The second class is the actual gateway into Visual Studio. It is exported using the IGlyphFactoryProvider contract, associated with a specific tag and content type. It also specifies a name that makes it easier to identify. Finally, it specifies that it should be drawn after items in the "VSTextMarker" layer, which means it will appear to be on top of items in this layer. The actual implementation of this class is a simple factory method for instances of the CheckCommentGlyphFactory class.
If you run this extension it will start up in the Experimental Instance of Visual Studio. Load a code file and add a comment that starts with Check: and a blue triangle appears in the margin to the left as in Figure 53-3.

The Managed Extensibility Framework simplifies the process of creating extensible applications by allowing you to think of your application as a collection of composable parts, each of which exposes exports and requires imports. Extensions can be added to your application by creating appropriate catalogs of parts and providing them to your composition container. MEF is able to cover a much wider range of capabilities than those covered in this chapter. Be sure to check out the MEF Programming Guide on http://mef.codeplex.com for more information.
Visual Studio 2010 is able to create a highly extensible run time by taking advantage of MEF. It watches extensions for known exported contracts, which it will use when composing the new WPF Editor control, allowing you to easily extend its behavior. In addition to this, Visual Studio exports a number of services on well-known contracts that you can import for use in your extensions. For more information about the new Visual Studio Editor and how to extend it using MEF, consult the Visual Studio 2010 Editor topic on MSDN, which contains many examples of extensions.