
A generation of applications built around services and the separation of user experience from backend data stores has seen requirements for occasionally connected applications emerge. Occasionally connected applications are those that continue to operate regardless of network availability. In Chapter 34 you will learn how data can be synchronized to a local store to allow the user to continue to work when the application is offline. However, this scenario leads to discussions (often heated) about security. Because security (that is, user authentication and role authorization) is often managed centrally, it is difficult to extend so that it incorporates occasionally connected applications.
In this chapter you become familiar with the client application services that extend ASP.NET Application Services for use in client applications. ASP.NET Application Services is a provider-based model for performing user authentication, role authorization, and profile management that has in the past been limited to web services and web sites. In Visual Studio 2010, you can configure your rich client application, either Windows Forms or WPF, to make use of these services throughout your application to validate users, limit functionality based on what roles users have been assigned, and save personal settings to a central location.
Over the course of this chapter you are introduced to the different application services via a simple WPF application. In this case it is an application called ClientServices, which you can create by selecting the (C# or VB) WPF Application template from the File
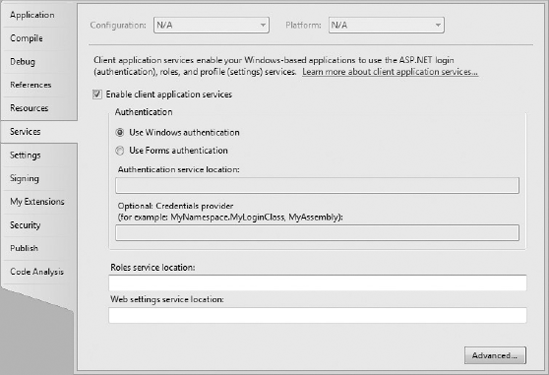
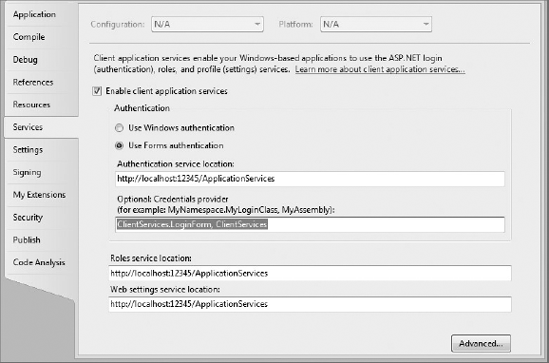
To begin using the client application services, you need to enable the checkbox on the Services tab of the project properties designer, as shown in Figure 33-1. The default authentication mode is to use Windows authentication. This is ideal if you are building your application to work within the confines of a single organization and you can assume that everyone has domain credentials. Selecting this option ensures that those domain credentials are used to access the roles and settings services. Alternatively, you can elect to use Forms authentication, in which case you have full control over the mechanism that is used to authenticate users. We return to this topic later in the chapter.
Note
You can also add the client application services to existing applications via the Visual Studio 2010 project properties designer in the same way as for a new application.
You will notice that when you enabled the client application services, an app.config file was added to your application if one did not already exist. Of particular interest is the <system.web> section, which should look similar to the following snippet:
<system.web>
    <membership defaultProvider="ClientAuthenticationMembershipProvider">
        <providers>
            <add name="ClientAuthenticationMembershipProvider" type=
            "System.Web.ClientServices.Providers.ClientWindowsAuthentication
MembershipProvider, System.Web.Extensions, Version=4.0.0.0, Culture=neutral,
PublicKeyToken=31bf3856ad364e35" serviceUri="" connectionStringName="Default
Connection" credentialsProvider=""/>
</providers>
</membership>
<roleManager defaultProvider="ClientRoleProvider" enabled="true">
<providers>
<add name="ClientRoleProvider"
type="System.Web.ClientServices.Providers.ClientRoleProvider, System.Web.Ext
ensions, Version=4.0.0.0, Culture=neutral, PublicKeyToken=31bf3856ad364e35"
serviceUri="" cacheTimeout="86400" connectionStringName="DefaultConnection"/>
</providers>
</roleManager>
</system.web>

Here you can see that providers have been defined for membership and role management. You can extend the client application services framework by building your own providers that can talk directly to a database or to some other remote credential store such as Active Directory. Essentially, all the project properties designer does is modify the app.config file to use the providers that ship with the .NET Framework and define associated properties. To implement your own providers, you need to create concrete classes that implement the abstract methods defined in the System.Web.Security.RoleProvider, System.Web.Security.MembershipProvider, or System.Configuration.SettingsProvider classes (depending on which provider you are implementing).
After you define the default role and membership providers, you use the client application services to validate the application user. To do this, you need to invoke the ValidateUser method on the System.Web.Security.Membership class, as shown in the following snippet:
- C#
using System.Web.Security;
public partial class MainWindow : Window{
    public MainWindow(){
        InitializeComponent();
    }
    private void Window_Loaded(object sender, RoutedEventArgs e){
        if (Membership.ValidateUser(null, null)){
            MessageBox.Show("User is valid");
        }
        else{
            MessageBox.Show("Unable to verify user, application exiting");
            this.Close();
            return;
        }
    }
}
- VB
Imports System.Web.Security
Class MainWindow
    Private Sub Window_Loaded(ByVal sender As System.Object,
                      yVal e As System.Windows.RoutedEventArgs) Handles Me.Loaded
        If Membership.ValidateUser(Nothing, Nothing) Then
            MessageBox.Show("User is valid")
        Else
            MessageBox.Show("Unable to verify user, application exiting")
            Me.Close()
            Return
        End If
    End Sub
End Class
Interestingly, there is no overload of the ValidateUser method that accepts no arguments; instead, when using Windows authentication, you should use Nothing (VB) or null (C#) for the username and password arguments. In this case, ValidateUser does little more than prime the CurrentPrincipal of the application to use the client application services to determine which roles the user belongs to, and by default will return true. You see later that using this method is the equivalent of logging the user in to the application.
Note
The preceding code snippet, and others throughout this chapter, may require you to import the System.Web.Security namespace into this class file. You may also need to manually add a reference to System.Web.dll in order to resolve type references.
The client application services include what is often referred to as an application framework for handling security. VB has for a long time had its own application framework for Windows Forms Applications that is enabled and disabled via the Application tab on the project properties designer. This framework already includes limited support for handling user authentication, but it conflicts with the client application services. Figure 33-2 shows how you can elect to use an application-defined authentication mode so that you can use both the Windows application framework and the client application services in your application.
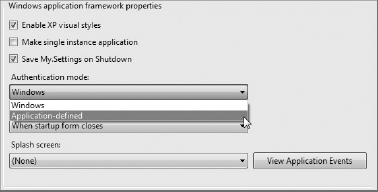
Note that this setting is available only if you are developing a Windows Forms Application in VB.
So far, you have seen how to enable the client application services, but they haven't really started to add value because the user was already authenticated by the operating system when you were using Windows authentication for the client application. What isn't handled by the operating system is specifying which roles a user belongs to and thus what parts or functions within an application the user can access. Although this could be handled by the client application itself, it would be difficult to account for all permutations of users and the system would be impractical to manage, because every time a user was added or changed roles a new version of the application would have to be deployed. Instead, it is preferable to have the correlations between users and roles managed on the server, allowing the application to work with a much smaller set of roles through which to control access to functionality.
The true power of the client application services becomes apparent when you combine the client-side application framework with the ASP.NET Application Services. To see this, you should add a new project to your solution using the (VB or C#) ASP.NET Empty Web Application template (under the Web node in the New Project dialog), calling it ApplicationServices.
Right-click the newly created project in Solution Explorer and select Properties to bring up the project properties designer. Because you will be referencing this web application from other parts of the solution, it is preferable to use a predefined port and virtual directory with the Visual Studio Development Server. On the Web tab, set the specific port to 12345 and the virtual path to /ApplicationServices.
ASP.NET Application Services is a provider-based model for authenticating users, managing roles, and storing profile (a.k.a. settings) information. Each of these components can be engaged independently, and you can either elect to use the built-in providers or create your own. To enable the role management service for access via client application services, add the following snippet before the <system.web> element in the web.config file in the ApplicationServices project:
<system.web.extensions>
    <scripting>
        <webServices>
            <roleService enabled="true"/>
        </webServices>
    </scripting>
</system.web.extensions>

Because you want to perform some custom logic to determine which roles a user belongs to, you will need to create a custom role provider, called CustomRoles, to take the place of the default role provider. This is done by adding a new class to your project and implementing the RoleProvider abstract class. For this role provider, you are interested only in returning a value for the GetRolesForUser method; all other methods can be left as method stubs.
- C#
public class CustomRoles: RoleProvider{
    public override string[] GetRolesForUser(string username){
        if (username.ToLower().Contains("nick")){
            return new string[] { "All Nicks" };
} else{ return new string[] { }; } }
- VB
Public Class CustomRoles
    Inherits RoleProvider

    Public Overrides Function GetRolesForUser(ByVal username As String) As String()
        If username.ToLower.Contains("nick") Then
            Return New String() {"All Nicks"}
        Else
            Return New String() {}
        End If
    End Function
You now have a custom role provider and have enabled role management. The only thing missing is the glue that lets the role management service know to use your role provider. You provide this by adding the following roleManager node to the <system.web> element in the web.config file:
<roleManager enabled="true" defaultProvider="CustomRoles">
    <providers>
        <add name=" CustomRoles" type="AuthenticationServices.CustomRoles"/>
    </providers>
</roleManager>

The last thing to do is to make use of this role information in your application. You do this by first configuring your application with the URI to use for loading role information. On the Services tab of the ClientServices project properties (shown in Figure 33-1), enter http://localhost:12345/ApplicationServices. Next, you need to add a call to IsUserInRole to the Window_Loaded method:
- C#
private void Window_Loaded(object sender, RoutedEventArgs e){
    if (Membership.ValidateUser(null, null))
    { // Commented out for brevity.
    }
    if (Roles.IsUserInRole("All Nicks")){
        MessageBox.Show("User is a Nick, so should have Admin rights.");
    }
}
- VB
Private Sub Window_Loaded(ByVal sender As System.Object,
                       ByVal e As System.Windows.RoutedEventArgs) Handles Me.Loaded
    If Membership.ValidateUser(Nothing, Nothing) Then
        '. Commented out for brevity .
    End If
    If Roles.IsUserInRole("All Nicks") Then
        MessageBox.Show("User is a Nick, so should have Admin rights.")
    End If
End Sub
To see your custom role provider in action, set a breakpoint in the GetRolesForUser method. For this breakpoint to be hit, you have to have both the client application and the web application running in debug mode. To do this, right-click the Solution node in the Solution Explorer window and select Properties. From the Startup Project node, select Multiple Startup Projects and set the action of both projects to start. Now when you run the solution, you will see that the GetRolesForUser method is called with the Windows credentials of the current user, as part of the validation of the user.
In some organizations it would be possible to use Windows authentication for all user validation. Unfortunately, in many cases this is not possible, and application developers have to come up with their own solutions for determining which users should be able to access a system. This process is loosely referred to as forms-based authentication, because it typically requires the provision of a username and password combination via a login form of some description. Both ASP.NET Application Services and the client application services support forms-based authentication as an alternative to Windows authentication.
To begin with, you will need to enable the membership management service for access by the client application services. Adding the <authenticationService> element to the <system.web.extensions> element in the web.config file does this. Note that we have disabled the SSL requirement, which is clearly against all security best practices and not recommended for production systems.
<system.web.extensions>
         <scripting>
                <webServices>
                        <authenticationService enabled="true" requireSSL="false"/>
                        <roleService enabled="true"/>

The next step is to create a custom membership provider that will determine whether a specific username and password combination is valid for the application. To do this, add a new class, CustomAuthentication, to the ApplicationServices application and set it to inherit from the MembershipProvider class. As with the role provider you created earlier, you are just going to provide a minimal implementation that validates credentials by ensuring the password is the reverse of the supplied username, and that the username is in a predefined list.
- C#
public class CustomAuthentication : MembershipProvider{
    private string[] mValidUsers = { "Nick" };

    public override bool ValidateUser(string username, string password)
    {
        var reversed = new string(password.Reverse().ToArray());
        return (from user in mValidUsers
                where string.Compare(user, username, true) == 0 &&
                      user == reversed
                select user).Count() > 0;
    }
    // The rest of the implementation has been omitted for brevity
}
- VB
Public Class CustomAuthentication
    Inherits MembershipProvider
    Private mValidUsers As String() = {"Nick"}

    Public Overrides Function ValidateUser(ByVal username As String,
                                            ByVal password As String) As Boolean
        Dim reversed As String = New String(password.Reverse.ToArray)
        Return (From user In mValidUsers
                Where String.Compare(user, username, True) = 0 And
                        user = reversed).Count > 0
    End

   'The rest of the implementation has been omitted for brevity
End Class
As with the role provider you created, you will also need to inform the membership management system that it should use the membership provider you have created. You do this by adding the following snippet to the <system.web> element in the web.config file:
<membership defaultProvider="CustomAuthentication">
    <providers>
        <add name="CustomAuthentication"
  type="ApplicationServices.CustomAuthentication"/>
    </providers>
</membership>
<authentication mode="Forms"/>

Back on the client application, only minimal changes are required to take advantage of the changes to the authentication system. On the Services tab of the project properties designer, select Use Forms Authentication. This enables both the Authentication Service Location textbox and the Optional: Credentials Provider textbox. For the time being, just specify the authentication service location as http://localhost:12345/ApplicationServices.
Previously, using Windows authentication, you performed the call to ValidateUser to initiate the client application services by supplying Nothing as each of the two arguments. You did this because the user credentials could be automatically determined from the current user context in which the application was running. Unfortunately, this is not possible for Forms authentication, so you need to supply a username and password:
- C#
private void Window_Loaded(object sender, RoutedEventArgs e){
    if (Membership.ValidateUser("Nick", "kciN")){
        MessageBox.Show("User is valid");
- VB
Private Sub Window_Loaded(ByVal sender As System.Object,
                          ByVal e As System.Windows.RoutedEventArgs) _
                          Handles Me.Loaded
    If Membership.ValidateUser("Nick", "kciN") Then
        MessageBox.Show("User is valid")
If you specify a breakpoint in the ValidateUser method in the ApplicationServices project, you will see that when you run this solution the server is contacted in order to validate the user. You see later that this information can then be cached locally to facilitate offline user validation.
In the .NET Framework v2.0, the concept of settings with a User scope was introduced to allow per-user information to be stored between application sessions. For example, window positioning or theme information might have been stored as a user setting. Unfortunately, there was no way to centrally manage this information. Meanwhile, ASP.NET Application Services had the notion of profile information, which was essentially per-user information, tracked on a server, that could be used by web applications. Naturally, with the introduction of the client application services, it made sense to combine these ideas to allow settings to be saved via the Web. These settings have a scope of User (Web).
As with the membership and role services, you need to enable the profile service for access by the client application services. You do this by adding the <profileService> element to the <system.web.extensions> element in the web.config file:
<system.web.extensions>
    <scripting>
        <webServices>
            <profileService enabled="true"
                            readAccessProperties="Nickname"
                            writeAccessProperties="Nickname" />
            <authenticationService enabled="true" requireSSL="false"/>

Following the previous examples, you will build a custom profile provider that uses an in-memory dictionary to store user nicknames. Note that this isn't a good way to track profile information, because it would be lost every time the web server recycled and would not scale out to multiple web servers. Nevertheless, you need to add a new class, CustomProfile, to the ApplicationServices project and set it to inherit from ProfileProvider.
- C#
using System.Web.Profile;
using System.Configuration;
public class CustomProfile : ProfileProvider{
    private Dictionary<string, string> nicknames =
                                      new Dictionary<string, string>();

    public override System.Configuration.SettingsPropertyValueCollection
        GetPropertyValues(System.Configuration.SettingsContext context,
              System.Configuration.SettingsPropertyCollection collection){
        var vals = new SettingsPropertyValueCollection();
        foreach (SettingsProperty setting in collection){
            var value = new SettingsPropertyValue(setting);
            if (nicknames.ContainsKey(setting.Name)) {
                value.PropertyValue = nicknames[setting.Name];
            }
            vals.Add(value);
        }
        return vals;
    }

    public override void SetPropertyValues(SettingsContext context,
                          SettingsPropertyValueCollection collection){
        foreach (SettingsPropertyValue setting in collection){
            nicknames[setting.Name] = setting.PropertyValue.ToString();
        }
    }

    // The rest of the implementation has been omitted for brevity
}
- VB
Imports System.Configuration

Public Class CustomProfile
    Inherits ProfileProvider
    Private nicknames As New Dictionary(Of String, String)

    Public Overrides Function GetPropertyValues(ByVal context As SettingsContext,
                       ByVal collection As SettingsPropertyCollection) _
                                            As SettingsPropertyValueCollection
        Dim vals As New SettingsPropertyValueCollection
        For Each setting As SettingsProperty In collection
            Dim value As New SettingsPropertyValue(setting)
            If nicknames.ContainsKey(setting.Name) Then
                value.PropertyValue = nicknames.Item(setting.Name)
            End If
            vals.Add(value)
        Next
        Return vals
    End Function

    Public Overrides Sub SetPropertyValues(ByVal context As SettingsContext,
                               ByVal collection As SettingsPropertyValueCollection)
        For Each setting As SettingsPropertyValue In collection
            nicknames.Item(setting.Name) = setting.PropertyValue.ToString
        Next
    End Sub

    'The rest of the implementation has been omitted for brevity
End Class
The difference with the profile service is that when you specify the provider to use in the <system.web> element in the web.config file, you also need to declare what properties can be saved via the profile service (see the following snippet). For these properties to be accessible via the client application services, they must have a corresponding entry in the readAccessProperties and writeAccessProperties attributes of the <profileService> element, shown earlier.
<profile enabled="true" defaultProvider="CustomProfile">
    <providers>
        <add name="CustomProfile" type="ApplicationServices.CustomProfile"/>
    </providers>
    <properties>
        <add name="Nickname" type="string"
             readOnly="false" defaultValue="{nickname}"
             serializeAs="String" allowAnonymous="false" />
    </properties>
</profile>

As an aside, the easiest way to build a full profile service is to use the utility aspnet_regsql.exe (typically found at c:WindowsMicrosoft.NETFrameworkv4.0.21006aspnet_regsql.exe) to populate an existing SQL Server database with the appropriate table structure. You can then use the built-in SqlProfileProvider (SqlMembershipProvider and SqlRoleProvider for membership and role providers, respectively) to store and retrieve profile information. To use this provider, change the profile element you added earlier to the following:
<profile enabled="true" defaultProvider="CustomProfile">
    <providers>
        <add name="SqlProvider"
             type="System.Web.Profile.SqlProfileProvider"
             connectionStringName="SqlServices"
             applicationName="SampleApplication"
             description="SqlProfileProvider for SampleApplication" />
Note that the connectionStringName attribute needs to correspond to the name of a SQL Server connection string located in the connectionStrings section of the web.config file.
To use the custom profile provider you have created, in the client application, you need to specify the web settings service location on the Services tab of the project properties designer. This location should be the same as for both the role and authentication services: http://localhost:12345/ApplicationServices.
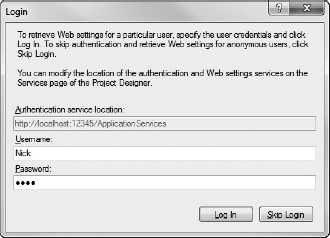
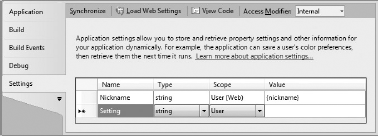
This is where the Visual Studio 2010 support for application settings is particularly useful. If you now go to the Settings tab of the project properties designer and click the Load Web Settings button, you are initially prompted for credential information, because you need to be a validated user to access the profile service. Figure 33-3 shows this dialog with the appropriate credentials supplied.
After a valid set of credentials is entered, the profile service is interrogated and a new row is added to the settings design surface, as shown in Figure 33-4. Here you can see that the scope of this setting is indeed User (Web) and that the default value, specified in the web.config file, has been retrieved.
If you take a look at the app.config file for the client application, you will notice that a new sectionGroup has been added to the configSections element. This simply declares the class that will be used to process the custom section that has been added to support the new user settings.
<configSections>
    <sectionGroup name="userSettings"
                  type="System.Configuration.UserSettingsGroup, System,
                        Version=4.0.0.0, Culture=neutral,
                        PublicKeyToken=b77a5c561934e089" >
      <section name="ClientServices.Properties.Settings"
               type="System.Configuration.ClientSettingsSection, System,
                     Version=4.0.0.0, Culture=neutral,
                     PublicKeyToken=b77a5c561934e089" allowExeDefinition=
                     "MachineToLocalUser" requirePermission="false" />
    </sectionGroup>
  </configSections>
Toward the end of the app.config file, you will see the custom section that has been created. As you would expect, the name of the setting is Nickname and the value corresponds to the default value specified in the web.config file in the ApplicationServices project.
<userSettings>
    <ClientAppServicesVB.MySettings>
        <setting name="Nickname" serializeAs="String">
            <value>{nickname}</value>
        </setting>
    </ClientAppServicesVB.MySettings>
</userSettings>
To make use of this in code you can use the same syntax as for any other setting. Here you simply retrieve the current value, request a new value, and then save this new value:
- C#
private void Window_Loaded(object sender, RoutedEventArgs e){
    // Commented out for brevity
    MessageBox.Show(My.Settings.Nickname)
    Properties.Settings.Default.Nickname = "Not the default Name";
    My.Settings.Save()
- VB
Private Sub Window_Loaded(ByVal sender As System.Object,
                          ByVal e As System.Windows.RoutedEventArgs) _
                                                 Handles Me.Loaded
    ' Commented out for brevity
    MessageBox.Show(My.Settings.Nickname)
    My.Settings.Nickname = InputBox("Please specify a nickname:", "Nickname")
    My.Settings.Save()
If you run this application again, the nickname you supplied the first time will be returned.
Earlier, when you were introduced to Forms authentication, you used a hard-coded username and password to validate the user. Although it would be possible for the application to prompt the user for credentials before calling ValidateUser with the supplied values, there is a better way that uses the client application services framework. Instead of calling ValidateUser with a username/password combination, you go back to supplying Nothing as the argument values and define a credential provider; then the client application services will call the provider to determine the set of credentials to use.
- C#
private void Window_Loaded(object sender, RoutedEventArgs e){
    if (Membership.ValidateUser(null, null)){
        MessageBox.Show("User is valid");
- VB
Private Sub Window_Loaded(ByVal sender As System.Object,
                         ByVal e As System.Windows.RoutedEventArgs) _
                                                              Handles Me.Loaded
    If Membership.ValidateUser(Nothing, Nothing) Then
        MessageBox.Show("User is valid")
This probably sounds more complex than it is because it is relatively easy to create a credentials provider. Start by adding a login form to the client application. Do this by selecting the Login Form template from the Add New Item dialog and calling it LoginForm. Unfortunately, this template is only available for VB developers as a Windows Forms form. If you want to create a WPF version or are working in C# you will need to add a new Window to the ClientServices project and add a TextBox (name it UsernameTextBox), a PasswordBox (name it PasswordTextBox), and two Buttons (name them OK and Cancel). While you have the designer open, click the OK button and change the DialogResult property to OK.
To use this login form as a credential provider, modify it to implement the IClientFormsAuthenticationCredentialsProvider interface. An alternative strategy would be to have a separate class that implements this interface and then displays the login form when the GetCredentials method is called. The following code snippet contains the code-behind file for the LoginForm class, showing the implementation of the IClientFormsAuthenticationCredentialsProvider interface:
- C#
using System.Web.ClientServices.Providers;
public partial class LoginForm : Window,
                                 IClientFormsAuthenticationCredentialsProvider {
    public LoginForm(){
InitializeComponent(); } private void OK_Click(object sender, RoutedEventArgs e){ this.DialogResult = true; this.Close(); } private void Cancel_Click(object sender, RoutedEventArgs e){ this.DialogResult = false; this.Close(); } public ClientFormsAuthenticationCredentials GetCredentials(){ if (this.ShowDialog() ?? false) { return new ClientFormsAuthenticationCredentials( UsernameTextBox.Text, PasswordTextBox. Password, false); } else{ return null; } } }
- VB
Imports System.Web.ClientServices.Providers

Public Class LoginForm
    Implements IClientFormsAuthenticationCredentialsProvider

    Public Function GetCredentials() As ClientFormsAuthenticationCredentials _
            Implements IClientFormsAuthenticationCredentialsProvider.GetCredentials
        If Me.ShowDialog() = Forms.DialogResult.OK Then
            Return New ClientFormsAuthenticationCredentials(UsernameTextBox.Text,
                                                            PasswordTextBox.Text,
                                                            False)
        Else
            Return Nothing
        End If
    End Function
End Class
Note
You will notice that the C# and VB code snippets are quite different. This is because the C# uses a new WPF window, while the VB snippet uses the Windows Form Login Form template.
As you can see from this snippet, the GetCredentials method returns ClientFormsAuthenticationCredentials if credentials are supplied, or Nothing (VB)/null (C#) if Cancel is clicked. Clearly this is only one way to collect credentials information, and there is no requirement that you prompt the user for this information. (The use of dongles or employee identification cards are common alternatives.)
With the credentials provider created, it is just a matter of informing the client application services that they should use it. You do this via the Optional: Credentials Provider field on the Services tab of the project properties designer, as shown in Figure 33-5.
Now when you run the application, you are prompted to enter a username and password to access the application. This information is then passed to the membership provider on the server to validate the user.
In the previous steps, if you had a breakpoint in the role provider code on the server, you may have noticed that it hit the breakpoint only the first time you ran the application. The reason for this is that it is caching the role information offline. If you click the Advanced button on the Services tab of the project properties designer, you will see a number of properties that can be adjusted to control this offline behavior, as shown in Figure 33-6.
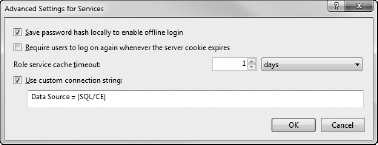
It's the role service cache timeout that determines how frequently the server is queried for role information. Because this timeout determines the maximum period it will take for role changes to be propagated to a connected client, it is important that you set this property according to how frequently you expect role information to change. Clearly, if the application is running offline, the changes will be retrieved the next time the application goes online (assuming the cache timeout has been exceeded while the application is offline).
Clicking the Save Password Hash checkbox means that the application doesn't have to be online for the user to log in. The stored password hash is used only when the application is running in offline mode, in contrast to the role information, for which the cache is queried unless the timeout has been exceeded.
Whether the application is online or offline is a property maintained by the client application services, because it is completely independent of actual network or server availability. Depending on your application, it might be appropriate to link the two as shown in the following example, where offline status is set during application startup or when the network status changes. From the project properties designer, click the View Application Events button on the Application tab (VB), or open App.xaml and add an event handler for the Startup event. This displays a code file in which the following code can be inserted:
- C#
using System.Net.NetworkInformation;
public partial class App : Application{
    private void Application_Startup(object sender, StartupEventArgs e){
        NetworkChange.NetworkAvailabilityChanged +=
        new NetworkAvailabilityChangedEventHandler
                                      (NetworkChange_NetworkAvailabilityChanged);
        this.UpdateConnectivity();
    }

    private void NetworkChange_NetworkAvailabilityChanged(object sender,
                                            NetworkAvailabilityEventArgs e){
        this.UpdateConnectivity();
    }

    private void UpdateConnectivity(){
        System.Web.ClientServices.ConnectivityStatus.IsOffline =
 !System.Net.NetworkInformation.NetworkInterface.GetIsNetworkAvailable();
    }
}
- VB
Class Application
    Private Sub MyApplication_Startup(ByVal sender As Object,
           ByVal e As System.Windows.StartupEventArgs) Handles Me.Startup
        AddHandler System.Net.NetworkInformation.NetworkChange.
        NetworkAvailabilityChanged, _
                      AddressOf MyApplication_NetworkAvailabilityChanged
        UpdateConnectivity()
    End Sub
Private Sub MyApplication_NetworkAvailabilityChanged( ByVal sender As Object ByVal e As System.Net.NetworkInformation.NetworkAvailabilityEventArgs) UpdateConnectivity() End Sub Private Sub UpdateConnectivity() System.Web.ClientServices.ConnectivityStatus.IsOffline = Not _ My.Computer.Network.IsAvailable() End Sub End Class
You should note that this is a very rudimentary way of detecting whether an application is online, and that most applications require more complex logic to determine if they are, in fact, connected. The other thing to consider is that when the application comes back online, you may wish to confirm that the user information is still up to date using the RevalidateUser method on the ClientFormsIdentity object (only relevant to Forms authentication):
- C#
(System.Threading.Thread.CurrentPrincipal.Identity as System.Web.ClientServices.ClientFormsIdentity).RevalidateUser()- VB
CType(System.Threading.Thread.CurrentPrincipal.Identity,
              System.Web.ClientServices.ClientFormsIdentity).RevalidateUser()
The last property in the Advanced dialog determines where the cached credential and role information is stored. This checkbox has been enabled because we chose to use Windows authentication earlier in the example. If you are using Forms authentication you can clear this checkbox. The client application services will use .clientdata files to store per-user data under the Application.UserAppDataPath, which is usually something like C:UsersNickAppDataRoamingClientServices1.0.0.0 (this will differ on Windows XP). Using a custom connection string enables you to use a SQL Server Compact Edition (SSCE) database file to store the credentials information. This is required for offline support of Windows authentication.
Note
Unfortunately, the designer is limited in that it doesn't enable you to specify any existing connections you may have. If you modify the app.config file, you can tweak the application to use the same connection.
This might be a blessing in disguise, because the |SQL/CE| datasource property (which is the default) actually lets the client application services manage the creation and setup of the SSCE database file (otherwise you have to ensure that the appropriate tables exist).
You will notice that the files that are created are .spf instead of the usual .sdf file extension — they are still SSCE database files that you can explore with Visual Studio 2010.
In this chapter, you have seen how the ASP.NET Application Services can be extended for use with client applications. With built-in support for offline functionality, the client application services enable you to build applications that can seamlessly move between online and offline modes. Combined with the Microsoft ADO.NET Synchronization Services, they provide the necessary infrastructure to build quite sophisticated occasionally connected applications.