
Creating your First Silverlight application
Using the Navigation Framework
Theming your Silverlight application
Running a Silverlight application outside of the browser
Although it's a rather new technology, Silverlight has been getting a lot of traction from within Microsoft and the developer community due to its huge potential as a development platform. New major versions are released very regularly (there were only nine months between the version 2 and version 3 releases), demonstrating that it is progressing fast. At the time of writing Silverlight had reached version 4, which is already showing a lot of maturity for a reasonably young technology.
Previously, it was quite a chore to configure Visual Studio 2008 for Silverlight development, requiring Service Pack 1 along with the Silverlight Tools to be installed just to get started. Visual Studio 2010 comes already configured for Silverlight development "out of the box," making it very easy to get started. Also, Visual Studio 2008 had no designer for Silverlight user interfaces (initially there was a preview view but this was later abandoned), requiring developers to write the XAML and run their application to view the results, or use Expression Blend if they had access to it (which did have a designer). This has been vastly improved in Visual Studio 2010, with a very capable designer now available making it much easier for developers to create user interfaces in Silverlight.
Because Silverlight is effectively a subset of Windows Presentation Foundation (WPF) you will find that many of the Visual Studio features for WPF detailed in Chapter 18 also apply to Silverlight, and thus aren't repeated here. Of course, Silverlight has no Windows Forms interoperability (due to it running in a sandboxed environment and not using the full .NET Framework), but the other Visual Studio features detailed for WPF development can also be used when developing Silverlight applications. This chapter takes you through the features of Visual Studio that are specific to Silverlight and don't apply to WPF.
When starting Silverlight development you will notice its similarity to WPF. Both technologies revolve around their use of XAML for defining the presentation layer, and are very similar to develop with. However, they do differ greatly in how they are each intended to be used. Silverlight could essentially be considered a trimmed-down version of WPF, designed to be deployed via the Web and run in a web browser — what is generally called a Rich Internet Application (RIA). WPF, on the other hand, is for developing rich client (desktop) applications. It could be pointed out that WPF applications can be compiled to an XBAP (XAML Browser Application) and deployed and run in the same manner as Silverlight applications, but these require the .NET Framework to be installed on the client machine and can only be run on Windows — neither of which is true for Silverlight applications.
One of the great benefits of Silverlight is that it doesn't require the .NET Framework to be installed on the client machine (which can be quite a sizable download if it isn't installed). Instead, the Silverlight run time is just a small download (about 5 MB), and installs itself as a browser plug-in. If the user navigates to a web page that has Silverlight content but the client machine doesn't have the Silverlight run time installed, the user is prompted to download and install it. The install happens automatically once the user agrees to it, and the Silverlight application opens when the install completes. With such a small download size for the run time, the Silverlight plug-in can be installed and running the Silverlight application in under two minutes. This makes it very easy to deploy your application. Though not as prevalent as Adobe Flash, Silverlight is rapidly expanding its install base and eventually it's expected that its install base will come close to that of Flash.
One of the advantages Silverlight applications (and RIA applications in general) have over ASP.NET applications is that they allow you to write rich applications that run solely on the client, and communicate with the server only when necessary (generally to send or request data). Essentially, you can write web applications in much the same way as you write desktop applications. This includes the ability to write C# or VB.NET code that runs on the client — enabling you to reuse your existing codebase and not have to learn new languages (such as JavaScript).
Another great benefit of Silverlight is that Silverlight applications will run in all the major web browsers, and most excitingly will also run on Mac as well as Windows, enabling you to build cross-browser and cross-platform applications very easily. Support for Linux is being provided by Moonlight (developed by the Mono team at Novell), although its development is running somewhat behind the versions delivered by Microsoft. This means that Silverlight can be the ideal way to write Web-deployed cross-platform applications. Silverlight applications render exactly the same across different web browsers, removing the pain of regular web development where each browser can render your application differently.
The downsides of Silverlight are that it only includes a subset of the .NET Framework in order to minimize the size of the run time download, and that the applications are run in a sandboxed environment — preventing access to the client machine (a good thing for security, but reduces the uses of the technology). There are tradeoffs to be made when choosing between WPF and Silverlight, and if you choose Silverlight you should be prepared to make these sacrifices to obtain the benefits.
Ultimately, you could say that Silverlight applications are a cross between rich client and web applications, bringing the best of both worlds together.
Visual Studio 2010 already comes configured with the main components you need for Silverlight development. Silverlight is supported out of the box with Visual Studio 2010, but if a new version of Silverlight has been released that you want to target you will need to download the SDK for that version. The best place to check if a new SDK has been released and download any required (or related) components is http://www.silverlight.net/getstarted.
Create a new project and select the Silverlight category (see Figure 22-1). You will find a number of project templates for Silverlight to start your project.

The Silverlight application project template is essentially a blank slate, providing a basic project to start with (best if you are creating a simple gadget). The Silverlight Navigation Application project template, however, provides you with a much better structure if you are planning to build an application with more than one screen/view, providing a user interface framework for your application and some sample views. The Silverlight Class Library project template generates exactly the same output as a standard Class Library project template, but targets the Silverlight run time instead of the full .NET Framework.

Use the Silverlight Navigation Application template for your sample project because it gives you a good base to work from. When you create the project you are presented with the template wizard screen shown in Figure 22-2 to configure the project.
Most of the options in this window are dedicated to configuring the web project that will be generated in the same solution as the Silverlight project. Designed primarily to be accessed via a web browser, Silverlight applications need to be hosted by a web page. Therefore, you also need a separate web project with a page that can act as the host for the Silverlight application in the browser.
So that the wizard generates a web project to host the Silverlight application, select the Host the Silverlight application in a new Web site option. If you are adding a Silverlight project to a solution with an existing web project that will host the application, you can uncheck this option and manually configure the project link in the project properties (for the Silverlight application). A default name for the web project will already be set in the New Web Project Name textbox, but you can change this if you want. The final option for configuring the web project is to select its type. The options you have are:
ASP.NET Web Application Project
ASP.NET Web Site Project
ASP.NET MVC Web Project
Which of these web project types you choose to use is up to you, and has no impact on the Silverlight project at all. The sample application uses the Web Application Project, but how you intend to develop the web site that will host the application will ultimately determine the appropriate web project type.
In the Options group are some options that pertain to the Silverlight application itself. The Silverlight Version drop-down list allows you to choose the Silverlight version you want to target. The versions available in this list will depend on the individual Silverlight SDKs you have installed, defaulting to the latest version available. Because RIA Services are discussed in Chapter 35, disregard the Enable WCF RIA Services option for now and leave it unchecked for the sample application.
Note
You can change the properties in the Options group at a later point in time via the project properties pages for the Silverlight project (see Figure 22-4).
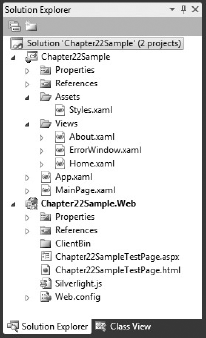
Let's take a tour through the structure of the solution that has been generated (shown in Figure 22-3). As was previously noted you have two projects: the Silverlight project and a separate web project to host the compiled Silverlight application. The web project is the startup project in the solution because it's really this that is opening in the browser and then loading the Silverlight application.
The web project is linked to the Silverlight project such that once the Silverlight application is compiled its output (that is, the .xap file) is automatically copied into the web project (into the ClientBin folder), where it can be accessed by the web browser. If you haven't already done so, compile the solution and you will see the .xap file appear under the ClientBin folder.
The web project includes two different pages that can be used to host the Silverlight application: a standard HTML page and an ASPX page. Both will do exactly the same thing, so it's up to you which one you use and you can delete the other.
Looking at the Silverlight project now, you will see an App.xaml file and a MainPage.xaml file — very similar to the initial structure of a WPF project. The MainPage.xaml file will fill the browser window, show a header at the top with buttons to navigate around the application, and host different "views" inside the Frame control that it contains. So you could think of MainPage.xaml as being the shell for the content in your application.
The project template includes two default content views: a Home view and an About view. Modifying and adding new views is covered in the next section. This folder also contains ErrorWindow.xaml, which inherits from ChildWindow (essentially a modal dialog control in Silverlight) and pops up when an unhandled exception occurs (the unhandled exception event is handled in the code-behind for App.xaml and displays this control).
The Assets folder contains Styles.xaml, which comprises the theme styles used by the application. This is discussed in the "Theming" section in this chapter.
Now take a look at what options are available in the project properties pages of the Silverlight project. The property page unique to Silverlight applications is the Silverlight page that is shown in Figure 22-4.
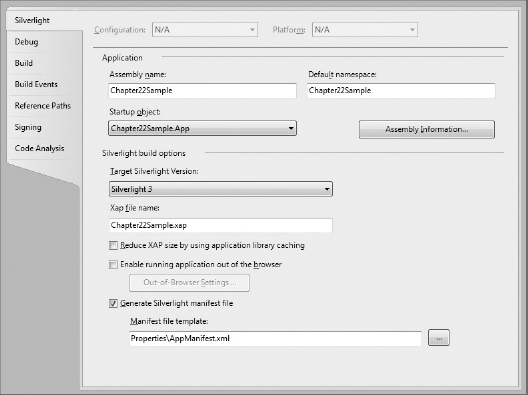
A number of options are of particular interest here. The Xap file name option allows you to set the name of the .xap file that your Silverlight project and all its references (library and control assemblies, and so on) will be compiled into. A .xap file is simply a zip file with a different extension, and opening it in a zip file manager enables you to view its contents. If your project is simple (that is, was created using the Silverlight Application project template and doesn't reference any control libraries), it will probably only contain your project's assembly and a manifest file. However, if you reference other assemblies in your project (such as if you use the DataGrid control that exists in the System.Windows.Controls.Data.dll assembly) you will find that your .xap file blows out in size very quickly (because these are also included in the .xap file). This would mean that each time you make a minor change to your project and deploy it that the users will be re-downloading the assemblies (such as the assembly containing the DataGrid) that haven't changed simply because they are included again in the .xap file. Fortunately, there is a way to improve this scenario, and that's to use application library caching. This is very easy to turn on, simply requiring the Reduce XAP size by using application library caching option to be checked. The next time the project is compiled the referenced assemblies will be separated out into different files and downloaded separately from the application's .xap file.
One caveat is that for assemblies to be cached they must have an extension map XML file, which is included in the .xap file and points to the zip file containing the assembly. Most controls from Microsoft will already have one of these, so you should not have to worry about this issue. Now when you compile your project again, take a look at the ClientBin folder under the web project. You will find one or more .zip files — one for each external assembly referenced by your Silverlight project, which isn't included in the core Silverlight run time. Your .xap file will also be much smaller because it will no longer contain these assemblies. The first time the user runs your application all the required pieces will be downloaded. Then when you update your project and compile it only the .xap file will need to be downloaded again. The benefits of this include less bandwidth being used for both the server and the client (updates will be much smaller to download), and updates will be much quicker, meaning less time for the users to wait before they can continue to use your application.
Note
Unfortunately, application library caching cannot be used in applications that are configured to run in Out Of Browser mode (detailed later in this chapter), because Out Of Browser mode requires all the assemblies to be in the .xap file. If you attempt to set both options, a message box appears stating as such.
Now let's return to see how the Silverlight project and the web project are linked together. This project link is managed by the web project, and can be configured from its project properties page. Open the properties for this project and select the Silverlight Applications tab to see the Silverlight projects currently linked to the web project (Figure 22-5).
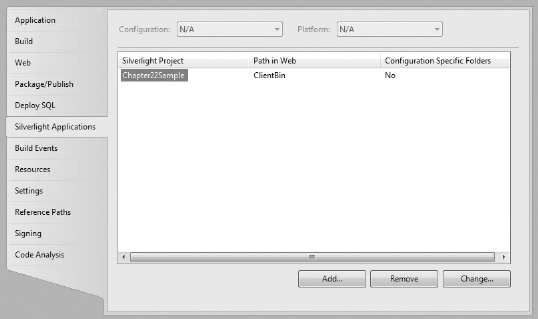
You will most likely only need to use this property page if the web project needs to host multiple Silverlight applications, or you have added a Silverlight project to a solution already containing a web project and you need to link the two. Project links can only be added or removed (not modified), so you will generally find you will use this property page only when a Silverlight project has been added or removed from the solution.
This property page displays the existing links in the list that this web project has to Silverlight projects in the solution. You have three options here: you can add another link to a Silverlight project, you can remove a project link, or you can change a project link (although this change option is not what you might initially expect, as discussed shortly).
Click the Add button to link another Silverlight project to the web project. Figure 22-6 shows the window used to configure the new link.
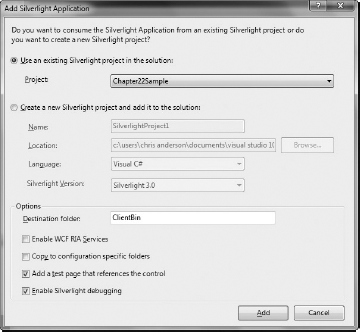
You have two choices when adding a link to a Silverlight project. The first is to link to a Silverlight project already in the solution, where you can simply select a project from the drop-down list to link to. You also have the choice to create a new Silverlight project and have it automatically link to the current web project. Unfortunately, you don't have the ability to select the project template to use, so it will only generate a new project based upon the Silverlight Application project template, somewhat limiting its use.
The Destination Folder option enables you to specify the folder underneath the web project that this Silverlight project will be copied to when it has been compiled. The test pages that are generated (if selected to be created) to host the Silverlight application will point to this location.
If the Copy to configuration specific folders option is set, the Silverlight application will not be copied directly under the specified destination folder, but an additional folder will be created underneath it with the name of the current configuration (Debug, Release, and so on)? and the Silverlight application will be copied under it instead. Note that when this setting is turned on, the test pages will still point to the destination folder, not the subfolder with the name of the current configuration which will now be where the Silverlight application is located. If you want to use this option you will need to manually update the test pages to point to the path as per the current configuration, and update this each time you switch between configurations. By default, this option is not set, and it is probably best not to use it unless necessary.
Selecting the Add a test page that references the control option adds both an HTML page and an ASPX page to the web project, already configured to host the output of the Silverlight project being linked (you can delete the one you don't want to use).
The Enable Silverlight debugging option turns on the ability to debug your Silverlight application (that is, stop on breakpoints, step through code, and so on). The downside to enabling this option is that it disables JavaScript debugging for the web project, because enabling debugging for both at the same time is not possible.
Returning to the list of linked Silverlight projects (Figure 22-5), the Remove button removes a link as you'd expect, but the Change button probably won't do what you'd initially assume it would. This button is used simply to toggle between using and not using configuration-specific folders (described earlier).
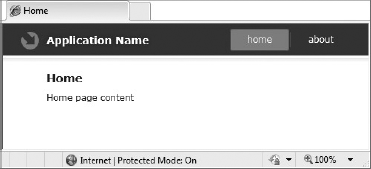
Now that you have learned the structure of the project you can try running it. You can see that the Silverlight Navigation Application project template gives you a good starting point for your application and can form the basis of your application framework (as shown in Figure 22-7).
Because you have used the Silverlight Navigation Application project template for your project you should take a quick look at Silverlight's Navigation Framework. The Navigation Framework was introduced in Silverlight 3, and makes it easy to create an application with multiple views and navigate between them. MainPage.xaml contains a Frame control (a part of the Navigation Framework), which is used to host the individual views when they are required to be shown.
Views must inherit from the Page control in order to be hosted in the frame. If you take a look at Home.xaml you will notice that the root element is navigation:Page instead of UserControl. To create a new view, right-click the Views folder and select Add
Each view needs a URI to point to it, and this URI will be used when you want to navigate to that view. You may want to set up a mapping from a chosen URI to the path (within the project) of its corresponding view file. These mappings are defined on the UriMapper property of the Frame control (in MainPage.xaml). These mappings allow wildcards, and a wildcard mapping has already been created that allows you to simply use the name of the XAML file (without the .xaml on the end). It will look for a XAML file with that name with a .xaml extension in the Views folder. This means you don't need to set up a mapping if you want to navigate to your Test.xaml file using /Test as the URI.
Now you need to add a button that allows you to navigate to the new view. In MainPage.xaml you will find some HyperlinkButton controls (named Link1 and Link2). Copy one of these and paste it as a new line below it (you may want to create another divider element by copying the existing one too). Change the NavigateUri to one that maps to your view (in this case it will be /Test), give the control a new name, and set the text to display on the button (in the Content property).
Now run the project. The new button will appear in the header area of the application, and clicking it navigates to the new view.
Note
Note how the bookmark on the URL (the part after the # in the URL in the address bar of the browser) changes as you navigate between pages. You can also use the browser's Back and Next buttons to navigate backward and forward through the history of which views were previously navigated to. It also enables deep linking, such that views have a unique URL that can automatically be opened to. The Navigation Framework provides all of this functionality.
Like WPF, Silverlight has extensive styling and theming capabilities, although their styling models are implemented slightly differently from one another. Silverlight introduced the Visual State Manager (VSM), a feature that WPF did not originally have (until WPF 4), which enables a control contract to be explicitly defined for the boundary between the control's behavior (that is, the code) and its look (that is, the XAML). This permits a strict separation to be maintained between the two. This contract defines a model for control templates called the Parts and States model, which consists of parts, states, transitions, and state groups. Further discussion of this is beyond the scope of this chapter, however the VSM in Silverlight manages this model. This is considered a much better way of managing styles than WPF's original method of using triggers, and thus the VSM has been incorporated into WPF 4. However, until Silverlight 4, Silverlight did not support implicit styling (unlike WPF, which did), where it could be specified that all controls of a given type should use a particular style (making applying a theme to your project somewhat difficult). To make theming easier, Microsoft created the ImplicitStyleManager control, which shipped in the Silverlight Toolkit control library. Silverlight 4 finally introduced implicit styling, making the ImplicitStyleManager control somewhat redundant, but you'll still use it here to demonstrate theming that works across all versions of Silverlight.
Note
You can download the free Silverlight Toolkit from CodePlex here: http://silverlight.codeplex.com. It also contains numerous useful controls that aren't included in the Silverlight SDK (such as charts, tab control, TreeView, and so on).
So despite their differences, WPF and Silverlight both have controls in their respective toolkit projects that enable similar styling and theming behavior between the two.
Now take a look at applying a different theme to your project in order to completely change the way the controls look. Silverlight has the same themes available as demonstrated in Chapter 18 (in fact, the themes were originally developed for Silverlight and ported to WPF), and can be found in the Silverlight Toolkit. You will call these control themes to separate them from the application themes that are discussed shortly.
You have a couple of ways to use these control themes. One is to take one of the XAML theming files from the Silverlight Toolkit, copy it into your project's root folder, and include it in your project (setting its Build Action to Content at the same time). For this example you will use the System.Windows.Controls.Theming.ExpressionDark.xaml theme file. Now add a reference to the System.Windows.Controls.Theming.Toolkit.dll from the Silverlight Toolkit (which enables you to use the ImplicitStyleManager control). Unfortunately, you can't specify the theme at the application level because the ImplicitStyleManager control has some limitations imposed by Silverlight, therefore in the root element of all of the views to be themed you will need to add the following namespace prefix and property value definitions:
xmlsn:theming="clr-namespace:System.Windows.Controls.Theming; assembly=
System.Windows.Controls.Theming.Toolkit"

theming:ImplicitStyleManager.ResourceDictionaryUri=
"System.Windows.Controls.Theming.ExpressionDark.xaml"
theming:ImplicitStyleManager.ApplyMode="OneTime"
Now when you compile and run your project you will find all the controls in the views that have had their themes set are now using the themes from the specified theme file.
Note
You may find that the project doesn't compile due to missing references that the theme file is using. Because the theme file has styles for many different controls, it is referencing the assemblies that contain those controls. You can either add a reference to the required assemblies, or if you don't want to use them, you can remove the styles for those controls (and their related namespace prefix definitions) from the theme file.
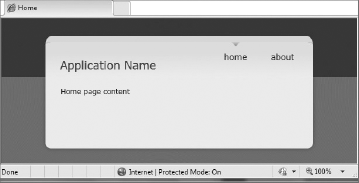
If you create your project using the Silverlight Navigation Application template or the Silverlight Business Application template you can also take advantage of some alternative application themes that have been created to give your application a whole new look. You can find the application theme styles in the Styles.xaml file under the Assets folder in your Silverlight project. The App.xaml file merges the styles from this file into its own if your project is based on the Silverlight Navigation Application project template. MainPage.xaml uses the styles that have been defined in Styles.xaml to specify its layout and look. Therefore, all you need to do is replace this file with one with the same styles defined but with different values in order to completely change the way the application looks. A number of alternative application theme files for projects based upon the Silverlight Navigation Application project template have been created by Microsoft and the community, and can be downloaded from http://gallery.expression.microsoft.com (look in the Themes category). For example, simply replacing the Styles.xaml file for the project shown in Figure 22-7 with the theme file from the gallery called "Frosted Cinnamon Toast" completely changes the way it looks, as shown in Figure 22-8.
Though Silverlight was initially designed as a browser-based plug-in, Silverlight 3 introduced the ability to run a Silverlight application outside the browser as if it were a standard application, and it was no longer necessary to run your Silverlight application within a browser. In fact, you don't even need to be online to run a Silverlight application once it has been installed to run in Out-Of-Browser mode. Out-Of-Browser applications are delivered initially via the browser, and can then be installed on the machine (if enabled by the developer). This install process can be initiated from the right-click menu or from code — the only criteria being that the install process must be user initiated (so random applications can't install themselves on users' machines without their approval).
By default, your Silverlight application will not be configured for Out-Of-Browser mode, and you must explicitly enable this in your application for the feature to be available. The easiest way to enable this is in the project properties for the Silverlight application, as was shown in Figure 22-4. When you put a check in the Enable Running the Application Out of the Browser option the Out-of-Browser Settings button becomes enabled, and clicking this button pops up the window shown in Figure 22-9.
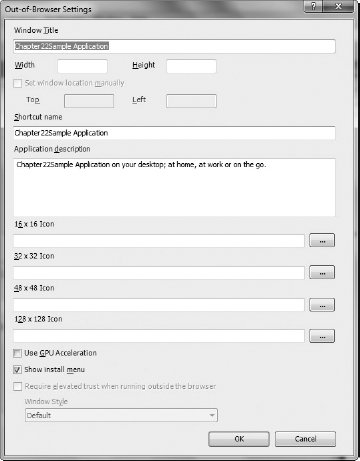
This window enables you to configure various options for when the application is running in Out-Of-Browser mode. Most of the options are fairly self-explanatory. You can set the window title and its starting dimensions (the window is resizable). You can also configure the start menu/desktop shortcuts, set the text for the shortcut (the shortcut name), set the text that will appear when the mouse hovers over the icon (the application description), and set the various-sized icons to use for the shortcut. These icons must be PNG files that have already been added as files in your Silverlight project. Select the appropriate image for each icon size. If you leave any of these icons blank, it simply uses the default Out-Of-Browser icon for that icon size instead. The two checkboxes at the bottom enable you to set whether Out-Of-Browser mode should use GPU acceleration (for Silverlight applications running inside the browser this setting is set on the Silverlight plug-in itself), and the Show install menu checkbox specifies whether the user should have the option to install the application via the right-click menu (otherwise, the install process must be initiated from code).
Note
Note that your Silverlight application is still sandboxed when running outside the browser and will have no more access to the user's computer than it did while running inside the browser. So although it may appear to be running as if it were a standard application, it's still restricted by the same security model as when it's running inside the browser. However, Silverlight 4 introduced the ability for Out-Of-Browser applications to obtain elevated trust privileges, including COM automation and local file access.
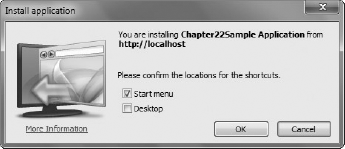
Once you've configured the Out-Of-Browser settings you can now run the project and try it out. When your application is running, right-click anywhere on your application and select the Install XXXX onto your computer option as shown in Figure 22-10 to initiate the install process (where XXXX is the name of the application).
The window shown in Figure 22-11 appears with options for the user to select which types of shortcuts to the application should be set up.
This installs the application locally (under the user's profile), configures the selected desktop/start menu shortcuts, and automatically starts the application in Out-Of-Browser mode.
Note
To uninstall the application, simply right-click it and select the Remove this Application option.
Of course, you will need to update your application at some point in time and have the existing instances that were installed updated accordingly. Luckily, this is very easy to do, but does require some code. This code could be used anywhere in your application, but you'll put it in the code-behind for the App.xaml file, and start the update available check as soon as the application has started as follows:
- VB
Private Sub Application_Startup(ByVal o As Object, ByVal e As StartupEventArgs) _
                                                                Handles Me.Startup
    Me.RootVisual = New MainPage()

    If Application.Current.IsRunningOutOfBrowser Then
Application.Current.CheckAndDownloadUpdateAsync() End If End Sub Private Sub App_CheckAndDownloadUpdateCompleted(ByVal sender As Object, _ ByVal e As _ System.Windows.CheckAndDownloadUpdateCompletedEventArgs) _ Handles Me.CheckAndDownloadUpdateCompleted If e.UpdateAvailable Then MessageBox.Show("A new version of this application is available and " & "has been downloaded. Please close the application and " & "restart it to use the new version.", "Application Update Found", MessageBoxButton.OK) End If End Sub- C#
private void Application_Startup(object sender, StartupEventArgs e)
{
    this.RootVisual = new Page();

    if (Application.Current.IsRunningOutOfBrowser)
    {
        Application.Current.CheckAndDownloadUpdateCompleted +=
               Current_CheckAndDownloadUpdateCompleted;
        Application.Current.CheckAndDownloadUpdateAsync();
    }
}

private void Current_CheckAndDownloadUpdateCompleted(object sender,
                      CheckAndDownloadUpdateCompletedEventArgs e)
{
    if (e.UpdateAvailable)
    {
        MessageBox.Show("A new version of this application is available and " +
            "has been downloaded.  Please close the application and restart " +
            "it to use the new version.", "Application Update Found",
            MessageBoxButton.OK);
    }
}
As you can see, if the application is running in Out-Of-Browser mode you check to see if there are any updates. This asynchronously goes back to the URL that the application was installed from and checks if there is a new version (during which the application continues to load and run). If so it automatically downloads it. Whether or not an update was found, it raises the CheckAndDownloadUpdateCompleted event once the check (and potential download of a new version) is complete. Then you just need to see if an update had been found, and notify the user if so. The update is automatically installed the next time the application is run, so in order to start using the new version the user will need to close the application and reopen it again.
To test the update process, start by including the update check code in your application. Run the application and install it using the method described earlier. Close both it and the instance that was running in the browser and return to Visual Studio. Make a change to the application (one that allows you spot the difference if it is updated correctly) and recompile it. Now run the previously installed version (from the Start menu or desktop icon). The application starts, and shortly afterwards the message box appears stating that the new version has been downloaded and to restart the application. When you reopen the application again you should see that you are indeed now running the new version.
In this chapter you have seen how you can work with Visual Studio 2010 to build applications with Silverlight, and run them both within and outside the browser. To learn about one of the many means of communicating between the client and the server and transferring data see Chapter 35, "WCF RIA Services."