
Customizing the build environment
Performing actions at the beginning and the end of the build
Creating custom MSBuild scripts
Although you can build most of your projects using the default compilation options set up by Visual Studio 2010, occasionally you'll need to modify some aspect of the build process to achieve what you want. This chapter looks at the various build options available to you in both Visual Basic and C#, outlining what the different settings do so you can customize them to suit your own requirements.
In addition, you learn how Visual Studio 2010 uses the MSBuild engine to perform its compilations and how you can get under the hood of the configuration files that control the compilation of your projects.
Before you even get started on a project, you can modify some settings in the Options pages for Visual Studio 2010. These options apply to every project and solution that you open in the IDE, and as such can be used to customize your general experience when it comes to compiling your projects.
The first port of call for professional Visual Basic developers should be the General page of the Projects and Solutions group. By default, the Visual Basic development settings of the IDE hide some of the build options from view, so the only way to show them is to activate the Show Advanced Build Configurations option.
When this is active, the IDE displays the Build Configuration options in the My Project pages, and the Build
Two other options on this page relate to building your projects. One allows Visual Studio to automatically show the Output window when you start a build and the other allows Visual Studio to automatically show the Error window if compilation errors occur during the build process. By default, all language configurations have both of these options turned on.
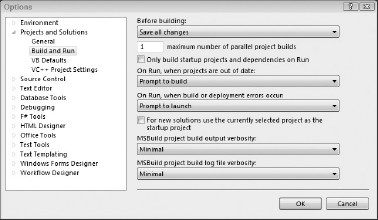
The Build and Run options page (shown in Figure 45-1) in the Projects and Solutions group has many more options available to you to customize the way your builds take place.
It's unclear from this page, but some of these options affect only C11 projects, so it's worth running through each option, what it does, and what languages it affects:
Before Building: This tells Visual Studio how to handle changes that have been made to any part of your project before the build process. You have four options:
Save All Changes automatically saves any changes without prompting you. This is perhaps the best option, because you don't have to remember to save your work. This is the default setting.
Save Changes to Open Documents Only also automatically saves changes, but only to open documents. This excludes some changes to solution and project files.
Prompt to Save All Changes gives you the chance to save any changes before the build commences. When the build process is started, it displays a dialog prompting you to save the changes or not. If you decline to save the changes, the build still continues but uses the last saved version of the file. This option can be good to use when you want to know when you've made changes (perhaps inadvertently) to the source code.
Don't Save Any Changes, as it suggests, doesn't save changes to any files, open in the editor or otherwise.
Maximum Number of Parallel Project Builds: This controls how many simultaneous build processes can be active at any one time (assuming the solution being compiled has multiple projects).
Only Build Startup Projects and Dependencies on Run: This option only builds the part of the solution directly connected to the startup projects. This means that any projects that are not dependencies for the startup projects are excluded from the default build process. This option is active by default, so if you have a solution that has multiple projects called by the startup projects through late-bound calls or other similar means, they will not be built automatically. You can either deactivate this option or manually build those projects separately.
On Run, When Projects Are Out of Date: This option is used for C++ projects only and gives you three options for out-of-date projects (projects that have changed since the last build). The default is Prompt to Build, which forces the build process to occur whenever you run the application. The Never Build option always uses the previous build of out-of-date projects, and the Prompt to Build gives you an option to build for each out-of-date project. Note that this only applies to the Run command, and if you force a build through the Build menu, projects are rebuilt according to the other settings in the build configuration and on this Options page.
On Run, When Build or Deployment Errors Occur: This controls the action to take when errors occur during the build process. Despite official documentation to the contrary, this option does indeed affect the behavior of builds in Visual Basic and C#. Your options here are the default Prompt to Launch, which displays a dialog prompting you for which action to take; Do Not Launch, which does not start the solution and returns to design time; and Launch Old Version, which ignores compilation errors and runs the last successful build of the project.
The option to launch an old version enables you to ignore errors in subordinate projects and still run your application; but because it doesn't warn you that errors occurred, you run the risk of getting confused about what version of the project is active.
Note that when you use the Prompt to Launch option, if you subsequently check the Do Not Show This Dialog Again option in the prompt dialog, this setting is updated to either Do Not Launch or Launch Old Version, depending on whether or not you to choose to continue.
Note
It is recommended that you set this property to Do Not Launch because this can improve the efficiency with which you write and debug code — one fewer window to dismiss!
For New Solutions Use the Currently Selected Project as the Startup Project: This option is useful when you're building a solution with multiple projects. When the solution is being built, the Visual Studio build process assumes that the currently selected project is the startup project and determines all dependencies and the starting point for execution from there.
MSBuild Project Build Output Verbosity: Visual Studio 2010 uses the MSBuild engine for its compilation. MSBuild produces its own set of compilation outputs, reporting on the state of each project as it's built. You have the option to control how much of this output is reported to you:
By default, the MSBuild verbosity is set to Minimal, which produces only a very small amount of information about each project, but you can turn it off completely by setting this option to Quiet, or expand on the information you get by choosing one of the more detailed verbosity settings.
MSBuild output is sent to the Output window, which is accessible via View

MSBuild Project Log File Verbosity: When Visual Studio builds a C++ project, it generates a text-based log file of MSBuild activities as well as the normal information that goes to the Output window. The amount of information that goes into this text file can be controlled independently using this option. One way to take advantage of this is to have more detailed information go into the log file and leave the Output window set to Minimal, which streamlines the normal development experience but gives you access to more detailed information when things go wrong. If you do not want Visual Studio to produce this separate log file, you can turn it off using the Projects and Solutions
It's also worth taking a look at the other Options pages in the Projects and Solutions category, because they control the default Visual Basic compilation options (Option Explicit, Option Strict, Option Compare, and Option Infer), and other C++-specific options relating to build. Of note for C++ developers is the capability to specify PATH variables for the different component types of their projects, such as executables and include files, for different platform builds; and whether to log the build output (see the preceding list).
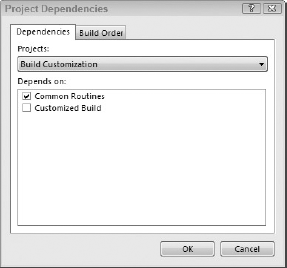
Visual Studio 2010 is able to detect inter-project dependencies between projects that reference each other. This is then used to determine the order in which projects are built. Unfortunately, in some circumstances Visual Studio can't determine these dependencies, such as when you have custom steps in the build process. Luckily, you can manually define project dependencies to indicate how projects are related to each other. You can access the dialog shown in Figure 45-3 by selecting either the Project
Note
Note that these menu commands are available only when you have a solution with multiple projects in the IDE.
You first select the project that is dependent on others from the drop-down, and then check the projects it depends on in the bottom list. Any dependencies that are automatically detected by Visual Studio 2010 will already be marked in this list. The Build Order tab can be used to confirm the order in which the projects will be built.
Visual Basic projects have an additional set of options that control how the build process will occur. To access the compile options for a specific project, open My Project by double-clicking its entry in the Solution Explorer. When the project Options page is shown, navigate to the Compile page from the list on the left side (see Figure 45-4).
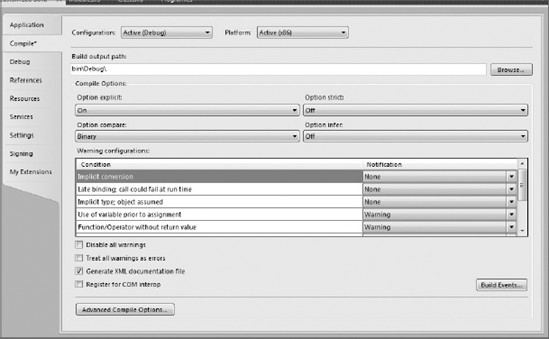
The Build Output Path option controls where the executable version (application or DLL) of your project is stored. For Visual Basic, the default setting is the binDebug or binRelease directory (depending on the current configuration), but you can change this by browsing to the desired location.
Note
It is recommended that you enable the Treat All Warnings as Errors option because this will, in most cases, encourage you to write better, less error-prone code.
You should be aware of two additional sets of hidden options. The Build Events button in the lower-right corner is available to Visual Basic developers who want to run actions or scripts before or after the build has been performed. They are discussed in a moment. The other button is labeled Advanced Compile Options.
Clicking the Advanced Compile Options button displays the Advanced Compiler Settings dialog (see Figure 45-5) in which you can fine-tune the build process for the selected project, with settings divided into two broad groups: Optimizations and Compilation Constants.
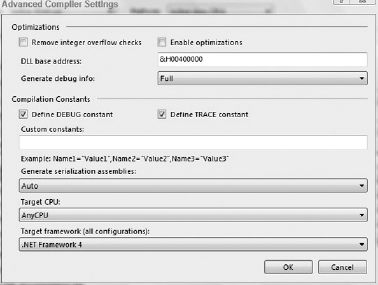
The settings in the Optimizations group control how the compilation is performed to make the build output or the build process itself faster or to minimize the output size. Normally, you can leave these options alone, but if you do require tweaks to your compilation, here's a summary of what each option does:
Remove Integer Overflow Checks: By default, your code is checked for any instance of a possible integer overflow, which can be a potential cause for memory leaks. Deactivating this option removes those checks, resulting in a faster-running executable at the expense of safety.
Enable Optimizations: Optimizing the build may result in faster execution with the penalty being that it takes marginally longer to build.
DLL Base Address: This option enables you to specify the base address of the DLL in hexadecimal format. This option is disabled when the project type will not produce a DLL.
Generate Debug Info: This controls when debug information will be generated into your application output. By default, this option is set to full (for Debug configurations), which enables you to attach the debugger to a running application. You can also turn debugging information off completely or set the option to pdb-only (the default for Release configurations) to only generate the PDB debugging information. The latter means that you can still debug the application when it is started from within Visual Studio 2010 but you will only be able to see the disassembler if you try to attach to a running application.
Compilation constants can be used to control what information is included in the build output and even what code is compiled. The Compilation Constants options control the following:
Define DEBUG Constant and Define TRACE Constant: Enable debug and trace information to be included in the compiled application based on the
DEBUGandTRACEflags, respectively.Custom Constants: If your application build process requires custom constants, you can specify them here in the form
ConstantName="Value". If you have multiple constants, they should be delimited by commas.
The last three options don't really fall under compilation constants, but they do allow you to further customize the way the project builds.
Generate Serialization Assemblies: By default this option is set to Auto, which enables the build process to determine whether serialization assemblies are needed, but you can change it to On or Off if you want to hard-code the behavior.
Note
Serialization assemblies are created using the
Sgen.execommand-line tool. This tool generates an assembly that contains anXmlSerializerfor serializing (and deserializing) a specific type. Normally these assemblies are generated at run time the first time anXmlSerializeris used. Pre-generating them at compile time can improve the performance of the first use. Serialization assemblies are namedTypeName.XmlSerializers.dll. See the documentation ofSgen.exefor more info.Target CPU: Depending on what CPU types are known to your system, this option enables you to optimize the build output to a specific platform. The default option of AnyCPU provides output that can be run on any CPU that supports the .NET Framework.
Target Framework: This is the only option in this dialog that applies to all configurations and is used to determine what version of the base class libraries the project is compiled against.
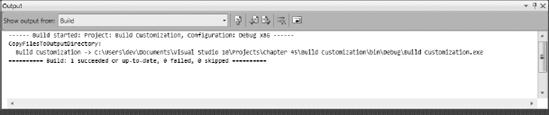
You can perform additional actions before or after the build process by adding them to an events list. Click the Build Events button on the My Project Compile page to display the Build Events dialog. Figure 45-6 shows a post-build event that executes the project output after every successful build.
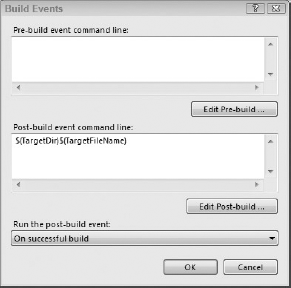
Each action you want to perform should be on a separate line, and can be added directly into either the Pre-build Event Command Line text area or the Post-build Event Command Line text area, or you can use the Edit Pre-build and Edit Post-build buttons to access the known predefined aliases that you can use in the actions.
Note
If your pre- or post-build event actions are batch files, you must prefix them with a call statement. For example, if you want to call archive_previous_build.bat before every build, you need to enter call archive_previous_build.bat into the Pre-build Event Command Line text box. In addition to this, any paths that contain spaces should be encased in double-quotes. This applies even if the path with spaces comes from one of the built-in macros.
Shown in Figure 45-7, the Event Command Line dialog includes a list of macros you can use in the creation of your actions. The current value is displayed for each macro so you know what text will be included if you use it.
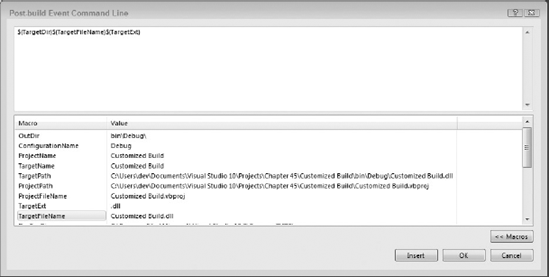
In this sample, the developer has created a command line of $(TargetDir)$(TargetFileName)$ (TargetExt), assuming that it would execute the built application when finished. However, analyzing the values of each of the macros, it's easy to see that the extension will be included twice, which can be amended quickly by either simply removing the $(TargetExt) macro or replacing the entire expression with the $(TargetPath) macro.
At the bottom of the Build Events dialog there is an option to specify the conditions under which the Post Build Event will be executed. The valid options are:
Always: This option runs the Post Build Event script even if the build fails. Remember that there is no guarantee when this event fires that Visual Studio has produced any files at all, so your post-build script should be able to handle this scenario.
On Successful Build: This is the default option. It causes the Post Build Event script to be run whenever the build is considered to be successful. Note that this means that it will run even if your project is up to date (and therefore is not rebuilt).
When the Build Updates the Project Output: This option is very similar to On Successful Build, except that it only fires the Post Build Event script when the project output files have changed. This is a great option for keeping a local cache of archived builds of your projects because it means you will only copy a file into the archive if it has changed since the last build.
There are no filter options for determining if the Pre-Build Event will be executed.
C# provides its own set of build options. In general, the options are the same as those available to a Visual Basic project, but in a different location because C# programmers are more likely to tweak the output than Visual Basic developers, who are typically more interested in rapid development than in fine-tuning performance.
Instead of a single Compile page in the project property pages, C# has a Build page and a Build Events page. The Build Events page acts in exactly the same way as the Build Events dialog in Visual Basic, so refer to the previous discussion for information on that page.
As you can see in Figure 45-8, many of the options on the Build page have direct correlations to settings found in the Compile page or in the Advanced Compiler Settings area of Visual Basic. Some settings, such as Define DEBUG Constant and Define TRACE Constant, are identical to their Visual Basic counterparts.
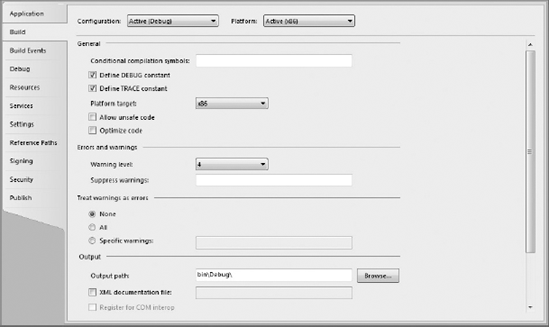
However, some are renamed to fit in with a C-based vocabulary; for example, "Optimize code" is equivalent to "Enable optimizations." As with the Visual Basic compile settings, you can determine how warnings are treated, and you can specify a warning level.
Clicking the Advanced button on the Build page invokes the Advanced Build Settings dialog, shown in Figure 45-9, which includes settings that are not accessible to Visual Basic developers. These settings give you tight control over how the build will be performed, including information on the internal errors that occur during the compilation process and what debug information is to be generated.
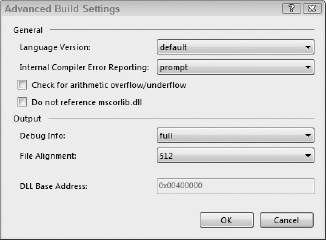
These settings are mostly self-explanatory, so the following list is a quick summary of what effect each one has on the build:
Language Version: Specifies which version of the C# language to use. The default is to use the current version. In Visual Studio 2010, the other options are ISO-1 and ISO-2, which restricts the language features to those defined in the corresponding ISO standard.
Internal Compiler Error Reporting: If errors occur during the compilation (not compilation errors, but errors with the compilation process itself), you can have information sent to Microsoft so it can add it to its revision of the compiler code. The default setting is Prompt, which asks you whether you want to send the information to Microsoft.
Other values include None, which won't send the information; Send, to automatically send the error information; and Queue, which adds the details to a queue to be sent later.
Check for Arithmetic Overflow/Underflow: Checks for overflow errors that can cause unsafe execution. Underflow errors occur when the precision of the number is too fine for the system.
Do Not Reference mscorlib.dll: By default, the mscorlib.dll, which defines the
Systemnamespace, is automatically referenced in your project, but you can check this option to build your ownSystemnamespace and associated objects.Debug Info: Identical to the Visual Basic Generate debug info setting.
File Alignment: Used to set the section boundaries in the output file, and enables you to control the internal layout of the compiled output. The values are measured in bytes.
DLL Base Address: Identical to the Visual Basic setting of the same name.
Using these settings for your projects enables you to closely control how the build process will perform. However, you have another option with Visual Studio 2010, which is to edit the build scripts directly. This is made possible because Visual Studio 2010 uses MSBuild for its compilations.
Visual Studio 2010 uses MSBuild, which is the compilation engine Microsoft originally released with Visual Studio 2005. It uses XML-based configuration files to identify the layout of a build project, including all of the settings discussed earlier in this chapter, as well as what files should be included in the actual compilation.
In fact, since Visual Studio 2005, Visual Studio uses MSBuild configuration files as its project definition files, in place of the old project file formats used by previous versions of Visual Studio. This enables the MSBuild engine to be used automatically when compiling your applications within the IDE because the same settings file is used for both your project definition in the IDE and the build process.
As already mentioned, the contents of Visual Studio 2010 project files are based on the MSBuild XML Schema and can be edited directly in Visual Studio so you can customize how the project is loaded and compiled.
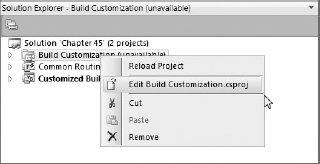
However, to edit the project file you need to effectively remove the project's active status from the Solution Explorer. Right-click the project you want to edit in the Solution Explorer, and choose the Unload Project command from the bottom of the context menu that is displayed.
The project will be collapsed in the Solution Explorer and marked as unavailable. In addition, any open files that belong to the project will be closed while it is unloaded from the solution. Right-click the project entry again and an additional menu command will be available to edit the project file (see Figure 45-10).
The XML-based project file will be correspondingly opened in the XML editor of Visual Studio 2010, enabling you to collapse and expand nodes. The following listing is a sample MSBuild project file for an empty C# project:
<?xml version="1.0" encoding="utf-8"?>
<Project
  ToolsVersion="4.0"
  DefaultTargets="Build"
  xmlns="http://schemas.microsoft.com/developer/msbuild/2003">
  <PropertyGroup>
    <Configuration Condition=" '$(Configuration)' == '' ">Debug</Configuration>
    <Platform Condition=" '$(Platform)' == '' ">x86</Platform>
    <ProductVersion>8.0.30703</ProductVersion>
    <SchemaVersion>2.0</SchemaVersion>
    <ProjectGuid>{04ABE6E2-5500-467B-BB01-0BBF0258E94A}</ProjectGuid>
    <OutputType>Exe</OutputType>
    <AppDesignerFolder>Properties</AppDesignerFolder>
    <RootNamespace>ConsoleApplication</RootNamespace>
    <AssemblyName>ConsoleApplication</AssemblyName>
    <TargetFrameworkVersion>v4.0</TargetFrameworkVersion>
    <TargetFrameworkProfile>Client</TargetFrameworkProfile>
    <FileAlignment>512</FileAlignment>
  </PropertyGroup>
  <PropertyGroup Condition=" '$(Configuration)|$(Platform)' == 'Debug|x86' ">
    <PlatformTarget>x86</PlatformTarget>
    <DebugSymbols>true</DebugSymbols>
<DebugType>full</DebugType>
<Optimize>false</Optimize>
<OutputPath>binDebug</OutputPath>
<DefineConstants>DEBUG;TRACE</DefineConstants>
<ErrorReport>prompt</ErrorReport>
<WarningLevel>4</WarningLevel>
</PropertyGroup>
<PropertyGroup Condition=" '$(Configuration)|$(Platform)' == 'Release|x86' ">
<PlatformTarget>x86</PlatformTarget>
<DebugType>pdbonly</DebugType>
<Optimize>true</Optimize>
<OutputPath>binRelease</OutputPath>
<DefineConstants>TRACE</DefineConstants>
<ErrorReport>prompt</ErrorReport>
<WarningLevel>4</WarningLevel>
</PropertyGroup>
<ItemGroup>
<Reference Include="System" />
<Reference Include="System.Core" />
<Reference Include="System.Xml.Linq" />
<Reference Include="System.Data.DataSetExtensions" />
<Reference Include="Microsoft.CSharp" />
<Reference Include="System.Data" />
<Reference Include="System.Xml" />
</ItemGroup>
<ItemGroup>
<Compile Include="Program.cs" />
<Compile Include="PropertiesAssemblyInfo.cs" />
</ItemGroup>
<Import Project="$(MSBuildToolsPath)Microsoft.CSharp.targets" />
<!-- To modify your build process, add your task inside one of the targets
below and uncomment it. Other similar extension points exist, see
Microsoft.Common.targets.
<Target Name="BeforeBuild">
</Target>
<Target Name="AfterBuild">
</Target>
-->
</Project>

The XML contains the information about the build. In fact, most of these nodes directly relate to settings you saw earlier in the Compile and Build pages, but also include any Framework namespaces that are required. The first PropertyGroup element contains project properties that apply to all build configurations. This is followed by two conditional elements that define properties for each of the two build configurations, Debug and Release. The remaining elements are for project references and project-wide namespace imports.
When the project includes additional files, such as forms and user controls, each one is defined in the project file with its own set of nodes. For example, the following listing shows the additional XML that is included in a standard Windows Application project, identifying the Form, its designer code file, and the additional application files required for a Windows-based application:
<ItemGroup>
  <Compile Include="Form1.cs">
    <SubType>Form</SubType>
  </Compile>
  <Compile Include="Form1.Designer.cs">
    <DependentUpon>Form1.cs</DependentUpon>
  </Compile>
  <Compile Include="Program.cs" />
  <Compile Include="PropertiesAssemblyInfo.cs" />
  <EmbeddedResource Include="PropertiesResources.resx">
    <Generator>ResXFileCodeGenerator</Generator>
    <LastGenOutput>Resources.Designer.cs</LastGenOutput>
    <SubType>Designer</SubType>
  </EmbeddedResource>
  <Compile Include="PropertiesResources.Designer.cs">
    <AutoGen>True</AutoGen>
    <DependentUpon>Resources.resx</DependentUpon>
  </Compile>
  <None Include="PropertiesSettings.settings">
    <Generator>SettingsSingleFileGenerator</Generator>
    <LastGenOutput>Settings.Designer.cs</LastGenOutput>
  </None>
  <Compile Include="PropertiesSettings.Designer.cs">
    <AutoGen>True</AutoGen>
    <DependentUpon>Settings.settings</DependentUpon>
    <DesignTimeSharedInput>True</DesignTimeSharedInput>
  </Compile>
</ItemGroup>

You can also include additional tasks in the build process in the included Target nodes for BeforeBuild and AfterBuild events. However, these actions will not appear in the Visual Studio 2010 Build Events dialog discussed earlier. The alternative is to use a PropertyGroup node that includes PreBuildEvent and PostBuildEvent entries. For instance, if you wanted to execute the application after it was successfully built, you could include the following XML block immediately before the closing </Project> tag:
<PropertyGroup>
  <PostBuildEvent>"$(TargetDir)$(TargetFileName)"</PostBuildEvent>
</PropertyGroup>
Once you've finished editing the project file's XML, you need to re-enable it in the solution by right-clicking the project's entry in the Solution Explorer and selecting the Reload Project command. If you still have the project file open, Visual Studio asks if you want to close it to proceed.
An extended discussion on the MSBuild engine is beyond the scope of this book. However, it's useful to understand the different components that make up the MSBuild project file so you can look at and update your own projects.
Four major elements form the basis of the project file: items, properties, targets, and tasks. Brought together, you can use these four node types to create a configuration file that describes a project in full, as shown in the previous sample C# project file.
Items are those elements that define inputs to the build system and project. They are defined as children of an ItemGroup node, and the most common item is the Compile node used to inform MSBuild that the specified file is to be included in the compilation. The following snippet from a project file shows an Item element defined for the Form1.cs file of a WindowsApplication project:
<ItemGroup>
  <Compile Include="Form1.cs">
    <SubType>Form</SubType>
  </Compile>
</ItemGroup>PropertyGroup nodes are used to contain any properties defined to the project. Properties are typically key/value pairings. They can only contain a single value and are used to store the project settings you can access in the Build and Compile pages in the IDE.
PropertyGroup nodes can be optionally included by specifying a Condition attribute, as shown in the following sample listing:
<PropertyGroup Condition=" '$(Configuration)|$(Platform)' == 'Release|x86' ">
  <DebugType>pdbonly</DebugType>
  <Optimize>true</Optimize>
  <OutputPath>binRelease</OutputPath>
  <DefineConstants>TRACE</DefineConstants>
  <ErrorReport>prompt</ErrorReport>
  <WarningLevel>4</WarningLevel>
</PropertyGroup>
This XML defines a PropertyGroup that will only be included in the build if the project is being built as a Release for the x86 platform. Each of the six property nodes within the PropertyGroup uses the name of the property as the name of the node.
Target elements enable you to arrange tasks (discussed in the next section) into a sequence. Each Target element should have a Name attribute to identify it, and it can be called directly, thus enabling you to provide multiple entry points into the build process. The following snippet defines a Target with a name of BeforeBuild:
<Target Name="BeforeBuild">
</Target>
Tasks define actions that MSBuild will execute under certain conditions. You can define your own tasks or take advantage of the many built-in tasks, such as Copy. Shown in the following snippet, Copy can copy one or more files from one location to another:
<Target Name="CopyFiles">
    <Copy
        SourceFiles="@(MySourceFiles)"
        DestinationFolder="\PDSERVER01SourceBackup"
    />
</Target>One aspect of most automated build systems is planning application versioning. In this section, you see how you can customize the build process for your project so that it can accept an external version number. This version number will be used to update the AssemblyInfo file, which will subsequently affect the assembly version. Start by looking at the AssemblyInfo.cs file, which typically contains assembly version information such as the following.
[Assembly: AssemblyVersion("1.0.0.0")]
What the build customization needs to do is replace the default version number with a number supplied as part of the build process. To do this we have elected to use a third-party MSBuild library entitled MSBuildTasks, which is a project on Tigris (http://msbuildtasks.tigris.org/). This includes a FileUpdate task that can be used to match on a regular expression. Before we can use this task, we need to import the MSBuildTasks Targets file. This file is installed into the default MSBuild extensions path by the MSBuildTasks MSI.
<Project ToolsVersion="4.0" DefaultTargets="Build" xmlsn="http://schemas.microsoft.com/developer/msbuild/2003"><!-- Required Import to use MSBuild Community Tasks --><Import Project="$(MSBuildExtensionsPath)MSBuildCommunityTasksMSBuild.Community.Tasks.Targets"/><PropertyGroup> ...
Because we want to update the AssemblyInfo file before the build, we could add a call to the FileUpdate task in the BeforeBuild target. This would make it harder to maintain and debug later on. A much better approach is to create a new target for the FileUpdate task and then make the BeforeBuild target depend upon it, as follows:
<Import Project="$(MSBuildToolsPath)Microsoft.CSharp.targets" /> <Target Name="BeforeBuild" DependsOnTargets="UpdateAssemblyInfo"> </Target><Target Name="UpdateAssemblyInfo"><Message Text="Build Version: $(BuildVersion)" /> <FileUpdate Files="PropertiesAssemblyInfo.cs" Regex="d+.d+.d+.d+" ReplacementText="$(BuildVersion)" /> </Target>
You will notice here that we are using a property called $(BuildVersion), which doesn't yet exist. If we run MSBuild against this project now, it will replace the version numbers in our AssemblyInfo file with a blank string. This unfortunately will not compile. We could simply define this property with some default value like this:
<PropertyGroup>
    <BuildVersion>0.0.0.0</BuildVersion>
        <Configuration Condition=" '$(Configuration)' == '' ">Debug</Configuration>
This will work but it means that when building our project in Visual Studio 2010 it will always have the same version. Luckily the MSBuildTasks library has another task called Version, which will generate a version number for us. Here is the code:
<Target Name="BeforeBuild" DependsOnTargets="GetVersion;UpdateAssemblyInfo"> </Target> ...<Target Name="GetVersion" Condition=" $(BuildVersion) == ''"><Version BuildType="Automatic" RevisionType="Automatic" Major="1" Minor="3" > <Output TaskParameter="Major" PropertyName="Major" /> <Output TaskParameter="Minor" PropertyName="Minor" /> <Output TaskParameter="Build" PropertyName="Build" /> <Output TaskParameter="Revision" PropertyName="Revision" /> </Version> <CreateProperty Value="$(Major).$(Minor).$(Build).$(Revision)"> <Output TaskParameter="Value" PropertyName="BuildVersion" /> </CreateProperty> </Target>
The new GetVersion target will only be executed if $(BuildVersion) is not specified. It calls into the Version task from MSBuildTasks, which sets the major version number to 1 and the minor version number to 3 (you could, of course, configure these instead of hard-coding them). The Build and Revision numbers are automatically generated according to a simple algorithm. These components of the version are then put together in a CreateProperty task, which comes with MSBuild, to create the full $(BuildVersion) that we need. Finally, this task has been added to the list of targets that BeforeBuild depends on.
Now when we build the project in Visual Studio 2010, we will get an automatically generated version number as per usual. In your automated build process you can specify the version number as an argument to the MSBuild call. For example:
MSBuild CustomizedBuild.csproj /p:BuildVersion=2.4.3154.9001
The default build behavior can be customized with an enormous range of options in Visual Studio 2010 thanks to the power and flexibility of the MSBuild engine. Within the project file you can include additional actions to perform both before and after the build has taken place, as well as include additional files in the compilation.