
Chapter 5. Programming Revisited
In this chapter, we’ll cover several more advanced topics that you will need to understand to use some of the other code samples in this book. First among these is object-oriented programming (OOP), that is, programming using classes and objects as the fundamental units to organize your code. This topic is a fundamental part of the nature of C++, which is quite important to understand if you’re going to work with openFrameworks (oF) in any meaningful way. We will cover file structure and how to create classes and objects in C++. Finally, we will cover pointers and references, which are quite advanced topics but important ones if you plan on doing any serious work with openFrameworks. It also helps a lot when looking at libraries created for Arduino or if you decide to build your own library.
Object-Oriented Programming
To work with oF—and, in many cases, to work with Processing—you need to understand object-oriented programming, which is a way of organizing and assembling your code that is used in many different kinds of programming languages and for many different purposes. Hundreds of programming languages support OOP, and the principles don’t vary too greatly across languages, so once you understand the basics of it, you’ll find yourself better able to follow along with code that you encounter and better able to construct your own code when you’re working on a project. At its core, OOP is the philosophy of creating classes that represent different tasks or objects in your application to delegate responsibility and organize the structure of your application. Classes can handle specific functionality like reading data from a camera and displaying it to a screen, they can represent a data object like a file, and they can be events for one part of an application to tell another about something that has happened. The class is the blueprint for what kind of object the class will create. When you create one of these classes to use in your application, you call that particular instance of the class an object. There may be unfamiliar terms in that previous sentence, but there probably aren’t any unfamiliar concepts. My favorite analogy is the car analogy.
Imagine a car. What are the abstract qualities of a car? Let’s stick with four right now: doors, windows, wheels, and the motor. So, we have a really basic abstract car that has a few different characteristics that we can identify. We’re not talking about any particular car; we’re talking about any car. Now, let’s picture a particular car. I’m thinking of the red 1975 Volvo 240L station wagon that my parents had when I was a kid; you’re most likely thinking of a different car. We can both identify our particular cars as being two instances of the abstract kind-of-thing car that share all the common characteristics of a car as well as having their own particular characteristics that make them unique objects. If you can handle that leap of taxonomic thinking, objects and classes should be fairly easy for you. Let’s go forward.
Classes
All three tools profiled in this book—Arduino, Processing, and openFrameworks—provide a wide and rich variety of data types and methods. That said, it is inevitable that as you work with these tools you’ll need to add your own constructions to these frameworks to create the works that you envision. These things that you need to add can be different kinds, but in all likelihood, they’ll consist of some data and some functionality. In other words, they will probably consist of some variables and some methods. Once again, we need to approach this with the three distinct programming languages discussed in this book in mind. Arduino doesn’t use classes as much as Processing or oF. This is because sending and receiving bytes from a microcontroller or from hardware tends to be a very “low-level” operation; that is, it doesn’t frequently require the use of classes and new types. Arduino, and the C programming language on which it is based, can use something called a struct, which is collection of properties with a name, but we won’t be discussing structs in this book. This isn’t because structs aren’t important, but rather because they aren’t particularly important in the common tasks that are done in Arduino. Lots of times in Arduino when you need to do new things, you write new functions. This isn’t always the case; when you’re creating a library, for instance, you’ll end up creating classes. But for beginners, OOP isn’t something that you’ll be doing a lot in Arduino. In Processing and C++, however, the kinds of things that these languages are good at frequently require new data types and new objects with their own methods. In Processing and C++, when you need to create a new different type to do something in your application or to store some data, you create a class.
Why do you use classes? The short answer is that you use classes
to break functionality into logical pieces that represent how you use
them, how the application regards them, and how they are organized. An
application that handles reading data from multiple cameras and saving
images from them as pictures will probably have a Camera class, a Picture class, and maybe a File class. A game with spaceships might
have the classes Spaceship,
Enemy, Asteroid, and so on. Using classes helps
make the code for an application easier to read, modify, debug, and
reuse.
The Basics of a Class
The concept of a class is a difficult one for many people at
first; however, with a little bit of patience, you’ll find that it’s
not all that different from the way you see the world. A
class is a grouping of variables and methods
into an object that contains and controls access to them all. Think
of a very simple description of dog. A dog has a breed, an age, and
a weight, for example. These are all traits that, if you were trying
to describe the dog in code, you would use variables to describe. A
dog also has some actions it can perform; it can run, it can eat, or
it can bark. If you were to describe these actions in code, you
would make methods to describe them. Let’s go ahead and make a
simple class in Processing that shows what this Dog class might look like:
class Dog{

    String breed;
    int age;
    int weight;

    Dog(){} // we'll talk about this one much more
    void run(){}
    void bark(){}
    void eat(){}
};
In C++, that class will look exactly the same. The differences between Processing and C++ are going to become more apparent later.
That’s all. When you want to create a Dog in your application, just like when
you make a String, you create a new instance of a Dog, declare the variable, and call the
constructor:
Dog rover = new Dog();
Now that you’ve made rover,
you can describe rover and call
his methods:
rover.breed = "shepard"; // set the breed of the dog
rover.age = 3; // set his age
rover.weight = 50; // set his weight
rover.run(); // tell him to run
rover.bark(); // tell him to bark
That was nothing terribly challenging, was it? So, the concept
of classes really isn’t that difficult, because the idea was created
to make programming easier for people, to make writing code mimic
the way that people perceive and classify the world. Classes have
properties (variables), like the breed property of the Dog, and methods (behaviors), like the
run() method of the Dog. All methods of a class are created
equal, except one, which we call the
constructor. Let’s revisit making the Dog variable rover once again:
Dog rover = new Dog();
Let’s look more closely at = new
Dog();. This calls the constructor, performing any actions
that you want to perform when the Dog is first created. This will be the
first thing that this instance of the Dog does, because this is where the
Dog really begins, in the
constructor call. The Dog()
method is a special method, which is why it doesn’t return anything;
that is, it doesn’t declare a return type. Let’s continue thinking
about the Dog example. A Dog, rover in particular, has to have an age.
It’s impossible to have a dog without an age, so let’s go ahead and
say that when the Dog is created,
you set its age:
Dog() {
    age = 1;
}
This means now that by default whenever you make a Dog, its age will be 1:
Dog rover = new Dog();
println(rover.age); // prints 1, because the dog is 'just born' ;)
So now, you’ve created a simple class that you can use to create objects possessing all of the properties that you require. A well-written class lets you group functionality and data together in logical objects that allow you to focus on what the code needs to do, rather than how it is structured. This topic will be revisited many times in the following chapters.
Class Rules
Classes can be declared in files outside your primary code file. To work with a class or multiple classes that have been defined in separate files, those files and classes need to be imported. This is handled slightly differently in each of the different programming environments discussed here, so we’ll discuss it in the chapter relevant to each of these languages. The filenames that these classes should be saved in are particular to each environment and language as well. In C++, classes are saved across two file types: .cpp files and .h files. The reason for this and the way that it works will be discussed in Chapter 6. In Processing, these external class files are saved in .pde files that are then imported. There are also .java files that can be imported into the Processing environment.
Both in Processing and in C++, the class declaration must always look like this:
class ClassName{
    // all the things the class has
};
Note that the class declaration is followed by curly brackets that enclose the definition of the class, which, in C++, is followed by a semicolon. In Processing and Java, the semicolon isn’t required, but the brackets function the same way.
Classes should have a declared constructor unless they’re just for storing data. For example:
class Point{
    int xPosition;
    int yPosition;
};
This doesn’t require a constructor, but when you use your code, you’ll have to use it like this:
Point pt = new Point();
pt.xposition = 129;
pt.yposition = 120;
If a constructor is provided for this class, as shown here:
class Point{

    int xPosition;
    int yPosition;
    // this is the constructor for this class
    Point(int xPos, int yPos){
        xPosition = xPos;
        yPosition = yPos;
    }
};
then the class can be used as follows:
Point pt = new Point(129, 120);
This saves you some typing and makes your code more compact.
It also avoids the classic problem that you might run into later
where you have Point objects that
don’t have any values because none were set. This way, all Point objects will have an
x and y. In this case, the
problem is taken care of, and you can concentrate on your project
and not hunting down bugs.
A class generally should have good method names linked to the
job that class is supposed to do. A good rule of thumb is to say
that classes should be nouns and methods should be verbs. This isn’t
for the compiler; the compiler doesn’t care what you call your
class, variable, or method. This is more for you, the person writing
the code. Remembering what you were thinking when you wrote a class
or what the class should be used for is far easier if you have names
for the class and the methods that make sense to you. For instance,
a Dog should have run(), bark(), and eat() methods, but not a paper() method. A method called fetchThePaper() would be far more
appropriate, but ultimately, your code is your own, and you can do
whatever you like with it.
Public and Private Properties
A class has a name, and it has two basic kinds of properties: public and private. Public ones are available to the outside world, which means that other classes can use those properties and methods. Private properties are not available to the outside world, only to methods and variables that are inside the class, which means that other classes cannot use those properties and methods. When we create a class, we have the following shell in C++:
class Dog {
    public:
    //all public stuff goes here
    private:
    //all private stuff goes here
}; // a closing bracket and a ; to mark the end of the class
To give the Dog class some
methods, you simply put the method definitions underneath the public and private keywords, depending on whether you
needed that method to be public or private like so:
class Dog {
    public:
    void bark() {
        printf("bark");
    }

    void sleep() {
       // sleep() can call dream, because the dream() method
       //is within the Dog class
       dream();
}

    private:
    void dream() {
        printf("dream");
    }
};
In Processing, you do not need to use the public: keyword on top of all the public
variables. Instead, each method is marked as public and private
separately, like so:
class Dog{

    public void bark(){
        println("bark");
    }

    // sleep() can call dream, because the dream() method
    //is within the Dog class
    public void sleep() {
        dream();
    }

    private void dream() {
        println("dreaming");
    }

};
Now, if you create a Dog,
called Rover, and try to call the
dream() method on him, you’ll get
an error because dream() is private
and cannot be accessed by external operations, that is, operations
that are not going on inside the class itself:
Dog d;
d.bark();
d.dream(); // this doesn't work
Now, that may not make a ton of sense right away: why make things that we can’t use? The answer to that is design and usage. Sometimes you want to make certain methods or properties of a class hidden to anything outside of that class. Generally, you want a class to expose the interface that something outside of your class can access and have the class do what it is supposed to do. Methods or properties that aren’t necessary for the outside world to use or manipulate can be declared private to keep objects outside the class from accessing them or using them inappropriately. You might not ever make methods private, but if you work with C++ and Processing long enough, you’re guaranteed to run into methods and variables that have been marked private when you’re looking at other people’s code. Now you’ll understand what it is and why they might have done it.
Inheritance
Discussing public and private brings us to inheritance. This is
a big part of OOP, and, like many of the other topics in OOP, seems
tricky at first but ends up being fairly easy and common sense. We’ll
look at some simple examples using Dog and then some more complicated examples
using shapes later to help you get the hang of it.
Inheritance means that a class you’re
making extends another class, getting all of its variables and methods
that have been marked public. Imagine there is a general kind of
Dog and then specialized kinds of
dogs that can do all the things that all dogs can do, such as run,
bark, smell, plus some other things. If I were to
make a class called Retriever, I
could rewrite all the Dog stuff in
the Retriever class,
or I could just say this: A Retriever is a Dog with some other special stuff added on.
Let’s say the Retriever does
everything the Dog does
plus it fetches.
Here’s the code in Processing:
class Retriever extends Dog{

    public void retrieve() {
        println("fetch");
    }

}
Here’s the code in C++:
class Retriever : public Dog {
public:
    void retrieve() {
        printf("retrieve");
    }

private:

};
Does this mean that you can have the Retriever bark? Since the Retriever is a Dog, the answer is yes, because all the
methods and variables from the Dog
are available to the Retriever
class that extends it.
Here’s the code in Processing:
Retriever r = new Retriever();
r.bark(); // totally ok, from the parent class
r.retrieve();
Here’s the code in C++:
Retriever r; // note, you don't need to do = new...()
r.bark(); // totally ok, from the parent class
r.retrieve();
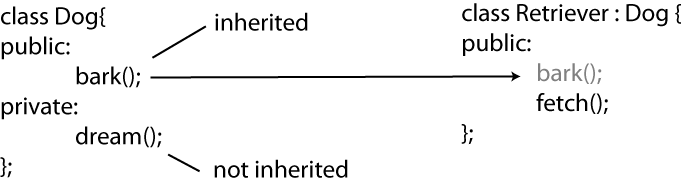
In Figure 5-1, you can see how the methods of classes are passed down what is sometimes called the chain of inheritance.

The Dog class defines two
methods: run() and bark(). The Retriever logically extends the Dog, since the Retriever is a dog, but it is also a
specific kind of dog, namely, the kind of Dog that can fetch things. So, the Retriever defines only one method, but
actually it has three because it inherits from the Dog. The Labrador is a kind of Retriever and hence is a Dog as well. A Labrador can do all the things a plain old
Retriever can do because it extends
the Retriever, but it also can
swim. So, even though the class for
the Labrador class has only one
method, it can do four things, run(), bark(), fetch(), and swim(), because it always inherits all the
methods of its parent classes.
Why is this important? Well, if you’re going to make interactive
designs and artwork that use code, you’re going to end up reading a
lot of code. You’re inevitably going to run into a class that is
calling methods that you won’t see anywhere when you look at the code
listing. It’s probably defined in one of the parent classes that the
class extends. You also might start making types of things that you
realize share some common characteristics. If you’re making an
application that draws lots of things to the screen, it might make
sense to put a draw() method on
them all. If at some point later in writing code you want to change
some core aspect of the draw()
method, you would go through every class and change it. It would make
things easier if the draw() method
was in one place, like a parent class, for instance. This is another
one of the advantages of creating class structures: to avoid
duplicating code unnecessarily and make your code simpler to read,
change, and share.
There’s a caveat to using inheritance with your classes, which
is that only methods and variables marked as
public will be inherited. You heard right: anything marked
private doesn’t get inherited. There’s one small catch to this: in
both C++ and Java, there are a few additional levels of privacy for
methods and objects, but they’re not as important for the purposes of
this book. So, in the class shown in Figure 5-2, again using the
Dog and Retriever analogy, the Retriever will have a bark() method that it will inherit from the
Dog class, but it will not have a
dream() method because the Dog has that method marked as
private.
The same would go for any variables defined in the Dog class; the Retriever will inherit
all public
variables and no private ones. This is a good
thing to know when reading through the code of libraries that you
might want to use, like the ofImage
or ofVideoGrabber classes in
openFrameworks or some of the libraries available in Processing.
Processing: Classes and Files
In Processing, classes often are defined within the main file for the application that you see when you’re working with a Processing application. If you open the folder that your application is saved in, you’ll see that this main file is a .pde file that has the name of your application. This is the main file of your application, and lots of times if you want to make a new class, you’ll just add it to this file. However, in a complex application, you may want to make multiple classes, and you want to break them apart into separate files so they’re easier to read and maintain, or so you can use a file from another place. To do this, all you need to do is create a new .pde file in the same folder and put your class declaration and description into that file.
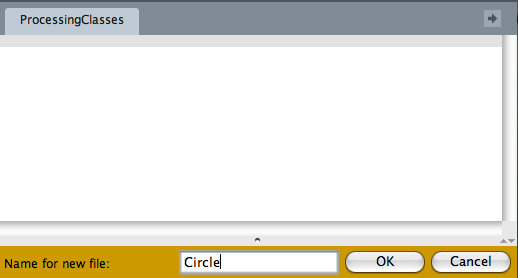
To create a new .pde file within your application folder that will automatically be imported into your application, click the New Tab icon at the right of the Processing IDE, as shown in Figure 5-3.

This opens a small dialog box asking you to name your new file (Figure 5-4).
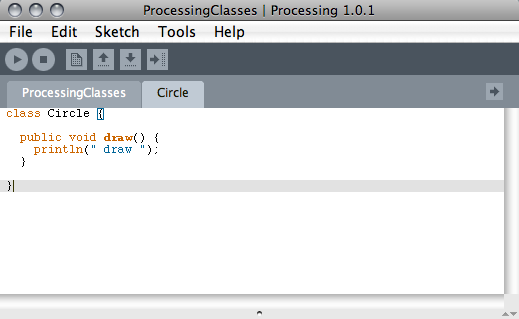
After you’ve given your file a name, Processing automatically
creates the new .pde file in your
sketch folder. You can begin adding your class to the file and then
using it in your main application file, that is, the file that
contains the draw() and setup() methods (Figure 5-5).
What do you get for putting this extra work into creating new files and classes? There are two distinct advantages to creating files and separate classes: it makes organizing your code and debugging your application easier, and once you’ve written some classes that work well and do something that you’d like to use again, it’s easy to copy and paste the file into a new project and reuse all your code from the class. This last bit is, although oversimplified, a lot of the basis of the Processing, Arduino, and openFrameworks projects: providing reusable code to speed up creating your projects.
C++: Classes and Files
C++ is an object-oriented language. It’s quite difficult to write anything in C++ without creating at least a few classes, and as you work with oF, you’ll find classes and class files all over the place. If you’ve read this chapter up to this point, you should have a fairly good idea of what a class is and what it does.
So, now we’re going to define an absurdly simple class called
Name:
class Name {
public:
        string firstName;
        string secondName;

        Name(string first, string second) {
                firstName = first;
                secondName = second;
        }
};
Next up is creating an instance of Name. So, somewhere else in our code, we
create an instance of Name like
so:
Name name("josh", "noble");That’s it. We’ve made a class, and we’ve instantiated an instance of it. We’re sort of off to the races.
So, what are some things that are commonly created and stored as
classes? A good example is one of the oF core classes, the ofSoundPlayer class. This class represents
what it sounds like it would represent: a sound player. It has methods
to play, stop, set the volume, and set the position that the player
reads from. We wouldn’t expect it to do anything else, and in fact it
doesn’t. It also provides lots of useful properties that help us
determine whether a sound is currently playing and whether there was a
problem loading the sound.
Why do we use classes? In the short answer, we use classes to break functionality into logical pieces that represent how we use them, how the application regards them, and how they are organized. It makes sense to think of a spaceship game having spaceships, enemies, asteroids, planets, high scores, and so on. For example, we use classes to organize all the functionality that an enemy would need into one place so that when we need to make a enemy, we know we’re always getting the same characteristics, and when we need to make a change to the enemies, we can do it in just one place. It’s far more difficult to introduce classes later than it is to simply begin with them. The theory of how to best organize classes is a serious topic that has spawned many a serious nerd-spat. We’re not going to delve into it deeply, but in Chapter 18, there are some pointers to introductory texts as well as heavy classics.
.cpp and .h
.cpp and .h shall now forever be burned into your mind as the two file formats of a C++ class. That’s right: two file formats and two separate files. The why of this is a bit irrelevant; what’s important is that you follow how the two work together and how you’ll use them. We’re going to take this slowly because it’s important.
In an oF application, there will be two types of files: .cpp and .h files. .cpp files contain the implementation of a class, while the .h file contains the prototype of that class. The prototype of that class, the .h file, is going to contain the following:
Any
importstatements that the class needs to makeThe name of the class
Anything that the class extends (more on this later)
Declarations of variables that the class defines (sometimes referred to as properties)
Declarations of methods that the class defines
The definition of the class, the .cpp file, will contain the following:
The actual definition of any methods that the class defines
So, why are there so few things in the .h file and so many in the .cpp? Well, usually the definition of a method takes up a lot more space than the declaration of it. If I want to define a method that adds two numbers and returns them, I define it like so:
int addEmUp(int a, int b);
This is the kind of thing that you’ll see in an .h file—methods with signatures but no bodies. Take a moment to let that sink in: the method is being declared, not defined. Now, if I want to do something with this method, I need to actually define it, so I’ll do the following:
int addEmUp(int a, int b){
    return a+b;
}
Here, you actually see the meat of the method: add the two numbers and return it. These are the kinds of things that you’ll see in the definition of a class in the .cpp files.
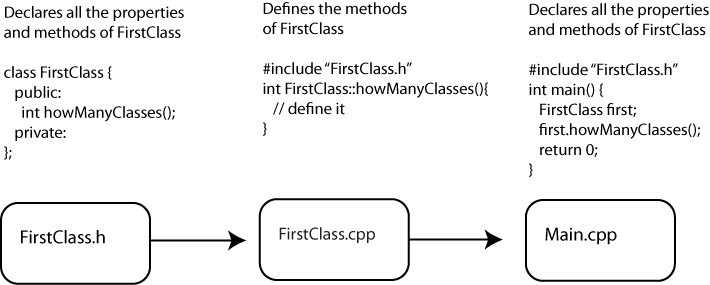
If you want to have your class contain a variable, and you will, then you can define that in the .h header file as well. Just remember that the declarations go in the .h file and the definitions go in the .cpp file, and you’ll be OK. When you’re working with oF, you’ll frequently see things that look like Figure 5-6.
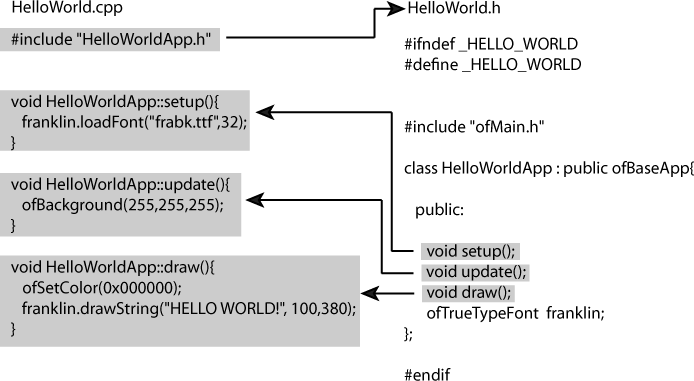
Don’t worry about all the specifics of this diagram; we’re
going to return to it in Chapter 6 when we
discuss oF in greater detail. For now, just notice how the setup(), update(), and draw() methods are declared but not
defined in the .h file, and how
they are defined in the .cpp
file with the name of the class in front of them. This is going to
be a wonderfully familiar pattern for you by the end of this
book.
A Simple C++ Application
Example 5-1 is your first C++ class,
helpfully named FirstClass. First
up you have the .h file where
all the definitions are made:
// make sure we have one and only one "First class"
#ifndef _FIRSTCLASS
#define _FIRSTCLASS

// give the class a name
class FirstClass{
// declare all the public variables and methods, that is, all the values that can
// be shared
public:
    FirstClass();
    int howManyClasses();
// declare all the private variables and methods, that is, all the values that are
// only for the internal workings of the class, not for sharing
private:
    int classProperty;
};

#endif
We’ll talk this through, because the first thing you see is
this really odd #ifndef. Don’t
let this scare you away, because it actually has a perfectly good
explanation. Frequently in a larger project, you’ll have a single
class that is referenced in lots of other classes. Going back to our
little space game example, our Enemy class is going to be needed in more
than one place. When the compiler is compiling our classes, we don’t
want it to compile Enemy multiple
times; we want it to compile the enemy only once. This weird little
#ifndef statement tells the
compiler that if it hasn’t already defined something called _FIRSTCLASS, then it should go ahead and
compile everything in here. If it has already
defined something called _FIRSTCLASS and, by extension, also
compiled all the code in our header file, then we don’t want it to
do anything. The #ifndef acts
just like any other if statement.
Take a glance at the end of the class, and note the #endif; this is just like the closing
} on a regular C++ if statement. The rest of it is much more
straightforward. The class
keyword goes in front of the name of the class and a {. All the class data is contained within
the opening class statement { and
the closing class statement };.
Inside of that you can see the word public. This means that after the public keyword, everything will be
publicly accessible, which means that it is available to other
classes that have access to instances of FirstClass. Everything up until the
private keyword will be public, and, logically, everything after
the private keyword will be
private.
So, by looking at the .h file, you know the name of the class, what properties your class defines, what methods it defines, and whether those properties and methods are public or private. That’s great, but it’s not quite everything, so we’ll list the .cpp file so you can see how all these methods are actually defined in Example 5-2.
// first import our header file
#include "FirstClass.h"
// then import the file that contains the 'print' method
#include <iostream>


// this is our constructor for the FirstClass object
FirstClass::FirstClass()
{
    // this is a little magic to get something printed
    // to the screen
    printf(" FirstClass
");
    classProperty = 1; // initialize our property
}

int FirstClass::howManyClasses()
{
    // once again, just a little message to say 'hello'
    printf(" howManyClasses method says: 'just one class'
");
    // note that we're returning classProperty, take a look at the method
    // declaration to understand why we're doing this (hint, it says 'int')
    return classProperty; // do something else with our property
}
Note that for each of the methods that are declared in the
.h file there is a
corresponding definition in the .cpp file. Here, you can see how each of
the methods of the class is put together with both a definition in
the .cpp file and a declaration in the
.h file. So far, so good. You have an instance
of a class, but you aren’t creating an instance of it anywhere yet.
That’s about to change with the final file. This last file is not a
class but is a single .cpp file
called main. There is a rule in
C++ that says you must have one file that has a method called
main(). When your application is
launched, this is the method that will get called, so it’s where all
your initialization code goes. In an oF application, this is just
creating an instance of your application and running it; this will
all be covered in greater detail in Chapter 6. There is no rule that says you must
have a file called main in
order to run your application, but it’s the way it’s done in oF, and
that means it’s the way we’ll demonstrate in Example 5-3.
#include "FirstClass.h"

// all applications must have a 'main' method
int main() {
    FirstClass firstClass; // here is an instance of our class
    firstClass.howManyClasses(); // here we call a method of that inst.
    return 0; // here we're all done
}
So, is this the only way to make a simple C++ application (Figure 5-7)? The answer is no; however, this is the way that oF is set up, so this is the way that we’ll show.
There are many more tricks to classes in C++ and many more wonderful mysterious things that you can do. If you want to learn more, you’re in luck, because there are dozens of good manuals and guides to help you learn C++. If you don’t really want to learn more, you’re in luck, because oF hides much of the complication of C++, allowing you to concentrate on other parts of your project.
Pointers and References
C++ is a very powerful and very fast programming language because it is very “low-level.” That is, it doesn’t hide the inner workings of the computer nearly as much as a language like Processing. This has upsides and downsides. To follow many of the openFrameworks examples in this book, you’ll need to have at least a cursory familiarity with two concepts: the pointer and the reference. If you’re not interested in working with openFrameworks and C++ right now, then feel free to skip this section and move on. You might come back to it later; you might not. Above all, this book is meant to be helpful to you, not to shove things at you that you’re not interested in.
The pointer and the reference are complementary concepts that are inextricably linked. To understand how they work, though, you need to first understand what happens when a variable is declared and see how the memory of a computer works. Take a look at this:
int gumballs = 6;
What you’re doing here is telling the computer to store
something the size of an int with a
value of 6 and a variable name of
gumballs. It’s important to
understand that the value and the variable name are separate. They are
exchanged for one another when needed. One example is when you add
5 to gumballs:
int moreGumballs = gumballs + 5; // "gumballs" is replaced with 6
This is easy to do because gumballs is really representing a part of
memory. That section of memory is represented by hexadecimal numbers
like 0x2ac8 that simply stand for the beginning of the location in the
computer’s memory where the value of gumballs is stored. The variable gumballs simply stores that location so that
you can access it easily. When you set gumballs to 8:
gumballs = 8;
what you’re doing is changing the value that is stored in the
section of memory that gumballs
represents. When you set gumballs, you set that section of the
computer’s memory. When you get gumballs, you read that section of the
computer’s memory. You’re reading the bytes stored in the computer’s
memory by location. That location is referred to by the
friendly variable name, but in reality, it’s a
physical location. It really doesn’t matter a ton, until you start to
deal with pointers and references, because the pointer and the
reference let you declare up front whether you want to work with a
pointer to a location in memory, or whether you want to deal with that
memory explicitly. We’ll talk more about when and why you would do
each of those things later.
Here’s a simple example that you can run with any C++ compiler to see how this works:
#include <iostream>
int main () {
    int gumballs = 6;
    int gumdrops = 12;
    // here's where we make the magic
    printf(" the variable gumdrops has the value of %i and ¬
        the address of %p
", gumdrops, &gumdrops);
    printf(" the variable gumballs has the value of %i and ¬
the address of %p
", gumballs, &gumballs);
}
This will print out something that might look like this:
the variable gumdrops has the value of 12 and the address of 0xbffff998
the variable gumballs has the value of 6 and the address of 0xbffff99c
Notice two things. First, notice the & in front of the two variables:
&gumdrops
&gumballs
These are both references, which indicate that you want the name
of the location in memory where these are stored. When you use the
variable name, you just get back what’s stored there. When you use the
reference, though, you get the name of the location where the actual
value is stored. Second, notice the actual location in memory:
0xbffff998. That’s just on my
computer at one particular moment in time, so if you run the code,
your output will almost certainly look different. This is interesting
because this is the place that gumdrops is stored. What is stored there is
an integer, 12, and the way you get
at that integer is by using the variable name gumdrop.
Reference
The reference, as mentioned earlier, is the location in memory
where a variable is stored. Any variable’s address can be accessed
using the reference operator (&). Though much more can be done with
references, in this book we’re going to limit the use of references
solely to initializing pointers. With that in mind, we’ll talk about
a pointer and show how the pointer works.
Pointer
Pointers are so called because they do in fact point at things; in particular, they point at locations in memory much like you just saw in the discussion of references.
The pointer, like a variable and a method, has a
type. This is so you know what kind of thing
is stored in the memory that the pointer is pointing at. Let’s go
ahead and make a pointer to point at gumdrops:
int* pGumdrops = &gumdrops;
There are two important things to notice here. First is that
when the pointer is created, the pGumdrops variable uses the same type as
the variable whose address the pointer is going to point to. If you
are making a pointer to point to a float, then the pointer must be
of type float; if you are making
a pointer to point to an object of a class called Video, then the pointer must be of type
Video (assuming that Video is a class). The second is that the
pointer is marked as a pointer by the presence of the * after the type declaration. A pointer to
a float would look like this:
float* pointerToAFloat;
In the preceding code snippet, you have declared the pointer, but have not initialized it. This means that it doesn’t point at anything yet:
pointerToAFloat = &someFloat;
Now you have initialized the pointer, which means that it can be passed around in place of the variable itself, which is all well and good, but it doesn’t help you do things with the pointer. To do things with the pointer, you need to dereference the pointer:
int copyOfGumdrops = *pGumdrops;
To dereference the pointer—that is, to get the information that is stored in the location that the pointer points to—you dereference the pointer by using the * symbol in front of the name of the pointer. Think of the * as indicating that you’re either telling the pointer to point to some place in particular, initializing it, or getting what it points at. Here’s another example showing how dereferencing the pointer works:
int gumdrops = 12;
int* pGumdrops = &gumdrops;
printf(" pGumdrops is %i
", *pGumdrops);// will be 12
gumdrops = 6;
printf(" pGumdrops is %i
", *pGumdrops);// will be 6
gumdrops = 123;
printf(" pGumdrops is %i
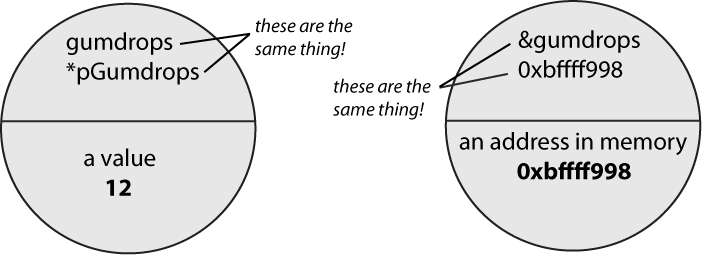
", *pGumdrops);// will be 123Any time you change the value of gumdrops, the value that pGumdrops points to changes. Figure 5-8 illustrates the
relationship between the variable and the pointer. When you do the
following:
int gumdrops = 12;
int* pGumdrops = &gumdrops;
you are creating the relationship shown in Figure 5-8.
When to Use Pointers
As you may recall from the earlier discussion on methods, when something is passed to a method, a copy of it is used for manipulation. This generally means that when you pass something to a method, it doesn’t alter the original variable:
void addExclamation(string s){
    s+="!";
}

string myName = "josh";
addExclamation(myName);
printf( myName ); // will still be 'josh', not 'josh!'
If you wanted to alter the variable that is passed in to the
addExclamation() method, you
would pass a pointer to the method:
void addExclamation(string* s){
    *s+="!";
}

string myName = "josh";
string* pName = &myName;
addExclamation(pName);
printf( myName ); // will now be 'josh!', not 'josh'
When you pass a pointer you are passing an object that points to the actual memory, and dereferencing the pointer allows you to change what is actually in memory. If you have a very large picture that you want to alter, you want to alter the picture, not create a copy of the picture and alter that. Why not? Because it might not be the picture that’s currently open, because you might want to alter a particular picture in the filesystem, or because the picture might be really large and altering might take up too much memory. This brings us to the second extremely common situation in which you might use pointers.
Some Rules for Pointers
If you have a video file, a huge photo, or a lot of sound data, you don’t want to be making copies of that all over your program, though you’ll probably need to access it all over the place. The judicious use of the pointer is a way to allow different parts of a program to access a variable and alter that variable without multiple copies of it.
There are several very important rules to pointers. Write these down somewhere, commit them to memory, or otherwise preserve them:
Don’t try to access a pointer before it has been initialized. This:
int* pInt;
printf(" printing out pInt %i ", *pInt);
will not print anything meaningful.
Check whether a pointer is
NULLbefore doing anything with it:if(ptr != NULL) { // now you can use the pointer }If you try to use the pointer and it isn’t assigned to anything, then your application won’t do what you want it to do and might crash.
Although you can do this:
int* ptInt = 212;
you really shouldn’t. This can create bugs that are really difficult to track down. When using a pointer, unless you’re very confident in your skills, brave, or just very smart, you should set pointers to initialized variables. If you’re comfortable with dynamically allocating memory, it can be a very powerful tool.
You might come across code that looks like this:
FirstClass* fc = new FirstClass();
This creates a new
FirstClassand keeps a pointer to the object that can be used to access that object. If this is something that you’re curious about understanding better, look in Chapter 18 for a list of books focusing entirely on C++.If you dynamically create an object, you have to clean up after yourself by calling
deleteon the pointer:FirstClass* fc = new FirstClass(); // do some things with fc ... // now we're all done with it, so clean up delete fc;
If you don’t delete pointers that you’ve dynamically allocated when you’re done using them, and especially if you assign them in a method and don’t delete them before the method is finished, you’re creating what’s called a memory leak. These can cause your application to run slowly or crash.
Pointers and Arrays
Pointers and arrays have a very close relationship. An
array is in fact either a pointer to a section
of memory or a pointer to a bunch of pointers. Really, when you make
an array of int
variables:
int gumballs[10];
what you’re saying is that there are going to be a list of
10 integers next to one another.
It’s the same thing as this:
&gumballs[0]
How’s that? Take a look at what declaring the array actually does in Figure 5-9.

What you are doing is making a series of 10 integers, all in a row, within memory. Nothing links them together, except that they are all right next to one another. When you get the second element in the array, what you’re doing is getting the next integer after the initial integer. The array itself is just a pointer to the location in memory where the first element of the array is stored, along with a number to indicate how many more places are stored for the array. In this case, there are 9 after the initial place, for a total of 10. So, if the beginning of the array is the location of the first element in memory, how do we get the next element in memory? By adding one to the pointer. Don’t let this throw you for a loop, because it’s deceptively simple:
int myInt = 4;
int* ptInt = &myInt;
int* nextPointer = ptInt + 1;// point to the next piece of memory
Imagine a row of shoe boxes. Imagine that you make a
metaphorical pointer to the second shoe box by saying “that red shoe
box there.” Saying “the next shoe box” is like saying “the shoe box
to the right of the red shoe box.” You’re not doing anything with
the shoes inside those shoe boxes; you’re just getting the next shoe
box. That’s exactly what adding to the pointer does. You’re not
adding to the value that the pointer is pointing to, you’re adding
to the location in memory that you’re interested in accessing. Going
back to our gumballs array of
integers, when you get the second element in the array, what you’re
doing is this:
gumballs + 1
because gumballs is a
pointer to the location of the first element in the array. You can
do some really clever things with pointer arithmetic, but they
aren’t particularly important at the moment.
When Are You Going to Use This?
If you follow along with this book, you’re going to encounter
pointers first when getting sound data in an openFrameworks
application. The main application class in oF is called ofBaseApp, and it has an audioReceived() method that you can use to
get data from the sound card of a computer. The audioReceived() method looks like
this:
void audioReceived (float * input, int bufferSize, int nChannels)
That pointer to float is a
pointer to the beginning of an array of sound samples. All the data
of a sound is stored in a computer in an array of floating-point
variables. When you want to work with the sound that your computer’s
sound card has captured, you’ll get a pointer to an array and a
bufferSize variable that tells
you how large the array is. To use that sound data, you simply loop
through the values in that array using a for loop:
for (int i = 0; i < bufferSize; i++){
    printf("left channel is %f and right channel is %f",input[i*2],
        input[i*2+1]);
}
The reasoning behind the way the elements are accessed from the input array will be explained in Chapter 7. For the time being, just rest assured that, if you’ve followed everything in this chapter and the previous section in particular, you’re going to be able to put it to use to make some interesting stuff. If you didn’t really follow that last bit, don’t sweat it too much, because you’re not going to really need to work with pointers if you don’t want to quite yet. You’ll find that as you spend more time around these things and see how they’re used more, they’ll start to make a lot more sense to you.
Review
A class is a group of variables and methods that are stored together within a single object. For example:
class Point{
    int xPosition;
    int yPosition;
};
Once classes are defined, they can be used like other variable types. First defined, then initialized:
Point pt = new Point();
Classes can define multiple methods and variables. One of the special methods that a class defines is the constructor. The constructor is a method that has the same name as the class and is called when the class is instantiated.
class Point{
    int xPosition;
    int yPosition;
    Point(){
        // anything to do when the object is first constructed
    }
};
The constructor is the only method that does not use a return type.
Pointers are a special type that exist in C++ and Arduino that
point to a location in memory where a value is stored. They are
declared with a type, like any other variable, but use an * immediately after the type declaration to
indicate to the compiler that the variable is a pointer:
int* intPt;
A reference refers to the actual location in memory where the
value of variable is defined and is indicated by the & in front of the variable. Once the
pointer is declared, it can be set to point to the reference of a
variable:
int apples = 18;
intPt = &apples;
Pointers can be set only to the reference of a variable or a value but should usually be set only to the reference of a variable.
Pointers can be incremented using the + and decremented using the − symbol. This moves the location in memory
to which the pointer points.