
Chapter 2. Programming Basics
Writing code is never extremely easy; however, it is also not as difficult as you might imagine. The basis of all programming is simple logic, and programming languages use lots of simple math symbols and English words. So, if you’re comfortable with things like equals signs, some very basic algebra, and a smattering of English words, you’ll probably do just fine. This chapter is by necessity far shorter than it could be. Learning all of the intricacies of writing code in even a single programming language, much less multiple languages, takes years of study. However, you can easily learn some of the basics, read documents, ask questions on user forums, and use what other people have created, and then find yourself able to create projects and designs within a short amount of time. With that in mind, this chapter is a simple introduction to the fundamentals that the rest of this book relies on.
There are a few types of readers using this book. The first says, “I just want it to work.” For you, this chapter will explain just enough that you’ll be able to follow along with the examples in this book and the ones that you find online, and be able modify them slightly to get them to do what you need them to do. You’ll definitely want to read this chapter, probably more than once, but know that I understand your predicament. I was there once myself. You should know, though, that simply copying and pasting code with no understanding of what it’s doing is a very easy way to become seriously frustrated. You should know at least the basics of what your code is doing. Another kind of reader says, “I want it to work, and I want to know why it works.” For you, this chapter will be an introduction. You’ll probably read it, read some examples, and come back to this chapter again later. That’s a good thing. You’ll probably also want other books soon. Some of the best are listed in Chapter 18. Another kind of reader may be familiar with some material covered in this book but not others. For you, this chapter will probably be a review and may not even be necessary, but you might want to flip through it just in case you’re not familiar with the Processing or Arduino languages or some of basics of C++. If you are familiar with the basics of all of these languages, then you might want to skip ahead to the chapters on the tools themselves or to Chapter 5 for some more advanced material on programming. Whichever type you are, you should read enough to understand what the code listings in the rest of the book describe.
Why You’ll Read This Chapter More Than Once
In all likelihood, the first time you read this chapter, some of it will not make sense. That’s perfectly normal and to be expected. As you read through the rest of this book, when you have questions, return to this chapter. There’s no substitute for seeing how code functions within the context of something interesting to you. Some of the ideas might not make sense at first, but after seeing them put into practice, being patient, and hacking at them, you’ll find that none of this is wildly complicated. Don’t be afraid when you don’t understand something, don’t be afraid to look back at this chapter, and above all, don’t be afraid to copy code from this book and change it until it breaks. Hacking at code, taking stuff that works, breaking it, and then figuring out why it breaks is the best way to understand. Of course, the goal throughout this book is to try to provide code that will just work and satisfy the first kind of reader, those of you who simply want it to work and be done with it. In either event, though, this is going to require some patience, because it simply won’t make sense the first time through. With a little bit of patience, though, and the willingness to experiment, fail, and try again, you’ll find that this isn’t all that difficult.
The Nature of Code
Throughout this chapter, you’ll be learning about programming—writing code, to be more exact—so it’s important to know not only what code is but how it fits into the process of creating a program. There are a few key terms that you should understand before starting to program:
- Code
Code is a series of instructions that a computer will execute when the code is run. It is written in a programming language that, like natural languages, is essentially a contract between two parties. In the case of code, though, the two parties are the programmer and the compiler. You’ll learn more about a compiler shortly; for the moment, we’ll just think of it as the listener who understands our code. Code can be as simple as adding two numbers or as complex as rendering an animation. What matters is that you write correct instructions to the compiler using a programming language and a text editor of some sort and then tell the compiler what files contain the instructions. Writing code is typing code instructions into a text file that will later be passed to a compiler of some sort. To write a program can mean writing source code from scratch, or it can mean putting several programs together and creating a way for them to communicate. This can also mean configuring prebuilt projects. Creating applications and code doesn’t always require writing code, but if you have this book, then you’re probably interested in creating code.
- Files
Code is stored in text files that usually any text editor can open. These files contain your code and nothing else. For larger and more complex projects, you can link multiple files together. Sometimes, larger projects will have many hundreds of code files that will all be linked together to create the sum of the code for the application. Arduino projects use .pde files and sometimes .c files. Processing projects also use .pde files and sometimes .java files. openFrameworks projects use .cpp and .h files. In each case, the different file types do different things and have different purposes that you’ll learn more about later in this book.
- Compiler
A compiler is a program that takes a code file (or many code files) and turns it into a series of instructions that a computer will run as a program. Most modern computers do not directly process any instructions that you write; instead, you ask a compiler to turn your code into machine instructions. The compiler optimizes machine instructions for the computer to run very quickly, but they would be very difficult for a person to write, so the better step is to write code in a more human-friendly way and convert it to machine-friendly instructions. This means that when you write code for an Arduino controller or write some Java code, you don’t simply run that code; you compile it and have the compiler create an executable file that your computer can run. You can imagine the process of writing code as a series of translations in which you tell the compiler what you want to do with the program that it will create in a high-level programming language like Processing or C++ and the compiler then creates a machine language file that will run that file.
- Executable
An executable is a file that can be run as an application. It is the result of writing code and compiling it. Sometimes the terms application and executable are used interchangeably, but they’re not the same. An application may consist of many executable files, or it may consist of only one. In either case, for the kinds of projects you’ll be learning to build in this book, you’ll always have an executable.
Now you’re ready to get started writing your own code.
Variables
Looking at variables is a good place to start. Everyone remembers variables from their first algebra classes. You might have seen something like this written on a blackboard or whiteboard:
| x = 5 |
That says, “There’s something called x, and
it is equal to the number 5.” Variables in computing are very similar.
They represent something, and in fact they always represent a certain kind of something.
That’s a little different than the algebra example because that
example didn’t need to say that x
is going to be a number; it just says, “x is a number.” If you wanted
to use code to make a number called x and use it as a variable, you would do it
like this:
int x;
The int indicates (or
sets) the type of the variable. You can’t just
make any type of variable; you have to make specific kinds of
variables. The kind of variable is called its
type; types are dealt with a lot more in the next
section, so for right now, let’s concentrate on getting the basics of
variables down.
int x = 5;
This code creates a variable named x that is an integer and has the value of
5. What this means is that
somewhere in your computer’s memory there is something called x that is storing the value 5. You can set the value of x right away, as in int x = 5, or create it and leave it for
later use, as in int x. Look at
another example:
int y = 10;
int x = 5;
int z = x + y;
This snippet shows some code that creates variables, gives two of them values, and sets a third variable’s value to be the sum of the first two.
Simple Types
In the platforms covered in this book, all variables are
typed. This means that they have a type that
tells the computer what sorts of things are going to be stored in
the variable. This is because numbers, letters (usually called
characters), and true/false (called boolean
values) all require different amounts of space to store and move
around.
Here are some of the most common types that you’ll encounter in each of the programming languages in this book.
int
This is the datatype for integers, which are numbers without a decimal point, like 2 or 20,392. Now, we’re about to run into our first real problem in this chapter: there are three programming languages used in this book; they all have similar things, but they sometimes work just a little bit differently. In Processing, integers can be as large as 2,147,483,647 and as low as –2,147,483,648. In Arduino and C++, the languages that openFrameworks (oF) uses, things work a little differently, and understanding why requires a quick explanation of signed and unsigned variables. The next small section explaining signed and unsigned variables might be a bit heavy at first, so you may want to skim over it the first time, particularly if you’re more interested in working with Processing.
Signed versus unsigned
As mentioned earlier, variables need to be declared with a type because the computer needs to know how much space they will take up. That means that sometimes an int is 4 bytes or 32 bits of information all the time and that it can store 4 bytes worth of information. So, what happens when you need a negative int? Well, you have to store whether it’s negative or positive, and the way you do that is by moving all the values of the int down into the negative values. For the moment, you’ll see how this works in C++, the language that oF uses, and then the rest of the languages will be addressed. In C++, where the int represents a value in between –2,147,483,647 to 2,147,483,647, if you have an int that is never going to use a negative number, you can use an unsigned int that stores anything from 0 to 4,294,967,295. This is what’s called having signed or unsigned variables. Unsigned variables don’t store negative numbers, whereas signed variables do. The way this works requires a little bit of thinking about binary numbers.
An int is 32 binary values. Binary counting uses 1 and 0 to count instead of 0 through 9 like we’re used to doing. This means that when you want to set a variable to 1, you’ll actually be storing the value 1 in the place where the variable is stored. When you want to store the value 2, you’ll be storing 10, which means 1 in the 2’s place and nothing in the 1’s place. Additionally, 3 is represented as 11, which means 1 in the 2’s place and 1 in the 1’s place, for 2+1, which is 3. Further, 4 is represented as 100, which is 1 in the 4’s place and nothing in the 2’s or 1’s place. Therefore, 16 is 1,000, 17 is 1,001, 18 is 1,010, and so on. This is called two’s complement math because it counts everything up by squaring for the next value. That’s a very quick introduction to binary math, but don’t worry, there’s a much more comprehensive discussion of this in several chapters later in this book where you begin using bits and binary.
Figure 2-1 shows the ways that signed and unsigned variables work. Remember that in C++ the int is 32 bits, so there will be 32 boxes to show what each bit stores.
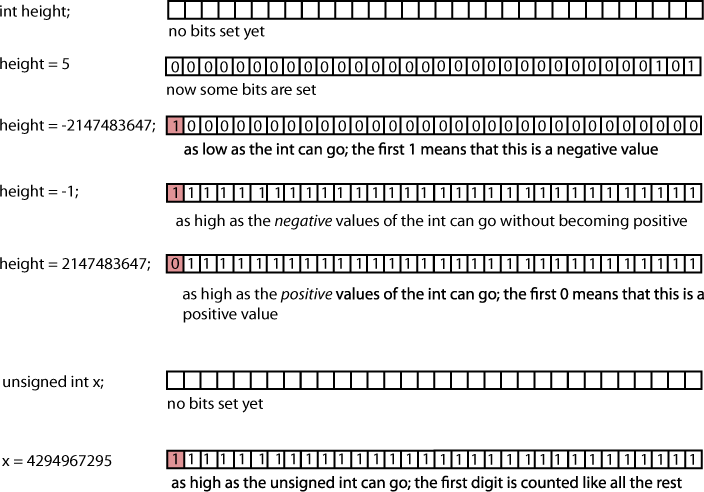
In unsigned numbers, the first bit is counted like any other bit. In signed numbers, the first bit is used to store whether the number is positive or not, and this is why unsigned variables can store larger values than signed variables.
Arduino and C++ use unsigned variables, and all variables
are signed unless you indicate otherwise by putting unsigned in front of the variable
type:
unsigned int = 5;
Processing does not use unsigned variables; all numerical variables in Processing are signed.
In C++, the language you’ll use with oF, signed ints are −2,147,483,647 to 2,147,483,647, and unsigned ints are between 0 and 4,294,967,295. In Arduino, the int can be between −32,768 to 32,767. Tricky? Not really. Lots of times you won’t have to think about what you’re storing in the int. When you do have to think about how large the value you’re going to be storing is, it’s time to use a bigger number type, like long or double. We’ll discuss these later in this section. When using Processing, you never have to think about how large the value will be at all, so it isn’t a problem. Simply figure out whether you’ll need a decimal point. If you do, then use a float; if you don’t, then use an int.
float
The float is the datatype for floating-point numbers, which are numbers that have a decimal point. Floating-point numbers are often used to approximate analog and continuous values because they have a greater range of values than integers. Signed float variables can be as large as 2,147,483,647 and as low as −2,147,483,647. Float variables aren’t signed in C++ or Arduino.
char
This type can contain characters, that is, single letters or
typographic symbols such as A, d, and $. Here are two char variable declarations:
char firstLetter = 'a';
char secondLetter = 'b';
So, what is different about floats, ints, and chars? char variables can sometimes be added together like numbers, but it’s not going to work the way you think it will. When working with Processing or Arduino, it’s not going to work period, and with C++ in openFrameworks it will work, but not as you might expect:
char thirdLetter = 'a' + 'b'; // this won't become 'ab' or 'c'
Like I mentioned earlier, Processing and Arduino aren’t going to like this at all. They’re just going to throw errors at you and complain. C++, however, will work, and the next section will explain why.
bool or boolean
Boolean values store two possible
values: true and false. In C++ and Arduino, the true is actually a 1, and the false is actually a 0. It’s usually
clearer to use true and
false, but you can use 1 and 0
if you like. They’re very handy for storing very simple results:
you received a message from the server or you didn’t, the user
clicked the F key or they didn’t.
For Arduino and Processing, you do the following:
boolean b = true;
In C++, you do this:
bool b = true;
Note that the Processing and Arduino version uses the word
boolean, while C++ uses the
word bool.
Both true and false are reserved words. That means
that the compiler only recognizes them as being values that you
can use to set Boolean variables. This means that you can’t, for
example, do this:
boolean true = false;
It will cause errors, which is something that, although unavoidable, you generally want to restrict to more interesting things that will help you create your projects.
string
A string is a sequence of characters.
This is both a helpful, metaphorical way to think about it and a
matter of fact, and it is something that you’ll investigate more
closely later. The string includes helpful methods for looking at
individual characters, comparing strings to see whether they’re
the same or different, searching strings for parts of the string
(for example, finding “toast” in “toaster”), and extracting parts
of strings (getting “toast” out of “toaster”). The differences
between a string and a char is that a string is always defined
inside double quotes ("Abc")
and can consist of multiple characters, while char variables are
defined inside single quotes ('A') and can consist of only one
character.
Here are some strings in Processing:
String f = "foo";
String b = "bar";
String fb = f+b;// this will be "foobar"
string f = "foo";
string b = "bar";
string foobar = f+" "+b;// this will be "foo bar" note the space w/in quotes
Note that Processing uses String, while C++ uses string. Why isn’t there any Arduino
example? Arduino doesn’t have a String or a string, because it doesn’t need one.
We’ll have to leave the explanation for this until the next
section. Suffice to say, it’s not a huge problem.
Since a String is defined within quotes:
String super = "super";
including quotes in a String requires the (backslash) character to be used preceding the quote:
String quoted = "He said "It's super"."
This is known as an escape sequence.
Other escape sequences include t for the tab character, which is
written with the escape
character, and n for newline,
which is written
. A single
backslash is indicated by \
because without the in front, the compiler would think that
you’re writing an escape sequence. If you wanted to write the
characters hat’s great!, you’d write
this:
String quoted = "\that's great!";
Otherwise, without the double backslash, you’d end up with this:
" hat's great!"
The compiler would assume that the is a tab.
byte
The byte is the datatype for bytes, that is, 8 bits of information storing numerical values. In Processing the byte stores values from −128 to 127 (a signed value), and in the Arduino it stores from 0 to 255 (an unsigned value). Bytes are a convenient datatype for sending information that can’t or shouldn’t be represented by strings or other kinds of numbers such as the contents of a file, data sent to or from hardware, data about the pixel of an image, or a millisecond of sound.
Here are bytes in Processing and Arduino:
byte firstByte = 55;
byte newByte = 10+firstByte;
Now, the byte newByte is
just a value waiting to have something done with it. If you were
to treat newByte like a char,
it would be A and if you treat it like an int, it would be 65.
Because bytes are so lightweight, they often are used to represent
data that needs to be read or written, or sent quickly, or as data
that doesn’t have an easy representation in other formats.
C++ does not have a byte type. Where you would use a byte in
Processing or Arduino, you use a char in C++. Why is this? Remember that
the char is an ASCII number
value, that is, a number between either −128 and 127 or 0 through
255, that represents a letter or character. The designers of C++,
taking a cue from the C programming language that preceded it,
being as efficient as possible, recognized that this value could
be used not only for characters but for anything. Hence, in C++
you use the char more
frequently than in Processing or Arduino.
Arrays
The array is a slightly more complex datatype than the ones that were shown earlier. An array contains one or more variables in a list. Remember one of the problems that you’re going to run into in this book is that there are three different programming platforms used in this book, each of which does things slightly differently. We’ll look at three different arrays filled with integers in each of our platforms to give you a feel for the similarities and differences.
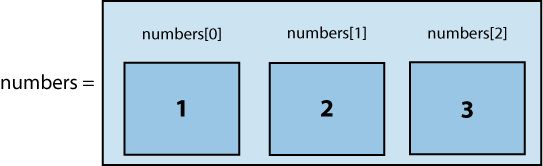
The array is a list of multiple elements; in the code snippet
below, it will contain integers. You’re going to create an array
that holds three int values: 1,
2, 3. It’s nothing too thrilling, but it’s a good place to
start.
Note the markers above each of the elements in the array in
Figure 2-2: numbers[0], numbers[1], numbers[2]. These are the array access
operators. That’s not a typo; they do count up from 0. We’ll come
back to these after we look at creating the array.
Here’s what the array looks like in Processing:
int[] numbers = new int[3];
numbers[0] = 1;
numbers[1] = 2;
numbers[2] = 3;
First, look at the declaration of the array, as shown in Figure 2-3.
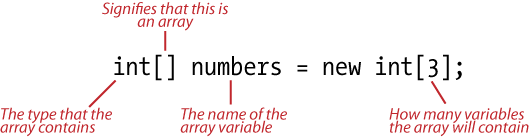
You can declare arrays to be filled with any type, even types
that you create yourself. We’ll get to this later. The code snippet
sets all the values of the array. When you want to access an element
in the array, you use the access operators, [] to access the index position in the
array that is specified within the square brackets:
int x = numbers[0];
The previous sets x to
1, because the first item in our
numbers array is 1:
int y = numbers[1] + numbers[2];
The previous sets y to the
values of the second plus the third elements of numbers, that is, 2 plus 3, which equals
5. If you use the = operator in
front of the array with the access operator, it sets the value of
the element in the array at that point:
numbers[0] = 1;
numbers[0] = 5;
Whereas numbers[0]
originally was 1, it is now
5. The array is really storage,
and each element in the array is like a box that can store any
variable of the type declared when the array is created. When any
item within the array is set, it will store that value until it is
changed.
Instead of putting each number into the array on a separate line of code, the array values can be created all at once:
int arr[] = {1, 2, 3};or:
int arr[3] = {1, 2, 3};Note that above the array does not need to have a number length assigned to it. This results in the same array as creating the array in the first example; however, it assumes that you know all the values that will go into the array. If you do not, use the first method described.
The next language to look at is the declaration of an array in Arduino. Luckily for the sake of brevity, the Arduino platform deals with arrays very similarly to Processing. Creating an array in Arduino or C++ can be done in any one of the three following ways.
Here’s what the array looks like in Arduino or C++:
int arr[] = {1, 2, 3};or:
int arr[3];
or:
int array[3] = {1, 2, 3};Figure 2-4 breaks down the parts in the array.

The only difference between the array in Processing and in
Arduino is that while Processing supports the new keyword when creating an array,
Arduino does not. If you know all the elements when you’re creating
the array, do it like so:
int array[3] = {1, 2, 3};Otherwise, you should construct an array like this:
int[] arr = new int[3];
Now that we’ve covered the basics of arrays, you’ll look at some of the more complex aspects of dealing with the array. The first is the error that you’re sure to encounter at some point, specifically, the “out of bounds access” error in all its many forms. What this means is that you’ve tried to access an element in the array that does not exist.
In Arduino and C++, arrays can be initialized as shown here:
char arr[3] = {'a', 'b', 'c'};
char badArrayAccess = arr[3];
When you try to do something with the badArrayAccess variable, you’ll find that
not only is it not a char, but that accessing it might just crash
your program. This is because the array arr contains three char variables, and
you’re trying to access a fourth one, which violates the number of
elements established when declaring the array. Another mistake is
trying to store the wrong kinds of variables in the array, as shown
here:
char arr[3]; // an array of chars, with space for 3 variables
float f = 2.3;
arr[0] = f; // oops! arr expects chars, so will turn f into "2"
bool b = true;
arr[1] = b; // oops! arr expects chars, so will convert b into "1"
This won’t cause an error; however, it won’t return the variables correctly, because the array declared is expecting char variables, so when you place float and bool variables within that array, it automatically converts them to char, with frequently unpredictable results. Table 2-1 is a quick comparison of the datatypes and how the three languages use them.
Arduino | Processing | C++ | Use |
int | int | int | A number without a decimal point, for example: 4 or −12 |
float | float | float | A number with a decimal point, for example: 1.23 or −128.12 |
char | char | char | A single character or
number that will be treated as a character, for example:
|
None (use char[] instead) | String | string | A grouping of characters together, for example: hello, 172 Cherry Street |
byte | byte | None (use char instead) | The value of a byte, between −128 and 127 if the byte is signed and 0 and 255 if it is not signed |
boolean | boolean | bool | A |
double (but same as float) | double | double | A floating-point number with higher precision than float |
Casting
What do you do if you have a number that is an integer but you need it to be a float? You cast it. This means that you convert it from its original type into a new type:
Here’s what casting looks like in Processing, Arduino, and C++:
int i = 5;
float f = (float)i; // float is now 5.0
Why can’t you simply set f
to i?
float f = i;
Types won’t allow you to do that, because that’s the point of
a type. You know what specific type values are, how much memory they
require, and how they can be used. The previous code will cause an
error if you try to run it. Instead, cast the variable. You can’t
change the type of a variable once it’s declared. In this example,
i will always be an int, but if
you need to use it as a float, you can very easily cast it. Some
other examples of casting involving char variables because they are
such a fundamental datatype. For instance, if you want to cast a
char to a float and then back you do the following:
char ch = 'f';
int fAsInt = (int)ch;// now fAsInt is 102
char newChar = char(fAsInt); // newChar is now 'f'
One important thing to note is that you cannot cast an array:
char[] foo = {'a', 'b', 'c', 'd'};
int[](foo); // ERROR
To cast anything in an array, you need to cast every element of the array. We’ll cover this in greater detail in the sections on loops, but for now, we’ll look at this:
char[] foo = {'a', 'b', 'c', 'd'};
int i = int(foo[0]);
Here you create an array of char variables and then read one of those char values out of the array and cast it as an int.
Operators
Operators are the symbols that a compiler
uses to perform commands and calculations in your program. Operators
let you set variables like the =
operator, compare variables like the == operator, add variables like the
+ operator, and so on. There are
three major types of operators. The first operators are the
mathematical operators that perform mathematical operations. These
should be familiar from any math class you’ve ever taken. The second
are assignment operators that change values. The third are
comparison operators, which determine whether two variables are
equal, different, greater than, or less than another
variable.
Mathematical operators work pretty much as expected, with one
notable exception. + adds two
values, for example:
int apples = 5
int moreApples = apples + 3; // moreApples is equal to 8.
The exception occurs when you add strings; you end up with the two strings stuck together:
string first = "John";
string second = "Brown";
string full = first+second; // now full is JohnBrown
This is because of something called operator overloading. If you’re curious enough, you can check some of the recommended programming books from Chapter 18 for a full description, or look online because it’s a more advanced topic.
The other simple mathematical operators are – (subtraction), * (multiplication), and / (division). The last mathematical
operator is %, the
modulo.
The modulo tells you what is left over (the remainder) when the value on the left is divided by the value on the right. Here are some examples:
8 % 2 // equals 0 since there's no remainder when 8 is divided by 2
17 % 2 // equals 1 since there's a remainder of 1 when 17 is divided by 2
19 % 5 // equals 4 since the remainder is 4 when 19 is divided by 5
12 % 11 // equals 1 since the a remainder of 1 when 12 is divided by 11
19.0 % 5 // equals 4.0 since we're dealing with floats
Assignment operators work from right to left. That is, the operator uses the value on the right to assign or change the variable on the left. For example:
int age = 6;
The = operator sets the
variable on the left to 6. There
are other types of assignment operators that change the value of the
variable on the left, just like the = operator. For instance:
+=Adds the value on the right to the value on the left:
int height = 6;
height += 1; // height is now 7
height += 10; // height is now 17
-=Subtracts the value on the right from the variable on the left:
int size = 16;
size -= 8; // height is now 8
size -= 6; // height is now 2
++and–-Add one or subtract one from the variable on the left:
int hearts = 2;
hearts++; // hearts is now 3
hearts--; // hearts is now 2 again
hearts--; // hearts is now 1
*=or/=These work roughly the same as the
+=and-=statements, multiplying or dividing the variable on the left by the value on the right:int i = 15; i /= 3; // i is now 5 int j = 20; j /= 2; // j is now 10 float k = 100.0; k /= 3.333333; // k is now 30.000004 float m = 100.0; m /= '2'; // not a good idea i *= 4; // i is now 20 m *= 0.5; // m was 2.0 and is now 1.0
Comparisons are very important in programming and particularly important in using control statements, which will be discussed in the next section. Before we get to that, though, you need to become familiar with the various operators. These operators are common across all the programming languages discussed in this book and, with slight variations, across all programming languages. Comparisons allow you to determine whether variables are the same, different, greater than, or less than one another:
== (equal to)Compares whether two things are equal. For example:
5 == 4 // false
'a' == 'a' // true
(12 / 3) == (2 * 2); // true
4.1 == 4 // false
char(102) == int('f') // true, because 102 is 'f' in ASCII
"duck" == 0.002 // false, because it doesn't make any sense
!= (not equal to)Checks whether things are not equal, for example:
3 != 1 //true, they're not equal
'B' != 'b' // also true, they're not equal
> (greater
              than)
Checks whether the value on the left is greater than the value on the right, just like in math class:
4 > 3 // true
5 > 192901.2 //false
"fudge" > 8 // false, because it doesn't make any sense
< (less than)Checks whether the value on the left is smaller than the value on the right, again, just like in math class:
3 < 2 // false
'g' < 106 // since 'g' is 103 in ASCII this is true
-100 < 100 // true
>= (greater than or equal
              to)
Checks whether the value on the left is greater than or equal to the value on the right, just like in math class:
3 >= 3 // true, since they're equal
0 >= −0.001 // since 0 is greater than −0.001, this is true
'?' >= 'h' // false, since '?' is 63 in ASCII and 'h' is 104
4 >= 28 // false
"happy" >= "sad" // false, because it doesn't make any sense
<= (less than or equal
              to)
Checks whether the value on the left is smaller than or equal to the value on the right, again, just like in math class:
13.001 <= 13.001 // true, since they're equal
0 <= −0.001 // since 0 is greater than −0.001, this is false
'!' <= '7' // true, since '!' is 33 in ASCII and '7' is 55
&&Evaluates the statement on the left and the statements on the right and returns
trueif they are both true:(4 > 3) && ('f' > '1') // true ((5 * 2) == 10) && ((6 - 3) != 4) // true (5 < 10) && (2 > 4) // false, even though the left is true, the right isn't||Evaluates the statement on the left and the statements on the right and returns
trueif either one of them is true:(4 < 3) || ('f' > 'e') // true, left isn't true but the right is ((5 * 2) == 10) || ((6 - 3) != 4) // both are true ('b'=='g') || (2 > 4) // false, none of them are true
You may be wondering what to do with all these evaluations and comparisons. The answer is control statements. Table 2-2 lists operators and their uses.
Operator | Use |
| Adds, subtracts, multiplies, and divides. |
| Modulo; returns the remainder of a division. |
| Assignment; assigns the value on the right to the variable on the left. |
| Mathematical assignment; adds, subtracts, multiples, or divides the value on the left by the value on the right and sets the value on the right to that result. |
| Adds 1 to the value to the left. |
| Subtracts 1 from the value to the right. |
| Compares the value on
the left with the value on the right. If they are equal,
then the expression is |
| Compares the value on
the left with the value on the right. If they are not equal,
then the expression is |
| Compares the value on
the left with the value on the right. If the value on the
left is greater than or greater than or equal to the value
on the left, the expression is |
| Compares the value on
the left with the value on the right. If the value on the
left is lesser than or greater than or equal to the value on
the left, the expression is |
| Checks the truth of
the expression to the left of the operator and to the right;
if both are true, the entire expression is |
| Checks the expression
to the left of the operator and to the right of the
operator; if either is true, the entire expression is
|
Control Statements
You’ll often want to control how the logic of your program
flows. If one thing is true, then
you’ll want to do something different if it’s false. You might also want to do something a
certain number of times or until something becomes false. There are two kinds of control
statements that you can use to create this kind of logic flow in your
application: conditional logic statements, which
check whether something is true or
false, and
loop statements, which do something a set number
of times or until something becomes false.
if/then
The if/then is a conditional logic statement, and
it works just like it does in English: “If it’s raining, then I’ll
bring an umbrella.” These statements look like this:
if(condition) {
    result if the condition is true
} else {
    result if the condition is false
}
There must be a true/false expression in the brackets next to
the if. Here’s an example:
int myWeight = 72;

if(myWeight > 100) {
    print(" you're getting heavy! ");
} else {
    print(" you're still doing ok ");
}
You can also use the if
statement without an else:
int myHeight = 181;

if(myHeight > 200) {
    print(" you're too tall ");
}
This just means that the actions inside the brackets will
execute if the statement is true;
otherwise, you don’t do anything. You can also check that things are
not true:
boolean allDone = false;

if(!allDone) {  // if not all done
    print(" keep going! ");
} else {
    print(" ok, quit! ");
}
There is one last permutation on this pattern:
if(age == 5){
    print(" you're 5!");
} else if(age == 25) {
    print(" you're 25!");
} else {
    print(" can't login "); // if neither of the above is true
}
In this example, there is a new term introduced, else if. What this does is evaluate
another statement before going on to the else statement. This means that if the
first statement doesn’t evaluate to true, then check each else if looking for the first one that is
true. If none is true, then do the else statement.
for Loop
The for statement lets us
do things over and over again, for a specified number of
repetitions. Loops are frequently used to loop through arrays and
examine, use, or alter each element within them. This is going to be
particularly useful when dealing with the pixels in images or frames
of video, as well as sounds, data from the Internet, and many other
kinds of information that needs to be sorted through:
int i;
for(i = 0; i < 10; i++) {
    print(char(i)+", "); // this will print 0, 1, 2, 3, 4, 5, 6, 7, 8, 9,
}
The for statement uses
three different statements, as shown in Figure 2-5.
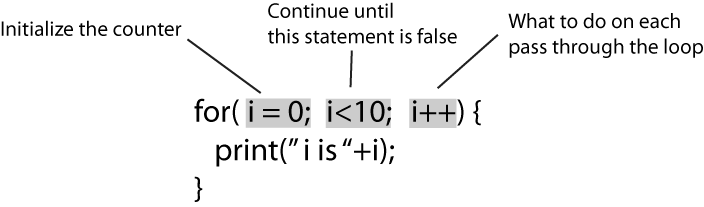
The integer i is used to
set the number of times that the loop will execute, running all the
code inside the code block. In the initialization of the for loop, you set i to 0; as long as i is less than 10, you continue looping,
and each time the for loop is
passed, i is incremented by
1.
Of course, it is also entirely possible to use subtraction in
the for loop:
for(int i = 5; i>-1; i--){
   print(i);
}
Another great use of the for loop is to go through an array and
look at each item in the array:
int[] intArr = {0, 1, 2, 3, 4, 5};
int sum = 0;
for(int j = 0; j < 6; j++){
    sum += intArr[j]; // we'll get the item in the array using the loop
}
Each time the loop executes, sum will be incremented using the next
integer in the intArr
array.
while Loop
The while loop is similar
to the for loop, but it is
slightly less sophisticated:
while(trueOrFalse){
//something to do each time
}
As long as the expression that the while is evaluating each time through
remains true, the loop will
continue executing. This is important to note because if the
evaluated variable does not become false, the loop will never exit, and your
program could become locked up while the loop runs. Creating an
infinite loop—that is, a loop that never
exits—is easy and will
certainly make your program unusable, so take care when using any of
the control statements. Here’s an example using a counter, much like
in the for loop:
int j = 0;

while(j < 100) {
    print(" what's up? "+j);
    j++; // if j is not incremented we end up with an infinite loop
}
Each time the loop executes, the integer j is incremented. When j is no longer less than 100, the loop is
exited, and the program continues on:
boolean ready = false;
float number = 0.0;

while(ready != true) {
    print(" we're just waiting" );
    number += 0.1;
    if(number > 1.0){
        ready = true;
    }
}
print(" we're ready ");
In this example, you increment a number and use a second
variable, a Boolean value, to determine whether you are in fact
ready. Until the ready variable
is true, the loop will continue
executing, and the “we’re ready” message will not be printed.
continue
The continue statement
tells a loop to skip over any further instructions and go on to the
next repetition. For instance, if you wanted to loop through a
certain number of items and process only odd numbers, you could do
this:
for(int i = 0; i< 10; i++) {
    if( i % 2 == 0){
        continue;
    }
    println(i + " is not divisible by 2");
}
This will print the following:
1 is not divisible by 2
3 is not divisible by 2
5 is not divisible by 2
7 is not divisible by 2
9 is not divisible by 2
The continue statement here
starts the loop over again. If you have a complicated operation to
perform, then using the continue
statement allows you to evaluate whether you need to run that
operation and to skip it if you do not. This means your code does
only what is necessary.
break
The break statement breaks
the loop. It is a great tool to use when you’re looping through an
array looking for something and suddenly you find it. Once you’ve
found it, you can quit looping easily by using the break statement:
int[] intArr = {1, 2, 3, 4, 5, 6, 2, 12, 2, 1, 19, 123, 1, 3, 13};
int counter = 0;

while(counter < intArr.length)
{
    if(intArr[counter] == 5) { // we're looking for 5
        print(" found it at ");
        break;
    }
    counter++;
}
// code will continue from here after the break
print(counter); // found the value 5 in intArr[4]
Functions
What is a function?
A function is a name for a grouping of one or more lines of code and is somewhat like a variable in that it has a type and a name. It’s very much unlike a variable in that it doesn’t just store information; it manipulates it. Going back to the basic algebra analogy you saw earlier when first looking at variables, a variable is something like this:
x
A function is something more like an instruction with something that is given at the beginning of the instruction and something that is expected in return. Writing out a function in simple English, you might see something like this: “When someone gives you some money, add the amount given to you to the amount that you already have and report that number back to me.”
There are a few parts there that can be broken out:
An amount of money that you are given
Adding the amount given to you to the amount that you already have
Reporting that number
Those three things can be thought of in order as follows: what the function takes or what will be passed in to it, what it does, and what it returns. Functions are set patterns of behavior in your program that take certain kinds of values, do something with those values, and return something when they are finished.
Defining a Function
To turn the written example into code, you would define a variable to be used to keep track of all the money that you have:
int myBank = 0;
Then you create a function that takes money, adds it to
myBank, and returns that
value:
int moneyReceived(int money){
  myBank += money;
  return myBank;
}
Now, you have defined a function called moneyReceived(). Using pseudocode or
talking though what a function is supposed to do can be quite
helpful when trying to understand it. “Take an integer, add it to
the money already in the bank, and return that value.” Figure 2-6 is a diagram that helps walk you
through what the function is supposed to do.

Notice that the return statement is returning something that
is of the same type as the type listed in front of the function
name. The variable myBank is an
int that the moneyReceived() function
returns.
Passing Parameters to a Function
Once the function is defined, it’s time to call it. To call
the function, you need to pass the correct kinds of parameters to
it, which requires knowing what parameters the function requires. In
the moneyReceived() function
example, the required parameter is a single integer. Both of the
following examples are legal:
moneyReceived(4);
or:
int priceOfDinner = 17;
moneyReceived(priceOfDinner);
This next one is not legal:
float f = 1.32;
moneyReceived(f);
because the variable being passed to the function is not the correct type. This is why being able to see the function declaration, that is, where its return type, name, and parameters are established, is so important.
The return statement indicates the type of value that the
method will return, just as a type for a variable determines what
kind of value the variable will store. Functions that don’t return
anything are declared void, and
any other kind of return value needs to be declared. For example, if
you created a function that would return a char, you would declare it like
so:
char myFunction()
Note that the function always has the following pattern: type, function name, parentheses, and any parameters that need to be passed to the function:
int multiplyByTwo(int value){
    return value * 2;
}
This previous function takes an integer value, multiplies that value by 2, and then returns whatever that value is. When a function has a return type, it can be used to set the values of variables:
int x = 5;
int twoTimesX = multiplyByTwo(x); // twoTimesX is now 10
Here, you use a function to return a char based on the value passed into the
function:
char convertIntToChar(int i){
    char ch = char(i);
    return ch;
}
New variables can be set using the values returned from a function:
string addExclamationPoints(string s) {
    return s+"!!!";
}
string myStr = addExclamationPoints("hello"); // myStr will be 'hello!!!'
That’s a bit tricky to see what’s going on at first, but you simply have to understand that the function is going to become equal to a string when it’s all done with its operations, which means that you can treat it like a string. Your program will take care of making sure that everything within the function will be run before it gets used to set the value of the variable.
That’s why having functions typed is so important. Anything typed as an integer can be used to create a new integer:
int squareOfEight = square(8);
This will work if the square() function looks like this:
int square(int val) {
    return val*val;
}
Since square() returns an
int, you can use it set an
int. If it returned a float or
another datatype, it wouldn’t work, which makes reading and
understanding the return types of functions so important.
Some Suggestions on Writing Functions
Name them well. Functions should do what their names indicate.
A function called square is very
well named if it takes an integer or float as a parameter and
returns the square of that value. It’s not so well named if it
doesn’t do that. Generally thinking of functions as verbs is a good
way to go because it makes you think about what that thing should do
in the first place and help you remember what you meant it to do
later when you have to look back at it.
Make them no smaller than sensible and no larger than necessary. A function of 200 to 300 lines of code should probably be broken down into smaller functions. This helps you reuse different parts of the code in different places, where necessary, and helps you locate problems more quickly when they occur. Being able to isolate a problem to several lines of code instead of several hundred can save you hours.
When you find yourself needing to do the same tasks repeatedly, put the code into a function and call that function. For instance, if you are frequently resizing images and saving them to a folder somewhere online, you could make a function like this:
resizeAndSave(int picHeight, int picWidth, String urlToSave)
This cleans up your code, saves you typing, and makes debugging problems easier. The less stuff you have to look at, the more quickly you’ll be able to find things, locate problems, and remember where you left off in a piece of code.
Overloading Functions
Function declarations are important for two reasons. First, the function declaration tells you what parameters to pass to the function and what kinds of things you can do with any values returned from a function. Second, the function declaration and the parameters that the function take are unique for the function that the compiler uses. A function that accepts two strings is considered different from a function that accepts three strings, even if those functions have the same name. Making multiple functions with the same name that accept different parameters allows you to use the same functionality to handle different situations. This is called overloading a method, allowing it to accept multiple sets of parameters.
Think of a verb like “draw.” It’s easy for us to differentiate between “drawing a picture” and “drawing a card” because of the context. The compiler treats functions that same way, which makes it easier for us to name functions with the same functionality by the same name and rely on the compiler to differentiate between them using the context of the kinds of parameters passed. Sizes for a video could be set using int values or float values, for example. The compiler considers each of these functions to be completely separate, even if they have the same name. When the function is called, if float values are passed, then the function of that name that accepts floats is used.
Here is an example of an overloaded function in Processing:
char multiplyByTwo(char value){

    return char(int(value) * 2);
}

String multiplyByTwo(String value) {
    return value+value;
}

int multiplyByTwo(int value){

    return value * 2;
}

int[] multiplyByTwo(int value[]){
    for(int i = 0; i<value.length; i++) {
        value[i] *= 2;
    }
    return value;
}
This function accepts an int, a String, a char, and an array
of ints (int[]). The version of
the function that will be called is dependent on what is passed to
it.
Here it is in Processing:
    println(multiplyByTwo('z'));// this will print ô
    println(multiplyByTwo(5)); // this will print 10
    println(multiplyByTwo("string"));// this will print stringstring
    int[] foo = {1, 2, 3, 4};
    println(multiplyByTwo(foo));//this will print 2, 4, 6, 8
Overloading functions is a great tool because it allows you to make a single way to do something and modify it slightly to take different kinds of variables as parameters. One thing to note is that although having different types of parameters, as shown here, is fine:
int function(int i) {
}

int function(float f) {
}

int function(char c) {
}
having different return types does not always work:
int function(int i) {
}

float function(float f) {
}

char function(char c) {
}
This will throw an error in Arduino and C++ but not in Processing. Generally, it’s not the best idea, but it’s your code, your project, and your call.
Objects and Properties
So, what’s an object? An object is a grouping of multiple properties into a single thing that represents all those different properties. That sounds wretchedly abstract, but it’s actually quite simple: think of a chair. A chair has a height, a weight, and a number of legs. So, those are three different properties of a thing called a chair. If you were to think about how you’d represent that in code, you’d probably say something like this:
Chair myChair;
myChair.height = 22;
See the dot (.) after the
name of the Chair instance but
before the property? That’s the dot operator, and
in a lot of the most popular programming languages today it’s the way
that you access the properties of an object to use or set them. Let’s
look more at what to do with the chair:
myChair.legs = 4;
myChair.weight = 5;
So, now you’ve made a chair called myChair that has some different properties:
legs, weight, and height. Well, that’s not particularly
useful. Let’s think of something that might be a little bit more
useful to you. The following code snippets will all be using
Processing:
PImage img = loadImage("mypicture.jpg");
image(img, 20, 10);
img.x = 300; // set the x position of the image
img.y = 300; // set the y position of the image
The previous code might be a little mysterious at first, but
let’s look at the parts that you can make sense of right away.
PImage is an object in Processing
that lets you load and display image files, resize them, and
manipulate their pixels. The explanation of all that needs to wait
until the next chapter, which focuses on the Processing language. For
the moment, you want to focus on these two lines:
img.x = 300; // set the x position of the image
img.y = 300; // set the y position of the image
What you know after looking at these lines is that the PImage has an x property and a y property. So, when you create a PImage object, like our img object created in the previous code
snippet, you can get or set those properties. That means that you can
tell the object where the image should be, or you can find out where
the image is. It all depends on which side of the equals sign you’re
placing the image on:
int xPosition = img.x; // get the image x position
img.x = 400; // set the image x position
Now, let’s look at another thing that an image can do, which is
copy all of its pixels and return them to be used by another image.
The PImage does this by using the
copy function. Let’s take a look at
calling that function:
img.copy();
Notice the . operator there
again? Just like the properties, the . operator is how you call functions as
well. You might think that’s confusing, but it’s actually sort of
helpful. The . indicates that
you’re using something within that object. So, the PImage copy function is another property of
the PImage, just one that happens
to be a function.
Note
Methods versus functions: usually functions that are part of
something like the PImage—for
instance, copy—are called
methods. The difference between them is mostly
semantic and isn’t something you should worry about. Just remember
that if you see the term method, it’s referring
to a function that belongs to an object like PImage.
Now, if you happen to look at the documentation for the copy function on the Processing website,
you’ll see something that looks like Figure 2-7.
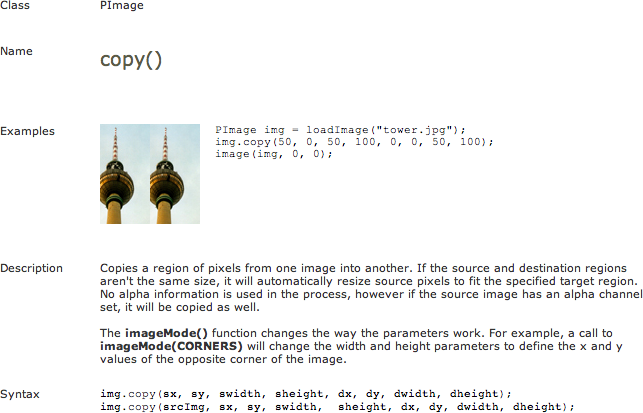
So, what does this tell you? It shows you an example of using
the PImage copy, and it shows you
what the signature of the function looks like. Here it is in
Processing:
img.copy(sx, sy, swidth, sheight, dx, dy, dwidth, dheight);
img.copy(srcImg, sx, sy, swidth, sheight, dx, dy, dwidth, dheight);
This tells you that the PImage has a function called copy that has two different ways it can be
called. You’ll need to read the rest of the PImage documentation on the Processing
website to know what parameters you need to pass to each of these
functions, but the names of those parameters should be somewhat
helpful. Looking at the documentation shown in Figure 2-7 for the first
function, you see several parameters with an s appended to them and several with a
d appended to them. The s stands for source, and the d stands for destination, making them a
little easier to understand. The function copies the pixels from one
PImage object to another PImage object. Now that you have a rough
idea of what sorts of parameters these functions take, you can call
them on two different PImage
objects:
PImage  p1 = loadImage("baby.jpg");
image(p1, 0, 0);
PImage p2 = new PImage(400, 400);
p2.copy(p1, 0, 0, p1.width, p1.height, 10, 10, p1.width * 2, p1.height * 2);
image(p2, 100, 100);
Take a moment to read the fourth line carefully. You’re calling
a function on the p2 PImage, on
p2, and passing the height and
width of p1 as parameters. Let’s
look at that function signature one more time:
img.copy(srcImg, sx, sy, swidth, sheight, dx, dy, dwidth, dheight);
srcImg is the PImage you want to copy pixels from, and
sx and sy are where you want to copy the image
from. dx and dy is where the image will be copied to and
how wide and high the image will appear. You can use the properties of
a PImage to pass values to a
function of another PImage. You’ll
see this quite frequently, where properties of objects are stored,
passed around, and accessed later.
Let’s imagine for a moment that you’ve made some object that has
a whole bunch of PImage objects
inside it. You’ll call it a PhotoAlbum. That object has a function on it
called getNewestPicture. In using
your PhotoAlbum class, you might
have something that looks like this in Processing:
PhotoAlbum newAlbum;
newAlbum.getNewestPicture().filter(BLUR);
So, even though we haven’t covered the filter function, I’d bet you can guess what
doing filter(BLUR) will do. The
interesting thing to note here is how a value from the getNewestPicture function has another
function called on it right away. You could just as easily say this in
Processing:
PhotoAlbum newAlbum;
PImage img = newAlbum.getNewestPicture();
img.filter(BLUR);
The two code snippets here will do exactly the same thing, but they’ll do them in slightly different ways. It isn’t important which way you do these things; it’s only important that you’re able to follow both the ways that they’re done because you’ll encounter them both.
Scope
Scope is one of those nefarious things that can create some of the most mysterious bugs known. Luckily for you, it’s quite easy to keep it straight because there’s a simple rule that will keep you out of trouble.
Let’s first look at the following little Processing code snippet:
void setup() {

    if(true)
    {
        int i = 0;
    }
    i+=1;
    print(i);

}
OK, that was rather pointless, but if you try to compile it, you’ll see something interesting pop up above the Processing console window (we’ll cover how to do that in Chapter 3). You’ll see this:
Cannot find anything named "i"
What was that? The scope of something means the place in your program where things are accessible. Figure 2-8 shows where in the function that each variable is accessible.
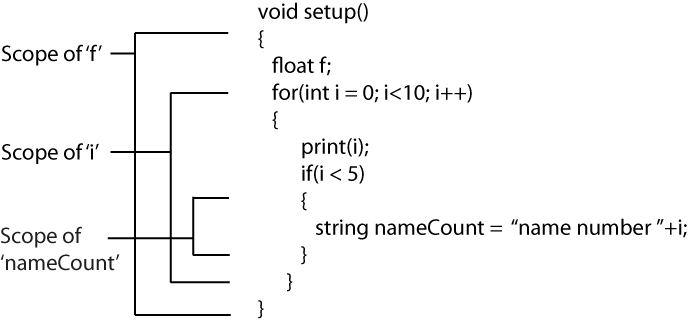
The general rule of variable scope is this: all variables exist within the brackets that surround them. If you have a variable within a function, you have this:
void someFunction() {
    int anInt;
}
The variable anInt is going
to exist in that function, until the closing bracket for the function,
which is the } at the end of the
function. If a variable is defined within an if statement, then you have this:
if(something) {
    int anInt;
}
anInt = 5; // can't do this! anInt doesn't exist out here
In this case, anInt exists
only inside that if statement, not
anywhere else. Why is this? The short answer is that it makes it
easier for your program to figure out what things are being used and
what things aren’t so that it can run more efficiently. Just remember
the rule of the brackets: if there’s a bracket before a variable, it
exists only until another bracket closes it.
Some variables are available everywhere in a program, so they
never go out of scope. These kinds of variables are called
global variables. In a Processing or Arduino
application, you can create a global variable by declaring it outside
of the setup() method of your
application. In an oF application, it’s a little different to do.
You’ll learn more about variables and global variables in each chapter
relating to the specific language that you’ll be looking at, because
each one handles them in a slightly different fashion.
Review
Variables represent data stored in the computer’s memory for your program to access.
Variables have a type that describes what kind of information can be stored in them and specified when the variable is declared, for instance:
int weight = 150;
or:
float f = 1.12;
Variables are declared and then initialized. These can be done in separate steps:
int apples;
apples = 5;
or at the same time:
int apples = 5;
Variables can be cast to another variable type by using the name of the new type and parentheses to cast the variable:
float f = 98.9;
int myInt = int(f); //myInt is now the float f converted into an int
All variable types can be stored in arrays. These are declared with the length of the array and the type of variable stored in the array:
int arr[6]; // creates an array that can hold up to 6 integers
Accessing an array at any point within it is done by using the index, which begins at 0 and extends to the length of the array minus 1:
arr[0] = 1;
arr[1] = 2;
print(arr[0]); // will print '1', the first element in the array
Arrays can be filled when they are declared, as shown here:
int arr[3] = {1, 2, 3};or the elements in the array can be set one at a time.
Control structures allow you to control the flow your program. The most commonly used control structure are branching structures:
if(somethingTrueOrFalse){
    //if the evaluated statement is true
} else {
    //if the evaluated statement is false
}
and loops:
for(int i = 0; i<someNumber; i++) {
    //do something someNumber of times
}
Functions are declared with a name, a return type, and any parameter that the function requires:
returnType functionName(parameterType parameterName) {
//what the function does
}
Using a function is usually referred to as calling the function. This is separate from declaring the function:
splitString(0, 10, 'hello there'), // this calls the function declared above
Functions can be overloaded, which means that multiple method declarations can be made with the same name and different parameters. When you call one of the functions, the compiler will determine which version of the function you meant to call.