
Chapter 7. Sound and Audio
Our primary experience of computing and of computers is through the screen. The feedback to the user and the input of the user are both most often communicated visually. This isn’t, however, how our experience of the world works, or how our cognitive and perceptual facilities function. One of our most finely turned and emotionally evocative senses, our hearing, is often relegated to a lesser role or is ignored altogether in interactive design. In some scenarios, sound isn’t a viable method of input or feedback. We don’t want to have to talk to a computer or have it making noise in a quiet office. In other situations, neglecting the possibility of aural interaction with a user is a great loss to both an art piece or a product. Video game designers have put great effort and attention into their sound engines and the quality of the sounds in their games. Architects and interior designers, stage designers, sociologists, and of course musicians and sound artists all understand how our experience of the world is shaped by sound. Sound isn’t always vital to a particular task, but it’s an essential component of a rich and complete experience. You don’t need to hear anything to enter your credit card number into a form, but a well-crafted, logical, and sensible use of sound in an application helps you perceive the world.
When sound is married effectively with a visual element, both elements are strengthened. Imagine a ball hitting a wall with and then again without the sound of it. Being able to hear the sound tells you a great deal about the room, including whether it echoes, whether it’s muffled, and how large it is. It tells you a great deal about the wall, about the ball, and about the strength with which the ball was thrown. These shape the mental image and shape the understanding of the world around that image. When you create applications, it’s of utmost importance that you help the user understand the application. From this little thought experiment, you can begin to see how sound can shape, heighten, and enrich a user’s understanding of the world.
Sound physically affects us beyond its movement of the air that surrounds us; a sound wave causes the area of the human brain that is responsible for processing audio signals to generate electrical pulses at the same frequency. The sound wave for an A note, 440 Hz, causes the brain to produce electrical pulses at 440 Hz. So, your physical reaction to sound reaches beyond the pressure on your ears and, in some extreme cases, your stomach and skin and reaches into your brain as well. Our experience of hearing is a physical phenomenon on many different levels.
The physical nature of sound also makes it a very powerful tool for input. Asking a participant to interact with a device through sound is, while not completely novel, engaging in that it asks them to draw more attention to themselves than asking them to input something through a keyboard. An application that asks you to talk to it demands your attention and your presence in a way that keyboard input does not. This kind of vocal input also tells your application a lot more about the user. An incredible amount of information is contained within the voice that can be used by application: the volume, pitch, cadence, rhythm, pauses, and starts.
In this chapter, you’ll learn some of the techniques for creating and processing audio in Processing and openFrameworks as well as learn more about how computers process audio and how you can analyze audio signals.
Sound As Feedback
Sound can influence a person’s perception of objects and information. A higher sound is in a different location than a lower one. A major chord is a different type of object than a minor chord. A sudden change in pitch signals a change in the state of your system. Typically, humans can hear any sounds between 20 Hz and 20,000 Hz. This is an immense data set; however, we’ll offer a few caveats. First, the human ear is far more sensitive to certain ranges of sound than others. These ranges correlate generally to normal human vocal ranges. Second, the ear can’t detect all changes in frequency. The amount of change of a frequency depends greatly on the volume of the sound and the range that it’s in. Despite these limits, the amount of information that can be transmitted in audio is immense.
Here are a few general examples about how you can use sound to give a user direct feedback on an action or on information:
- As a recognition or audio icon
Think of an action, one without a visible indication of what has happened. If you can’t provide any visual signal to a user, then a sound can signal the user. This can be a simple clicking sound that accompanies pressing a button or a small, subtle sound that acknowledges that a transaction at an ATM has completed. The sound does the same thing as a pop-up message. Given the myriad of contexts in which users interact with applications today—in a busy office, on a bus, in their cars—it’s difficult to create omnicontextually appropriate sounds, so many designers avoid the use of sound altogether. This doesn’t mean that using sounds as feedback isn’t useful, appropriate, or even enriching. It does, however, shape a lot of the thinking about the use of sound. Some research suggests that the first time a user performs a task, audio feedback is extremely helpful, but that with repeated performances of that same task, sonic feedback becomes a potential nuisance. It’s important to consider this when designing for a task-driven activity.
- As an associative or textural message
In more passive activities, sound becomes something quite different. Think of almost any product, and you’ll probably hear a jingle dancing through your head. A sound can be, just like an image, an iconic signifier or a branding tool. Movies, television shows, commercials, radio broadcasts, and even operating systems all have musical signatures. This is because sound is a very ephemeral and, frequently, a deeply emotional experience. It’s partly that ephemeral quality that makes sound such a powerful experience.
- As an aid to simulation
In less task-driven interactions, in play, for example, or in exploratory applications, sound becomes a vital part of the feedback to the user because we experience so much of the world in a fully audiovisual environment. The experience of a world or environment without sound is at least a little limited. The higher the fidelity of the sound and the more closely the sound is appropriately related to the event, the more fully realized the environment will seem. Think of a video game that involves computer-generated enemies shooting at you. When enemies are right next to you, you would expect that the sound of their gunfire would be louder than when they are far away from you. The sound “seems right” if it matches our experiential expectation. The audio can give a user information if it’s contextually correct. If you see someone walking down a hallway and you hear echoes, this is contextually correct and gives a sense of the hallway, their footsteps, and the scene as a whole. The sound of footsteps echoing in a field doesn’t really give a user information because it isn’t contextually accurate.
Humans are very skilled at positioning sound. This is a product of the development of our ability, via hearing, to detect danger from potential predators or enemies. This means that auditory signals can transmit spatial information. Playing any video game will bear this out. Using two or four speakers, you can experience a rich world of physical data, positioning Doppler effects, echoes, and other facts that give you so much information. You’ll learn more about creating 3D sound in openFrameworks later in this chapter.
- As a product of play or nondirected action
Creating tools for making sound is one of the oldest endeavors. Creating instruments is a complex and vast topic. Nearly all of us have at least some experience with an instrument for creating sound, whether it’s a guitar, a drum, the tapping of our foot, our own voice, a computer program, or a programming language. One of our favorite pieces for working with sound is the Sonic Wire Sculptor by Amit Pitaru. It combines the ability to visualize sound, to make something out of the most ephemeral of art forms, with a tool that gives the user the ability to create both drawings and music. The Reactable project (which Sergi Jordà et al., developed at Pompeu Fabra University of Barcelona) is another excellent example of a music and sound-making tool.
- As a way of telling us information about the objects making the sounds
This ties in to a certain degree to the third point, as an aid to simulation. The source of a sound is oftentimes indicated in the sound itself. Hitting a glass with a fork sounds like a glass, a person whistling sounds like air rushing past something, a rock landing in water tells you a great deal about the size of the rock, and when you hear someone’s voice, you gather a great deal of information about them. You can hear what makes the sound. You also hear where the sound is coming from, the location, the echo, the shape of the room or space, and how much background noise distracts from the primary noise.
- As an emotional trigger
The beeps, clicks, and verification sounds that you’re accustomed to hearing in an application are small, subtle tones. Those small audible feedback signals are appropriate for use in a business application, an operating system, or a website. Many books and discussions of using sound in interaction are limited to these sorts of auditory signals because, on a pragmatic level, the majority of work done in interaction design is for websites and business applications. Part of the premise of this book is to consider the possibilities for communication outside these sorts of contexts.
The powerful subconscious emotional significance of sound as a signifier is almost always on display in limited and subtle ways in traditional application interaction design and surrounds us in our day-to-day lives, in the soaring strings in a poignant moment of a film, in the cheer when a goal is scored in football, or in the opening stanza of a national anthem. Because the context of interaction with programs changes rapidly and dramatically, the nature of the sound and the information that it conveys changes as well. At the dawn of the video gaming industry, the 8-bit sound employed by game designers was aimed at producing simple feedback signals to accompany visuals. Now sound design is employed in games to add emotional elements, drive the narrative, heighten tension or rewards, or alert players to events offscreen.
The best way to determine how to create the signals and understanding in your users or audience is to experiment and observe closely how the sounds you use are received. Although engineering is often the art of avoiding failure, interaction and industrial design are the art of failing and understanding the failures correctly. Sound in particular is difficult to understand in the context of an application without seeing how others react to it. A good sound design is a deeply enriching aspect to any experience that is immersive, emotionally affective, and truly communicative, and takes a great amount of practice, testing, and tweaking to get right. That said, getting it right is well worth the effort.
Sound and Interaction
Interactive art that works with sound is bound to the interaction that the user has with the sound. That depth of interaction is determined by the control that the user or participant has over the sound.
The key element to understand is how the audience will control the sound that they will hear or that they create. If the user doesn’t have any control over the sound they hear, that person is a spectator. The control that users have over the sound can vary. The acoustics of an automobile, the road noise, the sound of the engine, and the acoustic qualities of the interior are very important to the driver. All of these become elements that the driver controls and alters while driving. Spend any time with someone who loves cars, and they’ll invariably tell you about the sound of an engine when it’s revved up. The interaction there is simple: press on the pedal. What it communicates, though, is quite rich and complex. If it were simply a sound that the driver did not control, then it would not have the same attractiveness to the driver. It’s part of the experience of driving and an element of the experience that industrial engineers pay close attention to. The industrial designer Raymond Loewy wrote, “A fridge has to be beautiful. This means it also has to sound good.”
Interaction is generally processing-oriented. This means that the elements of interaction never stand on their own: they are always interrelated and linked to a temporal development. Sounds themselves are inherently bound to processes in time. As interactive systems become more and more common, where the processes of the system are more and more difficult for users to understand, providing continuous feedback becomes more important. While visual information relies on movement and color, a sound can create a more continuous signal. The idea isn’t to have an application buzz or beep the entire time the user is interacting with it, because some of the aspects of sound make working with it less desirable, such as public space, low sound quality, and bandwidth problems.
Let’s examine some of the most common ways of using sound as the driver of an interaction:
- The user creates a sound that she or someone else can hear
This is essentially a recap of using sound as feedback for play or nondirected action. In these sorts of scenarios, the user’s goal is to manipulate, control, or make a sound. This doesn’t have to be as directed and purposeful as playing a piano or as finely controlled as a recording studio mixing board. Helping people make novel sounds can be a sort of play, a way of communicating whether someone can control the generation of sound, or a way of sending a signal to someone else. Some sound-generating interactive instruments are the theremin, RjDj, the iPhone DJing application, and of course the classic DJ turntable setup. What these all have in common isn’t just that they make sound, but that the sound is produced interactively. In the case of the theremin and turntables, the sound is produced by a user’s gestures. Think of using the Wii to drive a theremin, using the accelerometer to change the tempo of a drum, or having a painting application create different sounds based on the color and stroke that users create on a canvas.
- The user creates a sound input using a tool
Sound is everywhere and has such a vast range of tempos, timbres, pitches, and volumes that it’s nearly impossible to prune it down into neat input data, unless you know exactly what kind of sound you’re expecting. You may remember rotary dial phones—the old phones that sent a series of clicks for each number. The call routing system used those clicks to determine what number you were dialing. That system was later replaced by push-button phones that used a different tone to represent each number. These are both prosaic but excellent examples of sound-creating tools that create input. Any well-known music instrument can create a very precise tone that could be used as a command. A MIDI keyboard or a tool like the Monome control board offers even more possibilities. Any sound that can be reproduced with any degree of fidelity can be mapped to a command. The sort of fidelity required for complex commands isn’t well suited to the human voice, but it can be very well suited to any instrument.
- The user creates a sound that is the input
Two different types of applications use sound that users generate on their own, that is, without an extra tool: those that use sound data and those that use speech data. While it’s true that spoken words are sound data, getting a computer to recognize speech is different from having it process sound. If you’re interested only in processing the sound that users make, you can use a few different approaches. The first, and perhaps more obvious, is to use a microphone. From a microphone, you can analyze the volume of the user’s speech, varying some input based on how loud they are talking. You can also determine whether they have just begun talking by taking a “snapshot” of the sound in a given period of time (a second, for instance) and comparing it with the sound in the next snapshot. Big changes in sound can indicate an activation that can act like a switch. Volume is a spectrum that means that it doesn’t report data that’s on or off but rather data from 0 to 100. Pitch, the frequency of the user’s voice or the sound he is creating, works much the same way. It can be turned into any kind of spectrum values. Another thing that you can determine from a voice is its tempo. You can do this using beat detection, which a library like Minim for Processing makes very easy. The speed of sound is another spectrum of data that you can use. Adding another microphone lets you create positional data by simply comparing which mic is louder. Finally, as mentioned earlier, sound is vibration, and many piezo elements or small microphones can be used with Arduino to create up to 10 sound and vibrational inputs. These could be used to determine the position of a user within a room, enable many different elements to communicate, or create an interface that uses highly sensitive sounds to catch taps, touches, or rattling.
- The user talks or says a word to create the input
Speech recognition is exciting, filled with interactive possibilities, and is, at the moment, very difficult to do. Speech recognition doesn’t mean recognizing who is talking (that’s called voice recognition), but rather recognizing what someone is saying. As you might imagine, the difficulty of the task grows as the vocabulary grows. Recognizing a “yes” or a “no” is quite easy. Understanding a full-speed English sentence with a possible vocabulary of 25,000 words is very, very difficult. Beyond the computational difficulties, there aren’t any easy ways to get started working with speech recognition. A few open source speech recognition engines exist that you can play with, but they’re a little difficult to get started with. Ideally, this will change soon so that artists and designers can get started making voice-activated and speech-driven applications.
You should consider creating an application that enables sound interactions for several reasons. On a practical level, sound creates opportunities for you to let users with physical or situational mobility issues interact with your application. Sound interaction also enables communication where no keyboard or physical input can be used. On a completely different level, interacting through sound can be fun. Making noises is like play, and making noises to drive an application that does something playful in response is a fun interaction all around: the input is fun, and the feedback is fun.
How Sound Works on a Computer
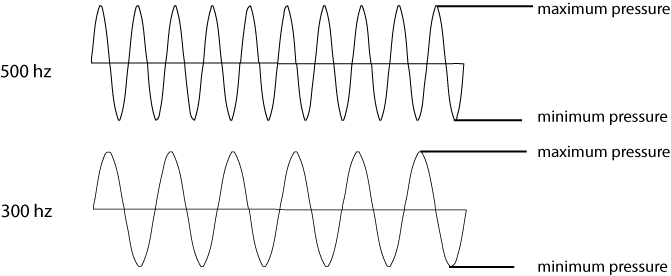
Before we can discuss a representation of sound, we need to discuss what sound actually is. Sound is a wave of air pressure that we can detect with our ears. That wave has both a minimum and maximum pressure that define the sound frequency. Higher sounds have a higher frequency, and lower sounds have a lower frequency, which means that the maximum and minimum values occur much more closely together. The volume of the sound is, roughly speaking, the amount of air that the sound displaces. So, a pure single tone is single wave, which might look something like one of the two waves in Figure 7-1.
It’s interesting to note that when two or three tones are combined, they create a complex tone that looks like the ones in Figure 7-2.

For you to work with sound on a computer, you or someone else needs to have captured the sound using a microphone; alternatively, you might have synthesized it using a sound synthesizer. In the case of capturing sound, you’re converting the wave in the air to an electromagnetic wave. That electromagnetic signal is then sent to a piece of hardware called an analog to digital converter, which converts the electromagnetic wave into a series of integers or floating-point numbers. This is where one of the trickiest parts of working with sound comes into play.
A wave is a smooth curve, whereas a series of numbers trying to represent that curve needs to reduce some of the complexity of that curve. Why is that? Take a look at Figure 7-3.

Notice in the upper two diagrams of Figure 7-3 how a higher sampling rate means that the values of the blocks, which represent the values in the array of floating-point numbers for passing audio data around an application, more closely approximate the curves. The sample rate is actually the number of samples taken per second. In CD audio, the waveform is sampled at 44.1 KHz (kilohertz), or 44,100 samples per second. That’s the most common modern sample rate for consumer audio, but it’s not the only possibility. Older audio files used to go as low as 11 KHz or 22 KHz, whereas modern video uses an audio sample rate of 48 KHz. Greater sample rates mean larger data sets, and lower sample rates mean smaller data sets. Depending on your needs, one sample rate might be more appropriate than another. A nice compromise is 44.1 KHz.
In the lower two diagrams of Figure 7-3, the one on the left shows how a lower bit rate makes it more difficult to accurately approximate a sound. Specifically, 8-bit audio (256 possible values per sample) isn’t a very good representation of a sound: think of the first Nintendo Entertainment System. That has its own charm, but you wouldn’t want to record most music with it. CDs use 16-bit audio, allowing more than 65,000 possible values for each sample. Modern digital audio software also starts at 16-bit, but it’s increasingly popular to record at 24-bit, with a massive 16 million possible values per sample.
For uncompressed audio, such as a .wav or .aiff file, sound approximation is done by measuring the wave many, many times a second and converting that measurement into a binary number of a certain size. Each measurement is called a sample, and the overall process is referred to as sampling. This creates a representation of the wave using slices of discrete values; the representation looks like stairs when you lay it over the sine-wave diagram. These factors (the number of measurements per second, or sample rate, and the precision of measurements, or bit depth) determine the basic quality of an uncompressed audio file. What about MP3 files? They operate in much the same way, but with an extra level of compression to save space. You’ll notice that an MP3 file is smaller than the same data saved in WAV format. This saves space but also reduces quality, and means that the actual data stored in an MP3 file is different.
As you work through the examples in this chapter, you’ll find arrays of floating-point numbers used again and again. This is because floating-point numbers are the root of audio processing, storing and manipulating data as numbers, and then writing the numbers to the audio card of a computer. Listed below is some of the equipment and hardware interaction used to make, capture, or play sound:
- Sound card
A sound card (also known as an audio card) is a computer expansion card that facilitates the input and output of audio signals to/from a computer with the help of specialized software. Typical uses of sound cards include providing the audio component for multimedia applications such as music composition, video or audio editing, presentation/education, and entertainment (games). Many computers have sound capabilities built-in, while others require additional expansion cards to provide for audio capability.
- Buffering and buffers
Computers grab only what you need from a file to send to the sound card. This is called buffering. You’ll notice that much of the sound data that you receive when working with audio is grabbed in small chunks that are often passed around either as arrays of floating-point numbers or as pointers to arrays of floating-point numbers.
- Drivers and devices
Most libraries enable communication between your software and your computer sound card. The average sound card handles both writing sound out to a speaker and reading and digitizing sound coming from a microphone. For most other devices, like keyboards, instruments, or other devices, you’ll need to have your application enable the device either by using a library for Arduino, Processing, or openFrameworks, or by having your application interface with another system. The applications that enable an operating system to communicate with other applications are called drivers and are often used to facilitate communication over USB or Serial ports. This chapter explains some of the basics of how to use the MIDI and OSC protocols, both of which let you communicate with other systems and devices, many of which are quite relevant to processing audio signals.
Audio in Processing
While Processing has a great deal of support for working with graphics, video, and OpenGL built into the core libraries, it doesn’t provide nearly as much functionality for working with audio. Luckily, the Processing community has developed several excellent libraries for working with sound. The Minim library, developed by Damien Di Fede, is one of the best known and most complete, though several others are available as well. It’s available with the Processing download as one of the core libraries.
Instantiating the Minim Library
The philosophy in creating Minim was, as Damien puts it, to “make integrating audio into your sketches as simple as possible while still providing a reasonable amount of flexibility for more advanced users. There are no callbacks, and you do not ever need to directly manipulate sample arrays; all of the dirty work is handled for you.”
The core of the Minim library is a class called Minim. Every time you use the Minim
library, you need to instantiate a Minim object and call its
constructor with the this
keyword. You can perform four tasks with the Minim object: play an audio file that you
load into your application, play audio that you create in your
program, monitor audio and get data about it, and record audio to
disk. Different classes in the Minim library handle these tasks and
you can obtain instances of those classes by calling the appropriate
methods of Minim:
Minim minim;
// remember that the 'this' keyword refers to your Processing application
minim = new Minim(this);
Now that you have the library initialized, you can begin doing things with it, like loading MP3 files and playing them back:
import ddf.minim.*;
AudioPlayer song;
Minim minim;
void setup()
{
    size(800, 800);
    // don't forget to instantiate the minim library
    minim = new Minim(this);
    // this loads song.mp3 from the data folder
    song = minim.loadFile("song.mp3");

}
This is a common pattern in the Minim library and in a lot of
sound manipulation libraries, like the C++ Sound Object library. A
core class is instantiated, and then new objects are created from
that core object to do specific tasks like playing files, creating
filters, or generating tones. To load an audio file, the AudioPlayer class provides mono and stereo
playback of WAV, AIFF, AU, SND, and MP3 files. AudioPlayer is instantiated by the static
Minim loadFile() method. Once
you’ve created AudioPlayer, you
can pause, play, and apply filters, as well as read data from the
raw audio file using the right
and left arrays, all from
AudioPlayer. The left and right properties of AudioPlayer are
arrays filled with floating-point numbers that represent the left
and right channels in the audio file. In the draw() method, those arrays can be used to
draw a line of small ellipses. You’ll be hearing the sound, and
seeing a representation of it as well:
void draw()
{
    fill(0x000000, 30);
    rect(0, 0, width, height);
    //background(0);
    stroke(255);
    noFill();
    for(int i = 0; i < song.bufferSize() - 1; i++)
    {
        ellipse(i * 4, 100 + song.left.get(i)*100, 5, 5);
        ellipse(i * 4, 250 + song.right.get(i)*100, 5, 5);
    }
}
The AudioPlayer class also
defines play() and pause() methods for the playback of the
audio information:
boolean isPlaying = false;
void mousePressed()
{
    if(isPlaying) {
        song.pause();
        isPlaying = false;
    } else {
        song.play();
        isPlaying = true;
    }
}
void stop()
{
  minim.stop();
  super.stop();
}
In these few lines of code, you have an instantiated an audio library that can load an audio file, control the playback, and read the data from the audio file as it plays to create graphics.
Generating Sounds with Minim
Minim also defines methods to generate new sounds from equations. Four fundamental kinds of waves can generate sounds: triangle, square, sine, and sawtooth. The names are derived from the appearance of the waves when they are graphed, as in Figure 7-4.

Each of these creates a slight variation of the familiar single tone that can be the base of a more complex tone. Minim simplifies generating tones for you by providing several convenience classes that generate tones and let you manipulate their frequency and amplitude in your application. While generating a sine wave may not seem useful when you need to provide feedback to a user, it’s an excellent way to begin building complex layers of sound that increase in pitch or volume depending on input.
Before we go over the code for generating the waves, it’s
important to understand how the Minim library gets access to the
sound card of the computer on which it’s running. Generating a sine
or sawtooth wave is really a process of feeding floating-point
values to the sound card so that it can convert them into analog
signals. The AudioOutput class is
used to store information about the data being sent to the sound
card for manipulation while the application is running. Though the
AudioOutput class has several
dozen methods, in the interest of space we’ll discuss these
two:
Additionally, the AudioOutput class defines the following
variables:
leftIs an array containing all the samples for the left channel of the sound being sent to the sound card.
rightIs an array containing all the samples for the right channel of the sound being sent to the sound card.
mixIs an array of data containing the mix of the left and right channels.
Any time you need access to the data being sent to the sound
card—say you’re mixing several tones together and want the final mix
of all the sounds—the mix
property of the AudioOutput class
will give you access to that information.
You can’t use AudioOutput
before it has had all of its information set by the Minim framework.
To do this, you use the main Minim class, which defines a getLineOut() method with the following
four signatures:
getLineOut(int type)
getLineOut(int type, int bufferSize)
getLineOut(int type, int bufferSize, float sampleRate)
getLineOut(int type, int bufferSize, float sampleRate, int bitDepth)
You’ll notice that all the methods require a type parameter, which can be one of the following:
MONOSets up a mono, or single-channel, output.
STEREOSets up a stereo, or two-channel, output.
The getLineOut() method
instantiates and gives data to AudioOutput, as shown here:
AudioOutput out;
out = minim.getLineOut(Minim.STEREO);
Without calling the getLineOut() method, none of the audio
data generated by the SineWave or
SquareWave classes will be routed
correctly to the sound card. Now that you know how to start the
sound, take a look at generating a square wave and a sine
wave:
import ddf.minim.*;
import ddf.minim.signals.*;

AudioOutput out;
SquareWave square;
SawWave saw;
Minim minim;

void setup()
{
    size(800, 800);
    //don't forget, you always need to start Minim first
    minim = new Minim(this);

    //get system access to the line out
    out = minim.getLineOut(Minim.STEREO, 512);

    // create a SquareWave with a frequency of 440 Hz,
    // an amplitude of 1 with 44100 samples per second
    square = new SquareWave(440, 1, 44100);
    // create a SawWave with a frequency of 600Hz and
    // an amplitude of 1
    saw = new SawWave(600, 1, 44100);

    // now you can attach the square wave and the filter to the output
    out.addSignal(square);
    out.addSignal(saw);
}

void draw() {
    saw.setFreq(mouseX);
    square.setFreq(mouseY);
}

void stop() {
  minim.stop();
  super.stop();
}
Running this program should give you an idea of what setting the frequency on a sine or square wave sounds like. In the next chapter, which covers using controls with the Arduino board, you’ll learn how to use physical knobs to tune a sine wave. That is just the beginning of what is possible when you combine means of input and means of feedback.
Another thing that you’ll probably want to do with the Minim library is playback and manipulate audio files. To play audio files in Minim, you use the AudioPlayer. Like many of the other objects in the Minim library, you create the object by having it returned from a method on the main Minim object. For the AudioPlayer, it looks like this:
AudioPlayer player = Minim.loadFile("myfile.mp3");This starts the file streaming from its location. The name of the file can be just the filename, like “mysong.wav”, in which case Minim will look in all of the places Processing looks (the data folder, the sketch folder, etc.), it can be the full path to the file, or it can be a URL:
void play()Starts playback from the current position.
void play(int
              millis)
Starts playback millis from the beginning.
One of the difficulties in working with sound in Java is that
certain implementations of the JVM have small quirks. One of them
affects how Minim changes the volume of the sound when you play back
an MP3 file. On some machines, you’ll use the setGain() method and
on others you’ll use the setVolume() method. Both take floating
point values, usually between –80 and 12 for setGain() and 0 to 1.0 for setVolume(). The easiest way to check
whether some functionality is supported is to call the hasControl() method
of the AudioPlayer class:
AudioPlayer player = Minim.loadFile("myfile.mp3");
boolean hasVolume = player.hasControl(Controller.VOLUME);
This code snippet shown below loads up two files and then allows the user to fade between them using the movement of the mouse. The code will be broken up into the following:
import ddf.minim.*;

AudioPlayer player;
AudioPlayer player2;
Minim minim;

boolean hasVolume;

void setup()
{
  size(512, 200);
  minim = new Minim(this);

  // load a file, give the AudioPlayer buffers that are 1024 samples long
  player = minim.loadFile("two.mp3", 1024);
  player2 = minim.loadFile("one.mp3", 1024);
  // play the file
  player.play();
  player.printControls();
  player2.play();
  hasVolume = player.hasControl(Controller.VOLUME);
}

void draw()
{
  background(0); // erase the background
  stroke(0, 255, 0);
  float gain1 = 0;
  float gain2 = 0;
If the setup on the users computer can alter the volume, then set that using the mouse
position, otherwise, set the gain using the mouse position. The effect will be more
or less the same.
  if(hasVolume) {
    player.setVolume(mouseX / width);
    gain1 = map(player.getVolume(), 0, 1, 0, 50);
  } else {
    player.setGain(map(mouseX, 0, width, -20, 1));
    gain1 = map(player.getGain(), -20, 1, 0, 50);
  }
As mentioned earlier in this chapter, the sound buffer is really just a big array of floating point numbers that represent the sound wave. To draw the sound wave to the screen, you can just loop through all the values in each channel and use the value however you’d like. Here, it’s just being used to draw a line:
for(int i = 0; i < player.left.size()-1; i++) {
    line(i, 50 + player.left.get(i)*gain1, i+1, 50 + player.left.get(i+1)*gain1);
    line(i, 150 + player.right.get(i)*gain1, i+1, 150 + player.right.get(i+1)*gain1);
  }
  stroke(255, 0, 0);
  if(hasVolume) {
    player2.setVolume(width - mouseX / width);
    gain2 = map(player2.getVolume(), 0.0, 1, 0, 50);
  } else {
    player2.setGain(map(width - mouseX, 0, width, -20, 1));
    gain2 = map(player2.getGain(), -20, 1, 0, 50);
  }
  for(int i = 0; i < player2.left.size()-1; i++) {
    line(i, 50 + player2.left.get(i)*gain2, i+1, 50 + player2.left.get(i+1)*gain2);
    line(i, 150 + player2.right.get(i)*gain2, i+1, 150 + player2.right.get(i+1)*gain2);
  }
}

void stop()
{
  // always close Minim audio classes when you are done with them
  player.close();
  player2.close();
  minim.stop();

  super.stop();
}
Filtering Sounds with Minim
Filtering sounds is an important element of manipulating them.
Filtering a sound can involve removing a narrow band of its sound
frequency, removing the highest or lowest frequency part of a
complex sound, changing its pitch, or removing popping sounds from
audio to smooth it out, among other things. Being able to create and
tune filters in Minim is quite simple. The following example creates
a SquareWave tone and then
applies a LowPass filter to it,
the frequency of which is controlled by the mouse
position:
import ddf.minim.*;
import ddf.minim.signals.*;
import ddf.minim.effects.*;

AudioOutput out;
SquareWave square;
LowPassSP lowpass;
Minim minim;

void setup()
{
    size(800, 800);
    // don't forget to instantiate the minim library
    minim = new Minim(this);
    // get a stereo line out with a sample buffer of 512 samples
    out = minim.getLineOut(Minim.STEREO, 512);
    // create a SquareWave with a frequency of 440 Hz,
    // an amplitude of 1, and the same sample rate as out
    square = new SquareWave(440, 1, 44100);
    // create a LowPassSP filter with a cutoff frequency of 200 Hz
    // that expects audio with the same sample rate as out
    lowpass = new LowPassSP(200, 44100);

    // now we can attach the square wave and the filter to our output
    out.addSignal(square);
    out.addEffect(lowpass);
}

void draw()
{
    try {
    if(out.hasSignal(square)) {
        out.removeEffect(lowpass);
    }
    // set the frequency of the lowpass filter that we're using
    lowpass.setFreq(mouseY);
    out.addEffect(lowpass);
    } catch(Exception e) {
    }
}
You’ll want to make sure that you include a stop() method to close out the Minim
library:
void stop()
{
    out.close();
    minim.stop();
    super.stop();
}
This is very small taste of what the Minim library can do, but it is a starting place to explore how to create sophisticated sound in your Processing applications. For more information on the Minim library, go to the Minim website and look at the thorough, well-written, and extremely helpful documentation by Damien Di Fede.
Sound in openFrameworks
It’s certainly not this book’s intention to overwhelm you with
library names and strange acronyms, but they are an important part of
working with openFrameworks. For many purposes, the code included in
the openFrameworks core library will do just fine. In equally as many
cases, though, you’ll want to work with the underlying engines to
tweak something, add some functionality, get a different value to work
with, or do any of several tasks. When you glance into the libs folder of openFrameworks, you’ll see
the libraries with the classes that openFrameworks uses to make an
openFrameworks application, specifically, ofGraphics, ofTexture, ofSoundStream, and so on. When working
with sound, you’ll work with two classes most of the time: ofSoundPlayer and ofSoundStream. ofSoundStream is used for more low-level
access to the sound buffer and uses the RtAudio library developed at
McGill University by Gary P. Scavone. RtAudio provides an API that
lets you control and read data from the audio hardware of your
computer. The other library used in openFrameworks for the ofSoundPlayer class is the FMOD Ex library.
It provides more high-level methods to play and manipulate
sounds.
You can manipulate sound with openFrameworks using two
approaches. The first option is to directly manipulate the sound data
sent from the sound card by using the ofSoundStream class that is included as a
part of the core oF distribution. The second option is to use a
library like the ofxSndObj add-on.
This wraps the Sound Object library developed by Victor Lazzini to
provide you with a powerful, flexible library that includes a wealth
of tools for generating, manipulating, and mixing sounds. First, let’s
look at the ofSoundStream
class.
The ofBaseApp class defines
two callback methods that let you work with sound: audioReceived() is
called when the system receives any sound, and audioRequested() is called before the system
sends sound to the sound card. Both of these callbacks both require
that the ofSoundStreamSetup()
method is called before they will be activated. This tells the RtAudio
library to start up, begin processing audio from the system microphone
(or line in), and send data to the system sound card:
ofSoundStreamSetup(int nOutputs, int nInputs, int
 sampleRate, int bufferSize,  int nBuffers)
The ofSoundStreamSetup()
method has five parameters:
nOutputIs the number of output channels that your computer supports. Usually this will be two: left and right. If you have a surround sound setup, it might be four or five.
nInputsIs the number of input channels that your system uses.
sampleRateIs usually 44,100 KHz, or CD quality, though you may want to make it higher or lower depending on the needs of your application.
bufferSizeIs the size of the buffer that your system supports. At the time of writing this book, on any operating system, it’s probably 256 values.
nBuffersIs the number of buffers that your system will create and swap out. The more buffers, the faster your computer will write information into the buffer, but the more memory it will take up. You should probably use two for each channel that you’re using. Here’s an example call:
ofSoundStreamSetup(2, 0, 44100, 256, 4);
The previous snippet will send two channels of stereo sound to the
audioReceived()method each time the underlying RtAudio library sends information from the sound card. This should be called in the setup method of your openFrameworks application. Now, look at the first of two callback methods. TheaudioReceived()method is called whenever the system microphone detects sound:void audioReceived(float * input, int bufferSize, int nChannels)
inputIs a pointer to the array of data.
bufferSizeIs the size of the buffer, the number of floating point values in the input array.
nChannelsIs the number of sound channels represented in the sound data.
The input parameter is always an array of floating-point numbers
with the length given in the bufferSize variable. This sounds a little
tricky to work with, but as you can see, by using a for loop with a length determined by
bufferSize, it isn’t that
difficult:
float samples[bufferSize];
for (int i = 0; i < bufferSize; i++) {
    // increment the sample counter
    samples[sampleCounter] = input[i];
}
Remember that the pointer to a float is actually just the first
element in an array. If this doesn’t ring any bells, look back at
Chapter 5. Also, note that this
callback won’t be triggered unless you call ofSoundStreamSetup() with one or two
channels set as the input, like so:
ofSoundStreamSetup(0, 2, 44100, 256, 4);Next, the audioRequested()
method is called when the system needs one buffer worth of audio to
send to the sound card. The method sends the array of floating-point
information that represents the buffer of audio data, the size of the
buffer, and the number of channels:
void audioRequested() (float * output, int bufferSize, int nChannels)
To have the audioRequested()
callback triggered by the system, you would need to call ofSoundStreamSetup() with one or two
channels in the output. If you want to alter the data before it’s sent
to the sound buffer, you must do it within this method.
Now you’ll use these two methods to create a way to record sound from the microphone and shift the pitch around. Example 7-1 shows the header file for the audioReceived1 application, which is followed by the .cpp file for the application (Example 7-2).
#ifndef AUDIO_RECIEVED1
#define AUDIO_RECIEVED1

#include "ofMain.h"
#define LENGTH 220500 // 1 channel, 5 sec
class audioReceived1 : public ofBaseApp{
    public:

        float lsample[LENGTH];
        float rsample[LENGTH];
        float ltemp[LENGTH];
        float rtemp[LENGTH];

        bool recording;
        int lastKey;
        int sampleCounter;
        int playbackCounter;
        int recordingLength;
        void setup();
        void update();
        void draw();
        void keyPressed(int key);
        void octaveDown ();
        void octaveUp ();
        void audioReceived(float * input, int bufferSize, int nChannels);
        void audioRequested(float * output, int bufferSize, int nChannels);

};

#endif#include "audioReceived1.h"
// set up the audio
void audioReceived1::setup(){
ofBackground(255,255,255);
// 2 output channels, 2 input channels, 44100 samples per second
// 256 samples per buffer, 4 num buffers (latency)
ofSoundStreamSetup(2, 2, this, 44100, 256, 4);
recording = true;
}The audioReceived() method
notifies the application when sound has been sent from the microphone.
If the recording variable is true
and you haven’t gotten too many samples, say 10 seconds worth, then
capture the left channel input to the lsample array and the right channel input to
the rsample array:
void audioReceived1::audioReceived (float * input, int bufferSize,      int nChannels)
{
    if(sampleCounter < 220499) { // don't get too many samples
        for (int i = 0; i < bufferSize; i++) {
            lsample[sampleCounter] = input[i*2];
            rsample[sampleCounter] = input[i*2+1];
            sampleCounter++;
        }
    } else  {
        if(recording) {
            recording = false;
        }
    }
}
Next, define the audioRequested() method. The values sent
from the microphone were stored in the lsample and rsample arrays. If your application is
recording, then you don’t want to mess up the recording by writing
data to the speakers, so send all zeros; otherwise, play back the
sampled sound from the lsample and
rsample buffers:
void audioReceived1::audioRequested(float * output, int bufferSize,
    int nChannels){
    if (!recording) {
        if(playbackCounter >= LENGTH) {
            playbackCounter = 0;
        }
        // loop over the buffer of samples
        for (int i = 0; i < bufferSize; i++) {
            // increment the sample counter
            output[i*2] = lsample[playbackCounter];
            output[i*2+1] = rsample[playbackCounter];
            playbackCounter++;
        }
    }
    // if we are recording, output silence
    if (recording) {
        for (int i = 0; i < bufferSize; i++) {
            output[i] = 0;
        }
    }
}
The octaveDown() and octaveUp() methods mirror one another. The
octaveDown() method takes small
sections of the lsample and
rSample arrays, divides them by
2.0, and then adds the current value in each array to the next value
to smooth out the sound. This helps avoid empty popping spots in the
playback of the sound. The octaveUp() method works in much the same
fashion, though it doesn’t require the smoothing of values that the
octaveDown() method does. This uses
a technique called windowing, which is often used
in digital signal processing to reduce noise and processing time when
processing a signal. Windowing is a fairly complex topic and the
mathematics behind it aren’t entirely relevant to how you’ll use it.
The basic idea of it though is simpler to understand—a portion of the
signal is taken and then clamped down to zero at both ends:
void audioReceived1::octaveDown (){
    int winLen = 5000;
    int halfWin = winLen / 2;
    if (!recording) {
        int numWins = int(LENGTH / winLen);
This is where the creation of the windows begins, looping through the sound from each channel, averaging each number with the following value, and storing it in the temporary array for that channel. Each value is spaced out more in the array, a somewhat crude way of lowering the tone of the sound:
for (int i = 0; i < numWins; i++) {
            int windowStart = i * winLen;
            for (int j = 0; j < halfWin; j++) {
             ltemp[windowStart + (j*2)] = lsample[windowStart + j];
             ltemp[windowStart + (j*2) + 1] = (lsample[windowStart + j] +
                 lsample[windowStart + j + 1]) / 2.0f;
             rtemp[windowStart + (j*2)] = rsample[windowStart + j];
             rtemp[windowStart + (j*2) + 1] = (rsample[windowStart + j] +
                 rsample[windowStart + j + 1]) / 2.0f;
            }
        }
        for (int i = 0; i < LENGTH; i++) {
            rsample[i] = rtemp[i];
            lsample[i] = ltemp[i];
        }
    }
}

void audioReceived1::octaveUp (){
    int winLen = 5000;
    int halfWin = winLen / 2;
    if (!recording) {
        int numWins = int(LENGTH / winLen);
Here the inverse of the octaveDown() method is used—every other
value from the sample is used to populate the temporary array for each
channel:
for (int i = 0; i < numWins; i++) {
         int winSt = i * winLen; // store the start of the window
         for (int j = 0; j < halfWin; j++) {
          ltemp[winSt + j] = lsample[winSt + (j * 2)];
          ltemp[winSt + halfWin + j] = lsample[winSt + (j*2)];
          rtemp[winSt + j] = rsample[winSt + (j * 2)];
          rtemp[winSt + halfWin + j] = rsample[winSt + (j*2)];
        } // now average the values a little to prevent loud clicks
        ltemp[winSt + halfWin - 1] =
                (ltemp[winSt + halfWin - 1] + ltemp[winSt + halfWin]) / 2.0f;
        rtemp[winSt + halfWin - 1] =
                (rtemp[winSt + halfWin - 1] + rtemp[winSt + halfWin]) / 2.0f;
        }

for (int i = 0; i < LENGTH; i++) {
            rsample[i] = rtemp[i];
            lsample[i] = ltemp[i];
        }
    }
}

void audioReceived1::keyPressed(int key) {
    if(key == 357) // up
        octaveUp();
    if(key == 359) // down
        octaveDown();
}
You’ll notice that if you use the octave up and down methods repeatedly, the sound quality deteriorates very quickly. This is because the algorithms used here are pretty simplistic and lead to dropping values quickly. A much more sophisticated approach is to use a library called SMBPitchShift, which was written by Stephen Bernsee (his name will come up later in this chapter in the section The Magic of the Fast Fourier Transform). This library lets you change the pitch of a sound in semitones. A semitone, also called a half step or a half tone, is the smallest musical interval; an example is the shift from C and D♭. It also preserves the sound through the shifts in pitch with much greater accuracy than the previous example. Example 7-3 shows the header file for that library.
#ifndef _SMB_PITCH_SHIFT
#define _SMB_PITCH_SHIFT

#include <string.h>
#include <math.h>
#include <stdio.h>

#define M_PI 3.14159265358979323846
#define MAX_FRAME_LENGTH 8192

class smbPitchShifter
{
    public:
    static void smbPitchShift(float pitchShift, long numSampsToProcess,
      long fftFrameSize, long osamp, float sampleRate, float *indata,
      float *outdata);
    static void smbFft(float *fftBuffer, long fftFrameSize, long sign);
    static double smbAtan2(double x, double y);

};
For the sake of brevity, we’ll omit the .cpp file for smbPitchShifter. You can check it out in the
code
downloads for this book in the code samples for Chapter 7.
Understanding the methods that this function defines and what
parameters they take is enough for the moment:
float pitchShiftIs the amount to shift the pitch up or down. To determine the amount to shift, take the number of semitones that you want to step up or down, divide it by 12 to account for the number of notes, and since the harmonic scale is logarithmic, raise it to the power of 2:
int semitones = −1;    // go down one semitone
float pitchShift = pow(2., semitones/12.);    // convert semitones to factor
long
            numSampsToProcess
Is the number of samples total that need to be processed.
long fftFrameSizeIs the size of the frame that the method will try to shift at a given time. You should probably stick with 2,048.
long osampIs the amount to overlap frames. Essentially, a higher number here, say 32, will produce higher-quality but slower shifts, while a lower number, like 4, will operate faster but with less quality.
float sampleRateIs the sample rate of your sound.
float *indataIs a pointer to the audio data that you want to pitch shift.
float *outdataIs a pointer to the data that will contain the pitch-shifted sound. In the following code snippets, the
indataandoutdataare the same.
If you’ve correctly placed smbPitchShifter in the
src folder of your application, you can import it
and use smbPitchShifter in the
octaveUp() and octaveDown() methods, as shown here:
void audioReceived2::octaveDown (){
    int semitones = −3;    // shift up by 3 semitones
    float pitchShift = pow(2., semitones/12.);    // convert semitones
                                                     //to factor
    int arrayBitLength = LENGTH * sizeof(float);
    // the call to the memcpy method copies the values from the ltemp
        //array into
    // the lsample array
    memcpy(ltemp, lsample, arrayBitLength);
    memcpy(rtemp, rsample, arrayBitLength);
    smbPitchShifter::smbPitchShift(pitchShift, (long) LENGTH, 2048, 4,
        44100, ltemp, ltemp);
    smbPitchShifter::smbPitchShift(pitchShift, (long) LENGTH, 2048, 4,
        44100, rtemp, rtemp);
    memcpy(lsample, ltemp, arrayBitLength);
    memcpy(rsample, rtemp, arrayBitLength);
}

void audioReceived2::octaveUp (){

    long semitones = 3;    // shift up by 3 semitones
    float pitchShift = pow(2., semitones/12.);    // convert semitones to
                                                        //factor
    int arrayBitLength = LENGTH * sizeof(float);
    memcpy(ltemp, lsample, arrayBitLength);
    memcpy(rtemp, rsample, arrayBitLength);
    smbPitchShifter::smbPitchShift(pitchShift, (long) LENGTH, 2048, 4,
        44100, ltemp, ltemp);
    smbPitchShifter::smbPitchShift(pitchShift, (long) LENGTH, 2048, 4,
        44100, rtemp, rtemp);
    memcpy(lsample, ltemp, arrayBitLength);
    memcpy(rsample, rtemp, arrayBitLength);
}
One of the greatest strengths of C++ is its popularity. That popularity means that there is always a vast body of code written by researchers over the past 20 years and made available to the world for free by programmers and artists. You can almost always find a working example of something that you want to do.
The ofSoundStream part of the
openFrameworks sound is simple, fast, and requires that you do most of
the audio processing yourself. In the next section, we’ll look at
ofSoundPlayer,
which leverages the powerful FMOD Ex library to provide some very
useful shortcuts for playing back and processing sound.
openFrameworks and the FMOD Ex Library
The ofSoundPlayer class
offers higher-level access and uses the FMOD Ex library developed by
Firelight Technology. FMOD Ex is used in many major video games and is
available for all the major operating system platforms: Xbox,
PlayStation 3, and iPhone. If you look at the ofSoundPlayer header file, ofSoundPlayer.h, in the sound folder of oF/libs, you’ll see some of the core
functionality that the ofSoundPlayer class enables:
void     loadSound(string fileName, bool stream = false);
void     unloadSound();
void     play();
void     stop();

void     setVolume(float vol);
void     setPan(float vol);
void     setSpeed(float spd);
void     setPaused(bool bP);
void     setLoop(bool bLp);
void     setMultiPlay(bool bMp);
void     setPosition(float pct);    // 0 = start, 1 = end;
These methods are all very straightforward to understand and use, so in this section, we’ll move on to a different aspect of the FMOD libraries: using the 3D sound engine.
FMOD Ex is the low-level sound engine part of the FMOD suite of tools. This library is included with openFrameworks. FMOD Ex input channels can be mapped to any output channel and output to mono, stereo, 5.1, 7.1, and Dolby Pro Logic or Pro Logic 2 with ease. The API includes a whole suite of 14 DSP effects, such as echo, chorus, reverb, and so on, which can be applied throughout the DSP mixing network. The API can play back .wav, .midi, .mp3, .xma, .ogg and .mod files. FMOD Ex also lets you work with 3D sound and supply 3D positions for the sound source and listener. FMOD Ex will automatically apply volume, filtering, surround panning, and Doppler effects to mono, stereo, and even multichannel samples.
Because the implementation of FMOD Ex in openFrameworks is all
contained within ofSoundPlayer,
looking at the ofSoundPlayer.h
file will give you an idea of what sort of functionality is built-in.
Take note of these two methods:
static void initializeFmod();
static void closeFmod();
These methods start up and close down the FMOD Ex engine. If you glance at the definitions of these methods in ofSoundPlayer.cpp, you’ll see the calls to the FMOD Ex engine:
FMOD_System_Init(sys, 32, FMOD_INIT_NORMAL, NULL);  //do we want
                                                      //just 32 channels?

FMOD_System_GetMasterChannelGroup(sys, &channelgroup);
bFmodInitialized = true;
It’s these sorts of calls that you’re going to add and modify
slightly. The FMOD Ex engine isn’t set up to run in 3D sound mode the
way that openFrameworks has implemented it. The solution is to create
a new class that extends the ofSoundPlayer class that we’ll call
Sound3D.
Here’s what the header file for that class looks like:
#ifndef SOUND_3D
#define SOUND_3D
#include "ofMain.h"

class Sound3D : public ofSoundPlayer {
    public:
        Sound3D();
These two methods are the most interesting:
        static void initializeFmod();
        static void closeFmod();
        void loadSound(string fileName, bool stream = false);
        void play();
        static FMOD_CHANNELGROUP * getChannelGroup();
        static FMOD_SYSTEM * getSystem();
};
#endif
The definition of the Sound3D
class in Example 7-4 sets up the FMOD Ex library to
operate in 3D mode.
#include "Sound3D.h"
bool bFmod3DInitialized = false;

static FMOD_CHANNELGROUP * channelgroup;
static FMOD_SYSTEM       * sys;

Sound3D::Sound3D(){

    initializeFmod();
}

// this should only be called once
void Sound3D::initializeFmod(){

    if(!bFmod3DInitialized){
        FMOD_System_Create(&sys);
        FMOD_System_Init(sys, 32, FMOD_INIT_NORMAL, NULL);
        //do we want just 32 channels?
Here, the FMOD Ex engine is set to use 3D mode. Now that the two
static variables are declared, the FMOD_CHANNELGROUP and the FMOD_SYSTEM are passed to the FMOD_System_GetMasterChannelGroup()
method. The FMOD_SYSTEM instance is
initialized and then the FMOD_CHANNELGROUP is set as the channel
that the system will use:
        FMOD_System_Set3DSettings(sys, 10.0f, 10.0f, 10.0f);
        FMOD_System_GetMasterChannelGroup(sys, &channelgroup);
        bFmod3DInitialized = true;
    }
}
These two methods are provided to allow access to the channelgroup and the sys variables. These are used by the oF
application to set the locations of the sounds and the
listeners:
FMOD_CHANNELGROUP * Sound3D::getChannelGroup() {
    return channelgroup;
}

FMOD_SYSTEM * Sound3D::getSystem() {
    return sys;
}

void Sound3D::loadSound(string fileName, bool stream){
    result = FMOD_System_CreateSound(sys, ofToDataPath(fileName).c_str(),
        FMOD_3D, NULL, &sound);
    result = FMOD_Sound_Set3DMinMaxDistance(sound, 1.f, 5000.0f);

    if (result != FMOD_OK){
        bLoadedOk = false;
        printf("ofSoundPlayer: Could not load sound file %s
",
            fileName.c_str() );
    } else {
        bLoadedOk = true;
        FMOD_Sound_GetLength(sound, &length, FMOD_TIMEUNIT_PCM);
        isStreaming = stream;
    }
}

void Sound3D::play(){

    FMOD_System_PlaySound(sys, FMOD_CHANNEL_FREE, sound, bPaused, &channel);
    FMOD_VECTOR pos = {  0.0f, 0.0f, 0.0f };
    FMOD_VECTOR vel = {  0.0f, 0.0f, 0.0f };
    FMOD_Channel_Set3DAttributes(channel, &pos, &vel);
    FMOD_Channel_GetFrequency(channel, &internalFreq);
    FMOD_Channel_SetVolume(channel,volume);
}
Now you’re ready to create an actual application that uses FMOD
Ex. All the positions of the listeners and the sound emanating from
the channel are positioned using FMOD_VECTOR vector objects. Chapter 9 discusses vectors in far greater
detail. A vector is an object with a direction and a length. In the
case of a 3D vector, like the FMOD_VECTOR type, there are x, y, and z
values that each represent a direction. FMOD uses four different
vectors for the listener and two for the channel, as shown in Figure 7-5. The listener
vectors represent the position, facing, relative up, and velocity of
the listener, who is most likely the user. The channel vectors
represent the position and velocity of the sound origin.
In the following header file (Example 7-5),
you’ll see the four vectors for the listener and the two for the sound
defined, along with a pointer to the actual FMOD_SYSTEM variable that the ofSoundPlayer class defines. Other than
that, the rest of the header file is rather straightforward.
#ifndef _FMOD_APP
#define _FMOD_APP

#include "ofMain.h"
#include "Sound3D.h"

class fmodApp : public ofBaseApp{

    public:

        void setup();
        void update();
        void draw();
        void keyPressed( int key );
        void mouseDragged( int x, int y, int button );
        Sound3D player;
        // note these reference to the FMOD_SYSTEM
        // this is why you added the getSystem method to Sound3D
        FMOD_SYSTEM* sys;
        FMOD_VECTOR listenerVelocity;
        FMOD_VECTOR listenerUp;
        FMOD_VECTOR listenerForward;
        FMOD_VECTOR listenerPos;

        FMOD_VECTOR soundPosition;
        FMOD_VECTOR soundVelocity;
        bool settingListener;
        bool settingSound;
};

#endif
The fmodApp.cpp file
contains a few other “newish” methods specific to the FMOD engine that
require a little bit of explanation. First, all the vectors are
initialized in the setup() method.
Neither the listener nor sound is given a velocity here. You can
experiment with changing these values on your own:
#include "fmodApp.h"
void fmodApp::setup(){

    listenerVelocity.x = 0;
    listenerVelocity.y = 0;
    listenerVelocity.z = 0;
    listenerUp.x = 0.f;
    listenerUp.y = 0.f;
    listenerUp.z = 0;
    listenerForward.x = 0.f;
    listenerForward.y = 0.f;
    listenerForward.z = 1.0;
    listenerPos.x = 3.f;
    listenerPos.y = 3.f;
    listenerPos.z = 1.f;
    soundPosition.x = 3.f;
    soundPosition.y = 3.f;
    soundPosition.z = 1.0;
    soundVelocity.x = 0;
    soundVelocity.y = 0;
    soundVelocity.z = 0.0;
Next, the player has a sound loaded from the openFrameworks
application’s data folder, and the play() method is called on it:
    player.loadSound("synth.wav");
    player.setVolume(0.75);
    player.setMultiPlay(true);
    player.play();
Next, use the getSystem()
method that you added to the ofSoundPlayer class. You’ll need to use the
scoping resolution operator :: to
call the static method. If you’re not familiar with this, take a look
back at Chapter 5. Set the sys variable to the FMOD_SYSTEM instance that the Sound3D class has initialized:
    sys = Sound3D::getSystem();
}

void fmodApp::update() {
    if(!player.getIsPlaying())
        player.play();
Next, ensure that the sound loops, but check whether the player
is playing. If it isn’t, restart the playback of the .wav file. The listener attributes are set
in the update() method of the oF
application using the FMOD_System_Set3DListenerAttributes()
method, and the channel attributes are set using the FMOD_Channel_Set3DAttributes() method. These
are both rather longish methods and are filled with pointers, which
means that you’ll need to use the reference operator & in front of the vectors that you pass
to these methods. Note also that you must pass the system needs to set
the listener attributes, which is why the getSystem() method was added to the Sound3D class. Since this example has only
one listener, just pass 0 for the listener and the correct vectors for
the rest of the parameters to represent the position of the listener
in 3D space:
FMOD_System_Set3DListenerAttributes(FMOD_SYSTEM *system, int listener,
    const FMOD_VECTOR *pos, const FMOD_VECTOR *vel, const FMOD_VECTOR *forward,
    const FMOD_VECTOR *up);
Setting the properties of the channel is a little simpler. Pass the channel, which is the vector that represents the position of the sound in 3D space and its velocity:
FMOD_Channel_Set3DAttributes(FMOD_CHANNEL *channel, const FMOD_VECTOR *pos,
    const FMOD_VECTOR *vel);
Here are the actual calls that you’ll want to add to your application:
    FMOD_System_Set3DListenerAttributes(sys, 0, &listenerPos,
        &listenerVelocity, &listenerForward, &listenerUp);
    FMOD_Channel_Set3DAttributes(player.channel, &soundPosition,
        &soundVelocity);
Right after this, you’ll need to tell the system to update the sounds based on all the values that you set:
FMOD_System_Update(sys);
}
Next, in the draw() method,
draw circles at the positions of the listener and the sound in the
application window so you have a visual representation of the sound
and listener positions:
void fmodApp::draw(){
    ofSetColor(0xff0000);
    ofEllipse(soundPosition.x * 100, soundPosition.y * 100, 10, 10);
    ofSetColor(0x0000ff);
    ofEllipse(listenerPos.x * 100, listenerPos.y * 100, 10, 10);
}
Allow the user to set the sound and listener positions by dragging the mouse. This could be anything—a user’s movement in a space, an accelerometer, a joystick, or almost anything else that can create three numbers. The important thing is to get the three numbers:
void fmodApp::mouseDragged( int x, int y, int button ) {
    if(settingListener) {
        soundPosition.x = float(x) / 100.f;
        soundPosition.y = float(y) / 100.f;
        soundPosition.z = −2.0 - float( x/100.f )
    } else {
        listenerPos.x= float(x) / 100.f;
        listenerPos.y = float(y) / 100.f;
        soundPosition.z = −2.0 - float( x/100.f )
    }
}
Finally, to let the user toggle between editing the sound and listener positions, make any key press change the object for which the position is being modified:
void fmodApp::keyPressed( int key ){
    if(settingListener) {
        settingListener = false;
        settingSound = true;
    } else {
        settingListener = true;
        settingSound = false;
    }
}
This is just the bare surface of what the FMOD Ex library can do. It can create up to 16 channels and position each of them in 3D space, navigate a listener or even multiple listeners through multidimensional space, create echoes based on the geometry of a space, simulate Doppler effects, and do a lot more. It lets you use sophisticated techniques to place, shape, and simulate sound. Having the ability to create complex and realistic sound helps with one of the main points of working with sound that was mentioned at the beginning of this chapter: sound gives us a lot of information about the world. In the case of a virtual world, correct sound goes a long way toward giving us information about a world that may not immediately be visible to the user.
The Sound Object Library
One thing that FMOD Ex doesn’t do is generate new sounds. To create and mix complex new sounds in openFrameworks, you can use the Sound Object library (also called SndObj).
The Sound Object library is an object-oriented audio processing library created by Victor Lazzarini. It provides objects for the synthesis and processing of sound that can be used to build applications for computer-generated music. The core code, including sound file and text input/output, is fully portable across several platforms. Platform-specific code includes real-time audio I/O and MIDI input support for Linux (OSS, ALSA, and Jack), Windows (MME and ASIO), and Mac OS X (CoreAudio but no MIDI at the moment). The source code for the core library classes can be compiled under any C++ compiler.
At the core of the Sound Object library is SndObj (pronounced
“sound object”), which can generate signals with audio or control
characteristics. It has a number of basic attributes, such as an
output vector, a sampling rate, a vector size, and an input
connection, which points to another SndObj. Depending on the type of
SndObj, other attributes will also
be featured; for example, an oscillator will have an input connection
for a function table, a delay line will have a delay buffer, and so
on.
The Sound Object library provides tools for loading, playing, and analyzing audio files; creating sine, sawtooth, and square waves; mixing sounds; and recording to audio files. To make working with the Sound Object library a little easier in openFrameworks, you can download the ofxSndObj add-on from addons.openframeworks.cc. This means that you can use the Sound Object library in openFrameworks in two ways: on its own, which requires that you download and compile the library yourself, or using the ofxSndObj add-on, which requires only that you download and install ofxSndObj. For the purposes of this book, we’ll concentrate primarily on using the add-on, though if you’re interested, you can check out the Sound Object library’s website and look at the examples of using it on its own.
The core of the ofxSndObj add-on is the ofxSndObj class. Any time you create an
application that uses the
ofxSndObj add-on, you need to make sure you include an instance of the
ofxSndObj class. At a minimum,
you’ll need to follow these three steps:
Instantiate an instance of
ofxSndObj.Call either the
startOut()orstartSystemInOut()method to initialize the output and input for the Sound Object library.Call the ofxSndObj add-on’s
startProcessing()method.
We’ll now look at a skeletal application that uses the ofxSndObj library. The following is the header .h file:
#ifndef _TEST_APP
#define _TEST_APP

#define MACOSX

#include "ofMain.h"
#include "ofxSndObj.h"
#include "AudioDefs.h"

class testApp : public ofBaseApp{

    public:

        void setup();
        ofxSndObj sndobj;
};

#endif
The following are the definitions in the .cpp file:
void testApp::setup(){
    sndobj.startOut(true, 1);
    sndobj.startProcessing();
}
This creates the Sound Object library and starts the processing thread that will assemble and mix all the different sounds that you create and send them to your computer’s sound card. Next, you’ll create a pair of tones.
An oscillator is an object that creates
repetitive variation, typically in time, of some measure about a
central value (often a point of equilibrium) or between two or more
different states. In Sound Object, oscillators are used to create
tones. Just as the actual sound that our ear detects possesses a
frequency at which the wave oscillates and an amplitude, the Sound
Object oscillator object has a frequency, an amplitude, and a type of
wave that it represents. The type of wave that the oscillator creates
is determined by the ofxSOTable
object passed to it. The ofxSOTable
object contains a function that determines what changes to make to the
signal every time it’s processed. This table object is where you set
the type of wave that the oscillator will create and how many
milliseconds the wave will play before repeating. This may seem a bit
strange at first, but seeing an example should help you. First, we’ll
look at how the two objects are constructed.
The init() method for
ofxSOOscillator looks like
this:
void init(ofxSndObj& parent, ofxSOTable t, float frequency, float amp,
    ofxBaseSndObj b, int type);
The ofxSOTable() method
accepts the following parameters:
ofxSOTable tableDetermines the oscillator, what kind of wave it will produce (
SINE,SAW,SQUARE), and how long its cycle will be.float frIs the frequency offset of the wave, and it controls the pitch. By default this is 440 Hz.
float ampIs the amplitude offset, and it controls the loudness of the wave. By default this is set to 1.0.
ofxBaseSndObj
            inputfr
Is the frequency control input, which is another
ofxSndObjobject. The fundamental frequency can be controlled by another object, letting you link the frequency that the wave produces to another object.The
init()method forofxSOTablelooks like this:void init(ofxSndObj& parent, long length, int type, float phase);
The parameters are shown here:
long lengthIs the table length.
int typeSets the wave that the table will generate to one of these preset wave shapes: SINE, SAW, SQUARE, or BUZZ.
Now, look at the following header file for an application using the ofxSndObj add-on. A lot of the extra methods have been stripped out to make it easier to read:
#ifndef _OFXSNDOBJ_OSCIL
#define _OFXSNDOBJ_OSCIL

#define MACOSX

#include "ofMain.h"
#include "AudioDefs.h"


class ofxSndObjOscilEx : public ofBaseApp{

    public:

        void setup();

        void mouseDragged(int x, int y, int button);

        ofxSOTable t1;
        ofxSOTable t2;
        ofxSOOscillator o1;
        ofxSOOscillator o2;

        ofxSndObj sndobj;
};

#endif
Since the objects are going to have their constructors called
when the application is first run, you’ll need to always make sure
that you call the init() methods on
each object. The general pattern for working with both the ofxSndObj
and Sound Object libraries (if you choose to do so at some point) is
to initialize the library, start communication with the system sound
card, initialize any objects that you want to use in generating your
sound, and then call the startProcessing() method of the main
ofxSndObj object to process all the
sound objects and create the final sounds. After that, it’s easy to
tune the sound objects, change their frequencies or amplitudes, change
the components that go into a mix, and even add new objects. This is
essentially the pattern that is on display here. All the objects are
initialized in the setup() method,
and the two oscillators are then altered by the user’s mouse movement
in the mouseDragged()
method:
#include "ofxSndObjOscilEx.h"
#include "stdio.h"


void ofxSndObjOscilEx::setup(){

    ofBackground(255,0,0);
    sndobj.startOut(true, 1);

    t1.init(sndobj, 2500l, SINE, 1.f);
    t2.init(sndobj, 2500l, SQUARE, 1.f);

    o1.init(sndobj, t1, 1.f, 100.0f);
    o2.init(sndobj, t2, 200.f, 10000.f, o1, OFXSNDOBJOSCILLATOR);

    sndobj.setOutput(o2, OFXSNDOBJOSCILLATOR, 1);
    sndobj.setOutput(o2, OFXSNDOBJOSCILLATOR, 2);

    sndobj.startProcessing();
}


void ofxSndObjOscilEx::mouseDragged(int x, int y, int button){
    float xFreq, yFreq;
    o1.setFrequency(x * 3);
    o2.setFrequency(y * 3);
}
The tones are a sort of “Hello, World” for the Sound Object
library. One of the next steps to take is to begin working with loops,
including creating them from other sounds, setting their duration, and
mixing them together. This next example will use three of the
ofxSndObj objects: ofxSOLoop,
ofxSOWav, and ofxSOMixer.
ofxSOLoop lets you create and
tune loops of other tracks. You can loop either an audio file loaded
into the Sound Object library or a sound or series of sounds that have
been created in Sound Object. The init() method of this class takes the
following parameters:
void init(ofxSndObj& parent, float xfadetime,
 float looptime, ofxBaseSndObj inObject, int intype, float pitch);
parentReferences the main (or parent)
ofxSndObjobject that allofxSndObjobjects must use to communicate with the underlying system.xfadetimeIs the amount of time that the end of a loop will play over the beginning of the loop when it restarts. This is given in seconds.
looptimeIs the length of the loop in seconds.
inObjectIs the object that is the source of the loop.
intypeIs the type of object that is being passed in as a loop. It’s important to get this correct. Take a look at ofxSndObj.h for all the different types along with their integer values listed in the enum at the top of the header.
pitchIs the bend to the pitch of the loop.
ofxSOWav lets you load a
.wav file into the Sound Object
library. At the moment, MP3 files aren’t supported. The following is
the init() method:
void init(ofxSndObj& parent, string filePath, bool stereo, int channel);
filePath is the path to the
sound file that is being loaded. The stereo and channel variables simply indicate whether
the sound should be played in stereo and on which channel the sound
should be played.
ofxSOMixer creates a mix of
all the objects added to it. The init() method simply takes the reference to
the ofxSndObj object to start the
mixer, and all the objects are added using the addObject() and removeObject() methods:
void init(ofxSndObj& parent);
void addObject(ofxBaseSndObj b, int type);
void removeObject(ofxBaseSndObj b, int type);
Again, it’s important that the correct types be passed in to the
addObject() and removeObject() methods.
Without these types, the mixer will not know what type of object is
being added or where to find it. Now, let’s move on to the example;
we’ll keep the code sample here short. The only references will be to
those objects in the header file that are different from the previous
example. First, declare ofxSOMixer,
the two ofxSOWav instances, the two ofxSOLoop instances, and of course the
ofxSndObj instance:
ofxSOMixer m;
ofxSOWav wavFile;
ofxSOWav wavFile2;
ofxSOLoop looper;
ofxSOLoop looper2;
ofxSndObj sndobj;
The setup() method calls the
init() method of each of these
objects, passing the ofxSOWav
objects to ofxSOLoop to create
their sources and passing the ofxSOLoop objects to ofxSOMixer:
void testApp::setup(){

    ofBackground(255,0,0);

    sndobj.startOut(true, 1);
    // initialize the mixer first
    m.init(&sndobj);
    // load the wav files
    wavFile.init(&sndobj, "tester.wav", true, 2);
    wavFile.init(&sndobj, "tester.wav", true, 2);
    // now create the two loopers
    looper.init(&sndobj, 1.f, 10, wavFile, OFXSNDOBJWAV, 1.f);
    looper2.init(&sndobj, 1.f, 10, wavFile2, OFXSNDOBJWAV, 1.f);
    // add the two loops to the mixer
    m.addObject(looper, OFXSNDOBJLOOP);
    // always remember to call startProcessing when you're ready
    // to have sndobj startup
    sndobj.startProcessing();

}
You can do a great deal more interesting work with the ofxSndObj add-on as well as with the Sound Object library. For example, you can input audio via a microphone, manipulate it, mix it with loaded sound, tune it with great precision, and then send it to audio files or speakers. There’s much more information on the SndObj library at http://sndobj.sourceforge.net/.
The Magic of the Fast Fourier Transform
You’ve all probably seen a equalizer readout on a stereo or audio program that shows you how loud a song is in different frequencies. The lower frequencies are often shown in bands to the left, and the higher frequencies to bands in the right. There are a few different approaches to analyzing a sound this way, but the most common is called the Fourier transform, named after the French mathematician Joseph Fourier. A transform is a mathematical term for the multiplying of a differential equation by a function to create a new equation that is simpler to solve. The Fourier Transform is very useful in signal processing, but involves a lot of computation and processing time. The fast Fourier transform is essentially a fast version of the discrete Fourier transform that was developed in 1969 so that Fourier Transforms could be calculated more quickly.
In looking at the fast Fourier transform (FFT), we’ll give you two different explanations of varying difficulty. You’ll see the terms fast Fourier transform and FFT everywhere in audio-processing code. In its most simplified and pragmatic form, the fast Fourier transform is used to decompose a signal into partial waves that can be more easily analyzed. When you want to analyze the spectrum or amplitude of each frequency of an audio buffer, you’ll probably in one way or another be using the Fourier transform.
In a little more detail, the Fourier transform helps represent any signal as the sum of many different sine or cosine or sinusoidal waves (the name given to a wave that is a combination of a sine wave and a cosine wave). This is important because it lets you figure out how loud a complex signal is at a given frequency, for instance, 440 Hz. Complex signals are tested by taking a sine wave and multiplying it by many smaller signals to determine which smaller signals show the greatest correspondence to the complex signal that you’re attempting to analyze. These smaller signals are either sine or cosine waves or sinusoids. You could almost imagine this as many small filters, each of which isolates a small frequency range in a signal and determines how loud those frequencies are in the given range. This is computationally and mathematically quite efficient, which is why it’s in widespread use. In the discrete Fourier transform, for any number of samples that you’re trying to determine a frequency for the signal at, you’ll need to determine the same number of sine waves to approximate that signal over time. This is where the fast in the fast Fourier transform comes in. Imagine that the signal you’re trying to process is a simple sinusoidal wave. You don’t need to process the entire signal; you probably just want some information about its phase, frequency, and magnitude instead of sine and cosine waves from some predefined frequencies. The fast Fourier transform is a way of doing this quickly and without needing to calculate the number of values that the less efficient discrete Fourier transform requires. One of the drawbacks of the fast in the FFT is that it almost always requires a number of samples divisible by 2, as you’ll see in both the openFrameworks and Processing examples.
Many distinct FFT algorithms exist that involve a wide range of mathematics, and you’ll find a great body of literature related to Fourier transformations and to digital signal processing as a whole. An excellent tutorial, created by Stephen Bernsee, is available at www.dspdimension.com/admin/dft-a-pied/.
This doesn’t quite explain why you would want to use the FFT, though. If you want to know how loud a sound is at a particular Hertz range, say, between 300 Hz and 325 Hz, you can use the FFT. This lets you analyze the tonal makeup of a complex sound. In the implementations of the FFT in Processing and openFrameworks, performing the FFT returns a spectrum of sound. The spectrum does not represent individual frequencies, that is, 300 and then 301 and then 302, but actually represents frequency bands centered on particular frequencies. In other words, 300 to 325 is actually roughly an estimate of the amplitude of the sound at 312.
To use the FFT in openFrameworks, you need to create an ofSoundPlayer instance and use the ofSoundGetSpectrum() method, which looks
like this:
float * ofSoundGetSpectrum(int nBands)
nBands is the number of
slices of the sound spectrum that you want to receive. More slices
means more accurate data, but it also means slower processing, so keep
that in mind if you’re using this to drive complex animations. The
float * part means a pointer to a
floating-point number. Remember that an array of floating-point
numbers is really just a pointer to the first number in the array and
an idea of the length of the array. To dynamically create an array,
that is, create and store data on the fly, you simply need to give the
address of the first element and have an idea of how many values are
following it. If this is a little foggy for you, look back at Chapter 5. You’ll see how the returned value
is used in the code snippets that follow. The first step is to declare
a pointer to a float in the header file of the application:
float * fftSmoothed;
Then, you can call ofSoundGetSpectrum() like so:
fftSmoothed = ofSoundGetSpectrum(128);
You can find a call to the ofSoundGetSpectrum() method in the example
applications that come with the openFrameworks downloads:
int nBandsToGet = 128;
int numberOfFreqsToGet = 256;
float * val = ofSoundGetSpectrum(nBandsToGet);// request 128 values for fft
    for (int i = 0;i < nBandsToGet; i++){
        // smooth the values out a little
        fftSmoothed[i] *= 0.96f;
        // take the max, either the smoothed or the incoming:
        if (fftSmoothed[i] < val[i]) fftSmoothed[i] = val[i];
    }
Notice that here the values are smoothed out by comparing the previous values with the new values and taking the larger of the two. This prevents any really sudden drops.
The draw() method of that
application has the values being used to draw rectangles, which will
create a display not unlike the classic equalizer display of bars from
an amplifier or audio player:
float width = (float)(5*128) / nBandsToGet;
    for (int i = 0;i < nBandsToGet; i++){
        // (we use negative height here, because we want to flip them
        // because the top corner is 0,0)
        ofRect(100+i*width,ofGetHeight()-100,width,-(fftSmoothed[i] * 200));
    }
In Processing, Minim provides a way to perform the FFT via the
FFT object. You construct it as
shown here:
FFT(int timeSize, float sampleRate);
For instance:
FFT fft = FFT(256, 44100);
To use the FFT implementation that the Minim library provides,
you need to use an AudioSource
object or some object that extends AudioSource. In this example, the AudioPlayer object is
used to load an MP3 and then read the spectrum from that audio. Note
the two import statements at the
top. The first one is necessary to access the Minim FFT object:
import ddf.minim.analysis.*;
import ddf.minim.*;

Minim minim;
AudioPlayer player;
FFT fft;
String windowName;

void setup() {
  size(512, 200);
  minim = new Minim(this);

  player= minim.loadFile("song.mp3", 2048);
  player.loop();
  fft = new FFT(player.bufferSize(), player.sampleRate());
  windowName = "None";
}

void draw() {
  background(0);
  stroke(255);
  // perform the FFT on the samples in the mix of the songs, left and right channel
  fft.forward(player.mix);
  for(int i = 0; i < fft.specSize(); i++)
  {
    // draw the line for frequency band i, scaling it by 4 so
 we can see it a bit better
    line(i, height, i, height - fft.getBand(i)*4);
  }
  fill(255);
}

void stop() {
  // always close Minim audio classes when you finish with them
  player.close();
  minim.stop();

  super.stop();
}
You can also use the fast Fourier transform with the Sound
Object library for openFrameworks. The ofxSndObj class defines a createFFT() method that you pass the object
containing the sound for which you would like a sound spectrum along
with the type of object that you’re passing in. Here, you’re passing
an ofxSOMixer object to the
createFFT()
method:
sndobj.createFFT(table, m, OFXSNDOBJMIXER);
Note that you must also pass in an ofxSOTable object:
createFFT(ofxSOTable table, ofxBaseSndObj base, int type)
The base object that is passed in will provide the sound, while
the ofxSOTable object defines any
functions that will be performed on the sound to trim values from the
returned spectrum. You can access the sound spectrum that is created
by the Sound Object library by passing an array of floating-point
numbers to the getFFT() method,
like so:
float fft[1024];
sndobj.getFFT(fft);
Now you can use the fft array
for creating graphics or performing any other kinds of calculations
based on the returned spectrum. Take a look at the following
application:
#ifndef _SNDOBJ_FFT
#define _SNDOBJ_FFT

#define MACOSX

#include "ofMain.h"
#include "ofxSndObj.h"
#include "AudioDefs.h"


class ofxSndObjFFT : public ofBaseApp{

    public:

        void setup();
        void update();
        void draw();

        ofxSOMixer m;
        ofxSOWav wavFile;

        float fft[1024];

        ofxSOTable table;
        ofxSOLoop looper;
        ofxSndObj sndobj;
};

#endif
Example 7-6 shows the .cpp file for this application. The
setup() method contains all the
initialization code for the Sound Object library, and the update() and draw() methods read the FFT spectrum and
draw circles based on the amplitude values for each frequency.
#include "testApp.h"
#include "stdio.h"


void testApp::setup(){

    ofBackground(255,0,0);
    sndobj.startOut(true, 1);

    m.init(sndobj);
    // load the file
    wavFile.init(sndobj, "tester.wav", true, 2);
    // create a loop
    looper.init(sndobj, 1.f, 10, wavFile, OFXSNDOBJWAV, 1.f);
    // add the loop to a mix
    m.addObject(looper, OFXSNDOBJLOOP);
    table.init(sndobj, 2500, 1, 1.f);
    // create the FFT based on the sound in the mixer
    sndobj.createFFT(table, m, OFXSNDOBJMIXER);
    sndobj.startProcessing();
}

void testApp::update() {
    sndobj.getFFT(fft);
    ofBackground(255, 255, 255);
}

void testApp::draw()
{
    ofSetColor(0, 255, 0);
    ofNoFill(); // draw empty circles
    int i;
    // the constant DEF_VECSIZE tells how large our system thinks
 a sound buffer should be
    for(i = DEF_VECSIZE; i>0; i--) {
        // draw a circle based on the values in the spectrum
        ofCircle(300, 300, fft[i] / (i*2));
    }
}
Physical Manipulation of Sound with Arduino
This chapter began by talking about the physical nature of sound. Yet we haven’t really looked at any direct electrical manipulation of sound. We’re about to rectify that. One of the most commonly used sensors for the Arduino controller is a piezo sensor. You can find a more thorough discussion of piezoelectricity and how to find these sensors in Chapter 8, so the introduction to this sensor will be brief here.
Piezo sensors are usually used to detect vibration and pressure
by outputting more electricity when they are bent or altered. However,
it’s possible to do more with a piezo sensor than detect pressure. In
fact, one of the more common uses of a piezo sensor is in a buzzer.
Many older electronics and primitive speakers use piezo elements.
Their output range is quite limited, but for simple tones without a
great deal of depth, a piezo is quite adequate. Thanks to some
excellent work by David Cuartielles, who figured out the amount of
time to push a common piezo sensor HIGH to replicate each note of the common
eight-note scale, you can use Table 7-1 to
play notes from a piezo sensor.
This concept of pulse width is one that will require a little bit more exploration. For the Arduino, the pulse is a short blast of 5-volt current, and the width is the length of time that the controller sends those 5 volts. You’ll notice on your controller (or, if you have an Arduino Mini, in the schematic for your controller) that some pins are marked PWM.
A Quick Note on PWM
PWM stands for pulse width modulation, and it’s important because your Arduino controller can’t actually output analog voltages. It can output only digital voltages, either 0 or 5 volts. To output analog voltages, the computer uses averaged voltages, flipping between 0 and 5 volts at an appropriate interval to simulate the desired output voltage, as in Figure 7-6.
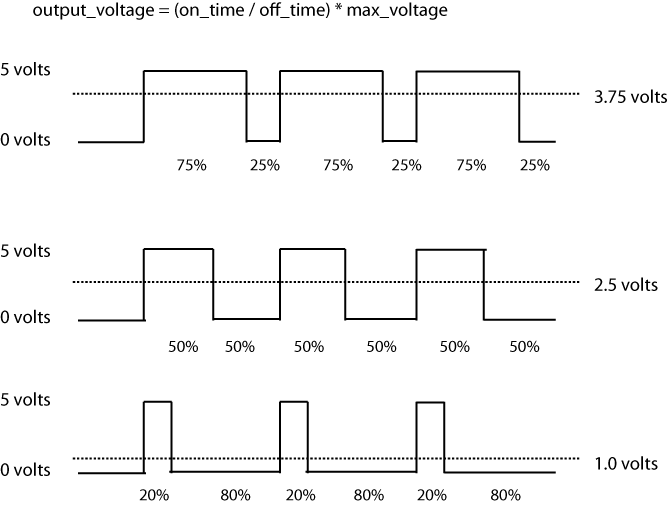
To make a tone—for example, an A—you send a 5-volt signal to the piezo sensor for 1,136 microseconds and then send a 0-volt signal or no signal to the piezo for 1,136 microseconds. In the following code, you’ll see two arrays filled with the notes and their relative microsecond delays.
// this enumerates the different notes
byte names[] = {'c', 'd', 'e', 'f', 'g', 'a', 'b', 'C'};
// enumerate the tones and the period required for them
int tones[] = {1915, 1700, 1519, 1432, 1275, 1136, 1014, 956};
Note
The duration of the pulse is in microseconds, not milliseconds; 1,136 microseconds is 1.136 milliseconds and 0.001136 seconds.
A melody can be input as a series of notes with lengths in front
of them, for example, 4a, which
indicates a note with a length about four times the base length.
Notice next that the notes in the names array correlate to the correct lengths
in the tones array. For each note,
the PWM value will be looked up in the tones array. The microsecond value is used
to send a HIGH signal and then a
LOW signal from the digital pin.
The rest of the code that follows finds the correct note and adjusts
the length of the note. This is because high notes will be shorter
than longer notes since the amount of time in the signal required to
make the sound is longer.
The piezo sensor will almost certainly have a red wire and a black wire. If not, look at the data sheet for your piezo sensor to determine which wire is the ground and which is the power. The power line is connected to digital pin 3 of the Arduino controller, and the ground is connected to the ground pin on the Arduino. The rest of this code is carefully annotated for you:
int speakerOut = 3; // this is the pin that the piezo element should be connected to
// this enumerates the different notes
byte names[] = {'c', 'd', 'e', 'f', 'g', 'a', 'b', 'C'};
// enumerate the tones and the frequency required for them
int tones[] = {1915, 1700, 1519, 1432, 1275, 1136, 1014, 956};
// here's the melody we'll play, with the length of the note and the note itself
byte melody[] = "4c4d4e4f4g4a4b4C";
int eachNote = 0;
int noteLength = 0;
int findNote = 0;
int melodyLength = 8;
int theRightNote;

void setup() {
  pinMode(3, OUTPUT);
}

void loop() {
  //start our program
  digitalWrite(speakerOut, LOW);
  int correctedNoteLength;

  //loop through each notes in our melody
  for (eachNote = 0; eachNote < melodyLength; eachNote++) {
      // find the note that we're suppposed to play
      for (findNote=0;findNote<8;findNote++) {
        //store that note
        if (names[findNote] == melody[eachNote*2 + 1]) {
          theRightNote = findNote;
        }
      }

      // adjust the note because higher notes take less time to play
      // so we need to add some time to higher notes and subtract time
      // from lower notes
      int adjustmentAmt = (1450 - tones[theRightNote])*3;
      correctedNoteLength = (((melody[eachNote*2]) * 200) + adjustmentAmt) / 100;

      //make sure that we play the note for the length specified in the length
      for (noteLength = 0; noteLength <= correctedNoteLength; noteLength++) {
          digitalWrite(speakerOut,HIGH);
          delayMicroseconds(tones[theRightNote]);
          digitalWrite(speakerOut, LOW);
          delayMicroseconds(tones[theRightNote]);
      }
    }
  }
If you liked this, you can find an updated example of this code by David Cuartielles on the Arduino website and a more complex example that uses an actual speaker instead of a piezo element created by Alexandre Quessy.
Creating Interactions with Sound
Now that you’ve learned some basic sound generation and manipulation techniques, the question becomes, how do you create interactions with these libraries and techniques? FFT lets you do rather sophisticated analysis of sounds. Analyzing sounds lets you do things based on a pitch or on the amplitude of a sound in a particular frequency range. This lets you create an input based on the volume or pitch of people’s voices, based on tones as old touch-tone telephones once did, or based on certain patterns of sounds. With all the libraries that have been presented in this chapter, we’ve just scratched the surface of what they can do, and all of them deserve a closer look.
Using the Minim library, you can create tones and sounds; load, play back, and process audio files; mix and loop multiple complex series of sounds; and apply effects to those sounds. With the Sound Object library, you can create tones, loops, mixes of sounds, and tones, and you can perform exact manipulations of those tones. This opens up two options: first, you can programmatically create audible feedback for a user or listener, and second, you can let users create their own sounds, loops, and mixes based on an interface and input system that you devise. Applying audio effects, pitch bending, tuning, and control of the timing of sounds is rich interactive terrain both as input and as feedback. Finally, with the FMOD Ex library, you can create 3D sound and sound effects to provide physically realized feedback that can position, respond, and inform a user.
Further Resources
For anyone serious about making computer sound, the following four tools are invaluable: PureData, Max/MSP, Csound, and SuperCollider.
PureData, created by Miller Puckette and maintained by Puckette and a large group of collaborators, is a real-time graphical programming environment for audio, video, and graphical processing. Max/MSP shares some core ideas and lineage with PureData and has a very similar interface: a graphical programming environment bolstered by a wealth of plug-ins. It’s a commercial product and must be purchased, but it provides a substantial community and a wide range of tools that make it a worthwhile investment. It’s very popular with composers, sound artists, and interactive artists, and has been used to generate music by DJs, in sound installation, and in live performances of all kinds all over the world.
Csound is a system and programming environment for creating sounds, mixing, and creating filters. Finally, SuperCollider is an environment and programming language released in 1996 by James McCartney. It consists of a server that processes commands to perform real-time audio synthesis and algorithmic composition and a scripting language that lets you pass commands to that server. Since then, it has been evolving into a system used and further developed by both scientists and artists working with sound. It’s an efficient and expressive dynamic programming language, and it’s an interesting framework for acoustic research, algorithmic music, and interactive programming.
For understanding music, digital signal processing, and sound on a computer, The Computer Music Tutorial by Curtis Roads (MIT Press) is a must. It’s a little bit dated at this point, but the explanations of fundamental concepts in signal processing, synthesizer generation, and the mathematics behind sound are invaluable.
HCI Beyond the GUI, edited by Philip Kortum (Morgan Kaufmann), also provides a lot of very valuable information for designers or artists thinking about working with sound as an interactive element, particularly for application development or more commercially or product-oriented design efforts. David Huron wrote a wonderful book on the topic of sound, surprise, and expectation called Sweet Anticipation (MIT Press) that addresses the psychology of music and sound. Leonard Meyer’s Emotion and Meaning in Music (University of Chicago Press) is also a wonderful book on similar topics that would be well suited to anyone with a background in music.
If you’re interested in working with electronics for music and audio production either by assembling components from low-level components or by repurposing other electronics the book, Handmade Electronic Music by Nic Collins (Routledge) is a gold mine of tutorials, information, and inspiration. It’s also a fine primer for many of the basic concepts of electronics that we don’t have space to cover in this book.
Voice user interfaces are one of the most tantalizing interactive elements of working with sound. Unfortunately, at this time they are also difficult to begin working with right away. In the interest of preventing this book from becoming out-of-date too quickly, we’ll make only a few mentions of projects that might be of interest. A fully open-source library called Sphinx, developed at Carnegie Mellon University, was primarily intended to run on Linux but has been ported to Mac OS X and Windows. The Julius library has been developed over the past dozen or so years by a rotating team of researchers at Japanese universities. Currently, the project is headed up out of Kyoto University. The Julius project is being updated frequently and has a fairly large user base. It has successfully been used in iPhone applications and seems quite promising. By the time this book is published, better documentation and resources may be available for this Julius and Sphinx.
Review
Sound is a wave of air pressure that has both a maximum and minimum pressure as well as a frequency.
The sound card is a device that converts sounds into digital signals. Devices that need to communicate with an operating system use applications called drivers to exchange information with an operating system. Buffering is the technique of storing a small portion of the audio data received from the audio card.
In a Processing application, you can use the Minim library to
load sounds and play them back by using the load() and play() methods of the Minim object. The
AudioOutput class of the Minim
library allows you to output sounds through your sound card, the
AudioInput allows you to input
sounds.
The Minim library allows you to create filters, for instance a LowPass filter, and waves, for instance a SquareWave or a SineWave.
Sound in oF is done through two classes ofSoundPlayer and the ofSoundStream. The ofSoundPlayer wraps the FMOD Ex library for
higher-level sound access and the ofSoundStream uses the rtAudio library for
lower-level access to data directly from the sound card.
Pitch shifting is a technique for changing the pitch of a sound by shifting the value of each number in the sound data up or down a certain amount. This often involves the use of technique called windowing, which is used to create a small section of a signal for analysis.
The FMOD Ex library can also be used to create 3D sounds that lets you place both the listener and the sound origin.
To generate sounds in oF, you can use the ofxSndObj library that uses the Sound Object library for oF to load sounds, create waves, and mix these together.
You can also play sounds with the Arduino controller by using Pulse Width Modulation to send signals to a peizo element at a specific interval to create a sound.
The Fast Fourier Transform is an algorithm used to determine how loud a signal is within a certain frequency range. This is often used to create equalizer views or to do rudimentary beat detection.