
There are several concepts that should be covered to lay the foundation for the heart of this book, including subroutines, feedback, troubleshooting, motor and color sensor matching, and unit conversion, among others.
My Blocks , or Subroutines
In programming, a subroutine is a program that is used to do a task that must be done over and over. Rather than doing the programming for such a task many times, a “mini” program called a subroutine is written just to do that task. The program is carefully debugged and tuned, then it is “called” and run by programs that need it, avoiding the need to repetitively create and debug the code. The principle of dividing programs into smaller, more manageable blocks is called modularity , and it can be a tremendous time saver. The term used for such subroutines in LEGO®/MINDSTORMS®/EV3/NXT programming is “My Block.”
So, are there times and places in FIRST ® LEGO® League (FLL®) where it makes sense to use My Blocks? Absolutely! In fact, there are tasks that must be done every season by every robot, regardless of the Robot Game mat layout, missions, or LEGO models used on the mat. Common tasks include moving forward and backward a specified distance, in either a straight or curved line; turning in place; and finding, following, and squaring up on lines. Because these tasks are useful for any mat layout, they can be worked on during the off-season, before the Challenge guide is published for the coming season. Having a functional library of My Blocks ready to go at the start of the season allows better focus on the unique aspects of that year’s Robot Game. My Blocks are covered in more detail in a later chapter.
Feedback
Another important concept in more advanced programming is feedback. Feedback is the information that is monitored, or “fed back,” to the control algorithm. The feedback is compared to the desired value, and differences indicate how to make corrections to get closer to the desired value. For example, when following a line, the program must constantly monitor light intensity to track the line accurately. Feedback information typically comes from one of the sensors, such as the color sensor, motor rotation sensor(s) , gyro sensor , ultrasonic sensor , and touch sensor . The color sensor is invaluable for finding and following lines, and the motor rotation sensors are important for determining distance traveled. The ultrasonic sensor can be used to help a robot follow smooth, regular surfaces like the game table walls, and to determine distances to objects. The gyro sensor can be useful for determining which direction the robot is facing, and the touch sensor can be used to determine when the robot has contacted an object. The EV3 brick has four sensor ports . Motor rotation sensor information is transmitted through the motor ports, leaving all four sensor ports available for other sensors. Specific sensor usage and associated feedback techniques are covered in more detail in later chapters.
The preceding paragraph discussed using feedback to allow the robot to monitor itself and make corrections for more precise, reliable operation, but there is another type of feedback: user feedback. This type of feedback is not for the robot, but for the person(s) running the robot. For example, when you are troubleshooting it can be invaluable to know that the robot actually detected the line it just passed, or that it just activated its steering correction to maintain a straight course. Such feedback can be provided by changing the color of the lights on top of the brick, or by providing an audio signal, such as a beep, to cue the user without requiring the robot to stop mid-mission . User feedback is covered in more detail in a subsequent chapter.
Troubleshooting
Troubleshooting is an area that can be very tricky. It is often very tempting, after observing some errant behavior in the robot, to make a premature conclusion rather than thinking through the situation carefully. If the program is then changed to “fix” the problem, it can end up introducing more problems instead of improving the program. There are a couple of things one can do avoid this. First, slow down and think carefully about the underlying problem that is causing the errant behavior; second, check to make sure you can consistently re-create the problem. Doing so takes discipline, but can save a lot of grief caused by erroneous “corrections.”
Unit Conversion
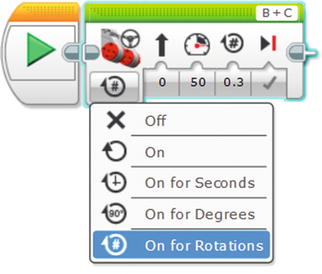
Move Steering, 0.3 wheel rotation
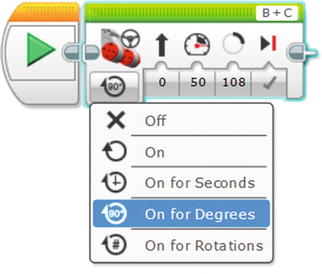
Move Steering, 108° wheel rotation
Motor and Color Sensor Matching
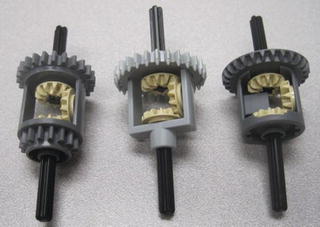
Example differentials
Similarly, if your robot uses two color sensors, it helps to use two sensors that are closely matched. This can be determined by observing the baseline values of the sensor during calibration . When calibrating one of the sensors, note the minimum and maximum values for the calibration, then repeat for the other sensor. If they are close, the sensors are well matched. If not, it would be wise to find a pair of sensors that are matched. The reason for this is that the calibration settings for the sensor that is being calibrated are applied to all of the color sensors connected to the brick, so if the sensors are not matched the results from one sensor might not match results from the other sensor(s). (Color sensor calibration is covered in Chapter 5.)
Levels of Complexity
Many tasks can be performed at different levels of complexity and effectiveness, allowing beginners to create effective programs, then improve them as they gain experience. For instance, a basic My Block for moving forward a specified distance might just convert inches to degrees of rotation. A more advanced version could monitor a gyro sensor and add steering correction to ensure the robot moves in a straight line. An even more advanced My Block might incorporate acceleration and deceleration to allow for higher speed without wheel slip. (Wheel slip introduces error, making the distance moved inaccurate and inconsistent.)
Commenting and Program Development
Commenting programs is very important. It is a big help to others who need to use or modify the program. Comments can also be very helpful, even for the original programmer, if he or she has not looked at the program for some time. In FLL competition, programs are often written and worked on as teams, so comments can be invaluable for effective programming. They are also useful for judges evaluating the programs, and demonstrate a higher level of professionalism than programs without comments.
In addition to commenting, a good practice is to build up complex programs a few blocks at a time, then debug and tune before continuing. Debugging and tuning are generally quicker and easier when done in smaller chunks. An additional benefit is that the earlier parts of the program are run many times and typically end up being thoroughly tested. Running early parts of the program many times also has a downside. For large programs, a lot of time can be “wasted” rerunning parts of the program that have already been tested and verified. This issue can often be mitigated by dividing the program into parts during development , then later combining the parts to make the larger program.
Errors and Consistency
There are two basic types of errors: random and systematic. Random errors are caused by limitations of the robot itself or the environment in which it operates. They are generally beyond the control of the user, although there are sometimes ways to minimize their effects. Systematic errors are caused by inaccurate calibration or other mistakes in the robot’s construction or programming. Consider the example of a My Block programmed to input a distance in inches, convert it to degrees of wheel rotation, and move the robot forward the specified distance. Suppose the robot was programmed to move forward 10" and, after running the program several times, the robot stopped at distances ranging from 10.75" to 11.25", with an average distance of 11.00". The measurements imply a systematic error of 11.00" – 10.00" = 1.00". This can be corrected by adjusting the Math block to reduce the conversion factor by 9 percent so that the robot travels 10" instead of 11".
On the other hand, it appears that the robot’s travel has a random error of ±0.25", so it can consistently hit 10.00" within 0.25", but could end up anywhere between 9.75" and 10.25" (once the conversion factor is calibrated properly). This might be a limitation of the robot itself. Moreover, this error is likely to scale with distance, so it may be more than 0.25" at longer distances.
For Titan Robotics, the last team I coached, we established a “five of five,” or “5/5” rule: Our goal was to run each mission successfully five times out of five tries. To achieve that level of consistency (not that we always succeeded), it is important to eliminate systematic errors and compensate for random errors .
Resetting the EV3 Brick

EV3 brick buttons
- 1.
Press and hold the Back, Left, and Center buttons.
- 2.
When the display goes blank, release the Back button.
- 3.
When the display says “Starting,” release the Left and Center buttons.
- 4.
Wait for the brick to finish its normal boot process.
Updating the Firmware
The term “firmware” refers to software that is stored in read-only memory. It is a quasi-permanent type of software, generally designed to facilitate interaction with the hardware in a computer system. Although infrequent, LEGO does occasionally publish firmware updates to fix bugs or provide enhanced functionality in the brick. The Home Edition of the firmware can be downloaded at www.LEGO.com , and the Education Edition from education.LEGO.com .
When updates are published, it is probably a good idea to update your brick’s firmware, although if your robot is functioning reliably and a competition is approaching, it might be better to wait. If you do update and have problems, you can revert to the previous version if you kept a copy. Also, if your robot begins acting erratically, and nothing seems to fix it, a firmware update to “reset” the firmware is worth a try. To update the firmware, make sure the brick is on and connected to your PC, then go to the Tools menu and select Firmware Update .
Conclusion
This chapter introduced a number of concepts you can teach your kids as they learn how to program the EV3 brick. These concepts are used by engineers and scientists on a daily basis. Learning and applying them effectively will contribute to success in FLL competition, but it will also leave them with skills they can apply in many areas as they grow older.