My Blocks, geometry, unit conversion
, feedback
, looping constructs, proportional control, and traction
Requirements
1.
Square up on walls.
2.
Follow a wall for a specified distance while staying a constant distance from the wall without touching it.
3.
Follow a wall for a specified distance while “leaning” against it.
Squaring Up on a Wall
Learning topic covered: geometry
Like lines, walls can be used to “square up” the robot. The process, however, is somewhat different. Probably the easiest way to square up on one of the border walls is simply to ram it with the front or back of the robot. As long as there are sturdy rectangular frames at the front and back of the robot, one of the forward or backup My Blocks can be used, using a Distance parameter set for slightly farther than the distance to the wall, and with a Power high enough to lose traction
and generate wheel slip when the robot is blocked from moving. This action will cause the robot to square up so that it is perpendicular to the wall. Because it is useful to have a “light guard” around the color sensors, the guard can serve the dual purpose of light shield and bumper
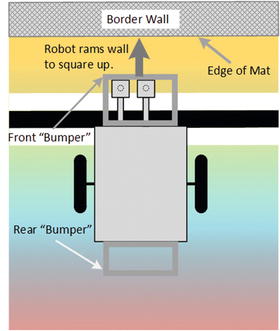
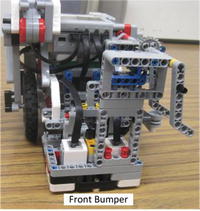
. Figure 6-1 illustrates the concept, and Figure 6-2 and Figure 6-3 show our competition robot’s front and rear bumper structures.
Figure 6-1
Squaring
up on walls
Figure 6-2
Robot front bumper
Figure 6-3
Robot rear bumper
Following
a Wall Without Touching It
Learning topics covered: My Blocks, feedback
, looping constructs
, proportional control
Sometimes the robot needs to navigate areas on a challenge board that do not have a black line, but are near a border wall that can be used as a navigation reference. This section addresses the case where the robot needs to follow along a wall while staying some distance away from it instead of touching it. The ultrasonic sensor
can be used for this type of navigation
.
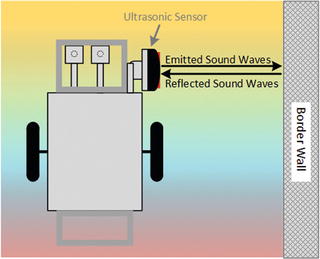
The ultrasonic sensor uses sound waves at frequencies above the range of human hearing. In Presence mode it can listen for emanations from another sensor, but we use it in Measure mode. In Measure mode it emits ultrasonic waves and measures the time each wave takes to travel to the border wall and reflect back to the sensor. Because the speed of sound is known, if the time is measured precisely, the distance to the wall can be calculated. This process is called Sound Navigation and Ranging (SONAR)
, and is illustrated in Figure 6-4. Submarines have used SONAR for decades, and some marine mammals also have natural SONAR capabilities.
Figure 6-4
SONAR concept
The distance provided by the sensor can be used to compute a steering correction for a Move Steering
block
, similar to what we did with the LineFollow My Block using a color sensor. Note that, like the color sensor(s), the ultrasonic sensor must be mounted ahead of the drive axle for forward movement (behind the axle for backward movement). My robot uses port 4 for the ultrasonic sensor. Once your robot is configured, let’s start programming!
An easy way to start is to copy the blocks from LineFollow into a new program. Replace the Color Sensor block with an Ultrasonic Sensor
block in mode “Compare – Distance Inches,” and set the correct port. Select all but the Start block and create a My Block named WallFollow
with numeric inputs for distance to the wall and forward distance to travel (e.g., WallDist and FwdDist). Use the approach outlined near the end of Chapter 3 to tune the gain. For my robot I started with a gain of 1, increased it to 10, and then increased it to 100 before it began oscillating. After some experimenting a gain of 25 seemed to work best with my robot. An example My Block is shown in Figure 6-5.
Figure 6-5
WallFollow
My Block
One final note: The ultrasonic sensor
does not appear to work closer than 1.5" to 2.0" from a wall, likely due to the horizontal separation of the transmitter and receiver.
Following
a Wall by Leaning Against It
Learning topic covered: geometry
Another possibility for wall following is to use wheels mounted to the side of the robot so that it can remain in contact with and “roll” along the wall. An example of a robot that uses wheels in such a fashion is shown in Figure 6-6. Note that if the wheels are not mounted far enough ahead of and behind the driving axle, the robot might rotate around the roller guide and turn into the wall instead of “leaning” against and following it.
Figure 6-6
Robot with wheels to guide it along a wall
Because the robot will “lean” against the wall, the wall will ensure the robot goes straight, and the wiggle correction portion of the program will not be needed. The leaning effect can be accomplished with a small nonzero Steering input to a Move Steering
block. Our original Forward My Block provides a good starting point, but needs an additional input for steering, so a new My Block will have to be constructed using the My Block Builder
.
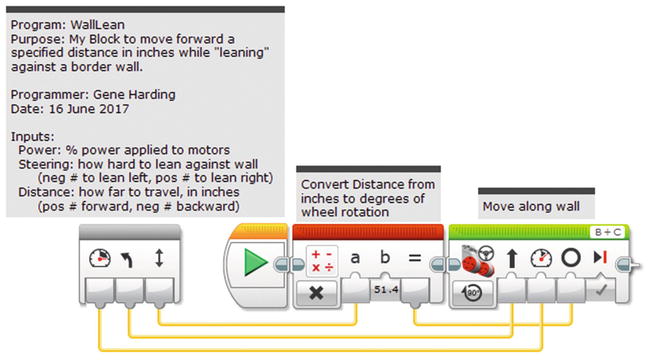
Copy the two blocks from Forward into a new program file and make a new My Block with a name something like WallLean
. Give it numeric inputs for Steering, Power, and Distance. The default value for Steering should be a low number. If the default will be a lean left, –2 is probably good, although a larger number might work if the roller is far enough ahead of the driving axle (or behind it if moving backward). As with the other forward My Blocks, 20 to 30 is probably a reasonable default value for Power, and perhaps 10 for the Distance parameter. Figure 6-7 shows an example of this My Block.
Figure 6-7
WallLean
My Block
Conclusion
At this point, your robot should have a pretty full repertoire of My Blocks for navigating a competition board: moving forward and backward; turning; finding, following, and squaring
up on lines; finding line intersections; and using walls. If you are willing and able to deal with the increased complexity, the next chapter deals with making it faster.