There are numerous web pages online that provide an introduction to EV3 hardware
and software, but for the sake of completeness this chapter provides such an introduction to help beginners get started, and share a few tips that might be useful even for some experienced users. There are two different types of EV3 kits that can be purchased, so I will begin with a description of the similarities and differences between the two kits, including variations in both hardware and software. Next is a description of the user interface to explain file management, communicating with the brick, creating programs
, and operating the brick. The chapter finishes with step-by-step instructions to create and run a couple of basic programs.
Education vs. Home Editions
There are two versions of the EV3 kit: Education and Home Editions. In terms of hardware
, both kits include one brick, two large motors, one medium motor, and one color sensor. The Education Edition also has a second touch sensor, a gyro sensor, and an ultrasonic sensor. The Home Edition has an infrared sensor and associated remote control, which allow the robot to be controlled remotely. The hardware
differences are summarized in Table 2-1.
Table 2-1
Key Hardware Features for Education and Home Editions
Item/Feature
Education Edition
Home Edition
Brick
1
1
Large motor
2
2
Medium motor
1
1
Color sensor
1
1
Touch sensor
2
1
Gyro sensor
1
0
Ultrasonic sensor
1
0
Infrared sensor
0
1
Infrared remote control
0
1
Rechargeable battery and charger
1
0
There are also two editions of the EV3 software. The Education Edition has the ability to do experiments as well as programs
, and can do data logging (experiments and data logging are beyond the scope of this book). The Home Edition also does not come with software support for gyro and ultrasonic sensors, but software blocks can be added to support those sensors. The sensors can be purchased directly from LEGO or from many other places online. The software blocks are gyro.ev3b and ultrasonic.ev3b, respectively, and are available for free download at www.LEGO.com.
The Programming Interface
The EV3 software opens in a window called the Lobby. Although the Education Edition Lobby
and Home Edition Lobby look different, both have a conventional top menu bar that can be used to create new projects
and open existing projects, as shown in Figure 2-1.
Figure 2-1
Education Edition Lobby
(top) vs. Home Edition Lobby (bottom)
To open an existing project in either edition, from the menu bar select File ➤ Open Project…. Let’s create a new project: From the menu bar select File ➤ New Project. (In the Education Edition you must additionally select Program instead of Experiment.) This opens the programming window
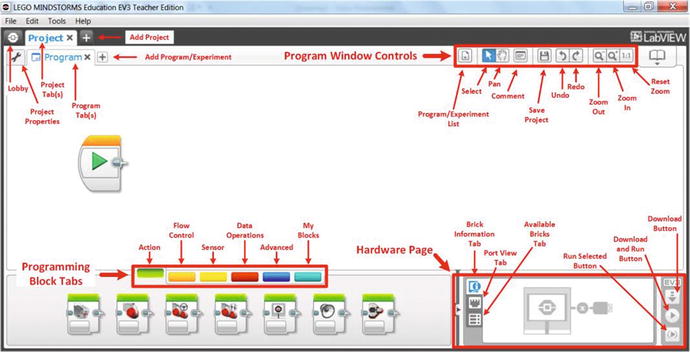
shown in Figure 2-2. The Content Editor is outside the scope of this book, so close it by clicking on the icon, on the right side of the page near the top.
Figure 2-2
EV3 programming window
The row of buttons at the top right contains program window controls. (The program window is the space used to compose a program.) The first button provides a drop-down list of all programs
in the current project, including My Blocks. The second button provides an arrow cursor for selecting blocks in the program window. A block can be selected individually by clicking on it, or multiple blocks can be selected by drawing a box around them. The Pan button enables moving the entire program left, right, up, or down in the display window. The Comment button places a comment window in the upper left corner of the program window. Once there it can be filled in, resized, and moved around as needed. The Save, Undo, Redo, Zoom Out, Zoom In, and Reset Zoom buttons function as their names imply.
The lower right portion of the display is called the Hardware Page
. The page is unavailable, as shown in Figure 2-2, until a brick is connected to the computer. At the left of the Hardware Page are three tabs that control what information is viewed in the page: Brick Information, Port View, and Available Bricks. Three buttons are on the right side. The top button, Download, downloads the entire project to the brick
. The middle button, Download and Run
, downloads the project and runs the program currently shown in the Program window. The bottom button, Run Selected
, downloads and runs only the blocks currently selected in the Program window. This option can be very handy for tuning programs
.
Programming blocks are arranged in six tabs at the bottom left and middle: green for Action blocks
, orange for Flow Control
, yellow for Sensor
, red for Data Operations
, dark blue for Advanced
, and turquoise for My Blocks
.
At the top left part of the window is a traditional menu bar with File, Edit, Tools, and Help options. Below that are tabs to access the Lobby
and each of the open projects
, as well as to add a new project. Below those are tabs to access Project Properties and each program or experiment within the current project, as well as add a new program or experiment to the current project.
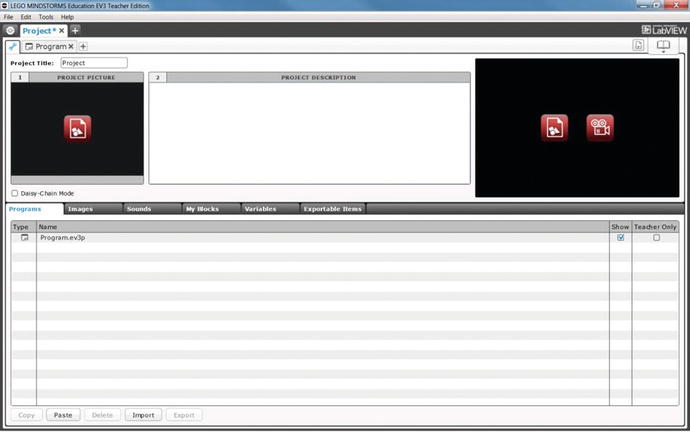
Clicking the Project Properties tab opens a new window, as shown in Figure 2-3. The lower portion of the page includes tabs for working with programs
, images, sounds, My Blocks, variables, and exportable items. Buttons at the bottom allow the user to copy, paste, delete, import, and export items. One note of caution when deleting items: There is not pop-up window to confirm a deletion before it is deleted, so be very careful when deleting items. Once that button is clicked, the selected item is gone!
Figure 2-3
Project Properties window
One more item needs to be covered before we begin programming: data wires. Data wires
are the virtual connections that allow information to be passed between blocks in a program. There are five types: text, numeric, numeric array, logic, and logic array. Array operations are beyond the scope of this book, but text, numeric, and logic data wires can be useful in various types of programming. The type of wire is indicated by its color and by the shape of the tab in the programming block: orange with a square tab for text, yellow with a rounded tab for numeric, and green with a pointed tab for logic. Figure 2-4 shows a notional program with each type of wire marked by an EV3 comment box. Notice that, in the second and third green Display blocks, the input tabs are square even though the data wires are numeric and logic, respectively. The data conversions from numeric to text and from logic to text are done automatically by the EV3 software. This is a change from the NXT, which was the second-generation Mindstorms software. With the NXT, a separate block was necessary to explicitly perform data conversions.
Figure 2-4
Text, numeric, and logic data wire
types indicated by color
Simple Program to Play Sounds and Flash Lights; Run Selected
, Download and Run
from PC
Now let’s build our first program. We will start with something simple: sounds and lights
. These only require the brick, so a functioning robot is not needed. Having the robot make sounds is fun for most kids, and the lights can be used to indicate what part of a program is being run. This can be especially useful for troubleshooting.
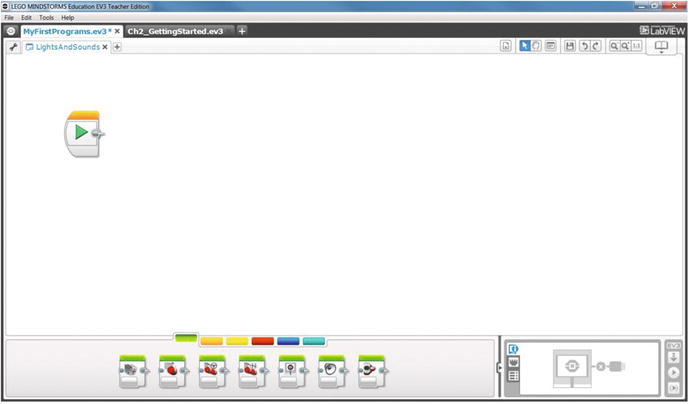
Create a new project by selecting File ➤ New Project (and Program if using the Education Edition) from the menu bar. Close the Content Editor by clicking the icon at the upper right. Rename your project by saving it (File ➤ Save Project As, click the Save Project icon in the Program Window Controls area, or press Ctrl+Shift+S) as MyFirstPrograms. Double-click the Program tab and rename it LightsAndSounds. The programming window
should look similar to Figure 2-5.
Figure 2-5
Initial programming window
for LightsAndSounds program
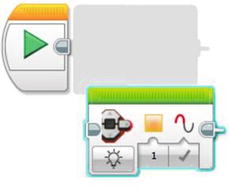
The rightmost programming block under the green tab is Brick Status Light
. Click on it and drag it onto the program window. Notice that, as it gets close to the Start block (the one already in the window), a gray “shadow” the shape of the Brick Status Light appears right next to the Start block, as shown in Figure 2-6. This “shadow” indicates where the block will “drop” onto the program chain when the left mouse button is released. Drop it there.
Figure 2-6
Shadow indicating where block will drop onto program chain
The first button in the block, at the lower left, is the mode button. Clicking it will give options (for this type of block) of Off, On, and Reset, as shown in Figure 2-7. Leave it set to On. The next button is a numeric input for selecting the light color. Clicking it reveals that 0 indicates a green light, 1 an orange light, and 2 a red light. Leave it set to 1 for orange. The third button is a logic input to determine whether the light will be pulsed (True) or not (False will leave the light on continuously). True is indicated by a check mark and False by an X. Change it to False so the light will be on continuously.
Figure 2-7
Mode options for Brick Status Light block
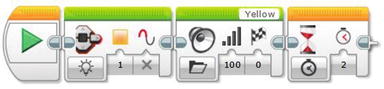
Next, place a Sound block
onto the program chain right after the Brick Status Light block. Note that floating the mouse cursor over a block before you pull it into the programming window
reveals its name, as shown in Figure 2-8. The Sound block’s modes are Stop, Play File, Play Tone, and Play Note. It also has options for setting the Volume from 0-100 percent, and numeric options for Play Type. Leave Volume at 100 and Play Type at 0 (Wait for Completion).
Figure 2-8
Floating the cursor over a Sound block
reveals its name
Click in the white box in the upper right part of the Sound block to select a File Name. Although orange is not one of the predefined color options, yellow is, so select that by picking LEGO Sound Files ➤ Colors ➤ Yellow as shown in Figure 2-9. When you select Yellow you should also hear the sound played through the computer’s speaker(s).
Figure 2-9
Yellow Sound block
Let’s run this program using the Download and Run button. Turn on the brick by pressing the middle (dark gray) button. Connect the brick to the computer using the USB cable. The brick is ready when the status light turns green and it plays a brief tune called the “Download” sound (in the LEGO Sound Files, System folder). Click the Download and Run button (on the lower right, as shown in Figure 2-2). The program should download and run, as indicated by the status light briefly turning orange and the brick saying “yellow”. The light goes out as soon as the Sound block is finished, which is fairly quick, so let’s add a Wait block to make the light stay on longer. Go to the orange tab on the programming palette and drag a Wait block to the end of the program. Select mode Time and 2 seconds, as shown in Figure 2-10.
Figure 2-10
Add 2-second Wait block
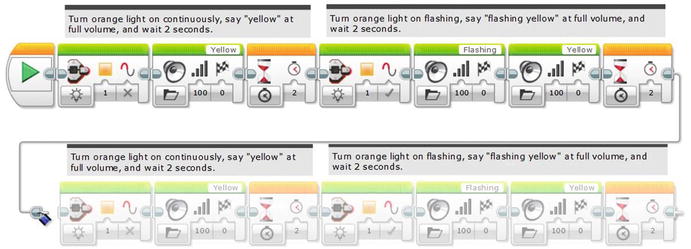
Now let’s add some blocks to see what the light looks like when it is pulsing. Draw a box that touches the right three blocks (Brick Status Light, Sound, and Wait) to select them. If you have selected them successfully, the block borders will turn turquoise. Press Ctrl+C to copy the blocks and Ctrl+V to paste them, then click and drag them to the end of the program chain. Copy the Yellow Sound block
and insert the copy just after the second Brick Status Light block
. Change its sound to Flashing by clicking the Yellow file name and selecting Information ➤ Flashing. Change the second Brick Status Light block’s Pulse parameter to True. The program should now look like Figure 2-11. Verify the new part of the program by selecting it with a box and clicking the Run Selected button. The brick should say “flashing yellow” and the orange light should flash for a little more than 2 seconds (2 seconds plus the time it takes to play the audio). Now run the whole program by clicking the Download and Run button.
Figure 2-11
Continuous yellow followed by flashing yellow
Commenting is an important part of documenting programs
, so let’s add some comments. Click the Comment button in the Program Window Controls at the upper right. A comment window will appear at the upper left in the Programming window
. Double-click in the window and type something like “Turn orange light on continuously, say “yellow” at full volume, and wait 2 seconds.” Then resize the box to stretch across the second through fourth blocks and place the comment just above them. Repeat the process to comment the last four blocks, and the program should look like Figure 2-12.
Figure 2-12
First programming line with comments
Note that there is another method for adding comments to programs
: the Comment block
, located under the Advanced programming blocks tab
. It has one advantage over the comment boxes: Because it is a Program block it moves with the code when new blocks are added, whereas the comment boxes must be manually moved when programming changes reposition the programming blocks. On the other hand, the Comment block has a significant disadvantage: It is a fixed size, so it can only display a few dozen characters (three lines). Moreover, it cannot be placed over several blocks to provide a “summary” comment as shown in Figure 2-12.
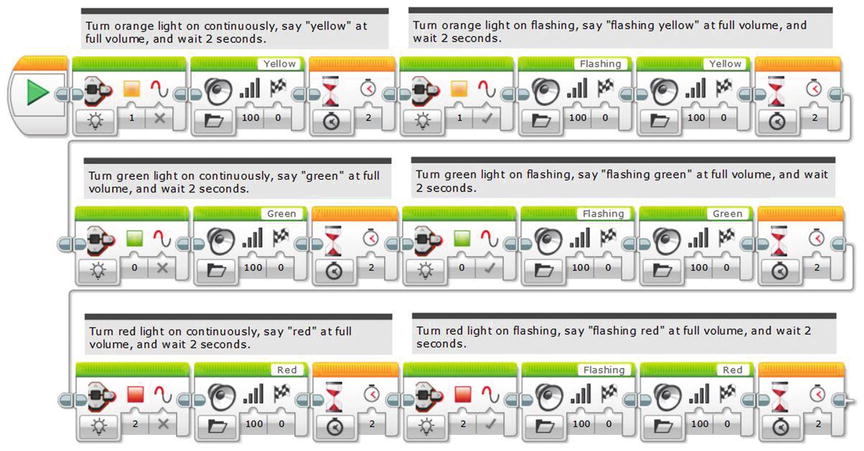
Next, let’s add sections to the program to repeat the process for the green and red lights. We will use copy and paste to make the process easier (press Ctrl+C to copy blocks, Ctrl+V to paste). Also, if we add sections directly to the end of the current program, the listing will extend off of the screen. This is okay, but harder to read, so we will add the new sections in the white space below the current program blocks. Select all of the current program, including comments, except for the Start block, then copy and paste them under the current program. Note that they are faded in color because they are not yet active parts of the program (see Figure 2-13). They must be connected to the first program line. Do this by clicking the Sequence Plug Exit
on the right side of the last Wait block in the first line, then dragging a Sequence Wire and plugging it into the Sequence Plug Entry
at the beginning of the second program line. This is illustrated in Figure 2-13. After you do this, the second program line will be displayed in bright colors like the first line.
Figure 2-13
Connecting program lines
Now make the following changes to the programming blocks in the second line: (1) Change both Brick Status Light colors to 0 (green), (2) change both Yellow Sound blocks to Green, and (3) replace “orange” and “yellow” in the comment blocks
with “green”. Repeat the process for a third programming line, replacing “green” with “red” as shown in Figure 2-14. Run the program by clicking the Download and Run button. If interested, experiment with the different sounds, light options, and timing.
Figure 2-14
Complete LightsAndSounds program
Simple Program to Move Forward and Backward; Download from PC, Run from Brick
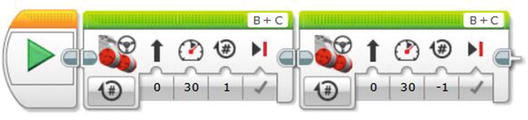
It’s time now to write a program to make the robot move. This will require a working robot. The convention in this book is to wire the left large motor to port B and the right large motor to port C.
Open a new program and name it ForwardAndBack. Place a Move Steering block
onto the program line and set the Power to 30. Leave Steering set to 0, Rotations to 1, and Brake at End to True. Place a second Move Steering block onto the program line with the same parameters, except set Rotations to -1. Your program should look like Figure 2-15. Remember to save it before proceeding; that is a good habit to have. Turn on your robot, connect it to the computer, and click the Download button to download the program
.
Figure 2-15
ForwardAndBack program
This time we will run the program from the brick instead of from the PC. Use the left and right buttons on the brick to select the second tab on the brick’s display, then use the up and down buttons to highlight the project (MyFirstPrograms), press the Middle (dark gray) button to select it, and use the down button to highlight the program (ForwardAndBack). The robot is now ready to run. Place it so that it has room to move forward at least one wheel rotation and press the middle button to run the program. The robot should move forward one wheel rotation, then backward one wheel rotation, and stop.
Next, let’s make this program into a My Block.
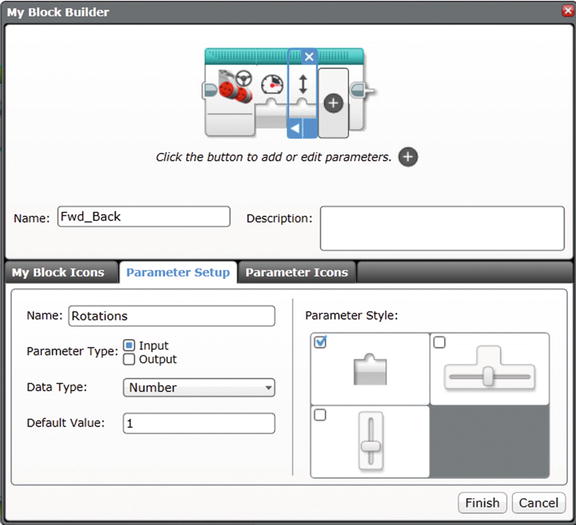
Making a My Block
Select the two Move Steering blocks
in the program window, but not the Start block. In the menu bar at the top of the page, click Tools ➤ My Block Builder to open the My Block Builder
window, as shown in Figure 2-16. Type Fwd_Back into the Name box. The reason for choosing such a short name is that a short name will be displayed on the block itself, whereas a long name will be truncated. Select one of the icons depicted in the lower half of the window (the Move Steering icon is a reasonable choice). That icon should then appear on the left part of the My Block icon at the top part of the window.
Figure 2-16
My Block Builder window
When creating My Blocks, you can set up both input and output parameters. Input parameters
are values you set on the My Block, just like the Move Steering block
has parameters for Steering, Power, Rotations, and Brake at End (all input parameters in this case). Let’s set up this My Block to have input parameters for Power and Rotations.
Power
Click the plus sign on the right side of the My Block icon. This should add two new tabs to the lower part of the window: Parameter Setup and Parameter Icons.
Click the Parameter Setup tab, type Power for the name, leave the Parameter Type set to Input, and Data Type to Number. Type 30 for the Default Value. Leave Parameter Style set to Text Input.
Click the Parameter Icons tab and select an icon for the input. One of the power icons, like the one used in the Move Steering block, is a good choice.
Rotations
Add a Rotations parameter by clicking the + again.
Click the Parameter Setup tab, type Rotations for the name, leave the Parameter Type set to Input, and Data Type to Number. Type 1 for the Default Value. Leave Parameter Style set to Text Input.
Click the Parameter Icons tab and select an icon (the vertical double arrow is a good choice).
The My Block Builder
window should look like Figure 2-17. Click the Finish button to create the My Block.
Figure 2-17
Finished My Block Builder window
Note that a new tab with the My Block name
, Fwd_Back, was added to the program window. Under this new tab, the final step is to connect the inputs from the block at the left side to the appropriate inputs in the two Move Steering blocks
. Click the tab below the Rotations input and drag it to the Rotations input of each Move Steering block to make the connection. Do the same with the Power input. Note that you can also drag the data wires
to align them for a cleaner look, as shown in Figure 2-18.
Figure 2-18
Code for Fwd_Back My Block
Now, click the ForwardAndBack tab to see your original program. The code blocks have been replaced by the My Block. Click the Sequence Plug Exit
of the Start block to automatically draw the My Block up next to it. Also, note that because this My Block requires inputs, it cannot be run directly from the brick, even though it shows up on the brick’s menu. It must be run from inside a program.
Click the My Blocks tab on the programming palette at the bottom, and you should see your new My Block listed. Download it to the brick
and run it. Uh-oh! It goes forward twice instead of forward and back. Fortunately, you can edit a My Block after it is created, as long as you don’t need to change the inputs, outputs, icons, or default values. Go back to the Fwd_Back tab and, from the Data Operations tab at the bottom of the page, insert a Math block between the two Move Steering blocks
. Unplug the Power wire from the second Move Steering block and plug it into the “a” input of the Math block. Change the mode to multiply, set b = −1, and connect the Math block output to the Power input of the second Move Steering block. The corrected code should look like Figure 2-19. Numerous other blocks could be added to the My Block code if desired. If you have not saved the project recently, do so now. Saving frequently is always a good practice.
Figure 2-19
Corrected My Block code
Working in the Project Properties Window
The last thing we need to do is work with programs
and My Blocks in the Project Properties window. Add a new program and name it Temp. Go back to your LightsAndSounds program (or ForwardAndBack), select all of the blocks except the Start block, press Ctrl+C to copy them, go to the Temp program tab, and press Ctrl+V to paste them into the Temp program. Drag them next to the Start block to connect them to it. The Temp program is superfluous, so let’s delete it. Note that if you click the X (on the tab) next to the program name it only closes the program; it does not delete it.
Click the Project Properties tab
(the one on the left with the wrench icon). The bottom half of the window has tabs for Programs, Images, Sounds, My Blocks, Variables, and Exportable Items. Your three programs should be listed under the Programs tab (but not Fwd_Back, which is listed under the My Blocks tab). Let’s delete Temp. Click Temp.ev3p, then click the Delete button to delete it. Careful! The program does not prompt to make sure you really want to delete it. When you click the Delete button the program is deleted immediately.
Select LightsAndSounds.ev3p, click the Copy button, then the Paste button. A copy of the program is added with the suffix 2: LightsAndSounds2.ev3p. It is present, but does not show up on the tabs at the top because it has not yet been opened. You can open it by either double-clicking it in the Project Properties window
, or by clicking the Program/Experiment List button and selecting it from the drop-down list. Delete the duplicate program, LightsAndSounds2.ev3p.
Conclusion
At this point you should have written some basic programs
, run them on the brick, and implemented a My Block. Now that you are familiar with the EV3 interface and some basic programming techniques, you are ready to begin writing more advanced programs. Chapter 3 starts this process by guiding you to create enhanced My Blocks to make the robot move forward and backward.