Chapter 5: Red Team Infrastructure
As we learned in the previous chapter, purple teaming involves the capacity to mimic attack techniques in order to test and improve your overall security level. Once we have selected the Tactics, Techniques, and Procedures (TTPs) we want to test, we will need to start preparing them. To do so, we will need to install some servers and configure them in order to execute the selected TTPs. However, before jumping into action, we will start by looking at specific distributions that come with preinstalled tools to help us perform the assessment. Initially, this distribution and toolbox can be used as an all-in-one infrastructure. Then, to gradually increase the complexity of our assessments and goals, we will discuss the general concepts and technologies related to Command and Control (CnC or C2), starting with some information and ideas for the selection of our domain names. Following this, we will move on to the different types of C2 that we can use to challenge the blue team. To strengthen the detection and response capabilities of our organization, we will also approach the concept of a redirector to protect the red team infrastructure from incident responders. Last but not least, we want to offer some hints and solutions to help automate this preparation; this will allow us to capitalize on each iteration of our purple teaming process.
Finally, this chapter is not intended to be a complete guide on all of the red team's latest techniques and tricks. There are a plethora of very good and well-written books on the subject in which to dive deeper and become a specialist in this field. However, this chapter aims to cover the key concepts that are necessary to start and mature red teaming activities.
In this chapter, we are going to cover the following main topics:
- Offensive distributions
- Domain names
- C2
- Redirectors
- Power of automation
Now, let's get started!
Technical requirements
This chapter requires you have knowledge related to virtualization to set up your distributions but also some basics regarding the systems to configure it. Additionally, you will require some entry-level web skills and knowledge of Linux command lines to help you implement the domain names, the C2, and the redirectors.
Let's jump into the presentation of some of the distributions that we can deploy and use during the setup of our offensive infrastructure.
Offensive distributions
As we come through the preparation phase of the purple teaming process, we can start deploying our infrastructure. During our first assessment, we will probably perform a lot of tasks manually. However, following this, we should really start thinking about automating the deployment and configuration of the infrastructure.
One of the very first considerations and installations should be the offensive machine. Indeed, during our initial exercises, we will mostly use this asset as an all-in-one toolbox. This machine will help us to perform offensive actions such as implant creation, C2, and scanning assets and so on. However, later, it will also allow us to perform administrative tasks such as managing remote C2, deploying redirectors, and more. Later, in the chapter, we will examine how to split roles between hosts to build a more mature red team infrastructure.
A wide variety of prepackaged distributions are freely available on the internet; we will go through some of them to help select the one that best fits our needs. Note that we could also use non-offensive oriented distributions for this type of operation. However, we will probably spend a lot of time installing tools when we could spend it on more interesting points, at least for the initial assessments.
Kali Linux
Created and maintained by Offensive Security, this Debian-based distribution is often seen as a reference operating system for security operations and assessments.
The number and variety of tools that are ready to use make this distribution a real asset for multiple types of security tasks and operations. These include the following:
- Penetration testing
- Forensic investigation
- Reverse engineering
One of the strengths of red team operations within Kali Linux is the tool list that comes installed with the distribution. From Open-Source Intelligence (OSINT) going through lateral movements to post-exploitation, we will be able to find the tool that fits our needs. And, if a tool is missing, as we will be running on a Linux system, we will be able to find and install the required packages directly from the Kali Linux packages repository or any other source.
Due to the reputation of this distribution and its available tools, there are a lot of tutorials, documentation, and information on the internet to help us understand, use, and work with this operating system.
Now, let's take a look at another Linux distribution that has also been built for the purpose of offensive operations but is slightly more purple team-oriented: Slingshot.
Slingshot
If we want something which is more tailored for mature adversary emulation, we can take a look at this Ubuntu-based distribution: SlingShot.
Mainly packaged and maintained by the SANS Institute, this distribution developed by Ryan O'Grady is tightly linked to the offensive courses of this organization.
One slightly different distribution is the SlingShot C2 Matrix edition. This modified version is linked to the C2 Matrix framework project and has been built to help choose and test the C2 framework. For example, this version comes with the following preinstalled framework that you can test and use, but feel free to contribute to the project and the C2 evaluation:
- Metasploit
- Covenant
- Merlin
- Koadic
- Empire
Both types of Slingshot distributions come with multiple C2 frameworks preinstalled but also with some great additional tools such as VECTR, which will help you to track and measure your exercise. However, we will discuss these tools later in Chapter 9, Purple Team Infrastructure.
On the official C2 Matrix website, you will be able to find the Open Virtual Appliance (OVA) image that can be downloaded, but there is also a questionnaire to help us determine the best C2 solution for our assessment.
Commando VM
Moving on, let's not forget about the Windows fans out there: the Complete Mandiant Offensive VM (Commando VM) is an offensive distribution based on Windows 10.
After installing your Windows VM and applying the latest patches, you simply need to download and install a Powershell Script from the official GitHub repository. Then, just run it using elevated privileges and you are good to go:

Figure 5.1 – Installation script for Commando VM
Once the installation of the script is complete, this VM will give you a lot of utilities, especially for the Windows infrastructure. Aside from the other tools that are prepackaged and ready to use, the installation will also perform some clean-up on the host, removing some annoying features such as Defender and Cortana. Additionally, it comes with the Chocolatey package manager, which will ease the process of installing new tools and software.
All of the offensive machines mentioned earlier more or less contain the same toolset and can, therefore, fit into your assessment. In addition, all of them are very convenient as they provide easy and flexible ways in which to install new tools and scripts. Additionally, most of the offensive security solutions are packaged for both operating systems' families. The final choice will mostly depend on your preferences and experiences.
One of the very first steps into more complex assessments is learning how to use external infrastructure and domains. This concept is not mandatory for the first assessments, however it allows to get one step further to emulate more realistic scenarios. We will explore this in greater detail in the next section.
Domain names
Before jumping into the core of our infrastructure, one important point to bear in mind is the selection of our domain names. Indeed, we mean domain names in the plural sense, as you will require several domains to better mimic threat actors or one, at the very least, if you want to evaluate a specific point such as exfiltration, phishing, or beaconing.
Before digging into domain names, let's have a quick word about using direct IP. As soon as a suspicious action is caught during your exercise, the incident response team will start looking at logs, and network communications. Evidence pointing directly to an IP address will be considered highly suspicious and, therefore, analyzed deeply and quickly. Additionally, some security solutions have a number of blacklisting sharing features when they find something suspicious; therefore, we need to be careful that such features do not accidentally add one of the production IPs from our organization on such a list during our exercise. Finally, more and more organizations will not allow direct IP communication. That is why it is mandatory to consider using domain names during offensive or purple teaming assessments.
Choosing a domain name must be done wisely, as it could make a real difference during the execution phase. That choice could directly lead to being detected or not. For instance, we should try to mimic a financial domain name if we want to avoid inspection by security products. If we want to harvest domain credentials, we should look for domain names related to login or well-known authentication platforms to increase the trust level of our phishing campaign. However, to avoid a quick flag during an incident response for our C2 beaconing, we can use a name that is as close as possible to the update or software products as they will blend in with legitimate network traffic. These are some of the considerations of the mindset that we need to have when selecting a domain name, thus, to increase the realistic aspect of our exercise and to reduce the ease for the blue team and security tools.
There are several methods available to help us select the perfect domain name for each of our exercises:
- Create a brand-new domain and spend time performing configurations, creating a good reputation, and categorization. Reputation is something that needs to be built in several days, even months, but this preparation time is generally something we don't have the luxury of during purple teaming. This method allows you to be creative. We will not be limited to specific naming or problems that other methods could face. A nice out-of-the-box tool that can be used to quickly help you categorize your domain against different security vendors is Chameleon. Its usage is quite simple, and the tool can be found at https://github.com/mdsecactivebreach/Chameleon.
- Domain reuse: An interesting and well-known method is to use expired domain names. This is cheap, quick, and also beneficial to the historical reputation and categorization of the domain. We can check for such domain names on www.expireddomains.net. We can attempt to look for a domain that is close to our objectives and the context of our organization. We should also pay attention to the categorization of domain names, as we will be able to bypass some security inspection solutions by using specific categories such as Financial, Banking, and Health.
As shown in the following screenshot, when we connect to expireddomains.net we will be able to sort the list of available domain names based on multiple criteria such as the date of birth (which is important for historical trust), Alexa Ranking:

Figure 5.2 – The Expired domain website
Regardless of the solution chosen to select domain names, we should still perform configuration and testing to ensure everything goes as expected during the exercise.
Note that we should always prepare some backup domain names. If the incident response team starts blocking domains or IPs, we will need to react and change the payload configuration to keep control over the assets we compromised, just like a real threat actor would do.
In addition to this, we must purchase and implement SSL/TLS certificates from any certificate provider out there such as Let's encrypt or RapidSSL, for example. This will allow us to bypass several network traffic inspection tools and blend better into the overall traffic of the organization.
Finally, once we think we are ready, we must test our domain and review results to try to reduce the level of detection during the assessment. Well-known security companies allow us to inspect and test the status of a domain. For example, you could use the following websites and tools: virustotal.com, urlscan.io, sitereview.bluecoat.com (from Symantec), and mxtoolbox.com under Blacklist.
Now that we have discussed different methods in which to select domains names, we will start looking at what we want to serve behind our domains: C2.
C2
Once our offensive machine is all set and the domains are reserved, let's take a look at one of our core infrastructure components: C2. This type of asset will host C2 solutions and will be responsible for serving and communicating with compromised assets sitting internally within the organization. Essentially, it will host our payload, and once it has been executed on an asset, a communications link will then be established with this server's backend or moved to another type of server.
We can split C2 assets into the following categories, which are based on their intent and roles:
- Phishing C2
- Short-term C2
- Long-term C2
Phishing C2
As its name suggests, this type of C2 can be used in the early stage of the execution phase to phish our target by hosting a fake authentication page or payload to download.
The intent of this server is to send the first stage of our attack. Then, once the payload is executed or the credentials are harvested, we will be able to move on to another C2 server's type.
To fulfill this role, we will require at least two services, an SMTP and a web server. The first component will allow us to send the phishing email to the selected targets, and once opened or clicked on, the second service will be used to serve the phished targets. Note that all services can sit on one single server or split on differents servers. To begin, let's take a look at how we can set up our SMTP server.
Several solutions can be leveraged to avoid pain, as it is always difficult to properly set up an SMTP server (for instance, SPF records, DKIM records, reverse DNS, clean email headers, and more). Fortunately, there are a lot of tutorials and articles covering this subject on the internet.
For a quick setup, we can look for third-party services or use our hosting provider's SMTP server. However, we should be careful when choosing those solutions, as it is almost always against the terms and conditions of the services. In addition to this, the provider is likely to perform security inspections on the outgoing emails and might, therefore, block our campaign. Still, using those services can save us a huge amount of time, and we will also benefit from the hosting reputation, which is very useful when bypassing filtering security solutions.
Also, it is worth mentioning that spoofing is still a thing today, as Sender Policy Framework (SPF) records are often not used, not properly configured (usually, they are soft fail only), or simply integrate public mail services IPs that are used for marketing or newsletters. These flaws could easily be leveraged to spoof sender mail addresses and still bypass this security control.
Now, let's take a look at the phishing frameworks that exist out there that can help us in our mission. To begin, we could go for a phishing solution such as GoPhish or IRedMail. It is really simple to set up, and there is also a lot of information on the internet to help us. Later, after hitting some of those solutions' limitations, we could probably create our own phishing emails by crafting them manually.
Let's quickly go through the open source framework of GoPhish to get a taste of how it can be configured. After downloading and running Gophish on your C2, we have to link the GoPhish framework to a mail server. To do so, move on the sending profiles menu and create a new profile, fill the information from the mail server and the created email address (that is, information gathered from our subscribed service or our hosting provider).
Then, we need to configure the page where the victims will land, that is, the landing page when they click on the link. Depending on the scenario, we can point to a crafted payload or a fake login page:
- For a fake authentication page, we can use the import site and enter the real URL of the login page you are trying to usurp.
- Regarding payload delivery, we have several options to play with. We can either add our own payload as an attachment to the phishing email or host the payload on a web server and insert the URL as a link in the phishing email. Each method has its pros and cons that deserve to be assessed. Using the payload as an attachment will likely have a higher chance of being opened by users, but it will also increase the risk of getting caught by email filtering solutions. Using a URL to redirect users to a malicious payload will have a greater probability of bypassing security solutions, but some users will not open it. We should perform some information gathering and testing before selecting our delivery methods to avoid being blocked during the exercise or simply follow the TTP we are trying to reproduce.
For example, in the following screenshot, we can view the form to create our phishing emails templates. Here, we have attached a Docx document, and we just need to define and write a catchy body and subject for our exercise. You can then save the template for other campaigns if this one is successful:
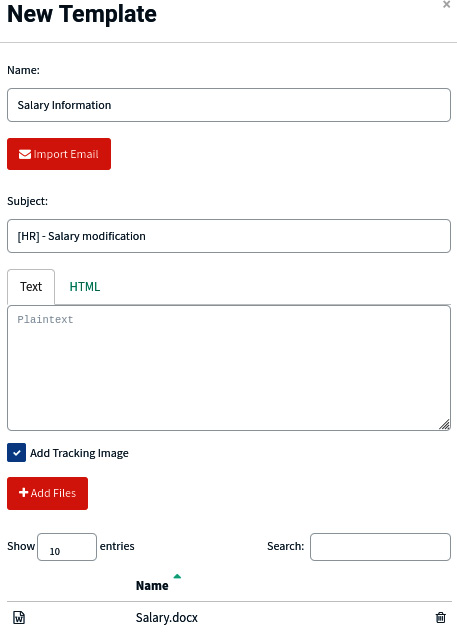
Figure 5.3 – A sample email template from GoPhish
Finally, we must test all of the setups, if possible, in the real environment. This is to ensure that everything goes as expected during the exercise and that our campaign is not blocked by any security solutions such as anti-spam.
Short-term/interactive C2
Short-term C2 or short-haul C2 are servers that are actively used during the execution of the exercise. They will receive frequent callbacks from compromised assets, and they will also be used for our red team operators to launch commands, upload additional tools and payloads, receive stolen data, and more.
For instance, if we decide to go for a payload attachment inside a phishing email, then when the attachment payload is executed and the persistence mechanisms are all set, the first callback should be to our short-term C2. Once we receive this callback on the C2, we will start interacting with the compromised asset to perform internal reconnaissance, privilege escalation, and lateral movement:

Figure 5.4 – Short-term C2
At the end of this section, we will provide a useful resource that can help us choose the right C2 technologies.
Long-term C2
This is probably the stealthiest type of C2 server on the list. The main purpose of this server is to receive low-frequency callbacks (for example, every hour or even every day) from a highly secured asset or zone. This server should be used as a last solution to retake control after incident response actions might have kicked in. For instance, if our previous server has been blocked at, for example, the firewall level, we will need to use our long-term C2 server to upload a new payload to fulfill our objectives. During the purple teaming exercise, long-term C2 can be used to validate whether the incident response process has been completed and performed efficiently, without, for example, skipping a specific indicator.
Before diving straight into a specific solution, we need to consider the context of our exercise, what we want to evaluate, and how we want to do it. To help us with that task, there is a list of C2 frameworks that we can refer to in this Google Sheets document:
This list references around 80 frameworks and evaluates them according to the following criteria:
- Language: What language is used for the development (server and implant)
- UI: The user interface options and API
- Implant: Which operating systems can the implant run on
- Channel: The methods used by the implant for communication with the C2
- Capabilities: The options and customizations that can be applied to the implant
- Detection: Ideas on how to detect implant and C2 communications
- Support: Where to find help, and how many people are within its community
Before we go on to create a complex Excel sheet to map our needs with available solutions, we should take a look at the C2 Matrix project by Jorge Orchilles (http://ask.thec2matrix.com/). This solution has been created to help figure out which framework will help us to achieve our goals. By answering several questions, the C2 Matrix will propose options to help you choose the frameworks that best suit your needs:

Figure 5.5 – The C2 Matrix questionnaire
Whatever the method we decide to choose for the framework, we should test it as much as possible to ensure it will fit our exercise needs.
As mentioned in the introduction to this chapter, the idea is to always start simple before gradually increasing and maturing our capabilities and the exercise's complexity. Therefore, we should always align our red team infrastructure with the objectives of the exercise. For instance, we could start our first exercise with a simple interactive C2 and the capabilities to execute our implant directly within the organization.
Just before going into action, we should consider protecting our infrastructure to avoid being kicked out at the first alert by the blue team and to also avoid rebuilding the whole infrastructure again. Redirectors fulfill this role as they allow us to hide a C2 behind a decoy host, which is easier to replace and rebuild.
Redirectors
We couldn't mention red team infrastructure without addressing the topic of redirectors. Redirectors are a key component of the infrastructure and are placed between the victims and the C2 servers. In other words, they will allow us to avoid a full blockage of the exercise's infrastructure by the blue team once they find out the first indicator of the attack. Indeed, they will hide our backend C2, and they will also hide our communications when interacting with the victim asset, therefore, acting just like an intermediate:

Figure 5.6 – Redirector
We could use as many redirectors as we have C2 servers, but to limit the size of our infrastructure, we could also set up one redirector for multiple backend C2 servers. Alternatively, if you wish to increase the difficulty level for the blue team, you could also implement multiple redirectors for each backend C2. In any case, the redirector will forward the traffic sent or received from the compromised host(s) to the backend and also any actions and commands you issues from the C2. As mentioned earlier, redirectors will be the ones facing the victims and, therefore, might be part of indicators that incident responders will likely find and block. That is why we use several redirectors in order to easily switch to a fresh one when the other gets caught and blocked by the blue team.
We will cover some of the most common redirectors that can be used in a red teaming assessment, in which you will have a phishing C2, a web server hosting a payload (a short-term C2), and a long-term C2.
When using phishing to obtain credentials or simply to send a payload (such as an attachment or a link), we will want to prevent the blue team from being able to find the phishing C2 public IP in the email header. In order to avoid this quick catch, we can implement an SMTP server that will act as a relay for our campaigns. Alternatively, if our infrastructure is hosted externally, we could use our hosting provider SMTP servers to act as an SMTP redirector, and you will benefit from the hosting provider information, preventing the blue team from simply blocking the sender's infrastructure.
This intermediate server will receive your campaigns, remove some headers from the email, and then forward the emails to the victims.
Here are some header examples that your SMTP relay should remove before sending the emails to the victims: Received, X-Mailer, and X-Originating-IP.
After removing these headers, we need to avoid being dropped by the internal SMTP server at the target level. To ensure this, we need to make sure our intermediate SMTP relay can validate some email security checks such as SPF, DomainKeys Identified Mail (DKIM), and Domain-based Message Authentication, Reporting, and Conformance (DMARC).
Be aware that the previous parameters are only to allow the email to get through the email gateway. It will then need to be delivered by the targeted organization's SMTP server in the mailboxes and not the spam folder. It is very difficult to enumerate all the checks and methods used by anti-spam solutions to flag an email as spam, but as a starting point, we should consider the following:
- The age of the domain, for example, SpamAssassin and other solutions, would flag an email as suspicious if the domain used to send the email has been recently registered.
- An email with attachments or links is often flagged with a high-risk score.
- Status of the sender IP on RealTime Blackhole List.
- The sender's IP reputation.
- Validation of SPF, DMARC, and DKIM.
- The reverse DNS of the sender IP is a valid domain name.
- An SMIME signature.
When we get through the initial access tactic phase, we will, usually, want to start exchanging data and executing commands on the compromised asset. For C2 communications, we have several protocols and implementations that we can play with, for instance, HTTP/HTTPS, domain fronting, DNS, and more. This decision is very important and needs to be taken during the preparation phase with the help of the C2 Matrix for example.
For example, let's consider HTTP/HTTPS. We can set up a simple redirection using iptables or socat. Both solutions will simply act as a proxy server, and all incoming traffic will be sent to the backend C2. The compromised hosts will never talk directly to the C2. However, depending on the motivation and goals, we can also implement more advanced HTTP redirections using the Apache mod_rewrite module. This will allow us to filter and redirect any traffic that is not coming from our implant to the destination of our choice. For instance, we can redirect any network flow from the incident responder based on the User-Agent or any other information contained within the packets, such as the originating country or IP, to block and avoid security solutions (Sandbox, Antivirus, and Scanners). In addition, if the C2 framework used by the red team does not support TLS, it could be handled by the redirector directly via the web server to add an extra security layer.
Sometimes, setting up redirectors in front of the C2 infrastructure is difficult, but it will save a lot of time when performing iterative exercises, as we will not need to rebuild our whole C2 infrastructure for each exercise. Instead, we will just burn the redirectors and fire up a new one.
One last word before jumping on to the next section. We should also discuss domain fronting and the Content Delivery Network (CDN). This technique allows us to bypass security restrictions and censorship by using Akamai or AWS as redirectors to our C2 server. By doing so, we can benefit from their trust levels to the security application that will inspect our traffic. This technique relies on the usage of SSL/TLS encryption to encapsulate our final domain name inside the Server Name Indication of the requests, and the requested hostname will be the CDN domain. On reception, the CDN will forward our requests to our hidden server, which could be, for example, our C2 server. A very well-written tutorial to help us deploy domain fronting on Azure to protect our C2 can be found at https://bit.ly/3u4g1c0.
Still, this is time-consuming, and that is why, as soon as we finish setting up and testing our infrastructure, we should look at automating the deployment of new redirectors using various technologies. With time and experience, we will also look at automating the entire red team's infrastructure along with some advanced red team tasks such as generating and building payloads.
The power of automation
As mentioned in the earlier sections, setting up a red team infrastructure, even a simple one without a robust multilayered architecture, requires quite a lot of setting up and configuration. This is something we do not want to perform at each iteration of the purple teaming exercise, as it will require too much effort to be efficient and increase the overall return on investment (ROI) of such assessments.
Depending on the levels of maturity and comfort in this field, we should think about automation. Even during the first assessments, we should look for the next exercise and start thinking about documenting the deployment and making copies/exports of the configurations (including VMs and scripts). This will help us to reduce the setup time for the next exercise, increasing, therefore, the ROI. Even if it is not the same scope or goal, there will always be a benefit to be had at one of the stages of the attack preparation phase.
Automation can be as simple as performing an export of a VM or saving code into a private repository, but there will be more and more benefits when we start automating the deployment of more complex infrastructure components. For instance, using solutions such as Ansible allow us to prepare templates for servers but also configurations of specific services that need to run on top of it.
Many hosting providers, such as AWS or DigitalOcean, can be used by Ansible to interact with and set up an infrastructure (VMs) but also perform DNS configurations. Terraform is another technology that could be used for the same purpose. There are a lot of great resources regarding this topic on the internet. These resources can help us to build our own automation playbook, however there is also some projects that give away almost everything ready to download and use.
One of the most interesting and educative series on this subject is Infrastructure as Code (Terraform + Ansible) by Rasta Mouse from Zero Point Security. This article covers many interesting topics, from setting up all of the VMs to installing Covenant C2 and creating an Apache redirector in front of Covenant.
And, if we do not have time to spare to learn about Ansible, we could also use some prepackaged solutions such as Overlord (forked from Red-Baron) from Qsecure (https://github.com/qsecure-labs/overlord). Once cloned and installed with the Bash script, we are redirected to a specific prompt that allows us to run and play specific modules, which will deploy and configure the asset we need, based on the information that we provided within the config.json file:
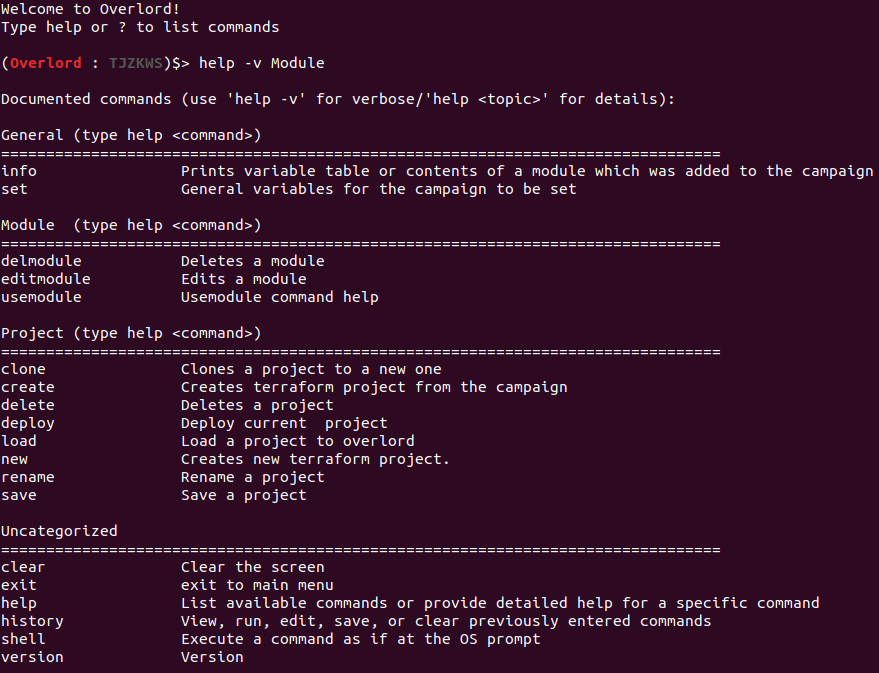
Figure 5.7 – The Overlord Module page
From there, you will be able to start deploying our infrastructure with the help of multiple modules. For example, the set command allows us to configure the cloud provider and the secret we will use. Then, usemodule will help us to deploy all of the components that we will need for our exercise. Do not forget to use the add command to commit your change to your campaign. Automation concept will be explored with concrete examples and tools in Chapter 13, PTX - Automation and DevOps Approach.
Summary
In this chapter, we introduced important concepts to help us set up an infrastructure to perform red teaming operations and, therefore, help us improve the overall security level of our organizations. As we learned in Chapter 2, Purple Teaming – a Generic Approach and a New Model, purple teaming will be executed over and over again as deploying and maintaining an effective offensive infrastructure is a totally different job and requires specific resources and knowledge. However, we don't have time and resources to reinstall an entire red team infrastructure over as deploying and maintaining an effective offensive infrastructure is a totally different job and requires specific resources and knowledge.
This is why we also discussed automation, and later in the book, we will examine other helpful solutions to simulate TTPs in an automation fashion.
This chapter was structured in a way to introduce you to more and more advanced considerations for your red team infrastructure the deeper you dive into the chapter.
Now that we discussed some of the important concepts of our red team infrastructure, we will now introduce and discuss the important concepts of the blue team, starting with the data we need to perform an efficient detection in the case of a real attack.
Further reading
- SMTP setup: https://www.ired.team/offensive-security/red-team-infrastructure/smtp
- Domain fronting: https://bigb0ss.medium.com/redteam-c2-redirector-domain-fronting-setup-azure-adbedbd28305
- Rasta Mouse: https://rastamouse.me/infrastructure-as-code-terraform-ansible/
- Ansible tutorials: https://redteamer.tips/automating-red-team-infrastructure-with-ansible-part-1-raw-infrastructure/