
Chapter 12: PTX – Purple Teaming eXtended
The previous chapters described how it was possible to leverage the red and blue forces for creating a purple teaming process relying, when possible, on automation and typical purple products such as Breach and Attack Simulation (BAS). Chapter 2, Purple Teaming – a Generic Approach and a New Model, described all the process workflows clearly reflecting that the main concept is being able to generate some active checks (like an attacker would perform), and in the meantime, making sure that these active checks are detected or blocked. We have also seen that automation is a major key to the purple teaming process's success. Different purple teaming applications exist along with many commercial solutions to answer this need: from our point of view, these typical approaches can be improved and extended.
As explained in Chapter 2, Purple Teaming – a Generic Approach and a New Model, we believe that the purple teaming approach could be extended to broader use in any related activity where the red and blue mindsets should be unified.
We will see how to implement continuous and automated security controls from different security perspectives: external attack surface, cloud, vulnerability management, and containers.
You will discover a new purple concept we call diffing that could be implemented for any security control in the infrastructures at reduced to no cost.
This chapter will cover the following topics:
- PTX – the concept of the diffing strategy
- Purpling the vulnerability management process
- Purpling the outside perimeter
- Purpling the Active Directory security
- Purpling the containers' security
- Purpling the cloud security
All the code content published here can be found at https://github.com/PacktPublishing/Purple-Team-Strategies.
Technical requirements
This chapter requires the understanding of purple teaming concepts and usage of general security tools such as vulnerability scanners, compliance checks programs, offensive tools, and network scanners. This chapter also heavily relies on Python code and therefore, requires you to have basic Python knowledge (data structures and library usage).
PTX – the concept of the diffing strategy
We have seen that the purple teaming approach requires generating active checks (using offensive tools) to assess defense mechanisms for detection and prevention (using blue team solutions such as Security Information and Event Management (SIEM) and Endpoint Detection and Response (EDR)). For that purpose, we have seen that automation can be a great ally to ease the process with the help of commercial and free solutions.
But now, one main drawback exists. When we try to automate an assessment process and run the same checks regularly, we may fall into a situation where we can't triage the results in a timely fashion. Indeed, we will likely get the same results and probably will not be able to manage real issues, as well as not being able to differentiate the noise from the relevant issues.
An example of this is the vulnerability management process itself. Indeed, if you run vulnerability scans each week, you will get a similar report every time with potentially additional vulnerabilities. This makes it difficult to handle this process in a correct manner due to the amount of data to handle.
This is where the diffing approach could help.
The word diffing was rarely used in the security industry, except for patch diffing. This activity is used for offensive and research purposes to detect the differences between binary file versions that were inherited from a patch. This, on paper, quite simple approach allows reverse engineers to discover the vulnerable functions that were patched to be able to identify the vulnerability and create offensive code (exploits).
From what we've seen, attackers already use the diffing approach to create offensive code. From that postulate, a similar approach can be applied with a purple teaming mindset to enhance the global defensive security posture of the company using any offensive, compliance, or security controls tools.
This strategy is based on the Prepare, Execute, Identify, and Remediate (PEIR) model presented in Chapter 2, Purple Teaming – a Generic Approach and a New Model.
An important point to keep in mind is that the diffing approach intervenes in a second step. A first assessment needs to be performed to initiate the state of all the issues and observations. It must be documented, prioritized for remediation, and followed up. The organization must follow its vulnerability management process in order to address all relevant findings as we would do normally.
Once this step is done, the diffing approach based on the PEIR model can be applied.
The initial process iteration is as follows:
- Prepare:
- Define the tools for the interface (network or vulnerability scanner and Active Directory (AD) security checks).
- Execute:
- A tool creates a report from an attack or audit's perspective.
- This report is stored in a database.
- Identify:
- A security team will take this report into consideration and will prepare an action plan with the management for these problems.
- Remediate:
- Once issues are prioritized, they will be remediated.
The diffing PEIR (next iterations) is as follows:
- Prepare:
- Done at the first iteration
- Execute:
- The tool is executed and creates an output.
- This last output is compared to the previous one (diffing) automatically.
- New findings/observations are appended to a database/repository.
- Identify:
- Remediate:
- The new finding is handled and added to the remediation plan for treatment, depending on its prioritization.
This whole process can be applied to any solution that generates a standardized output, which makes it an invaluable strategy to extend our purple teaming approach at reduced to no cost.
We propose the following schema as a generic summarized workflow:
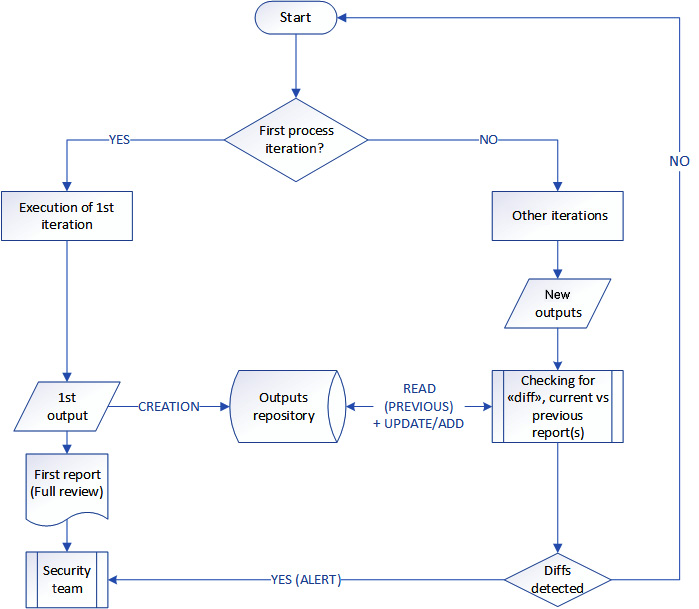
Figure 12.1 – Generic summarized diffing action workflow
In this chapter, we will try to describe a common root for all suggested implementations. Indeed, the DeepDiff library is used in several implementations. DeepDiff (https://zepworks.com/deepdiff/current/) is a Python 3 library that can be used to detect differences between any structured data, such as dictionaries, lists, and iterables. It is powerful, simple to use, and offers multiple customization possibilities (such as filtering out fields depending on their name content, for example).
To install DeepDiff, simply run the following command:
pip3 install deepdiff
We also draw attention to the fact that the code and examples are provided as proofs of concept and should not be used in production without proper additional usual controls, such as exception handling, logging of activities, both successes and failures, data availability monitoring, and controls of updates.
The next sections will describe how this strategy can be implemented by highlighting different real-life examples.
Purpling the vulnerability management process
From our experience, we see this process as being painful for most companies. Here are some of the most common pitfalls:
- Improper frequency of scans.
- Non-actionable reports or outputs, making it difficult to prioritize courses of action.
- Flood of information at each scan, which creates difficulties to distinguish new vulnerabilities from the old ones.
- The human and the time resources allocated often make the process slow and, therefore, leave the infrastructure exposed to threats for a long period of time.
- Negotiation between security and business teams when risk management is not well defined or disseminated.
Of course, the diffing approach will not resolve all pitfalls, but it can help technical and management teams to reduce risks by facilitating the identification and prioritization of vulnerabilities with a near-real-time approach.
The entire implementation of this specific use case cannot be provided as is, as there are many different variables, such as the type of vulnerability scanner. Indeed, each of them uses different data structures and ways to fetch reports. For these reasons, the next example supposes that the following elements are already implemented correctly:
- We need the following directories:
- /opt/ptx/vulnscan/reports_raw/, which will contain fetched reports from the vulnerability scanner
- /opt/ptx/vulnscan/last_known/, which will have the last known report (created at the first run automatically)
- Reports or outputs should be in a JSON structured format for easier data manipulation (for example, Extensible Markup Language (XML) should be converted to JSON).
- We assume we have already fetched vulnerability reports using an application programming interface (API) or another solution, and that they are stored in the previously mentioned directory.
- Reports or outputs should have a standard naming convention including the date, for example, report-2021-12-07.json.
- We also suppose that the current structure of data is a list object containing one dictionary for each identified vulnerability:
[
{ "impacted_host": "1.2.3.4",
"severity": "High",
"risk_name": "A sensitive vulnerability"
. . .
},
{ "impacted_host": "10.1.3.5",
"severity": "High",
"risk_name": "RCE vulnerability in Joomla..."
. . .
},
. . .
]
- We assume that the field containing the vulnerability name is populated with risk_name and that the impacted device is impacted_host.
Now that we have seen the different requirements, we can move forward to perform a high-level overview of the workflow. Of course, the code can be adjusted to anyone's needs.
We get the last report from the last_known/ directory.
If no file exists in last_known/, we create one based on the last report we got from the reports_raw/ directory, then we exit with a message saying to assess the first report.
Otherwise, we transform the last report from "reports_raw/" into a grouped structure, such as the following code block. This grouping transformation is performed to create a summary of vulnerability names as the key on one hand, and the list of impacted hosts as the values on the other hand:
{
"RCE vulnerability in Joomla...": ["1.3.4.6", "10.3.2.20", "1.2.3.5" ],
"Docker remote command execution": [ "10.20.30.3", "10.22.3.8"],
"Other XXX example vulnerability: [ "10.6.9.4" ]
}
The next steps are as follow:
- We perform the diffing operations between the most recent report from "reports_raw/" and the last report file from "last_known/".
- We generate an output if any difference is detected.
- Finally, we update the file in last_known/ as the new reference.
The full Vulnscan-diffing.py code is available at https://github.com/PacktPublishing/Purple-Team-Strategies/tree/main/Chapter-12/vulnscan.
In the following, we highlighted important sections of codes from Vulnscan-diffing.py:
. . .
# We want only High or Medium severity vulnerabilities
df = df[ ( df["severity"]=="High" ) | ( df["severity"] == "Medium" )]
# A groupby operation is performed on the report to group risks by impacted hosts
data_raw = df.groupby("risk_name")["impacted_host"].apply(list).to_json()
. . .
### Diffing the two results previous vs new report
anomalies=DeepDiff(previous,new,ignore_order=True, verbose_level=2)
. . .
### The new model become the last_known
shutil.copyfile(latest_report, last_known)
Running the full code will produce this output at the first iteration:

Figure 12.2 – The vulnscan-diffing.py first iteration output
If this same code runs after a new report is published in the /opt/ptx/vulnscan/reports_raw directory, then the diffing will occur and produce the following output:

Figure 12.3 – The vulnscan-diffing.py new iteration
Basically, this diffing approach will provide not only new vulnerabilities identified but also new impacted hosts added to an existing vulnerability list (for example, new hosts impacted by a previously known vulnerability).
At this step, this script can be automated using a cron job for scheduling, and the output collected using Splunk Universal Forwarders, Logstash, or Filebeat, for example, to be forwarded to a SIEM and then generate an alert or update a dashboard.
Tips and Tricks
Regarding used fields such as risk_name, impacted_host, or severity, it could be interesting to normalize all our reports from our different vulnerability scanners using the same naming convention. In this vision, you may benefit from a cross-correlation approach across all our assessment tools' perimeters regardless of the data structures in their reports! Specifically, for the severity field, we may standardize values between all vendors to have a unified severity, so we could implement a simplified risk scale across all our vulnerability scanners for an even better correlation strategy.
Let's now apply the same approach to improve the security posture of our external perimeter
Purpling the outside perimeter
The global concept here is to be able to detect newly opened and exposed ports in our infrastructure automatically. Basically, to detect open ports in an IP range, we could rely on the Nmap software (https://nmap.org). Nmap is the world's most well-known open source vulnerability scanner. It provides advanced scanning capabilities, different output formats, and the possibility to integrate scripts for advanced vulnerability detections, thanks to the Nmap Scripting Engine (NSE). For this use case, we will focus on port scanning only.
Implementing this continuous control requires at least the following elements:
- An external Linux system (outside of our infrastructure)
- The ability to perform network scans from this host
- Nmap installed
- A cron job with a shell script to run Nmap frequently and generate reports
- Deploying Python script in charge of comparing reports results
As in the previous implementation, our directory structure will be the following:
- /opt/ptx/nmap/reports_raw/, which will contain outputs from Nmap scans
- /opt/ptx/nmap/last_known/, which will have the last known scan report
- /opt/ptx/nmap/networks_list.txt, which is basically a file containing the list of network ranges to scan (one by line)
In this workflow, we will not use the DeepDiff Python library to reduce the complexity of the diffing operation. Indeed, DeepDiff would have output a complex format that requires processing to turn into actionable information.
The first part of the implementation is to schedule the Nmap scan. The Nmap-run.sh script will be run daily; it is available at https://github.com/PacktPublishing/Purple-Team-Strategies/blob/main/Chapter-12/nmap/Nmap-run.sh.
We chose to use the -oG option, to output a grepable format. This simplified structured output is easier to diff compared to an XML format, as we can see in the following:
# Nmap 7.70 scan initiated Thu Dec 16 17:49:53 2021 as: nmap -sT --open -P0 -oG new 127.0.0.1
Host: 127.0.0.1 (localhost) Status: Up
Host: 127.0.0.1 (localhost) Ports: 22/open/tcp//ssh///, 631/open/tcp//ipp///, 8080/open/tcp//http-proxy/// Ignored State: closed (997)
It is quite easy to convert this kind of output into a simple JSON object structure, such as the following:
{
"127.0.0.1": ["22/open/tcp//ssh///", "631/open/tcp//ipp///", "8080/open/tcp//http-proxy///" },
"hostN": ["21/open/tcp//ftp///"]
}
Regarding this implementation, another very important thing to notice is the risk of false positives and false negatives. Indeed, sometimes, network scanners may detect a new port, miss it on a second scan (related to a network error, for example), and then it will reappear on the third one. Therefore, it will trigger a new false-positive alert. In order to mitigate this risk, we can also implement a history check based on previous scans. For example, we can check that the detection did not occur in the three previous scans.
The whole code for this section is available at https://github.com/PacktPublishing/Purple-Team-Strategies/tree/main/Chapter-12/nmap.
The following is an extract from Nmap-diffing.py:
. . .
# The following variable is an integer that represents the number of previous reports to consider in the analysis
number_of_history_to_check = 3
. . .
# Now we compare the latest report with last_known and defined history; we return anomalies (things that exist in latest_report and not in previous (merged))
# Everything that does not exist becomes an anomaly
for host in latest_report_parsed:
for port in latest_report_parsed[host]:
if port not in merged_history[host]:
if host not in anomalies:
anomalies[host] = set()
anomalies[host].add(port)
if len(anomalies) > 0:
pprint.pprint(anomalies)
### The new report now becomes last_known
shutil.copyfile(latest_report, last_known)
Running the full Python code in the first iteration state will produce the following output:

Figure 12.4 – Nmap-diffing.py output, first iteration
Then, running the Python code after the first iteration will produce the following output:

Figure 12.5 – Nmap-diffing.py output, other iteration
This output is basically the difference between the last identified scan report compared with both the previously analyzed one and the other historical reports. The number of historical reports is defined by the number_of_history_to_check value.
Tips and Tricks
The configuration used in this Nmap scan is very basic. It is recommended to consult the manual page of Nmap, especially for any kind of optimization that could be relevant to a specific environment. For very large networks, this solution may not be applicable as is. In such a situation, we would look at projects such as Scantron (https://github.com/rackerlabs/scantron), which is optimized for larger and distributed environments. Furthermore, small modifications could be performed to include User Datagram Protocol (UDP) scanning. It is currently not implemented in this setup as it will add strong additional delays during the scans.
Now we will deep dive into the security of the Windows Active Directory by leveraging a tool called PingCastle.
Purpling the Active Directory security
AD service security is a critical component for most companies. Usually, it is a very complicated topic to handle and requires security audits to detect configuration weaknesses and vulnerabilities. These flaws can be related to incorrect patching, failure in design or implementation, and even sometimes existing persistence left by an attacker during a breach.
These possible vulnerabilities are exploited by attackers to perform privilege escalations, lateral movements, and in the end, full domain compromise. A very interesting and free tool exists to tackle this problem: PingCastle (https://www.pingcastle.com).
This tool was developed by Vincent Le Toux (also the co-author of the famous exploitation tool Mimikatz). PingCastle allows us to perform a full audit of our AD domain, even from a simple AD domain user. It checks for most known issues and vulnerabilities in terms of patching, implementations, risks, or existing persistence through a complete health check. It is a must-have solution for any company in the world. This tool provides HTML/PDF reports, as shown in the following screenshot:
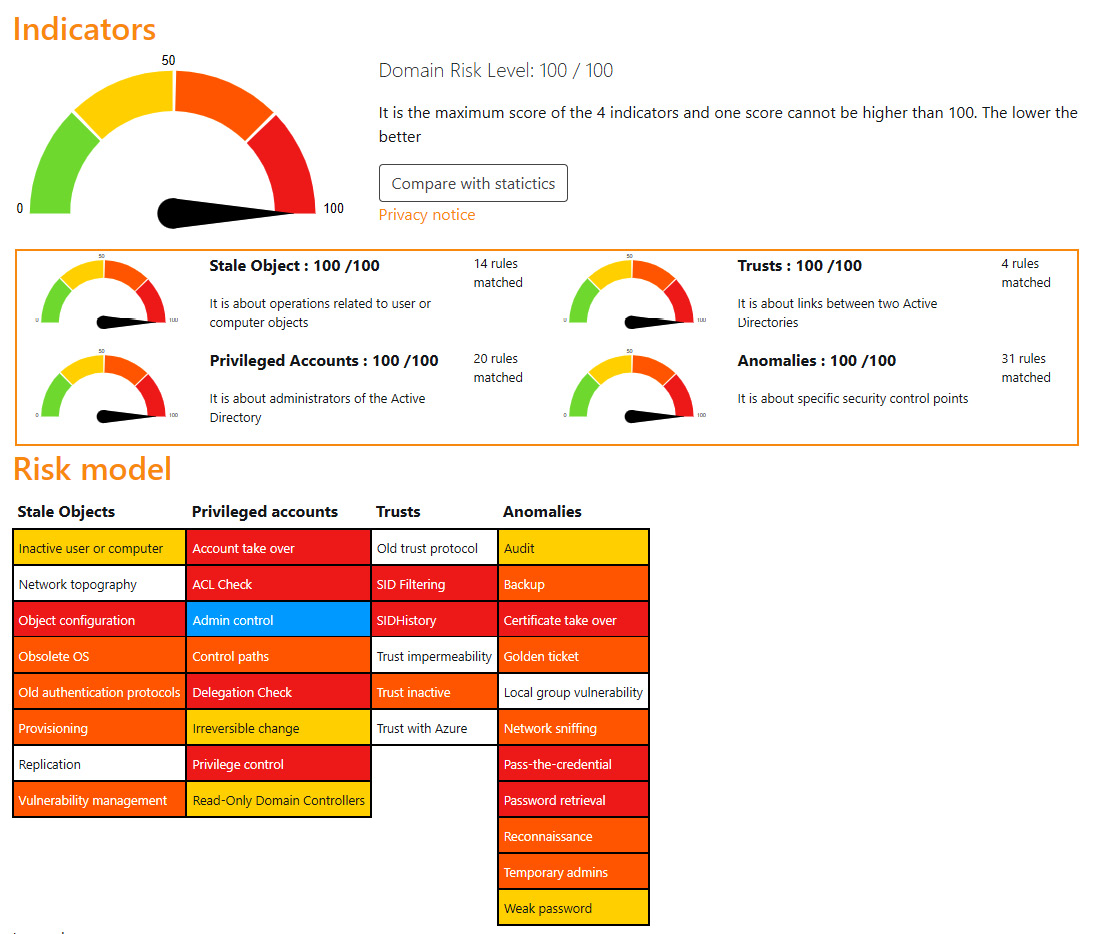
Figure 12.6 – PingCastle HTML report 1/1 sample from https://www.pingcastle.com
For any detected anomalies, the tool provides details of the impacted objects, MITRE ATT&CK mapping, impacts, risk scoring, and remediation possibilities, as shown in the following screenshot:
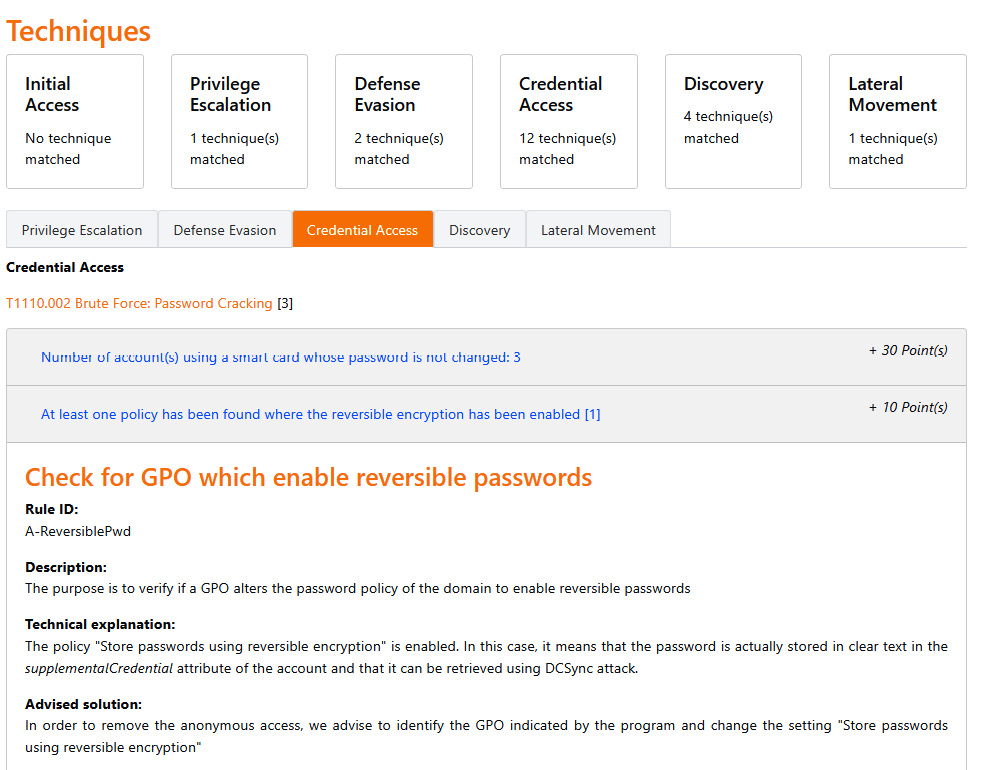
Figure 12.7 – PingCastle HTML report 2/2 sample from https://www.pingcastle.com
As said, PingCastle can generate human-readable reports but can also generate XML reports, which can be used for automation purposes. This last feature is very interesting in a diffing approach; indeed, just as an attacker may use different tools (including PingCastle) to find security issues to exploit an AD domain, we will rely on this health check as an active security control to detect existing and new vulnerabilities.
Implementing this continuous control requires at least the following elements:
- An internal Windows system joined to the domain
- PingCastle installed (self-executable)
- A fetching mechanism of the XML report to a central Linux server. (This part is not detailed in this section but can be done using authenticated network share on the PingCastle output directory.)
- Using the Python script to compare output results
In this diffing scenario, we will rely on the deepdiff Python library, as it will be easier to manage complex objects and detect anomalies.
Tips and Tricks
In Chapter 13, PTX – Automation and DevOps Approach, you will find a complete implementation of the whole automation process using continuous integration and continuous deployment (CI/CD).
This CI/CD approach will also have the benefit of checking and updating the PingCastle executable before any scheduled launch.
The following is an example of the XML report data structure:
<?xml version="1.0" encoding="utf-8"?><HealthcheckData xmlns:xsd="http://www.w3.org/2001/XMLSchema" xmlns:xsi="http://www.w3.org/2001/XMLSchema-instance"><EngineVersion>2.9.2.1</EngineVersion><GenerationDate>2021-12-15T16:27:20.3870141+02:00</GenerationDate><Level>Normal</Level><MaturityLevel>1</MaturityLevel><DomainFQDN>internal-domain.lan</DomainFQDN><NetBIOSName>internal</NetBIOSName><ForestFQDN>internal-domain.lan</ForestFQDN>
. . .
The objective is to first convert this data into a structured JSON format (more easily browsable with Python) and focus on the RiskRules and HealthcheckRiskRule objects, which basically contain a summary of the findings in the report, as shown in the following:
[
{'Category': 'PrivilegedAccounts',
'Model': 'AccountTakeOver',
'Points': 20,
'Rationale': 'Presence of Admin accounts which have not the flag "this '
'account is sensitive and cannot be delegated": 3',
'RiskId': 'P-Delegated'},
. . .
{'Category': 'Anomalies',
'Model': 'TemporaryAdmins',
'Points': 15,
'Rationale': 'Suspicious admin activities detected on 5 user(s)',
'RiskId': 'A-AdminSDHolder'}
]
PingCastle-diffing.py is used to perform the diffing operations and is available at https://github.com/PacktPublishing/Purple-Team-Strategies/blob/main/Chapter-12/pingcastle/PingCastle-diffing.py.
The following is an extract from from PingCastle-diffing.py:
. . .
### We are excluding specific fields to avoid false positives due only to time changes, and creation dates.
excludedRegex = [
r".+Time", r".+Date.+", r".+Last", r".+Creation.+", r".+Number.+"
]
. . .
### Cleaning results with specific patterns to avoid incoherent diffing. This can be probably improved and is not false-positive proof; you have to adapt in your context if required
. . .
if re.findall("day(s) ago|weak RSA key", e["Rationale"]):
temp_e["Rationale"] = re.sub("d+", "REPLACED", e["Rationale"])
if re.findall("[d+]", e["Rationale"]):
temp_e["Rationale"] = re.sub("d+", "REPLACED", e["Rationale"])
. . .
### Anomaly detection using DeepDiff
anomalies=deepdiff.DeepDiff(old,new,ignore_order=True,exclude_regex_paths=excludedRegex)
This specific detection scenario will be treated in Chapter 13, PTX – Automation and DevOps Approach; the Python code for diffing will be shortened and will work with a simplified execution approach:
Here is the command line to execute the python script.
# ./PingCastle-diffing.py previous_report.xml current_report.xml
This means that, in this case, we will not have to manage the different directories for working, looking for the last files, and recording the last known report to compare with the previous, for example. All these requirements will be handled by the DevOps approach.
In any way, we must manually analyze the first report generated by PingCastle.
Running the script on a previous versus new report will produce the following output if anomalies are detected:

Figure 12.8 – PingCastle-diffing.py anomaly detection output
As usual, this must be considered as an alert that must be investigated using the human-readable report in HTML.
We have seen how to apply the diffing approach to better secure our Active Directory. We will now tackle another trendy topic from a security point of view which is container.
Purpling the containers' security
Nowadays, most companies rely on container-based technologies such as Docker and Kubernetes, for both test and production environments. These technologies offer the ability to deploy services quickly in a standardized and portable way over any system. The benefits of the container approach are huge, and this represents a real turning point in the computing industry. As usual, offering new technologies to people also introduces new attack vectors. For these reasons, containerized applications should also be integrated into our security controls and assessed in our purple teaming exercises.
In addition to standard security controls and security processes, we may need to introduce tools specifically created to detect vulnerabilities and misconfigurations in the container environments at different layers: operating systems, language-specific packages, Infrastructure as Code (IaC) files, and configurations, for example.
An interesting project is Trivy (https://github.com/aquasecurity/trivy), which is actively maintained, and describes itself as a "Scanner for vulnerabilities in container images, file systems, and Git repositories, as well as for configuration issues." Trivy is normally designed to be used in the CI phase, before deploying or pushing to a container. In this use case, Trivy will allow us to scan our containerized environments to detect vulnerabilities and misconfigurations. The following schema describes the detection scope of Trivy:
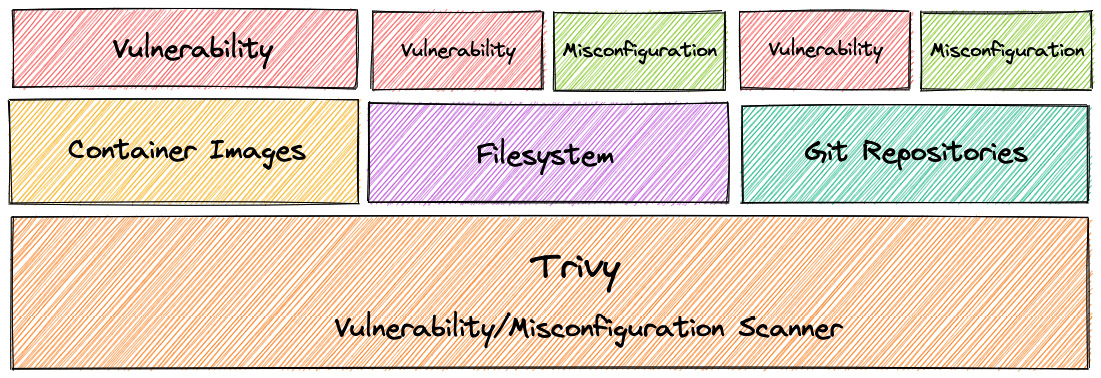
Figure 12.9 – Trivy coverage (Source: https://github.com/aquasecurity/trivy)
Checking the security before deployment is an absolute requirement, but it is also important to perform security testing in the continuous application life cycle to ensure the environment is not impacted by a new vulnerability (which might not be detected easily by a usual vulnerability scanner, for example).
In this use case, we will implement an additional layer of security control based on regular vulnerability checks in all Docker-hosted images. We may easily extend this use case for other components, such as IaC configurations.
We can find the Trivy installation instructions at https://bit.ly/3J5MK7T.
This implementation is a bit different than the previous ones; indeed, in this case, the diffing script will also launch the scanning actions. Basically, this script will do the following:
- List existing Docker images.
- Extract some configuration information about the images.
- Launch a Trivy scan focusing on HIGH and CRITICAL severity vulnerabilities, with a JSON output.
- Transform all the data using pandas and custom code to obtain a simplified structure of all the reports, such as the following:
{
"erp-app:latest": {
"image_id": "bc6b65772f29",
"vuln": {
"libbz2": [
"CRITICAL/CVE-2019-12900/bzip2: out-of-bounds write in function BZ2_decompress ------ "
],
. . .
}
}
"other-app:latest": {
"image_id": "8e6b10b9c087",
"vuln": {
"apache2": [
"CRITICAL/CVE-2020-11984/httpd: mod_proxy_uwsgi buffer overflow ------ ",]
}
}
}
- The result will be stored using the same model: previous report (last_known) and new (report_raw).
- Compare previous and new reports to detect new anomalies.
Trivy-diffing.py is used for this purpose and is available at https://github.com/PacktPublishing/Purple-Team-Strategies/blob/main/Chapter-12/trivy/Trivy-diffing.py.
The following is an extract from from Trivy-diffing.py:
. . .
severity = "HIGH,CRITICAL"
. . .
### Getting Docker images list
docker_images_l = run_cmd("docker image ls -q").split()
. . .
### Perform the Trivy scan on the image
report = run_cmd("trivy -f json -q --severity " + severity + " " + name)
. . .
### Grouping data to obtain the expected format
. . .
temp.groupby("PkgName")["risk_name"].apply(list).to_json()
return json.loads(temp)
. . .
### Performing anomaly detection
. . .
anomalies=DeepDiff(previous,new,ignore_order=True,verbose_level=2)
. . .
### Current report becomes last_known
shutil.copyfile(current_report, last_known)
Running the script produces the following output if an anomaly is detected:
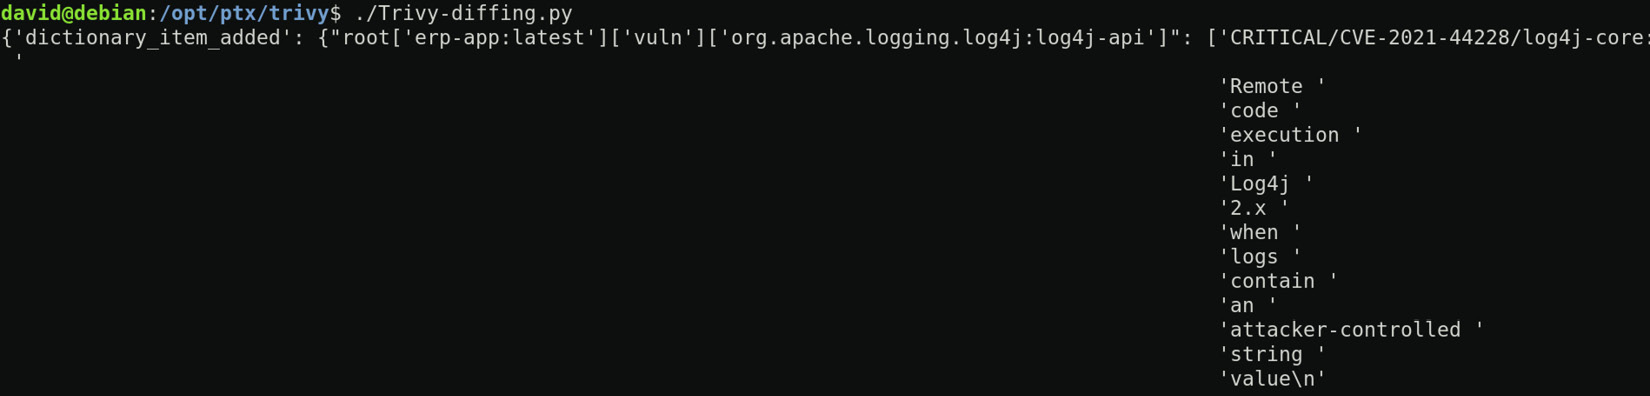
Figure 12.10 - Trivy-diffing.py anomaly detection output
Another trendy topic that we, as a security function, have to master is the cloud environment. We will now briefly see some ideas to implement a similar approach for the cloud.
Purpling cloud security
Different approaches may exist to perform security controls in cloud environments, such as vulnerability scanners, specific commercial cloud security scanners, or open source tools.
Now that we understand the diffing concept and the integration of this principle as an extension to usual purple teaming exercises, we can apply this same methodology to open source cloud security scanner solutions such as the following:
- Sparrow (CISA) https://github.com/cisagov/Sparrow
- SkyArk (Cyberark) https://github.com/cyberark/SkyArk
- CloudSploit (Aqua) https://github.com/aquasecurity/cloudsploit
Usually, we will focus on specific use cases from these tools, such as new risky applications consent for users (to detect OAuth2 credential stealing attempts) or new accounts with privileges, for example.
Finally, while all these diffing examples are great and can be implemented right away, the question of prioritization needs to be thought about first. Just like good old vulnerability management, we need to prioritize what vulnerabilities we have to remediate first (severity, exploitation evidence, and exposure) before firing up the vulnerability scanners. There is nothing worse than receiving an assessment report with 200 vulnerabilities that are not prioritized; therefore, we need to ensure we don't make the same mistake. Unfortunately, this topic is out of the scope of this book. However, as this book is mainly discussing adversary emulation, we always like to link our cybersecurity priorities with what really matters, such as what real threat actors performed.
Summary
In this chapter, we developed a diffing concept as an extension to the usual purple team arsenal to perform automated security controls at multiple layers of the infrastructure. We also detailed different practical implementations of this concept. We should now be able to design and implement our own security controls using the same methodology.
All the different diffing strategies from this chapter were demonstrated as standalone code; a more advanced and global implementation could rely on the usage of DevOps to manage all these security controls in a centralized, industrialized, up-to-date, and more user-friendly approach. The next chapter will describe this in detail using the AD security control use case.