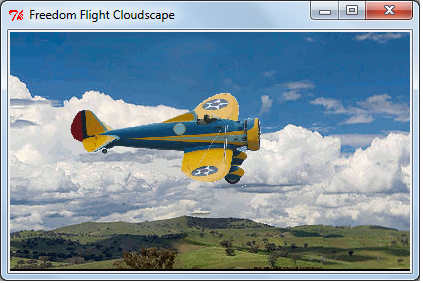
The next thing to achieve is to create what appears to be one practically infinitely wide panorama. We extend the technique used in the previous example and make a background image that appears to be endless.

We have provided a single image that has been doctored so that the right-hand edge fits exactly onto the left-hand edge to create an endless and continuous image if they are placed side by side. The GIMP image manipulation program was used to do this editing. In a very condensed explanation, we do the following:
- We copy a portion of the image that does not have too much detail vertically where we make the cut.
- This is then pasted onto one end so that there is substantial overlap of the two images.
- Then the top layer, containing the copy-and-pasted portion, has the eraser tool with a fuzzy edge applied so that we cannot see the transition from one image to the next.
# passing_cloudscape_1.py
# >>>>>>>>>>>>>>>>
from Tkinter import *
import time
root = Tk()
root.title("Freedom Flight Cloudscape")
cw = 400 # canvas width
ch = 239 # canvas height
chart_1 = Canvas(root, width=cw, height=ch, background="black")
chart_1.grid(row=0, column=0)
cycle_period = 50 # time between new positions of the background # (milliseconds).
#=============================================
posn_x1 = 0
posn_x2 = 574
posn_plane_x = 60
posn_plane_y = 60
posn_y = 00
# Panorama image size = 574 x 239
im_one = PhotoImage(file = "/constr/pics1/continuous_clouds  _panorama.gif")
im_two = PhotoImage(file = "/constr/pics1/continuous_clouds  _panorama.gif")
im_plane = PhotoImage(file = "/constr/pics1/yellow_airplane_2.gif")
#===========================================
def animdelay():
chart_1.update() # This refreshes the drawing on the # canvas.
chart_1.after(cycle_period) # This makes execution pause for 50 # milliseconds.
chart_1.delete(ALL) # This erases *almost* everything on # the canvas.
num_cycles = 10 # Number of total cycles of the # loop.
k = 0
for j in range(0,num_cycles*1148): # Number of steps to be taken # arbitrary.
posn_x1 -= 1
posn_x2 -= 1
k += 1
chart_1.create_image(posn_x1,posn_y,anchor=NW, image=im_one)
chart_1.create_image(posn_x2,posn_y,anchor=NW, image=im_two)
chart_1.create_image(posn_plane_x,posn_plane_y,anchor=NW,  image=im_plane)
if k == 574:
posn_x1 = 574
if k == 1148:
posn_x2 = 574
k = 0
posn_x1 = 0
animdelay()
root.mainloop()
We use the same x coordinate position adjustment technique as we did in the previous recipe. This time we choose the position for readjustment to be a multiple of 574 which is the width, in pixels, of the cloudscape image. We also use the image of an airplane, on a transparent background. The airplane is kept stationary.
