
The illustration shows what we might expect:
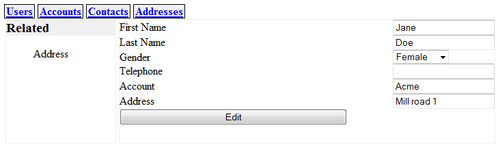
We have selected a Contact and its details are available for editing, including a reference to an Account. Now on the left, however, we have a sidebar showing the available one-to-many relations, in this case, the only one-to-many relation applicable to a Contact is Address.
To show a list of entities, we already have a suitable building block, the Browse class that will not only let us browse a list of entities in various ways, but is also capable of filtering those entities. In this example, we would want to show just those addresses that are associated with this specific contact.
We therefore add a new method to the Display class that will produce an HTML fragment together with some JavaScript to show the list of available one-to-many relations:
Chapter9/display.py
@staticmethod
def related_link(re,e):
	return '<li id="%s" class="%s" ref="%s">%s</li>'%(
		e.id,e.__class__.__name__,re.lower(),re)
def related_entities(self,e):
	r=['<div class="related_entities"><h3>Related</h3><ul>']
	if hasattr(e.__class__,'reltype'):
		r.extend([self.related_link(re,e)
			for re,rt in e.__class__.reltype.items()
			if (rt == '1:N' or rt == 'N:N')])
	r.append('</ul></div>')
	r.append('''
	<script>
	$('div.related_entities li').click(function(){
		var rel=$(this).attr("ref");
		var related=$("input[name=related]").val();
		$(".content").load(rel,
			$.param({
			"pattern" : $(this).attr("class") +
				"," + $(this).attr("id"),
			"related": related}),
		function(){shiftforms(rel)});
	});
</script>''')
return "
".join(r)
To determine which relations are available, related_entities() refers to the reltype class variable (highlighted), which is a dictionary of entity names and their type maintained by the MetaRelation class when a new relation is defined. For each suitable relation, a<li> element is produced with the help of the related_link() method.
These<li> elements have an id attribute that holds the unique ID of the referring entity (the ID of the contact in this example) and a class attribute that indicates the type of the referring entity (Contact in this case). The<li> elements also have a rel attribute that points to the URL that is serviced by a Browse class. For now, we derive this URL from the name of the entities we are referring to (in this case, address).
The final piece of HTML produced is a<script> element that installs an event handler on the<li> elements. This click handler will take the ref attribute of its associated<li> element to construct a URL that is subsequently used to open a new window. We will have to adapt the index() methods of the Display and Browse classes slightly to pass and process those attributes around, as we will see in a minute.
In our example, the resulting HTML fragment (minus the script element) would look like this:
<div class="related_entities">
	<h3>Related</h3>
	<ul>
		<li ref="address" class="Contact" id="1">Address</li>
	</ul>
</div>
And the load() call that will replace the contents of the<div> element with the content class would be passed the following URL, for example: http://127.0.0.1:8080/ address/?_=1295184609212&pattern=Contact,1&related=Contact,1.
Note
Note that we use jQuery's param() function here to convert an object containing several attributes to a string suitable to add to a URL. We could have simply passed the object here, but that would result in a POST action even though we configured all AJAX calls to use the HTTP GET method. Normally, that wouldn't be a problem, but if the final slash is missing in the URL, CherryPy will redirect us to the URL with the slash at the end and the AJAX call will be made again, but this time without the parameters appended! To prevent this possible awkwardness and to aid in debugging, we force the use of the GET method by constructing the full URL ourselves with the help of the param() function.