
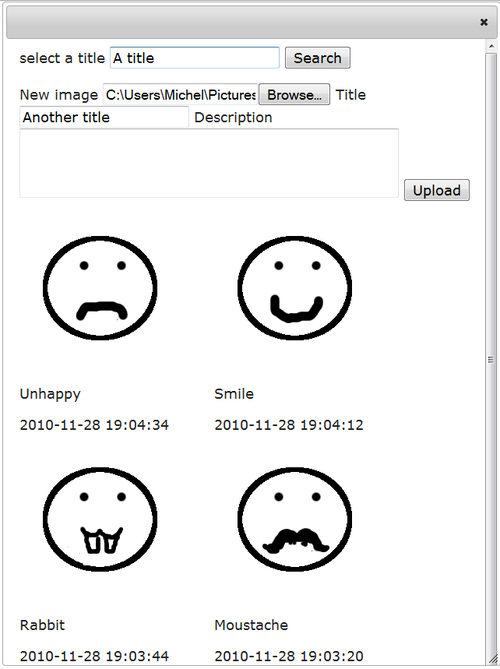
On the page that allows us to edit a topic, we have half hidden an important element: the dialog to insert an image. If the insert image button is clicked, a dialog is present, as shown in the following image:
Because a dialog is, in a way, a page of its own, we take the same steps to identify the functional components:
- Identify the main structure
- Identify specific functional components
- Identify hidden functionality
The dialog consists of two forms. The top one consists of an input field that can be used to look for images with a given title. It will be augmented with jQuery UI's auto complete functionality.
The second form gives the user the possibility to upload a new file while the rest of the dialog is filled with any number of images. Clicking on one of the images will close the dialog and insert a reference to that image in the text area of the edit page. It is also possible to close the dialog again without selecting an image by either clicking the small close button on the top-right or by pressing the Escape key.
The whole dialog consists of markup that is served by the images() method.
Chapter6/wikiweb.py
@cherrypy.expose
def images(self,title=None,description=None,file=None):
		if not file is None:
				data = file.file.read()
				wikidb.Image(title=title,description=description,
						data=data,type=str(file.content_type))
		yield '''
		<div>
				<form>
						<label for="title">select a title</label>
						<input name="title" type="text">
						<button type="submit">Search</button>
				</form>
				<form method="post" action="./images"
						enctype="multipart/form-data">
						<label for="file">New image</label>
						<input type="file" name="file">
						<label for="title">Title</label>
						<input type="text" name="title">
						<label for="description">Description</label>
						<textarea name="description"
								cols="48" rows="3"></textarea>
						<button type="submit">Upload</button>
				</form>
		</div>
		'''
		yield '<div id="imagelist">
'
		for img in self.getimages():
				yield img
			yield '</div>'
There is some trickiness here to understand well: from the edit() method, we call this images() method to provide the markup that we insert in the page that is delivered to the client requesting the edit URL, but because we have decorated the images() method with a @cherrypy.expose decorator, the images() method is visible from the outside and may be requested with the images URL. If accessed that way, CherryPy will take care of adding the correct response headers.
Being able to call this method this way is useful in two ways: because the dialog is quite a complex page with many elements, we may check how it looks without being bothered by it being part of a dialog, and we can use it as the target of the form that is part of the images dialog and that allows us to upload new images. As with the edit() method, the distinction is again made based on a whether a certain parameter is present. The parameter that serves this purpose is file and will contain a file object if this method is called in response to an image being submitted (highlighted).
The file object is a cherrypy.file object, not a Python built in file object, and has several attributes, including an attribute called file that is a regular Python stream object. This Python stream object serves as an interface to a temporary file that CherryPy has created to store the uploaded file. We can use the streams read() method to get at its content.
Note
Sorry about all the references to file, I agree it is possibly a bit confusing. Read it twice if needed and relax. This summary may be convenient:
This item has a which is a
The images() method file parameter herrypy.file object
A cherrypy.file object file attribute Python stream object
A Python stream object name attribute name of a file on disk
The Python stream can belong to a number of classes where all implement the same API. Refer to http://docs.python.org/py3k/library/functions.html#open for details on Python streams.
The cherrypy.file also has a content_type attribute whose string representation we use together with the title and the binary data to create a new Image instance.
The next step is to present the HTML markup that will produce the dialog, possibly including the uploaded image. This markup contains two forms.
The first one (highlighted in the previous code snippet) consists of an input field and a submit button. The input field will be augmented with auto complete functionality as we will see when we examine wikiweb.js. The submit button will replace the selection of images when clicked. This is also implemented in wikiweb.js by adding a click handler that will perform an AJAX call to the getimages URL.
The next form is the file upload form. What makes it a file upload form is the<input> element of the type file (highlighted). Behind the scenes, CherryPy will store the contents of a file type<input> element in a temporary file and pass it to the method servicing the requested URL by submitting the form.
There is a final bit of magic to pay attention to: we insert the markup for the dialog as part of the markup that is served by the edit() method, yet the dialog only shows if the user clicks the insert image button. This magic is performed by jQuery UI's dialog widget and we convert the<div> element containing the dialog's markup by calling its dialog method, as shown in this snippet of markup served by the edit() method():
<script>$("#imagedialog").dialog({autoOpen:false});</script>
By setting the autoOpen option to false, we ensure that the dialog remains hidden when the page is loaded, after all, the dialog should only be opened if the user clicks the insert image button.
Opening the dialog is accomplished by several pieces of JavaScript (full code available as wikiweb.js). The first piece associates a click handler with the insert image button that will pass the open option to the dialog, causing it to display itself:
Chapter6/wikiweb.js
$("#insertimage").click(function(){
	$("#imagedialog").dialog("open");
});
Note that the default action of a dialog is to close itself when the Escape key is pressed, so we don't have to do anything about that.
Within the dialog, we have to configure the images displayed there to insert a reference in the text area when clicked and then close the dialog. We do this by configuring a live handler for the click event. A live handler will apply to elements that match the selector (in this case, images with the selectable-image class) even if they are not present yet. This is crucial, as we may upload new images that are not yet present in the list of images shown when the dialog is first loaded:
Chapter6/wikiweb.js
$(".selectable-image").live('click',function(){
	$("#imagedialog").dialog("close");
	var insert = "<" + $(this).attr("id").substring(3) + "," +
$(this).attr("alt") + ">";
	var Area = $("#edittopic textarea");
	var area = Area[0];
	var oldposition = Area.getCursorPosition();
var pre = area.value.substring(0, oldposition);
	var post = area.value.substring(oldposition);
	area.value = pre + insert + post;
	Area.focus().setCursorPosition(oldposition + insert.length);
});
The first activity of this handler is to close the dialog. The next step is to determine what text we would like to insert into the text area (highlighted). In this case, we have decided to represent a reference to an image within the database as a number followed by a description within angled brackets. For example, image number 42 in the database might be represented as<42,"Picture of a shovel">. When we examine the render() method in wikiweb.py, we will see how we will convert this angled bracket notation to HTML markup.
The remaining part of the function is concerned with inserting this reference into the<textarea> element. We therefore retrieve the jQuery object that matches our text area first (highlighted) and because such a selection is always an array and we need access to the underlying JavaScript functionality of the<textarea> element, we fetch the first element.
The value attribute of a<textarea> element holds the text that is being edited and we split this text into a part before the cursor position and a part after it and then combine it again with our image reference inserted. We then make sure the text area has the focus again (which might have shifted when the user was using the dialog) and position the cursor at a position that is just after the newly inserted text.