
6
Web Server Structures
Web servers are the most common servers for remote access at the moment. Web services based on HTTP are flexible and powerful.
In this chapter, we will see how web servers are structured, starting by describing how the basic request-response architecture works, and then diving into a LAMP-style architecture in three layers: the web server itself, the workers executing the code, and an intermediate layer that controls those workers and presents a standardized connection to the web server.
We will describe each layer in detail, presenting a specific tool, such as nginx for the web server, uWSGI for the intermediate layer, and the Python Django framework for the specific code inside the worker. We will describe each of them in detail.
We will also include the Django REST framework, as it's a tool that builds on top of Django to generate RESTful API interfaces.
Finally, we will describe how extra layers can be added on top for greater flexibility, scalability, and performance.
In this chapter, we'll cover the following topics:
- Request-response
- Web architecture
- Web servers
- uWSGI
- Python workers
- External layers
Let's start by describing the basis of the request-response architecture.
Request-response
The classical server architecture is heavily based on request-response to communicate. A client sends a request to a remote server and the server processes it and returns a response.
This communication pattern has been prevalent since the era of mainframes and works in an analog manner as software communicates internally with a library, but over a network. The software calls a library and receives a response from it.
An important element is the time delay between the sending of the request and the reception of the response. Internally, it is rare that a call takes more than a couple of milliseconds, but for a network, it may be measured in hundreds of milliseconds and seconds, very commonly.
Network calls are very dependent on where the server is located. A call within the same data center will be fast, perhaps taking less than 100 milliseconds, while a connection to an external API will likely take close to a second or more.
Times will also be highly variable, as the network conditions may affect them greatly. This time difference makes it important to handle it properly.
The usual strategy when making requests is to make them synchronously. That means that the code stops and waits until the response is ready. This is convenient, as the code will be simple, but it's also inefficient, as the computer will be not doing anything while the server is calculating the response and it's being transferred through the network.
The client can be improved to perform multiple requests at the same time. This can be done when the requests are independent of each other, allowing it to make them in parallel. An easy way to achieve this is to use a multithreaded system to perform them, so they can speed up the process.
Typically, a flow will be required, with some requests that can be performed in parallel and others that require waiting until information is received. For example, a common request to retrieve a web page will make one request to retrieve the page and later will download multiple files referenced (e.g. header files, images) in parallel.
We will see later in the chapter how this effect can be designed to increase the responsiveness of web pages.
The fact that the network is more unreliable than a local call, requires better error handling that understands this fact. Any request-response system should take extra care about capturing different errors, and retry, as network problems typically are transient, and can be recovered if retried after waiting.
As we saw in Chapter 2, API Design the multiple status codes from HTTP can give detailed information.
Another characteristic of the request-response pattern is that a server cannot call the client proactively, only return information. This simplifies the communication, as it's not entirely bidirectional. The client is required to initiate the request, and the server only needs to listen for new requests coming. This also makes both roles asymmetrical and requires the client to know where the server is, usually by its DNS address and the port to access (by default, port 80 for HTTP and 443 for HTTPS).
This characteristic makes some communication patterns difficult to achieve. For example, full bidirectional communication, where two parts want to initiate the sending of messages, is difficult to achieve with request-response.
A crude example of this is a message server implemented only in request-response. Two clients require the usage of an intermediate server.
This basic structure is common in applications like forums or social networks that allow the users to have some sort of direct messaging between users.
Each user can perform two actions:
- Request any new message addressed to them
- Send a new message to another user
A user needs to check periodically whether there are new messages available through polling. This is inefficient, as it's likely that for any new message there'll be a significant number of checks that return "no new messages available." Even worse, there could be a significant delay before noticing that a new message is available if the checks are not performed often enough.
In real applications, normally this polling is avoided by sending a notification in a way that's proactive towards the client. For example, mobile OSes have a system to deliver notifications, enabling the server to send a notification through an external API provided by the OS to notify the user of a new message. An older alternative is to send an email with the same goal.
There are other alternatives, of course. There are P2P alternatives, where two clients can connect to each other, and there are connections with a server through websockets that can remain open, allowing the server to notify the user of new information. They both deviate from the request-response architecture.
Even with these limitations, request-response architecture is the basis of web services and has been proven to be very reliable over the decades. The possibility of having a central server that controls communication and can take a passive role in accepting new requests makes the architecture simple to implement and quick to evolve, and simplifies the client's work. The centralized aspect allows a lot of control.
Web architecture
We introduced in the introduction of the chapter the LAMP architecture, which is the base for the web server architecture:
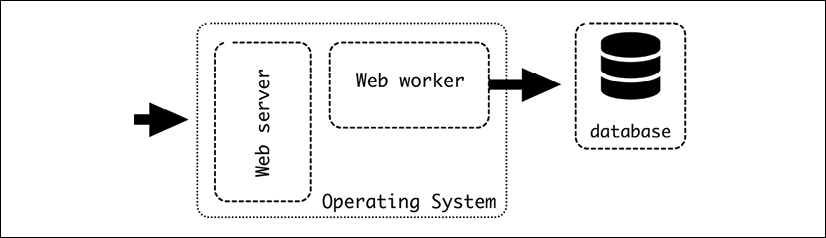
Figure 6.1: The LAMP architecture
The LAMP architecture is more general, but we will take a closer look at the web server and web worker. We will use specific tools, based on the Python ecosystem, but we will discuss possible alternatives.
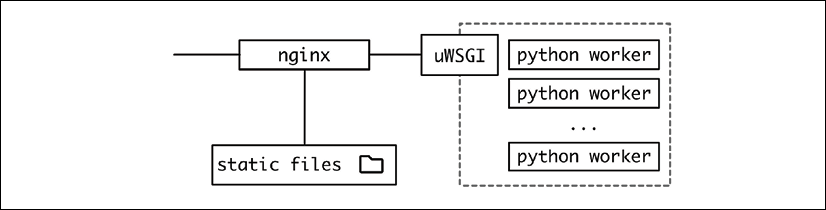
Figure 6.2: More detailed architecture in a Python environment
From the point of view of an incoming request, a web request accesses the different elements.
Web servers
The web server exposes the HTTP port, accepts incoming connections, and redirects them towards the backend. One common option is nginx (https://www.nginx.com/). Another common option is Apache (https://httpd.apache.org/). The web server can directly serve a request, for example, by directly returning static files, permanent redirects, or similar simple requests. If the request requires more computation, it will be directed towards the backend, acting as a reverse proxy.
The primary objective of the web server in the presented architecture is to work as a reverse proxy, accepting HTTP requests, stabilizing the input of data, and queuing the incoming requests.
A basic configuration for nginx could look like this. The code is available on GitHub at https://github.com/PacktPublishing/Python-Architecture-Patterns/blob/main/chapter_06_web_server/nginx_example.conf.
server {
    listen 80 default_server;
    listen [::]:80 default_server;
    error_log /dev/stdout;
    access_log /dev/stdout;
       root /opt/;
    location /static/ {
        autoindex on;
        try_files $uri $uri/ =404;
    }
    location / {
        proxy_set_header Host $host;
        proxy_set_header X-Real-IP $remote_addr;
         uwsgi_pass unix:///tmp/uwsgi.sock;
         include uwsgi_params;
    }
}
The directive server opens and closes the basic block to define how to serve the data. Note each line ends with a semicolon.
In nginx parlance, each server directive defines a virtual server. Normally there will be only one, but multiple can be configured, for example, to define different behaviors based on the DNS addressed.
Inside, we have a basic configuration on what port to serve – in our case, port 80 and both IPv4 and IPv6 addresses. The default_server clause means this is the server to be used by default:
    listen 80 default_server;
    listen [::]:80 default_server;
IPv4 is the common address with four numbers, like 127.0.0.1. IPv6 is longer, and it's intended as a replacement for IPv4. For example, an IPv6 address can be expressed as 2001:0db8:0000:0000:0000:ff00:0042:7879. IPv4 addresses have already been exhausted, meaning that there are no new addresses available. IPv6 will in the long run provide enough to avoid this problem, though IPv4 is still widely used, and probably will remain in use for a long time yet.
Next, we define where the static files are, both in terms of the external URL, and what is the mapping with some section of the hard drive.
Note the static location needs to be defined before the reverse proxy:
    root /opt/;
    location /static/ {
        autoindex on;
        try_files $uri $uri/ =404;
    }
root defines the starting point, while location starts a section that will serve the URL /static/file1.txt from the file located in the hard drive at /opt/static/file1.txt.
try_files will scan for files in the URI and raise a 404 error if it's not there.
autoindex automatically generates an index page to check the contents of a directory.
This option is typically disabled in production servers, but it's very handy to detect problems with static files while running in test mode.
It's important in production environments to serve static files directly from the web server, instead of doing them further along the line with the Python worker. While this is possible, and a common case when working in a development environment, it's very inefficient. The speed and memory usage will be much bigger, while a web server is optimized to serve static files. Please always remember to serve static files in production through a web server.
Serving static content externally
An alternative is to use an external service to handle files, like AWS S3, that allows you to serve static files. The files then will be under a different URL than the service, for example:
- The service URL is
https://example.com/index - The static files are in
https://mybucket.external-service/static/
All the references inside the service web pages, then, should point to the external service endpoint.
This way of operating requires you to push the code to the external service as part of the deployment. To allow for uninterrupted deployments, remember that the static content needs to be available before. Another important detail is to upload them with a different path, so static files between deployments are not confused.
This is easy to do using different root paths. For example:
- Version
v1of the service is deployed. This is the starting point. The static content is served fromhttps://mybucket.external-service/static/v1/.The calls to the service, like
https://example.com/index, return all their static content pointing at versionv1. - Once
v2of the service is ready, the first thing to do is to push it to the external service, so it's available inhttps://mybucket.external-service/static/v2/. Note that, at this point, no user is accessing/static/v2; the service is still returning/static/v1.Deploy the new service. Once it is deployed, the users will start accessing
/static/v2when they callhttps://example.com/index.
As we've seen in previous chapters, the key for a seamless deployment is to perform actions in small increments, and each step must perform actions that are reversible and prepare the terrain so there's no moment when something that's required is not ready.
This approach can be used for big operations. In a JavaScript-heavy interface, like a single-page application, changing the static files effectively can be a new deployment. The underlying service API can remain the same but changing the downloaded version for all JavaScript code and other static content, which in effect will deploy a new version.
We talked about single-page apps in Chapter 2.
This structure makes both versions of the static content available at the same time. This can also be used to make tests or release beta versions. As the service is returning whether to use version A or B, this can be set dynamically.
For example, adding an optional parameter in any call to overwrite the returned version:
- Calling
https://example.com/indexreturns the default version, for example,v2. - Calling
https://example.com/index?overwrite_static=v3returns the specified version instead, likev3.
Other options are returning v3 for specific users, like beta testers or internal staff. Once v3 is deemed correct, it can be changed to be the new default with a small change in the service.
This approach can be taken to the extreme to push any single commit to the source control to the public S3 bucket, and then test in any environment, including production. This can help to generate a very fast feedback loop where QA or product owners can quickly see changes in their own browser, without requiring any deployment or special environment.
Don't feel limited to a unique integer as the version number; it can work as well with a random UUID or SHA of the content generated automatically. Web storage is quite cheap, so it would require a lot of versions with very big files to really start to worry about cost. And old versions can be deleted periodically.
While this approach can be very aggressive and not viable for all applications, for an application that requires many changes in a rich JavaScript interface or to make drastic changes to the look and feel, it can be highly productive.
This external serving can be combined with CDN (content delivery network) support for a multiregional proxy. This will distribute the files around the world to provide a copy of it closer to the user.
Think of a CDN as an internal cache by the company providing the service. For example, we have a service where their servers are located in Europe, but a user is accessing it from Japan. This company has servers in Japan that store a copy of the static content. That means that the user can access the files with much lower latency than if the request had to reach a server in Europe, more than 8,000 kilometers away.
Using a CDN is very powerful for truly global audiences. They are especially useful for serving data that requires low latency around the world. For example, broadcasting near real-time video.
Video broadcast online is typically transferred as small video chunks of a few seconds in duration. An index file keeps track of what is the latest chunk generated, so clients can be kept up to date. This is the basis of the format HTTP Live Streaming, or HLS, very common as the transfer of data is done directly through HTTP.
The data can be distributed internally between the different servers from the company providing the CDN service quite quickly, as they'll use dedicated networks between them instead of using an external network.
In any case, using an external service to store the static files will, obviously, remove the need to configure the web server for them.
Reverse proxy
Let's continue describing the web server configuration. After describing the static files, we need to define a connection to the backend, acting as a reverse proxy.
A reverse proxy is a proxy server that can redirect a received request towards one or more defined backends. In our example, the backend is the uWSGI process.
A reverse proxy works in a similar way as a load balancer, though load balancers can work with more protocols, while a reverse proxy is only capable of working with web requests. On top of distributing requests across different servers, it can also add some features like caching, security, SSL termination (receiving a request in HTTPS and connecting to other servers using HTTP), or, in this particular case, receive a web request and transfer it to through a WSGI connection.
The web server will be able to communicate with the backend in multiple ways, allowing flexibility. This can use different protocols, like FastCGI, SCGI, straight HTTP for pure proxying, or, in our case, connecting directly to the uWSGI protocol. We need to define it to connect through either a TCP socket or a UNIX socket. We will use a UNIX socket.
TCP sockets are designed to allow communication between different servers, while UNIX sockets are designed to communicate processes locally. UNIX sockets are a little bit lighter for communication inside the same host and they work like a file, allowing you to assign them permissions to control what process can access what socket.
The socket needs to be coordinated with the way uWSGI is configured. As we will see later, the uWSGI process will create it:
    location / {
       proxy_set_header Host $host;
       proxy_set_header X-Real-IP $remote_addr;
       include uwsgi_params;
        uwsgi_pass unix:///tmp/uwsgi.sock;
    }
First of all, the root of the server is at the / URL. It's important to make the static content before the reverse proxy, as the locations are checked in order. So any request for a /static request gets detected before checking for / and it's properly treated.
The core of the reverse proxy configuration is the uwsgi_pass clause. This specified where to redirect the requests. include uwgi_params will add a bunch of standard configurations to be passed to the next stage.
uwsgi_params is actually a defined file included by default in nginx config that adds a lot of uwsgi_param statements with elements like SERVER_NAME, REMOTE_ADDRESS, etc.
More uwsgi_param can be added if necessary, in a similar way to the headers.
Extra elements can be added as HTTP headers. They'll be added to the request, so they are available further down the request.
       proxy_set_header Host $host;
       proxy_set_header X-Real-IP $remote_addr;
In this case, we are adding the Host header, with information about the requested host. Note that the $host is an indication to nginx to fill the value with the host the request is addressed to. In the same way, the header X-Real-IP is added with the IP address from the remote address.
Setting headers correctly to pass on is unappreciated work, but can be critical to properly monitor problems. Setting headers may require doing so at different stages. As we will discuss later, a single request can pass through multiple proxies, and each of them needs to adequately forward the headers.
In our configuration, we only use a single backend, as uWSGI will balance between different workers. But, if necessary, multiple backends can be defined, even mixing UNIX and TCP sockets, defining a cluster.
upstream uwsgibackends {
  server unix:///tmp/uwsgi.sock;
  server 192.168.1.117:8080;
  server 10.0.0.6:8000;
}
Later, define the uwsgi_pass to use the cluster. The requests will be equally spread over the different backends.
uwsgi_pass uwsgibackends;
Logging
We also need to track any possible error or access. There are two different logs that nginx (and other web servers) produces:
- Error log: The error log tracks possible problems from the web server itself, like not being able to start, configuration problems, etc.
- Access log: The access log reports any request accessing the system. This is the basic information about the system flowing. It can be used to find specific problems like 502 errors when the backend cannot be connected, or, when treated as aggregated, it can detect problems like an abnormal number of error status codes (
4xxor5xx).
We will talk in further detail about logs in Chapter 11.
Both logs are critical information that needs to be adequately detected. Following the Twelve-Factor App, we should treat them as streams of data. The easiest is to redirect them both to standard output.
    access_log /dev/stdout;
    error_log /dev/stdout;
This requires nginx to not start as a daemon process, or if it is, capture the standard output properly.
Another option is to redirect the log into a centralized log facility, using the proper protocol. This directs all the logs into a centralized server that captures the information. In this example, we send it to a syslog host in syslog_host.
    error_log syslog:server=syslog_host:514;
    access_log syslog:server=syslog_host:514,tag=nginx;
This protocol allows you to include tags and extra information that can help separate the origin of each log later.
Being able to distinguish the source of each log is critical and always requires a bit of tweaking. Be sure to spend some time making the logs easy to search. It will greatly simplify the work when an error in production requires gathering information.
Advanced usages
A web server is very powerful, and shouldn't be underestimated. Other than acting purely as a proxy, there are a lot of other features that can be enabled like returning custom redirects, overwriting the proxy with a static page for maintenance windows, rewriting URLs to adjust changes, providing SSL termination (decrypt receiving HTTPS requests to pass them decrypted through regular HTTP, and encrypt the result back), caching requests, splitting the requests based on percentages for A/B testing, choosing a backend server based on geolocalization of the requester, etc.
Be sure to read the documentation of nginx at http://nginx.org/en/docs/ to read all the possibilities.
uWSGI
The next element of the chain is the uWSGI application. This application receives the requests from nginx and redirects them into independent Python workers, in WSGI format.
Web Server Gateway Interface (WSGI) is a Python standard to deal with web requests. It's very popular and supported by a lot of software, both from the sending end (like nginx, but also other web servers like Apache and GUnicorn) and from the receiving end (virtually every Python web framework, like Django, Flask, or Pyramid).
uWSGI will also start and coordinate the different processes, handling the lifecycle for each of them. The application works as an intermediary, starting a group of workers receiving the requests.
uWSGI is configured through a uwsgi.ini file. Let's see an example, available on GitHub at https://github.com/PacktPublishing/Python-Architecture-Patterns/blob/main/chapter_06_web_server/uwsgi_example.uni.
[uwsgi]
chdir=/root/directory
wsgi-file = webapplication/wsgi.py
master=True
socket=/tmp/uwsgi.sock
vacuum=True
processes=1
max-requests=5000
# Used to send commands to uWSGI
master-fifo=/tmp/uwsgi-fifo
The first element defines what the working directory is. The application will be launched here, and other file references will work from here:
chdir=/root/directory
Then, we describe where the wsgi.py file is, which describes our application.
The WSGI application
Inside this file is the definition of the application function, which uWSGI can use to address the internal Python code, in a controlled way.
For example:
def application(environ, start_response):
    start_response('200 OK', [('Content-Type', 'text/plain')])
    return [b'Body of the response
']
The first parameter is a dictionary with predefined variables that detail the request (like METHOD, PATH_INFO, CONTENT_TYPE, and so on) and parameters related to the protocol or environment (for example, wsgi.version).
The second parameter, start_response, is a callable that allows you to set up the return status and any headers.
The function should return the body. Note how it's returned in byte stream format.
The difference between text streams (or strings) and byte streams was one of the big differences introduced in Python 3. To summarize it, byte streams are raw binary data, while text streams contain meaning by interpreting that data through a particular encoding.
The differentiation between both can be a bit baffling sometimes, in particular since Python 3 makes the difference explicit, and that clashes with some previous lax practices, especially when dealing with ASCII content that can be represented in the same way.
Keep in mind that text streams need to be encoded to be transformed into byte streams, and byte streams need to be decoded into text streams. Encoding is moving from the abstract representation of text to the precise representation of binary.
For example, the Spanish word "cañón" contains two characters not present in ASCII, ñ and ó. You can see how encoding them through UTF8 replaces them with specific binary elements described in UTF8:
>>> 'cañón'.encode('utf-8')
b'caxc3xb1xc3xb3n'
>>> b'caxc3xb1xc3xb3n'.decode('utf-8')
'cañón'
The function can also work as a generator and use the keyword yield instead of return when the returning body needs to be streamed.
Any function that uses yield is a generator in Python. This means that when called, it returns an iterator object that returns elements one by one, normally to be used in loops.
This is very useful for situations where each element of the loop takes some time to process but can be returned without being required to calculate every single item, reducing latency and memory usage, as not all elements need to be maintained in memory.
>>> def mygenerator():
...   yield 1
...   yield 2
...   yield 3
>>> for i in mygenerator():
...   print(i)
...
1
2
3
In any case, the WSGI file is normally created by default by whatever framework is used. For example, a wsgi.py file created by Django will look like this.
import os
from django.core.wsgi import get_wsgi_application
os.environ.setdefault("DJANGO_SETTINGS_MODULE", "webapplication.settings")
application = get_wsgi_application()
Note how the function get_wsgi_application will automatically set up the proper application function, and connect it with the rest of the defined code – a great advantage of using an existing framework!
Interacting with the web server
Let's continue with the uwsgi.ini configuration with the socket configuration:
socket=/tmp/uwsgi.sock
vacuum=True
The socket parameter creates the UNIX socket for the web server to connect to. It was discussed before in this chapter, when talking about the web server. This needs to be coordinated on both sides, to ensure they connect properly.
uWSGI also allows you to use a native HTTP socket, using the option http-socket. For example, http-socket = 0.0.0.0:8000 to serve all addresses on port 8000. You may use this option if the web server is not on the same server and needs to communicate through the network.
When possible, avoid exposing uWSGI directly publicly over the internet. A web server will be safer and more efficient. It will also serve static content much more efficiently. If you really must skip the web server, use the option http instead of http-socket, which includes a certain level of protection.
The vacuum option cleans up the socket when the server is closed.
Processes
The next parameters control the number of processes and how to control them:
master=True
processes=1
The master parameter creates a master process that ensures that the number of workers is correct, restarting if not, and deals with the process lifecycle, among other tasks. It should always be enabled in production for smooth operation.
The processes parameter is very straightforward and describes how many Python workers should be started. Received requests will be load balanced across them.
The way uWSGI generates new processes is through pre-forking. This means that a single process gets started, and after the application is loaded (which may take a while), it's cloned through a fork process. This sensibly speeds up the startup time for new processes, but at the same time, relays that the setup of the application can be duplicated.
This assumption, on rare occasions, may cause problems with certain libraries that, for example, open file descriptors during initializations that cannot be shared safely. If that's the case, the parameter lazy-apps will make each worker start from scratch, independently. This is slower, but it creates more consistent results.
Choosing the right number of processes is highly dependent on the application itself and the hardware that supports it. The hardware is important as a CPU with multiple cores will be able to run more processes efficiently. The amount of IO vs CPU usage in the application will determine how many processes can be run by the CPU core.
Theoretically, a process not using IO and purely crunching numbers will use the whole core without wait periods, not allowing the core to switch to another process meanwhile. A process with high IO, with the core idle while waiting for results from the database and external services, will increase its efficiency by performing more context switches. This number should be tested to ensure the best results. A common starting point will be two times the number of cores, but remember to monitor the system to tweak it and obtain the best results.
An important detail about the created processes is that they deactivate the creation of new threads by default. This is an optimization choice. In the majority of web applications, there's no need to create independent threads inside each of the workers, and that allows you to deactivate the Python GIL, speeding up the code.
The Global Interpreter Lock or GIL is a mutex lock that only allows a single thread to have control of the Python process. This means that, inside a single process, no two threads can run at the same time, something that multi-core CPU architecture makes possible. Note that multiple threads may be waiting for IO results while another runs, which is a usual situation in real-life applications. The GIL is typically held and released constantly, as each operation first holds the GIL and then releases it at the end.
The GIL is commonly blamed for inefficiencies in Python, though the effect is only perceived in high-CPU multi-threaded operations in native Python (as opposed to using optimized libraries like NumPy), which are not as usual and are already slow to start with.
These interactions with the GIL are only wasteful if no threads will be run, so that's why uWSGI deactivates it by default.
If threads need to be used, the option enable-threads will enable them.
Process lifecycle
During the time of operation, processes won't stay static. Any working web application will need to reload with new code changes regularly. The next parameters are related to how processes are created and destroyed.
max-requests=5000
# Used to send commands to uWSGI
master-fifo=/tmp/uwsgi-fifo
max-requests specifies the number of requests to be processed by a single worker before being restarted. Once the worker gets to this number, uWSGI will destroy it and create another worker from scratch, following the usual process (fork by default, or using lazy-apps if configured).
This is useful to avoid problems with memory leaks or other sorts of stale problems, where the performance of a worker gets degraded over time. Recycling the workers is a protective measure that can be taken pre-emptively, so even if a problem is present, it will be corrected before it causes any issues.
Remember that, based on the Twelve-Factor App, web workers need to be able to be stopped and started at any time, so this recycling is painless.
uWSGI will also recycle the worker when it's idle, after serving its 5,000th request, so it will be a controlled operation.
Keep in mind this recycling may interfere with other operations. Depending on the startup time, it may take a few seconds or worse (especially if lazy-apps is used) to start the worker, potentially creating a backlog of requests. uWSGI will queue the incoming requests. In our example configuration, there's only a single worker defined in processes. With multiple workers this can be mitigated, as the rest of the workers will be able to handle the extra load.
When multiple workers are involved, if each of them will restart after their 5,000th request, a stampede problem can be created where one after another all the workers are recycled. Keep in mind that the load is distributed through the workers equally, so this count will be in sync across the multiple workers. While the expectation is that, for example, with 16 workers, at least 15 of them will be available, in practice we might find that all are being recycled at the same time.
To avoid this problem, use the max-requests-delta parameter. This parameter adds a variable number for each worker. It will multiply the delta for the worker ID (a unique consecutive number for each worker starting from 1). So, configuring a delta of 200, each worker will have the following:
|
Worker |
Base max-request |
Delta |
Total requests to recycle |
|
Worker 1 |
5,000 |
1 * 200 |
5,200 |
|
Worker 2 |
5,000 |
2 * 200 |
5,400 |
|
Worker 3 |
5,000 |
3 * 200 |
5,600 |
|
… | |||
|
Worker 16 |
5,000 |
16 * 200 |
8,200 |
This makes the recycling happen at different times, increasing the number of workers available at the same time, as they won't restart simultaneously.
This problem is of the same kind as what's called a cache stampede. This is produced where multiple cache values are invalidated at the same time, producing the regeneration of values at the same time. Because the system expects to be running under some cache acceleration, suddenly having to recreate a significant portion section of the cache may produce a serious performance problem, to the point of the complete collapse of the system.
To avoid this, avoid setting fixed times for the cache to expire, such as a certain hour of the clock. This can happen, for example, if a backend gets updated with news for the day at midnight, making it tempting to expire the cache at this time. Instead, add an element to make the different keys expire at slightly different times to avoid this problem. This can be achieved by adding a small random amount of time to the expiry time for each of the keys, so they can reliably be refreshed at different times.
The master-fifo parameter creates a way to communicate with uWSGI and send commands:
# Used to send commands to uWSGI
master-fifo=/tmp/uwsgi-fifo
This creates a UNIX socket in /tmp/uwsgi-fifo that can receive commands in the form of characters redirected to it. For example:
# Generate a graceful reload
echo r >> /tmp/uwsgi-fifo
# Graceful stop of the server
echo q >> /tmp/uwsgi-fifo
This method allows for better handling of situations than sending signals, as there are more commands available and it allows for quite granular control of the processes and the whole uWSGI.
For example, sending Q will produce a direct shutdown of uWSGI, while q will produce a graceful one. A graceful shutdown will start by stopping accepting new requests in uWSGI, then waiting until any request in the internal uWSGI queue is being processed, and when a worker has finished its request, stopping it in an orderly fashion. Finally, when all workers are done, stop the uWSGI master process.
The graceful reload with r takes a similar approach, keeping the requests in the internal queue and waiting until the workers are done to stop them and restart them. It will also load any new configuration related to uWSGI itself. Note that, during the time of the operation, the internal uWSGI listen queue may be filled up, causing problems.
The size of the listen queue can be tweaked with the listen parameter, but keep in mind that there's a limit set up by Linux that you may need to change as well. Defaults are 100 for listen and 128 for the Linux configuration.
Do tests before changing those to big values, as churning through a big backlog of tasks has its own problems.
If the loading of processes is done through the fork process, after starting up the first one, the rest will be copies, so they will be loaded quite quickly. By comparison, using lazy-apps may delay achieving full capacity as each individual worker will need to be individually started from scratch. This can produce an extra load on the server, depending on the number of workers and the startup procedure.
A possible alternative for lazy-apps is to use the c option, reloading the workers with chain reloading. This reloads each worker independently, waiting until a single worker is totally reloaded before moving to the next one. This procedure doesn't reload the uWSGI configuration but will do with code changes in the workers. It will take longer, but it will work at a controller pace.
Reloading a single server under load may be complicated. Using multiple uWSGI servers simplifies the process. In this situation, reloads should happen at different times to allow you to distribute the load.
A cluster-style approach can be taken in using multiple servers to perform this dance, creating copies of the uWSGI configuration in multiple servers and then recycling them one at a time. While one is reloading, the others will be able to handle the extra load. In extreme situations, an extra server can be used to produce extra capacity during the reload.
This is common in cloud environments where an extra server can be used and then destroyed. In Docker situations, new containers can be added to provide this extra capacity.
For more information about the master-fifo and accepted commands, including how to pause and resume the instance, and other exotic operations, check the uWSGI documentation at https://uwsgi-docs.readthedocs.io/en/latest/MasterFIFO.html.
uWSGI is a very powerful application that has almost endless possibilities for configuration. Its documentation is overwhelming in the amount of detail it contains, but it's incredibly comprehensive and insightful. You can learn a lot, not only about uWSGI but also about how the whole web stack works. I highly recommend going through slowly, but surely, to learn a lot. You can access the documentation at https://uwsgi-docs.readthedocs.io/.
Python worker
The core of the system is the Python WSGI worker. This worker receives the HTTP requests from uWSGI after they're routed by the external web server, etc.
This is where the magic happens, and it is specific to the application. This is the element that will see faster iteration than the rest of the links of the chain.
Each framework will interact in a slightly different way with the requests, but in general, they will follow similar patterns. We will use Django as an example.
We won't discuss all aspects of Django or go into a deep dive of its features but will use a selection to look at some lessons that are useful for other frameworks.
The Django project is really well documented. Seriously, it has always been distinguished by its world-class documentation, since the project started. You can read it here: http://www.djangoproject.com.
Django MVT architecture
Django borrows heavily from the MVC structure but tweaks it a bit into what's called MVT (Model-View-Template):
- The Model remains the same, the representation of the data and interacting with the storage.
- The View receives the HTTP request and processes it, interacting with the different Models that may be required.
- The Template is a system to generate HTML files, from values passed on.
This changes Model-View-Controller a bit, though the result is similar.
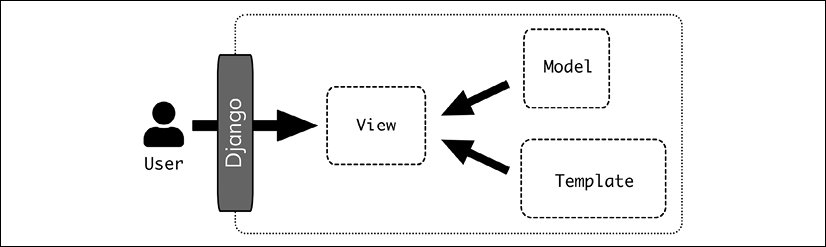
Figure 6.3: The Model-View-Controller
The Model works the same in both systems. The Django View acts as a combination of the View and the Controller, and the Template is a helping system for the View component of the Django View.
The templating system is not strictly required to be used, as not every Django interface requires an HTML page as a result.
While Django was designed to create HTML interfaces, there are ways of creating other types of interfaces. In particular, for RESTful interfaces, the Django REST framework (https://www.django-rest-framework.org) allows you to expand the functionality and generate self-documented RESTful interfaces easily.
We will look at the Django REST framework later in the chapter.
Django is a powerful and comprehensive framework and has some assumptions on how things are supposed to run, such as using the Django ORM or using its templating system. While doing so is "swimming with the current," it's definitely possible to take other approaches and tailor any part of the system. This can involve elements like not using templates, using a different templating system, using a different ORM library like SQLAlchemy, and adding extra libraries to connect to different databases, including ones not supported natively by Django (like NoSQL databases). Do not let the constraints of the system limit you from achieving your goals.
Django is opinionated in the way that it presents a lot of elements working together with certain assumptions. They are tightly related to each other. If that's an impediment, for example, because you need to use wildly different tools, a good alternative can be Pyramid (https://trypyramid.com), a Python web framework designed to build your own combination of tools to ensure flexibility.
Routing a request towards a View
Django provides the tools to perform the proper routing from a particular URL to a specific View.
This is done in the urls.py file. Let's see an example.
from django.urls import path
from views import first_view, second_view
urlpatterns = [
    path('example/', first_view)
    path('example/<int:parameter>/<slug:other_parameter>', second_view)
]
The required Views (that are typically declared as functions) are imported from whatever module they are currently in into the file.
The urlpatterns list defines an ordered list of URL patterns that will be tested against an input URL.
The first path definition is very straightforward. If the URL is example/, it will call the View first_view.
The second path definition contains definitions to capture parameters. It will transform the defined parameters properly and pass them over to the view. For example, the URL example/15/example-slug will create these parameters:
parameter=int(15)other_parameter=str("example-slug")
There are different types of parameters that can be configured. int is self-explanatory, but slug is a limited string that will include only alphanumeric, _ (underscore), and – (dash) symbols, excluding characters like . or other symbols.
There are more types available. There's also a str type that can be too broad. The character / is understood as special in URLs and it's always excluded. This allows for easy separation of parameters. The type slug should cover more typical use cases for parameters inside a URL.
Another option is to generate the paths directly as regex. If you are familiar with the regex format, this can be very powerful and allow a great deal of control. At the same time, regexes can grow really complex and difficult to read and use.
from django.urls import re_path
urlpatterns = [
    re_path('example/(?P<parameter>d+)/', view)
]
This was the only option available previously in Django. As you can see for the example, equivalent to example/<int:parameter>/, the new path-defined URL patterns are easier to read and to deal with.
An intermediate option is to define types to be sure that they match specific values, for example, creating a type to match only months like Apr or Jun. If the type is defined in this way, an incorrect pattern like Jen will return a 404 automatically. Internally, this will require writing a regex to match the proper string anyway, but afterwards, it can transform the value. For example, to transform the month Jun to either the number 1, normalize it as JUNE, or any other value that makes sense later. The complexity of the regex will be abstracted by the type.
Keep in mind that the patterns are checked in order. That means that, if a pattern may fulfil two paths, it will select the first one. This may have unintended effects when a previous path "hides" the next one, so the least restrictive patterns should be positioned later.
For example:
from django.urls import path
urlpatterns = [
    path('example/<str:parameter>/', first_view)
    path('example/<int:parameter>/', second_view)
]
No URL will ever get passed to second_view, as any parameter that is an integer will be captured first.
This kind of error is usually possible in most URL routers in web frameworks, as most of them are pattern-based. Keep an eye in case it affects your code.
The interesting stuff happens inside of the View.
The View
The View is the central element of Django. It receives the request information, plus any parameters from the URL, and processes it. The View normally will use the different Models to compose the information, and finally returns a response.
The View is in charge of deciding if there's any change in behavior based on the request. Note that the routing towards the View only distinguishes between different paths, but other distinctions like HTTP method or parameters will need to be differentiated here.
This makes it a very common pattern to differentiate between POST and GET requests to the same URL. A common usage in web pages is to make a form page to display the empty form, and then POST to the same URL. For example, in a form with a single parameter, the structure will be similar to the following example:
This is intended as pseudocode to not complicate it.
def example_view(request):
    # create an empty form
    form_content = Form()
    if request.method == 'POST':
        # Obtain the value
           value = request.POST['my-value']
           if validate(value):
               # Perform actions based on the value
            do_stuff()
            content = 'Thanks for your answer'
        else:
            content = 'Sorry, this is incorrect' + form_content
    elif request.method == 'GET':
        content = form_content
    return render(content)
While it's true that Django includes a form system that simplifies the validation and reporting of forms, this structure can grow legs and become tiresome. In particular, the multiple nested if blocks are confusing.
We won't go into details with the form system in Django. It is quite complete and allows you to render rich HTML forms that will validate and show possible errors to the user. Read the Django documentation to know more.
Instead of that, dividing the View with two different subfunctions may be clearer.
def display_form(form_content, message=''):
    content = message + form_content
    return content
def process_data(parameters, form_content):
    # Obtain the value
       if validate(parameters):
           # Perform actions based on the value
        do_stuff()
        content = 'Thanks for your answer'
    else:
        message = 'Sorry, this is incorrect'
        content = display_form(form_content , message)
    return content
def example_view(request):
    # create an empty form
    form_content = Form()
    if request.method == 'POST':
        content = process_data(request.POST, form_content)
    elif request.method == 'GET':
        content = display_form(form_content)
    return render(content)
The challenge here is to preserve the fact that, when the parameters are incorrect, the form needs to be rendered again. By the principle of DRY (Don't Repeat Yourself), we should try to locate that code in a single place. Here, in the display_form function. We allow some customization of the message to add some extra content, in case the data is incorrect.
In a more complete example, the form will be tweaked to show the specific errors. Django forms are able to do this automatically. The process will be to create a form with the parameters from the request, validate it, and print it. It automatically will produce the proper error messages, based on the type of each of the fields, including custom types. Again, refer to Django's documentation for more information.
Note that the display_form function gets called both from example_view and also inside process_data.
HttpRequest
The key element for passing information is the request parameter. This object's type is HttpRequest, and contains all the information that the user is sending in the request.
Its most important attributes are:
method, which contains the used HTTP method.- If the method is
GET, it will contain aGETattribute with aQueryDict(a dictionary subclass) containing all the query parameters in the request. For example, a request such as:/example?param1=1¶m2=text¶m1=2Will produce a
request.GETvalue like this:<QueryDict: {'param1': ['1', '2'], 'param2': ['text']}>Note that the parameters are stored internally as a list of values, because query parameters accept multiple parameters with the same key, though that's not usually the case. They'll return a unique value when queried anyway:
>>> request.GET['param1']
2
>>> request.GET['param2']
text
They'll be all reported in order, with the latest value being returned. If you need to access all values, use the method getlist:
>>> request.GET.getlist('param1')
['1', '2']
All the parameters are defined as strings, needing to be converted to other types if necessary.
- If the method is
POST, an analogousPOSTattribute will be created. In this case, it will be filled first by the body of the request, to allow encoding form posts. If the body is empty, it will fill the values with query parameters like theGETcase.
POST multiple values will commonly be used in multiple selection forms.
content_typewith the MIME type of the request.FILES, including data for any uploaded files in the request, for certainPOSTrequests.headers, a dictionary containing all the HTTP headers of the request and headers. Another dictionary,META, contains extra information from headers that may be introduced and are not necessarily HTTP-based, likeSERVER_NAME. In general, it is better to obtain information from theheadersattribute.
There are also some useful methods to retrieve information from the request, for example:
.get_host()to obtain the name of the host. It will interpret the different headers to determine the proper host, so it's more reliable than directly reading theHTTP_HOSTheader..build_absolute_uri(location)to generate a full URI, including the host, port, etc. This method is useful to create full references to return them.
These attributes and methods, combined with the parameters described in the request, allow you to retrieve all the relevant information necessary for processing the request and call the required Models.
HttpResponse
The HttpResponse class handles the information being returned by the View to the web server. The return from a View function needs to be an HttpResponse object.
from django.http import HttpResponse
def my_view(request):
    return HttpResponse(content="example text", status_code=200)
The response has a default status_code of 200 if it's not specified.
If the response needs to be written in several steps, it can be added through the .write() method.
response = HttpResponse()
response.write('First part of the body')
response.write('Second part of the body')
The body can also be composed as an iterable.
body= ['Multiple ', 'data ', 'that ', 'will ', 'be ', 'composed']
response = HttpResponse(content=body)
All responses from HttpResponse will be composed completely before being returned. It is possible to return responses in a streaming way, meaning that the status code will be returned first and chunks of the body will be sent over time. To do that, there's another class called StreamingHttpResponse that will work in that way, and can be useful for sending big responses over time.
Instead of using integers to define the status code, it's better to use the defined constants available in Python, for example:
from django.http import HttpResponse
from http import HTTPStatus
def my_view(request):
    return HttpResponse(content="example text", status_code=HTTPStatus.OK)
This makes the usage of each status code more explicit and helps increase the readability of the code, making them explicitly HTTPStatus objects.
You can see all the status codes defined in Python here: https://docs.python.org/3/library/http.html. Note the name is their standard HTTP status code name, as defined in several RFC documents, for example, 201 CREATED, 404 NOT FOUND, 502 BAD GATEWAY, etc.
The content parameter defines the body of the request. It can be described as a Python string, but it also accepts binary data, if the response is not plain text. If that's the case, a content_type parameter should be added to adequately label the data with the proper MIME type.
HttpResponse(content=img_data, content_type="image/png")
It is very important that the returned Content-Type matches the format of the body. This will make any other tool, like a browser, properly interpret the content adequately.
Headers can also be added to the response using the headers parameter.
headers = {
    'Content-Type': 'application/pdf',
    'Content-Disposition': 'attachment; filename="report.pdf"',
}
response = HttpResponse(content=img_data, headers=header)
Content-Disposition can be used to label the response as an attachment that should be downloaded to the hard drive.
Also, we can set up the Content-Type header either manually through the headers parameter or through the content_type parameter directly.
Headers are also stored in the response when it is accessed as a dictionary:
response['Content-Disposition'] = 'attachment; filename="myreport.pdf"'
del response['Content-Disposition']
There are specialized subclasses for common cases. Instead of using a generic HttpResponse, for JSON encoded requests, it's better to use JsonResponse, which will correctly fill the Content-Type and encode it:
from django.http import JsonResponse
response = JsonResponse({'example': 1, 'key': 'body'})
In the same style, the FileResponse allows you to download a file directly, providing a file-like object and directly filling the headers and content type, including if it needs to be an attachment
from django.http import FileResponse
file_object = open('report.pdf', 'rb')
response = FileResponse(file_object, is_attachment=True)
The response can also be created by rendering a template. This is the usual way of doing so for HTML interfaces, which was what Django was originally designed for. The render function will automatically return an HttpResponse object.
from django.shortcuts import render
def my_view(request):
    ...
    return render(request, 'mytemplate.html')
Middleware
A key concept in WSGI requests is that they can be chained. This means that a request can go through different stages, wrapping a new request around the orinal at each stage, which allows you to add functionality.
This leads to the concept of middleware. Middleware improves the handling between systems by simplifying handling several aspects of the request, adding functionality, or simplifying their usage.
Middleware is a word that can refer to different concepts depending on the context of its usage. When used in an HTTP server environment, it typically refers to plugins that enhance or simplify the handling of requests.
A typical example of middleware is logging each received request in a standard manner. The middleware will receive the request, produce a log, and hand the request to the next level.
Another example is managing whether the user is logged or not. There's a standard Django middleware that will detect any session stored in cookies and will search in the database for the associated user. It will then fill the request.user object with the proper user.
Another example, enabled by default in Django, checks the CSRF token on POST requests. If the CSRF token is not present or it's incorrect, the request will be immediately intercepted and it will return 403 FORBIDDEN, before accessing the View code.
We introduced the idea of CSRF and tokens in Chapter 2.
Middleware can access the request both when it's received and the response when it's ready, so they can work on either side or both sides in coordination:
- Logging middleware that generates a log with the path and method of the received request can generate it before the request is sent to the View.
- Logging middleware that also logs the status code needs to have the information of the status code, so it will need to do it once the View is finished and the response is ready.
- Logging middleware that logs the time it took to generate the request will need to first register the time when the request was received, and what time it is when the response is ready, to log the difference. This requires code both before and after the View.
Middleware is defined in this way:
def example_middleware(get_response):
    # The example_middleware wraps the actual middleware
    def middleware(request):
        # Any code to be executed before the view
        # should be located here
        response = get_response(request)
        # Code to be executed after the view
        # should be located here
        return response
    return middleware
The structure to return a function allows the initialization of chained elements. The input get_reponse can be another middleware function or could be the final view. This allows this kind of structure:
chain = middleware_one(middleware_two(my_view))
final_response = chain(request)
The order of the middleware is also important. For example, logging should happen before any middleware that can stop the request, as if done in reverse order, any rejected request (for example, not adding a proper CSRF) won't be logged.
Generally, middleware functions have some recommendations on where they should be located. Some are more sensitive to their position than others. Check the documentation for each one.
Middleware can be easily added, either custom-made or by using third-party options. There are a lot of packages that create their own middleware functions for useful features in Django. When considering adding a new feature, spend some time searching to see if there's something already available.
Django REST framework
While Django was designed originally to support HTML interfaces, its functionality has been expanded, both as new features inside the Django project itself, as well as other external projects that enhance Django.
One of particular interest is Django REST framework. We will use it as an example of the available possibilities.
Django REST framework is not only a popular and powerful module. It also uses a lot of conventions that are common across REST frameworks in multiple programming languages.
For our example, we will implement some of the endpoints that we defined in Chapter 2. We will use the following endpoints, to follow the whole lifecycle of a micropost.
|
Endpoint |
Method |
Action |
|
|
|
Retrieve all the microposts from a user |
|
|
|
Create a new micropost for the user |
|
|
|
Retrieve a single micropost |
|
|
|
Update a micropost |
|
|
|
Delete a micropost |
The basic principle behind Django REST framework is to create different classes that encapsulate the exposed resources as URLs.
The extra concept is that objects will be transformed from an internal Model into an external JSON object and vice versa through a serializer. The serializer will handle the creation and validate that the external data is correct.
A serializer can't only transform a Model object, but any kind of internal Python class. You can use them to create "virtual objects" that can pull information from multiple Models.
A peculiarity of Django REST framework is that the serializer is the same for input and output. In other frameworks, there are different modules for the way in and out.
Models
We first need to introduce the models to store the information. We will use a Usr Model for the users and a Micropost Model.
from django.db import models
class Usr(models.Model):
    username = models.CharField(max_length=50)
class Micropost(models.Model):
    user = models.ForeignKey(Usr, on_delete=models.CASCADE,
                             related_name='owner')
    text = models.CharField(max_length=300)
    referenced = models.ForeignKey(Usr, null=True,
                                   on_delete=models.CASCADE,
                                   related_name='reference')
    timestamp = models.DateTimeField(auto_now=True
The Usr model is very straightforward, only storing the username. The Micropost Model stores a string of text and the user that created the micropost. Optionally, it can store a referenced user.
Note that the relations have their own named back reference, reference and owner. They are created by default by Django so you can search where a Usr is referenced, for example.
Note also that the text allows for 300 characters, instead of the 255 that we said in the API. This is to allow a bit of extra space in the database. We will still protect against more characters later.
URL routing
With this information, we create two different views, one for each URL that we need to create. They'll be called MicropostsListView and MicropostView. Let's take a look first at how the URLs are defined in the urls.py file:
from django.urls import path
from . import views
urlpatterns = [
    path('users/<username>/collection', views.MicropostsListView.as_view(),
         name='user-collection'),
    path('users/<username>/collection/<pk>', views.MicropostView.as_view(),
         name='micropost-detail'),
]
Note that there are two URLs, that correspond to this definition:
/api/users/<username>/collection
/api/users/<username>/collection/<micropost_id>
And each is mapped to the corresponding view.
Views
Each view inherits from the proper API endpoint, the collection one from ListCreateAPIView, which defines the actions for LIST (GET) and CREATE (POST):
from rest_framework.generics import ListCreateAPIView
from .models import Micropost, Usr
from .serializers import MicropostSerializer
class MicropostsListView(ListCreateAPIView):
    serializer_class = MicropostSerializer
    def get_queryset(self):
        result = Micropost.objects.filter(
             user__username=self.kwargs['username']
        )
        return result
    def perform_create(self, serializer):
        user = Usr.objects.get(username=self.kwargs['username'])
        serializer.save(user=user)
We will check the serializer later. The class requires defining the queryset that it will use to retrieve the information when the LIST part of the class is called. Because our URL includes the username, we need to identify it:
    def get_queryset(self):
        result = Micropost.objects.filter(
             user__username=self.kwargs['username']
        )
        return result
self.kwargs['username'] will retrieve the username defined in the URL.
For the CREATE part, we need to overwrite the perform_create method. This method receives a serializer parameter that already contains the validated parameters.
We need to obtain the username and user from the same self.kwargs to be sure to add it to the creation of the Micropost object.
    def perform_create(self, serializer):
        user = Usr.objects.get(username=self.kwargs['username'])
        serializer.save(user=user)
The new object is created combining both the user and the rest of the data, added as part of the save method for the serializer.
The individual View follows a similar pattern, but there's no need to overwrite the creation:
from rest_framework.generics import ListCreateAPIView
from .models import Micropost, Usr
from .serializers import MicropostSerializer
class MicropostView(RetrieveUpdateDestroyAPIView):
    serializer_class = MicropostSerializer
    def get_queryset(self):
        result = Micropost.objects.filter(
            user__username=self.kwargs['username']
        )
        return result
In this case, we allow more operations: RETRIEVE (GET), UPDATE (PUT and PATCH), and DESTROY (DELETE).
Serializer
The serializer transforms from the Python object of the Model to the JSON result and the other way around. The serializer is defined like this:
from .models import Micropost, Usr
from rest_framework import serializers
class MicropostSerializer(serializers.ModelSerializer):
    href = MicropostHyperlink(source='*', read_only=True)
    text = serializers.CharField(max_length=255)
    referenced = serializers.SlugRelatedField(queryset=Usr.objects.all(),
                                             slug_field='username',
                                             allow_null=True)
    user = serializers.CharField(source='user.username', read_only=True)
    class Meta:
        model = Micropost
        fields = ['href', 'id', 'text', 'referenced', 'timestamp', 'user']
ModelSerializer will automatically detect the fields in the model defined in the Meta subclass. We specified the fields to be included in the fields section. Note that, apart from the ones that are directly translated, id and timestamp, we include others that will change (user, text, referenced) and an extra one (href). The directly translated ones are straightforward; we don't need to do anything there.
The text field is described again as a CharField, but this time, we limit the maximum number of characters.
The user field is also redescribed as a CharField, but using the source parameter we define it as the username of the referenced user. The field is defined as read_only.
referenced is similar to it, but we need to define it as SlugRelatedField, so it understands that's a reference. A slug is a string that references the value. We define that the slug_field is the username of the reference, and add the queryset to allow searching for it.
The href field requires an extra defined class to create a proper URL reference. Let's take a detailed look:
from .models import Micropost, Usr
from rest_framework import serializers
from rest_framework.reverse import reverse
class MicropostHyperlink(serializers.HyperlinkedRelatedField):
    view_name = 'micropost-detail'
    def get_url(self, obj, view_name, request, format):
        url_kwargs = {
            'pk': obj.pk,
            'username': obj.user.username,
        }
        result = reverse(view_name, kwargs=url_kwargs, request=request,
                         format=format)
        return result
class MicropostSerializer(serializers.ModelSerializer):
    href = MicropostHyperlink(source='*', read_only=True)
    ...
view_name describes the URL that will be used. The reverse call transforms the parameters into the proper full URL. This is wrapped in the get_url method. This method receives mainly the obj parameter with the full object. This full object is defined in the source='*' call to the MicropostHyperlink class in the serializer.
The combination of all these factors makes the interface work correctly. Django REST framework can also create an interface to help you visualize the whole interface and use it.
For example, a list will look like this:
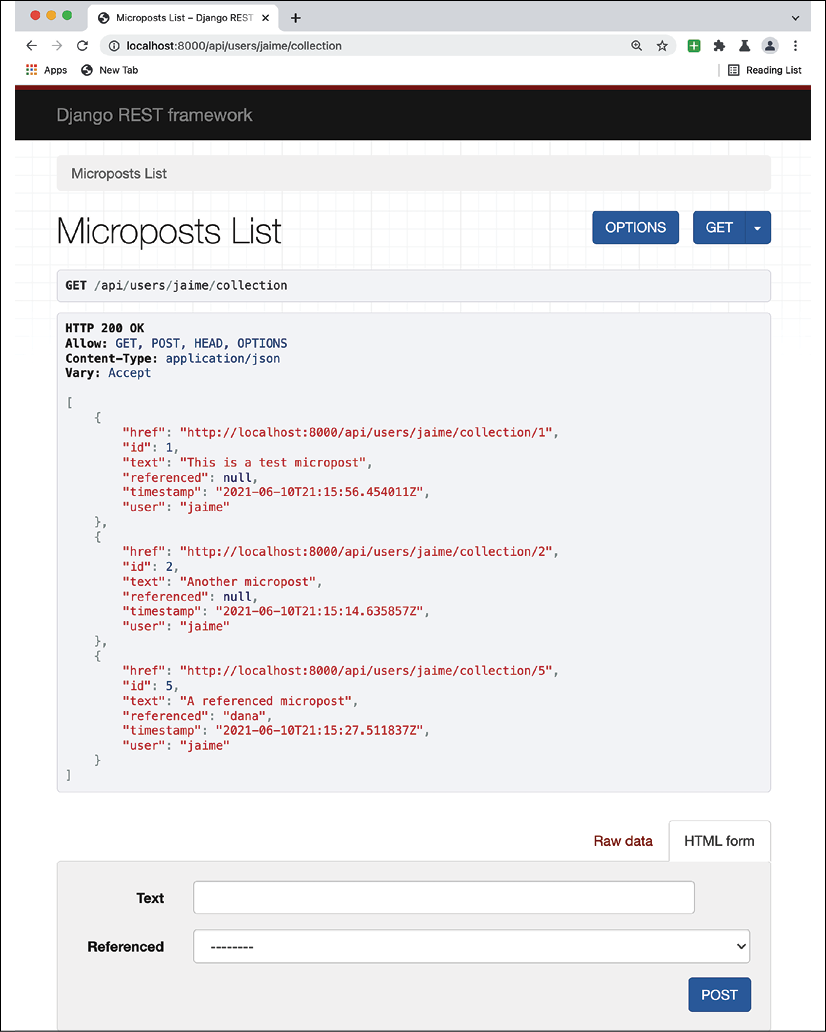
Figure 6.4: Microposts List
And a micropost page will look like this, which allows you to test different actions like PUT, PATCH, DELETE, and GET.
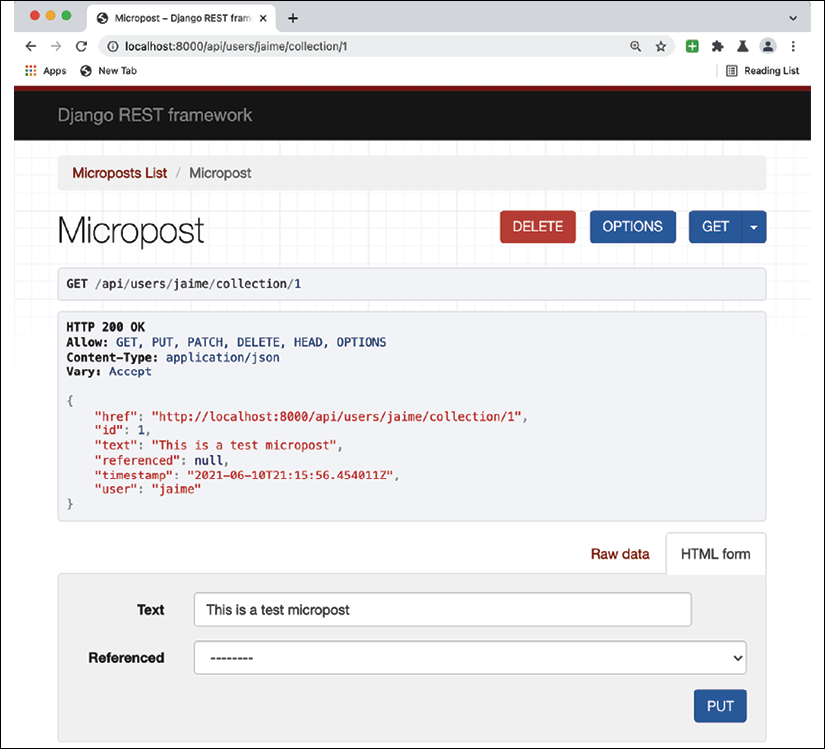
Figure 6.5: Microposts page
Django REST framework is very powerful and can be used in different ways to be sure that it behaves exactly as you expect. It has its own quirks, and it tends to be a little temperamental with the parameters until everything is configured just right. At the same time, it allows you to customize the interface in every aspect. Be sure to read the documentation carefully.
You can find the whole documentation here: https://www.django-rest-framework.org/.
External layers
On top of the web server, there is the possibility to continue the link by adding extra levels that work on the HTTP layer. This allows you to load balance between multiple servers and increase the total throughput of the system. This can be chained into multiple layers, if necessary.
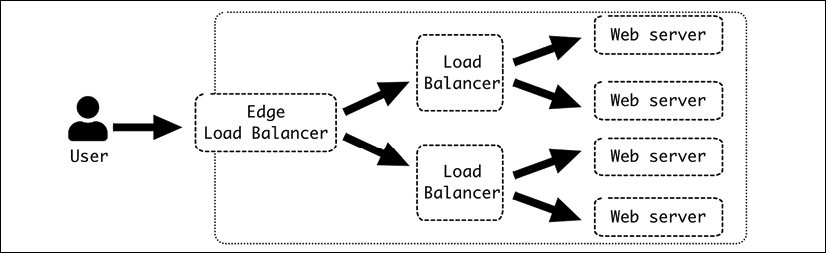
Figure 6.6: Chained load balancers
The route from the user to the edge of our system is handled by the internet, but once it reaches the edge load balancer, it directs the requests inside the system. The edge load balancer works as a gateway between the external networks and the controlled environment of our network.
The edge load balancer is normally the only one that handles HTTPS connection, allowing the rest of the system to use only HTTP. This is convenient as HTTP requests are easier to cache and handle. HTTPS requests are encoded end to end and cannot be properly cached or analyzed. The internal traffic is protected from external access and should have robust policies to be sure that only approved engineers are able to access it and access logs to audit accesses. But at the same time, it can be easily debugged, and any traffic problems can be solved much more easily.
The configuration of the network can greatly vary, and in lots of cases multiple load balancers are not required, and the edge load balancer can handle multiple web servers directly. The capacity in this case is key, as a load balancer has a limit on the number of requests that it can take.
Some key load balancers can be set up as specialized hardware to ensure that they have the capacity to handle the required number of requests.
This multi-layered structure allows you to introduce caching at any point of the system. This can improve the performance of the system, though it needs to be treated with care to be sure that it's adequate. After all, one of the most difficult problems in software development is the proper handling of the cache and its invalidation.
Summary
In this chapter, we went into the details about how web servers work, and the different layers that are involved.
We started by describing the fundamental details of the request-response and web server architecture. Then, we moved on to describe a system with three layers, using nginx as the front web server and uWSGI to handle multiple Python workers that run Django code.
We started with the web server itself, which allows you to serve HTTP, directly return the static content stored in files, and route it towards the next layer. We analyzed the different configuration elements, including enabling header forwarding and logging.
We continued by describing how uWSGI works and how it's able to create and set up different processes that interact through the WSGI protocol in Python. We described how to set up the interaction with the previous level (the nginx web server) and the next level (the Python code). We also described how the workers can be restarted in an orderly way, and how they can be automatically recycled periodically to mitigate certain kinds of problems.
We described how Django works to define a web application, and how the requests and responses flow through the code, including how the middleware can be used to chain elements in the flow. We also introduced Django REST framework as a way to create RESTful APIs and show how our example introduced in Chapter 2 can be implemented through the views and serializers provided by Django REST framework.
Finally, we described how the structure can be extended by layers on top to be sure to distribute the load across multiple servers and scale the system.
We will next describe event-driven systems.
Join our book’s Discord space
Join the book’s Discord workspace for a monthly Ask me Anything session with the authors:
https://packt.link/PythonArchitechture
