
8
Advanced Event-Driven Structures
As we saw in the previous chapter, event-driven architectures are quite flexible and capable of creating complex scenarios. In this chapter, we will see what are the possible event-driven structures that cover more advanced use cases and how to deal with their complexities.
We will see how some common applications like logs and metrics can be thought of as event-driven systems and use them to generate control systems that will feedback into the system producing the events.
We will also discuss, with an example, how to create complex pipelines where different events are being produced and the system is coordinated. We will also move to a more general overview, introducing the bus as a concept to interconnect all the event-driven components.
We will introduce some general ideas on further complex systems to describe some of the challenges that these kinds of big event-driven systems can produce, such as the need to use CQRS techniques to retrieve information that crosses multiple modules. Finally, we will give some notes on how to test the system, paying attention to the different levels of tests.
In this chapter, we'll cover the following topics:
- Streaming events
- Pipelines
- Defining a bus
- More complex systems
- Testing event-driven systems
We will start by describing streams of events.
Streaming events
For some purposes, it can be good to just produce events that capture information and store it for later access. This structure is typical for instrumentation, for example, where we create an event every time there's an error. This event will contain information about things such as where the error was generated, debugging details to be able to understand it, and so on. The event is then sent, and the application continues recovering from the error.
The same can be done for specific parts of the code. For example, to capture an access time to a database, the timing and related data (like the specific query) can be captured and sent in an event.
All those events should be compiled into a location to allow them to be queried and aggregated.
While usually not thought of as event-driven processes, this is pretty much how logs and metrics work. In the case of logs, the events are generally text strings that get fired whenever the code decides to create them. The logs are forwarded to a destination that allows us to search them later.
Logs can be stored in different formats. It's also common to create them in JSON to allow better searching.
These kinds of events are simple but can be very powerful by allowing us to discover what the program is executing in a live system.
This instrumentation may also be used to enable controls or alerts when certain conditions are matched. A typical example of this is to alert us if the number of errors captured by logs crosses a certain threshold.

Figure 8.1: Monitoring events flow
This can also be used to produce feedback systems, where the instrumentation monitoring the system can be used to determine whether to change something in the system itself. For example, capturing metrics to determine whether the system needs to scale up or scale down and change the number of servers available based on the amount of requests or other parameters.

Figure 8.2: Feedback of scaling events
This is not the only way a system can be monitored, though. This method of operation can also be used as a way of detecting quotas, for example, short-circuiting the processing of incoming requests if a certain quota has been exceeded.
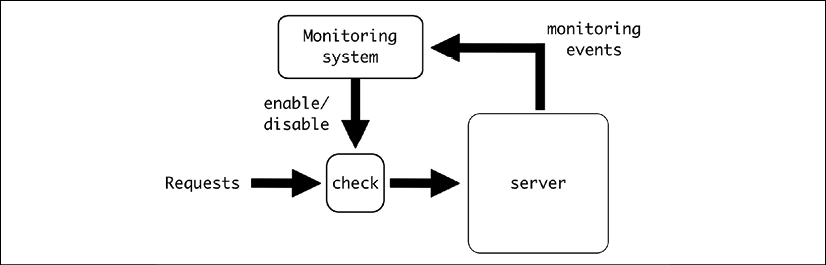
Figure 8.3: Monitor to detect quotas and stop extra requests
This structure is different from the upfront approach of setting a module that controls the system, relying instead on acting only when the threshold is breached, making the calculations in the background. This can reduce the amount of processing required upfront.
For example, for a quota of a maximum number of requests per minute, the process will be something like the following pseudocode:
def process_request(request):
    # Search for the owner of the request
    owner = request.owner
    info = retrieve_owner_info_from_db(owner)
    if check_quota_info(info):
        return process_request(request)
    else:
        return 'Quota exceeded'
check_quota_info will be different in both cases. The upfront approach requires maintaining and storing information about the previous requests:
def check_quota_info(info):
    current_minute = get_current_minute()
 if current_minute != info.minute:
     # New minute, start the quota
     info.requests = 0
     info.minute = current_minute
 else:
     info.requests += 1
 # Update the information
 info.save()
 if info.requests > info.quota:
     # Quota exceeded
     return False
 # Quota still valid
 return False
If the validation is done in an external system, based on the events generated, check_quota_info doesn't need to store the information, rather just checking whether the quota has been exceeded:
def check_quota_info(info):
    # Generate the proper event for a new event
    generate_event('request', info.owner)
 if info.quota_exceeded:
     return False
 # Quota still valid
 return False
The whole check is performed in the backend monitoring system, based on the generated events, and then stored in the info. This detaches the logic for whether to apply the quota from the check itself, decreasing the latency. The counterpart is that the detection of the quota having been exceeded may be delayed, allowing some requests to be processed even if they shouldn't be according to the quota.
Ideally, the generated events should already be in use to monitor the requests received. This operation can be very useful as it reuses events generated for other uses, reducing the need to collect extra data.
At the same time, the check can be more complex and doesn't need to be done as each new request comes along. For example, for an hourly quota when multiple requests are received every second, perhaps a check every minute is good enough to ensure the quota is respected. This can save a big deal of processing power compared to checking the conditions every time a request is received.
This, of course, is highly dependent on the specific scales, characteristics, and requests involved in different systems. For some systems, upfront could be a better choice, as it's easier to implement and doesn't require a monitoring system. Always validate whether the options fit into your system before implementing.
We will talk in more detail specifically about logs and metrics in Chapter 12, Logging, and Chapter 13, Metrics.
Pipelines
The flow of events doesn't have to be contained in a single system. The receiving end of the system can produce its own events, directed to other systems. Events will cascade into multiple systems, generating a process.
This is a similar situation to the one presented previously, but in this case it's a more deliberate process aimed at creating specific data pipelines where the flow between systems is triggered and processed.
A possible example of this is a system to rescale videos into different sizes and formats. When a video is uploaded into the system, it needs to be converted into multiple versions to be used in different situations. A thumbnail should also be created to display the first frame of the video before playing it.
We will do this in three steps. First, a queue will receive the event to start the processing. This will trigger two events in two different queues to process the resize and the thumbnail generation independently. This will be our pipeline.
To store the input and output data, given that they are videos and images, we require external storage. We will use AWS S3, or more precisely, a mock for S3.
AWS S3 is an object storage service provided by Amazon in the cloud, very popular for being both easy to use and very stable. We will use a mock of S3 that will allow us to start a local service that behaves like S3, which will simplify our example.
Here is a high-level diagram of the system:

Figure 8.4: Video and image queue
To get started, we need to upload the source video to the mock S3 and start the task. We will also require some way of checking the results. For that, two scripts will be available.
The code is available on GitHub at https://github.com/PacktPublishing/Python-Architecture-Patterns/tree/main/chapter_08_advanced_event_driven.
Let's start with the setup configuration.
Preparation
As outlined above, we have two key prerequisites: a queue backend and the mock S3 storage.
For the queue backend, we will use Redis again. Redis is very easy to configure for multiple queues, and we'll see how later. To start the Redis queue, we will again use Docker to download and run the official image:
$ docker run -d -p 6379:6379 redis
This starts a Redis container exposed on the standard port 6379. Note the -d option will keep the container running in the background.
For the mock S3 service, we will use the same approach, starting a container that starts S3 Mock, a system that replicates the S3 API, but stores the files locally. This lets us avoid setting up a real S3 instance, which involves getting an AWS account, paying for our usage, and so on.
S3 Mock is a great option for development testing for S3 storage without using a real connection to S3. We will see later how to connect to the mock with a standard module. The full documentation can be found at https://github.com/adobe/S3Mock.
To start S3 Mock, we will also use Docker:
$ docker run -d -p 9090:9090 -t adobe/s3mock
The container exposes the endpoint on port 9090. We will direct the S3 requests toward this local port. We will use the videos bucket for storing all the data.
We will define three different Celery workers that will perform three different tasks: the base task, image task and video task. Each one will be pulling events from different queues.
This distinction of specific tasks for different workers is done deliberately for explanation purposes. In this example, there's probably not a good reason to make this distinction, as all the tasks can run in the same worker, and new events can be reintroduced in the same queue, and this is recommended, as we saw in the previous chapter. Sometimes, though, there are other conditions that may require a change of approach.
For example, some of the tasks may require specific hardware for AI processing, use way more RAM or CPU power making it impractical to make all workers equal, or other reasons that will necessitate separating the workers. Still, be sure that there's a good reason to make the split. It will complicate the operation and performance of the system.
We will also use some third-party libraries. This includes Celery, as we saw in the previous chapter, but also other libraries, like boto3, click, and MoviePy. All the required libraries are available in the requirements.txt file so they can be installed with the following command:
$ pip3 install -r requirements.txt
Let's start with the first stage of the process, the base task that will redirect to the other two.
Base task
The main task will receive a path that contains the image. It will then create two tasks for the processing of the video resizing and the extraction of the thumbnail.
Here's the code for base_tasks.py:
from celery import Celery
app = Celery(broker='redis://localhost/0')
images_app = Celery(broker='redis://localhost/1')
videos_app = Celery(broker='redis://localhost/2')
logger = app.log.get_default_logger()
@app.task
def process_file(path):
    logger.info('Stating task')
    logger.info('The file is a video, needs to extract thumbnail and '
                'create resized version')
    videos_app.send_task('video_tasks.process_video', [path])
    images_app.send_task('image_tasks.process_video', [path])
    logger.info('End task')
Note that we are creating three different queues here:
app = Celery(broker='redis://localhost/0')
images_app = Celery(broker='redis://localhost/1')
videos_app = Celery(broker='redis://localhost/2')
Redis allows us to create different databases easily by referring to them with an integer. So, we create database 0 for the base queue, database 1 for the images queue, and database 2 for the videos queue.
We generate events in these queues with the .send_task function. Note that on each queue we send the proper task. We include the path as a parameter.
Note that all parameters for the tasks are defined in the second parameter of .send_task. This requires that the parameter is a list of arguments. In this case, we only have a single parameter that needs still to be described as a list with [path].
When the task is triggered, it will enqueue the next tasks. Let's take a look at the image task.
Image task
To generate a thumbnail of the video, we need the help of two third-party modules:
- boto3. This common library helps us connect to AWS services. In particular, we will use it to download and upload to our own mocked S3 service.
You can check the whole boto3 documentation at https://boto3.amazonaws.com/v1/documentation/api/latest/index.html. It can be used to control all AWS APIs.
- MoviePy. This is a library for working with video. We will extract the first frame as an independent file using this library.
The full MoviePy documentation is available at https://zulko.github.io/moviepy/.
Both libraries are included in the requirements.txt file described earlier in the chapter and included in the GitHub repo. Let's take a look at image_tasks.py:
from celery import Celery
import boto3
import moviepy.editor as mp
import tempfile
MOCK_S3 = 'http://localhost:9090/'
BUCKET = 'videos'
videos_app = Celery(broker='redis://localhost/1')
logger = videos_app.log.get_default_logger()
@videos_app.task
def process_video(path):
    logger.info(f'Stating process video {path} for image thumbnail')
    client = boto3.client('s3', endpoint_url=MOCK_S3)
    # Download the file to a temp file
    with tempfile.NamedTemporaryFile(suffix='.mp4') as tmp_file:
        client.download_fileobj(BUCKET, path, tmp_file)
        # Extract first frame with moviepy
        video = mp.VideoFileClip(tmp_file.name)
        with tempfile.NamedTemporaryFile(suffix='.png') as output_file:
            video.save_frame(output_file.name)
            client.upload_fileobj(output_file, BUCKET, path + '.png')
    logger.info('Finish image thumbnails')
Note that we define the Celery application with the correct database. We then describe the task. Let's divide it into different steps. We first download the source file defined in path into a temporary file:
client = boto3.client('s3', endpoint_url=MOCK_S3)
# Download the file to a temp file
with tempfile.NamedTemporaryFile(suffix='.mp4') as tmp_file:
    client.download_fileobj(BUCKET, path, tmp_file)
Note that we define the endpoint to connect with MOCK_S3, which is our S3 Mock container, exposed on http://localhost:9090/ as we described before.
Right after it we generate a temporary file to store the downloaded video. We define that the suffix of the temporary file to be .mp4 so later VideoPy can detect properly that the temporary file is a video.
Note the next steps are all inside the with block defining the temporary file. If it was defined outside of this block, the file would be closed and not available.
The next step is to load the file in MoviePy and then extract the first frame into another temporary file. This second temporary file has a suffix of .png to label it as an image:
video = mp.VideoFileClip(tmp_file.name)
with tempfile.NamedTemporaryFile(suffix='.png') as output_file:
    video.save_frame(output_file.name)
Finally, the file is uploaded to S3 Mock, adding .png to the end of the original name:
client.upload_fileobj(output_file, BUCKET, path + '.png')
Once again, pay attention to the indentation to be sure that the temporary files are available at the different stages.
The task to resize the video follows a similar pattern. Let's take a look.
Video task
The video Celery worker pulls from the video queue and performs similar steps to the image task:
from celery import Celery
import boto3
import moviepy.editor as mp
import tempfile
MOCK_S3 = 'http://localhost:9090/'
BUCKET = 'videos'
SIZE = 720
videos_app = Celery(broker='redis://localhost/2')
logger = videos_app.log.get_default_logger()
@videos_app.task
def process_video(path):
    logger.info(f'Starting process video {path} for image resize')
    client = boto3.client('s3', endpoint_url=MOCK_S3)
    # Download the file to a temp file
    with tempfile.NamedTemporaryFile(suffix='.mp4') as tmp_file:
        client.download_fileobj(BUCKET, path, tmp_file)
        # Resize with moviepy
        video = mp.VideoFileClip(tmp_file.name)
        video_resized = video.resize(height=SIZE)
        with tempfile.NamedTemporaryFile(suffix='.mp4') as output_file:
            video_resized.write_videofile(output_file.name)
            client.upload_fileobj(output_file, BUCKET, path + f'x{SIZE}.mp4')
    logger.info('Finish video resize')
The only difference from the image task is the resizing of the video to a height of 720 pixels and uploading the result:
# Resize with moviepy
video = mp.VideoFileClip(tmp_file.name)
video_resized = video.resize(height=SIZE)
with tempfile.NamedTemporaryFile(suffix='.mp4') as output_file:
     video_resized.write_videofile(output_file.name)
But the general flow is very similar. Note that it's pulling from a different Redis database, corresponding to the video queue.
Connecting the tasks
To test the system, we need to start all the different elements. Each one is started in a different terminal so we can see their different logs:
    $ celery -A base_tasks worker --loglevel=INFO
    $ celery -A video_tasks worker --loglevel=INFO
    $ celery -A image_tasks worker --loglevel=INFO
To start the process, we need a video to be processed in the system.
One possibility to find good, free, videos is to use https://www.pexels.com/, which has free stock content. For our example run, we will download the 4K video with URL https://www.pexels.com/video/waves-rushing-and-splashing-to-the-shore-1409899/.
We will use the following script to upload the video to the S3 Mock storage and start the task:
import click
import boto3
from celery import Celery
celery_app = Celery(broker='redis://localhost/0')
   MOCK_S3 = 'http://localhost:9090/'
BUCKET = 'videos'
SOURCE_VIDEO_PATH = '/source_video.mp4'
@click.command()
@click.argument('video_to_upload')
def main(video_to_upload):
# Note the credentials are required by boto3, but we are using
# a mock S3 that doesn't require them, so they can be fake
    client = boto3.client('s3', endpoint_url=MOCK_S3,
                          aws_access_key_id='FAKE_ACCESS_ID',
                          aws_secret_access_key='FAKE_ACCESS_KEY')
    # Create bucket if not set
    client.create_bucket(Bucket=BUCKET)
    # Upload the file
    client.upload_file(video_to_upload, BUCKET, SOURCE_VIDEO_PATH)
    # Trigger the
    celery_app.send_task('base_tasks.process_file', [SOURCE_VIDEO_PATH])
if __name__ == '__main__':
    main()
The start of the script describes the Celery queue, the base queue, that will be the start of the pipeline. We define several values related to the configuration, as we saw in the previous tasks. The only addition is SOURCE_VIDEO_PATH, which will host the video in S3 Mock.
In this script we use the same name to upload all files, overwriting it if the script is run again. Feel free to change this if it makes more sense to you to do it differently.
We use the click library to generate an easy command-line interface (CLI). The following lines generate a simple interface that requests the name of the video to upload as the parameter of the function.
@click.command()
@click.argument('video_to_upload')
def main(video_to_upload):
           ….
click is a fantastic option to generate CLIs quickly. You can read more about it in its documentation here: https://click.palletsprojects.com/.
The content of the main function simply connects to our S3 Mock, creates the bucket if not set yet, uploads the file to SOURCE_VIDEO_PATH, and then sends the task to the queue to start the process:
    client = boto3.client('s3', endpoint_url=MOCK_S3)
    # Create bucket if not set
    client.create_bucket(Bucket=BUCKET)
    # Upload the file
    client.upload_file(video_to_upload, BUCKET, SOURCE_VIDEO_PATH)
    # Trigger the
    celery_app.send_task('base_tasks.process_file', [SOURCE_VIDEO_PATH])
Let's run it and see the results.
Running the task
The script can be run after adding the name of the video to upload. Remember that all the libraries in requirements.txt need to be installed:
$ python3 upload_video_and_start.py source_video.mp4
It will take a bit of time to upload the file to S3 Mock. Once called, the first worker to react is the base one. This worker will create two new tasks:
[2021-07-08 20:37:57,219: INFO/MainProcess] Received task: base_tasks.process_file[8410980a-d443-4408-8f17-48e89f935325]
[2021-07-08 20:37:57,309: INFO/ForkPoolWorker-2] Stating task
[2021-07-08 20:37:57,660: INFO/ForkPoolWorker-2] The file is a video, needs to extract thumbnail and create resized version
[2021-07-08 20:37:58,163: INFO/ForkPoolWorker-2] End task
[2021-07-08 20:37:58,163: INFO/ForkPoolWorker-2] Task base_tasks.process_file[8410980a-d443-4408-8f17-48e89f935325] succeeded in 0.8547832089971052s: None
The other two will start soon after. The image worker will display new logs, starting the image thumbnail creation:
[2021-07-08 20:37:58,251: INFO/MainProcess] Received task: image_tasks.process_video[5960846f-f385-45ba-9f78-c8c5b6c37987]
[2021-07-08 20:37:58,532: INFO/ForkPoolWorker-2] Stating process video /source_video.mp4 for image thumbnail
[2021-07-08 20:38:41,055: INFO/ForkPoolWorker-2] Finish image thumbnails
[2021-07-08 20:38:41,182: INFO/ForkPoolWorker-2] Task image_tasks.process_video[5960846f-f385-45ba-9f78-c8c5b6c37987] succeeded in 42.650344008012326s: None
The video worker will take longer as it needs to resize the video:
[2021-07-08 20:37:57,813: INFO/MainProcess] Received task: video_tasks.process_video[34085562-08d6-4b50-ac2c-73e991dbb58a]
[2021-07-08 20:37:57,982: INFO/ForkPoolWorker-2] Starting process video /source_video.mp4 for image resize
[2021-07-08 20:38:15,384: WARNING/ForkPoolWorker-2] Moviepy - Building video /var/folders/yx/k970yrd11hb4lmrq4rg5brq80000gn/T/tmp0deg6k8e.mp4.
[2021-07-08 20:38:15,385: WARNING/ForkPoolWorker-2] Moviepy - Writing video /var/folders/yx/k970yrd11hb4lmrq4rg5brq80000gn/T/tmp0deg6k8e.mp4
[2021-07-08 20:38:15,429: WARNING/ForkPoolWorker-2] t:   0%|          | 0/528 [00:00<?, ?it/s, now=None]
[2021-07-08 20:38:16,816: WARNING/ForkPoolWorker-2] t:   0%|          | 2/528 [00:01<06:04,  1.44it/s, now=None]
[2021-07-08 20:38:17,021: WARNING/ForkPoolWorker-2] t:   1%|          | 3/528 [00:01<04:17,  2.04it/s, now=None]
...
[2021-07-08 20:39:49,400: WARNING/ForkPoolWorker-2] t:  99%|#########9| 524/528 [01:33<00:00,  6.29it/s, now=None]
[2021-07-08 20:39:49,570: WARNING/ForkPoolWorker-2] t:  99%|#########9| 525/528 [01:34<00:00,  6.16it/s, now=None]
[2021-07-08 20:39:49,874: WARNING/ForkPoolWorker-2] t: 100%|#########9| 527/528 [01:34<00:00,  6.36it/s, now=None]
[2021-07-08 20:39:50,027: WARNING/ForkPoolWorker-2] t: 100%|##########| 528/528 [01:34<00:00,  6.42it/s, now=None]
[2021-07-08 20:39:50,723: WARNING/ForkPoolWorker-2] Moviepy - Done !
[2021-07-08 20:39:50,723: WARNING/ForkPoolWorker-2] Moviepy - video ready /var/folders/yx/k970yrd11hb4lmrq4rg5brq80000gn/T/tmp0deg6k8e.mp4
[2021-07-08 20:39:51,170: INFO/ForkPoolWorker-2] Finish video resize
[2021-07-08 20:39:51,171: INFO/ForkPoolWorker-2] Task video_tasks.process_video[34085562-08d6-4b50-ac2c-73e991dbb58a] succeeded in 113.18933968200872s: None
To retrieve the results, we will use the check_results.py script, which downloads the contents of the S3 Mock storage:
import boto3
MOCK_S3 = 'http://localhost:9090/'
BUCKET = 'videos'
client = boto3.client('s3', endpoint_url=MOCK_S3)
for path in client.list_objects(Bucket=BUCKET)['Contents']:
    print(f'file {path["Key"]:25} size {path["Size"]}')
    filename = path['Key'][1:]
    client.download_file(BUCKET, path['Key'], filename)
By running it, we download the files into the local directory:
$ python3 check_results.py
file /source_video.mp4         size 56807332
file /source_video.mp4.png     size 6939007
file /source_video.mp4x720.mp4 size 8525077
You can check the resulting files and confirm that they have been generated correctly. Note that source_video.mp4 will be the same as your input video.
This example demonstrates how to set up a relatively complex pipeline where different queues and workers are triggered in a coordinated fashion. Note that while we directly used Celery to send the tasks to the queues, we could also have used Celery Flower and an HTTP request to do this.
Defining a bus
While we talked about the queue backend system, this hasn't been truly expanded to the concept of a bus. The term bus originates from the hardware buses that transmit data between different components of a hardware system. This makes them a central, multisource, and multidestination part of the system.
A software bus is a generalization of this concept that allows us to interconnect several logical components.
In essence, a bus is a component specialized in the transmission of data. This is an ordered communication compared to the usual alternative of connecting directly to the services through a network, without any intermediate component.
As the bus is in charge of data transmission, that means that the sender doesn't need to know much other than the message to transmit and the queue to send it to. The bus itself will transmit to the destination or destinations.
The concept of a bus is closely related to that of the message broker. A message broker, though, typically includes more capacities than a pure bus, such as being able to transform messages along the way and use multiple protocols. Message brokers can be very complex and allow a huge amount of customization and decoupling of services. In general, most of the tools to support the usage of a bus will be labeled as message brokers, though some are more powerful than others.
Though we will use the term "bus", some of the capacities will be more closely related to features such as routing messages, which should require tools considered message brokers. Analyze the requirements of your specific use cases and use a tool that can fulfil them.
The bus will be then defined as a central point where all the event-related communication will be directed to. This simplifies the configuration, as the events can be routed to the proper destination without requiring a different endpoint.
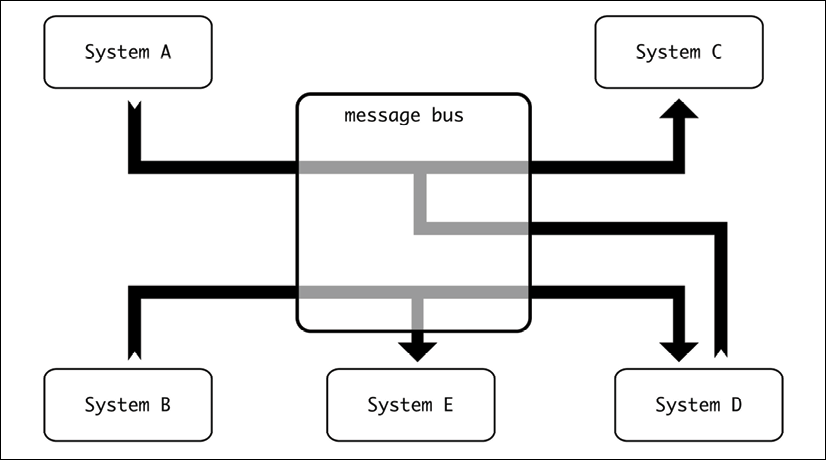
Figure 8.5: Message bussing
Internally, though, the bus will contain different logical divisions that allow the proper routing of messages. These are the queues.
The routing can be complicated, if the bus allows for it, which is the case here.
In our example before, we used Redis as a bus. Though the connection URL is a little different, it can be refactored to make it a bit clearer:
# Remember that database 0 is the base queue
BASE_BROKER = 'redis://localhost/0'
Base_app = Celery(broker=BROKER)
# Refactor for base
BROKER_ROOT = 'redis://localhost'
BROKER_BASE_QUEUE = 0
base_app = Celery(broker=f'{BASE_BROKER}/{BROKER_BASE_QUEUE}')
# To address the image queue
BROKER_ROOT = 'redis://localhost'
BROKER_IMAGE_QUEUE = 1
image_app = Celery(broker=f'{BASE_BROKER}/{BROKER_IMAGE_QUEUE}')
This central location makes the configuration of all the different services easy, both for pushing events to the queues and pulling from them.
More complex systems
More complex systems can be created where the events pass through multiple stages and are even designed for easy plugin systems working from the same queue.
This can create complicated setups where the data flows through complex pipelines and is processed by independent modules. These kinds of scenarios are typically seen on instrumentation that aims to analyze and process big quantities of data to try and detect patterns and behaviors.
Imagine, for example, a system that makes bookings for a travel agency. There are a lot of searches and bookings requests that happen in the system, with associated purchases such as car rentals, luggage bags, food, and so on. Each of the actions produces a regular response (search, book, purchase, and so on), but an event describing the action will be introduced into a queue to be processed in the background. Different modules will analyze user behavior with different objectives in mind.
For example, the following modules could be added to this system:
- Aggregate economic results by time, to obtain a global view of how the service is working over time. This can involve details such as purchases per day, revenue, margins, and so on.
- Analyze the behavior of regular users. Follow users to discover their patterns. What are they searching for before booking? Are they using offers? How often are they booking flights? How long is their average trip? Any outliers?
- Be sure that there's enough inventory for purchases. Backorder any required elements, based on the items being purchased in the system. This includes also scheduling enough food for flights, based on pre-purchases.
- Collect information about preferred destinations, based on searches.
- Trigger alerts for things like full flights that could lead to scheduling more planes for those days.
These modules are fundamentally about different things and present a different view on the system. Some are more oriented toward the behavior of users and marketing, while others are more related to logistics. Depending on the size of the system, it could be determined that the modules require a different, dedicated team to take care of each of them independently.
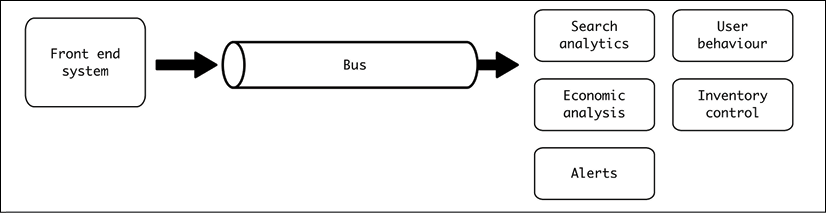
Figure 8.6: Bus from front end system to different modules
Note that each system will likely have its own storage to allow it to store the information. This could also lead to the creation of their own APIs to access this information once collected.
To query the information, the system needs to query the databases of the modules where the data is stored. This can be an independent service, but it will likely be the same system's front end, as it will typically contain all the external interface and permissions handling.
This makes it necessary for the front end system to access the stored information, either by directly accessing the database or by using some API to access it. The front end system should model access to the data, as we saw in Chapter 3, Data Modeling, and will very likely require a model definition that abstracts the complex access to the data.
The same event will be sent to the bus, and then the different services will receive it. To be able to do so, you'll need to get a bus that accepts subscriptions from several systems and delivers the same message to all subscribed systems.
This pattern is called publish/subscribe or pub/sub. The consumers of the events need to subscribe to the topic, which is, in pub/sub parlance, is the equivalent of a queue. Most buses accept this system, though it may require some work to configure.
For example, there's a library to allow Celery to work under this system available at https://github.com/Mulugruntz/celery-pubsub.
Note that the workers in this case can create more events to be introduced. For example, any module will be able to create an alert, to which the alert system will be notified. For example, if the inventory is too low, it may require a quick alert at the same time it backorders, to be sure that action is taken quickly.
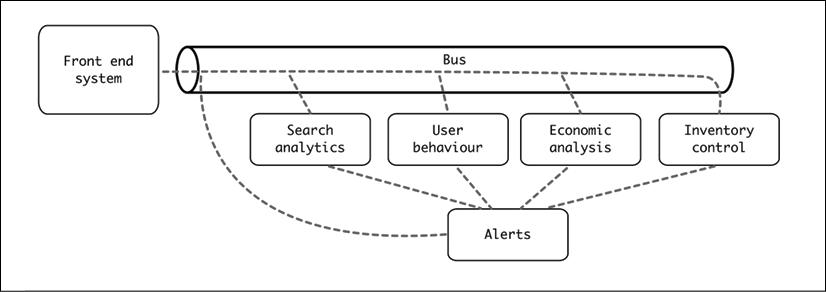
Figure 8.7: Note that communication between the modules and the alerts also is done through the bus
Complex event-driven systems can help you distribute the work between different components. In this example, you can see how the immediate response (booking a flight) is completely independent of the further detailed analysis in the background that can be used for longer-term planning. If all the components were added while the request was served, it could interfere with performance. The backend components can be swapped and upgraded while the front end system is unaffected.
To properly implement this kind of system, the event needs to use a standard format that's easy to adapt and extend, to ensure that any module that receives it can quickly scan through it and discard it if it's not necessary.
A good idea is to use a simple JSON structure like the following:
{
  "type": string defining the event type,
  "data": subevent content
}
For example, when a search is produced, an event like this will be created:
{
  "type": "SEARCH",
  "data": {
    "from": "Dublin",
    "to": "New York",
    "depart_date": 2021-12-31,
    "return_date": null,
    "user": null
  }
}
The type field makes easy to discard the event if it's not of interest to any module. For example, the economic analysis module will discard any SEARCH event. Other modules may require further processing. For example, the user behavior module will analyze SEARCH events where the user field in the data is set.
Keep in mind that an important element for event-driven systems is that the storage may not be common to all. Perhaps each independent module has its own database. You'll need to use the techniques for CQRS that we discussed in Chapter 3, Data Modeling, to model data in these modules. In essence, you'll need to ask differently to read and to save new data, as writing new data requires the generation of events; and you'll need to model them as a business unit. What's more, the model may need to merge information from multiple modules in some cases. For example, if there's a query in the system that requires obtaining some economic information for a user, it needs to query both the user behavior module and the economic analysis module, while presenting the information as a unique model of EconomicInfoUser.
When information is frequently accessed, it may make sense to duplicate it in several places. This goes against the single responsibility principle (that every feature should be the sole responsibility of a single module), but the alternative is to create complicated methods of access to get information that's commonly used. Be careful when designing and dividing the system to avoid these problems.
The flexible data structure will allow for new events to be generated, adding more information and allowing for controlled changes across the modules by enforcing the backward compatibility of changes. Then the different teams can work in parallel, improving the system without stepping on each other's toes too much.
But ensuring that they behave correctly can be complicated, as there are multiple parts that interact with each other.
Testing event-driven systems
Event-driven systems are very flexible and, in certain situations, can be incredibly useful in detaching different elements. But this flexibility and detachment can make them difficult to test to ensure that everything works as expected.
In general, unit tests are the fastest tests to generate, but the detached nature of event-driven systems makes them not very useful to properly test the reception of events. Sure, the events can be simulated, and the general behavior of receiving an event can be tested. But the problem is: how can we ensure that the event has been properly generated? And at the right moment?
The only option is to use integration tests to check the behavior of the system. But these tests are more expensive to design and run.
There's always an endless debate about naming tests, what exactly a unit test is compared to an integration test, system test, acceptance test, and so on. To avoid getting into too deep a discussion here, at it's not the objective of the book, we will use the term unit test to describe tests that can only be run in a single module, and integration test to refer to those that require two or more modules interacting with each other to be successful. Unit tests will mock any dependence, but integration tests will actually call the dependence to be sure that the connection between modules works correctly.
These two levels are significantly different in terms of the cost for each test written. Way more unit tests can be written and run than integration tests in the same period of time.
For example, in our previous example, to test that a purchase of food correctly triggers an alert, we need to:
- Generate a call to purchase a food item.
- Produce the appropriate event.
- Handle the event in the inventory control. The current inventory should be configured as low, which will produce an alert event.
- Handle the alert event properly.
All these steps require configuration to be done in three different systems (the front-end system, the inventory control module, and the alert module), along with setting up the bus to connect them. Ideally, this test will require the system to be able to start up with an automation system to automate the tests. That requires every module involved to be automatable.
As we can see, this is a high bar in setting up and running tests, though it is still worth doing. To achieve a sane balance between integration and unit tests, we should grow them and apply some strategy to be sure that we have reasonable coverage for both.
Unit tests are cheap, so every case should have healthy coverage by unit tests, where the external modules are mocked. This includes cases such as different input formats, different configurations, all flows, errors, and so on. Good unit tests should cover most possibilities from an isolation point of view, mocking the input of data and any sent event.
For example, continuing the inventory control example, many unit tests can control the following requisites, all by changing the input request:
- Purchase of an element with high inventory.
- Purchase of an element with low inventory. This should produce an alert event.
- Purchase of a non-existing element. This should generate an error.
- Event with invalid format. This should generate an error.
- Purchase of an element with zero inventory. This should generate an alert event.
- More cases, such as different kinds of purchases, formats, and so on.
Integration tests, on the other hand, should have only a few tests, mostly covering the "happy path". The happy path means that a regular representative event is being sent and processed, but doesn't produce expected errors. The objective of an integration test is to confirm that all the parts are connecting and working as expected. Given that integration tests are more expensive to run and operate, aim to implement only the most important, and keep an eye out for any test that isn't worth maintaining and can be pruned.
We described, in the above discussion on integration tests, a happy path scenario. The event triggers a handle in the inventory and generates an alert that's also handled. For integration tests, this is preferred over not generating an alert, as it stresses the system more.
Though it depends on the system, the ratio of unit to integration test should be heavily weighted toward unit tests, sometimes by 20 times or more (meaning 1 integration test for 20 unit tests).
Summary
In this chapter, we have seen more event-driven systems with a variety of advanced and complex architectures that can be designed. We have presented some of the flexibility and power that event-driven design can bring to a design, but also the challenges attached to event-driven design.
We started by presenting common systems such as logs and metrics as event-driven systems, as they are, and considered how looking at them in this way allows us to create alerting and feedback systems that can be used to control the source of the events.
We also presented an example with Celery of a more complex pipeline, including the usage of multiple queues and shared storage to generate multiple coordinated tasks, such as resizing a video and extracting a thumbnail.
We presented the idea of a bus, a shared access point for all events in the system, and looked at how we can generate more complex systems where events are delivered to multiple systems and cascade into complex actions. We also discussed the challenges of solving these complex interactions, both in terms of requiring the use of CQRS techniques to model information that can be read after the write is generated through events, and the demands in terms of testing at different levels with unit and integration tests.
In the next chapter, we will see the two main architectures for complex systems: monolithic and microservices.
Join our book’s Discord space
Join the book’s Discord workspace for a monthly Ask me Anything session with the authors:
https://packt.link/PythonArchitechture
