
2
API Design
In this chapter, we will talk about the basic application programming interface (API) design principles. We will see how to start our design by defining useful abstractions that will create the foundation for the design.
We will then present the principles for RESTful interfaces, covering both the strict, academic definition and a more practical definition to help when making designs. We will look at design approaches and techniques to help create a useful API based on standard practices. We will also spend some time talking about authentication, as this is a critical element for most APIs.
We will focus in this book on RESTful interfaces, as they are the most common right now. Before that, there were other alternatives, including Remote Procedure Call (RPC) in the 80s, a way to make a remote function call, or Single Object Access Protocol (SOAP) in the early 2000s, which standardized the format of the remote call. Current RESTful interfaces are easier to read and take advantage of the already established usage of HTTP more strongly, although, in essence, they could potentially be integrated via these older specifications.
They are still available nowadays, although predominantly in older systems.
We will cover how to create a versioning system for the API, attending to the different use cases that can be affected.
We will see the difference between the frontend and the backend, and its interaction. Although the main objective of the chapter is to talk about API interfaces, we will also talk about HTML interfaces to see the differences and how they interact with other APIs.
Finally, we will describe the design for the example that we will use later in the book.
In this chapter, we'll cover the following topics:
- Abstractions
- RESTful interfaces
- Authentication
- Versioning the API
- Frontend and backend
- HTML interfaces
- Designing the API for the example
Let's take a look at abstractions first.
Abstractions
An API allows us to use a piece of software without totally understanding all the different steps that are involved. It presents a clear menu of actions that can be performed, enabling an external user, who doesn't necessarily understand the complexities of the operation, to perform them efficiently. It presents a simplification of the process.
These actions can be purely functional, where the output is only related to the input; for example, a mathematical function that calculates the barycenter of a planet and a star, given their orbits and masses.
Alternatively, they can deal with state, as the same action repeated twice may have different effects; for example, retrieving the time in the system. Perhaps even a call allows the time zone of the computer to be set, and two subsequent calls to retrieve the time may return very different results.
In both cases, the APIs are defining abstractions. Retrieving the time of the system in a single operation is simple enough, but perhaps the details of doing so are not so easy. It may involve reading in a certain way some piece of hardware that keeps track of time.
Different hardware may report the time differently, but the result should always be translated in a standard format. Time zones and time savings need to be applied. All this complexity is handled by the developers of the module that exposes the API and provides a clear and understandable contract with any user. "Call this function, and the time in ISO format will be returned."
While we are mainly talking about APIs, and throughout the book we will describe mostly ones related to online services, the concept of abstractions really can be applied to anything. A web page to manage a user is an abstraction, as it defines the concept of "user account" and the associated parameters. Another omnipresent example is the "Shopping cart" for e-commerce. It's good to create a clear mental image, as it helps to create a clearer and more consistent interface for the user.
This is, of course, a simple example, but APIs can hide a tremendous amount of complexity under their interfaces. A good example to think about is a program like curl. Even when just sending an HTTP request to a URL and printing the returned headers, there is a huge amount of complexity associated with this:
$ curl -IL http://google.com
HTTP/1.1 301 Moved Permanently
Location: http://www.google.com/
Content-Type: text/html; charset=UTF-8
Date: Tue, 09 Mar 2021 20:39:09 GMT
Expires: Thu, 08 Apr 2021 20:39:09 GMT
Cache-Control: public, max-age=2592000
Server: gws
Content-Length: 219
X-XSS-Protection: 0
X-Frame-Options: SAMEORIGIN
HTTP/1.1 200 OK
Content-Type: text/html; charset=ISO-8859-1
P3P: CP="This is not a P3P policy! See g.co/p3phelp for more info."
Date: Tue, 09 Mar 2021 20:39:09 GMT
Server: gws
X-XSS-Protection: 0
X-Frame-Options: SAMEORIGIN
Transfer-Encoding: chunked
Expires: Tue, 09 Mar 2021 20:39:09 GMT
Cache-Control: private
Set-Cookie: NID=211=V-jsXV6z9PIpszplstSzABT9mOSk7wyucnPzeCz-TUSfOH9_F-07V6-fJ5t9L2eeS1WI-p2G_1_zKa2Tl6nztNH-ur0xF4yIk7iT5CxCTSDsjAaasn4c6mfp3fyYXMp7q1wA2qgmT_hlYScdeAMFkgXt1KaMFKIYmp0RGvpJ-jc; expires=Wed, 08-Sep-2021 20:39:09 GMT; path=/; domain=.google.com; HttpOnly
This makes a call to www.google.com and displays the headers of the response using the -I flag. The -L flag is added to automatically redirect any request which is what is happening here.
Making a remote connection to a server requires a lot of different moving parts:
- DNS access to translate the server address
www.google.comto an actual IP address. - The communication between both servers, which involves using the TCP protocol to generate a persistent connection and guarantee the reception of the data.
- Redirection based on the result from the first request, as the server returns a code pointing to another URL. This was done owing to the usage of the
-Lflag. - The redirection points to an HTTPS URL, which requires adding a verification and encryption layer on top of that.
Each of these steps also makes use of other APIs to perform smaller actions, which could involve the functionality of the operating system or even calling remote servers such as the DNS one to obtain data from there.
Here, the curl interface is used from the command line. While the strict definition of an API discard stipulates that the end user is a human, there's not really a big change. Good APIs should be easily testable by human users. Command-line interfaces can also be easily automated by bash scripts or other languages.
But, from the point of view of the user of curl, this is not very relevant. It is simplified to the point where a single command line with a few flags can perform a well-defined operation without worrying about the format to get data from the DNS or how to encrypt a request using SSL.
Using the right abstractions
For a successful interface, the root is to create a series of abstractions and present them to the user so that they can perform actions. The most important question when designing a new API is, therefore, to decide which are the best abstractions.
When the process happens organically, the abstractions are decided mostly on the go. There is an initial idea, acknowledged as an understanding of the problem, that then gets tweaked.
For example, it's very common to start a user management system by adding different flags to the users. So, a user has permission to perform action A, and then a parameter to perform action B, and so on. By adding one flag at a time, come the tenth flag, the process becomes very confusing.
Then, a new abstraction can be used; roles and permissions. Certain kinds of users can perform different actions, such as admin roles. A user can have a role, and the role is the one that describes the related permissions.
Note that this simplifies the problem, as it's easy to understand and manage. However, moving from "an individual collection of flags" to "several roles" can be a complicated process. There is a reduction in the number of possible options. Perhaps some existing users have a peculiar combination of flags. All this needs to be handled carefully.
While designing a new API, it is good to try to explicitly describe the inherent abstractions that the API uses to clarify them, at least at a high level. This also has the advantage of being able to think about that as a user of the API and see if things add up.
One of the most useful viewpoints in the work of software developers is to detach yourself from your "internal view" and take the position of the actual user of the software. This is more difficult than it sounds, but it's certainly a skill worth developing. This will make you a better designer. Don't be afraid to ask a friend or coworker to detect blind spots in your design.
However, every abstraction has its limits.
Leaking abstractions
When an abstraction is leaking details from the implementation, and not presenting a perfectly opaque image, it's called a leaky abstraction.
While a good API should try to avoid this, sometimes it happens. This can be caused by underlying bugs in the code serving the API, or sometimes directly from the way the code operates in certain operations.
A common case for this is relational databases. SQL abstracts the process of searching data from how it is actually stored in the database. You can search with complex queries and get the result, and you don't need to know how the data is structured. But sometimes, you'll find out that a particular query is slow, and reorganizing the parameters of the query has a big impact on how this happens. This is a leaky abstraction.
This is very common, and the reason why there are significant tools to help ascertain what is going on when running a SQL query, which is very detached from the implementation. The main one is the EXPLAIN command.
Operating systems are good examples of a system that generates good abstractions that don't leak the majority of the time. There are lots of examples. Not being able to read or write a file due to a lack of space (a less common problem now than three decades ago); breaking a connection with a remote server due to a network problem; or not being able to create a new connection due to reaching a limit in terms of the number of open file descriptors.
Leaky abstractions are, to a certain degree, unavoidable. They are the result of not living in a perfect world. Software is fallible. Understanding and preparing for that is critical.
"All non-trivial abstractions, to some degree, are leaky."– Joel Spolsky's Law of Leaky Abstractions
When designing an API, it is important to take this fact into account for several reasons:
- To present clear errors and hints externally. A good design will always include cases for things going wrong and try to present them clearly with proper error codes or error handling.
- To deal with errors that could come from dependent services internally. Dependent services can fail or have other kinds of problems. The API should abstract this to a certain degree, recovering from the problem if possible, failing gracefully if not, and returning a proper result if recovery is impossible.
The best design is the one that not only designs things when they work as expected, but also prepares for unexpected problems and is sure that they can be analyzed and corrected.
Resources and action abstractions
A very useful pattern to consider when designing an API is to produce a set of resources that can perform actions. This pattern uses two kinds of elements: resources and actions.
Resources are passive elements that are referenced, while actions are performed on resources.
For example, let's define a very simple interface to play a simple game guessing coin tosses. This is a game consisting of three guesses for three coin tosses, and the user wins if at least two of these guesses are correct.
The resource and actions may be as follows:
|
Resource |
Actions |
Details |
|
HEADS |
None |
A coin toss result. |
|
TAILS |
None |
A coin toss result. |
|
GAME |
START |
Start a new GAME. |
|
READ |
Returns the current round (1 to 3) and the current correct guesses. | |
|
COIN_TOSS |
TOSS |
Toss the coin. If the GUESS hasn't been produced, it returns an error. |
|
GUESS |
Accepts HEADS or TAILS as the guess. | |
|
RESULT |
It returns HEADS or TAILS and whether the GUESS was correct. |
A possible sequence for a single game could be:
GAME START
> (GAME 1)
GAME 1 COIN_TOSS GUESS HEAD
GAME 1 COIN_TOSS TOSS
GAME 1 COIN_TOSS RESULT
> (TAILS, INCORRECT)
GAME 1 COIN_TOSS GUESS HEAD
GAME 1 COIN_TOSS TOSS
GAME 1 COIN_TOSS RESULT
> (HEAD, CORRECT)
GAME 1 READ
> (ROUND 2, 1 CORRECT, IN PROCESS)
GAME 1 COIN_TOSS GUESS HEAD
GAME 1 COIN_TOSS TOSS
GAME 1 COIN_TOSS RESULT
> (HEAD, CORRECT)
GAME 1 READ
> (ROUND 3, 2 CORRECT, YOU WIN)
Note how each resource has its own set of actions that can be performed. Actions can be repeated if that's convenient, but it's not required. Resources can be combined into a hierarchical representation (like here, where COIN_TOSS depends on a higher GAME resource). Actions can require parameters that can be other resources.
However, the abstractions are organized around having a consistent set of resources and actions. This way of explicitly organizing an API is useful as it clarifies what is passive and what's active in the system.
Object-oriented programming (OOP) uses these abstractions, as everything is an object that can receive messages to perform some actions. Functional programming, on the other hand, doesn't fit neatly into this structure, as "actions" can work like resources.
This is a common pattern, and it's used in RESTful interfaces, as we will see next.
RESTful interfaces
RESTful interfaces are incredibly common these days, and for good reason. They've become the de facto standard in web services that serve other applications.
Representational State Transfer (REST) was defined in 2000 in a Ph.D. dissertation by Roy Fielding, and it uses HTTP standards as a basis to create a definition of a software architecture style.
For a system to be considered RESTful, it should follow certain rules:
- Client-server architecture. It works through remote calling.
- Stateless. All the information related to a particular request should be contained in the request itself, making it independent from the specific server serving the request.
- Cacheability. The cacheability of the responses should be clear, either to say they are cacheable or not.
- Layered system. The client cannot tell if they are connected to a final server or if there's an intermediate server.
- Uniform interface, with four prerequisites:
- Resource identification in requests, meaning a resource is unequivocally represented, and its representation is independent
- Resource manipulation through representations, allowing clients to have all the required information to make changes when they have the representation
- Self-descriptive messages, meaning messages are complete in themselves
- Hypermedia as the Engine of Application State, meaning the client can walk through the system using referenced hyperlinks
- Code on demand. This is an optional requirement, and it's normally not used. Servers can submit code in response to help perform operations or improve the client; for example, submitting JavaScript to be executed in the browser.
This is the most formal definition. As you can see, it's not necessarily based on HTTP requests. For more convenient usage, we need to limit the possibilities somewhat and set a common framework.
A more practical definition
When people talk colloquially about RESTful interfaces, normally they are understood as interfaces based on HTTP resources using JSON formatted requests. This is wholly compatible with the definition that we've seen before, but taking some key elements into consideration.
These key elements are sometimes ignored, leading to pseudo-RESTful interfaces, which don't have the same properties.
The main one is that URIs (Uniform Resource Identifiers) should describe clear resources, as well as HTTP methods and actions to perform on them, using the CRUD (Create Retrieve Update Delete) approach.
CRUD interfaces facilitate the performance of those actions: Create (save a new entry), Retrieve (read), Update (overwrite), and Delete entries. These are the basic operations for any persistent storage system.
There are two kinds of URIs, whether they describe a single resource or a collection of resources, as can be seen in the following table:
|
Resource |
Example |
Method |
Description |
|
Collection |
|
|
List operation. Returns all the available elements of the collection, for example, all books. |
|
|
Create operation. Creates a new element of the collection. Returns the newly created resource. | ||
|
Single |
|
|
Retrieve operation. Returns the data from the resource, for example, the book with an ID of 1. |
|
|
Set (Update) operation. Sends the new data for the resource. If it doesn't exist, it will be created. If it does, it will be overwritten. | ||
|
|
Partial update operation. Overwrites only the partial values for the resource, for example, sends and writes only the email for the user object. | ||
|
|
Delete operation. It deletes the resource. |
The key element of this design is the definition of everything as a resource, as we saw before. Resources are defined by their URIs, which contain a hierarchical view of the resources, for example:
/books/1/cover defines the resource of the cover image from the book with an ID of 1.
For simplicity, we will use integer IDs to identify the resources in this chapter. In real-world operations, this is not recommended. They have no meaning at all, and, even worse, they can sometimes leak information about the number of elements in the system or their internal order. For example, a competitor could estimate how many new entries are being added each week. To detach from whatever internal representation, try to always use a natural key externally, if available, such as the ISBN number for books, or create a random Universally Unique Identifier (UUID).
Another problem with sequential integers is that, at high rates, the system may struggle to create them correctly, as it won't be possible to create two at the same time. This can limit the growth of a system.
Most of the input and output of the resources will be represented in JSON format. For example, this could be an example of a request and response to retrieve a user:
GET /books/1
HTTP/1.1 200 OK
Content-Type: application/json
{"name": "Frankenstein", "author": "Mary Shelley", "cover": "http://library.lbr/books/1/cover"}
The response is formatted in JSON, as specified in Content-Type. This makes it easy to parse and analyze automatically. Note that the avatar field returns a hyperlink to another resource. This makes the interface walkable and reduces the amount of information that the client requires beforehand.
This is one of the most forgotten properties when designing RESTful interfaces. It is preferable to return full URIs to resources instead of indirect references, such as no-context IDs.
For example, when creating a new resource, include the new URI in the response, in the Location header.
To send new values to overwrite, the same format should be used. Note that some elements may be read-only, such as cover, and aren't required:
PUT /books/1
Content-Type: application/json
{"name": "Frankenstein or The Modern Prometheus", "author": "Mary Shelley"}
HTTP/1.1 200 OK
Content-Type: application/json
{"name": "Frankenstein or The Modern Prometheus", "author": "Mary Shelley", "cover": "http://library.com/books/1/cover"}
The same representation should be used for input and output, making it easy for the client to retrieve a resource, modify it, and then resubmit it.
This is really handy and creates a level of consistency that's very much appreciated when implementing a client. While testing, try to ensure that retrieving a value and resubmitting it is valid and doesn't create a problem.
When the resource will be directly represented by binary content, it can return the proper format, specified in the Content-Type header. For example, retrieving the avatar resource may return an image file:
GET /books/1/cover
HTTP/1.1 200 OK
Content-Type: image/png
...
In the same way, when creating or updating a new avatar, it should be sent in the proper format.
While the original intention of RESTful interfaces was to make use of multiple formats, for example, accepting XML and JSON, this is not very common in practice. JSON is, by and large, the most standard format these days. Some systems may benefit from using multiple formats, though.
Another important property is ensuring that some actions are idempotent, and others are not. Idempotent actions can be repeated multiple times, producing the same result, while repeating not-idempotent actions will generate different results. Evidently, the action should be identical.
A clear case of this is the creation of a new element. If we submit two identical POST creations of a new element of a resource list, it will create two new elements. For example, submitting two books with the same name and author will create two identical books.
This is assuming that there's no limitation to the content of the resource. If they are, the second request will fail, which will produce a different result to the first in any case.
On the other hand, two GET requests will produce the same result. The same is true for PUT or DELETE, as they'll overwrite or "delete again" the resource.
The fact that the only non-idempotent requests are POST actions simplifies significantly the design of measures to deal with problems when there's the question of whether it should be retried. Idempotent requests are safe to retry at any time, thereby simplifying the handling of errors such as network problems.
Headers and statuses
An important detail of the HTTP protocol that can sometimes be overlooked is the different headers and status codes.
Headers include metadata information about the request or response. Some of it is added automatically, like the size of the body of the request or response. Some interesting headers to consider are the following:
|
Header |
Type |
Details |
|
|
Standard |
Credentials to authenticate the request. |
|
|
Standard |
The type of the body of the request, like |
|
|
Standard |
When the message was created. |
|
|
Standard |
The sender has a copy of the resource at this time. If it hasn't changed since then, a |
|
|
De facto standard |
Stores the IP where the message was originated, and the different proxies it went through. |
|
|
Standard |
Same as |
A well-designed API will make use of headers to communicate proper information, for example, setting Content-Type correctly or accepting cache parameters if possible.
A comprehensive list of headers can be found at https://developer.mozilla.org/en-US/docs/Web/HTTP/Headers.
Another important detail is to make good use of available status codes. Status codes provide significant information about what happened, and using the most detailed information possible for each situation will provide a better interface.
Some common status codes are as follows:
|
Status code |
Description |
|
|
A successful resource access or modification. It should return a body; if it doesn't, use |
|
|
A successful |
|
|
A successful request that doesn't return a body, for example, a successful |
|
|
The accessed resource is now permanently located in a different URI. It should return a |
|
|
The accessed resource is temporarily located in a different URI. A typical example is being redirected to a login page if authenticated. |
|
|
A cached resource is still valid. The body should be empty. This status code is only returned if the client requested cached information, for example, using the |
|
|
A generic error in the request. This is the server saying, "something went wrong on your end." A more descriptive message should be added to the body. If a more descriptive status code is possible, it should be preferred. |
|
|
The request is not allowed, as the request is not properly authenticated. The request may lack valid headers for authentication. |
|
|
The request is authenticated, but it can't access this resource. This is different from the |
|
|
Probably the most famous status code! The resource described by the URI cannot be found. |
|
|
The requested method cannot be used; for example, the resource cannot be deleted. |
|
|
The server should return this status code if there's a limit to the number of requests the client can do. It should return a description or more info in the body, and ideally, a |
|
|
A generic error in the server. This status should only be used if an unexpected error happened in the server. |
|
|
The server is redirecting the request to a different server, and the communication was incorrect. This error normally appears when some backend service is unavailable or incorrectly configured. |
|
|
The server is currently unable to handle requests. Normally, this is a temporary situation, such as a load problem. It could be used to mark maintenance downtime, but this is generally rare. |
|
|
Similar to |
In general, non-descriptive error codes such as 400 Bad Request and 500 Server Error should be left for general situations. However, if there is a better, more descriptive status code, this should be used instead.
For example, a PATCH request to overwrite a parameter should return 400 Bad Request if the parameter is incorrect for any reason, but 404 Not Found if the resource URI is not found.
There are other status codes. You can check a comprehensive list, including details on each one, here: https://httpstatuses.com/.
In any error, please include some extra feedback to the user with a reason. A general descriptor can help the handling of unexpected cases and simplify debugging issues.
This is especially useful for 4XX errors as they will help users of the API to fix their own bugs and iteratively improve their integration.
For example, the mentioned PATCH may return this body:
{
    "message": "Field 'address' is unknown"
}
This will give specific details about the problem. Other options include returning error codes, multiple messages in case there are multiple possible errors, and also duplicating the status code in the body.
Designing resources
The available actions in a RESTful API are limited to CRUD operations. Therefore, resources are the basic construction blocks for the API.
Making everything a resource helps to create very explicit APIs and helps with the stateless requirement for RESTful interfaces.
A stateless service means that all the information required to fulfill a request is either provided by the caller or retrieved externally, normally from a database. This excludes other ways of keeping information, such as storing information locally in the same server's hard drive. This makes any server capable of handling every single request, and it's critical in achieving scalability.
Elements that could be activated by creating different actions could be separated into different resources. For example, an interface simulating a pen could require the following elements:
- Opening and closing the pen.
- Writing something. Only an open pen can write.
In some APIs, like an object-oriented one, this could involve creating a pen object and changing its state:
pen = Pen()
pen.open()
pen.write("Something")
pen.close()
In a RESTful API, we need to create different resources for both the pen and its status:
# Create a new pen with id 1
POST /pens
# Create a new open pen for pen 1
POST /pens/1/open
# Update the new open text for the open pen 1
PUT /pens/1/open/1/text
# Delete the open pen, closing the pen
DELETE /pens/1/open/1
This may look a bit cumbersome, but RESTful APIs should aim to be higher level than the typical object-oriented one. Either create the text directly, or create a pen and then the text, without having to perform the open/close operation.
Keep in mind that RESTful APIs are used in the context of remote calls. This means that they can't be low level, as each call is a big investment compared with a local API, as the time per call will be a sensible part of the operation.
Note also that every single aspect and step gets registered and has its own set of identifiers and is addressable. This is more explicit than the internal state that can be found in OOP. As we've seen, we want it to be stateless, while objects are very much stateful.
Keep in mind that a resource doesn't need to be translated directly into a database object. That's thinking backward, from the storage to the API. Remember that you are not limited to that, and can compose resources that obtain information from multiple sources or that don't fit into a direct translation. We will see examples in the next chapter.
Dealing only with resources can require certain adaptations if coming from a more traditional OOP environment, but they are a pretty flexible tool and can allocate multiple ways of performing actions.
Resources and parameters
While everything is a resource, some elements make more sense as a parameter that interacts with the resource. This is very natural when modifying the resource. Any change needs to be submitted to update the resource. But, in other cases, some resources could be modified for other causes. The most common case is searches.
A typical search endpoint will define a search resource and retrieve its results. However, a search without parameters to filter is not really useful, so extra parameters will be required to define the search, for example:
# Return every pen in the system
GET /pens/search
# Return only red pens
GET /pens/search?color=red
# Return only red pens, sorted by creation date
GET /pens/search?color=red&sort=creation_date
These parameters are stored in query parameters, which are natural extensions to retrieve them.
As a general rule, only GET requests should have query parameters. Other kinds of request methods should provide any parameters as part of the body.
GET requests are also easy to cache if including the query parameters. If the search is returning the same values for each request, given that that's an idempotent request, the full URI, including the query parameters, can be cached even externally from the service.
By convention, all logs that store GET requests will also store the query params, while any parameter sent as a header or in the body of the request won't be logged. This has security implications, as any sensible parameter, such as a password, shouldn't be sent as a query parameter.
Sometimes, that's the reason to create POST operations that typically would be a GET request, but prefer to set parameters in the body of the request instead of query parameters. While it is possible in the HTTP protocol to set the body in a GET request, it's definitely very unusual.
An example of this could be searching by phone number, email, or other personal information, so a middle-man agent could intercept and learn about them.
Another reason to use POST requests is to allow a bigger space for parameters, as the full URL, including query parameters, is normally limited to 2K in size, while bodies are much less restricted in size.
Pagination
In a RESTful interface, any LIST request that returns a sensible number of elements should be paginated.
This means that the number of elements and pages can be tweaked from the request, returning only a specific page of elements. This limits the scope of the request and avoids very slow response times and waste transmission bytes.
An example could involve using the parameters page and size, for example:
# Return only first 10 elements
GET /pens/search?page=1&size=10
A well-constructed response will have a similar format to this:
{
    "next": "http://pens.pns/pens/search?page=2&size=10",
    "previous": null,
    "result": [
        # elements
    ]
}
It contains a result field with the resulting list and next and previous fields that are hyperlinks to the next and previous page, with a value of null if it is not available. This makes it easy to walk through all the results.
A sort parameter could also be useful to ensure consistency in pages.
This technique also allows multiple pages to be retrieved in parallel, which can speed up the downloading of information, doing several small requests instead of one big one. The objective, though, is to provide sufficient filter parameters for generally returning not too much information, being able to retrieve only the relevant information.
Pagination has a problem, which is that the data in the collection may change between multiple requests, especially if retrieving many pages. The problem is as follows:
# Obtain first page
GET /pens/search?page=1&size=10&sort=name
# Create a new resource that is added to the first page
POST /pens
# Obtain second page
GET /pens/search?page=2&size=10&sort=name
The second page now has a repeated element that used to be on the first page but has now moved to the second, and then there's one element that's not returned. Normally, the non-return of the new resource is not that much of a problem, as, after all, the retrieval of information started before its creation. However, the return of the same resource twice can be.
To avoid this kind of problem, there's the possibility of sorting by default the values by creation date or something analogous. This way, any new resource will be added at the end of pagination and will be consistently retrieved.
For resources that return inherently "new" elements, like notifications or similar, add an updated_since parameter to retrieve only the new resources since the most recent access. This speeds up access in a practical way and retrieves only the relevant information.
Creating a flexible pagination system increases the usefulness of any API. Be sure that your pagination definition is consistent across any different resources.
Designing a RESTful API process
The best way to start designing a RESTful API is to clearly state the resources and then describe them, including the following details:
- Description: Description of the action
- Resource URI: Note that this may be shared for several actions, differentiated by the method (for example, GET to retrieve and DELETE to delete)
- Methods applicable: The HTTP method to use for the action defined in this endpoint
- (Only if relevant) Input body: The input body of the request
- Expected result in the body: Result
- Possible expected errors: Returning status codes depending on specific errors
- Description: Description of the action
- (Only if relevant) Input query parameters: Query parameters to add to the URI for extra functionality
- (Only if relevant) Relevant headers: Any supported header
- (Only if relevant) Returning status codes out of the ordinary (200 and 201): Different from errors, in case there's a status code that's considered a success but it's not the usual case; for example, a success returns a redirection
This will be enough to create a design document that can be understood by other engineers and allow them to work on the interface.
It is good practice, though, to start with a quick draft of the different URIs and methods, and to have a quick look at all the different resources that the system has without getting into too much detail, such as a body description or errors. This helps to detect missing resource gaps or other kinds of inconsistencies in the API.
For example, the API described in this chapter has the following actions:
GET    /pens
POST   /pens
POST   /pens/<pen_id>/open
PUT    /pens/<pen_id>/open/<open_pen_id>/text
DELETE /pens/<pen_id>/open/<open_pen_id>
GET    /pens/search
There are a couple of details that can be tweaked and improved here:
- It looks like we forgot to add the action to remove a pen, once created
- There are a couple of
GETactions for retrieving information about the created resource that should be added - In the
PUTaction, it feels a bit redundant to have to add/text
With this feedback, we can again describe the API as follows (modifications have an arrow):
GET    /pens
POST   /pens
GET    /pens/<pen_id>
DELETE /pens/<pen_id> ←
POST   /pens/<pen_id>/open
GET    /pens/<pen_id>/open/<open_pen_id> ←
PUT    /pens/<pen_id>/open/<open_pen_id> ←
DELETE /pens/<pen_id>/open/<open_pen_id>
GET    /pens/search
Note how the organization in the hierarchical structure helps to take a good look at all the elements and find either gaps or relations that may not be obvious at first glance.
After that, we can get into details. We can use the template described at the start of the section, or any other one that works for you. For example, we can define the endpoints to create a new pen and read a pen in the system:
Creating a new pen:
- Description: Creates a new pen, specifying the color.
- Resource URI:
/pens - Method:
POST - Input body:
{ "name": <pen name>, "color": (black|blue|red) } - Errors:
400 Bad Request
Error in the body, such as an unrecognized color, a duplicated name, or a bad format.
Retrieving an existing pen:
- Description: Retrieves an existing pen.
- Resource URI:
/pens/<pen id> - Method:
GET - Return body:
{ "name": <pen name>, "color": (black|blue|red) } - Errors:
404 Not Found
The pen ID is not found.
The main objective is that these small templates are useful and to the point. Feel free to tweak them as expected, and don't worry about being too completist with the errors or details. The most important part is that they are useful; for example, adding a 405 Method Not Allowed message could be redundant.
The API can also be designed using tools such as Postman (www.postman.com), which is an API platform that can be used to either design or test/debug existing APIs. While useful, it is good to be able to design an API without external tools, in case that's required, and because it forces you to think about the design and not necessarily the tool itself. We will also see how to use Open API, which is based more on the definition, and not so much on providing a test environment.
Designing and defining an API can also enable it to be structured in a standard manner afterward to take advantage of tools.
Using the Open API specification
A more structured alternative is to use a tool such as Open API (https://www.openapis.org/). Open API is a specification for defining a RESTful API through a YAML or JSON document. This allows this definition to interact with other tools to generate automatic documentation for the API.
It allows the definition of different components that can be repeated, both as input and output. This makes it easy to build consistent reusable objects. There are also ways of inheriting or composing from one another, thereby creating a rich interface.
Describing the whole Open API specification in detail is beyond the scope of this book. Most common web frameworks allow integration with it, generating the YAML file automatically or the web documentation that we'll see later. It was previously called Swagger and its web page (https://swagger.io/) has a very useful editor and other resources.
For example, this is a YAML file that describes the two endpoints described above. The file is available on GitHub: https://github.com/PacktPublishing/Python-Architecture-Patterns/blob/main/pen_example.yaml:
openapi: 3.0.0
info:
  version: "1.0.0"
  title: "Swagger Pens"
paths:
  /pens:
    post:
      tags:
      - "pens"
      summary: "Add a new pen"
      requestBody:
        description: "Pen object that needs to be added to the store"
        required: true
        content:
          application/json:
            schema:
              $ref: "#/components/schemas/Pen"
      responses:
        "201":
          description: "Created"
        "400":
          description: "Invalid input"
  /pens/{pen_id}:
    get:
      tags:
      - "pens"
      summary: "Retrieve an existing pen"
      parameters:
      - name: "pen_id"
        in: path
        description: "Pen ID"
        required: true
        schema:
          type: integer
          format: int64
      responses:
        "200":
          description: "OK"
          content:
            application/json:
              schema:
                $ref: "#/components/schemas/Pen"
        "404":
          description: "Not Found"
components:
  schemas:
    Pen:
      type: "object"
      properties:
        name:
          type: "string"
        color:
          type: "string"
          enum:
            - black
            - blue
            - red
In the components part, the Pen object gets defined, and then is used in both endpoints. You can see how both endpoints, POST /pens and GET /pens/{pen_id}, are defined and describe the expected input and output, taking into account the different errors that can be produced.
One of the most interesting aspects of Open API is the ability to automatically generate a documentation page with all the information to help any possible implementation. The generated documentation looks like this:
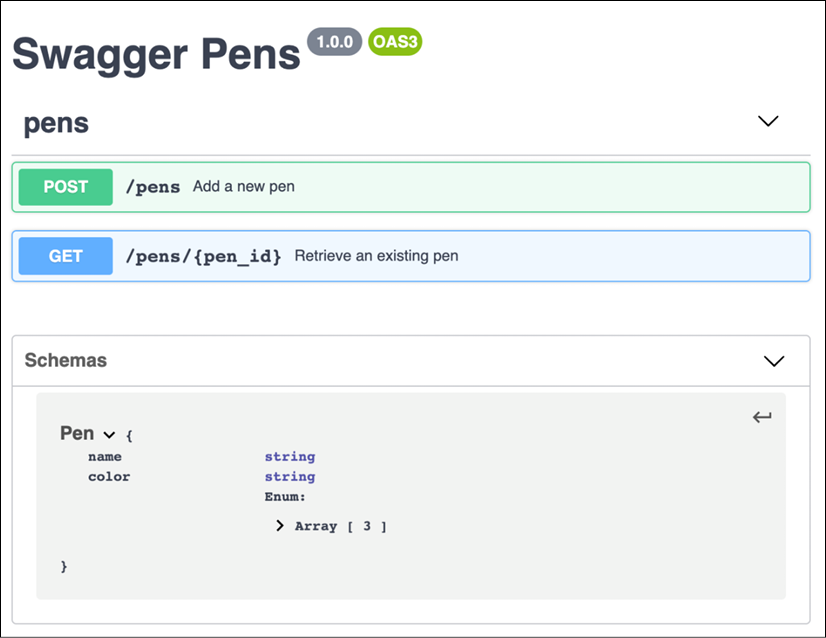
Figure 2.1: Swagger Pens documentation
If the YAML file describes your interface correctly and fully, this can be really useful. In some cases, it could be advantageous to work from the YAML to the API. This first generates the YAML file and allows work in both directions from there, both in the frontend direction and the backend direction. For an API-first approach, it may make sense. It's even possible to automatically create skeletons of clients and servers in multiple languages, for example, servers in Python Flask or Spring, and clients in Java or Angular.
Keep in mind that it's up to you to make the implementation match the definition closely. These skeletons will still require enough work to make them work correctly. Open API will simplify the process, but it won't magically solve all integration problems.
Each of the endpoints contains further information and can even be tested in the same documentation, thereby significantly helping an external developer who wants to use the API, as we can see in the next graphic:

Figure 2.2: Swagger Pens expanded documentation
Given that it's very easy to ensure that the server can generate this automatic documentation, even if the design is not started from an Open API YAML file, it's a good idea to generate it so as to create self-generating documentation.
Authentication
A critical part of virtually any API is the ability to distinguish between authorized and unauthorized access. Being able to log the user properly is critical, and a headache from the point of view of security.
Security is hard, so it's better to rely on standards to simplify the operation.
As we said before, these are just general tips, but in no way a comprehensive set of secure practices. This book is not focused on security. Please keep up with security issues and solutions, as this is a field that is always evolving.
The most important security issue regarding authentication is to always use HTTPS endpoints in production. This allows the channel to be protected against eavesdropping and makes communication private. Note that an HTTP website just means that the communication is private; you could be talking with the devil. But it's the bare minimum required to allow users of your API to send you passwords and other sensitive information without the fear that an external user is going to receive this information.
Normally, most architectures use HTTPS until the request reaches the data center or secure network, and then use HTTP internally. This permits a check on the data flowing internally but also protects data that is traveling across the internet. While less important these days, it also improves efficiency, as encoding requests in HTTPS require extra processing power.
HTTPS endpoints are valid for all access, but other details are specific depending on whether they are HTML interfaces or RESTful ones.
Authenticating HTML interfaces
In HTML web pages, normally, the flow to authenticate is as follows:
- A login screen gets presented to the user.
- The user enters their login and password and sends them to the server.
- The server verifies the password. If correct, it returns a cookie with a session ID.
- The browser receives the response and stores the cookie.
- All new requests will send the cookie. The server will verify the cookie and properly identify the user.
- The user can log out, removing the cookie. If this is done explicitly, a request will be sent to the server to delete the session ID. Typically, the session ID will have an expiry time for cleaning itself. This expiry can renew itself on each access or force the user to log in again from time to time.
It's important to set up the cookie as Secure, HttpOnly, and SameSite. Secure ensures that the cookie is only sent to HTTPS endpoints, and not to HTTP ones. HttpOnly renders the cookie inaccessible by JavaScript, which makes it more difficult to obtain the cookie via malicious code. The cookie will be sent automatically to the host that sets it. SameSite ensures that cookies are only sent when the origin of the source is a page from the same host. It can be set to Strict, Lax, and None. Lax allows you to navigate to the page from a different site, thereby sending the cookie, while Strict doesn't allow it.
You can obtain more information at the Mozilla SameSite Cookie page: https://developer.mozilla.org/en-US/docs/Web/HTTP/Headers/Set-Cookie/SameSite.
Possible bad usage of the cookie is through XSS (cross-site scripting) attacks. A compromised script reads that cookie, and then forges bad requests authenticated as the user.
Another important kind of security problem is cross-site request forgery (CSRF). In this case, the fact that the user is logged in on an external service is exploited by presenting a URL that will be automatically executed in a different, compromised website.
For example, while accessing a forum, a URL from a common bank is called, presented as an image, for example. If the user is logged in to this bank, the operation will be executed.
The SameSite attribute greatly reduces the risk of CSRF, but in case the attribute is not understood by older browsers, operations presented to the user by the bank should present a random token, making the user send both the authenticated request with the cookie and a valid token. An external page won't know a valid random token, making this exploit much more difficult.
The session ID that the cookie contains can either be stored in the database, being just a random unique identifier, or a rich token.
A random identifier is just that, a random number that stores the related information in the database, mainly, who is accessing and when the session expires. With every access, this session ID is queried to the server and the related information is retrieved. On very big deployments, with many accesses, this can create problems as it's less scalable. The database where the session ID is stored needs to be accessed by all workers, which can create a bottleneck.
One possible solution is to create a rich data token. This works by adding all the required information directly to the cookie; for example, storing the user ID, expiry, and so on, directly. This avoids database access, but makes the cookie possible to forge, as all information is in the open. To fix it, the cookie is signed.
The signature proves that the data was originated by a trusted login server and can be verified independently by any other server. This is more scalable and avoids bottlenecks. Optionally, the content can also be encrypted to avoid being read.
Another advantage of this system is that the generation of the token can be independent of the general system. If the token can be validated independently, there's no need for the login server to be the same as the general server.
Even more so, a single token signer can issue tokens for multiple services. This is the basis for SSO (Single Sign-On): log in to an auth provider and then use the same account in several related services. This is very common in common services such as Google, Facebook or GitHub, to avoid having to create a specific login for some web pages.
That operation mode, having a token authority, is the basis of the OAuth authorization framework.
Authenticating RESTful interfaces
OAuth has become a common standard for authenticating access for APIs, and RESTful APIs in particular.
There's a difference between authenticating and authorizing, and in essence, OAuth is an authorization system. Authenticating is determining who the user is, while authorizing is what the user is capable of doing. OAuth uses the concept of scope to return what the capabilities of a user are.
Most implementations of OAuth, such as OpenID Connect, also include the user information in the returning token to also authenticate the user, returning who the user is.
It is based on the idea that there's an authorizer who can check the identity of the user and provide them with a token with information allowing the user to log in. The service will receive this token and will log the user:
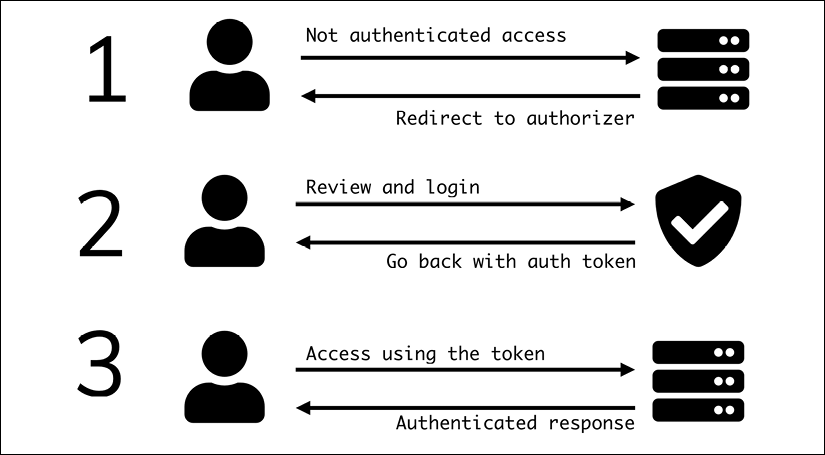
Figure 2.3: Authentication flow
The most common version at the moment is OAuth 2.0, which allows flexibility in terms of logging in and flow. Keep in mind that OAuth is not exactly a protocol, but provides certain ideas that can be tweaked to the specific use case.
This means that there are different ways in which you can implement OAuth, and, crucially, that different authorizers will implement it differently. Please verify their documentation with care when implementing the integration.
Generally, authorizers use the OpenID Connect protocol, which is based on OAuth.
There's an important difference in terms of whether the system accessing the API is the final user directly, or whether it accesses it on behalf of a user. An example of the latter could be a smartphone app to access a service like Twitter, or a service that needs to access the data stored for the user in GitHub, such as a code analysis tool. The app itself is not the one that performs the actions but transfers the actions of a user.
This flow is called the Authorization Code grant. The main characteristic is that the auth provider will present a login page to the user and redirect them with the authentication token.
For example, this could be the sequence of calls for the Authorization Code grant:
GET https://myservice.com/login
    Return a page with a form to initiate the login with authorizer.com
Follow the flow in the external authorize until login, with something like.
POST https://authorizer.com/authorize
  grant_type=authorization_code
  redirect_uri=https://myservice.com/redirect
  user=myuser
  password=mypassword
    Return 302 Found to https://myservice.com/redirect?code=XXXXX
GET https://myservice.com/redirect?code=XXXXX
-> Login into the system and set proper cookie,
   return 302 to https://myservice.com
If the system accessing the API is from the end user directly, the Client Credentials grant type flow can be used instead. In this case, the first call will send client_id (user ID) and client_secret (password) to retrieve the authentication token directly. This token will be set in new calls as a header, authenticating the request.
Note that this skips a step, and is easier to automate:
POST /token HTTP/1.1
  grant_type=authorization_code
  &client_id=XXXX
  &client_secret=YYYY
    Returns a JSON body with
    {
  "access_token":"ZZZZ",
  "token_type":"bearer",
  "expires_in":86400,
}
Make new requests setting the header
Authorization: "Bearer ZZZZ"
While OAuth allows you to use an external server to retrieve the access token, that's not strictly required. It can be the same server as the rest. This is useful for this last flow, where the ability to log in with an external provider such as Facebook or Google is not as useful. Our example system will use the Client Credentials flow.
Self-encoded tokens
The returned tokens from the authorization server can contain sufficient information such that no external check with the authorizer is required.
As we've seen, including the user information in the token is important to determine who the user is. If not, we will end with a request that is capable of doing the work, but without information on behalf of who.
To do so, the token is typically encoded in a JSON Web Token (JWT). A JWT is a standard that encodes a JSON object in a URL-safe sequence of characters.
A JWT has the following elements:
- A header. This contains information on how the token is encoded.
- A payload. The body of the token. Some of the fields in this object, called claims, are standard, but it can allocate custom claims as well. Standard claims are not required and can describe elements such as the issuer (
iss), or the expiration time of the token as Unix Epoch (exp). - A signature. This verifies that the token was generated by the proper source. This uses different algorithms, based on the information in the header.
In general, a JWT is encoded, but it's not encrypted. A standard JWT library will decode its parts and verify that the signature is correct.
You can test the different fields and systems in the interactive tool: https://jwt.io/.
For example, to generate a token using pyjwt (https://pypi.org/project/PyJWT/), you'll need to install PyJWT using pip if not previously installed:
$ pip install PyJWT
Then, while opening a Python interpreter, to create a token with a payload with a user ID and an HS256 algorithm to sign it with the "secret" secret, you use the following code:
>>> import jwt
>>> token = jwt.encode({"user_id": "1234"}, "secret", algorithm="HS256")
>>> token
'eyJ0eXAiOiJKV1QiLCJhbGciOiJIUzI1NiJ9.eyJ1c2VyX2lkIjoiMTIzNCJ9.vFn0prsLvRu00Kgy6M8s6S2Ddnuvz-FgtQ7nWz6NoC0'
The JWT token can then be decoded and the payload extracted. If the secret is incorrect, it will produce an error:
>>> jwt.decode(token,"secret", algorithms=['HS256'])
{'user_id': '1234'}
>>> jwt.decode(token,"badsecret", algorithms=['HS256'])
Traceback (most recent call last):
 …
  jwt.exceptions.InvalidSignatureError: Signature verification failed
The algorithm to be used is stored in the headers, but it's a good idea, for reasons of security, to only validate the token with the expected algorithm and not rely on the header. In the past, there have been some security problems with certain JWT implementations and forgery of the tokens, as you can read here: https://www.chosenplaintext.ca/2015/03/31/jwt-algorithm-confusion.html.
The most interesting algorithms, though, are not symmetrical ones like HS256, where the same value is added for encoding and decoding, but public-private keys like RSA-256 (RS256). This allows the token to be encoded with the private key and verified with the public key.
This schema is very common, as the public key can be distributed widely, but only the proper authorizer who has the private key can be the source of the tokens.
Including the payload information that can be used to identify the user allows authentication of the requests using just the information in the payload, once verified, as we discussed earlier.
Versioning the API
Interfaces are rarely created fully formed from scratch. They are constantly being tweaked, with new features added, and bugs or inconsistencies fixed. To better communicate these changes, it's useful to create some sort of versioning to transmit this information.
Why versioning?
The main advantage of versioning is to shape the conversation about what things are included when. This can be bug fixes, new features, or even newly introduced bugs.
If we know that the current interface released is version v1.2.3, and we are about to release version v1.2.4, which fixes bug X, we can talk about it more easily, as well as creating release notes informing users of that fact.
Internal versus external versioning
There are two kinds of versions that can get a bit confused. One is the internal version, which is something that makes sense for the developers of a project. This is normally related to the version of the software, usually with some help from version control, such as Git.
This version is very detailed and can cover very small changes, including small bug fixes. The aim of it is to be able to detect even minimal changes between software to allow the detection of bugs or the introduction of code.
The other is the external version. The external version is the version that people using the external service are going to be able to perceive. While this can be as detailed as the internal one, that is normally not that helpful to users and can provide a confusing message.
This largely depends on the kind of system and who their expected users are. A highly technical user will appreciate the extra details, but a more casual one will not.
For example, an internal version may distinguish between two different bug fixes, as this is useful to replicate. An externally communicated version can combine them both in "multiple bug fixes and improvements."
Another good example of when it's useful to make a difference is when the interface changes massively. For example, a brand-new revamp of the look and feel of a site could use "Version 2 interface," but this can happen over multiple internal new versions, to be tested internally or by a selected group (for example, beta testers). Finally, when the "Version 2 interface" is ready, it can be activated for all users.
One way of describing the external version could be to call it a "marketing version."
Note that here we are avoiding the term "release version" as it could be misleading. This version is only used to communicate information externally.
This version will be more dependent on marketing efforts than technical implementation.
Semantic versioning
A common pattern for defining versions is to use semantic versioning. Semantic versioning describes a method with three increasing integers that carry different meanings, in descending order of incompatibility:
vX.Y.Z
X is called the major version. Any change in the major version will mean backward-incompatible changes.
Y is the minor version. Minor changes may add new features, but any change will be backward compatible.
Z is the patch version. It will only make small changes such as bug fixes and security patches, but it doesn't change the interface itself.
The v at the start is optional but helps to indicate that it's a version number.
This means that software designed to work with v1.2.15 will work with versions v1.2.35 and v1.3.5, but it won't work with version v2.1.3 or version v1.1.4. It may work with version v1.2.14, but it may have some bug that was corrected later.
Sometimes, extra details can be added to describe interfaces that are not ready, for example, v1.2.3-rc1 (release candidate) or v1.2.3-dev0 (development version).
Normally, before the software is ready for release, the major number is set to zero (for example, v0.1.3), making version v1.0.0 the first one to be publicly available.
This semantic versioning is very easy to understand and gives good information about changes. It is widely used, but it has some problems in certain cases:
- Strictly adopting the major version for systems that don't have clear backward compatibility can be difficult. This was the reason why the Linux kernel stopped using proper semantic versioning, because they will never update the major version, as every single release needed to be backward compatible. In that case, a major version can be frozen for years and years and stops being a useful reference. In the Linux kernel, that happened with version 2.6.X, which remained for 8 years until version 3.0 was released in 2011 without any backward-incompatible change.
- Semantic versioning requires a pretty strict definition of the interface. If the interface changes often with new features, as happens typically with online services, the minor version increases quickly, and the patch version is of almost no use.
For online services, the combination of both will make only a single number useful, which is not a great use of it. Semantic versioning works better for cases that require multiple API versions working at the same time, for example:
- The API is very stable and changes very rarely, though there are regular security updates. Every couple of years, there's a major update. A good example is databases, such as MySQL. Operative systems are another example.
- The API belongs to a software library that can be used by multiple supported environments; for example, a Python library compatible with Python 2 for version v4 and Python 3 for v5. This can allow several versions to be kept alive if required.
If the system effectively has a single version running at the same time, it is better to not add the extra effort to keep proper semantic versioning in place as the effort is not worth the reward in terms of the kind of investment required.
Simple versioning
Instead of doing strict semantic versioning, a simplified version can be done instead. This won't carry the same kind of meaning, but it will be a constantly increasing counter. This will work to coordinate teams, although it won't require the same kind of commitment.
This is the same idea as the build number that can be created automatically by compilers, an increasing number to distinguish one version from another and work as a reference. However, a plain build number can be a bit dry to use.
It is better to use a similar structure to semantic versioning, as it will be understandable by everyone; but instead of using it with specific rules, it is looser than that:
- Normally, for a new version, increase the patch version.
- If either the patch version gets too high (in other words, 100, 10, or another arbitrary number), increase the minor version and set the patch version to zero.
- Alternatively, if there's any special milestone for the project, as defined by the people working on it, increase the minor number earlier.
- Do the same with the major version number.
This will allow the numbers to be increased in a consistent way without worrying too much about meaning.
This structure works very well for things like online cloud services, which, in essence, require an increasing counter, as they have a single version deployed at the same time. In this case, the most important use of the version is internal usage and won't require the maintenance that strict semantic versioning requires.
Frontend and backend
The usual way of dividing different services is by talking about the "frontend" and the "backend." They describe the layers of software, where the layer closer to the end user is the frontend, and the one behind is the backend.
Traditionally, the frontend is the layer that takes care of the presentation layer, next to the user, and the backend is the data access layer, which serves the business logic. In a client-server architecture, the client is the frontend and the server is the backend:

Figure 2.4: Client-Server architecture
As architectures grow more complex, these terms become somewhat polysemic, and they are usually understood depending on the context. While frontend is almost always understood as the user interface directly, backend can be applied to multiple layers, meaning the next layer that gives support to whatever system is being discussed. For example, in a cloud application, the web application may use a database such as MySQL as the storage backend, or in-memory storage such as Redis as the cache backend.
The general approach for the frontend and backend is quite different.
The frontend focuses on the user experience, so the most important elements are usability, pleasing design, responsiveness, and so on. A lot of that requires an eye for the "final look" and how to make things easy to use. Frontend code is executed in the final user, so compatibility between different types of hardware can be important. At the same time, it distributes the load, so performance is most important from the point of view of the user interface.
The backend focuses more on stability. Here, the hardware is under strict control, but the load is not distributed, making performance important in terms of controlling the total resources used. Modifying the backend is also easier, as changing it once changes it for all the users at the same time. But it's riskier, as a problem here may affect every single user. This environment primes more to focus on solid engineering practices and replicability.
The term full stack engineer is commonly used to describe someone who is comfortable doing both kinds of work. While this can work in certain aspects, it's actually quite difficult to find someone who is equally comfortable or who is inclined to work on both elements in the longer term.
Most engineers will naturally tend toward one of the sides, and most companies will have different teams working on both aspects. In a certain way, the personality traits for each work are different, with frontend work requiring more of an eye for design, and backend users being comfortable with stability and reliability practices.
In general, some common technologies used for the frontend are as follows:
- HTML and associated technologies such as CSS
- JavaScript and libraries or frameworks to add interactivity, such as jQuery or React
- Design tools
Backend technologies, as they are under more direct control, can be more varied, for example:
- Multiple programming languages, either scripting languages such as Python, PHP, Ruby, or even JavaScript using Node.js, or compiled languages such as Java or C#. They can even be mixed, making different elements in different languages.
- Databases, either relational databases such as MySQL or PostgreSQL, or non-relational ones such as MongoDB, Riak, or Cassandra.
- Web servers, such as Nginx or Apache.
- Scalability and high-availability tools, such as load balancers.
- Infrastructure and cloud technologies, such as AWS services.
- Container-related tech, like Docker or Kubernetes.
The frontend will make use of interfaces defined by the backend to present the actions in a user-friendly way. There can be several frontends for the same backend, a typical example being multiple smartphone interfaces for different platforms, but that use the same API to communicate with the backend.
Keep in mind that frontend and backend are conceptual divisions, but they don't necessarily need to be divided into different processes or repositories. A common case where the frontend and backend live together are web frameworks such as Ruby on Rails or Django, where you can define the frontend HTML interface at the same time as the backend controllers that handle the data access and business logic. In this case, the HTML code is served directly from the same process that performs access to the data. This process separates the concerns using the Model View Controller structure.
Model View Controller structure
The Model View Controller, or MVC, is a design that separates the logic of a program into three distinct components.
The Model View Controller pattern started very early in the design of graphic user interfaces and has been used in that area since the first full graphic interactive interfaces in the 80s. In the 90s, it started being introduced as a way of handling web applications.
- This structure is really successful as it creates a clear separation of concepts:
- The Model manages the data
- The Controller accepts input from the user and transforms it into the manipulation of the model
- The View represents the information for the user to understand
In essence, the Model is the core of the system, as it deals with the manipulation of the data. The Controller represents the input, and the View represents the output of the operations.
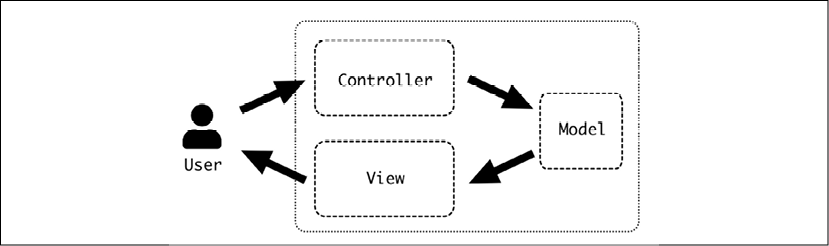
Figure 2.5: The Model View Controller pattern
The MVC structure can be considered at different levels, and it can be regarded as fractal. If several elements interact, they can have their own MVC structure, and the model part of a system can talk to a backend that provides information.
The MVC pattern can be implemented in different ways. For example, Django claims it is a Model View Template, as the controller is more the framework itself. However, these are minor details that don't contradict the general design.
The Model is arguably the most important element of the three as it's the core part of it. It contains the data access, but also the business logic. A rich Model component works as a way of abstracting the logic of the application from the input and output.
Commonly, some of the barriers between controllers get a bit blurry. Different inputs may be dealt with in the Controller, producing different calls to the Model. At the same time, the output can be tweaked in the Controller before being passed to the view. While it's always difficult to enforce clear, strict boundaries, it's good to keep in mind what the main objective of each component is so as to provide clarity.
HTML interfaces
While the strict definition of APIs works for interfaces that are designed to be accessed by other programs, it's good to spend a bit of time talking about the basics of how to create a successful human interface. For this purpose, we will talk mainly about HTML interfaces, aimed at being used by the end user in a browser.
Most of the concepts that we will deal with apply to other kinds of human interfaces, such as GUIs or mobile applications.
HTML technologies are highly related to RESTful ones because they were developed in parallel during the early days of the internet. Typically, they are presented intertwined in modern web applications.
Traditional HTML interfaces
The way traditional web interfaces work is through HTTP requests, only using the GET and POST methods. GET retrieves a page from the server, while POST is paired with some form that submits data to the server.
This was a prerequisite, as browsers only implemented these methods. While, nowadays, most modern browsers can use all HTTP methods in requests, it's still a common requirement to allow compatibility with older browsers.
While this is certainly more restrictive than all the available options, it can work well for simple website interfaces.
For example, a blog is read way more often than is written, so readers make use of a lot of GET requests to get the information, and perhaps some POST requests to send back some comments. The need to remove or change a comment was traditionally small, although it can be allocated with other URLs where POST is used.
Note that browsers will ask you before retrying a POST request as they are not idempotent.
An HTML interface doesn't work in the same way as a RESTful interface because of these limitations, but it can also improve with a design that takes the abstractions and resources approach in mind.
For example, some common abstractions for a blog are as follows:
- Each post, with associated comments
- A main page with the latest posts
- A search page that can return posts that contain a certain word or tag
This is very similar to the interface in resources, where only the two resources of "comment" and "post,", which will be separated in a RESTful way, will be joined in the same concept.
The main limitation of traditional HTML interfaces is that every change needs to refresh the whole page. For simple applications like a blog, this can work quite well, but more complex applications may require a more dynamic approach.
Dynamic pages
To add interactivity to the browser, we can add some JavaScript code that will perform actions to change the page directly on the browser representation; for example, selecting the color of the interface from a drop-down selector.
This is called manipulating the Document Object Model (DOM), which contains the representation of the document as defined by the HTML and possibly the CSS. JavaScript can access this representation and change it by editing any parameters or even adding or removing elements.
From JavaScript, independent HTTP requests can also be done, so we can use that to make specific calls to retrieve details that can be added to improve the experience of the user.
For example, for a form to input an address, a dropdown may select the country. Once selected, a call to the server will retrieve the proper regions to incorporate the input. If the user selects United States, the list of all states will be retrieved and be available in the next dropdown. If the user selects Canada, the list of territories and provinces will be used instead:
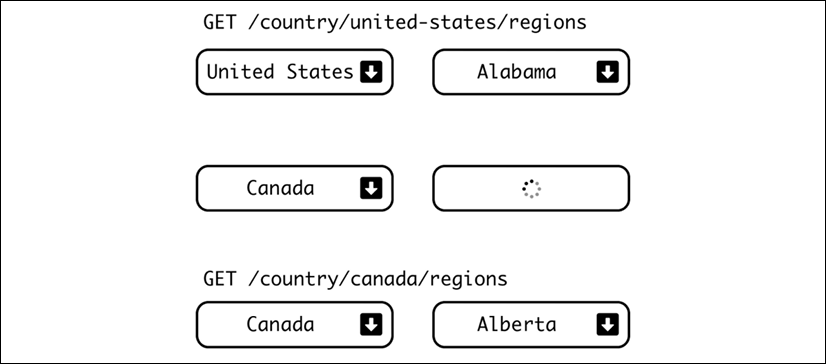
Figure 2.5: Improving user experience with appropriate dropdowns
Another example, that reverses the interface somewhat, could be to use the ZIP code to determine the state automatically.
There is actually a service to retrieve this information called https://zippopotam.us/. It can be called and returns not only the state but further information, in JSON format.
These kinds of calls are called Asynchronous JavaScript And XML (AJAX). Although the name mentions XML, it's not required, and any format can be retrieved. At the moment, it is very common to use JSON or even plain text. One possibility is to use HTML, so an area of the page can be replaced with snippets that come from the server:
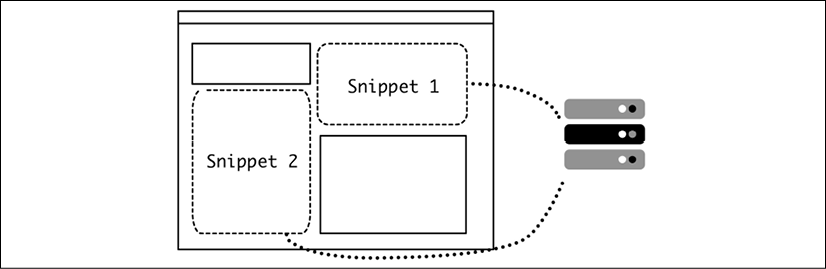
Figure 2.6: Using HTML to replace areas of the page
Raw HTML, although somewhat inelegant, can be effective, so it's very common to use a RESTful API returning JSON to retrieve the expected data for these small elements and then modify the DOM with it through JavaScript code. Given that the objective of this API is not to replace the HTML interface in its entirety, but complement it, this RESTful API will likely be incomplete. It won't be possible to create a full experience using only these RESTful calls.
Other applications go directly to the point of creating an API-first approach and create the browser experience from there.
Single-page apps
The idea behind a single-page app is easy. Let's open a single HTML page and change its content dynamically. If there's any new data to be required, it will be accessed through a specific (typically RESTful) API.
This completely detaches the human interface, understood as the elements that have the responsibility of displaying the information to a human, from the service. The service serves a RESTful API exclusively, without worrying about the representation of the data.
This kind of approach is sometimes called API-first as it designs a system from the API to the representation, instead of creating it the other way around, which is the natural way in which it is created in an organic service.
Although there are specific frameworks and tools designed with this objective in mind, such as React or AngularJS, there are two main challenges with this kind of approach:
- The technical skill required to create a successful human interface on a single page is quite high, even with the help of tools. Any non-trivial representation of a valid interface will require keeping a lot of state and dealing with multiple calls. This is prone to have errors that compromise the stability of the page. The traditional approach for browser pages works with independent pages that limit the scope of each step, which is easier to handle.
Keep in mind that there are interface expectations carried by the browser that can be difficult to avoid or replace, for example, hitting the back button.
- The need to design and prepare the API beforehand can result in a slow start for the project. It requires more planification and upfront commitment, even if both sides are developed in parallel, which also has its challenges.
These issues ensure that this approach is not usually done for new applications starting from scratch. However, if the application started with another kind of user interface, like a smartphone application, it could leverage the already existing REST API to generate an HTML interface that replicates the functionality.
The main advantage of this approach is detaching the application from the user interface. Where an application starts its development as a small project with a regular HTML interface, the risk is that any other user interface will tend to conform to the HTML interface. This can quickly add up to a lot of technical debt and compromise the design of the API, as the abstractions that are used will likely be derived from the existing interface, instead of the most adequate ones.
A whole API-first approach greatly separates the interface, so creating a new interface is as easy to use as the already existing API. For applications that require multiple interfaces, such as an HTML interface, but also different smartphones applications for iOS and Android, that could be a good solution.
A single-page application can also be quite innovative in terms of presenting a full interface. This can create rich and complex interfaces that deviate from what could be understood as a "web page," as in the case of a game or an interactive application.
Hybrid approach
Going all-in with a single-page application, as we've seen, can be quite challenging. To a certain degree, it is using a browser to overwrite its usage.
That's why normally the design doesn't go that far and creates a more traditional web interface. This interface is still recognizable as a web application but relies heavily on JavaScript to obtain information using a RESTful interface. This can happen as a natural step to migrating from a traditional HTML interface to a single-page app, but it may also be a conscious decision.
This approach combines the previous two. On the one hand, it still requires an HTML interface for the general approach of the interface, with clear pages to navigate. On the other, it creates a RESTful API that fills most of the information and uses JavaScript to make use of this API.
This approach is similar to the dynamic page one, but there is an important difference, which is the intention to create a coherent API that can be used without being totally tailored to the HTML interface. That changes the approach significantly.
In practice, this tends to create a less complete RESTful API, as some of the elements may be added directly to the HTML part of it. But, at the same time, it allows the iterative migration of elements into the API, starting with certain elements, but adding more as time goes by. This stage is very flexible.
Designing the API for the example
As we described in the first chapter, General Overview of the Example, we need to set the definition for the different interfaces that we will be working on in the example. Remember that the example is a microblogging application that will allow users to write their own text microposts so that they are available for others to read.
There are two main interfaces in the example:
- An HTML interface for allowing users to interact with the service using a browser
- A RESTful interface for allowing the creation of other clients like a smartphone app
In this chapter, we will describe the design of the second interface. We will start with a description of the different basic definitions and resources that we will use:
- User: A representation of the user of the application. It will be defined by a username and a password to be able to login.
- Micropost: A small text of up to 255 characters posted by a User. A Micropost can be optionally addressed to a User. It has also the time it was created.
- Collection: The display of Microposts from a User.
- Follower: A User can follow another User.
- Timeline: An ordered list of the Microposts by the followed Users.
- Search: Allow a search by User or by text contained in Microposts.
We can define these elements as resources in a RESTful way, in the way introduced earlier in the chapter, first as a quick description of the URIs:
POST   /api/token
DELETE /api/token
GET    /api/user/<username>
GET    /api/user/<username>/collection
POST   /api/user/<username>/collection
GET    /api/user/<username>/collection/<micropost_id>
PUT    /api/user/<username>/collection/<micropost_id>
PATCH  /api/user/<username>/collection/<micropost_id>
DELETE /api/user/<username>/collection/<micropost_id>
GET    /api/user/<username>/timeline
GET    /api/user/<username>/following
POST   /api/user/<username>/following
DELETE /api/user/<username>/following/<username>
GET    /api/user/<username>/followers
GET    /api/search
Note that we added POST and DELETE resources for /token to deal with login and logout.
Once this brief design is complete, we can flesh out the definition of each endpoint.
Endpoints
We will describe all the API endpoints in a bit more detail, following the template introduced previously in this chapter.
Login:
- Description: Using the proper authentication credentials, return a valid access token. The token needs to be included in the requests as the
Authorizationheader. - Resource URI:
/api/token - Method:
POST - Request body:
{ "grant_type": "authorization_code" "client_id": <client id>, "client_secret": <client secret> } - Return body:
{ "access_token": <access token>, "token_type":"bearer", "expires_in":86400, } - Errors:
400 Bad Request Incorrect body.
400 Bad Request Bad credentials.
Logout:
- Description: Invalidate the bearer token. If successful, it will return a
204 No Contenterror. - Resource URI:
/api/token - Method:
DELETE - Headers:
Authentication: Bearer: <token> - Errors:
401 Unauthorized Trying to access this URI without being properly authenticated.
Retrieve user:
- Description: Returns the username resource.
- Resource URI:
/api/users/<username> - Method:
GET - Headers:
Authentication: Bearer: <token> - Query Parameters:
size Page size. page Page number. - Return body:
{ "username": <username>, "collection": /users/<username>/collection, } - Errors:
401 Unauthorized Trying to access this URI without being authenticated.
404 Not Found Username does not exist.
Retrieve user's collection:
- Description: Returns the collection of all microposts from a user, in paginated form.
- Resource URI:
/api/users/<username>/collection - Method:
GET - Headers:
Authentication: Bearer: <token> - Return body:
{ "next": <next page or null>, "previous": <previous page or null>, "result": [ { "id": <micropost id>, "href": <micropost url>, "user": <user url>, "text": <Micropost text>, "timestamp": <timestamp for micropost in ISO 8601> }, ... ] } - Errors:
401 Unauthorized Trying to access this URI without being authenticated.
404 Not Found Username does not exist.
Create new micropost:
- Description: Create a new micropost.
- Resource URI:
/api/users/<username>/collection - Method:
POST - Headers:
Authentication: Bearer: <token> - Request body:
{ "text": <Micropost text>, "referenced": <optional username of referenced user> } - Errors:
400 Bad Request Incorrect body.
400 Bad Request Invalid text (for example, more than 255 characters).
400 Bad Request Referenced user not found.
401 Unauthorized Trying to access this URI without being authenticated.
403 Forbidden Trying to create a micropost of a different user to the one logged in.
Retrieve micropost:
- Description: Returns a single micropost.
- Resource URI:
/api/users/<username>/collection/<micropost_id> - Method:
GET - Headers:
Authentication: Bearer: <token> - Return body:
{ "id": <micropost id>, "href": <micropost url>, "user": <user url>, "text": <Micropost text>, "timestamp": <timestamp for micropost in ISO 8601>, "referenced": <optional username of referenced user> } - Errors:
401 Unauthorized Trying to access this URI without being authenticated.
404 Not Found Username does not exist.
404 Not Found Micropost ID does not exist.
Update micropost:
- Description: Update the text for a micropost.
- Resource URI:
/api/users/<username>/collection/<micropost_id> - Method:
PUT, PATCH - Headers:
Authentication: Bearer: <token> - Request body:
{ "text": <Micropost text>, "referenced": <optional username of referenced user> } - Errors:
400 Bad Request Incorrect body.
400 Bad Request Invalid text (for example, more than 255 characters).
400 Bad Request Referenced user not found.
401 Unauthorized Trying to access this URI without being authenticated.
403 Forbidden Trying to update a micropost of a different user to the one logged in.
404 Not Found Username does not exist.
404 Not Found Micropost ID does not exist.
Delete micropost:
- Description: Delete a micropost. If successful, it will return a
204 No Contenterror. - Resource URI:
/api/users/<username>/collection/<micropost_id> - Method:
DELETE - Headers:
Authentication: Bearer: <token> - Errors:
401 Unauthorized Trying to access this URI without being authenticated.
403 Forbidden Trying to delete a micropost of a different user to the one logged in.
404 Not Found Username does not exist.
404 Not Found Micropost ID does not exist.
Retrieve user's timeline:
- Description: Returns the collection of all microposts from the timeline of a user, in paginated form. The microposts will be returned by timestamp order, with the oldest being returned first.
- Resource URI:
/api/users/<username>/timeline - Method:
GET - Headers:
Authentication: Bearer: <token> - Return body:
{ "next": <next page or null>, "previous": <previous page or null>, "result": [ { "id": <micropost id>, "href": <micropost url>, "user": <user url>, "text": <Micropost text>, "timestamp": <timestamp for micropost in ISO 8601>, "referenced": <optional username of referenced user> }, ... ] } - Errors:
401 Unauthorized Trying to access this URI without being authenticated.
404 Not Found Username does not exist.
Retrieve the users a user is following:
- Description: Returns a collection of all users that the selected user is following.
- Resource URI:
/api/users/<username>/following - Method:
GET - Headers:
Authentication: Bearer: <token> - Return body:
{ "next": <next page or null>, "previous": <previous page or null>, "result": [ { "username": <username>, "collection": /users/<username>/collection, }, ... ] } - Errors:
401 Unauthorized Trying to access this URI without being authenticated.
404 Not Found Username does not exist.
Follow a user:
- Description: Causes the selected user to follow a different user.
- Resource URI:
/api/users/<username>/following - Method:
POST - Headers:
Authentication: Bearer: <token> - Request body:
{ "username": <username> } - Errors:
400 Bad Request The username to follow is incorrect or does not exist.
400 Bad Request Bad body.
401 Unauthorized Trying to access this URI without being authenticated.
404 Not Found Username does not exist.
Stop following a user:
- Description: Stops following a user. If successful, it will return a
204 No Contenterror. - Resource URI:
/api/users/<username>/following/<username> - Method:
DELETE - Headers:
Authentication: Bearer: <token> - Errors:
401 Unauthorized Trying to access this URI without being authenticated.
403 Forbidden Trying to stop following a user who is not the authenticated one.
404 Not Found Username to stop following does not exist.
Retrieve a user's followers:
- Description: Returns, in paginated form, all followers of this user.
- Resource URI:
/api/users/<username>/followers - Method:
GET - Headers:
Authentication: Bearer: <token> - Return body:
{ "next": <next page or null>, "previous": <previous page or null>, "result": [ { "username": <username>, "collection": /users/<username>/collection, }, ... ] } - Errors:
401 Unauthorized Trying to access this URI without being authenticated.
404 Not Found Username does not exist.
Search microposts:
- Description: Returns, in paginated form, microposts that fulfill the search query.
- Resource URI:
/api/search - Method:
GET - Headers:
Authentication: Bearer: <token> - Query parameters:
username: Optional username to search. Partial matches will be returned. text: Mandatory text to search, with a minimum of three characters. Partial matches will be returned. - Return body:
{ "next": <next page or null>, "previous": <previous page or null>, "result": [ { "id": <micropost id>, "href": <micropost url>, "user": <user url>, "text": <Micropost text>, "timestamp": <timestamp for micropost in ISO 8601>, "referenced": <optional username of referenced user> }, ] } - Errors:
400 Bad Request No mandatory query parameters.
400 Bad Request Incorrect value in query parameters.
401 Unauthorized Trying to access this URI without being authenticated.
Review of the design and implementation
This two-step approach of presenting and designing a new API enables you to quickly see whether something is out of place as regards the design. Then, it can be iterated over until fixed. The next step is to start with the implementation, as we will see in forthcoming chapters.
Summary
In this chapter, we described how the basics of API design are to create a set of useful abstractions that allow users to perform actions without having to care about the internal details. This led to describing how to define an API with resources and actions.
This definition of an API has evolved to cover RESTful interfaces that follow certain properties that make them very interesting for web server design. We described a bunch of useful standards and techniques when designing RESTful interfaces to create consistent and complete interfaces, including the OpenAPI tools. We went through authentication details as it's a very important element for APIs.
Remember that extra care should be advised when securing APIs that have external usage. We went through some general ideas and common strategies, but note that this book does not focus on security. This is a critical aspect of the design of any API and should be done carefully.
We covered the ideas behind versioning and how to create a proper versioning schema that's tailored to the specific use case for the API. We also covered the differences between the frontend and the backend and how this can be generalized. We also covered the MVC pattern, which is a very common way to structure software.
We described the different options for HTML interfaces to provide a complete overview of the different interfaces in web services. We covered different options in terms of how an HTML service can be constructed and interact with other APIs.
Finally, we presented the design for the RESTful interface for the example, while reviewing the general design and endpoints.
Another critical element of design is the data structure. We will cover this next.
Join our book’s Discord space
Join the book’s Discord workspace for a monthly Ask me Anything session with the authors:
https://packt.link/PythonArchitechture
