In this chapter, we explore a number of different advanced techniques that can be applied to your Django code, such as the generation of RSS and other formats, customizing the behavior of the admin application, and advanced use of the templating system.
The next chapter, Chapter 12, “Advanced Django Deployment,” consists of a similar group of topics, such as testing, data imports, and scripting—things that are more tangential to your core application logic. In both chapters, order doesn’t really matter—feel free to skip around as you see fit.
Django’s admin app is, in some ways, its crown jewel. This can seem odd to say about a component that lives in the “contrib” directory—those that inhabitant these confines are usually optional add-ons not core components. However, Django’s developers have labeled it that way because it’s the right thing to do—you don’t have to use the admin when you use Django, so it shouldn’t be required. But make no mistake: The admin app is a powerful and compelling application. If your project requires you to quickly create a polished, usable interface for adding and editing data, the admin is your friend.
Throughout the rest of the book, you’ve seen some of the customizations possible via ModelAdmin subclasses. For instance, just setting the list_display, list_filter, and search_fields options gives you much of the basic customization that you need.
It’s also been mentioned that the admin site used in our examples is the “default” admin site—and that’s because it’s possible to set up multiple different admin sites for extra flexibility. This enables you to go a ways toward having different admin views for different groups of users, for example.
However, inevitably you want the admin to do more. It’s not uncommon for new Django developers, after playing with the admin for a while, to say something such as, “I’ve been reading the documentation, and there’s this one thing I can’t figure out how to make it do. But if it just did this one additional thing, it would be the perfect tool!”
In the following, we show you some ways you can customize and extend the admin app to do some things people commonly request. However, as you read this section, keep in mind the admin is just another Django app. It’s an incredibly useful one with a lovely interface and a lot of configurability, but in the end it if doesn’t do what you want, you have the power to replace it with something else.
Depending on the depth of the customizations you find yourself contemplating, it could be wiser in the end to develop your own custom admin rather than trying to twist the existing one into doing things it wasn’t really designed for. If the well-established techniques outlined here don’t go far enough for you, it’s probably time to consider creating your own admin. With this cautionary note out of the way, following are some of the more advanced admin customizations available.
The admin app’s fieldsets setting gives you some very granular control over how data is displayed. For example, it’s probably what you want to use if you want to add some custom CSS styles to particular elements, group fields in a certain way, add Javascript input helpers to selected fields, or initially have certain fields display in a hidden state.
Here’s a trivial example model with display customization done using fieldsets.
class Person(models.Model):
    firstname = models.CharField(max_length=50)
    lastname = models.CharField(max_length=50)
    city = models.CharField(max_length=50)
    state = models.CharField(max_length=2)

class PersonAdmin(admin.ModelAdmin):
    fieldsets = [
        ("Name", {"fields": ("firstname", "lastname")}),
        ("Location", {"fields": ("city", "state")})
    ]

admin.site.register(Person, PersonAdmin)
In Python-speak, the fieldsets setting is a list of two-tuples. The first item of each tuple is a string label for the group of fields, and the second item is a dictionary of settings for that group. Inside the dictionary, the keys are the names of particular options (we list them next); the associated values can be of various types depending on the particular option. In our minimal previous example, the fields option is being set to a tuple of field names.
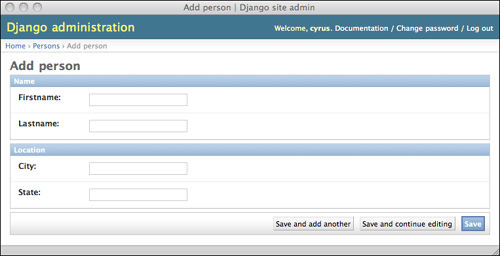
The result is the fields grouped via our use of the fieldsets option are displayed together in the admin, as seen in Figure 11.1.
Here are the options you can use (as dictionary keys per the previous example) under the fieldsets setting.
classes: This option specifies a tuple of strings, which are the names of CSS classes (ones available in your rendered template) that should be applied to this field group. The admin predefines a few classes that can be handy here: “collapsed,” which causes the fieldset to be collapsed under its header with a JavaScript-based toggle for expansion; “monospace,” which can be used for HTML
textareafields that are intended to contain code; and “wide,” which gives the fieldset a wider (though fixed) width in the admin. Look in the “media” directory inside django.contrib.admin to find the default stylesheets if you’re curious about what other classes you can use.
Note
If you are a practitioner of the “progressive enhancement” style of JavaScript development, the CSS classes you add via this option can serve as hooks for your custom JavaScript code—for example, if you want to add a WYSIWYG editor to a textarea.
description: This option specifies a string that is used as a description of the field group. Think of it as group-level
help_text. Django’s default admin CSS styles are carefully written to display text such as this in a readable, unobtrusive way. These nice design touches add even more value to simple labeling features such as this.fields: As explained previously, this option specifies a tuple of field names that should be grouped together visually in the admin. If the dictionary in which this option is set is prefaced by a string (for example, “Name” in our previous example), that label is used for the group. Otherwise, it appears without a textual header.
Going beyond simple settings changes, you can also make some significant adjustments to the appearance of your admin app by replacing one or more of the base templates with your own version. Of course, you’re not actually replacing per sé, but overriding the original templates with your own files, as we explain next.
Technically, the admin is just another Django app, but it’s a complicated one on all levels. The twisty maze of templates that it uses is not something a beginner should dive into unprepared. A gentle introduction is the template called base_site.html. Here’s the whole thing, reformatted slightly for presentation.
{% extends "admin/base.html" %}
{% load i18n %}
{% block title %}{{ title|escape }}|{% trans 'Django site admin' %}{% endblock %}
{% block branding %}
<h1 id="site-name">{% trans 'Django administration' %}</h1>
{% endblock %}
{% block nav-global %}{% endblock %}
With your knowledge of the Django template system, you understand the extends tag at the top is probably doing the heavy lifting here. You’re correct. A more complicated template called base.html is the true underlying template for all the admin pages. However, the two things in it you’d likely want to customize—the page’s <title> and the <h1> header block—have been tidily abstracted into base_site.html.
As for the customization, simply change the strings “Django site admin” and “Django administration” to whatever values are appropriate for your application and save the template. But where to save it?
To override the contents of this template, you need to create your own customized copy, and then help the Django template loader find it before the default one. You can place your copy either inside one of your applications’ template directories (if you’re using the app_directories template loader) or in one of your TEMPLATE_DIRS locations.
In either case, you need to place it inside a subdirectory labeled admin, so the extends tags in the other admin templates can locate it correctly.
If you’re placing it inside one of your applications (for example, myproject/myapp/templates/admin/base_site.html), make sure your application comes before the django.contrib.admin in your INSTALLED_APPS setting. Because the template loader searches those apps’ template directories in order, if the admin is listed before your app, the Django template loader ceases its search when it finds the original template.
If you’d like to delve a little deeper into customizing the admin templates, the next one to look at is index.html. It’s a bit more complex than base_site.html, but it is worth looking at if you want to significantly rearrange the main admin page.
Short of writing an entire custom admin app, the ultimate step in admin customization is writing your own admin views. This is far preferable to hacking up the Django admin app’s code directly.
At the very least, such hacks place an onerous maintenance burden on you, their creator, every time the main Django codebase is updated. If changes in upstream that conflict with your customizations have been made, you have to constantly deal with merging the two together. Additionally, if you make your customizations as stand-alone admin views, they are much easier to share with other Django developers, who can in turn contribute fixes and improvements back to you.
Writing new admin views is “just Django” in the sense there is very little about it specific to the admin. There are three basic requirements:
Your view should ideally be mapped to a URL that is “inside” the admin app’s URL space. This is more for user comfort than anything, but Django’s URLconf system makes it easy, so there’s little reason not to do it.
Your view should look like the rest of the admin; in other words, it should render its responses using the admin site templates.
Your view should use Django’s authentication decorators—explained in the next section—to enforce access.
Before you go any further in this section, if you’re new to Python and need a refresher on the concept of decorators, read this paragraph and then flip back to the section on decorators in Chapter 1, “Practical Python for Django.” Decorators are functions that change other functions. Your Django views are functions. You want to change them in a specific way—to restrict access so that only certain users can call them—and this is a natural fit for decorators.
You can think of the decorator as a guard for your view function. If the user passes your test, they’re in—the view runs and the page displays. If the user fails the test, she is redirected elsewhere. (By default, users are redirected to /accounts/login/ plus a parameter that says where users should be redirected after they’ve successfully logged in, for example, /accounts/login/?next=/jobs/101/. You can set LOGIN_URL in your settings.py to customize this URL if needed.)
For enforcing authentication, a single decorator does most of the heavy lifting for you, called user_passes_test.
To use this decorator, in addition to the view that you are guarding you also need to provide a utility function that actually applies the test in question. This function must take a User object and return a boolean (True or False). Such a function can be simple, even trivial:
def user_is_staff(user):
    return user.is_staff
Having defined that function, your use of the decorator would be something such as this:
@user_passes_test(user_is_staff)
def for_staff_eyes_only(request):
    print "Next secret staff meeting date: November 14th"
That definition of user_is_staff almost feels like a waste of a function, doesn’t it? This is where lambda comes in (for an introduction to lambda, refer back to Chapter 1). With lambda we can define an ad-hoc, “anonymous” function right in the decorator line itself.
@user_passes_test(lambda u: u.is_staff)
def for_staff_eyes_only(request):
    ...
Moving on with our example, let’s say you need to slice it finer than staff-or-not-staff. One of the handy things about Django’s admin and auth apps is they offer a convenient permissions system for managing your users. You already know that each model gets its own set of create/update/delete permissions in the admin, but these permissions are also accessible in your Python code. If you had a SecretMeeting model and accompanying privileges listed in the auth system, and you were creating a view that allowed certain people to add new secret meetings, your decorated function could look like this:
@user_passes_test(lambda u: u.can_create_secretmeeting)
def secret_meeting_create(request):
    ...
With a mix of Django’s predefined permissions and your own application-specific ones, you should be able to control access in whatever way you like.
Django provides a convenient facility, the Syndication app (django.contrib.syndication), for generating RSS or Atom feeds from any collection of model objects. This makes it incredibly easy to add feeds to your Django project.
The Syndication app is highly configurable, but it is easy to get started with thanks to its sensible defaults. There are only two essential steps: first, a special class that produces feed objects; second, a rule in your URLconf that passes these objects to the Syndication app. The easiest way to understand how this all works is to jump right into the code. We base this example on the Blog application developed back in Chapter 2, “Django for the Impatient: Building a Blog.”
To configure your feeds, you define a separate module containing special feed classes, which are then imported directly into your URLconf. Django doesn’t place any restrictions on where you place this file (or even what its name is), but a sensible location is inside your app directory, and the usual name is feeds.py. So, inside your mysite/blog directory, you would create a file called feeds.py containing the following code:
from django.contrib.syndication.feeds import Feed
from mysite.blog.models import BlogPost
class RSSFeed(Feed):
    title = "My awesome blog feed"
    description = "The latest from my awesome blog"
    link = "/blog/"
    item_link = link

    def items(self):
        return BlogPost.objects.all()[:10]
The title and description attributes are used by the consumer of the feed (for example, a desktop RSS reader) to label the feed. The link attribute specifies what page is associated with your feed. Your site’s domain name is prepended to whatever partial URL you provide.
The item_link attribute is used to determine what page to load if the reader wants to see the Web page associated with an individual feed item. By setting item_link to /blog/, we’re saying that a click on any individual feed item sends the user to the front page of our blog—and if you’re thinking that seems kind of inflexible, you’re right. A better technique is to extend your BlogPost model with a get_absolute_url method. The Syndication app automatically uses it if it’s present.
The items method is the heart of this class—it decides what objects are returned to the Syndication app. The code here returns the first ten objects in our list of blog posts; because our BlogPost model has its Meta.ordering attribute set to "-timestamp" (reverse-chronological order), we get them in reverse-chronological order.
This class we’ve created is just about the simplest thing that works. It contains only the items that the Syndication app absolutely requires. There are many optional attributes and more flexible ways specifying some of the required ones. In learning the possible customizations, it’s useful to understand that many attributes in a feed class can actually be one of three things:
A hardcoded value (as with the previous
title,description, andlink)A method that takes no explicit arguments (the implicit
selfreferring to the feed is required of course)A method that takes one explicit argument (an individual feed item)
The Syndication app figures out which one you’re doing by taking intelligent advantage of Python’s “duck typing.” The Syndication app looks for these three options (where applicable) in reverse order from how they’re listed here: If it finds a one-argument method with the appropriate name, it uses that, passing in the current feed object; next, it looks for a no-argument method and calls that if found; failing those two, it looks for a hardcoded value. Failing all three, it throws a FeedDoesNotExist exception (because in that case your feed is broken).
Having created the class that handles the actual generation of the feed, all that’s left is to give your feed a working URL. Continuing with our blog example, we would update our app’s URLconf file (mysite/blog/urls.py) so it looks like this:
from django.conf.urls.defaults import *
from django.contrib.syndication.views import feed
from mysite.blog.views import archive
from mysite.blog.feeds import RSSFeed

urlpatterns = patterns('',
    url(r'^$', archive),
    url(r'^feeds/(?P<url>.*)/$', feed, {'feed_dict': {'rss': RSSFeed}}),
)
We’ve added just three lines. Two are imports; we bring in the feed view object from the Syndication app, and we bring in our new RSSFeed class from our blog app.
We’ve also added a fairly complicated-looking URL pattern. Breaking it down into its three components, we have:
r'^feeds/(?P<url>.*)/$': Our URL regex. Because we’re inside the “blog” app, which currently lives at the URL/blog/, this means URLs of the form/blog/feeds/FOO/are captured with “FOO” being passed along to our view function.feed: The view function we’ve imported fromdjango.contrib.syndication.views.{'feed_dict': {'rss': RSSFeed}}: In anyurlpatternstuple, we can provide a third item such as this, a dictionary that is used to pass additional arguments to the view function. We’re passing one argument, calledfeed_dict, which is a one-item dictionary mapping the string “rss” to our RSSFeed class. We could add other types of feeds simply by creating the needed classes and referring to them in this dictionary.
Though the key we use in our context dict (“rss”) happens to be the type of feed, it could be anything—“latest” for the latest posts, for example. The Syndication app doesn’t restrict us there. It just wants to know how to connect requests to Feed classes that it can use.
Offering RSS or Atom feeds can be a great improvement to a regularly (or irregularly) updated site. Although these formats are ostensibly simple, rolling your own code for feed output is tedious and error-prone. The well-known Universal Feed Parser (http://feedparser.org/) ships with more than three thousand tests to make sure it robustly handles the huge range (some would say “mess” rather than “range”) of published feeds. By using Django’s Syndication app, you produce clean, valid output with a very small investment of code and configuration.
If you require more customization than we’ve covered here, see the official Django documentation. It’s unlikely that you ever have to take the roll-your-own approach again.
Because Django is a Web framework, naturally we think of it mostly as a tool for generating HTML and sending it via HTTP. But Django is perfectly adaptable to other types of content and other modes of delivery.
Two factors make this true. The first is that Django’s template language is text-based, not XML-based. A Web framework that can only do XML templating doesn’t help you much when you also need to generate plain text reports or e-mail.
The second factor is simply that Django’s exposure of the HTTP mechanisms driving your Web site enables you to tweak the various HTTP headers involved. Therefore, you’re able to set the Content-Type to a non-HTML value, such as JavaScript (as with the JSON view in Chapter 9, “Liveblog”) or add a Content-Disposition header to force downloading instead of browser rendering.
Here are a few short examples of using Django to generate non-Web-page output. Some of them use the template system, as we’ve just mentioned; others don’t because there are times when any template system is just unnecessary overhead. As always, use the right tool for the job.
One real-life example that we share briefly with you here hinges on a well-known open source monitoring system, Nagios (http://nagios.org/). Like many similar projects, it embraces the Unix convention of plain-text configuration files with a published format; such config files are an excellent target for Django’s template system.
One of the authors is, at the time of writing, producing a small, highly customized internal application to (among other things) generate a partial Nagios configuration setup. It’s based on a Django app that serves as a central database of information on systems and services; this catalog is then exported to a format Nagios can understand, enabling the user to keep track of systems in one place and have Nagios monitor them.
Here’s a simplified example of the system-service hierarchy model (in the real application, this information is spread among a number of models).
class System(models.Model):
    name = models.CharField(max_length=100)
    ip = models.IPAddressField()

class Service(models.Model):
    name = models.CharField(max_length=100)
    system = models.ForeignKey(System)
    port = models.IntegerField()
Next is a template that can generate a per-host Nagios service-check file, again greatly simplified from the real thing. Its intended context is a single System object, system.
define host {
    use             generic-host
    host_name       {{ system.name }}
    address         {{ system.ip }}
}

{% for service in system.service_set.all %}
define service {
    use                     generic-service
    host_name               {{ system.name }}
    service_description     {{ service.name }}
    check_command           check_tcp!{{ service.port }}
}
Note
Don’t be confused by the single curly-braces; they’re part of the Nagios file format and aren’t parsed by Django’s template system. The template system only cares about double curly-braces or curly-braces paired with percent signs.
When rendered, the previous template gives us a working Nagios file that defines the system as a Nagios host record and writes out any services associated with it, using a network check command that makes sure the recorded TCP port is up and running.
The Vcard format is a text-based format for contact information. It is a supported import and export format for many popular address book, e-mail, and PIM (Personal Information Manager) products, including Evolution, the OS X Address Book, and Microsoft Outlook.
If you have contact information in a Django app, you can want to be able generate vCards so that users can import that contact information into their local address book or PIM application.
This sample code uses the vObject module (available from http://vobject.skyhouseconsulting.com/), which makes generating vCard data a bit easier.
import vobject

def vcard(request, person):
    v = vobject.vCard()
    v.add('n')
    v.n.value = vobject.vcard.Name(family=person.lastname, given=person.firstname)
    v.add('fn')
    v.fn.value = "%s %s" % (person.firstname, person.lastname)
    v.add('email')
    v.email.value = person.email
    output = v.serialize()
    filename = "%s%s.vcf" % (person.firstname, person.lastname)
    response = HttpResponse(output, mimetype="text/x-vCard")
    response['Content-Disposition'] = 'attachment; filename=%s' % filename
    return response
The most significant bit here is the manipulation of the HttpResponse object to provide a non-HTML MIME type and a filename for the download. Rather than returning an HttpResponse directly, we first create the object, setting the content and MIME type. Then we set the response’s Content-Disposition header to specify an attachment. Returning that response object at the end of our view sets the transaction in motion, and the user receives the generated file.
This technique shows off Django’s excellent mix of high-level and low-level tools. The HttpResponse object makes it easy for us to leverage our knowledge of browsers, servers, and HTTP to customize the response we return—yet we don’t need to think about any of the other parts of the response unless we want to.
This method can be used with any non-HTML file type you want to generate and deliver, as seen in the following examples.
When it’s time to get tabular data out of your application, nothing beats the CSV (comma-separated value) format as a lowest common denominator. Every programming language under the sun can deal with it, and virtually any application designed to work with structured data (Microsoft Excel, Filemaker Pro) can import and export it. Python’s handy csv module is there to help you.
The first thing many programmers try to do when confronted with a CSV-related task is to write their own parser or generator. CSV is simple, after all, right? Just some commas and some numbers. Oh, and maybe some other characters. And maybe some quotation marks if there are commas in those characters. And maybe some escaping if there are quotation marks inside those quotation marks. This is getting complicated! Good thing somebody wrote a module to take care of it for us.
Let’s say we have been charged with turning the person data from the previous vCard example into a simple spreadsheet with columns for first name, last name, and e-mail address. First, let’s try it out in the interpreter to make sure we are using the csv module correctly. We use Python’s handy StringIO module to capture the output because the csv module is designed to work with file-like objects. (StringIO provides a file-like interface to strings.)
>>> import csv, StringIO
>>> output = StringIO.StringIO()
>>> output_writer = csv.writer(output)
>>> people = [("Bob", "Dobbs", "[email protected]"),
... ("Pat", "Patson", "[email protected]"),
... ("O,RLY", "O'Reilly", "[email protected]")]
>>> for p in people:
...     output_writer.writerow(p)
...
>>> print output.getvalue()
Bob,Dobbs,[email protected]
Pat,Patson,[email protected]
"O,RLY",O'Reilly,[email protected]
Looks good—it quoted the troublesome item that contained a comma. So, what does this look like as a Django view function? Very similar, thanks to the fact that Django’s HttpResponse objects, like StringIO objects, are “file-like”—that is, they have the write method that csv.writer is looking for.
def csv_file(request, people):
    import csv
    response = HttpResponse(mimetype="text/csv")
    response_writer = csv.writer(response)
    for p in people:
        response_writer.writerow(p)
    response['Content-Disposition'] = 'attachment; filename=everybody.csv'
    return response
When a user makes a request that hits this view, an HttpResponse object is still returned—that’s a requirement of all Django views, you recall—but instead of containing text/html content, it contains text/csv content, as well as a Content-Disposition header that, for most browsers, triggers a download rather than an attempt at in-browser display.
CSV is a handy answer to those inevitable “can we get our data out of Django and into application X” questions. Almost any program that works with structured data can read CSV.
PyCha (http://www.lorenzogil.com/projects/pycha/) is a simple, elegant charting and graphing library for Python, based on the Cairo graphics system. PyCha doesn’t try to accommodate every output format or configuration option under the sun, but it does have two strong points: a relatively Pythonic syntax and default output that actually looks quite pleasant.
As in the previous CSV example, the major tricks specific to Django are getting our output into a string so we can return it and setting the proper mime-type on our response.
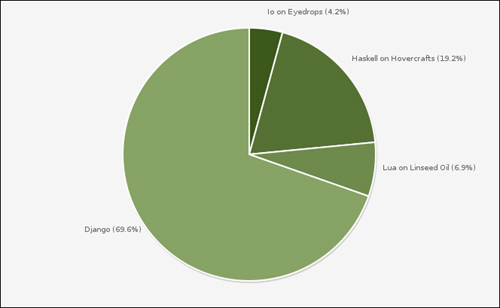
def pie_chart(request):
    import sys, cairo, pycha.pie
    data = (
        ('Io on Eyedrops', 61),
        ('Haskell on Hovercrafts', 276),
        ('Lua on Linseed Oil', 99),
        ('Django', 1000),
        )
    dataset = [(item[0], [[0, item[1]]]) for item in data]
    surface = cairo.ImageSurface(cairo.FORMAT_ARGB32, 750, 450)
    ticks = [dict(v=i, label=d[0]) for i, d in enumerate(data)]
    options = {
        'axis': {'x': {'ticks': ticks}},
        'legend': {'hide': True}
    }
    chart = pycha.pie.PieChart(surface, options)
    chart.addDataset(dataset)
    chart.render()
    response = HttpResponse(mimetime="image/png")
    surface.write_to_png(response)
    response['Content-Disposition'] = 'attachment; filename=pie.png'
    return response
The basic gist here is we’ve obtained a surface object, which is the primary drawing element in Cairo, and drawn our chart on it by passing it into the pycha.pie.PieChart constructor, and then calling the resulting chart’s render function. Once this drawing has been taken care of, we use the surface’s write_to_png method—which expects to write binary PNG data to a file-like object—and give it our response.
Therefore, at the end of the view function, our response is a PNG image, and we simply set its headers accordingly and return it so it gets sent to the browser, which downloads it.
Figure 11.2 is the resulting image.
In a real view, of course, rather than hard-coding our data inside the view function, we would fetch it from our database using a Django ORM query. Depending on your application, you can even consider writing a custom template tag that took data from a certain QuerySet and rendered it into a PNG chart. This would also be an excellent place to use caching because generating graphics files on the fly is a bit resource-intensive.
Though Django’s ORM system is not designed as a complete replacement for SQL, it’s more than sufficient to power many Web applications. You’ve already learned how to supplement Django ORM queries by passing raw SQL commands via the extra method. However, custom managers give you another way. You’ve already used managers, even if you didn’t know it, as in this code example:
really_good_posts = Post.objects.filter(gemlike=True)
Post.objects is a manager object. It’s an instance of a class that inherits from models.Manager, and the methods of this class determine what you can do with a queryset—filtering, in the case of this example.
A custom manager is simply a class you define that also inherits from models.Manager. It can be useful in two distinct ways: changing the set of objects returned by default (normally all objects in the table) and adding new methods to manipulate that set of objects.
Let’s say instead of writing the previous query over and over, you would like to have a more concise way to tell Django you only want the “gem-like” posts from your database. Easy. Write a manager like this:
class GemManager(models.Manager):
    def get_query_set(self):
        superclass = super(GemManager, self)
        return superclass.get_query_set().filter(gemlike=True)
So far so good, but how do you use it? Simply assign it to be an attribute of your model.
class Post(models.Model):
    """My example Post class"""
    title = CharField(max_length=100)
    content = TextField()
    gemlike = BooleanField(default=False)

    objects = models.Manager()
    gems = GemManager()
Notice your model now actually has two managers—one called objects and one called gems. They both return querysets; objects behaves just like the default manager of the same name.
Note
Our definition of the objects manager here is exactly equivalent to the one Django normally creates for us automatically. We have to define it explicitly on this model because of the way Django behaves in the presence of additional managers—the first one it sees on the model becomes the default manager, which is used by the admin when selecting objects. If we omitted the objects = models.Manager() line, the admin wouldn’t be able to show us the “non-gem-like” posts.
Having seen the code for the new manager gems, it’s probably pretty apparent what it does. Via Python’s super function, it calls the get_query_set method of the parent class (models.Manager), and then filters the result just like we were already doing before the custom manager.
How do we use it? Just as you’d expect—in the same way you use the default objects manager.
really_good_posts = Post.gems.all()
And of course, because your new custom manager returns a queryset, you can do further operations on it with filter, exclude, and other queryset methods.
The custom manager we defined previously is useful syntactic sugar. That is, it makes what would otherwise be a fairly verbose query:
really_good_posts = Post.objects.filter(gemlike=True)
into something much more compact:
really_good_posts = Post.gems()
If we are working a lot with this set of objects, this would certainly make our code read better, but it isn’t the whole story on custom managers. We can get even more power by adding custom methods to our custom manager class, enabling us to pass arguments for more flexibility.
Continuing our contrived example, let’s imagine we want to be able to compactly specify a queryset containing only posts that mention a certain word in both the title and the content. We could specify this with normal Django syntax as follows:
cat_posts = Post.objects.filter(gemlike=True, title__contains="cats",
    content__contains="cats")
That’s getting a little long, and if it’s a type of query that we use repeatedly, we find ourselves wanting something a bit more compact, such as:
cat_posts = Post.objects.all_about("cats")Note
One of the interesting challenges posed by creating custom classes and methods such as these is clear naming. Finding a good method name that reads well in the Post.objects.foo sort of chain is worth some effort; you (and anyone else who uses your code) look at it often. As a rule of thumb, managers should be nouns (“objects,” “gems”); manager methods should be verbs (“exclude,” “filter”) or adjectives (“all,” “latest,” “blessed”).
Here’s what the code behind such a manager method looks like:
class AllAboutManager(models.Manager):
    """Only return posts that are really good and all about X"""
    def all_about(self, text):
        posts = super(AllAboutManager, self).get_query_set().filter(
            gemlike=True,
            title__contains=text,
            content__contains=text)
        return posts
Strictly speaking, custom Managers don’t give you any power you don’t have without them. However, the clearer and less cluttered you can make the API of your model, the easier it is to write and maintain all the other code in your project that makes use of it.
Django’s templates, which you learned about in Chapter 6, “Templates and Form Processing,” embody a couple of deliberate design decisions that are not shared by all such systems. As we’ve mentioned, it’s designed to produce all sorts of text, not just XML variants such as XHTML. This makes it useful for producing JavaScript, CSS, plain-text e-mail, and other text-based output.
Django templating also differs from some other systems in that it is not a reinvention of, or a wrapper around, a full-fledged programming language. This increases the speed of template processing, reduces the overall complexity of the framework, and keeps things simpler and cleaner for nonprogrammers who are designing pages.
For many projects, the built-in capabilities of the template system are fine. However, there can be times when you need or want it to do more. In this section, you learn how to create custom template tags and filters and even use third-party template systems in place of Django’s provided one.
Let’s say you want to display a randomly selected image on the front page of your site. With what you know already, you could do this fairly easily. In your view code, you build a list of image files. Then, using Python’s random.choice function, you select one, and you pass that value to your template. The code for your view function can look something like this:
def home_view(request):
    img_files = os.listdir(settings.RANDOM_IMG_DIR)
    img_name = random.choice(img_files)
    img_src = os.path.join(settings.RANDOM_IMG_DIR, img_name)
    # ... other view processing goes here ...
    render_to_response("home.html", {'img_src': img_src})
(This code follows general good Django practice of keeping configuration values, such as RANDOM_IMG_DIR in your settings.py file, where they can be accessed by all your project’s apps and changed easily if needed.)
Finally, in your template you have an image tag that used the value you had passed:
<img src="{{ img_src }}" />That’s all fine as far as it goes. But suppose you decide to include that random image on a different page, driven by a different view. Or your designer says, “Hey, I have five other places I could use that random image thing... except three of them would have to pull images from a different directory.... Can you do that?” Yes, you can!
The key is a feature called custom template tags. The same mechanisms Django uses to define its own template tags are also available to you as a programmer. That means you can create a simple tag that your designer can use. Even better, the tag can be made to take a path argument, so your designer can have his/her “special” cases, too.
The code for a tag like this is fairly simple, so we start with the implementation, and then work backward, explaining the details. The tag we end up with looks like this in use:
<img src="{% random_image "faces/thumbnails" %}" />The name of the tag is random_image; the quoted string after the colon is a path name. We use a partial path that is assumed to be relative to MEDIA_ROOT. The Django template system takes care of parsing the argument and passing its value to your function (as template tags are just that—functions).
Here’s the complete code that defines the tag. As always, it’s up to us to import whatever modules we need to do our work. Most of this code is plain old Python; we focus our explanation on the Django-specific parts.
import os
import random
import posixpath
from django import template
from django.conf import settings

register = template.Library()

def files(path, types=[".jpg", ".jpeg", ".png", ".gif"]):
    fullpath = os.path.join(settings.MEDIA_ROOT, path)
    return [f for f in os.listdir(fullpath) if os.path.splitext(f)[1] in types]

@register.simple_tag
def random_image(path):
    pick = random.choice(files(path))
    return posixpath.join(settings.MEDIA_URL, path, pick)
The first new thing you have noticed is the register = template.Library() line. The template.Library instance gives us access to decorators that turn our simple functions into tags and filters that can be used by the template system. Although the name of the instance is arbitrary in the sense it could be called something else and still work, calling it register is a strongly encouraged and accepted Django convention which makes it easier for others to understand your code.
The files function is a simple helper that gives us a list of filenames whose extensions indicate they are images.
The random_image function is executed when our tag is used in a template, passing the path from the template tag. It gets a list of image filenames in the provided directory via files, chooses one, prepends your MEDIA_URL to make a path suitable for use in an img tag, and returns that path. (The use of posixpath.join here has nothing to do with POSIX paths; it’s just a good function for joining URL pieces, making sure that we only end up with a single slash between them, and unlike os.path.join, it uses forward slashes even on Windows.)
If there’s a magic line in this code, it’s the @register.simple_tag decorator on the random_image function. This turns our simple function into something that can be used by the template engine.
Though we’ve only defined one tag here, the file we’ve created is actually a Django tag library, which can hold many tags. So save the file with a name that suits the library; for example, imagine we are going to add other random-content tags to this library, called randomizers.py.
The file needs to be saved in a directory called templatetags that is somewhere on the template system’s search path. That is, either inside one of your INSTALLED_APPS (if you have django.template.loaders.app_directories.load_template_source listed in your settings.TEMPLATE_LOADERS), or inside one of the directories listed in your TEMPLATE_DIRS setting (if you have django.template.loaders.filesystem.load_template_source listed in your settings.TEMPLATE_LOADERS).
The templatetags directory is expected to be a Python package, which means you need to create an __init__.py file inside it—an empty one will do. If you forget to create that __init__.py file in your templatetags directory, you get an error, but not one that makes the problem obvious.
TemplateSyntaxError at /yourproject/
'randomizers' is not a valid tag library: Could not load template library
from django.templatetags.randomizers, No module named randomizers
So, if you get that error, create an empty __init__.py file in your templatetags directory. (If you want a refresher on why Python wants that file there, see the section on modules and packages in Chapter 1.)
With all that taken care of, your new tag is now ready for use by any applications in your project.
To make the new tag available for use in a given template, you use the template system’s load tag at the top of the template where you are using the tag. The load tag takes one argument, the module name of the library (no “.py”).
{% load randomizers %}Once the tag library is loaded into a template, the tags it defines are available in that template as if they were a built-in part of Django. Your new random_image tag can take as an argument either a literal string or a template variable. So, for example, you could determine in your view at runtime the specific directory from which random images are drawn, and pass that to your template as image_dir. Then, your use of the random_image tag can look like this:
<img src="{% random_image image_dir %}" />It’s also easy to define tags that take multiple arguments. The simple_tag decorator and Django’s template system take care of checking to see the number of arguments passed is the same as the number expected.
Let’s make a new random-image tag, based on the old one, which takes a second argument. Let’s say we want to be able to specify exactly what file type (extension) is used. For example, if our image directory has PNG, GIF, and JPEG images, we can specify we only want to select from the PNGs.
Here’s the new function to add to your randomizers.py file.
@register.simple_tag
def random_file(path, ext):
    pick = random.choice(files(path, ["." + ext]))
    return posixpath.join(settings.MEDIA_URL, path, pick)
The new tag is called random_file, and leverages the files function from the previous version. This new version simply adds a second argument, ext, and provides that (as a one-item list and with the needed “.” prepended) to the files function as its optional second argument.
Our new template tag looks like this in use.
<img src="{% random_file "special/icons" "png" %}" />For cases such as these where you want to provide template authors (including yourself) with a compact and readable way to generate values that would otherwise require custom code in multiple view functions, simple custom template tags can be just what you need. If you’re already wanting something more complex, read on.
Our previous example tags return simple strings. If you want a custom tag that returns more complex content—a dynamic snippet of HTML for example—you can be tempted to have your template tag function build and return that HTML. Don’t do that. The principle of MVC (see Chapter 3, “Starting Out”) means you should keep HTML in your templates, not in your view functions; likewise, you should keep hardcoded HTML out of your template tag functions if possible.
To address this, you could write a simple_tag that used the template engine, but Django provides a more convenient and flexible option: inclusion tags.
Inclusion tags are most useful when you want to render a piece of content with some values from the current template context. For example, let’s say your template has a variable called {{ date }} that contains the current date, and you’d like to have a template tag that renders a simple calendar for the current month.
Let’s build that tag now. Our tag is based on Python’s calendar module, which can give us the month as a list containing lists of day numbers (spots that lie before the beginning or after the month contain a 0).
>>> import calendar
>>> calendar.monthcalendar(2010, 7)
[[0, 0, 0, 1, 2, 3, 4], [5, 6, 7, 8, 9, 10, 11], [12, 13, 14, 15...
Now we just need a transformation that gives us a list where those zeroes have been turned into blanks—because we don’t want the days before the beginning of the month or the days after the end of the month showing up as zeroes. We do this using a list comprehension on the values returned by calendar.monthcalendar.
>>> import calendar
>>> month = calendar.monthcalendar(2010, 7)
>>> [[day or '' for day in week] for week in month]
[['', '', '', 1, 2, 3, 4], [5, 6, 7, 8, 9, 10, 11], [12, 13, 14...
The slightly tricky list comprehension says go through every week in the month; for each week, go through every day; for each day, if it has a nonzero (Boolean True) value, use that; otherwise use the empty string.
Because Django’s template engine doesn’t care whether we pass it integers or strings, the motley assortment of data types doesn’t cause us a problem. If we are passing this data to a Python function for further processing, the mix can give us pause.
The calendar module even provides us the names of the days and months.
>>> list(calendar.day_abbr)
['Mon', 'Tue', 'Wed', 'Thu', 'Fri', 'Sat', 'Sun']
>>> list(calendar.month_name)
['', 'January', 'February', 'March', 'April', 'May', 'June', 'July'...
In this age of CSS layouts, calendars are still tabular data, and so we generate the calendar HTML with table tags. Let’s create a small template just for our calendar; we presume that the full list is passed in as weeks:
<table>
<tr><th colspan='7'>{{ month }} {{ year }}</th></tr>
<tr>{% for dayname in daynames %}<th>{{ dayname }}</th>{% endfor %}</tr>
{% for week in weeks %}
    <tr>
    {% for day in week %}
        <td>{{ day }}</td>
    {% endfor %}
    </tr>
{% endfor %}
</table>
Our preferred naming convention for partial templates, including templates such as this one that are used by inclusion tags, is to start their names with an underscore. This serves as a visual reminder that they are not intended to be full-fledged document skeletons. Call your template fragment _calendar.html and save it somewhere that the template system can find it, whether that’s in your application’s templates directory or in one of your TEMPLATE_DIRS.
Now for the actual inclusion tag function. Create this as a new file in your templatetags directory, calling it inclusion_tags.py.
@register.inclusion_tag("_calendar.html")
def calendar_table():
    import calendar
    import datetime
    date = datetime.date.today()
    month = calendar.monthcalendar(date.year, date.month)
    weeks = [[day or '' for day in week] for week in month]
    return {
       'month': calendar.month_name[date.month],
       'year': date.year,
       'weeks': weeks,
       'daynames': calendar.day_abbr,
    }
Notice our function returns a dictionary; this is provided as the context dict when rendering the template we provided in the call to @register.inclusion_tag. In other words, any key in this dictionary becomes a variable in the template that can be used to display the corresponding value.
Other than what we’ve described previously, there’s nothing magical about inclusion tags. They exist to help you keep presentation separate from logic and to do so in a convenient way. You could create a tag via simple_tag that builds up and returns a big hunk of HTML, but that would be ugly to maintain. You could create a tag that made its own calls to the template engine, but that would be extra boilerplate. Inclusion tags enable you to write more compact code and keep template content in templates—where it belongs.
We add a quick-and-dirty stylesheet to our page just to dress up the calendar a bit. Place this code at the top of _calendar.html.
<style type="text/css">
td, th { padding: 4px; width: 30px; background: #bbb; }
td { text-align: right; }
</style>
When you want to use this tag, simply type {% load inclusion_tags %} at the top of the template in which you want to use it; when we use the tag, we just type a simple {% calendar_table %} at the spot where we want the calendar grid to appear.
The calendar grid, depending on our browser looks something like Figure 11.3.
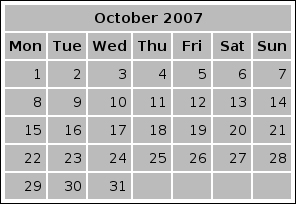
Not bad! Because of the tidy separation of business logic from presentation, your designer can easily tweak the tag’s template file. Meanwhile, you or other developers can make content changes, such as localizing the month and day names without having to touch the template (or any templates that include it) at all.
Django’s template system comes with a large number of very useful filters, but once in a while, there is reason to add your own. Filters are easy to use, and in fact, they’re easy to write as well. Like the other tags you’ve seen so far, there’s a convenient decorator syntax.
Filters are just functions—functions that, in most cases, accept strings and return strings. A fun example that isn’t very complicated (or at least not very long—it can look a little hairy depending how you feel about regular expressions) is a wikify filter that turns words in CamelCase into HTML links suitable for use on a wiki. Here’s the whole thing:
import re
from django.template import Library
from django.conf import settings

register = Library()
wikifier = re.compile(r'(([A-Z]+[a-z]+){2,})')

@register.filter
def wikify(text):
    return wikifier.sub(r'<a href="/wiki/1/">1</a>', text)
This tag expects a string; all occurrences of CamelCase words inside the string are replaced with links to /wiki/CamelCasedWord/. It can be used in a template such as this (presuming variables called title and content holding the page’s title and wiki-markup content, respectively).
{% load wikitags %}
<h1>My Amazing Wiki Page: {{ title }}</h1>
<div class="wikicontent">
{{ content|wikify }}
</div>The previous wikify function takes one argument; its value is the value of whatever expression appears in your template to the left of the “|” (pipe) character that precedes your filter name. But what if you also want the user of the filter to be able to adjust the action of that filter by passing an additional argument?
Filters can be written to take a second argument as well. Often this second argument is used to adjust the action of the filter. For example, let’s say you want a function that displays a string only if that string contains a certain sequence of characters (think of this like the Unix command grep). You could accomplish this with if/then template tags, of course, but a filter would be much more compact.
{{ my_string|grep:"magic" }}The definition of the filter looks like this:
@register.filter
def grep(text, term):
    if text.contains(term):
        return text
Arguments to filters are always quoted and separated from the filter name with a colon. Even when you are using it as a number or other nonstring data type, Django’s template syntax requires that it be quoted. So if you made a filter designed only to print input text when it was longer than a certain number of letters, it can look like this in use.
{{ bla_bla_bla|hide_if_shorter_than:"100" }}The implementation of a tag such as this needs to account for the type conversion to get its work done. So inside our filter we use the int function to do our conversion.
@register.filter
def hide_if_shorter_than(text, min_len):
    if len(text) >= int(min_len):
        return text
We convert the min_len argument to an int explicitly because it is passed to us as a string for the reason described previously.
Perhaps confusingly, the first argument that is passed to filter functions—the actual value that is being “filtered” or modified—is not restricted to being a string. You realize this must be true just from looking at the date- and time-related filters, which operate on Python datetime objects. Along these lines, this means you can also make filters that operate on nonstring objects. It’s unusually simple because so much of Web development is manipulation of string data, but it’s possible.
If you know that your filter function can get passed some nonstring data, but you want to treat it as a string, there’s a stringvalue decorator that you can add to your function. Multiple decorators can be applied to a single function, so if we decided to add this decorator to our hide_if_shorter_than function, we’d simply add @stringvalue on its own line underneath the @register.filter line.
Note
Order matters when applying decorators to a function. The order we mention previously—@register.filter, followed by @stringvalue, followed by the function itself—makes the input to the filter a string. Reversing that order to be @stringvalue followed by @register.filter would only ensure that the output of our filter is a string. A subtle, but important, distinction.
More complex custom template tags are possible—for example, paired block-style tags that perform some transformation on the content they enclose. Creating tags such as these are complex, involving fairly direct manipulation of the internal machinery of the Django template engine. It’s a lot more work than the previous simple decorators and not often needed. For details on advanced custom template tags, see the online Django documentation at www.djangoproject.com/documentation/templates_python.
The template engine’s job in Django is to prepare strings that serve as the content of HttpResponse objects. Once you understand this, it’s clear that if, for some reason, you decided you couldn’t accomplish your goals using Django’s provided template language, using a different template engine would not be major surgery.
Here’s the simplest possible alternative templating mechanism for Django.
def simple_template_view(request, name):
    template = "Hello, your IP address is %s."
    return HttpResponse(template % request.META['REMOTE_ADDR'])
No third-party modules necessary—this view just uses Python’s built-in string templating syntax.
Django gains a lot of strength from being a fairly integrated stack. However, it’s not intended to be a monolith—if you want to replace a component of Django with a third-party package you like better, in most cases you can.
The template system is an especially handy place to be able to do this. Why would you want a different template system?
You have come to Django from another system whose template syntax you prefer.
You run other projects written in other Python Web frameworks, and you’d like to settle on a common templating language.
You are converting a project from another Python Web framework and have existing templates you don’t have time to translate.
Your presentational logic requires features that can’t easily be added to Django’s template language.
One popular third-party template engine, and the one we use in this section, is Mako. It is quite different from the Django template language in appearance and design, but it does share some common virtues: It’s extremely fast, it’s not bound to XML-like languages, and it has a similar inheritance mechanism.
Mako replaces the Python templating framework called Myghty, which in turn was based on an influential system written in Perl called HTML::Mason. Mako has been used by sites such as reddit.com and python.org and is currently the default template engine of another Python web framework, Pylons. So if you’re looking at alternative templating systems, Mako is a good place to start. Among its cited influences are the Django template system itself, so despite the syntactic differences, there is some conceptual overlap that makes going back and forth between the two systems easier than it could be otherwise.
Unlike Django templates, Mako’s syntax is Python-based. This is a significant departure from the Django template philosophy, which strives to limit the amount of programming logic that makes its way into templates. Both approaches have their merits. The idea behind the Mako approach is that it is simple for Python programmers, while Python’s clear syntax helps keep it accessible to template designers.
Before we build a Django view that uses Mako, here’s a simple example in the interpreter to give you a feel for how Mako works.
>>> from mako.template import Template
>>> t = Template("My favorite ice cream is ${name}")
>>> t.render(name="Herrell's")
"My favorite ice cream is Herrell's"
>>> context = {'name': "Herrell's"}
>>> t.render(**context)
"My favorite ice cream is Herrell's"
In the first example, we explicity pass in the actual variable name, and in the second, we use a context as we have been doing throughout. Recall that context is simply a dictionary that we are passing to the render method. It should look very familiar—at this simple level, it’s nearly identical to the way Django’s template engine works.
Mako also has a filtering syntax that is much like Django’s.
>>> from mako.template import Template
>>> t = Template("My favorite ice cream is ${name | entity}")
>>> t.render(name="Emack & Bolio's")
"My favorite ice cream is Emack & Bolio's"
Now let’s wire up a Django view to use a Mako template.
from mako.template import Template

def mako_view(request):
    t = Template("Your IP address is ${REMOTE_ADDR}")
    output = t.render(**request.META)
    return HttpResponse(output)
In this view, we’re doing the same thing we did in the previous interactive example—creating a new Mako template and rendering it with a context coming from the request’s META object we saw briefly in Chapter 5, “URLs, HTTP Mechanisms, and Views.”
If you are really going to use Mako, of course, you want to store your templates in the filesystem (or possibly in the database), have Django be able to find them just like it finds its own templates (without having to specify full paths), create a Mako-friendly render_to_response method, and so on. Luckily, much of this work has been done for you by other Django/Mako pioneers. There’s some very helpful code posted on Django Snippets (http://www.djangosnippets.org/snippets/97/) and with the accompanying blog post linked from that page you should be off and running.
As mentioned in the introduction, this chapter has been all over the map, but we hope that we’ve opened some doors for you as a Django developer and made it more obvious how flexible and extensible the framework really is. The next chapter, Chapter 12, concludes Part IV of the book with another assortment of sections on advanced topics.