A common question from new Django users is, “Is there an open source CMS (Content Management System) written in Django?” Our typical answer is not always what people want to hear—that you should build your own. This chapter explores a couple of ways to do this with Django; first, by leveraging a contrib app that makes it easy to create and publish “flat” HTML pages, and then by making a more in-depth, but still simple, content creation system.
People mean many different things by “CMS.” It can be easier to build one using the tools Django provides than to try adapting someone else’s solution, unless that solution is already nearly identical to what you want.
The “CMS” label is used to refer to many different application types. To one person it can mean a basic interface for editing Web page content displayed in templates, such as a blog. To another it can encompass complicated permissions and workflow rules, generation of multiple output formats from a single source, multiple versions and editions, and all sorts of non-Web content (and the indexing, archiving, and managing thereof).
In other words, nearly everyone’s CMS application is custom to some extent. And Django’s sole purpose is to make it easier for you to develop custom Web applications. Practical-minded developers are rightfully cautious about reinventing the wheel, but it can be that your specific wheel hasn’t been invented yet.
As the ecosystem of open source Django applications matures, we will likely see a few CMS-type apps become mature enough to be recommended frequently, accumulating their own communities of users and maintainers. The perfect one for your needs might even be out there already. So do look around (see Appendix D, “Finding, Evaluating, and Using Django Applications,” for some pointers), but don’t feel shy about implementing your own solution.
The simplest Django-powered CMS doesn’t require writing any code at all. Django ships with an application called “Flatpages” that is suitable for simple cases. What’s most appealing about the Flatpages app is that, if it works for you, there’s very little setup to be done and no code of your own to maintain.
Another convenience is that the URLs pointing to your Flatpages-based pages are specified via the admin; you don’t have to edit a URLconf file to add a new page. Before you get too excited, though, here are some of its limitations.
All pages can be edited by all administrative users who have access to the Flatpages application; users can’t “own” individual pages.
Aside from
titleandcontentattributes and a few special-purpose fields we discuss, there’s not much to a Flatpages object; there’s no creation date or other bits of data you can have associated with a particular page.Because it’s a provided (“contrib”) app, you can’t easily change its admin options, add new fields, or model methods.
Assuming those aren’t showstoppers for you, however, Flatpages can be useful. We explore how to set up and use Flatpages in the next few sections, followed by a look at setting up a more robust, custom CMS application.
Here’s a quick overview of the steps necessary to get Flatpages up and running.
Create a new Django project with
django-admin.py.Open your project’s
settings.pyand update yourMIDDLEWARE_CLASSESsetting to includedjango.contrib.flatpages.middleware.FlatpageFallbackMiddleware.Add
django.contrib.flatpagesanddjango.contrib.adminto yourINSTALLED_APPS settings.pyvariable.Run
manage.py syncdbto get Django to create the necessary tables.Update your
urls.py, uncommenting the default admin-related line to activate it.(Re)start your Web server of choice.
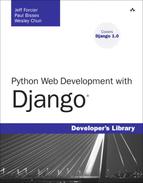
Once you’ve followed the previous steps, log in to the admin site, and you should see what looks like Figure 8.1.
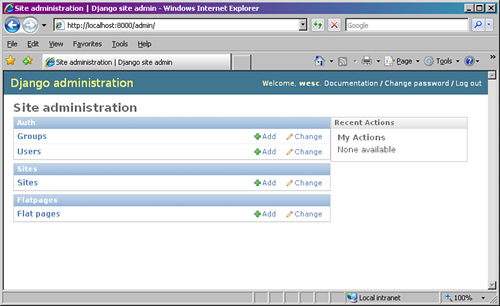
Click Add to create a new Flatpage object (see Figure 8.2). Only the url, title, and content fields are required. Make sure the URL includes leading and trailing slashes, as indicated.
Create one or two pages now, so you have something to look at when you get to the testing step!
We go straight into the templates next because Flatpages requires no URL management aside from what you’ve already done. Instead, it uses a special piece of Django middleware that intercepts 404 errors and looks up the requested URL in the list of Flatpage objects. If it finds a match, the Flatpages app takes over. If it doesn’t, the 404 is passed through for normal error handling.
Individual Flatpage objects have a template_name attribute that can be customized, but by default the Flatpages app looks for a template called flatpages/default.html among the templates available. That means you need to create a “flatpages” template directory in one of the locations listed in your project’s TEMPLATE_DIRS setting or inside a “templates” folder inside one of the applications listed in your INSTALLED_APPS setting if you’re using the app_directories template loader. Either way, create that directory now.
Your template is passed an object called flatpage that you can use as you’d expect. For example:
<h1>{{ flatpage.title }}</h1>
<p>{{ flatpage.content }}</p>
So, make yourself a minimal page template by saving the following code as default.html in the directory you just created.
<html>
    <head>
        <title>My Dummy Site: {{ flatpage.title }}</title>
    </head>
    <body>
        <h1>{{ flatpage.title }}</h1>
        <p>{{ flatpage.content }}</p>
    </body>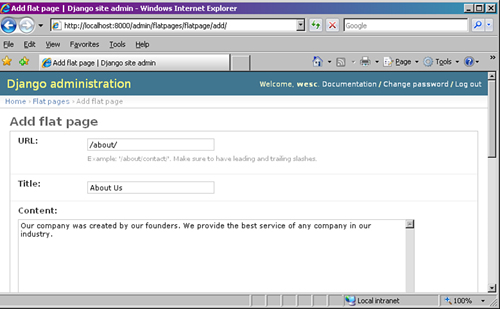
</html>At this point, try to load up your flatpage(s). For example, if your server is running on your workstation, and you created a Flatpage object via the admin whose URL value is /about/, you would load up http://localhost:8000/about/ in your browser. It should display the title and content fields’ values using your default.html template, as shown in Figure 8.3.
Hopefully you’ve seen enough to get a taste of how Flatpages is intended to be used and how well it fills its particular niche. We now focus on the meat of the chapter—an example of a more robust CMS application.
Flatpages are fine, but as outlined previously, they have many limitations. Getting beyond them is as simple or as complex as the needs of your site. Let’s walk through the process of using Django to build a custom CMS that goes beyond Flatpages. Specifically, we want our solution to
Enable users to enter text in a convenient non-HTML format that is automatically converted to HTML
Create page URLs based on human-friendly text rather than database-friendly integer primary keys
Provide pieces of a basic workflow—associating a staff user with each story and enabling each story to be marked as belonging to one of several production stages
Maintain creation and modification dates
Provide for categorization of stories with the capability to view stories by category
Offer a simple search function available on all pages
These are all things that Django facilitates. Most of them involve features you have already seen; part of learning how to build Django applications is learning how to effectively combine these features to get your results with as little unneccessary work as possible.
To begin with, you need to have another Django project set up (as usual, refer to Chapter 2, “Django for the Impatient: Building a Blog,” for a refresher on how to create a project, its database, and so forth). We refer to our project as cmsproject with a single application named cms.
Let’s start with the model.
Following is the central model definition for our little CMS. Note there are references to two other models (User and Category); we see where those come from, as well as add a few necessary import statements, shortly.
class Story(models.Model):
    """A hunk of content for our site, generally corresponding to a page"""

    STATUS_CHOICES = (
        (1, "Needs Edit"),
        (2, "Needs Approval"),
        (3, "Published"),
        (4, "Archived"),
    )

    title = models.CharField(max_length=100)
    slug = models.SlugField()
    category = models.ForeignKey(Category)
    markdown_content = models.TextField()
    html_content = models.TextField(editable=False)
    owner = models.ForeignKey(User)
    status = models.IntegerField(choices=STATUS_CHOICES, default=1)
    created = models.DateTimeField(default=datetime.datetime.now)
    modified = models.DateTimeField(default=datetime.datetime.now)

    class Meta:
        ordering = ['modified']
        verbose_name_plural = "stories"

    @permalink
    def get_absolute_url(self):
        return ("cms-story", (), {'slug': self.slug})

class StoryAdmin(admin.ModelAdmin):
        list_display = ('title', 'owner', 'status', 'created', 'modified')
        search_fields = ('title', 'content')
        list_filter = ('status', 'owner', 'created', 'modified')
        prepopulated_fields = {'slug': ('title',)}

admin.site.register(Story, StoryAdmin)
Inside the model class definition itself, the first bit of code defines four stages of a simplified workflow. Your process can have other steps, of course.
Although using Django’s mapping approach for field choices, as demonstrated here with STATUS_CHOICES, has many conveniences, in this case it does still boil down to integers in the database. You are not easily able to redefine what “1” means later, so it’s worth pausing a moment to be reasonably sure you’ve got a comprehensive list. This is true especially if you are going to be ordering your model instances based on the value of the field, as we have reason to do so here.
We also are able to use these values in our public views to determine what can be seen by our site visitors, that is, we want them to see “Published” and “Archived” stories but not those that “Needs Edit” or “Needs Approval.” This is just the logic that is determined by the business, project, and/or appplication requirements.
If you find yourself with a list of choices like this that just don’t settle down into a simple hardcoded list, what you probably want instead is a ManyToManyField, which can serve the same purpose but whose choices can be edited in the admin just like your other data.
After the STATUS_CHOICES definition come the field definitions.
title: The title we display, both in the browser’s title bar and in a heading on the rendered page.slug: The unique name for the page that is used in its URL. This is nicer than a plain integer primary key.category: The category for this item. This is a foreign key to another model we define in a moment.markdown_content: The page content in Markdown format (more on Markdown next).html_content: The page text as HTML. We automatically render this at edit time, so when pages are displayed there is no markup translation overhead. To reduce possible confusion, this field is not directly editable (and thus does not show up in editing forms in the Django admin app).owner: An admin user (or, as Django sees it, a foreign key reference to aUserobject) who “owns” this piece of content.status: The item’s place in the editorial workflow.created: The item’s creation time, automatically set to the current time (courtesy of Python’sdatetimemodule).modified: The item’s modification time, initially set to the current time. We need to take special steps to make sure this gets updated when the item is edited. This timestamp is displayed on the story detail pages.
One cosmetic touch we make in this model, purely for users of the admin, is to specify a verbose_name_plural attribute in the Meta inner class. This keeps our model from showing up in the admin app with the incorrect name of “Storys.” Finally, we have a permalinked get_absolute_url method, first mentioned in Chapter 7, “Photo Gallery.”
All we need to import, besides the usual django.db.models (and an associated permalink decorator function we explain next), is the datetime module (which we use for our created and modified fields) and the User model that comes with Django’s contrib.auth app. Last is the Django admin module, used to register our models with the admin app.
import datetime
from django.db import models
from django.db.models import permalink
from django.contrib.auth.models import User
from django.contrib import admin
Like the Flatpages app, you might find the User model lacking in certain respects once you get into building advanced Django applications. For example, its idea of what constitutes a user name can clash with your requirements. However, User is a significant convenience, an adequate and complete solution, and extremely useful as-is in many real-world applications.
So our User object is coming straight from Django’s contributed “auth” app. But what about Category? That’s ours; here is its model definition, which should appear in the models.py file directly above the Story model definition.
class Category(models.Model):
    """A content category"""
    label = models.CharField(blank=True, max_length=50)
    slug = models.SlugField()

    class Meta:
        verbose_name_plural = "categories"

    def __unicode__(self):
        return self.label

class CategoryAdmin(admin.ModelAdmin):
    prepopulated_fields = {'slug': ('label',)}

admin.site.register(Category, CategoryAdmin)
The Category model is simple, almost trivial. You often see models this simple—sometimes simpler with just a single specified field—in Django applications. We could hack up a similar effect by having a “category” field on our Story model, but that would make some things difficult (renaming categories) and others impossible (adding attributes to categories, for example, descriptions). Django makes it so easy to build a proper relational model that it almost always makes sense to do so.
As with Story, we also set a verbose_name_plural attribute here so we don’t appear illiterate to users of the admin.
Our database contains both publishable (3 and 4 from STATUS_CHOICES previously shown) and not-yet-publishable (statuses 1 and 2) stories. We want a convenient way to have only the former viewable on the site’s public pages, although of course making sure the full set is editable in the admin. Because this is a matter of business logic rather than presentation style, it should be implemented in our model.
We could make it happen via {% if...%} tags in our templates, but that solution would end up being needlessly brittle, verbose, and repetitive. (If you don’t believe this, we encourage you to try it—the negatives become apparent before you’re through!) Based on your authors’ collective experience, it’s always a good idea to keep business logic out of your templates because over time they turn into spaghetti!
We add this capability to our Story model via a custom Manager. For more on this technique, see the “Custom Managers” section of Chapter 4, “Defining and Using Models.” Add the following code to your models.py file, just following the import statements:
VIEWABLE_STATUS = [3, 4]

class ViewableManager(models.Manager):
    def get_query_set(self):
        default_queryset = super(ViewableManager, self).get_query_set()
        return default_queryset.filter(status__in=VIEWABLE_STATUS)
We first define VIEWABLE_STATUS as a simple list of integers corresponding to the statuses that merit a story being “viewable” by the general public. This is a module-level attribute, meaning it is available to other methods we can add in the future.
Next, we instantiate the manager objects within our model. At the bottom of your models.py, following the field and Meta inner class definitions, add the following two lines, remembering to indent them properly so they belong to the Story class:
    admin_objects = models.Manager()
    objects = ViewableManager()
As mentioned in Part 4, because the admin_objects manager is defined first, it becomes our model’s default manager and is used by the admin—ensuring stories at all stages are editable by staff. The name is not special, except as a reminder to us about what its purpose is.
Then we create an instance of our custom manager using the conventional objects name. Because we use this name in our URLconf and views, all our public pages automatically receive the special, filtered queryset of stories provided by the custom ViewableManager.
As a finishing touch on our models, we overwrite the built-in save function to apply a light markup language, called Markdown, to the text users enter via the admin. Somewhat similar to Wiki-style syntax, Markdown offers an simpler alternative to creating Web content. Editing Markdown is much more pleasant than raw HTML and is familiar to anyone who has composed a plaintext e-mail or edited a Wiki page.
You could easily use Textile, ReStructuredText, or other light markup languages as well. The key trick we are employing here is to override the model’s save method to “automagically” turn the Markdown into HTML right away, so the translation doesn’t have to be made on every page request—we mentioned this earlier when describing the pair of markdown_content and html_content fields.
To use Markdown with Python, you have to first download the Python-Markdown module as it is not part of the standard library. You can find it at http://www.freewisdom.org/projects/python-markdown/. Once it’s installed, import the markdown function from the markdown module with the following statement:
from markdown import markdown
This import might look circular, but in fact, it’s a common Python idiom when a module and the attribute you’re importing from that module share the same name.
Not knowing Markdown doesn’t impair your ability to understand this application, but for the uninitiated, following are a few examples. You can try them out in the Python interpreter if you like. For this demo, we define a helper function, tidy_markdown, that makes things print a little cleaner by removing the newlines (
) that Markdown inserts in its output. (When we’re using Markdown for more extended pieces of HTML, those newlines prevent the output from being a single extremely long line.)
>>> from markdown import markdown
>>> def tidy_markdown(text):
...     return markdown(text).replace('
', '')
>>>
>>> tidy_markdown("Hello")
'<p>Hello</p>'
>>> tidy_markdown("# Heading Level One")
'<h1>Heading Level One</h1>'
>>> tidy_markdown("Click here to buy my book (<http://withdjango.com/)">)
'<p><a href="http://withdjango.com/">Click here to buy my book</a></p>'
>>> tidy_markdown("""
... An alternate H1 style
... =====================
... > A blockquote
... * Bulleted item one
... * Bulleted item two
... """)
'<h1>An alternate H1 style</h1><blockquote><p>A blockquote</p></blockquote><ul>
 <li>     Bulleted item one </li>
 <li>     Bulleted item two </li></ul>'
As you can see, the input is plain text in Markdown syntax, and the function output is valid HTML.
So back to our Django application: To have our Markdown content automatically converted to HTML as we save it, we make an addition to our model code. It’s a simple three-line function, placed just above the assignment to admin_objects (but at the same indent level as the rest of the model class).
    def save(self):
        self.html_content = markdown(self.markdown_content)
        self.modified = datetime.datetime.now()
        super(Story, self).save()
When our code (or any application that works with our model, such as the Django admin) attempts to save an object to the database, our model’s save method is called first, translating the user-entered Markdown content into HTML. (If you need a review of the syntax of the super call, see Chapter 1, “Practical Python for Django”).
Database purists can cringe at the presence of a field whose contents can be easily computed from those of another field. If the conversion had no computational cost, we wouldn’t need to store the rendered HTML. It’s also a common trade-off that is different for every project. We’re assuming computing power is the limiting factor here, such as for a site that gets lots of traffic but doesn’t necessarily have a lot of content. For a site where database size is the greater concern—such as a community forum with thousands or millions of database entries—computing on every page view can be a more viable choice.
Because the model field storing our HTML is marked editable=False, it is not displayed in the admin interface. This keeps the user’s interactions cleaner and eliminates the frustrating possibility that someone can edit the rendered HTML then overwrite those changes by clicking Save. All changes get made to the Markdown source, converted to HTML, and saved to the html_content field without requiring any explicit attention. At save-time we also update the modified field with a current timestamp.
For more on Markdown and its syntax, see the official site at http://daringfireball.net/projects/markdown/. You should also know Python-Markdown also comes with some useful contributed extensions. In fact, this book was written in Markdown with the help of the Wrapped Tables “wtables” extension (see http://brian-jaress.livejournal.com/5978.html)! There is also a second Markdown project in Python should you want to investigate that; see http://code.google.com/p/python-markdown2/.
With the overridden save function out of the way, our models are finally all fleshed out. Before we move on to the views and templates, let’s ensure our URLs are in place. Here’s our project-level urls.py.
urlpatterns = patterns('',
    url(r'^admin/(.*)', admin.site.root),
    url(r'^cms/', include('cmsproject.cms.urls')),
)
The admin line is the same as always; the other URL pattern prefixes all URLs to the CMS app with “cms/.” If you want another prefix, such as “stories” or “pages,” you can, of course, specify that here. See Chapter 7 for an alternate approach for flexible root URLs.
Next, the file mentioned in the previous call to include is our app-level urls.py, which looks like this:
from django.conf.urls.defaults import *
from cms.models import Story

info_dict = { 'queryset': Story.objects.all(), 'template_object_name': 'story' }

urlpatterns = patterns('django.views.generic.list_detail',
    url(r'^(?P<slug>[-w]+)/$', 'object_detail', info_dict, name="cms-story"),
    url(r'^$', 'object_list', info_dict, name="cms-home"),
)

urlpatterns += patterns('cmsproject.cms.views',
    url(r'^category/(?P<slug>[-w]+)/$', 'category', name="cms-category"),
    url(r'^search/$', 'search', name="cms-search"),
)
In order, our URLs provide for the display of individual stories, the full list of stories, lists of stories by category, and lists of stories matching a search request.
Because we’re again taking advantage of Django’s generic views, this is where much of the action is in our application. We have four URL patterns, split into two patterns objects due to the differing view prefixes; however, we could also have directly imported and used the view functions themselves.
Note
We chose to use strings here because we’d like to start using the admin and the generic views before fully fleshing out our custom views; trying to import not-yet-defined functions wouldn’t work too well in that scenario. The use of strings and/or function objects in URLs is often relatively arbitrary—use whatever works best for you.
As you’ve seen in many of the previous chapters, generic views have many optional arguments to control their behavior. We’re using just one of those arguments here; template_object_name, which enables our story object to be referred to as story in the template rather than the default name of object.
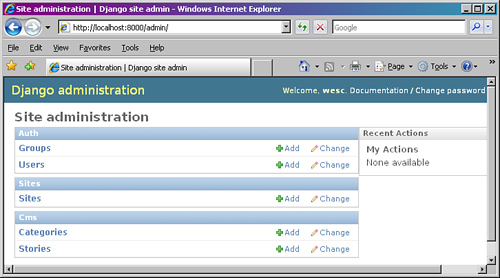
You should now have a functioning admin site for the CMS app. (Make sure you run manage.py syncdb at some point, so your database tables are created.) Connect to it now. Figure 8.4 is what you should expect to see from the admin page once you log in. Figure 8.5 shows the Add Story page, which shows up after clicking on Add.
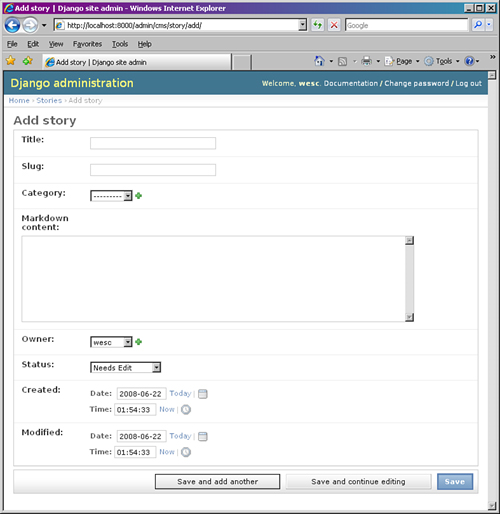
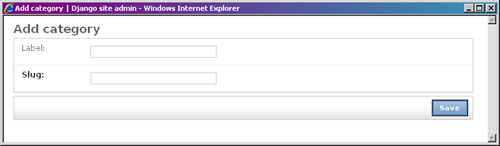
You can also choose to create a category. If you do and click the “+” on the Add Story page, you see a small popup as in Figure 8.6.
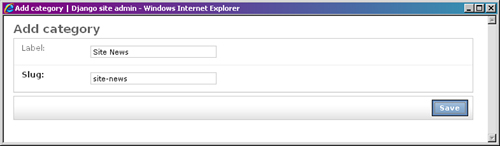
For example, enter “Site News” in the Label field. You see a Web-friendly string appearing in the Slug field at the same time (see Figure 8.7).
Now we can continue and finish adding our story. In our example, we set the status to Published (see Figure 8.8).
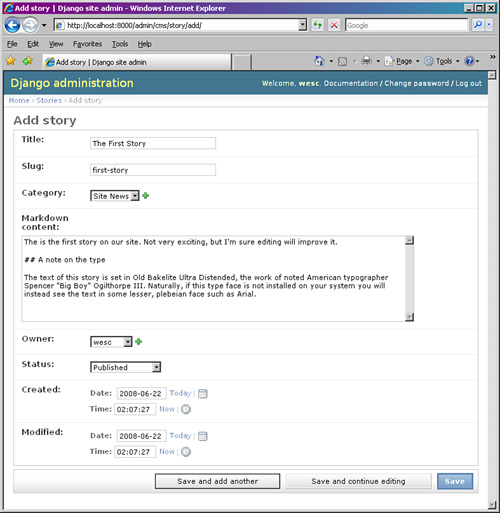
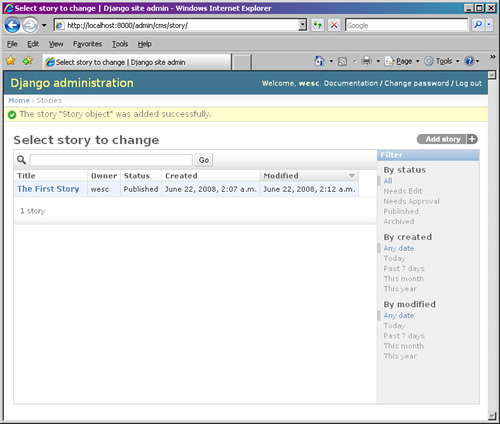
Once you save it, you should be redirected to the CMS Story page (see Figure 8.9) where your story should show up now.
Now you are welcome to add more and/or to edit stories, making sure at least one of them has Published or Archived status so there is something to see on the live site!
As seen earlier in the URLconf, we’re using generic views for most of our front-end display purposes. However, we need a couple lines of custom view code for our percategory listings. Here’s the start of our views.py file for this application.
from django.shortcuts import render_to_response, get_object_or_404
from django.db.models import Q
from cms.models import Story, Category

def category(request, slug):
    """Given a category slug, display all items in a category."""
    category = get_object_or_404(Category, slug=slug)
    story_list = Story.objects.filter(category=category)
    heading = "Category: %s" % category.label
    return render_to_response("cms/story_list.html", locals())
As you can see, it’s a simple view function, but one that isn’t quite able to be handled by one of the existing generic views, which is why we needed to write it directly. We move on to our templates now and return to the second custom view, one providing a search interface, afterward.
As with most Django projects, there is a base.html template that is extended by all others. In this case, we only have two more: story_detail.html and story_list.html. Create all three files in your cms folder, and set TEMPLATE_DIRS with the full directory path to your project in your settings.py file.
Let’s start with the simple base template, which looks like this:
<!DOCTYPE html PUBLIC "-//W3C//DTD HTML 4.01//EN"
"http://www.w3.org/TR/html4/strict.dtd">
<html lang="en">
<head>
<title>{% block title %}{% endblock %}</title>
<style type="text/css" media="screen">
body { margin: 15px; font-family: Arial; }
h1, h2 { background: #aaa; padding: 1% 2%; margin: 0; }
a { text-decoration: none; color: #444; }
.small { font-size: 75%; color: #777; }
#header { font-weight: bold; background: #ccc; padding: 1% 2%; }
#story-body { background: #ccc; padding: 2%; }
#story-list { background: #ccc; padding: 1% 1% 1% 4%; }
#story-list li { margin: .5em 0; }
</style>
</head>
<body>
<div id="header">
<form action="{% url cms-search %}" method="get">
<a href="{% url cms-home %}">Home</a> •
<label for="q">Search:</label> <input type="text" name="q">
</form>
</div>
{% block content %}
{% endblock %}
</body>
</html>We explain the various Django-specific pieces of this template later in the chapter. Now we need a template for displaying an individual story (story_detail.html), which, as we’ve said before, extends the base template.
{% extends "cms/base.html" %}
{% block title %}{{ story.title }}{% endblock %}
{% block content %}
    <h1>{{ story.title }}</h1>
    <h2><a href="{% url cms-category story.category.slug %}">{{ story.category
}}</a></h2>
    <div id="story-body">
        {{ story.html_content|safe }}
    <p class="small">Updated {{ story.modified }}</p>
    </div>
{% endblock %}
This is almost the simplest possible useful template—it expects only a single template variable, story. As long as this template is passed an object with title and html_content attributes, it should be happy.
One important item in the template is the safe filter that is applied to our html_content field. By default, Django auto-escapes all HTML in templates to protect against malicious user-entered content (a growing and serious security concern among Web applications). Because our Markdown source originates from trusted users, we feel justified in marking the content as “safe” and letting the browser treat the HTML literally, rather than escaping <em> to <em> and so on.
Our list template, story_list.html, is used by several different views that need to display multiple stories—category listings, search results, and the home page.
{% extends "cms/base.html" %}
{% block content %}
    {% if heading %}
        <h1>{{ heading }}</h1>
    {% endif %}
    <ul id="story-list">
    {% for story in story_list %}
        <li><a href="{{ story.get_absolute_url }}">{{ story.title }}</a></li>
    {% endfor %}
    </ul>
{% endblock %}
This is only slightly more complex than our detail template. It loops through the items in story_list, creating an <li> element for each where the title is used as link text for a link to the story’s detail page.
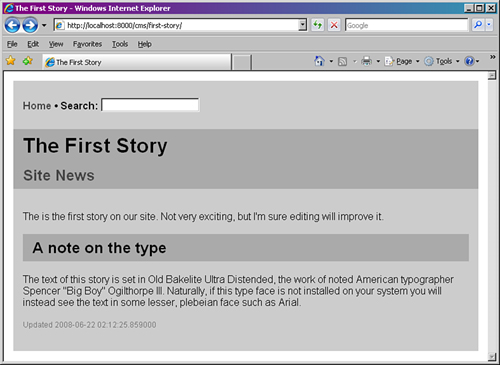
Because we are using story slugs, the URLs display our stories on our dev server with http://localhost:8000/cms/first-story/. Make sure your runserver has been restarted, load the URL into your browser, and you should see something like Figure 8.10.
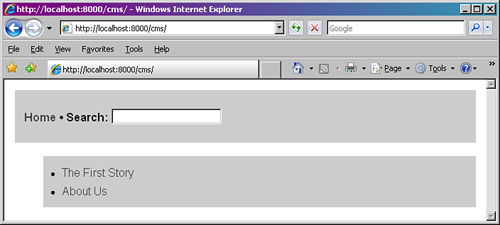
Next, we test out the object_list view that is displayed when we visit our site’s home page. This URL is http://localhost:8000/cms/, and when you visit the home page, you should see something like Figure 8.11.

The titles of the stories are links, generated by the get_absolute_url method we created previously.
Note our page has a search box on it! Read on to understand how we make it work.
Being able to search textual content is a must. For a public site, just adding a Google SiteSearch box is always an option (http://www.google.com/coop/cse/), but it’s nice to have a bit more control over the search process and the presentation of results.
Let’s add a simple search function to our site. Only a few pieces are needed to make this happen.
An HTML form containing a search field added to our
base.htmltemplate so it appears on every pageA view function that accepts input from this form and finds matching articles
The
story_list.htmltemplate we have already created, which we use to display those results
If you recall our earlier look at the base.html template, it includes a search box in the header. For that box to do something, we need a view that processes the form when it is submitted.
This task can’t be handled via a generic view, so we need another small custom view function. Add this code to your views.py right after the definition for the category method:
def search(request):
    """
    Return a list of stories that match the provided search term
    in either the title or the main content.
    """
    if 'q' in request.GET:
        term = request.GET['q']
        story_list = Story.objects.filter(Q(title__contains=term) | (markdown_content__contains=term))
        heading = "Search results"
    return render_to_response("cms/story_list.html", locals())
This is a custom view, but it doesn’t really need its own template. We’re able to reuse our story_list.html template as long as we provide it with what it expects—a QuerySet of Story model objects in a context variable named story_list. The search algorithm is simpleminded; a Story matches if the complete literal text submitted via the form is found in either the title or the Markdown content.
Let’s add a few more “stories.” In our example, we add an “About Us” page (just like in our Flatpages example) and mark it as Archived. We then add a Contact Us page but leave it in a Needs Edit state. Our admin screen should now show all three and their statuses, as seen in Figure 8.12.

In the main home page, however, we should only show the pages and provide the links of pages that we’ve enabled public access to (Published or Archived as controlled by VIEWABLE_STATUS). On visiting the home page as we do in Figure 8.13, you can see the Contact Us page does not show up!
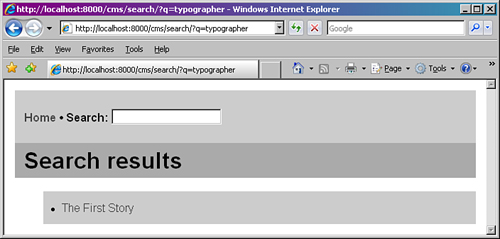
Now, let’s try out the search feature. On searching for the word, “typographer,” we see the only matching document is our first story, as shown in Figure 8.14.
This concludes the core functionality that we’re implementing for our CMS. Let’s discuss the final behavioral aspects of our application: managing users and permissions and a workflow as dictated by business logic.
Our system features a concept of ownership; each story is associated with a specific Django user object. There is no technical obstacle to a user editing or deleting content not marked as theirs—and no obstacle to their changing the ownership field, in fact. The presence of this field doesn’t create any per-object access control that did not exist before.
Note
In the near future, it will be possible to implement a more granular “per-object permissions” system in Django, using new admin-related features that were still in development at the time of writing. For more on this, see withdjango.com.
Nonetheless, this kind of informal or loosely enforced ownership can still be quite useful inside an organization where mutual trust exists. This is really not much different from an office environment where you trust that others don’t steal your special red stapler or shred documents in your filing cabinet. The convenient thing about the way we’ve implemented ownership here is we’re leveraging Django’s built-in user model. We don’t have to add any model code at all. Therefore we manage users using the Django admin.
As a superuser in the admin, you can use the admin to control who has the capability to edit users and groups and which of them have the right to access your Story model. You can also make it possible for users to edit Story objects but not Category objects. This would be a reasonable restriction, as most content editors are not reorganizing the information architecture of the site, but merely adding or updating existing content items.
Here’s the simple content workflow that motivates our status field and its choices:
An outside writer or staff member submits content for the page. This content is in draft form and needs to be edited.
After the initial edit is complete, a final approval is needed before publication.
Once the article is marked as “published,” it appears on the public Web site.
If the article becomes out of date, it can be marked as “archived.” This can mean, for example, it shows up in searches on the site, but is not featured in a “Recent articles” list on the home page.
This chapter’s example doesn’t involve any customization of the admin. If it did, this field would be used heavily by custom views that can do things such as color code items by their stage or present users with lists of action items when they logged in to the admin.
Note
You can find out more about customizing the admin in Chapter 11, “Advanced Django Programming.”
Note our models.py uses the the list_filter feature of the Django admin to offer convenient selection of stories at any one of the four stages. For example, an editor can use these to select all stories at the Needs Edit stage or an intern charged with culling old material can look just at the items with Archived status.
As suggested at the beginning of this chapter, there are as many different CMS architectures as there are users. The example application you’ve built in this chapter could be taken in several different directions, depending on what features are desired. Here are a few ideas.
Pagination. With only a few or a few dozen stories, our list pages remain manageable. But once you get into the realm of hundreds of items, displaying them all on a single page can be daunting to the user and potentially detrimental to the performance of your site as well. Likewise, if a search returns hundreds of results it’s unlikely that the user wants to see them all at once. Luckily, Django offers some built-in support for pagination, mostly in the form of the django.core.paginator module. For more, see the official Django documentation.
More powerful search. Our search function is handy, but doesn’t offer the power that something as familiar as a Web search engine does; a multiword phrase, for example, should ideally be treated as a collection of independent search terms unless otherwise specified. The implementation here could be made more sophisticated, but if you are doing full-text searching over large numbers of records you probably would benefit from something such as Sphinx, a search engine with available Django integration. For more, see withdjango.com.
Status change notifications. We’ve already got a custom save method that handles our Markdown rendering. We could easily extend this to improve our workflow system by detecting when a story’s status has been changed and sending a notification e-mail to the person responsible for handling stories at that stage. A key piece of implementing this would be to replace our status field with a ForeignKey to a full-fledged Status model, which in addition to the numerical value and label fields implied of our STATUS_CHOICES list would have a status_owner field, a ForeignKey field to the User model. Our save method would compare the recorded status value with the one about to be saved; if they differed, it would use Django’s send_mail function to notify the associated user.
Dynamically generated navigation. Our app doesn’t address the issue of site navigation, except to present a full list of all stories by default. For a real site, we’d need something better. One option would be to add some navigation-related fields to our Story model. A more flexible solution would be a separate Navigation model, which could be as simple as three fields: position in the overall sequence of navigation items, label to be displayed to the user, and a ForeignKey to the story that navigation item should link to.
User comments. Our CMS works well for publishing content, but doesn’t offer end users any way to contribute. A natural addition along these lines would be to enable comments to be posted on individual stories. Fortunately, Django has an excellent built-in commenting system that can work with both registered and anonymous users. Unfortunately, when we went to press, this system was pending a major rewrite, so we aren’t able to document it in this edition. However, if this functionality is of interest, check out the official documentation, which will be updated as soon as the feature is available.
Static files. Many marketing and public relations organizations desire the capability to upload content to distribute to customers, existing and potential, as well as providing presentations, reports, technical white papers, and so on, all in the form of PDF files, Word documents, Excel spreadsheets, ZIP archive files, and so forth.
It’s been a long chapter, but you should have gotten a good overview of how to leverage many of Django’s core components and contrib applications, both for a simple flatpages-based site and a more complex attempt at building a CMS.
By now, we hope you’re becoming familiar with the way Django apps are made: creating a project and applications with the command-line tools, thinking up a model definition (including how to leverage the admin), defining URLs, using both generic and custom views, and creating a template hierarchy.
There are two more example applications left in this part of the book: one using Ajax to create a liveblog and a look at a Django-based pastebin.