Django bills itself as “the Web framework for perfectionists with deadlines.” So let’s put ourselves on deadline and see how fast we can produce a simple blog using Django. (We’ll address your perfectionist side later.)
Note
This chapter assumes you’ve already installed Django on your system. If you haven’t, consult Appendix B, “Installing and Running Django.”
All the work in this chapter is done on the command line in your shell of choice (bash, tcsh, zsh, Cygwin, or what have you). So open your terminal and cd to a directory that is on your PYTHONPATH environment variable. On a Unix-based system such as Linux, Mac OS X, FreeBSD, and so on, you can issue an echo $PYTHONPATH command to see its contents; from a Win32 Command window, type echo %PYTHONPATH%. You can read more about paths in both the installation and Python chapters.
We recommend you try to follow along and actually build the blog as you go. If that’s not practical—if you aren’t near a computer, or you’re just impatient—simply reading it is illuminating too. That’s especially true if you have experience with one or more other modern Web frameworks, since many of the basic concepts are familiar.
If you are following along on your own computer, and you reach a point where the results you’re getting don’t match what you see here, stop and re-examine the step you just completed, and then review the two or three steps before that. Look for a spot where you could have skipped over a seemingly unimportant detail or didn’t understand a specific instruction. If no light bulbs come on, delete your sample project and start over. The authors used this method when learning Django; in addition to being faster than staring blankly at error messages for hours, the repetition of the steps leading up to your trouble spot really help with your retention!
The easiest way to organize your Django code when you are starting out is to use what Django calls a project:A directory of files that constitute, usually, a single Web site. Django comes with a utility called django-admin.py to streamline tasks such as the creation of these project directories. On Unix, it has a default installation into the /usr/bin directory, and if you’re on Win32, it goes into the Scripts folder right in your Python installation, for example, C:Python25Scripts. In either case, you need to make sure that django-admin.py is in your PATH so it can be executed from the command line.
To create the project directory for your blog project, issue this django-admin.py command:
django-admin.py startproject mysite
On a Win32 box, you need to open a DOS Command window first. It can be accessed via Start -> Programs -> Accessories -> Command Prompt. Also, instead of a $, you see something like C:WINDOWSsystem32> as a shell prompt.
Now take a look at the contents of the directory to see what this command has created for you. It should look something like this on Unix:
$ cd mysite
$ ls -l
total 24
-rw-r--r--    1 pbx  pbx     0 Jun 26 18:51 __init__.py
-rwxr-xr-x    1 pbx  pbx   546 Jun 26 18:51 manage.py
-rw-r--r--    1 pbx  pbx  2925 Jun 26 18:51 settings.py
-rw-r--r--    1 pbx  pbx   227 Jun 26 18:51 urls.py
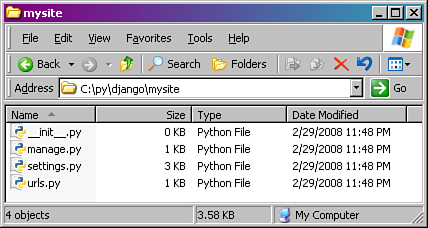
If you were developing on a Win32 platform, opening an Explorer window to that folder looks something like Figure 2.1, if we created a folder named C:pydjango with the intention of putting our project there.
Note
As you probably know if you’re an advanced Python user, that __init__.py file makes this project directory a Python package—a collection of related Python modules. Its status as a package enables us to use Python’s dot-notation to address individual pieces of our project, such as mysite.urls. (You can read more about packages in Chapter 1, “Practical Python for Django.”)
Besides __init__.py, the startproject command has created three other files.
manage.pyis a utility for working with this Django project. You can see from its permissions flags in the directory listing that it is executable. We run it in a moment.settings.pyis a file containing default settings for your project. These include database information, debugging flags, and other important variables. Any value in this file is available to any of your project’s installed apps—we show you the usefulness of that as we progress through this chapter.urls.pyis what’s known in Django as a URLconf, a configuration file that maps URL patterns to actions your applications perform. URLconfs are an exciting and powerful feature of Django.
Note
Every file created by the startproject command is Python source code. There’s no XML, no .ini files, and no funky configuration syntax. Django pursues a “pure Python” philosophy wherever possible. This gives you a lot of flexibility without adding complexity to the framework. For example, if you want your settings file to import settings from some other file or to calculate a value instead of having it hardcoded, there’s no barrier—it’s just Python.
At this point, you haven’t built your blog application yet, but nonetheless there are some Django conveniences in place for your use. One of the handiest is Django’s built-in Web server. It’s a server designed not for deploying public sites, but for quick development. Advantages of using it include
You don’t need to install Apache, Lighttpd, or whatever other Web server software you’d use in actual production—great if you’re working on a fresh server or a nonserver development machine or just playing around.
It automatically detects when you make changes to your Python source files and reloads those modules. This is a huge time-saver compared to manually restarting your Web server every time you edit your code, which is what’s required with most Python Web server setups.
It knows how to find and display static media files for the admin application, so you can work with it right away.
Running the development (or “dev”) server is as simple as issuing a single command. We’re going to use our project’s manage.py utility, a thin wrapper script that saves us the work of telling django-admin.py to use our specific project settings file. The command to run the dev server is
./manage.py runserver # or ".manage.py runserver" on win32
You should see something like the following with a slight difference for Win32 platforms where the quit key combination is CTRL-BREAK instead of CONTROL-C:
Validating models...
0 errors found.

Django version 1.0, using settings 'mysite.settings'
Development server is running at http://127.0.0.1:8000/
Quit the server with CONTROL-C.
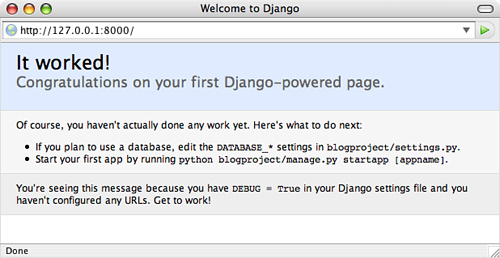
Open that link in your browser, and you should see Django’s “It Worked!” screen, as shown in Figure 2.2.
Meanwhile, if you look in your terminal session, you see the dev server has logged your GET request.
[07/Dec/2007 10:26:37] "GET / HTTP/1.1" 404 2049
The four chunks of the log line are from left to right: timestamp, request, HTTP response code, and byte count. (Your byte count is likely to be slightly different.) The response code is 404 (“Not Found”) because your project has no URLs defined yet. The It Worked! page is Django’s friendly way of telling you that.
Tip
If your server isn’t working at this point, retrace your steps. Be ruthless! It’s probably easier to delete your whole project and start following this chapter again from the beginning than it is to laboriously check every file and every line of code.
When you’ve successfully got the server running, we can move on to setting up your first Django application.
Now that we have a project, we can create applications (or “apps” in Django-speak) within it. To create our blog app, we’ll use manage.py again.
./manage.py startapp blog # or ".manage.py startapp blog" on win32
It’s just as simple as starting a project. Now we have a blog directory inside our project directory. Here’s what’s in it, first in Unix format, and then in a screenshot of Windows Explorer (see Figure 2.3).
$ ls -l blog/
total 16
-rw-r--r--   1 pbx  pbx   0 Jun 26 20:33 __init__.py
-rw-r--r--   1 pbx  pbx  57 Jun 26 20:33 models.py
-rw-r--r--   1 pbx  pbx  26 Jun 26 20:33 views.py
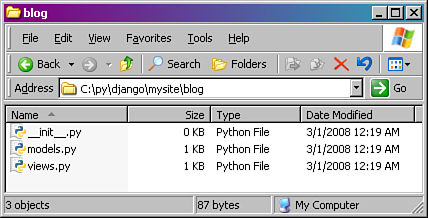
Like your project, your app is a package too. The models.py and views.py files have no real code in them; they’re merely placeholders. For our simple blog, in fact, we don’t need to touch the dummy views.py file at all.
To tell Django this new app is part of your project, you need to edit settings.py (which we can also refer to as your “settings file”). Open your settings file in your editor and find the INSTALLED_APPS tuple near the bottom. Add your app in dotted module form to that tuple in a line that looks like this (note the trailing comma):
'mysite.blog',
Django uses INSTALLED_APPS to determine the configuration of various parts of the system, including the automatic admin application and the testing framework.
We’ve now arrived at the core of your Django-based blog application: the models.py file. This is where we’ll define the data structures of the blog. Following the principle of Don’t Repeat Yourself (DRY), Django gets a lot of mileage out of the model information you provide for your application. Let’s create a basic model, and then see all the stuff Django does for us using that information.
Open up models.py in your favorite text editor (bonus points if it has a Python mode with syntax coloring). You see this placekeeper text:
from django.db import models

# Create your models here.
Delete the comment, and then add the following lines:
class BlogPost(models.Model):
    title = models.CharField(max_length=150)
    body = models.TextField()
    timestamp = models.DateTimeField()
That’s a complete model, representing a “BlogPost” object with three fields. (Actually, strictly speaking it has four fields—Django automatically creates an auto-incrementing, unique id field for each model by default.)
You can see our newly minted class, BlogPost, is a subclass of django.db.models.Model. That’s Django’s standard base class for data models, which is the core of Django’s powerful object-relational mapping system. Also, you notice our fields are defined like regular class attributes with each one being an instance of a particular field class. Those field classes are also defined in django.db.models, and there are many more types—ranging from BooleanField to XMLField—than the three we’re using here.
If you don’t have a database server installed and running, we recommend SQLite as the fastest and easiest way to get going. It’s fast, widely available, and stores its database as a single file in the filesystem. Access controls are simply file permissions. For more on how to set up a a database for use with Django, see Appendix B.
If you do have a database server—PostgreSQL, MySQL, Oracle, MSSQL—and want to use it rather than SQLite, then use your database’s administration tools to create a new database for your Django project. We name this database “djangodb” in our examples, but you can name it whatever you like.
Either way, with your (empty) database in place, all that remains is to tell Django how to use it. This is where your project’s settings.py file comes in.
Many people use Django with a relational database server such as PostgreSQL or MySQL. There are six potentially relevant settings here (though you may need only two): DATABASE_ENGINE, DATABASE_NAME, DATABASE_HOST, DATABASE_PORT, DATABASE_USER, and DATABASE_PASSWORD. Their names make their respective purposes pretty obvious. Just plug in the correct values corresponding to the database server you are using with Django. For example, settings for MySQL look something like this:
DATABASE_ENGINE = "mysql"
DATABASE_NAME = "djangodb"
DATABASE_HOST = "localhost"
DATABASE_USER = "paul"
DATABASE_PASSWORD = "pony"  # secret!
Note
We haven’t specified DATABASE_PORT because that’s only needed if your database server is running on a nonstandard port. For example, MySQL’s server uses port 3306 by default. Unless you’ve changed the setup, you don’t have to specify DATABASE_PORT at all.
For details on creating a new database and database user (which is required for database servers), see Appendix B.
SQLite is a popular choice for testing and even for deployment in scenarios where there isn’t a great deal of simultaneous writing going on. No host, port, user, or password information is needed because SQLite uses the local filesystem for storage and the native filesystem permissions for access control. So only two settings are needed to tell Django to use your SQLite database.
DATABASE_ENGINE = "sqlite3"
DATABASE_NAME = "/var/db/django.db"
Note
When using SQLite with a real Web server such as Apache, you need to make sure the account owning the Web server process has write access both for the database file itself and the directory containing that database file. When working with the dev server like we are here, permissions are typically not an issue because the user (you) running the dev server also owns the project files and directories.
SQLite is also one of the most popular choices on Win32 platforms because it comes free with the Python distribution. Given we have already created a C:pydjango directory with our project (and application), let’s create a db directory as well.
DATABASE_ENGINE = 'sqlite3'
DATABASE_NAME = r'C:pydjangodbdjango.db'
If you are new to Python, you notice the subtle difference in the first example; we used double quotes around sqlite3, whereas in the Win32 version, we used single quotes. Rest assured it has nothing to do with differing platforms—Python does not have a character type, so single quotes and double quotes are treated the same. Just make sure you open and close a string with the same type of quote!
You should also have noticed a small “r” in front of the folder name. If you’ve read Chapter 1, then you know this means to designate the object as a “raw string,” or one that takes all characters of a string verbatim, meaning do not translate special character combinations. For example,
usually means a newline character, but in a raw string, it means (literally) two characters: a backslash followed by an n. So the purpose of a raw string is specifically for DOS file paths, telling Python to not translate special characters (if there are any).
Now you tell Django to use the connection information you’ve given it to connect to the database and set up the tables your application needs. The command to do this is simply:
./manage.py syncdb # or ".manage.py syncdb" on win32
You see some output that starts like this as Django sets up the database:
Creating table auth_message
Creating table auth_group
Creating table auth_user
Creating table auth_permission
Creating table django_content_type
Creating table django_session
Creating table django_site
Creating table blog_blogpost
When you issue the syncdb command, Django looks for a models.py file in each of your INSTALLED_APPS. For each model it finds, it creates a database table. (There are exceptions to this later when we get into fancy stuff such as many-to-many relations, but it’s true for this example. If you are using SQLite, you also notice the django.db database file is created exactly where you specified.)
The other items in INSTALLED_APPS, the ones that were there by default, all have models too. The output from manage.py syncdb confirms this, as you can see Django is creating one or more tables for each of those apps.
That’s not all the output you got from the syncdb command, though. You also got some interactive queries related to the django.contrib.auth app.
You just installed Django's auth system, which means you don't have any superusers
defined.
Would you like to create one now? (yes/no): yes
Username (Leave blank to use 'pbx'):
E-mail address: [email protected]
Password:
Password (again):
Superuser created successfully.
Installing index for auth.Message model
Installing index for auth.Permission model
Now you’ve got one superuser (hopefully yourself) in the auth system. This comes in handy in a moment, when we add in Django’s automatic admin application.
Finally, the process wraps up with a couple lines relating to a feature called fixtures, which we come back to in Chapter 4, “Defining and Using Models.” These enable you to preload data in a freshly created application. For now, we’re not using that feature, so Django moves on.
Loading 'initial_data' fixtures...
No fixtures found.
Your initial database setup is now complete. The next time you run the syncdb command on this project (which you do any time you add an application or model), you see a bit less output because it doesn’t need to set up any of those tables a second time or prompt you to create a superuser.
The automatic back-end application, or admin, has been described as Django’s “crown jewel.” For anyone who has tired of creating simple “CRUD” (Create, Read, Update, Delete) interfaces for Web applications, it’s a godsend. We get much deeper into the admin in “Customizing the Admin” in Chapter 11, “Advanced Django Programming.” For now, let’s just turn it on and poke around.
Because it’s an optional part of Django, you need to specify in your settings.py file you’re using it—just like you did with your own blog app. Open settings.py and add the following line to the INSTALLED_APPS tuple, just underneath 'django.contrib.auth'.
'django.contrib.admin',
Every time you add a new application to your project, you should run the syncdb command to make sure the tables it needs have been created in your database. Here we can see adding the admin app to INSTALLED_APPS and running syncdb triggers the creation of one more table in our database:
$ ./manage.py syncdb
Creating table django_admin_log
Installing index for admin.LogEntry model
Loading 'initial_data' fixtures...
No fixtures found.
Now that the app is set up, all we need to do is give it a URL so we can get to it. You should have noticed these two lines in your automatically generated urls.py.
# Uncomment this for admin:
#    (r'^admin/', include('django.contrib.admin.urls')),
Remove the # character from the second line (and you can remove the first, comment-only line at the same time) and save the file. You’ve told Django to load up the default admin site, which is a special object used by the contrib admin application.
Finally, your applications need to tell Django which models should show up for editing in the admin screens. To do so, you simply need to define the default admin site mentioned previously and register your BlogPost model with it. Open the mysite/blog/models.py file, make sure the admin application is imported, and then add a line registering your model at the bottom.
from django.db import models
from django.contrib import admin

class BlogPost(models.Model):
    title = models.CharField(max_length=150)
    body = models.TextField()
    timestamp = models.DateTimeField()

admin.site.register(BlogPost)
This simple use of the admin is the tip of the iceberg; it’s possible to specify many different admin-related options by making a special Admin class for a given model, and then registering the model with that class. We do this shortly, and you also see examples of advanced admin use in later chapters, especially in Parts III, “Django Applications by Example,” and IV, “Advanced Django Techniques and Features.”
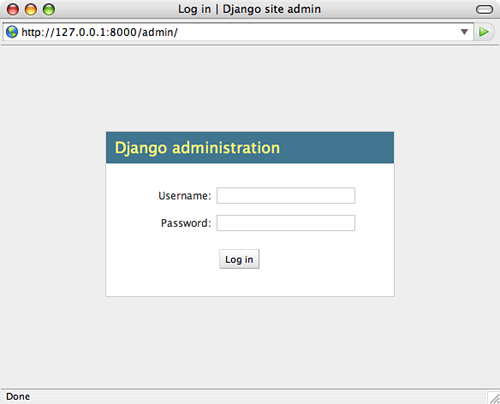
Now that we’ve set up our Django site with the admin app and registered our model with it, we can take it for a spin. Issue the manage.py runserver command again. Now, go to http://127.0.0.1:8000/admin/ in your Web browser. (Don’t worry if your dev server address is different; just add an admin/ onto it, whatever it is.) You should see a login screen, as shown in Figure 2.4.
Type the “superuser” name and password you created earlier. Once you’ve logged in, you see the admin home page, as shown in Figure 2.5.
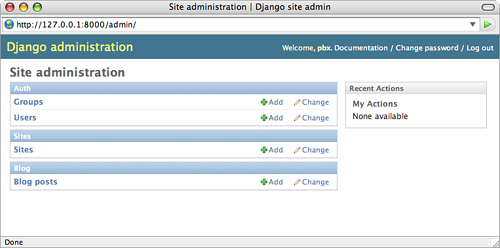
We’ll tour this interface later in the book; for now, just confirm your application, Blog, is showing up as seen in the screenshot. If it’s not, recheck the previous steps.
Tip
The three most common causes for “My app doesn’t show up in the admin,” problems are 1) forgetting to register your model class with admin.site.register, 2) errors in the app’s models.py, and 3) forgetting to add the app to the INSTALLED_APPS tuple in your settings.py file.
What’s a blog without content? Click the Add button to the right of Blog Posts. The admin presents a form for adding a new post, as shown in Figure 2.6.
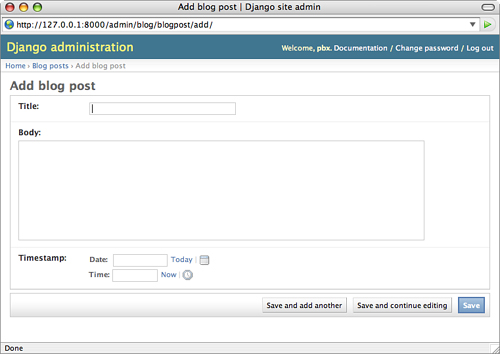
Give your post a title and some scintillating content. For the timestamp, you can click the Today and Now shortcut links to fill in the current date and time. You can also click the calendar or clock icons to pull up handy date and time pickers.
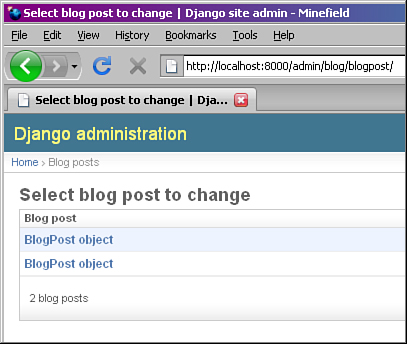
When you’re done writing your masterpiece, click the Save button. You see a screen with a confirmation message (“The blog post ‘BlogPost object’ was added successfully”) and a list of all your blog posts—a grand total of one at this point, as shown in Figure 2.7.
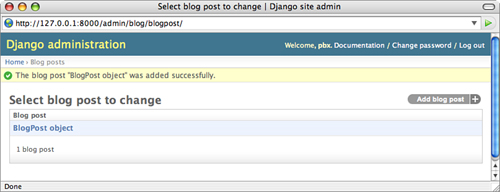
Why is the post given the awkward name of “BlogPost object”? Django is designed to flexibly handle an infinite variety of content types, so it doesn’t take guesses about what field can be the best handle for a given piece of content. Throughout Part 3’s example applications, you see examples of defining how to specify a particular field, or specially constructed string, to be used for your objects’ default labels.
Now go ahead and add a second post with different content by clicking on the Add Blog Post + button to the upper-right. When you are returned to the list view, you just see another BlogPost row added to the page. If you refresh the page or go away and come back to your application, the output has not improved any—you just do not feel satisfied with seeing all the entries generically labeled as “BlogPost object,” as shown in Figure 2.8. You are not alone if you’re thinking, “There has got to be a way to make it look more useful!”
However, we don’t have to wait until then to clean up the list display in our admin view. Previously, we enabled the admin tool with the bare minimum of configuration, namely registering our model with the admin app all by itself. However, with an extra two lines of code and a modification of the registration call, we can make the presentation of the listing much nicer and more usable. Update your mysite/blog/models.py file with a new BlogPostAdmin class and add it to the registration line, so your models.py looks like this:
from django.db import models
from django.contrib import admin

class BlogPost(models.Model):
    title = models.CharField(max_length=150)
    body = models.TextField()
    timestamp = models.DateTimeField()

class BlogPostAdmin(admin.ModelAdmin):
    list_display = ('title', 'timestamp')

admin.site.register(BlogPost, BlogPostAdmin)
The development server notices your changes and reloads your models file. If you are monitoring your command shell, you see some output to this effect.
If you refresh the page, you now see much more useful output based on the new list_display variable you added to your BlogPostAdmin class (see Figure 2.9).
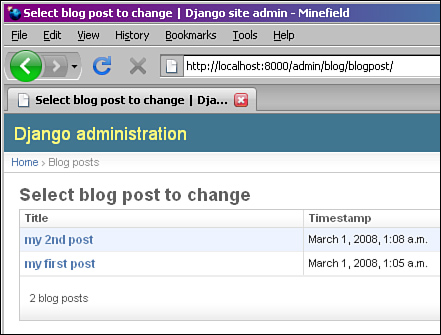
Try clicking on the Title and Timestamp column headers that have appeared—each one affects how your items are sorted. For example, click once on Title to sort in ascending order by title; click the Title header a second time to change to descending order.
The admin has many other useful features that can be activated with just a line or two of code: searching, custom ordering, filters, and more. As we’ve mentioned a few times already, Parts III and IV cover or demonstrate many of these topics in greater detail.
With the database and admin side of our application taken care of, it’s time to turn to the public-facing pages. A page, from Django’s perspective, has three typical components:
A template that displays information passed to it (in a Python-dictionary-like object called a
Context)A view function that fetches information to be displayed, typically from a database
A URL pattern that matches an incoming request with your view function, optionally passing parameters to the view as well
We’ll tackle these three in that order. In a sense this is building from the inside out—when Django processes a request, it starts with the URL patterns, then calls the view, and then returns the data rendered into a template.
Django’s template language is easy enough to read that we can jump right in to example code. This is a simple template for displaying a single blog post:
<h2>{{ post.title }}</h2>
<p>{{ post.timestamp }}</p>
<p>{{ post.body }}</p>
It’s just HTML (though Django templates can be used for any kind of textual output) plus special template tags in curly braces. These are variable tags, which display data passed to the template. Inside a variable tag, you can use Python-style dot-notation to access attributes of the objects you pass to your template. For example, this template assumes you have passed it a BlogPost object called “post.” The three lines of the template fetch the BlogPost object’s title, timestamp, and body fields, respectively.
Let’s enhance the template a bit so it can be used to display multiple blog posts, using Django’s for template tag.
{% for post in posts %}
<h2>{{ post.title }}</h2>
<p>{{ post.timestamp }}</p>
<p>{{ post.body }}</p>
{% endfor %}
The original three lines are unchanged; we’ve simply added a block tag called for that renders a template section once for each of a sequence of items. The syntax is deliberately similar to Python’s loop syntax. Note that unlike variable tags, block tags are enclosed in {% ... %} pairs.
Save this simple five-line template in a file called archive.html, and put that file in a directory called templates inside your blog app directory. That is, the path to your template file should be:
mysite/blog/templates/archive.html
The name of the template itself is arbitrary (we could have called it foo.html), but the templates directory name is mandatory. By default, when searching for templates, Django looks for a templates directory inside each of your installed applications.
Now we’ll write a simple view function that fetches all our blog posts from the database and displays them using our template. Open up the blog/views.py file and type the following:
from django.template import loader, Context
from django.http import HttpResponse
from mysite.blog.models import BlogPost

def archive(request):
    posts = BlogPost.objects.all()
    t = loader.get_template("archive.html")
    c = Context({ 'posts': posts })
    return HttpResponse(t.render(c))
Skipping over the import lines for the moment (they just load up the function and classes we need), here’s the breakdown of the view function, line by line:
Line 5: Every Django view function takes a
django.http.HttpRequestobject as its first argument. It can also take other arguments that get passed in via the URLconf, which is a feature you are using a lot.Line 6: When we created our
BlogPostclass as a subclass ofdjango.db.models.Model, we inherited the full power of Django’s object-relational mapper. This line is a simple example of using the ORM (Object-Relational Mapper; see Chapters 3, “Starting Out,” and 4 for more) to get all the BlogPost objects in the database.Line 7: To create our template object
t, we only need to tell Django the name of the template. Because we’ve stored it in thetemplatesdirectory of our app, Django can find it without further instruction.Line 8: Django templates render data that is provided to them in a context, a dictionary-like object. Our context
chas only a single key and value.Line 9: Every Django view function returns a
django.http.HttpResponseobject. In the simplest case, we pass the constructor a string. The templaterendermethod returns a string, conveniently.
Only one more piece is needed for our page to work—like anything else on the Web, it needs a URL.
We could create the needed URL pattern directly inside mysite/urls.py, but that creates a messy coupling between our project and our app. We can use our blog app somewhere else, so it would be nice if it were responsible for its own URLs. We do this in two simple steps.
The first step is much like enabling the admin. In mysite/urls.py, there’s a commented example line that is almost what we need. Edit it so it looks like this:
url(r'^blog/', include('mysite.blog.urls')),This catches any requests that begin with blog/ and passes them to a new URLconf you’re about to create.
The second step is to define URLs inside the blog application package itself. Make a new file, mysite/blog/urls.py, containing these lines:
from django.conf.urls.defaults import *
from mysite.blog.views import archive

urlpatterns = patterns('',
    url(r'^$', archive),
)
It looks a lot like our base URLconf. The action happens in line 5. First, note the blog/ part of the request URL, which our root URLconf was matching, is stripped—our blog application is reusable and shouldn’t care if it’s mounted at blog/ or news/ or what/i/had/for/lunch/. The regular expression in line 5 matches a bare URL, such as /blog/.
The view function, archive, is provided in the second part of the pattern tuple. (Note we’re not passing a string that names the function, but an actual first-class function object. Strings can be used as well, as you see later.)
Let’s see it in action! Is the dev server still running? If not, fire it up with manage.py runserver, and then go to http://127.0.0.1:8000/blog/ in your browser. You should see a simple, bare-bones rendering of any blog posts you have entered, complete with title, timestamp, and post body.
Using the key concepts laid out so far, you could go forward and refine this primitive blog engine in a number of ways. Let’s step through a few of them to make this project feel just a little more polished.
Our template is plain to say the least. Because this is a book on Web programming not Web design, we leave the aesthetic touches to you, but template inheritance is another feature of the template system that can make your life easier, especially as your page styles proliferate.
Our simple template is completely self-contained. But what if our site had a blog, a photo archive, and a links page, and we wanted all these to be based on a common base? Experience tells you the wrong way to do this would be to copy and paste your way to three kind-of-identical self-contained templates. The right way in Django is to create a base template, and then extend this template to generate the other, specific templates. In your mysite/blog/templates directory, create a template called base.html containing the following:
<html>
<style type="text/css">
body { color: #efd; background: #453; padding: 0 5em; margin: 0 }
h1 { padding: 2em 1em; background: #675 }
h2 { color: #bf8; border-top: 1px dotted #fff; margin-top: 2em }
p { margin: 1em 0 }
</style>
<body>
<h1>mysite.example.com</h1>
{% block content %}
{% endblock %}
</body>
</html>
Not exactly valid XHTML Strict, but it’ll do. The detail to notice is the {% block ... %} tag. This defines a named area that subtemplates can change. To make your blog app use this template, change your archive.html template so it references this new base template and its “content” block.
{% extends "base.html" %}
{% block content %}
{% for post in posts %}
<h2>{{ post.title }}</h2>
<p>{{ post.timestamp }}</p>
<p>{{ post.body }}</p>
{% endfor %}
{% endblock %}
The {% extends ... %} tag tells Django to look for a template named base.html, and plug the content of any named blocks in this template into the corresponding blocks in that template. You should now see something like Figure 2.10 (hopefully your blog posts are more exciting, though).

You should have noticed your blog posts are not being presented in traditional reverse-chronological order. It’s easy for us to tell Django to do that; in fact, we have a choice as to where we want to tell it to do so. We can add a default ordering to our model, or we can add it to the BlogPost.objects.all() query in our view code. In this case the model is a better location because we most often want posts ordered reverse chronologically. If we set our preferred ordering in the model, any part of Django that accesses our data uses that ordering.
To set default ordering for your model, give it an inner class called Meta and set the ordering attribute in that class.
class Meta:
    ordering = ('-timestamp',)
Take a look at your blog home page (/blog/). The newest post should now be on top. The string -timestamp is a concise way of telling Django, “order by the ‘timestamp’ field, and do it in descending order.” (If we omitted the “−”, they’d be presented in ascending date order instead.)
Note
Don’t omit the trailing comma inside the parentheses! It makes this a single-item tuple, rather than just a parenthesized string. Django expects a tuple here; you’re allowed to specify as many fields for ordering as you want. If you added 'title' after the comma, and you had two posts titled “A” and “B” with the same timestamp, post “A” would come first.
That timestamp is handy, but its ISO8601 format is a little nerdy. Let’s humanize it a bit by using a cool feature of the Django template system: filters.
Because this is a presentation detail, not a data structure or business logic detail, the appropriate place for it is in the template. Open your archive.html file and change the “post.timestamp” line to
<p>{{ post.timestamp|date }}</p>To apply a filter to a variable, you simply tack it on to the end of the variable name—inside the curly brackets—using a vertical bar, or “pipe,” character. Reload your blog home page. Now your dates appear in a more liberal-arts-friendly form (“July 7 “).
If the default style of the date filter isn’t to your liking, you can pass it an argument using strftime-type formatting. However, rather than using the conversion codes from Python’s time module, it uses the same formatting directives as PHP’s date function. For example, if you want to display the day of the week but omit the year, change the line to pass an argument to the date filter.
<p>{{ post.timestamp|date:"l, F jS" }}</p>This particular format string gives you dates in the style “Friday, July 6th.” Make sure you don’t leave any space on either side of that colon—the Django template engine is particular about this.
Of course, we could continue adding features to our blog engine forever (many people do!), but hopefully you’ve seen enough to give you a taste of the power of Django. In the course of building this skeletal blog app you’ve seen a number of Django’s elegant, labor-saving features:
The built-in Web server, which makes your development work more self-contained and automatically reloads your code if you edit it
The pure-Python approach to data model creation, which saves you from having to write or maintain SQL code or XML description files
The automatic admin application, which provides full-fledged content-editing features even for nontechnical users
The template system, which can be used to produce HTML, CSS, JavaScript, or any textual output format
Template filters, which can alter the presentation of your data (such as dates) without messing with your application’s business logic
The URLconf system, which gives you great flexibility in URL design while keeping application-specific portions of URLs in the application, where they belong
Just to give you an idea of what’s ahead, the following are some things we could proceed to do to our blog using Django’s built-in features:
Publish Atom or RSS feeds of our latest posts (see Chapter 11)
Add a search feature so that users can locate blog posts containing specific terms (see the CMS example app in Chapter 8, “Content Management System”)
Adopt Django’s “generic views” to avoid having to write any code in views.py at all (see the Pastebin example app in Chapter 10, “Pastebin”)
You’ve completed your whirlwind tour of Django basics. Chapter 3, fleshes out with a broad look at Django’s key components and the philosophies behind them, as well as provides a recap of some Web development principles central not only to Django itself, but to the lessons we offer in later parts of the book. Chapter 4, takes you down into the details of the framework, where you find answers to the questions of “how, why, and what about ...?” that probably arose as you walked through the previous examples. After Chapter 4, you have a solid enough understanding to follow along and build several example applications: a content management system, a pastebin, a photo gallery, and an Ajax-powered “live blog.”