This appendix introduces you to porting your Django application to the Google App Engine, a scalable Web application platform that is based in part on Django and embodies many Django features. Although we try to cover the basics, we cannot go over every aspect of this technology; you can find links to more information at the end of the appendix.
There are several ways of developing apps with App Engine with a varying degree of “Django-ness:”
A new/pure App Engine app
An existing Django app ported to App Engine
A new Django app written specifically for App Engine
The first method uses only the (minimal) Django features and components that come with every App Engine application—we discuss these in the next section. The other two methods bring more Django into the picture and are the focus of this appendix. Again, if you want to learn more about “pure” App Engine applications, check out the related links at the end because we aren’t covering those details here.
Our purpose is to focus on Django—developing applications with Google App Engine by itself warrants its own book!
The launch of Google App Engine represents an exciting development for those using or planning to use Django. Its release is a welcome boost to the profile of both Python and Django within the larger software development community, generating a lot of interest from folks who previous could not have considered using either technology.
Perhaps the most significant promise of App Engine is it aims to make deployment and server upkeep a nonissue. We deal with Web server setup—Apache or nginx deployment, whether to use mod_python or FCGI, and so on—because we have to, to make Web sites using Python.
Contrast this to PHP, which—while suffering from many problems, the language itself not least among them—is generally free of such worries. The App Engine allows Python Web developers a similar sort of care-free programming platform. On top of that, it enables us to leverage Google’s existing (and massive) infrastructure.
Pure App Engine applications are created in a single directory and use the toolset App Engine provides: the SDK’s development Web server (dev_appserver.py) and the application uploader (appcfg.py) used for deployment to the App Engine “cloud” when your code is ready for release.
Configuration of an App Engine application is defined in a YAML file (app.yaml) that can look something like:
application: helloworld
version: 1
runtime: python
api_version: 1

handlers:
- url: /.*
  script: helloworld.py
You notice the handlers section looks similar in function to a Django URLconf, hooking up a URL-like string with a specific script to execute. Another Django or Django-like feature of App Engine development is its templating system, which is essentially a wholesale reuse of Django’s own.
From the perspective of a Django developer, the biggest missing piece in Google’s implementation is Django’s ORM. Instead of a relational database, Google relies on its proprietary BigTable system for storage—see http://labs.google.com/papers/bigtable.html and http://en.wikipedia.org/wiki/BigTable for more information. There are no SQL statements, no relations, no JOINs, and so on.
Although you can write brand-new apps that use the other parts of Django and substitute Google’s BigTable-based ORM for your data models, this limitation scratches virtually all existing Django apps off the list. You can conceivably rewrite parts of your own apps to work around this, but you are not going to do that for existing Django apps and components such as the admin, the authentication system, the generic views, and so forth.
We discuss reworking your own apps for App Engine in the next section.
With those portions of Django out of the picture, we’re left with the core functionality: URLconfs, views, and templates. Although these components are enough to build any sort of Web site, they aren’t entirely satisfying if you want to use existing Django applications on the App Engine or build applications capable of deploying both normally and as App Engine.
The key to making your experience with App Engine a bit more like “real” Django development is the Google App Engine Helper for Django. This is an open-source Google-sponsored project (with Python creator Guido van Rossum being listed as one of its contributors) that aims to make App Engine a more comfortable environment for those with Django experience. It even enables you to swap in a more current version of Django instead of the one that App Engine ships with.
Before we go any further, we need to get the necessary software. You can download the Google App Engine SDK for your platform at http://code.google.com/p/googleappengine/, the SDK Project home page. An .msi file is available for Windows users along with a .dmg file for OS X. For everyone else, just download the general source ZIP file. Similarly, the helper is available for download at http://code.google.com/p/google-app-engine-django/.
Follow the instructions on installing both. Once completed, you are welcome to start playing around with the App Engine on its own; for example, we suggest following its tutorial to build a simple application solely on that platform. Google provides good documentation on how to get up and running with App Engine, so we don’t rehash it all here. The App Engine tutorial can be found at http://code.google.com/appengine/docs/gettingstarted/.
It’s advantageous to know how to create simple apps on both platforms so when we try integration such as bringing Google App Engine to an existing Django app or building a new App Engine application with more of a Django flavor, things come easier to you.
At the time of this writing, the Helper is in a fairly primitive state. Its primarily goal is to round off the sharp corners of App Engine from a Django developer’s perspective, but it has a long way to go. If you go poking around in the Helper source, be prepared to learn a bit about the internals of both App Engine and Django.
The Helper does not turn App Engine into Django, but it does ease the transition a bit. Although our following example presumes you are using the Helper, choosing to simply use the stock App Engine functionality is also perfectly acceptable. As is commonly said about Django, “It’s just Python.” Don’t let the rough edges of App Engine prevent you from exploring its potential. In the words of one observer, App Engine “makes it hard not to scale.” Assuming you are willing to trade the previous limitations for deployment convenience and the promise of immense scalability, then please read on.
The Helper is delivered in the form of a skeletal Django project containing a single application called appengine_django. You can use the skeleton as the basis of a new project or copy the appengine_django application folder into an existing project.
App Engine provides a minimal administrative back-end called the Development Console. Once you’ve installed the Helper, this admin app resides at a URL similar to http://localhost:8000/_ah/admin (assuming you have the App Engine server running on port 8000). Unlike the regular admin, this tool can only work with models that already have some records saved in the data store. If you have a model that has not yet been used to save any data, you are not able to create records of that type via the Development Console.
In this section, we are going to take our simple blog, as developed in Chapter 2, “Django for the Impatient: Building a Blog,” and turn it into an App Engine application. We are going to follow the steps as outlined in the Google App Engine Helper for Django README file, located at http://code.google.com/p/google-app-engine-django/source/browse/trunk/README. For the following example, we are assuming you called your project mysite and your application blog.
After downloading the Helper and unzipping it, you have a directory named appengine_helper_for_django. Copy the contents of that directory into the root folder of your existing Django blog project, so the app.yaml, main.py files, and the appengine_django folder are now coexisting with your Django files such as urls.py and settings.py.
Now, edit your app.yaml file and change the application name to the one you registered your application under in the App Engine’s Admin Console. The next step is to give your project access to the App Engine code itself.
Note
Updating app.yaml with an App Engine-registered name is not actually required; it’s only necessary when and/or if you decide to upload your code to the App Engine itself. It’s entirely possible to run your code with the SDK runserver without this information entered.
If you did not install the App Engine SDK using the Windows or Mac OS X installers, you need to manually link to the App Engine code. On a POSIX system (Linux or Mac OS X), the call to the ln command looks something like this:
$ ln -s THE_PATH_TO/google_appengine ./.google_appengine
Our next step is to integrate our helper into our command-and-control file manage.py. This enables us to manage our app almost like a stand-alone Django application. The way to do this is to add two new lines to the very top of the file (after the “sh-bang” line) right before the import of execute_manager, so the first four lines of manage.py look like this:
#!/usr/bin/env python

from appengine_django import InstallAppengineHelperForDjango
InstallAppengineHelperForDjango()

from django.core.management import execute_manager
This enables App Engine to take partial control over some of the Django management commands, as well as adding App Engine-specific code and making the Helper’s add-ons accessible. However, even with a modified manage.py, you still have access to many of the more important commands.
Now that we have a “new” manage.py, let’s use our first new command to generate a new settings.py file. (We recommend backing up the original in case you want to revert everything afterward!) Why are we doing this? Sadly, we have to remove all Django functionality that’s incompatible with App Engine—all the stuff we described previously. The way you do that is with the diffsettings command.
$ manage.py diffsettings
WARNING:root:appengine_django module is not listed as an application!
INFO:root:Added 'appengine_django' as an application
WARNING:root:DATABASE_ENGINE is not configured as 'appengine'. Value overridden!
WARNING:root:DATABASE_%s should be blank. Value overridden!
WARNING:root:Middleware module 'django.middleware.doc.XViewMiddleware' is not
compatible. Removed!
WARNING:root:Application module 'django.contrib.contenttypes' is not compatible.
Removed!
WARNING:root:Application module 'django.contrib.sites' is not compatible. Removed!
DATABASE_ENGINE = 'appengine'
DEBUG = True
INSTALLED_APPS = ('django.contrib.auth', 'django.contrib.admin', 'mysite.blog',
'appengine_django')
MIDDLEWARE_CLASSES = ('django.middleware.common.CommonMiddleware',
'django.contrib.auth.middleware.AuthenticationMiddleware')
ROOT_URLCONF = 'mysite.urls'  ###
SECRET_KEY = 'w**sb^(p($wzxra*a9_@4_z0s(9i(9x3(w--aribbaaa4(r^wi'
SERIALIZATION_MODULES = {'xml': 'appengine_django.serializer.xml'}  ###
SETTINGS_MODULE = 'settings'  ###
SITE_ID = 1  ###
TEMPLATE_DEBUG = True
TIME_ZONE = 'America/Los_Angeles'
In the output, all lines that start with “WARNING” usually indicate something is not compatible or is an incorrect setting and removed. All lines that come after the final line of WARNINGs and INFOs make up the contents to the new settings.py file.
We need to tweak our application to use App Engine objects now, so the first place is in models.py. Instead of using django.db.models.Model, we need to use appengine_django.models.BaseModel. Back up your original models file, and then modify models.py so it looks like:
from appengine_django.models import BaseModel
from google.appengine.ext import db

class BlogPost(BaseModel):
    title = db.StringProperty()
    body = db.StringProperty()
    timestamp = db.DateTimeProperty()
The similarities are definitely there—these are now equivalent objects to what you had before. One notable difference is we no longer need the max_length setting for our title. The App Engine StringProperty has a maximum of 500 bytes. For simplicity, we use the same property for body in our example.
If there is a chance that a blog entry exceeds this size, then you can use TextProperty instead. TextProperty can hold more than 500 bytes, but the downside is these values are not indexed and cannot be used in filters or sort orders. Of course, chances are you wouldn’t be filtering or sorting on your body attribute anyway, so it wouldn’t be a big loss in this case.
Because App Engine does not use the Django ORM, you have to change your view code to use BigTable queries. You discover the App Engine database API gives you two different ways of querying for data: a standard Query or a SQL-like GqlQuery. In our case, we love the ORM-ness of Django and want to preserve a high-level of data access, so we just use Querys.
We’re now ready to give our overhauled application a test drive. When you use manage.py runserver to start up the development server, you no longer see Django validating models, letting you know which settings file it’s using, and the friendly startup message. Instead, you see the App Engine server output.
$ manage.py runserver
INFO:root:Server: appengine.google.com
INFO:root:Running application mysite on port 8000: http://localhost:8000
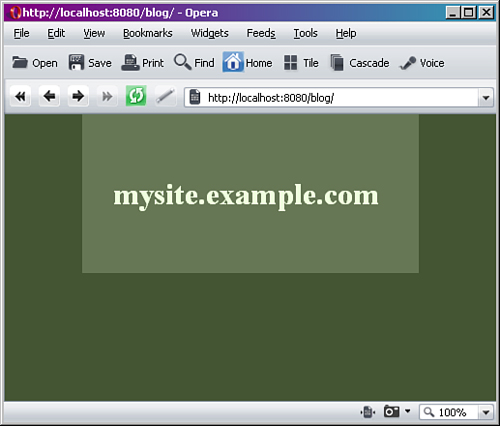
Open a web browser window to http://localhost:8000/blog. You should see the familiar blog entry screen as shown in Figure E.1. Of course, no entries are showing up because you are now using the App Engine datastore instead of the original Django ORM’s database and have nothing in there (yet)!
As we’ve mentioned previously, the Django admin app is not available on the App Engine. With no admin application, we need to add our first blog entry manually (via the Python shell) so the App Engine’s data-entry mechanisms is aware of that particular model. On this machine, we have IPython installed, so we see its startup message and prompts.
$ manage.py shell
Python 2.5.1 (r251:54863, Mar  7 2008, 04:10:12)
Type "copyright", "credits" or "license" for more information.

IPython 0.8.2 -- An enhanced Interactive Python.
?         -> Introduction and overview of IPython's features.
%quickref -> Quick reference.
help      -> Python's own help system.
object?   -> Details about 'object'. ?object also works, ?? prints more.
Once we have the prompt, we can import our BlogPost class, instantiate it, and fill in the details.
In [1]: from blog.models import BlogPost
In [2]: entry = BlogPost()
In [3]: entry.title = '1st blog entry'
In [4]: entry.body = 'this is my 1st blog post EVAR!!'
In [5]: from datetime import datetime
In [6]: entry.timestamp = datetime.today()
App Engine’s DateTimeProperty accepts a datetime.datetime object, hence our import and usage of that particular Python library. We then use the today function to get the current date and time and assign it as our timestamp. From here, to store the object, we just issue a call to put.
In [7]: entry.put()
Out[7]: datastore_types.Key.from_path('BlogPost', 1, _app=u'mysite')
In [8]: query = BlogPost.all()
In [9]: for post in query:
....: print post.title, ':', post.body, '(%s)' % post.timestamp
....:
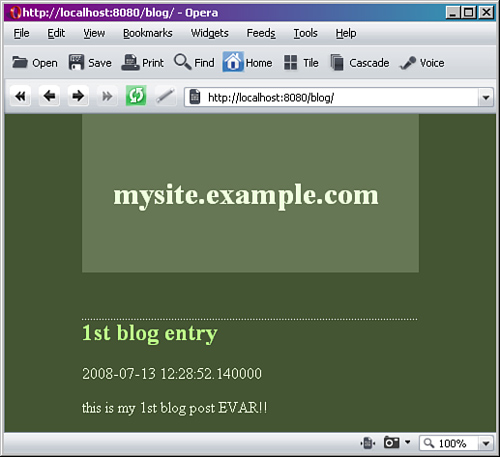
1st blog entry : this is my 1st blog post EVAR!! (2008-07-13 12:28:52.140000)As stated in the database API documentation, “The all() method on a Model... class returns a Query object that represents a query for all entities of the corresponding kind.” (This quote is from the high-level documentation on data manipulation that can be found at http://code.google.com/appengine/docs/datastore/creatinggettinganddeletingdata.html.) As you can see, we are able to open our newly-added data from within the shell. What remains is to go full circle and be able to view this new data in our app.
Make sure your server is up, and then refresh your Web browser pointing to http://localhost:8000/blog. You should now see your entry as shown in Figure E.2.
Hopefully this short experience has made you appreciate Django’s admin more than you could have before. At the same time, of course, you notice the Python shell can be an invaluable tool for working with data regardless of the state of your Web site.
By porting an existing Django application to the App Engine, you’ve actually performed the more difficult task first. Creating a new application is, for most part, simpler—because you do not have the “baggage” of an existing Django application. The following steps, which apply to creating a brand new App Engine-centric Django application, can be easily followed if you keep the previous section in mind:
Create your Django project using
django-admin.pyas usual.Copy the App Engine code (
app.yaml,main.py,appengine_django) into your project directory.Edit your
app.yamlfile with the new application name (the one registered with the App Engine Admin Console).If necessary, link to the Google App Engine code.
Run
manage.py startapp NEW_APP_NAME.Build your application!
When building your application, you have to keep in mind not to write “pure Django,” such as remembering to use the App Engine Helper’s models instead of Django’s. On the plus side, you now have access to all App Engine’s powerful APIs.
We suggest reading the App Engine documentation to see what’s possible with these frameworks.
In this appendix, we introduced you to the Google App Engine, what its capabilities are, and how it presents an alternative environment to develop Django applications. In exchange for new functionality, some Django features had to be sacrificed, making it more of a challenge for existing Django programmers to jump directly into App Engine-based development. Thankfully, the App Engine helper makes this task a bit easier.
We then went in-depth, showing you how to port one of our example applications to the App Engine. Creating a new application from scratch involves similar steps, except without any worries about preexisting code. As an exercise in getting up-to-speed with App Engine, we invite you to recreate the blog app completely from scratch, as a 100 percent App Engine application.
The bottom line for you as a Django developer is you can still program (mostly) in Django, but be able to take full advantage of all the benefits that Google App Engine has to offer: simple deployment, massive scalability, and the capability to leverage Google’s existing production infrastructure.
Following are some of the key online resources that we’d like to share with you. For a more comprehensive list, please visit the book’s Web site, withdjango.com.
Google App Engine
App Engine SDK Project
App Engine Tutorial
Google App Engine Helper for Django
Using the Google App Engine Helper for Django (Matt Brown, May 2008)
http://code.google.com/appengine/articles/appengine_helper_for_django.html
VIDEOS
Rapid Development with Python, Django, and Google App Engine (Guido van Rossum, May 2008)
http://sites.google.com/site/io/rapid-development-with-python-django-and-google-app-engine
Introducing GAE at Google Campfire (various, Apr 2008, 7 videos) http://innovationstartups.wordpress.com/2008/04/10/google-app-engine-youtubes/