
Choosing a Reporting Basis
Are you a business owner unsure of what critical information you should be reviewing in your data file and how often you should perform the review, or are you an accounting professional new to the QuickBooks software? This chapter provides both of you with the needed review and quick, easy-to-create reports with practical steps to managing your or your client’s data. Each section references the chapter where you find more detailed information.
A business owner will be able to use the quick methods in this chapter to better manage the results of your day-to-day transaction accuracy so that when you review reports such as the Balance Sheet or Profit & Loss for your business, you can be confident the information is correct.
The frequency with which a business owner chooses to review his or her data often will differ from the frequency with which an accountant will review the same data. For a business owner, this review should be performed after the bank account is reconciled. Because so many transactions affect cash, reconciling the bank account often will help uncover data entry errors.
For the accounting professional, when your client learns how to review their data before your appointment, you will be able to spend more time offering valuable business consulting with less time spent on transaction review.
Additionally, this book assumes that the business owner is not a graduated accountant. QuickBooks handles the “accounting” behind the scenes, making it easy to perform your day-to-day transactions. However, don’t misunderstand me—you do need an accountant to review your data regularly and prepare financials for lending institutions, as well as properly prepare your tax returns.
This chapter provides a quick step-by-step guide to navigating the many QuickBooks reports and alerts you to the ones that give you the valuable information you need.
When you review your QuickBooks reports you have options for the accounting basis you want to report on. To set up the default reporting basis click Edit, Preferences, select Reports & Graphs, and then click the Company preference tab (you must be logged in as the Admin user). In the Preferences dialog that opens select a Summary Report Basis of either Cash or Accrual:
• Cash Basis—Your Profit & Loss report will show expenses as of the date of the bill payment and income as of the date of your customer payment. No record of expense is recorded on the vendor bill date and no income is recorded on the customer invoice date.
• Accrual Basis—Your Profit & Loss report will show expenses as of the date of the vendor bill and income as of the date of your customer invoice, whether or not these bills or invoices have been paid.
QuickBooks users can prepare reports in both types of basis. The need for selecting a specific basis is more a tax filing determination than a business management reporting decision. Certain Internal Revenue Service rulings govern what type of accounting is appropriate for certain businesses; this discussion is outside the scope of this book.

My recommendation is that business owners view their business Profit & Loss report in accrual basis. This method more accurately matches your expenses with the related revenue in the same accounting period. Your accountant can then review the data in either cash or accrual basis reports. For more information on sharing data with your accountant, see Chapter 15, “Sharing Data with Your Accountant or Your Client.”
The reports discussed in the remaining sections of this chapter use accrual basis reporting. The reports I recommend reviewing are just a suggestion; your business (or client) might need to use all or just some of the review recommendations listed here. Where appropriate, I have also referenced the related chapter in this book where you can get more detailed information about the particular review topic.
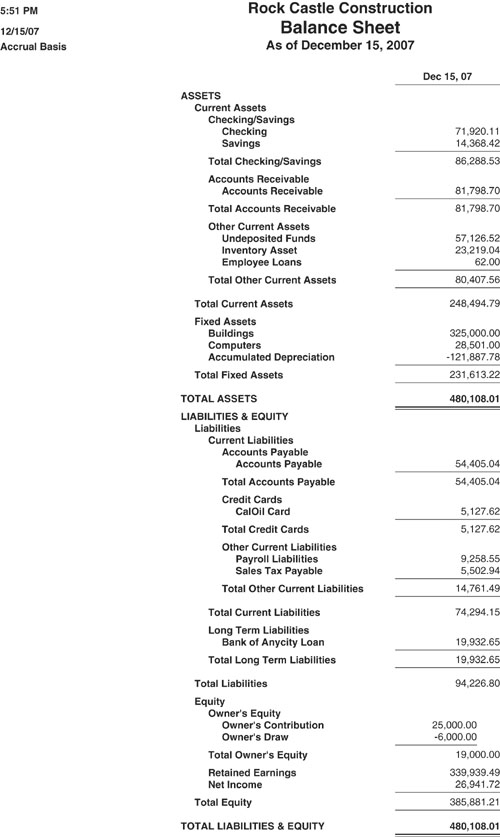
Did you know that the report a business owner looks at the least is also one of the most important? The Balance Sheet report shows the balance your business has of assets (what you own), liabilities (what you owe others), and equity (what you have put into the business). Because of the importance of these numbers the review of your data should start with this report.
Remember, this chapter presents the reports in accrual basis unless otherwise mentioned.
Begin by creating a Balance Sheet report of your data; this will be the primary report we use for review:
1. Click Reports, Company & Financial and choose the Balance Sheet Standard report. The report dialog opens.
2. Leave the report with today’s date. You are going to first review your report with today’s date before using any other date. In the following instructions, if a different date is needed, it will be noted in the step-by-step details. Verify that the top left of the report shows Accrual Basis. If not, click the Modify Report button on the report, and select Accrual Basis from the Report Basis options.
3. Click OK to accept the change in basis.
Figure 4.1 shows a sample data Balance Sheet.
Reviewing the account types assigned requires some basic knowledge of accounting. If as a business owner you are unsure, this review provides the perfect opportunity for your accountant to take a quick look at how your accounts are set up.
Review the names given to accounts. Do you see account names in the wrong place on the Balance Sheet? For example, does an Auto Loan account show up in the Current Asset portion of the Balance Sheet?
Follow these steps if you need to edit an account type:
1. Click Lists, Chart of Accounts to open the chart of accounts dialog.
2. Select the account in question with one click. Select the Account drop-down menu and select the Edit menu option. On the Edit Account dialog (see Figure 4.2) you can select the drop-down menu for Account Type to easily change the currently assigned account type (see Chapter 2, “Reviewing the QuickBooks Chart of Accounts”).

You should provide a copy of your Balance Sheet dated as of the last day of your tax year (or fiscal year) to your accountant and request that he or she verify that the balances agree with his or her accounting records used to prepare your tax return. This is one of the most important steps to take in your review because Balance Sheet numbers are cumulative over the years you are in business. You might need to provide the Balance Sheet report in both a cash and accrual basis. (See Chapter 5, “Power Reports for Correcting Beginning Balance Differences” and Chapter 15 for a discussion about setting a closing date to protect prior year numbers.)
Compare the bank account balances on the Balance Sheet report to the statement your bank sends you. Modify the date of the Balance Sheet to be the same as the last date of your bank statement balance. Your QuickBooks cash “book” balance should be equal to the bank’s balance plus or minus any uncleared deposits or checks/withdrawals dated on or before the statement ending date (see Chapter 6, “Bank Account Balance or Reconciliation Errors”).
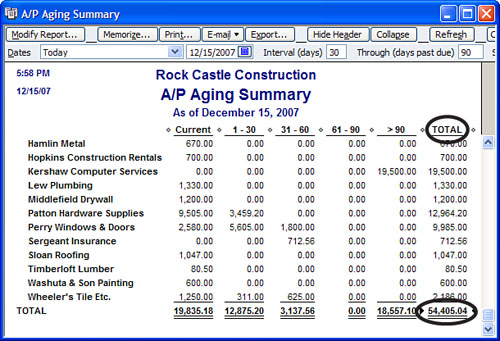
The Accounts Receivable balance on your Balance Sheet report should agree with the A/R Aging Summary report total, as shown in Figure 4.3. Accounts Receivable reports are available only in accrual basis (see Chapter 7, “Reviewing and Correcting Accounts Receivable Errors”).
Figure 4.3 The A/R Aging Summary report total should agree with your Balance Sheet Accounts Receivable balance.

To create the A/R Aging Summary report click Reports, Customers & Receivables and choose the A/R Aging Summary or A/R Aging Detail report. Click Collapse on the top of the report to minimize the line detail, making the report easier to view at a glance. The total should match the Accounts Receivable balance on the Balance Sheet report as shown in Figure 4.1.
The Undeposited Funds amount should agree with funds not yet deposited into your bank account, as shown in Figure 4.4 (use today’s date on your Balance Sheet report). (See Chapter 8, “Troubleshooting and Correcting Errors with the Undeposited Funds Account.”)
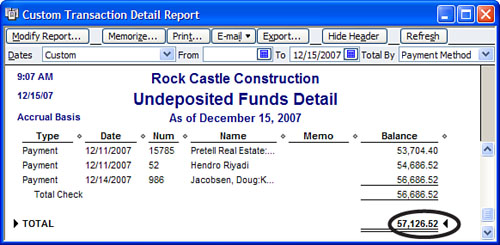
Create the following custom report to review the Undeposited Funds detail sorted by payment method:
1. Click Reports, Custom Transaction Detail. The Modify Report dialog opens.
2. In the Report Date Range pane select All (simply type an “a” without the quote marks and the date range will default to All).
3. In the Columns pane, select those data fields that you want to view on the report and select Payment Method in the Total By drop-down menu.
4. Click the Filters tab; Account is already highlighted in the Choose Filter pane. Choose Undeposited Funds from the Account drop-down menu to the right.
5. Also in the Choose Filter pane, scroll down to select Cleared; on the right choose Cleared No.
6. Optionally, click the Header/Footer tab and change the report title to Undeposited Funds. Click OK to view the report.
The amount of funds shown on this report should agree with the amount of funds you have not yet taken to the bank.
The Inventory balance on the Balance Sheet report (refer to Figure 4.1) should agree with the Inventory Valuation Summary report total, as shown in Figure 4.5. The ending dates of both reports need to be the same.
Figure 4.5 The total of the Asset Value column should agree with the Inventory balance on the Balance Sheet report.
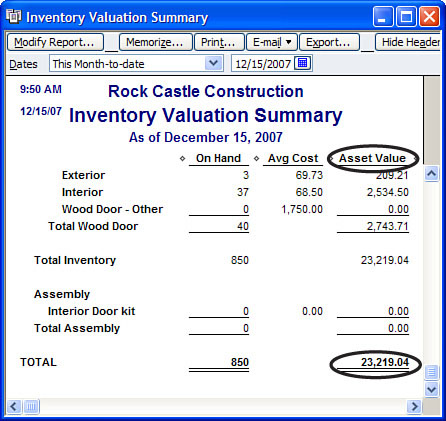
To create the Inventory Valuation Summary report, click Reports, Inventory and choose the Inventory Valuation Summary report. The total in the Asset Value column should match the Inventory Asset balance of the Balance Sheet report (see Chapter 10, “Reviewing and Correcting Inventory Errors”).
The Other Current Asset accounts can differ widely by company. If you have employee loans, make sure your records agree with employees’ records. For any other accounts in the Other Current Assets category look to documentation outside QuickBooks to verify the reported balances.
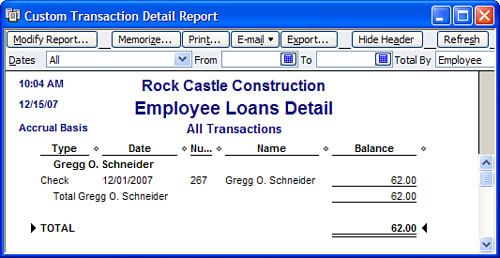
Need an easy report to sort the detail in these Other Current Asset accounts by a list name? In this example I created a detail report of the Employee Loans account sorted and subtotaled by employee, as shown in Figure 4.6. You can create this same report for any of your accounts, sorting in a way that improves the detail for your review (see Chapter 9, “Handling Current Asset Accounts Correctly”).
Figure 4.6 You can create a custom report to review balances in an Employee Loans account or any other asset account.
To create a detail report of your Other Current Asset accounts (as well as other types of accounts):
1. Click Reports, Custom Transaction Detail Report. The Modify Report dialog appears.
2. On the Date Range pane drop-down menu, select All.
3. On the Columns pane, select what data you would like to see in the report.
4. Also on the Columns pane, select Employee from the Total By drop-down menu.
5. Click the Filters tab.
6. The Choose Filter pane already has selected the Account filter. On the right, from the Account drop-down menu select the Employee Loans account (or select the specific account for which you want to see detail).
7. Optionally, click the Header/Footer tab and provide a unique report title. Click OK to create the modified report.
Verify the balances reported here with either the employees or outside source documents.
Fixed assets are those purchases that have a long-term life and for tax purposes cannot be expensed all at once but instead must be depreciated over the expected life of the asset.
Your accountant will advise you specifically for your business on what asset purchases belong in this account category. If the numbers have changed from year to year, you might want to review what transactions were posted to make sure they are fixed asset purchases and not expenses that should appear on the Profit & Loss report.
If you have properly recorded a fixed asset purchase to this account category, provide your accountant with the purchase receipt and any supporting purchase documents for their depreciation schedule records.
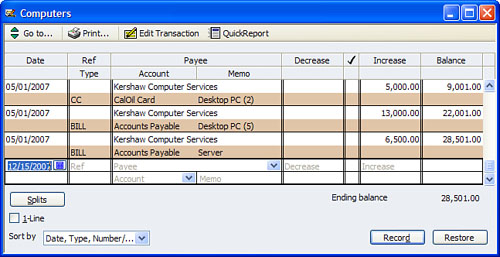
If after review you see a change in the totals from one year to the next, you can review the individual transactions in the account register by clicking Banking, Use Register and selecting the account you want to review. Figure 4.7 shows the register for Fixed Assets - Computers. If a transaction was incorrectly posted here, you could simply edit the transaction by double-clicking the line detail and correcting the assigned account category.
The Accounts Payable balance on the Balance Sheet report should agree with the A/P Aging Summary report total, as shown in Figure 4.8. Accounts Payable reports are available only in accrual basis (see Chapter 11, “Reviewing and Correcting Accounts Payable Errors”).
Figure 4.8 The A/P Aging Summary report total should agree with your Balance Sheet Accounts Payable balance.
To create the A/P Aging Summary or Detail report click Reports, Vendors & Payables and select the A/P Aging Summary or Detail report. QuickBooks will only report Accounts Payable on an accrual basis (see Chapter 11).
Your Credit Card account balance should agree with those on your credit card statement. You might have to adjust your Balance Sheet report date to match your credit card vendor’s statement date.
Did you know that you can download credit card transactions directly into your QuickBooks data? To find out more, click Banking, Online Banking, Participating Financial Institutions to see whether your credit card vendor participates.
The Payroll Liabilities balance on the Balance Sheet report should agree with your Payroll Liability Balances report total. Be careful with the dates here. If you have unpaid back payroll taxes you might want to select a date range of All for this report. In Figure 4.9 I used This Calendar Year-to-Date as the date range (see Chapter 14, “Reviewing and Correcting Payroll Errors”).
Figure 4.9 The Payroll Liability Balances report total should agree with the same total on the Balance Sheet report.

To create the Payroll Liability Balances report, click Reports, Employees & Payroll and select the Payroll Liability Balances report. Totals on this report should match your Balance Sheet report for the payroll liabilities account.
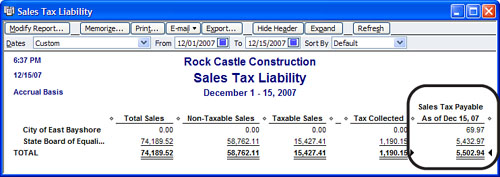
The Sales Tax Payable balance on the Balance Sheet report should agree with the Sales Tax Liability report balance. You might need to change the Sales Tax Payable report date to match that of your Balance Sheet. Caution: If you have set up your Sales Tax Preference as Cash Basis you will not be able to compare this balance to an Accural Basis Balance Sheet report (see Chapter 12, “Reviewing and Correcting Sales Tax Errors”).
To create the Sales Tax Liability report, click Reports, Vendors & Payables and select Sales Tax Liability report.
Make sure the To date matches that of the Balance Sheet report date. The totals, shown in Figure 4.10, should match the Sales Tax Payable total on your Balance Sheet report.
Figure 4.10 The Sales Tax Liability report total should match the Sales Tax Payable balance on your Balance Sheet report.
Any other accounts that you might have in the Other Current Liabilities and Long-Term Liabilities account types should be compared with outside documents from your lending institutions.
Equity accounts differ for each company. These account balances should be reviewed by your accountant and might have tax adjustments made to them at tax time. Note: If you have an account called Open Bal Equity with a balance, this account should have a zero balance once the data file setup is completed (see Chapter 13, “Reviewing and Correcting the Opening Balance Equity Account”).
The reports discussed in this chapter do not make up an exhaustive, end-all list for reviewing your Balance Sheet but they are a great start to reviewing your own data or your client’s data.
There are some additional reports you can review that add value to those discussed already. I discuss them in the remainder of this chapter, in no particular order.
An important evaluation to do is to compare your Payroll Summary report (if you are using QuickBooks to produce your employee’s paychecks) to the payroll expenses listed on your Profit & Loss Standard report. If you are using some outside payroll service, you will also want to compare their total payroll expenses to your Profit & Loss reported payroll expenses (see Chapter 14).
Follow these steps to create the Payroll Summary and Profit & Loss Standard reports:
1. Click Reports, Employees & Payroll and select the Payroll Summary report.
2. On the report dialog that opens select the Dates drop-down menu and choose This Calendar Year-to-Date (because payroll is reported by the calendar year).
3. Click Reports, Company & Financial and select the Profit & Loss Standard report.
4. On the report dialog that opens select the Dates drop-down menu and choose This Fiscal Year-to-Date if your business is a calendar year company, or select Custom and create the report for the same dates as the Payroll Summary report (because payroll is reported by the calendar year).
Compare your Payroll Expense account(s) totals on your Profit & Loss report to your Payroll Summary report totals. Identify those items on the Payroll Summary report that are costs to your business; this total should be what you have reported on your Profit & Loss report for payroll expenses.
Chapter 3, “Reviewing and Correcting Item List Errors,” provides details on how the QuickBooks customer invoice requires the use of items. Therefore, another important review to perform is to generate a report showing Total Sales by Item and compare this total to the income that is recorded on your Profit & Loss report for the same report date range. Remember, you are reviewing these reports in accrual basis.
Follow these steps to create the Sales by Item Summary and Profit & Loss reports:
1. Click Reports, Sales and choose the Sales by Item Summary report.
2. On the report dialog that opens select the Dates drop-down menu and choose This Fiscal Year-to-Date. Compare the totals on this Sales by Item Summary report to the Profit & Loss report created in the next couple of steps.
3. Click Reports, Company & Financial and choose the Profit & Loss Standard report.
4. On the report dialog that opens select the Dates drop-down menu and choose This Fiscal Year-to-Date.
The report totals from the Sales by Item Summary and Profit & Loss report total income should agree with each other. Note: If you report customer discounts as a negative income line item, you might need to add this total back in (see Chapter 3).
QuickBooks automatically records Net Income or (Loss) to the Balance Sheet, but I still mention it because it is an important review to do, particularly at tax time.
1. Click Reports, Company & Financial and select the Profit & Loss Standard report.
2. On the report dialog that opens, select the Date range of This Fiscal Year-to-Date.
Compare the Net Income (Loss) figure from the Profit & Loss report to the same figure on the Balance Sheet report, making sure the reports are being prepared with the same accrual or cash basis. I personally have never seen these numbers not match. If the numbers do not match you will want to verify data by clicking on File, Utilties and selecting Verify Data. If data integrity issues are reported, you can contact QuickBooks Technical Support for assistance at www.quickbooks.com/support.
More recent versions of QuickBooks now record any bank reconciliation discrepancies to an expense account automatically created by QuickBooks. (Earlier versions of QuickBooks used the Open Bal Equity account for these adjustments.) If it appears at all on your Profit & Loss report, this account should have a zero balance. If it does not, you will need to review why the bank account was reconcilied with an adjustment (see Chapter 6).
The problem of a cash basis Balance Sheet report having an accounts receivable or payable balance is perhaps more for the accounting professional than the business owner to review. The very nature of accounts receivable and payable means that these accounts should have no balance when you’re creating a Balance Sheet in a cash basis. There are, however, some reasons why this can happen:
• A/R or A/P transactions posting to other Balance Sheet accounts
• Inventory items on an invoice or credit memo
• Transfers between Balance Sheet accounts
• Unapplied A/R customer receipts or vendor A/P payments
• Payments applied to future-dated A/R or A/P invoices
• Preferences that contradict each other; for example, if you selected Cash Basis as your Summary Reports basis preference but Accrual Basis as your Sales Tax preference
• Data corruption; verify your data by clicking File, Utilities and selecting Verify Data
Create a transaction detail report to help you find these transactions:
1. Click Reports, Company & Financial and choose the Balance Sheet Standard report.
2. If your report is not currently prepared in cash basis (see top left of the report) then click the Modify Report button on the report dialog. The Display tab is opened automatically.
3. Select Cash for the report basis.
4. Click OK to return to the report.
5. Double-click the Accounts Receivable or Accounts Payable amount in question. QuickBooks creates the Transaction by Account report.
6. Click the Modify Report button on the top of the report.
7. For the Report Date Range remove the From date and leave the To date.
8. Click the Filters tab.
9. From the Choose Filters pane scroll down to select Paid Status and choose the Open option for Paid Status.
10. Click OK to create the modified Transaction by Account report.
This report now shows you the individual transactions that make up an unexpected balance in either Accounts Receivable or Payable on a Cash Basis Balance Sheet. Simply by reviewing these transactions and comparing to a few of the reasons that they may appear on your cash basis prepared Balance Sheet report will help you identify the proper correction to be made.
Did you know that you can download a report template from the QuickBooks website that you can import into your data or your clients’ data to provide this detail and other useful reports? See Chapter 16, “Reporting Tips and Tricks.”
Go to www.quickbooksgroup.com, on the left select QB Library. Then from the QB Library menu dialog select Reports. QuickBooks provides a long list of reports available for you to download and import into your file or your clients’ QuickBooks data files.
As a business owner, having completed this review of your data, you are now prepared with specific questions and directed to the chapter where you will find much more detailed information. You have also gathered for your accountant more specific questions and can request their advice on the methods you should use to make changes to your data.
For the accounting professional, you have easily identified areas of a client’s file that might need more review. Refer to the appropriate chapter to find many useful step-by-step guidelines for troubleshooting and correcting any problems.