
This recipe explains how to install an operating system's image on an SD card using the standard Linux utility, dd.
Most versions of Linux (and Mac OS) have the dd command installed. This powerful version of the copy command (cp) can be used to write blocks of data to devices such as an SD card.
Once you finish with this recipe, you will be able to write an SD card from a Linux (or Mac OS) computer.
The following are the ingredients:
- A computer running Linux with an SD card writer
- A class 4 SD card of 4 GB (or greater)
- A Raspberry Pi operating system's image file
The dd utility is normally installed by default with most Linux distributions. If it is not installed, use the appropriate Linux installation utility to install it.
All the commands in this example are executed as a privileged user (root).
The following are the steps for writing a disk image to an SD card on a Linux computer:
- Download a Raspberry Pi distribution disk image (http://www.raspberrypi.org/downloads).
- Excute the
dfcommand. Determine the name of the SD drive. - Execute the following command:
umount /dev/mmcblk0p1
Unmount the mounted disk partitions.
- Execute the following command:
dd bs=1M if=2012-08-16-wheezy-rasbian.img of=/dev/mmcblk0
Use
ddto copy the image to SD card, as shown in the following screenshot: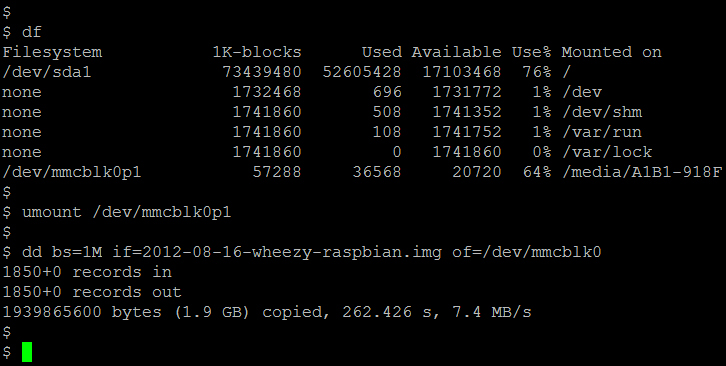
The preceding screenshot shows the df command being used to discover the name of the SD card drive, the umount command being used to unmount the SD card, and the dd command being used to write the recommended distribution to an SD card.
First a Raspberry Pi disk image is downloaded.
Then, the name of the SD drive is discovered using the df command. The df command shows how much disk is free on each of the mounted disk
drives. The SD card was just inserted, and its primary partition (p1) appears in this list as /dev/mmcblk0p1. The disk device is /dev/mmcblk0.
Finally, the dd command is used to write the Raspberry Pi disk image to the SD card. The following is the explanation for the command: dd bs=1M if=2012-08-16-wheezy-rasbian.img of=/dev/mmcblk0:
- Each disk block written is 1 MB (
bs=1M) - The input file (
if) is2012-08-16-wheezy-raspbian.img - The output file (
of) is the SD card disk device (/dev/mmcblk0)
The utility dd is one of the core GNU utilities found in most Linux distributions. It is a low-level utility that simply copies blocks of data from one file to another.
The previous screenshot shows an example of how the
df command can be used to determine the name of the SD drive. The first partition of the SD disk, /dev/mmcblk0p1, is mounted at /media/A1B1-918F. Disk images cover a whole disk, not just one partition, so the correct name of the disk drive in the previous example is /dev/mmcblk0 (notice that p1 is missing).
Before the image is copied to the SD card in the previous example, the disk partition is unmounted (umount /dev/mmcblk0p1—notice there is no n in umount). It is a good practice to unmount all disk partitions before formatting or overwriting a disk.
When the image is copied with the dd command:
if=specifies the input file (2012-08-16-wheezy-raspbian.img)of=specifies the output file (/dev/mmcblk0)bs=specifies the size of the blocks written to the disk
The dd utility can also be used as a backup tool. Just exchange the input file (if=) and output file (of=).
Use the following command to create a backup using the disk from the previous example:
dd bs=1M if=/dev/mmcblk0 of=backup-2012-08-16.img
- dd (Unix)
http://en.wikipedia.org/wiki/Dd_(Unix)
This article from Wikipedia explains original application of the
ddcommand. - dd – convert and copy a file
- dd (gnu – coreutils)
http://www.gnu.org/software/coreutils/manual/html_node/dd-invocation.html