
This recipe shows how to create a secure connection to the Raspberry Pi using PuTTY, one of the most commonly used Windows Secure Shell clients.
The PuTTY virtual terminal program is not built into Windows. It must first be downloaded and installed.
This recipe assumes the Raspberry Pi's SSH server has been enabled (see the Configuring remote access (raspi-config) recipe), the IP address of the Raspberry Pi has been discovered (see the previous recipe) and you are now ready to access the Raspberry Pi remotely from a Windows PC using PuTTY.
Once you finish with this recipe, you will be able to remotely administer your Raspberry Pi from a Windows PC.
The following are the ingredients:
- A Raspberry Pi with a 5V power supply
- An installed and configured "official" Raspbian Linux SD card
- A network connection
- A Windows PC connected to the same network as the Raspberry Pi
- PuTTY should be downloaded and installed on the Windows PC
For this recipe, there is no need to have a keyboard or display connected directly to the Raspberry Pi.
PuTTY can be downloaded from http://www.chiark.greenend.org.uk/~sgtatham/putty/.
The following are the steps for remotely accessing the Raspberry Pi using the PuTTY command:
- Insert the SD card into the Raspberry Pi and plug in the 5V power supply. The Raspberry Pi should start booting (you'll see LEDs flashing).
- Once the Raspberry Pi has booted, PuTTY can be started on the Windows PC (double-click on the
PuTTY.exefile).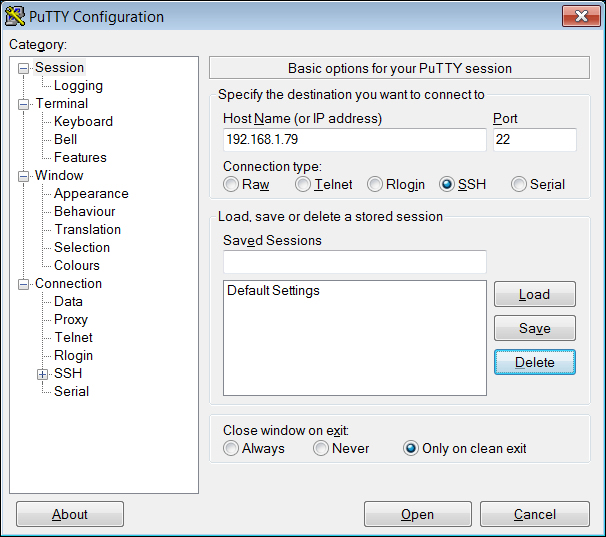
In the preceding screenshot, the configuration window for PuTTY is being configured to connect to a Raspberry Pi at the IP address 192.168.1.79.
- When PuTTY is started, the PuTTY Configuration screen is displayed.
- Enter the Raspberry Pi's IP address in the Host Name (or IP address) field, and click on Open to connect to the Raspberry Pi.
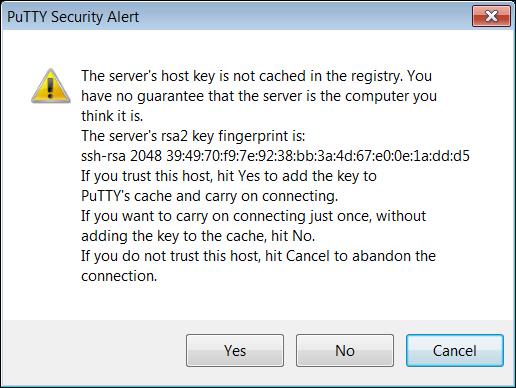
In the preceding screenshot, PuTTY is displaying a warning message the first time it connects to the Raspberry Pi's SSH server.
- The first time you connect to the Secure Shell server on the Raspberry Pi, PuTTY will display a warning message. This is because PuTTY does not yet have a stored security key for the Secure Shell server that is running on the Raspberry Pi.
- Click on the Yes button to continue.

The preceding screenshot shows a successful login using PuTTY.
- After you've accepted the security warning, you are asked for the login username and a password. Enter
piand the password that was configured during installation (raspberryis the default). - After you have successfully logged in to the Raspberry Pi remotely, you will no longer require a keyboard or a display to administer the system!
- Type in
exitto log out.
When the Raspberry Pi is reinstalled, the security key of the Secure Shell server will be generated newly. PuTTY will not recognize the newly generated security key.

The preceding screenshot shows what happens when the Raspberry Pi has been reinstalled. PuTTY will think there has been a security breach!
When the Putty Security Alert dialog box appears after reinstalling the Raspberry Pi, click on Yes to accept and store the new security key.
If the Raspberry Pi has not been reinstalled, click on Cancel to disconnect and then make sure that there has not been a security breach!
- PuTTY
http://www.chiark.greenend.org.uk/~sgtatham/putty/
PuTTY is a free SSH client for Windows. It is also a telnet client and an xterm emulator.