The following recipe explains how to install an operating system on an SD card using BerryBoot.
Unlike many Raspberry Pi distributions, BerryBoot is not a standalone disk image. It is a bare minimum Linux operating system running as a single application that automates the installation of the Raspberry Pi. It is by far the easiest way of selecting and installing an operating system distribution.
BerryBoot supports the installation of multiple Linux distributions on a single SD card and is by far the easiest way of installing an operating system for your Raspberry Pi. However, it does require an Internet connection during setup and installation.
The installation takes place by booting the Raspberry Pi with an installer that can be easily copied to a FAT-formatted SD card using drag-and-drop from any PC. When the Raspberry Pi boots, the installer runs and uses the Raspberry Pi's network connection to download the latest distribution of selected operating systems.
You will need the following:
- An initial Raspberry Pi setup (see the Preparing for the initial boot recipe)
- The latest
berryboot.zipfile (see the link given in the See also section of this recipe) - A class 4 SD card of 4 GB (or greater)
- A network connection
The Raspberry Pi needs to be connected to the Internet (via a home or office network) to complete this recipe. During installation, the network connection is used to download the selected distribution files. Without an Internet connection this recipe will not work.

The preceding screenshot shows the contents of the berryboot.zip file.
The following are the steps for creating a boot disk with BerryBoot:
- Format the SD card as a bootable FAT disk. Use the normal disk formatting tools that come with your PC's operating system.
- Extract the contents of the
berryboot.zipfile to the newly formatted SD card. Again, the normal archival tools that come with your PC will do the job. - Connect your Raspberry Pi to a network with access to the Internet.
- Insert the SD card in the Raspberry Pi and turn it on. This will start the BerryBoot installation process.

The preceding screenshot shows BerryBoot's Welcome screen.
- After the network interfaces have been detected, the Welcome dialog box is displayed.
- Set the appropriate video scan option (the example shows a green overscan area indicating overscanning should be disabled).
-
The time zone and keyboard layout are also set on the Welcome dialog box.
Tip
The Welcome screen has video settings and locale settings. If green bars are displayed at the top and bottom of the screen (as in the preceding example), then the Video mode should be set to Yes (disable overscan). This screen also contains locale settings for choosing a time zone and a keyboard layout. Click on the OK button to continue.

The preceding screenshot shows BerryBoot's Disk selection screen.
- The Disk selection dialog box can be used to select an installation disk other than the SD card. The target disk may be formatted in one of the following three ways:
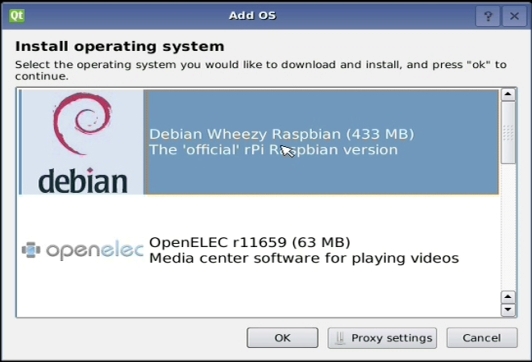
The preceding screenshot shows BerryBoot's Add OS screen.
- After the disk is formatted, BerryBoot downloads the list of available operating system images. The Add OS dialog box is used to select which operating system will be downloaded and installed next.

The preceding screenshot shows BerryBoot's BerryBoot menu editor screen.
- The BerryBoot menu editor screen is used to add additional operating systems and manage those that have already been installed. All the installed images will appear in the BerryBoot boot menu.
- The Add OS button is used to add another operating system to the boot menu (and repeat previous step)
- The Edit button is used to change the name of the image displayed on the boot menu and to configure the memory split
- The Clone button duplicates the current image in the boot menu
- The Export button can be used to export the current disk image to an external disk
- The Delete button deletes the current operating system from the boot menu
- The Make Default button can be used to select which image will boot by default
- The Exit button is used to reboot the Raspberry Pi
First an SD card is formatted as a bootable FAT disk (using the utility of your choice). Then the BerryBoot installation files are copied to the disk. No special image writers are required! Just drag-and-drop all the unarchived files onto the SD card.
Once all the installation files are copied to the newly formatted SD card, the disk can be safely ejected and inserted into an unpowered Raspberry Pi. When the power cord is connected to the Raspberry Pi, the Raspberry Pi will boot automatically into the BerryBoot installation application.
After booting, the Raspberry Pi tries to detect all attached network cards. The installation application can detect many modern wireless USB network cards; however, only a limited number are actually configurable by the application. Once the network has been detected (and selected), the Welcome screen is displayed.
The BerryBoot install application will then detect any attached USB disk devices (or network storage). The installation application will permit the operating system to be installed on a disk other than the SD card. However, the Raspberry Pi will still need the BerryBoot SD card to boot. The Raspberry Pi will not boot from any other device. Choose mmcblk0 to format the SD card. For most uses, the ext4 filesystem is the best choice. The B-tree file system (BTRFS) has advanced features that are not covered in this book. Choose ext4 – with discard flag set when formatting the SD card.
After the disk is formatted, the Add OS screen appears with a selection of Raspberry Linux distributions. There are distributions for using the Raspberry Pi as a media center (OpenELEC), as a classroom workstation (LTSP thin client BerryTerminal), and as a web server (BerryWebserver). There are also alternative Linux distributions (Puppy Linux and Sugar). And, of course, the "official" Raspbian Linux distribution is also included.
Once a Linux distribution has been chosen, it is downloaded and added to the boot menu. Choosing Exit from the BerryBoot menu editor screen reboots the Raspberry Pi. After reboot, the downloaded distributions are displayed on the boot menu and the user can select which distribution to boot.
Each of the recipes in this book could be used to create an "application cartridge".
An application cartridge is like a game cartridge that is plugged into a game console, ready to play. The only difference is an application is stored on the cartridge instead of a game. So when the application cartridge is plugged into the Raspberry Pi, an application is started and is ready to use.
Using application cartridges, the Raspberry Pi can easily be repurposed just by switching the cartridge (the SD card). After shutting down and turning off the Raspberry Pi, the current SD card in the Raspberry Pi could be replaced with another SD card that has a different image installed on it – easily switching the Raspberry Pi from one purpose to another.
Write a multimedia home theatre distribution, for example OpenELEC or Raspbmc on one SD card to create a home theatre application cartridge. Write an IPFire image on another SD card to create a firewall application cartridge. A Berry Terminal image could be used to create an application cartridge for client access to a terminal server; or recipes from this book could be used to create application cartridges for a file server, a web server, or a wireless access point.
With a library of application cartridges, a Raspberry Pi can serve multiple purposes.
- BerryTerminal
This Linux distribution turns the Raspberry Pi into a low-cost thin client allowing users to log in to a central Linux Terminal Server Project (LTSP) server. Thin clients can be used to run applications from Linux and Windows servers. Thin clients are reliable, cost-effective solutions for improving total cost of ownership (TCO) for organizations that only require simple desktop features (schools, call centers, factories).
- IPFire
http://en.wikipedia.org/wiki/IPFire
IPFire is a GNU Linux distribution that acts as a router and firewall. The Wikipedia article describes the distribution in more detail. You can download IPFire from http://www.ipfire.org/.
- List of software based on XBMC
http://en.wikipedia.org/wiki/List_of_software_based_on_XBMC
You can find a list of software distributions that are derived from the XBMC Media Center.
- XMBC
http://en.wikipedia.org/wiki/XBMC
You can find a Wikipedia article describing the free and open source media player application developed by the XBMC Foundation.
- Installing OpenELEC on a Raspberry Pi
http://wiki.openelec.tv/index.php?title=Installing_OpenELEC_on_Raspberry_Pi
You can find the installation instructions for putting OpenELEC on a Raspberry Pi.
- IPFire on Raspberry Pi ready to first test
http://planet.ipfire.org/post/ipfire-on-raspberry-pi-ready-to-first-test
A forum post describing how IPFire can be installed on a Raspberry Pi can be found.
- OpenELEC
The Open Embedded Linux Entertainment Center Linux distribution can be found.
- Raspbmc
A minimal XMBC Linux distribution developed specifically for the Raspberry Pi can be found.