
Now, let's start adding some code and making the game interactive! In this section, we'll do everything necessary to launch our main character using the slingshot.
The first thing we want to do is make sure that the position of our main character resets every time we start the game. Click on the main character and create the following script in the script area:
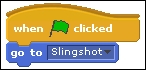
The code snippet states that when the green flag is clicked, the current sprite (the main character) will move to the same position as the slingshot.
Check whether your code works by clicking on the green flag. You should see your character jumping to the same position as the slingshot. You may find that the character is behind the slingshot; if you would prefer for it to be in front, simply click on it on the Stage and drag it a short distance. Interacting with any sprite in this way will put it on top of all the other sprites.
Now, let's allow the player to move the character around using the keyboard so that they can aim their shot. We are mostly going to be making use of the code block (from the Sensing section), as seen in the following screenshot, but with different keys:
Before you read any further in this book, take a minute to have a look around at the available code blocks. Can you find any useful blocks that we could combine with this block to move a sprite up, down, left, or right? This block is a strange shape; how can we connect it to the motion blocks?
There are actually a few different ways to do this, but in this book, we will use the following code block:
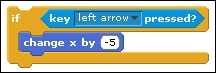
Hopefully, this looks fairly sensible to you. If the left arrow key is pressed, do something. This something may be a bit confusing, however, so here's a quick explanation.
As mentioned briefly in the previous chapter, the position of every sprite on the screen is given by two numbers (or coordinates). The x coordinate tells you how far left or right the sprite is, and the y coordinate tells you how far up or down the sprite is. The center of the Stage is at (0,0), that is, both the x and y coordinates are zero. The x coordinate increases from left to right and the y coordinate increases from bottom to top. You can see the current coordinates of any sprite underneath its name in the script area, and the coordinates of the mouse are shown just under the Stage.
Since we want to move left when the left arrow key is pressed, we have to change the x coordinate by a negative amount. In this case, it has the same effect as subtracting 5.
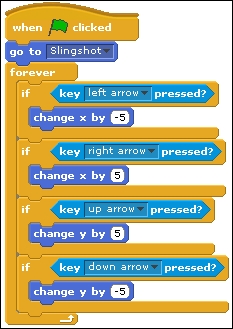
We will need one of these code blocks for each arrow key:
- The left arrow key should change the x coordinate by -5
- The right arrow key should change the x coordinate by 5
- The up arrow key should change the y coordinate by 5
- The down arrow key should change the y coordinate by -5
Finally, since we want the player to be able to press each button multiple times to continue adjusting their position, we need to put all these blocks inside one big forever block. The forever block should be connected to the bottom of the existing script so that the player can adjust the character's position after the position has been reset. This is how your code should now look:
Once again, test your code out by clicking on the green flag. You should be able to move your character around by pressing the various arrow keys.
Now that we've got the character in the right position, let's launch it! First, let's think about what we want to happen when the launch takes place. We want to stop the player from moving the character (so that they can't cheat), and instead, we want to start moving it with a speed and direction, depending on how far from the slingshot the player is.
Since we are moving into a new phase of the game, it is a good idea to use a separate script when we launch. This will help keep each script relatively small and manageable. Add the following code to the forever block where all of your other keyboard-handling blocks are, as follows:
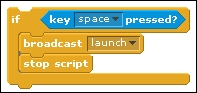
Here, launch is the name of a message. When the Space key is pressed, launch is sent to all the other scripts, and if any of them are waiting for this particular message, they will start to run. We also stop the current script so that we can stop repeatedly checking which keys are being pressed, and then the player can't continue to move the character around.
Before we create the second script, we want to be able to calculate how fast to fling the character. To do this, we are going to store the speed in a variable. Variables allow us to store one value each and can be shared between different scripts. In this case, we will store a number, but variables can also store text. We are actually going to use two variables to store the speed: one for up-down speed and the other for left-right speed. The reasons for this will become clear later. Create two new variables called x speed and y speed. Make sure they are both valid for this sprite only by choosing the appropriate option when creating the variables.
Now that we have these variables, we can create the second script, which will control our flight through the air. The code for this is shown in the following screenshot. It's a little complicated, but try to work out what it does as you build the script up in the script area. I'll explain how it works shortly (for the two long blocks that are almost identical, it is possible to create one, then right-click on it and duplicate it to save effort in creating the second one):
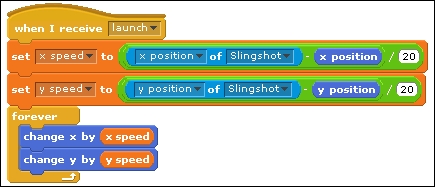
This script waits until it receives the launch message from the first script. Only then does it start. We set the x speed variable to a value that is relative to the distance between the character and the slingshot; this distance is calculated by subtracting the position of the bee from the position of the slingshot. I divide the value by 20 to make sure that the flight isn't too fast, but you may prefer a different value here. Here are step-by-step instructions to build the code block up:
- Start with a set x speed block
- Insert a division block and type 20 into the second space
- Insert a subtraction block into the first space of the division block
- Insert x position of Slingshot into the first space of the subtraction block
- Insert x position into the second space of the subtraction block
We then do exactly the same to compute the y speed value. Once the speed has been computed, we repeatedly move the object according to our speed.
We're now in a good place to test if everything is working. Click on the green flag, move around, and then launch using the Spacebar. You should be able to see your character fly in a straight line across the screen. You may want to try launching from different positions to see how this affects your speed and direction.
One thing that you may have noticed is that your character flies directly through the middle of the slingshot, not the part that it should actually be fired from. This is easy to fix. Click on Slingshot in the sprite list; choose the Costumes tab in the script area, click on Edit, and click on Set costume center. You can now drag the crosshairs around to choose a more sensible launch position. Once you have finished, click on OK. The slingshot will probably need repositioning on Stage, but your character's flight should now follow a better path.