
In this section, we're going to use Google Maps to get an image of our local area to display in our window.
Since Google Maps is an online service, an Internet connection is required to download a map. However, if your Raspberry Pi isn't connected to the Internet, there is still a way to proceed. Python is cross-platform. This means that it works on lots of different computers and operating systems. So long as you have access to another computer that does have an Internet connection, all the code in this chapter will work.
Python can be downloaded from http://www.python.org/download/, and the code in this book is based on Python 2.7 (Python is often preinstalled on Linux and Mac OS X operating systems, and it is best to keep it up to date with your built-in packaging system). Once installed on any computer, IDLE will be available and should behave exactly as Python 2 does on the Raspberry Pi.
Google has made it very easy to access its maps from the programs that we've written ourselves (up to 1000 times per day). All we need to do is create a web address with all the information we want about the map.
All addresses start with https://maps.googleapis.com/maps/api/staticmap? and contain all sorts of information, separated by & symbols after the question mark:
center=location: This is some text describing the location that the map should show. It could be a town name, postal code, or the name of a road or building. Web addresses should not contain any spaces, so if your chosen location does have spaces, they should be replaced by the+symbol, or the special%20sequence.zoom=value: This is a number that increases as we zoom in to the map. A value of around 13 to 14 seems to give good results for this project, but you might like to try other values.size=widthxheight: These are values in the form of pixels. In this chapter, I'm going to use a width of 640 pixels and a height of 480 pixels.format=type(optional): This denotes the format of the image to be downloaded, such as JPEG, GIF and PNG (default). In this chapter, we're going to use GIF as it works best with Tkinter.maptype=type(optional): This tells us what view of the map we should get. Do we want asatelliteimage or aroadmap, or do we want to see theterrain? If we don't choose a map type, we will get a road map.sensor=true/false: This tells us if we are using GPS (or something similar) to choose the location. For this project, it will always be set tofalse.
A full list of available options and their explanations can be found online at https://developers.google.com/maps/documentation/staticmaps/#URL_Parameters.
So, an example web address might be https://maps.googleapis.com/maps/api/staticmap?center=Cambridge,%20UK&zoom=13&size=640x480&format=gif&sensor=false. Here, I have chosen the map of Cambridge, UK, with a zoom level of 13, and an image that is 640 x 480 pixels and in the GIF format. You may want to type this address into a web browser and play with the various options to see what's possible.
So, how do we create these long web addresses automatically in our program? It turns out that Python makes this very easy for us with its format function. The format function takes some text and looks through it for markers that look like {0}, where 0 can be any number. Whenever the function sees one of these markers, it replaces it with the argument at that position, as shown in the following examples:
>>> "{0}".format(14)
'14'

>>> "Second = {1}, first = {0}".format(1,2)
'Second = 2, first = 1'
The main thing to look out for is that programming languages like to start counting from zero, so if you want to access the first argument of format, you use {0}, and if you want the seventh argument, you use {6}.
To generate our address, we can use the following code snippet:
address = "http://maps.googleapis.com/maps/api/staticmap?
center={0}&zoom={1}&size={2}x{3}&format=gif&sensor=false"
.format(location, zoom, width, height)
This is just a slightly longer and more complex version of what we've seen already. The symbols allow us to break the line into multiple parts so it doesn't go off the edge of the screen (or page), and they do not show up in the final address if we start a new line immediately after the symbol.
To make our code more readable and useful, it is best if we put this address creation code in a separate function. That way, we can generate addresses any time we like when the program is running, without having to copy the code.
Place the following code immediately after the import statement in hellogui.py, and then save it to a new file called mapping.py:
import urllib
def getaddress(location, width, height, zoom):
    locationnospaces = urllib.quote_plus(location)
    address = "http://maps.googleapis.com/maps/api/staticmap?
center={0}&zoom={1}&size={2}x{3}&format=gif&sensor=false"
.format(locationnospaces, zoom, width, height)
    return address
You'll notice that there's an extra line at the start of the function that uses urllib.quote_plus to make sure that there are no spaces in the name of the location by replacing them with + symbols. It can also handle any other characters that aren't allowed in web addresses. We had to import the urllib module first to get access to this function. The urllib module is short for URL library and allows us to access information over the Internet. Uniform Resource Locator (URL) is just another name for a web address. You may want to provide extra options to add extra arguments to the function later.
We can now see if our code works. Run the program and close the window that pops up—we're not interested in it for the moment. In the Shell (next to the >>> marker), type in getaddress("Cambridge, UK", 640, 480, 13), press Enter, and check that the link is the same as shown in the earlier example. You can even paste it (without the surrounding quotation marks) into a web browser to check that it works.
If you're really keen on controlling things with code, try out the following code snippet to see what it does. You can type this in as part of your program, or type it into the Shell after you have run the program in the Code Editor:
import webbrowser
webbrowser.open(getaddress("Cambridge, UK", 640, 480, 13))Now that we can create a web address for our map, we want to download the image to use in our program. To do this, we're going to create another function called getmap that uses getaddress. Here's the code snippet:
import base64
def getmap(location, width, height, zoom):
    address = getaddress(location, width, height, zoom)
    urlreader = urllib.urlopen(address)
    data = urlreader.read()
    urlreader.close()
    base64data = base64.encodestring(data)
    image = Tkinter.PhotoImage(data=base64data)
    return image
We first need to import another module. The base64 module allows us to convert the downloaded image data into something that Tkinter can use.
The first thing we do in our new function is create an address using the previous function. We can then connect to this address using urllib.urlopen and download the data using read. We make sure to tidy up afterwards by using close. (The urlreader object might have used some temporary storage that is no longer needed now that we have the data).
Unfortunately, the data we downloaded isn't in a form that Tkinter can use, so we need to convert it using base64.encodestring. You don't need to understand how this works; just be aware that it's there. (If you're interested in what's going on inside the module, take a look at http://docs.python.org/2/library/base64.html.) Finally, we convert the data into an image using Tkinter.PhotoImage and return it.
We now have an image ready to use, so it's time to display it in our program. It is possible to put the image inside the Label widget that we already have, but we will want to draw on top of it later, so we will use a Canvas widget instead. You can think of a Canvas widget as a bit like the canvas an artist would use. It allows us to draw all sorts of shapes and text in any color we like. For now, we're just going to draw our map.
Replace the two lines of code that mention the Label widget with the following code:
mapimage = getmap(location, width, height, zoom)
canvas = Tkinter.Canvas(window, width=width, height=height)
canvas.create_image(0,0,image=mapimage,anchor=Tkinter.NW)
canvas.pack()
First, we get the image using our getmap function. We then create a Canvas inside our window with a particular width and height. Then, we draw our image on the Canvas. We say that we want the northwest (NW) corner of the image to be placed at (0,0) coordinates within the Canvas. Since the northwest and (0,0) coordinates both mean the top-left corner, and the Canvas is the same size as the image, the image will fill the Canvas exactly. Finally, we pack the Canvas widget as we did with the Label widget.
One last thing to do is giving some sensible values for location, width, height, and zoom. We already have values for the width and height, but we'd like our map to be a little larger than our previous window. Replace the old width = and height = lines with the following code snippet:
location = "Cambridge, UK"
width = 640
height = 480
zoom = 13
Feel free to experiment with different values. When you run your program, you should now see something similar to this:
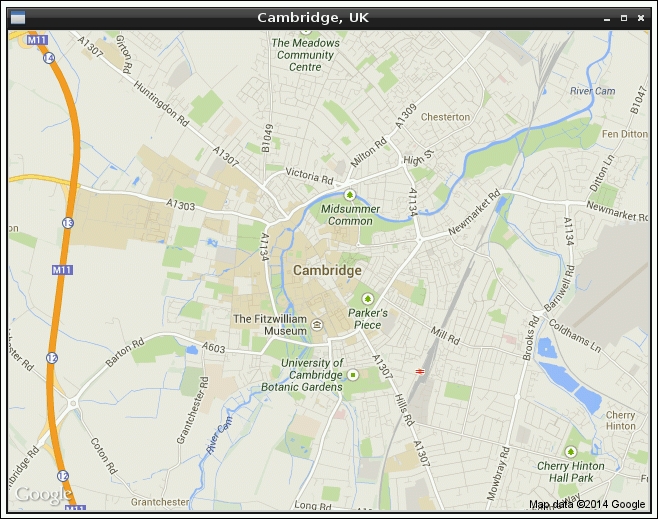
I have also updated the title of the window to use location rather than "Some text here" from before. If your code isn't working, it's likely that there's either a spelling mistake somewhere, some code needs to be moved up or down within the program, or Python isn't sure which blocks of code are meant to be inside other blocks. Remember that the number of spaces at the beginning of each line is very important. The recommendation is to use four spaces for each level of indentation. For example, the very first line of a function (in this project) should have no spaces in front of it, code inside this function should have four spaces at the start of each line, and code inside an if or while block inside that function should be indented with another four spaces. If you're stuck, take a look at the code listing near the end of the chapter.