
Let's dive right in to the wonderful world of motion detection!
The basic idea of motion detection is pretty simple from a computer's point of view—the motion detection software processes a continuous stream of images and analyzes the positions of the pixels that make up the image. If a group of contiguous pixels above a certain threshold starts to change from one frame to the next, that must be something moving. The tricky part of motion detection is weeding out false positives triggered by naturally occurring changes in light and weather conditions.
- We'll be working with a motion detection application called Motion. Install it using the usual command:
pi@raspberrypi ~ $ sudo apt-get install motion - With Motion installed, the next step is to create a configuration file for our webcam. The Motion installation puts a sample configuration file inside the
/etc/motiondirectory. We will use this configuration file as a template and modify it for our needs.- First, create a configuration directory for Motion in your home folder with the following command:
pi@raspberrypi ~ $ mkdir .motion - Then copy the example configuration from
/etc/motioninto your new directory:pi@raspberrypi ~ $ sudo cp /etc/motion/motion.conf ~/.motion - The configuration file is still owned by the root user, so let's make it ours by using the
chowncommand:pi@raspberrypi ~ $ sudo chown pi:pi ~/.motion/motion.conf - Now we can open up the configuration file for editing.
pi@raspberrypi ~ $ nano ~/.motion/motion.conf
- First, create a configuration directory for Motion in your home folder with the following command:
Motion has plenty of options to explore, and it's easy to be overwhelmed by them all. What we're aiming for, at this point, is to get a basic demonstration setup going with as few bells and whistles as possible. Once we've established that the main motion detection functionality is working as expected, we can move on to the advanced, extra features of Motion.
Apart from the regular, helpful comments preceded by the # character, the ; character is used to make individual configuration directives inactive. ; tunerdevice /dev/tuner0, for example, means that the line will be ignored by Motion.
We will now go through the configuration directives and pause to explain or change options, from top to bottom:
videodevice,v4l2_palette,width,height, andframerate: It is indeed important to update these directives if you want Motion to grab video directly from your webcam. However, we will not be doing this. Instead, we will be feeding the video stream that we have already set up with MJPG-streamer, into Motion. We will do this for three reasons:- MJPG-streamer is simply better at grabbing video from webcams using advanced V4L2 features.
- You'll learn how to connect conventional IP security cameras to Motion.
- We can utilize the tiny HTTP server of MJPG-streamer and you can keep watching your stream at a high frame rate.
netcam_url: Uncomment and change the line to readnetcam_url http://localhost:8080/?action=stream.The
netcam_urldirective is used to feed network camera feeds into Motion, like our MJPG-streamer feed. Since we're running MJPG-streamer on the same machine as Motion, we uselocalhostinstead of the IP address of the Pi.netcam_http: Uncomment and change this tonetcam_http 1.1to speed up the communication with MJPG-streamer.gap: Change value to2for this initial setup. This will be the number of seconds it takes for our alarm to reset as we're testing the system.output_normal: Change toofffor now, as we don't need any JPG snapshots to be stored until we have everything set up.ffmpeg_cap_new: Change this tooffduring setup; we don't need any movies to be written either, until we have everything set up.locate: Change toonfor our initial setup, because it'll help us understand the motion detection process.text_changes: Also change toonfor our initial setup as it'll help us dial in the sensitivity.webcam_maxrate: Change this value to match the frame rate of your MJPG-streamer video feed.webcam_localhost: You'll need to change this tooff, because we'll be monitoring the webcam from another computer and not from the Pi.control_port: This value needs to be changed to7070(or any number you like, above1024) because it's currently conflicting with the port we're using for MJPG-streamer.control_localhost: Also needs to be changed tooffas we'll be accessing Motion from another computer and not from the Pi.on_event_start: Uncomment and change the line to readon_event_start speaker-test -c1 -t sine -f 1000 -l 1. This is our temporary alarm sound. Don't worry, we'll find something better in a minute.
That's it for now; press Ctrl + X to exit, press y when prompted to save the modified buffer, and then press Enter to confirm the filename to write to.
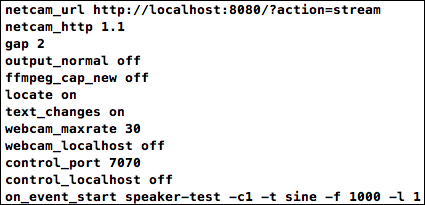
Initial Motion setup configuration
All right, let's take our Motion system out for a spin!
- First, make sure that MJPG-streamer is running. You can make it run in the background by applying the
-bflag, as shown in the following command:pi@raspberrypi ~ $ mjpg_streamer -b -i "input_uvc.so -r 640x480 -f 30" -o "output_http.so -w /usr/www"Note the number in parenthesis that
mjpg_streamerprovides when forking to the background. This is called a Process ID (PID), and can be used to stop themjpeg_streamerapplication by passing it to thekillcommand:pi@raspberrypi ~ $ kill [PID]You can explore all processes running on your Pi using the following command:
pi@raspberrypi ~ $ ps aux - Point your webcam away from yourself and any movement in the room and type in the following command:
pi@raspberrypi ~ $ motion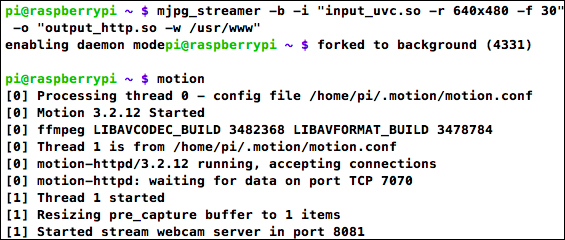
Motion with one camera starting up
Press Ctrl + C at any time, to quit Motion.
- Now try waving your hand in front of the webcam. If your Pi sent out a high-pitched note through the speakers and you see messages from the speaker test application on the console, we have managed basic motion detection! Even if you didn't trigger anything, keep reading to find out what's going on with the detection system.
- In your web browser, visit the address
http://[IP address]:8081.You should be looking at your feed from MJPG-streamer, but with a few key differences—a clock in the lower-right corner, and the number of changed pixels in the upper-right corner. If you're looking, instead, at a gray image with the text unable to open video device, there's most likely a problem with MJPG-streamer or the
netcam_urlline.Studying the number of changed pixels is one of the best ways to understand the motion detection system. The number will spike whenever you move the camera, but should come to a rest at zero as Motion learns about light sources and applies an automatic noise filter to minimize the risk of false positives.
- Now if you wave your hand in front of the camera, the pixel counter should climb and a rectangle will be drawn onto those areas in the image where Motion detected the largest changes in pixels. If the number of pixels climbs over the
thresholdvalue (1500by default) set in the configuration file, an event will fire, which is currently set to play the high-pitched tone. When no motion has been detected for the number of seconds specified by thegapvalue (60by default, currently2), the event ends and a new event may begin. - Let's look at an alternative method for tweaking the detection system called setup mode. Open up a new tab in your browser and enter the address
http://[IP address]:7070in the address bar.What you're seeing here is a simple web admin interface to control Motion. When we hook up more than one webcam to Motion, each camera will have its own thread and configuration, but right now there's only one thread and one configuration labeled All. Click on this to proceed.
- The little menu system is not very advanced but does contain a few convenient shortcuts: detection allows us to temporarily disable the motion alarm, and action allows us to write JPG snapshots or quit Motion. The config shortcut is perhaps the most useful one and allows us to try out different configuration directives on the fly. Click on config and then click on list to get a list of the currently loaded configuration directives. Now click on setup_mode, select on from the drop-down menu, and click on the set button.
- Now switch back to your camera tab (
http://[IP address]:8081); you'll be viewing the camera in setup mode. Now wave your hand in front of the webcam again; you'll see the largest areas of changed pixels highlighted in blue, and minor changes in gray tones. You'll also notice three counters—D: for difference in pixels, L: for labels (connected pixel areas), and N: for noise-level.
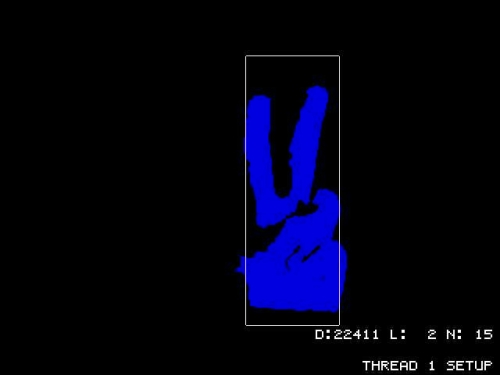
Motion camera in setup mode
The configuration directives you'd want to tweak if you find that the motion detection is performing poorly can all be found under the Motion Detection Settings section of the configuration file.
Now that we've established an initial working Motion setup, we have to decide what actions we want the system to take upon detection. Sounding an alarm, saving images and videos of the detected activity, logging the activity to a database, or alerting someone via e-mail are all valid responses to detection.
Let's create a directory to hold our evidence:
pi@raspberrypi ~ $ mkdir ~/evidence
We're going to revisit the configuration file, but this time, we're setting up the system for use in the real world. Once again, we'll go through the configuration file and pause to explain or change options, from top to bottom. You'll need to type in the following command first to open the file for editing:
pi@raspberrypi ~ $ nano ~/.motion/motion.conf
gap: We're changing this back to the default60seconds.output_normal: Change this tobestto save a JPG snapshot when the biggest change in motion occurs. We're also going to record a movie, so you won't miss anything.ffmpeg_cap_new: Change this toonto record a movie of the event that triggers the detection.ffmpeg_video_codec: Change this tompeg4to get a video that can be played back on the Pi itself with OMXPlayer, or on another computer with VLC.locate: Change this back tooff, as we don't want a rectangle drawn onto our evidence.text_changes: Same for this one; change it back toofffor cleaner video output.target_dir: Change this to our newly created/home/pi/evidencedirectory.webcam_maxrate: Change this back to1to lower the CPU usage. We can still directly watch the MJPG-streamer feed at 30 FPS.on_event_start: It's up to you whether you want to keep the alarm tone. Why not record a better one yourself with Sound eXchange (SoX)—perhaps a robot voice saying "intruder alert!"—and then play it back with a simplesoxcommand.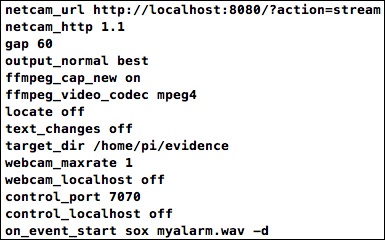
Real world Motion configuration
Now if you start Motion again and trigger a detection, a video file will start recording the event to your ~/evidence directory, and after the 60-second gap, a JPG snapshot with the largest change in motion will be written to the same location.
Whenever a new file is recorded, the filename will be announced in the Motion console log:
[1] File of type 8 saved to: /home/pi/evidence/01-20130127111506.avi
[1] File of type 1 saved to: /home/pi/evidence/01-20130127111526-04.jpg
To view the videos on the Pi itself, use omxplayer and specify a filename:
pi@raspberrypi ~ $ omxplayer ~/evidence/01-20130127111506.avi
Before we view the images, we need to install the FIM (Fbi IMproved) image viewer:
pi@raspberrypi ~ $ sudo apt-get install fim
Now we can start fim and point it to an individual image (by specifying its filename) or a collection of images (by using the wildcard asterisk character):
pi@raspberrypi ~ $ fim ~/evidence/*.jpg
Press Enter to show the next image, and press Q to quit fim.
If you've got an extra webcam at home, perhaps built into a laptop, it would be a shame not to let it help out with the motion detection mission, right?
We're going to look at how to connect more camera streams to Motion. These streams might come from conventional IP security cameras, but the same method works equally well for webcams on Windows and Mac computers, with some tinkering.
We'll be using webcamXP to add additional cams in Windows:
- Visit http://www.webcamxp.com/download.aspx to download the latest version of the webcamXP application installer (
wlite551.exe, at the time of writing). webcamXP is free for private use (single video source). - Install webcamXP using the installer.
- Launch webcamXP using the shortcut (webcamXP 5) from the Start menu.
- You will be prompted for the version of webcamXP that you would like to run. You can select webcamXP Free for our purposes, and then click on the OK button.
- Right-click on the large image frame and select your webcam from the list; it will most likely be located under PCI / USB (WDM Driver).
- You should be able to confirm that the stream is working by opening up a new tab in your browser and entering the following address in the address bar, but change
[WinIP]to the IP address of your Windows computer: http://[WinIP]:8080/cam_1.cgi- If the stream is working all right, proceed to add it to the Motion setup. You may quit webcamXP to stop the stream at any time.
We'll be using VLC to add additional cams in Mac OS X:
- You should have VLC installed already as per the instructions in the Viewing your webcam in VLC media player section.
- Launch VLC from the
Applicationsfolder. - From the File drop-down menu, select Open Capture Device….
- Select your webcam from the list and click on the Open button.
- VLC will start playing a live capture from your webcam. The important part is the title of the window, which starts with
qtcapture://followed by the ID number of your particular webcam. You will need this string later. Click on the Stop button to be able to see it clearly in the playlist. From the Window drop-down menu, select Media Information…, where you will be able to copy the string. - Now quit VLC and open up a Terminal window (located in
/Applications/Utilities) and type in the following command, replacing[ID]with the ID of your webcam and adjusting the width and height to suit your webcam:/Applications/VLC.app/Contents/MacOS/VLC qtcapture://[ID] --qtcapture-width 640 --qtcapture-height 480 --sout='#transcode{vcodec=mjpg}:duplicate{dst=std{access=http{mime=multipart/x-mixed-replace;boundary=--7b3cc56e5f51db803f790dad720ed50a},mux=mpjpeg,dst=:8080/stream.mjpg}}'VLC will start serving a raw M-JPEG stream over HTTP on port
8080, suitable for feeding into Motion. - You should be able to confirm that the stream is working by opening up a new tab in your browser and entering the address
http://[MacIP]:8080/stream.mjpgin the address bar, but change[MacIP]to the IP address of your Mac. - If the stream is working all right, proceed to add it to the Motion setup. You may quit VLC to stop the stream at any time.
To incorporate our new webcam stream into Motion, we will need to rework the configuration so that each camera runs in its own thread. We do this by taking all the configuration directives that are unique to each webcam and putting them in separate configuration files: ~/.motion/thread1.conf for camera one, ~/.motion/thread2.conf for camera two, and so on.
- Let's begin with our first webcam, the one plugged into the Pi. The following directives are unique to camera one and will be moved into
thread1.conf: - Then we add the new stream to
thread2.conf: - Now the last thing we have to do is to enable the threads in
~/.motion/motion.conf. At the bottom of the file, you'll find the thread directives. Change two of them to include your new thread configurations:thread /home/pi/.motion/thread1.confthread /home/pi/.motion/thread2.conf
As a final touch, you can uncomment the
text_leftconfiguration directive to enable text labels that'll make it easier to tell the camera feeds apart. - That's it! Fire up Motion and observe the startup messages.
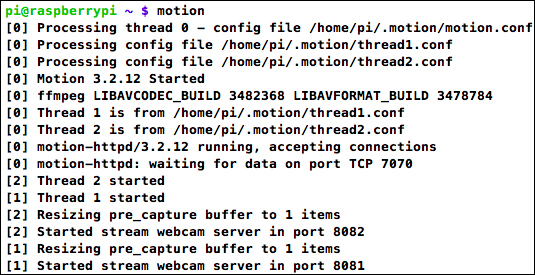
Motion starting up with multiple camera threads
Now visit http://[IP address]:7070, and you'll see that the initial web admin menu makes more sense. The feed of camera one is available at http://[IP address]:8081, and for camera two at http://[IP address]:8082.
The only thing missing from our motion detection system is a proper villain's lair security monitoring wall! We can easily throw one together using basic HTML, and serve the page with the tiny HTTP server already running with MJPG-streamer.
Let's add and edit our custom HTML document, with the following command:
pi@raspberrypi ~ $ sudo nano /usr/www/camwall.html
Use this code template and replace [IP address] with the IP address of your Raspberry Pi:
<!DOCTYPE html>
<html>
  <head>
    <title>Motion Camera Wall</title>
    <style>
      img{border:black solid 1px; float:left; margin:0.5%;}
      br{clear:both;}
    </style>
  </head>
  <body>
    <img src="http://[IP address]:8081/" width="320" height="240"/>
    <img src="http://[IP address]:8082/" width="320" height="240"/>
    <br/>
    <img src="http://[IP address]:8083/" width="320" height="240"/>
    <img src="http://[IP address]:8084/" width="320" height="240"/>
  </body>
</html>
Adjust the number of img tags to match the number of Motion threads. Feel free to increase the width and height values if your monitor resolution can fit them. Then save and exit nano.
So what we've built here is a simple HTML page that shows four different video feeds on the same page in a grid-like pattern. You can see this in the following screenshot. Each <img> tag represents one video camera.
Your security monitoring wall may now be admired at the following address:
http://[IP address]:8080/camwall.html
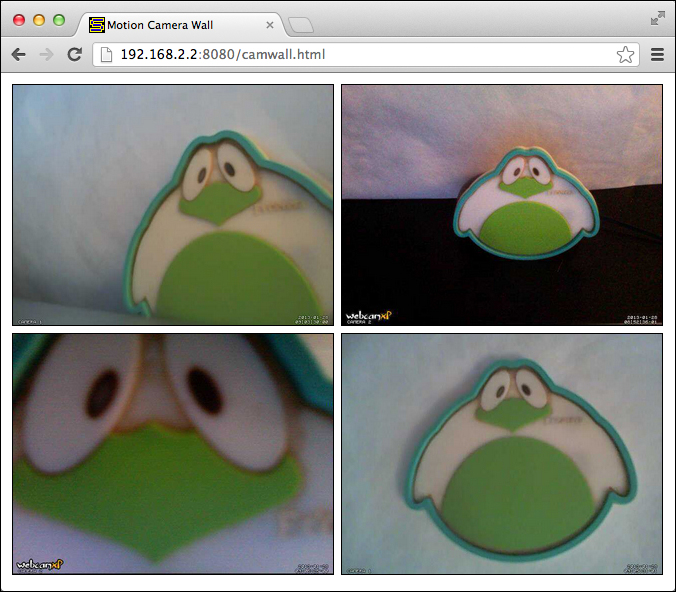
Motion security monitoring wall