
In this section, we'll create a file container, you can think of it as a vault, and we encrypt whatever is put inside. As long as the vault is unlocked, files can be added to or deleted from it just like any regular filesystem, but once we lock it, no one will be able to peek inside or guess what's in the vault.
We'll be using a tool called
cryptsetup that will help us create and manage the encrypted containers. Type the following command to install cryptsetup and the optional dosfstools
if you'd like your vault to be accessible on a Windows machine:
pi@raspberrypi ~ $ sudo apt-get install cryptsetup dosfstools
This technique will give you an encrypted vault mounted under a directory. You can then add files to it as you wish, and once locked, you can copy it and open it up on Windows.
- First, we need to create an empty file to hold our vault. Here you'll have to decide how much storage space to allocate to your vault. Once created, you won't be able to increase the size, so think about what kind of files you plan to store and their average size. Use the following command but replace
[size]with the number of megabytes you'd like to allocate:pi@raspberrypi ~ $ dd if=/dev/zero of=~/myvault.vol bs=1M count=[size] - Next, we'll create an encrypted filesystem inside the
myvault.volfile compatible with a platform-independent standard called Linux Unified Key Setup (LUKS). We'll specify-t vfatto get a FAT32 filesystem that can be accessed under Windows. If you don't intend to move the container, you may preferext4.pi@raspberrypi ~ $ sudo luksformat -t vfat ~/myvault.volSince formatting something will overwrite whatever was there before, even though it's just a single file in this case, you'll be prompted with a warning and will have to type
YESin all caps to initiate the process. Next, you'll be asked (three times) for a password that will be required to unlock your vault. You can safely ignore the warning frommkfs.vfatabout drive geometry. - If you're curious about the encryption in use on your vault, you can type the following command to get a detailed report:
pi@raspberrypi ~ $ sudo cryptsetup luksDump ~/myvault.volYou'll see that
cryptsetupuses AES encryption by default and that the LUKS format actually allows multiple passwords to unlock your vault as displayed by the Key Slots. Typecryptsetup --helpto get a list of possible actions that can be performed on your vault. - Now that the vault has been created, let's see how we would use it. First we need to unlock it with the following command:
pi@raspberrypi ~ $ sudo cryptsetup luksOpen ~/myvault.vol myvaultOnce you've entered the correct password, your vault will be made available in
/dev/mapper/under the name we've specified at the end of the line,/dev/mapper/myvaultin this case. You can now use this device as if it was a regular attached hard disk. - The next step is to mount the vault under a directory in
/home/pi/for easy access. Let's create the directory first:pi@raspberrypi ~ $ mkdir ~/vault - Now we can mount the vault using the following command:
pi@raspberrypi ~ $ sudo mount -o uid=1000,gid=1000 /dev/mapper/myvault ~/vaultThe user ID/group ID arguments that we specify here are specifically for the FAT32 filesystem. It ensures that the
piuser (which has an uid/gid of 1000) will be able to write to the~/vaultdirectory. With anext4filesystem these extra flags are not necessary because the permissions of the directory itself determine access.
That's all there is to it. You can now start filling up the ~/vault directory. Use df -h ~/vault to keep an eye on the space available in the vault.
To safely close the vault, you need to unmount it first with the following command:
pi@raspberrypi ~ $ sudo unmount ~/vault
Now most importantly, remember to lock your vault:
pi@raspberrypi ~ $ sudo cryptsetup luksClose myvault
To make the daily locking/unlocking routine a little less tedious, you can define these aliases:
alias vaulton='sudo cryptsetup luksOpen ~/myvault.vol myvault && sudo mount -o uid=1000,gid=1000 /dev/mapper/myvault ~/vault'
alias vaultoff='sudo umount ~/vault && sudo cryptsetup luksClose myvault'
To access your vault from Windows, visit http://www.freeotfe.org/download.html to download the latest version of FreeOTFE or FreeOTFE Explorer. I's a portable application and very easy to use.
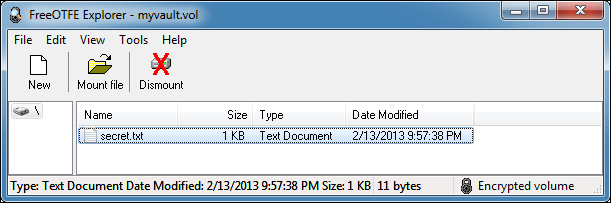
Accessing an encrypted file container with FreeOTFE Explorer